|
Kodak No.1 Autographic Special, Model A home vintage cameras index | |
|
| |
Kodak No.1 Autographic Special, Model A • 1915–1920  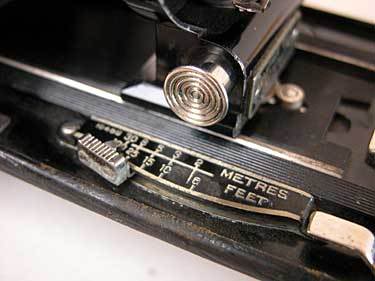 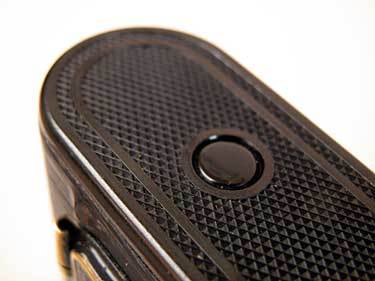 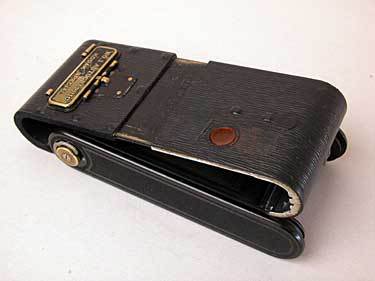 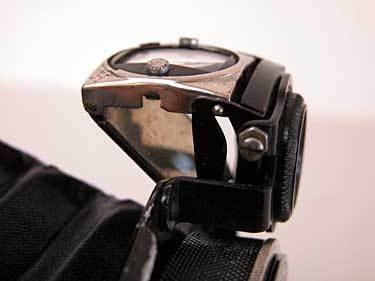  Some Source Links
|
History & Features
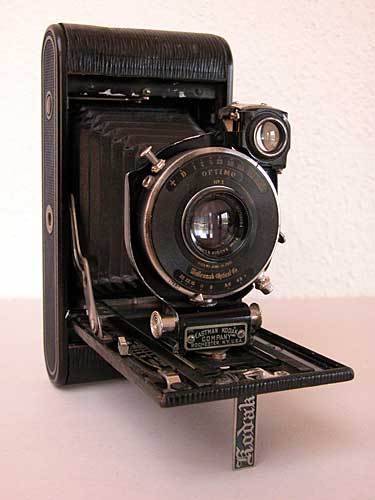
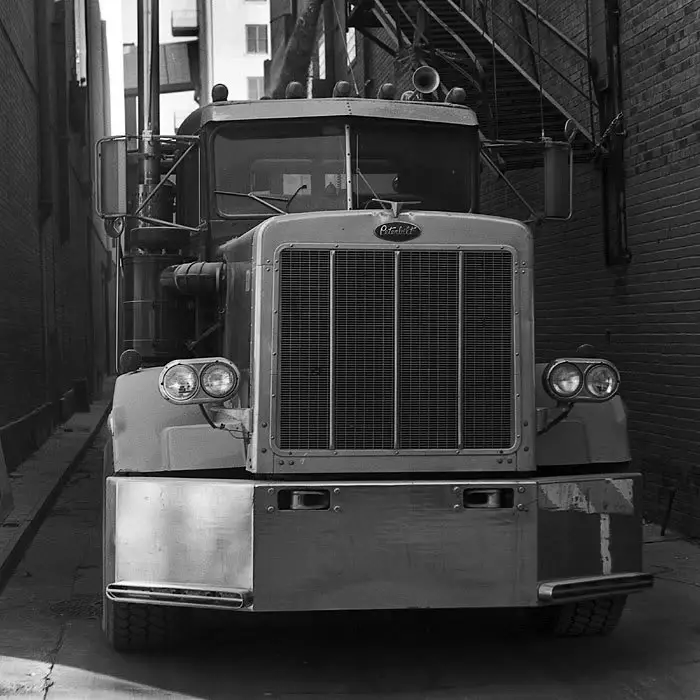
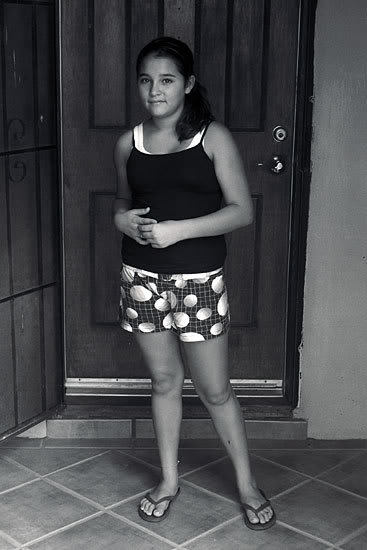
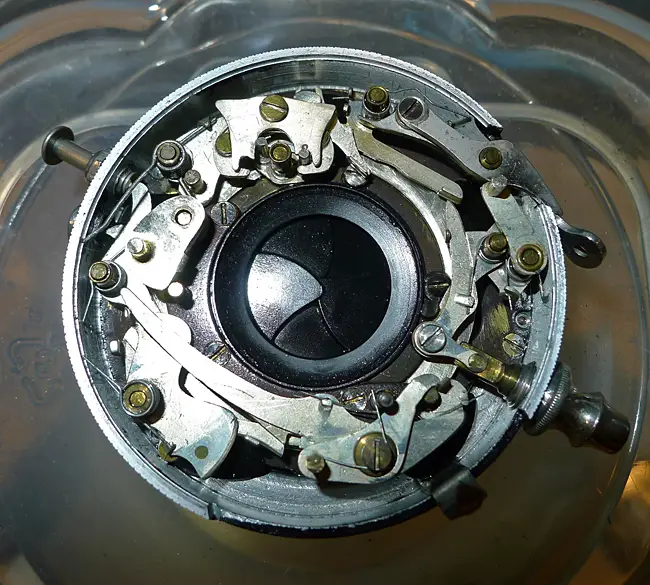
The No.1 Autographic Kodak Special, Model A when it first appeared in 1915 was a state-of-the-art hand camera which many amateur photographers must have aspired to own. The price of entry at that point was a steep $56, the equivalent in 2006 buying power of over $1000. Kodak made every effort to make purchasers happy with their decision; the features, materials and construction that went into the camera were extraordinary then, and even three quarters of a century later the camera can still be used with little sense of compromise. The heart of the "Special" designation for this camera was the super-sharp Bausch & Lomb -Zeiss Tessar set in a Wollensak Optimo No.1 shutter. The f4.5/90mm lens, fast for the time, was produced by Bausch & Lomb under license by Zeiss. In wide use then in better quality European and American cameras, the Tessar was nearly unrivaled for its abberation control and resolving power. The design for the innovative Optimo shutter dated from 1907; few others could offer the range of speeds at that time which went from 1 to 1/300 seconds, plus T and B settings. The slow speeds on the shutter were moderated by the use of the piston and cylinder dashpot which can be seen protruding from the shutter housing at about the five o'clock position. Another unusual feature of the shutter was the action of the shutter blades. When tripped, the shutter blades revolved through an open and close cycle. Then, on the next exposure, the blades went through the cycle in the opposite direction. The lever for cocking the shutter required a movement of only four or five degrees, perhaps a quarter of the movment required by most other shutters. The plunger-style shutter release was extremely smooth in operation, greatly aiding in the production of sharp images, even at slow hand-held speeds. Wollensak ads from the time boasted of the Optimo's fine machining, and the use of nickel silver components throughout which supported trouble-free operation. Aside from the lens and shutter, the rest of the No.1 Special were likely all manufactured in the Eastman Kodak plant, based in Rochester, New York, as were the factories of Wollensak and Bausch & Lomb. The camera body has a solid feel to it, supported by the use of top-quality materials and construction practices throughout. The base of the lens standard looks rather like an architectural abutment, and it does a very good job of holding the lens in a rigid vertical position. The lens can be drawn out to shooting position by squeezing the round silver buttons, and the assembly travels very smoothly and locks securely in place. The thumb slider for setting the camera's focus is also very smooth and precise in operation. The body of the No.1 Special, Model A incorporates several unual design features. The most immediately obvious of these is the bakelite panel on either side. Bakelite, invented in 1907, eventually came to be associated mostly with mass-produced and inexpensive cameras and other consumer goods. In 1915, however, the synthetic material probably was thought of as being rather modern and exotic, perhaps much like titanium and carbon fiber are viewed today. The other obvious innovation was the Autographic door on the back of the camera which allowed the user to write brief notes on the boarder of each exposed image; that feature had only been introduced with much fanfare in the year before the appearance of the No.1 Special. The distinctively patterned leather covering of the camera is sealskin. For inserting and removing film, the camera's back slid open at the midpoint after a round button near the ruby window was depressed. This convenient opening method seemed to work well, but it was only used in the original Model A camera. The joining of the back to the body of the camera may have been a little more subject to light leak than other systems, or perhaps the complex sliding mechanism just proved too costly to manufacture. Inside the body of the camera one finds a two-part pressure plate which maintains film flatness by pressure on the edges of the 120 roll film, much like other Kodak folders of the time. There are hinged frames to hold the feed and take-up spools and the one on the supply side has an additional hinge which tilts the end automatically to a convenient angle for film cartridge loading - one of the earliest quick-load systems. A wavy washer on one end of the supply-side spool holder maintains film tension. Restoration & Use My No.1 Special came to me in quite good shape. There were a few small nicks in the nicely textured covering, and there are "Zeiss bumps" on the back; those look like they might be easily flattened. The lens was clean and clear, and the shutter was operating when received, though clearly not at the rated speeds. The lens groups just screw out, though they may require the use of a friction pad of some sort. The shutter comes loose with the help of a lens spanner. The front plate on the shutter proved a mystery until I learned from John Shriver at photo.net how to unlock it. It turns out that there is a tiny lever which must be thrown to allow removal of the front plate. The lever will be found in the gap through which the aperture indicator moves, and it is close to the silver-colored dashpot on the lower right, with the free end of the lever pointing away from the dashpot. Lifting the lever to the open position allows the shutter's face plate to be moved slightly in a counterclockwise direction, and then lifted off. Underneath that is the shutter speed selector ring and a pierced cover held in by screws. I decided not to remove that cover as it looked like I could get good circulation of solvent through the shutter without doing so, and that seemed a prudent course since the Optimo is quite different from the Compur and Prontor shutters I am used to dealing with. After a couple hours soak in Ronsonol and overnight drying, the shutter appears to work well at all speeds. One thing I was very pleased to discover on receiving my No.1 Special was that it has what looks like a virtually new bellows. There are no holes or cracking of the material, and the tabs holding in the shutter have the paint scraped off, so it seems certain that a previous owner or service person replaced the original bellows. The soundness of the bellows was verified with my first roll of film which showed no evidence of pinholes. That assessment was correct for the bellows, but not entirely for the camera. The first roll of film I exposed in the camera was completed in about twenty minutes in a shaded mall where our local farmer's market is located. The next two rolls of film, shot during extended sunny-day walks, showed some intermittent leak problems. Some of the leakage was clearly through the red window; a couple of straight line leaks across the frame looked like they were coming through at some point in the case. The window problem was solved by slipping a small piece of paper-backed foam lightseal under the pressure plate so that it obscured about a third of the window. It was not obvious exactly where the light leakage in the case was taking place. I put some foam strips in the channels on the back and body of the camera, but that had little effect, and also seemed like a strategy that did not fit with the Kodak design. I then looked more closely at the lip of the camera's back and noted that there was some bare, white metal showing there which seemed out of place. There was also some residue that may have been the remnants of adhesive. I therefore decided to apply some strips of adhesive-backed black felt to the lips of the camera back that fit into the channels on the camera body. That and the ruby window treatment seems to have solved the light leak problem. The last remaining issue in getting the camera ready for use was the viewing system. The reflex finder on the No.1 Special is relatively large and bright for a Kodak folder. However, the viewer's mirror showed a little desilvering, and even under the best of conditions such viewers are a challenge to use effectively. I decided therefore to add a frame type eye-level viewer to the camera - one which I took in this case from a Kodak Junior 620. While it would not be difficult to attach the eye-level viewer with screws or adhesive to the No.1 Special, I just cannot contemplate the prospect of damaging that beautiful bakelite panel. So, I simply used a piece of black tape to hold the viewer in place. It is not the ideal solution in terms of convenience, but the taped-on viewer works surprisingly well, and it makes shooting the camera a real pleasure. I doubt I will ever again shoot one of my old Kodak folders without such an eye-level viewer in place. Below are some images made with the No.1 Special: 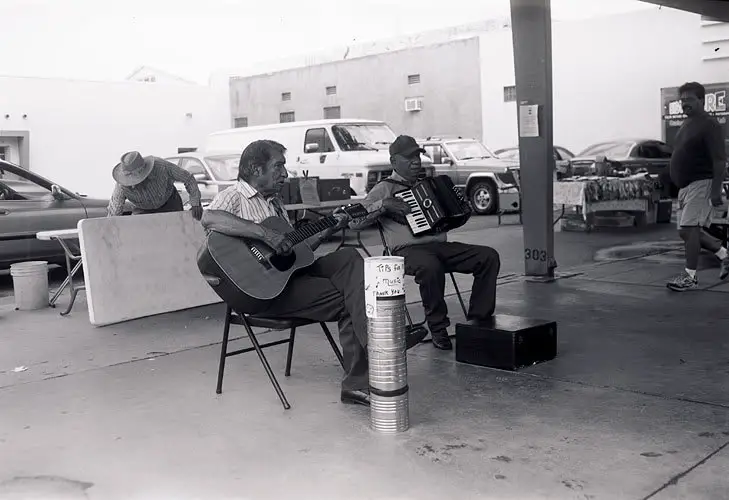


|

| |
|
home vintage cameras index | |