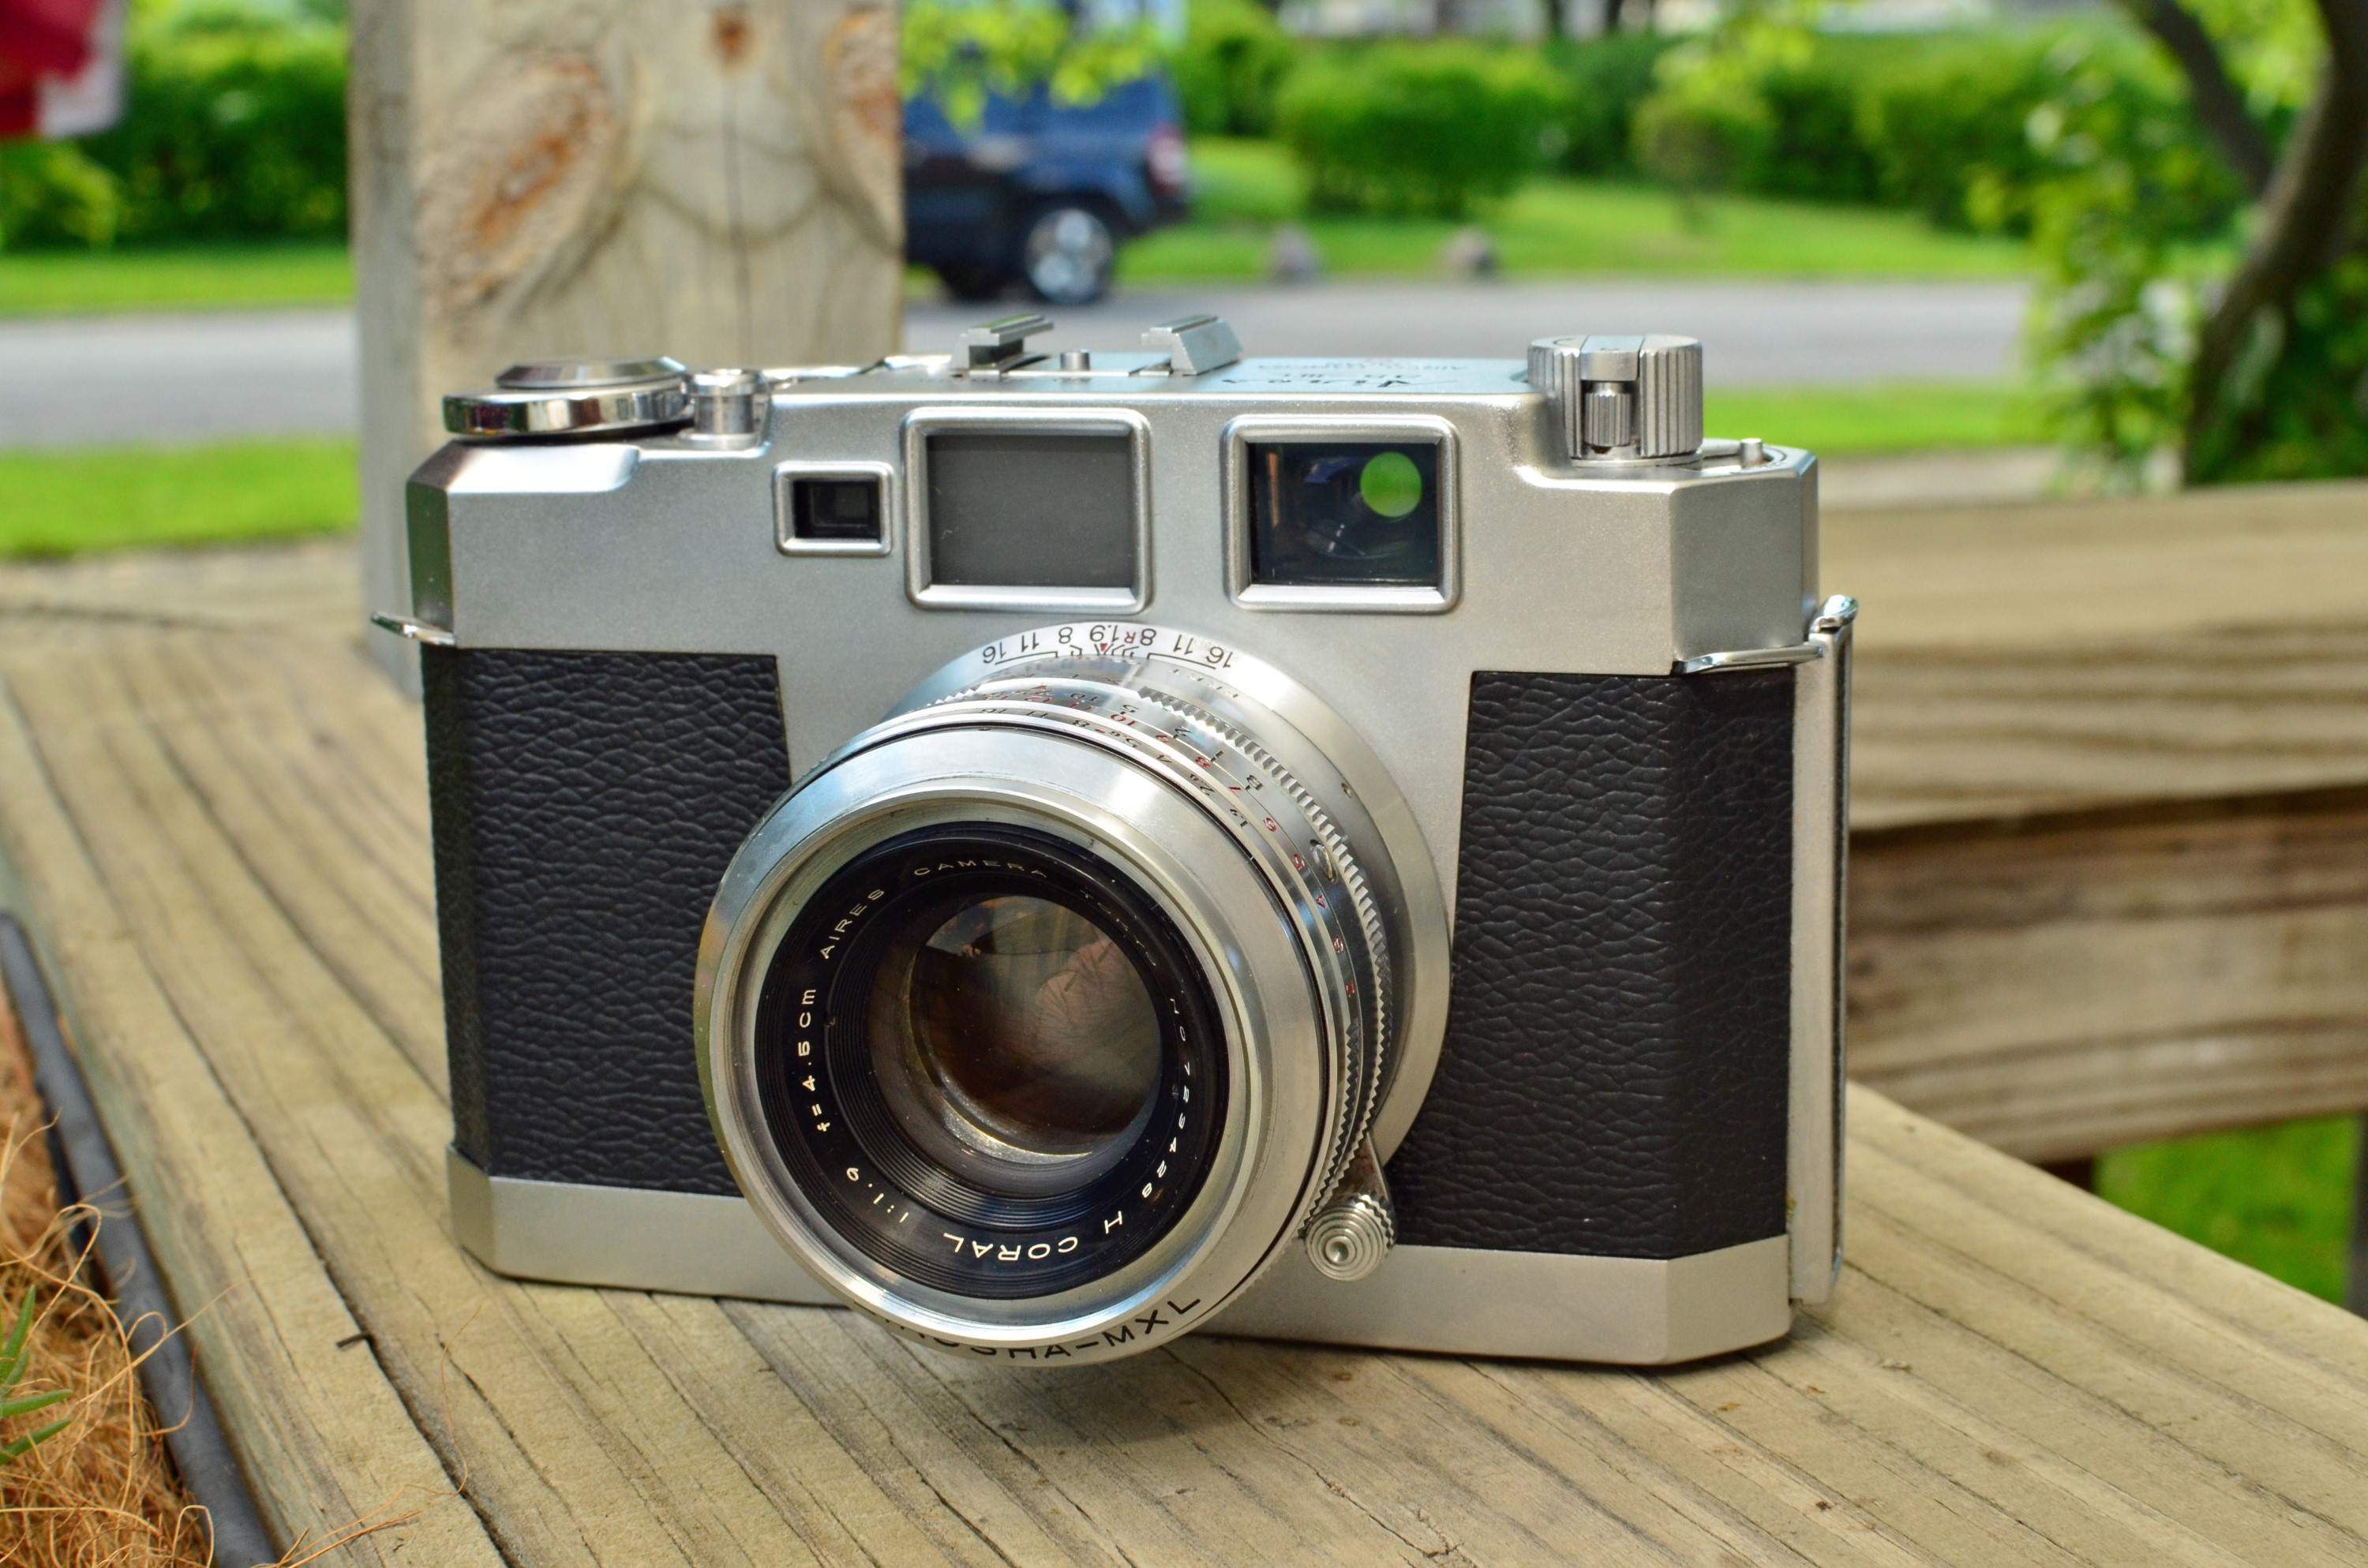
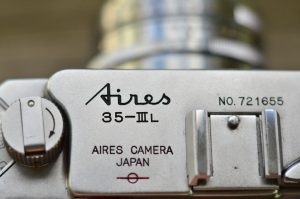
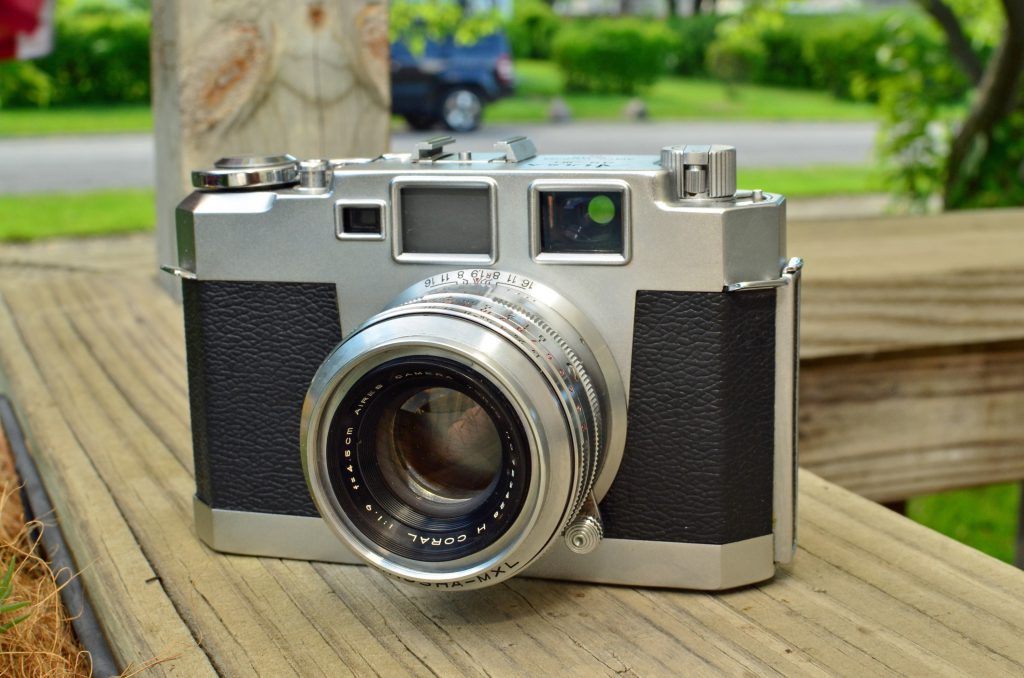
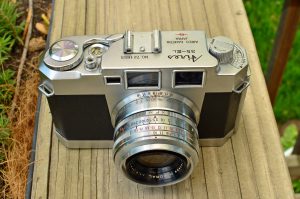
This is an Aires 35-III L fixed lens rangefinder camera made by the Aires Camera Works corporation out of Tokyo, Japan. The design loosely resembles the Leica M series of the same era. This model was very popular in Japan and received glowing reviews from the media. The “L” in the model name signifies that this model has a Light Value Scale which couples the shutter speed and aperture to assist a photographer in choosing appropriate settings based off light values.
 Film Type: 135 (35mm)
Lens: 45mm f/1.9 Aires Coral H coated 6 elements
Focus: 1′ 8″ to Infinity
Type: Coupled Rangefinder
Shutter: Seikosha MXL leaf
Speeds: B, 1 – 1/500 seconds
Exposure Meter: None
Battery: None
Flash Mount: M, X, and L PC Sync
Manual: http://www.cameramanuals.org/pdf_files/aires_35iiil.pdf
History
Of all of the extinct camera makers I’ve written about on this site, Aires is probably the one with the most success in the shortest amount of time. Lasting just barely over 10 years, the company actually succeeded at making a variety of well built and good performing leaf shutter rangefinders and TLRs in the 1950s.
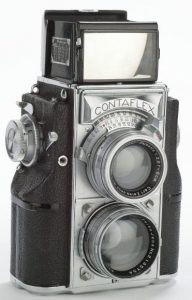
Beginning as Yallu Optical Co., Ltd. in 1949, the company developed a prototype 35mm TLR called the Yallu Flex which was inspired by the Zeiss-Ikon Contaflex which was another 35mm TLR introduced in 1935. The Yallu Flex prototype seemed to have a lot of things going for it. It was based off a good German design with modern features for its day, and combined the ease of use of a TLR with the small compact size of a 35mm camera. Despite the signs that this would be a successful camera, excitement over the first 50 prototypes was lukewarm, and in the end, it was never offered for sale.
After the failure of the Yallu Flex, the company regrouped and changed its name to Aires Camera Works, or K.K. Aires Shashinki Seisakusho in Japanese.
I should take a moment and clarify the pronunciation of the name “Aires”. Each time I see this name, my brain sees “Aries” like the constellation or sign of the Zodiac. The correct spelling is in fact, A I R E S, and it is pronounced like EYE – RES. I can’t find any evidence of this fact, but the Japanese often used clever word play in their names, so my guess is that the first two letters intentionally sounded like the word “eye” which is in essence, what a camera is.
Since the company already had shown promise as a TLR maker, their first models from the early 1950s were all of the Twin Lens Reflex type. Instead of thinking outside of the box with 35mm, the company stayed with the much more common 120 roll film format.
By 1954, Aires had released their top of the line model, the Aires Automat which featured a crank wind semi automatic film advance which also automatically cocked the shutter. It featured a Seikosha-Rapid shutter with M and X flash synchronization and came with both Zuiko and Nikkor lenses. In 1955, the price of an Aires Automat with leather case was 43,000 Yen, which was extremely high for the time.
Around this same time, Aires started to expand into the 35mm rangefinder market and released a new series of fixed lens Leica inspired cameras known as the Aires 35, Between the years of 1954 and 1959, the Aires 35 series saw many changes and sub-models. The Aires 35 III was the third sub-model in the line and featured many advanced features such as a single viewfinder window with superimposed rangefinder, a single crank film advance, and an excellent f/1.9 45mm Coral lens. Shortly after releasing the 35 III, the 35 V was released which had interchangeable lenses.
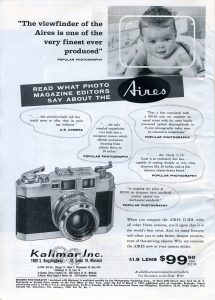 By the mid to late 1950s, Aires had already started to develop a strong reputation as a fine maker of inexpensive 35mm rangefinders. Selling for $99.50 in 1956, the Aires 35 III was reviewed in the January 1957 edition of Popular Photography where the camera received glowing accolades for its compact size, great ergonomics, and excellent Coral lens. On page 109, the magazine says:
At f/2 it (the Coral lens) is extremely crisp, and at f/4 it is probably as good as any lens of similar focal length in existence today. Very few high-speed lenses are capable of cutting sharply at very close distances like 20 inches, and at this distance the little Coral lens almost draws blood.
The magazine goes on to say that the viewfinder is one of the best they’ve ever seen, and that it was the first compact rangefinder with a single coupled viewfinder/rangefinder window. You can read the entire review for yourself here:
https://books.google.com/books?id=XVwzAQAAMAAJ&pg=PA90
Another site has a proclamation that Popular Photography named the Aires 35 III as their “Camera of the Year for 1957” but I read this entire article and it doesn’t actually say that. It’s still possible that this is true, but it must have happened in a different issue.
The Aires 35 III L is almost identical to the non-L version, with the exception that the L model adds a feature called a Light Value Scale. The camera has an EV light value scale and a coupled shutter and aperture ring on the lens. The EV scale is not the same thing as an automatic exposure mode rather it was an early attempt at simplifying exposure calculation for novice photographers.
The idea was that instead of having to calculate exposure by selecting an aperture size from f/1.9 to f/22 and a shutter speed from 1 second to 1/500 second, the photographer would only have to know EV light values. Sounds simple, right? Not so much.
EV can be obtained from an external light meter or an EV chart. An external light meter is definitely the easier way to go, but if you like a challenge, I will do my best to explain how to read an EV chart.
I am going to start at the absolute most basic explanation of aperture and shutter speed settings here.
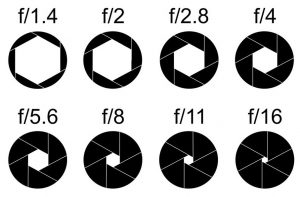 Aperture – Measured in “f-stops” refers to the size of the opening created by the blades inside of the lens. The smaller the f-stop number, i.e. f/2, the wider the opening, and therefore more light is allowed into the camera. Likewise, the larger the f-stop number, the smaller the opening and therefore, less light is allowed into the camera. Aperture is analogous to the diameter of a water pipe. The wider the diameter of the pipe, the more water can flow through it, likewise, the wider the aperture, the more light enters the camera.
Shutter speed – Measured in fractions or whole seconds. The longer a shutter remains open, the more light can be let in. Using the water pipe example, shutter speed is like a valve which opens and closes allowing water to pass through. Think of shutter speed as the opposite of aperture size. If you select a very narrow aperture size, i.e. f/22, you can allow more light to reach the film by selecting a slower shutter speed. It is generally accepted that if you go any slower than the inverse of the focal range of your lens (for example a 50mm lens would have a limit of 1/50) you need to stabilize the lens to avoid motion blur. On cameras with fixed prime lenses, 1/30 is usually the absolute limit since there isn’t actually a 1/50th shutter speed. If you go slower than this, there is a much greater chance of a blurry exposure due to camera shake unless you stabilize the camera on a fixed surface like a tripod.
Below is an EV chart for ISO 100 film showing the EV values 2-16 which are marked on the lens. If you use film faster (i.e. ISO 200, 400, etc) than ISO 100, you decrease the EV number by 1 for each speed faster. So for example, if you were shooting with ISO 400 film, you would subtract 2 from the EV number on this chart. The opposite is true for slower film, except you increase the EV number by a corresponding amount. In photography, you’ll often hear about something called “stops”. A stop is equivalent to one movement of aperture and shutter speed in one direction on this chart.
| EV | ||||||||
| 2 | 2.8 | 4 | 5.6 | 8 | 11 | 16 | 22 | |
| 2 | 1 | 2 | 4 | 8 | 15 | 30 | 60 | 120 |
| 3 | 1/2 | 1 | 2 | 4 | 8 | 15 | 30 | 60 |
| 4 | 1/4 | 1/2 | 1 | 2 | 4 | 8 | 15 | 30 |
| 5 | 1/8 | 1/4 | 1/2 | 1 | 2 | 4 | 8 | 15 |
| 6 | 1/15 | 1/8 | 1/4 | 1/2 | 1 | 2 | 4 | 8 |
| 7 | 1/30 | 1/15 | 1/8 | 1/4 | 1/2 | 1 | 2 | 4 |
| 8 | 1/60 | 1/30 | 1/15 | 1/8 | 1/4 | 1/2 | 1 | 2 |
| 9 | 1/125 | 1/60 | 1/30 | 1/15 | 1/8 | 1/4 | 1/2 | 1 |
| 10 | 1/250 | 1/125 | 1/60 | 1/30 | 1/15 | 1/8 | 1/4 | 1/2 |
| 11 | 1/500 | 1/250 | 1/125 | 1/60 | 1/30 | 1/15 | 1/8 | 1/4 |
| 12 | 1/1000 | 1/500 | 1/250 | 1/125 | 1/60 | 1/30 | 1/15 | 1/8 |
| 13 | 1/2000 | 1/1000 | 1/500 | 1/250 | 1/125 | 1/60 | 1/30 | 1/15 |
| 14 | 1/4000 | 1/2000 | 1/1000 | 1/500 | 1/250 | 1/125 | 1/60 | 1/30 |
| 15 | 1/8000 | 1/4000 | 1/2000 | 1/1000 | 1/500 | 1/250 | 1/125 | 21916 |
| 16 | 1/8000 | 1/4000 | 1/2000 | 1/1000 | 1/500 | 1/250 | 1/125 | |
| EV | ||||||||
| 2 | 2.8 | 4 | 5.6 | 8 | 11 | 16 | 22 | |
It is worth noting that the chart above reflects the standard aperture and shutter speed settings that are available on most cameras. The Aires 35 III L has non standard shutter speeds. Instead of 1/4, 1/8, 1/15, 1/30, 1/60, and 1/125, the Aires has 1/5, 1/10, 1/25, 1/50, and 1/100. This scale completely throws off the concept of an EV scale because there is one less preset shutter speed, but for the purposes of this review, I’ll just keep going on as if the camera had the standard shutter speeds. Also, f/2 on the scale above is close enough to f/1.9 which is what this lens is capable of. I find it curious that Aires went with a Light Value Scale when they weren’t using standardized shutter speeds.
When working with EV values, its important to understand that there are often several different combinations of shutter speed and aperture settings that result in the same EV value.
Looking at the chart above, we can see that 1/125 and f/5.6 has an EV value of 12, but so does 1/60 and f/8. Any combination of shutter speed and aperture on the same row has the same exact EV value, which means those settings will expose the image exactly the same. Thinking of our earlier example of a water pipe. If water is flowing through a pipe, and you open a valve for a longer period of time, you can counteract the increased water flow by using a smaller diameter pipe. Likewise, if you had a larger diameter pipe, and you wanted the same amount of water to pass through, you would open the valve for a smaller amount of time.
When you go up or down the EV scale, you over or under expose the image by 1 stop. So, if you were to keep the same shutter speed, but change aperture size by one stop, you have also changed your EV value by one stop. Likewise, if you changed the shutter speed by one stop, but kept aperture size the same, you have still changed your EV value by one stop.
Let’s look at one more example. EV 12 is good for full shade outdoor or very well lit indoor photos. Since there are a lot of instances where a photographer might be in that mid-lighting spot between bright sunlight in dim indoor shots, EV 12 is a good level that can capture a large variety of shots. The maximum aperture on the Aires 35 III L is f/1.9, which is very close to f/2, and on our EV chart, f/2 translates to 1/1000 seconds which the camera doesn’t support. So with the setting of EV 12, you are locked out of the f/2 position. But you can choose f/2.8 and you can go down from there. When shooting in a lighting condition that matches EV 12, you can use a wide range of shutter speeds on the camera and get the shot you want. You have the creative option to shoot with the aperture almost completely wide open, and you can go all the way down to f/11 and still shoot hand held. If you were using Sunny 16 with a shutter speed of 1/100, you’d set your aperture to f/5.6 for full shade photos, and that is the same exact thing as EV 12.
The EV system is even easier if you have an external light meter that plainly gives you the EV level for your scene. If your meter says to use EV 13, then just set the camera to EV 13, and that’s all you have to do. You don’t need to worry about what shutter speed or aperture size you use.
Hopefully I haven’t lost you at this point. The important thing to get is that as you increase your EV value, the less light you are letting into the camera, and as you decrease your EV value, the more light you are letting in.
The tricky part is knowing when to use each EV value. As a general rule, EV values of 11 through 15 are used outdoors in well lit areas. EV values of 7 through 10 are usually used indoors. Anything under 6 would be for special cases in low light where a tripod or some type of camera stabilization is required.
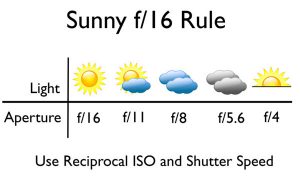 I’ve spoken before about the “Sunny 16” rule which helps select exposure settings when shooting outdoors. This rule states that if you set your shutter speed to whatever is closest to the reciprocal of your film speed, then you set aperture to whatever lighting conditions exist per the chart on the left.
For example, if you had ISO 100 speed film, the reciprocal would be 1/100, but most cameras do not have a shutter speed of 1/100, so you pick whatever is closest, which would normally be 1/125, but then again, the Aires 35 III L isn’t a normal camera, and it DOES have a speed of 1/100 so in this case, we’ll use that. If you had ISO 400 speed film, you would choose 1/500 since that is closest to 1/400.
If you were to use ISO 100 speed film in the Aires, you’d look at the EV value chart and compare what we know about the Sunny 16 rule. If you are in bright sunlight and have a shutter speed of 1/100, Sunny 16 says to use f/16. The EV chart says that 1/100 and f/16 are EV 15. Coincidentally, EV 15 is the standard for shooting in bright sunlight.
To modern photographers used to digital cameras, this level of involvement needed to select a proper aperture size and shutter speeds seems archaic, and in some ways it is, but once you get the hang of it, its really not that hard. You don’t need to worry about shutter speeds and aperture sizes, you just need to know the EV value for your lighting conditions. Once you have that set, any movement of the shutter speed selector, automatically compensates the aperture in the other direction, bringing you back to the same exposure. Of course there are times where you would want to purposely choose a specific shutter speed or aperture to prevent motion blur, or shallow depth of field, but that’s not the point here. The EV system is even easier than the Sunny 16 rule, because all you need to memorize are a few EV values and what they are used for.
Beyond the Aires 35-III L, Aires released a couple more models, most notably the 35-V which was their first rangefinder with interchangeable lenses, and then the fixed lens Aires Viscount which was similar to the 35 III, but with a completely new design.
By the end of the 1950s, Aires decided they wanted to use their expertise at making quality lenses and leaf shutters, and try their hand at SLRs. In 1959, they released a line of Aires SLRs known as the Penta, and eventually the Aires Ever. I can’t find a lot of info why they were unsuccessful or why their rangefinders could not keep them afloat as it appears the company went out of business in 1960, only one year after the release of their last SLR.
Today, Aires isn’t a well known marquee. I had only heard about them once or twice while researching Japanese rangefinders. In the 1950s there were already many Japanese companies making quality cameras and competing for the dollar of the consumer, and I just think that Aires fell victim to an over saturation of the market. The Aires 35-III L is a wonderful camera that seems really well made and it had some really nice features that weren’t common at the time.
There’s just enough interest in them out there that I was thankfully able to find two excellent resources for repairing mine. Hopefully my continued enthusiasm helps keep the memory of these cameras alive.
I bought this Aires camera for $21 including shipping from a buyer who didn’t know much about it. My first thought when looking at it was that it sorta resembled a Leica. I was aware of some Japanese fixed lens Leica clones, but I don’t know if I would go as far as to call this a Leica clone. Although the position of the windows and the general design of the top plate sorta resemble the Leica M-series, theres not a whole lot else that’s similar. For one, Leicas always had focal plane shutters and interchangeable lenses. Two, while the two share some vague design similarities, if you were to put them side by side, you can clearly tell they don’t look much alike. Its worth noting however, that Aires had a different model known as the Aires 35 III-C which had a stronger resemblance to the Leica M3.
In either case, I’m always a sucker for rangefinders from the 50s and 60s, especially ones that claim to have large and bright viewfinders and excellent optics. Its like the Yashica Electro of the 1950s. The more I read about this camera, the more I realized that it was special. I really think that had Aires remained successful into the modern age, their line of rangefinders would be much more highly regarded.
Repairs
In my research of this model before it arrived, I was aware of two very common problems with these Aires rangefinders. The first is that the shutter often sticks, which could cause some shutter speeds to work intermittently, or not at all. One article I read from someone claimed to own 4 of these cameras and they said that all 4 of them were frozen, so I was not optimistic.
The second problem, and one that stems from the original design of the camera is that the rangefinder “patch” is not very bright. When this camera debuted, the large viewfinder and combined rangefinder/viewfinder window was a thing of beauty, but as later rangefinders came to the market, the superimposed image on the Aires was pretty dim by comparison. Add 50 plus years of dirt, dust, and haze, and the rangefinder becomes almost completely useless.
Upon arrival, I confirmed that my copy would have both of these issues. The shutter actually would fire, but it took a couple of cycles to get it moving, and once it would start firing, it seemed to be accurate. If I let it sit for any length of time, the shutter would become stuck again.
The rangefinder was dim as expected. So dim in fact, that I couldn’t even see it outdoors. I feared that the reflective layer of the beam splitter (which is a semi transparent mirror that both reflects and lets light pass through) had lost it’s reflective layer. If this had happened, no amount of cleaning would have restored this camera to proper operation. I tried an experiment one night in a dark living room with only my television on. I pointed the camera at the edge of the screen and I could make out the dim rangefinder patch. The good news was that it appeared to be accurate, the bad news was that it was very, very dim.
I decided to tackle the sticky shutter first, since without an operational shutter, the camera doesn’t work at all. If I could at least get the shutter working, but never fixed the rangefinder, the camera could still be used as a scale focus camera. Despite this being a pretty uncommon model from a company that only existed for barely over a decade, I was fortunate enough to find a couple really good articles about repairing this specific model.
Michael Feuerbacher has a very detailed write-up on disassembling the front of the lens for cleaning. Normally disassembling a lens is not something that is for the faint of heart, but thankfully the Seikosha (Seiko, like the watch company) shutter is almost a direct copy of the German Compur-Rapid shutter which is one of the easier shutters to open up and clean.
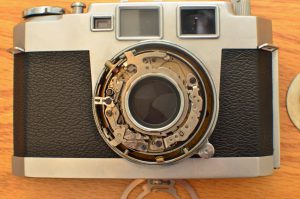
During disassembly, the entire front lens element comes out in one piece, so a lens spanner is not needed since you don’t ever have to touch the glass. Another plus is that you will not touch the focusing system, so collimation of the focus is not necessary when you are done.
The only tools you need are a set of precision screwdrivers, some Q-tips, and some Ronsonol lighter fluid. Ronsonol is primarily made out of something called Naphtha Oil, which you can also buy in bulk, but it was easier for me to locate Ronsonol, so that is what I used.
This was actually my second attempt at cleaning a sticky shutter with Ronsonol. The first was a Canonet S which was completely stuck. I don’t know if it was my technique, or if I just wasn’t patient enough, but I was never able to reliably get that shutter to work, so I gave up and sold the camera for approximately what I had paid for it.
The reason Ronsonol (or Naphtha Oil) is good for cleaning shutters is because it is highly evaporative, and when it evaporates, it leaves by no residue. The catch though, is that whatever sticky residue was on the shutter stays behind, so the objective is to “wash” the shutter with the oil and then using your Q-tip (some people use cotton swabs), brush off the goo when the oil is still wet.
This is a very tedious and delicate process. Shutter blades are extremely fragile, and if you press too hard on them, you can distort or even break them. Do this, and the entire shutter needs to be rebuilt, which is not something I would ever want to attempt. In Mike Feuerbacher’s article, his camera not only had a sticky shutter, but the aperture blades were stuck as well. Thankfully, I didn’t have any such issue with my aperture blades, but since I was in there, I wiped those as well. You can access the aperture by leaving the camera in Bulb mode and holding open the shutter.
When wiping the shutter blades, it is important to go in the direction of order of the blades. If you look closely, the shutters overlap each other. In the picture above, the top shutter blade is the one on the right (approximately 4 o’clock position). Start here, and GENTLY wipe the blades in a clockwise rotation, but STOP before getting back to where you started. The last shutter is under both the 4th and the 1st shutter blades. You do not want to drag your Q-tip to an overlapping shutter blade for risk of getting fibers stuck in between them and possibly damaging the edges of the blades. This all sounds a lot more complicated than it really is. If you use common sense and just look carefully at the orientation of the blades and just make sure you are not getting pieces of your Q-tip stuck in there, you should be fine.
This whole process needs to be repeated many times. Even more discouraging is that when you are cleaning the shutter, it will work fine when the Ronsonol is wet on the blades. You won’t know if you’ve succeeded until they have a chance to dry and try again. The problem is that the wet oil acts as a sort of lubricant and will allow a sticky shutter to work fine, but only while it is wet. The key is allowing the shutter to continue working after the oil has evaporated. You do not want any old goo to remain on the shutter blades.
On the Seikosha shutter, it also helps to clean the mechanism around the shutter as well. What I did with mine was hold the camera with the shutter facing down, and I gently squirted some Ronsonol into the shutter surrounding the blades. I did not attempt to wipe anything here, and just let it air dry.
I never counted how many cleaning cycles I did, but I would estimate, I did it between 20 and 30 times. The amount it takes could vary from camera to camera. If your shutter is completely frozen and doesn’t move at all, you might need to do it more than I did. Also, as I had mentioned, my aperture wasn’t stuck, but after cleaning the aperture blades, I noted a brown color on the Q-tip after wiping it, so I got something off the blades.
Once you feel as though you’ve done enough and the shutter seems to be working properly, you’ll want to give the inner lens element a wipe down with some lens cleaner. While Ronsonol does not leave any residue, it is possible that some other substance may be sitting on the inner lens element. Set your shutter to B mode, and open the aperture all the way to f/1.9, and then hold the shutter open so that the inner glass is exposed. Wipe this lens with a soft lens tissue and some lens cleaner. 91% (or higher) rubbing alcohol works for this too, but just be careful not to get the rubbing alcohol on the actual shutter.
The next step was to address the rangefinder. This requires removal of the top plate of the camera. I’ve removed several top plates before, and so far, the Aires has the easiest to remove top plate. Daniel Mitchell has an excellent site showing removal of the top plate. In his walk through, he is going as far as removing the entire shutter, which is obviously way beyond what we need to do, but for the purposes of cleaning the top of the camera, you can follow his instructions until you get the top plate off.
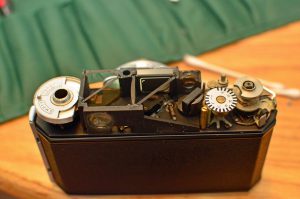
Unlike the shutter cleaning, this process does require a couple of special tools. In addition to precision screwdrivers, you will need a lens spanner tool to remove the slotted nut under the rewind knob, and to remove the dimpled nut under the film advance lever. You’ll also need some type of rubber grip to remove the disc on top of the film advance lever. I used a large pink pencil eraser and that worked fine.
Once you have the top plate off, you have the opportunity to clean the film speed reminder disc, which usually gets pretty dirty.
To properly clean the rangefinder and viewfinder, there are a total of 11 surfaces you’ll want to address. It is VERY important to pay attention to the beam splitters which are the two large diagonal pieces of glass in the picture above. Beam splitters have a semi-transparent reflective coating that is extremely fragile. Some people will tell you to never touch the surface of a beam splitter for risk of wiping away this reflective layer, but I’ve had luck gently dragging the surface of a clean Q-tip across it to remove any dust. Do not use any type of lens cleaner or liquid solution on the beam splitters and do not use a lot of force. Wipe both sides of both beam splitters, and once you have removed the dust, leave them be.
There is one other surface that requires a bit of special care. The third, and much smaller, diagonal surface next to the film counter is the moving mirror that moves when you focus the camera. Like all camera mirrors, the reflective surface on this mirror is on the front of the glass which is unlike a bathroom mirror where the reflective layer is behind the glass. While not as fragile as a beam splitter, you should still exercise caution when wiping this so you don’t damage this reflective coating. Also, since this mirror moves, you want to make sure you don’t mis-align it while cleaning it.
The rest of the surfaces are all glass and can be cleaned like you would clean any other camera glass. Be sure to clean the insides of the front and rear viewfinders, both sides of the vertical convex piece of glass, the inside of the middle window with the frame lines, and the inside of the front rangefinder window. On my example, the front of the rangefinder window, and the moving rangefinder mirror were the dirtiest.
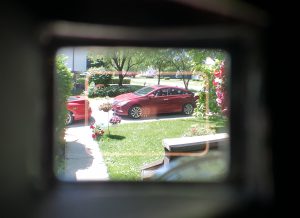
Once I had everything sufficiently clean, I put everything back together and I took a look through the viewfinder. I was pleased that not only was the viewfinder very clear and bright, but the rangefinder patch was much easier to see than before. While still nowhere near as vivid as one from my Yashica Electro or Konica Auto S2, it was comparable to my Kodak Retina IIa which is also from the 1950s. Unlike the Retina however, the viewfinder in the Aires is MUCH larger and easier to see. This is especially useful for people like me who use prescription glasses. I can easily see the entire frame without having to touch the surface of my glasses to the camera like on other cameras with tiny viewfinders. Back when this camera was first released, this viewfinder must have blown people away with how huge it was. Aside from the dim rangefinder, it would be at least another 10 years before cameras would consistently have viewfinders this large and bright.
I took the picture above with my smartphone to show how clear the viewfinder is, but I didn’t do a good job of showing the rangefinder. In use, it is much more visible than it was before, and I believe it is the same, or at least very close to how this camera would have been when it was new. The rangefinder patch has a slight pinkish hue to it which helps differentiate it from the rest of the window. I read online that some people will put a piece of tinted film in front of the main viewfinder window to help darken the main window, which would help the rangefinder patch to stand out a little more. I may try that in the future.
So, with my newly cleaned viewfinder and rangefinder, and unstuck shutter, I felt pretty confident that the camera was ready to go. I gave the exterior surfaces one last wipe down, and loaded batter….just kidding! There aren’t any batteries needed in this camera since everything is completely mechanical! I loaded in a roll of Kodak Max 400 and went shooting.
My Results
I’ve said it time and time again that I love my Yashica Electro. It is a very easy to use rangefinder with an excellent lens, and the meter is very accurate. Despite this camera being totally mechanical and lacking any sort of meter, it will definitely challenge my Electro the next time I want to go out shooting. Compared to the Electro, the Aires body is about the same height and thickness, but a little less wide. The lens sticks out slightly more on the Yashica, but the the Aires weighs a tad more, which is probably a result of it being nearly 20 years older and completely made of metal.
The following shots were taken around Memorial Day of 2015, and sadly, I didn’t capture any incredibly interesting shots, but from what I did get, I can unquestionably say that not only does this camera work perfectly, but the Copal lens is as sharp and colorful as everything I’ve read about it.
Like most leaf shutter cameras, the shutter is very quiet. If you are used to SLRs or cameras with focal plane shutters, it will take a little bit of getting used to the soft “click” of a leaf shutter. If you are in a noisy environment, it is very possible you won’t hear the shutter fire at all. You’ll just have to feel for it.
The film advance lever on this camera has a very tight spring, tighter than any other camera I own. After winding on the film, it does not allow any separation between your thumb and the lever. This isn’t a bad thing though, it has a very satisfying feel to it. You actually feel like you are moving around metal parts inside of the camera when you advance it. When winding the lever, it only needs to go 180 degrees which is less than some other 50s and 60s lever wind cameras that go well beyond 180 degrees. I have what I would consider to be average sized male hands, and I have no problem winding the camera in one single motion. For those of you who like to wind on in multiple movements, sadly the Aires has a ratcheting lever, so it will not come back to it’s original position until it has completed it’s entire motion.
I talked extensively above about the LVS system which does get some getting used to. After reading about it, I could see how it could come in handy for some people, but I really don’t use it. I use this camera with Sunny 16 and that works fine for me. The LVS ring does add an extra step to setting the correct aperture and shutter speeds on this camera, but its not obtrusive. Still, if I had my choice, I would have preferred the ‘non-L’ version of this camera for simplicity.
Loading and unloading film in this cameras is uneventful. The take up spool is an “over” design, which means the film leader is threaded counter-clockwise (looking from the top down).
The viewfinder is large and bright and very easy to use, even with prescription glasses. Actually, now that I say that, I think that’s a really huge benefit to this camera compared to other 50s or 60s rangefinders who often were stuck with extremely small viewfinders.
That’s pretty much it! This camera is attractive and easy to handle. The bright viewfinder and excellent optics make shooting quality pictures with razor sharp details a snap. This could very well be the easiest fully mechanical camera I own. I cannot wait to go out shooting with it again!
Additional Resources
http://pheugo.com/cameras/index.php?page=airesiiil

