
Prologue
 Back on December 12, 2014, I posted my first ever camera review on this site, for the Argus C3 Match-Matic. The idea to write about an old camera was just something I thought up on a whim and put together that review with my thoughts, and some sample pics I got from that camera. Never in a million years, would I have imagined that nearly five years later, my site would have grown into what it was.Over the years, I’ve refreshed a few posts to bring them up to my current formatting standards, but with this review, I’m leaving that original post as it was when I first published it, and creating an all new article covering the entire Argus C-series. I hope you enjoy it.
As I began writing this article, I began to hit milestones I had never hit with any previous camera review. My typical review is between four to six thousand words with the largest topping out at eight thousand words. But this time, I shattered the ten thousand word barrier, and hit eleven, then twelve thousands. I couldn’t stop myself, I just kept typing.
After having some sense talked into me by fellow collectors and bloggers, I decided to split up this Argus piece into five separate articles for you to enjoy in smaller parts. This week, I will release one piece at a time, with a full version of the whole article on Friday. The five parts will be:
- I – History of Argus and the C-series
- II – Repairing your Argus
- III – Identifying the Argus C-series
- IV – My Thoughts/Using a C3/Accessory Lenses
- V – My Results
I hope you enjoy reading everything just as much as I had writing it.
Introduction
This is the Argus C-series. First released in 1938 as the Argus Model C, the C-series includes the best selling American camera ever made, the Argus C3. Over 2.2 million were produced over the course of 28 years, the C-series saw many subtle variations and incremental improvements, but generally retained the same brick-like shape and pre-war feature set until the very last cameras came off the assembly line in 1966. The reason for it’s success was it’s unique looks, quality optics, capable feature set, and affordable price. The C-series had an interchangeable lens mount and had a variety of German made auxiliary lenses available for it. It was used by amateurs, professionals, students, the military, and countless other people in nearly every profession.
Repairs
The Argus C3 was not only a popular camera for it’s capabilities as a camera, but also due to it’s reliability and ruggedness. Of course no camera is totally immune from dirt, grime, or the perils of time, but even when Argus C3s do experience problems, they’re usually pretty easy to fix even for someone with no experience repairing cameras, making them a popular choice for someone wanting to learn how to repair cameras.
As with any camera repair, having good tools, a clean and brightly lit working environment, and patience are all prerequisites to a successful repair. If you have access to more than one Argus, it might be a good idea to practice on the “lesser” one as a practice camera for the “better” one. The first camera I ever took apart was an Argus, and while I would never consider myself a master camera technician, I don’t know that I would have had the courage to do as much as I have, had it not been for the Argus.
Below, I will show you the three most common issues that Argus C3s and all the variants are likely to encounter, a stuck or sluggish shutter, dirty viewfinder and rangefinder windows, and a misaligned rangefinder. Each of these three repairs can be done by a novice with basic tools, and about an hour of your time. For these images I am using an early post-war Argus C3. I will make a note if there is a difference between this one and other Arguses I’ve seen.
Cleaning the Viewfinder and Rangefinder Windows
This is a job that nearly every single Argus C-series camera I’ve ever encountered has needed. Most old cameras can develop dirty or hazy viewfinders, and the Argus are no different. Most cameras require the removal of the camera’s top plates to access the viewfinder glass, which itself requires removal of rapid wind levers, accessory shoes, rewind knobs, and other parts. With the Argus, you only need to remove two circular retaining rings and two small pieces of glass, and use a wet Q-tip with some glass cleaner to clean it out.
The only tool you’ll need for this job is a small 1.0 mm precision screwdriver. I use Wiha screw drivers that I purchased from Amazon and they’ve worked wonders on many cameras I’ve repaired.
First, open the rear of the camera so you can see into the film compartment. Look inside each of the two windows for the viewfinder and rangefinder, and you’ll see a small black circular retaining ring holding the glass lens in place.
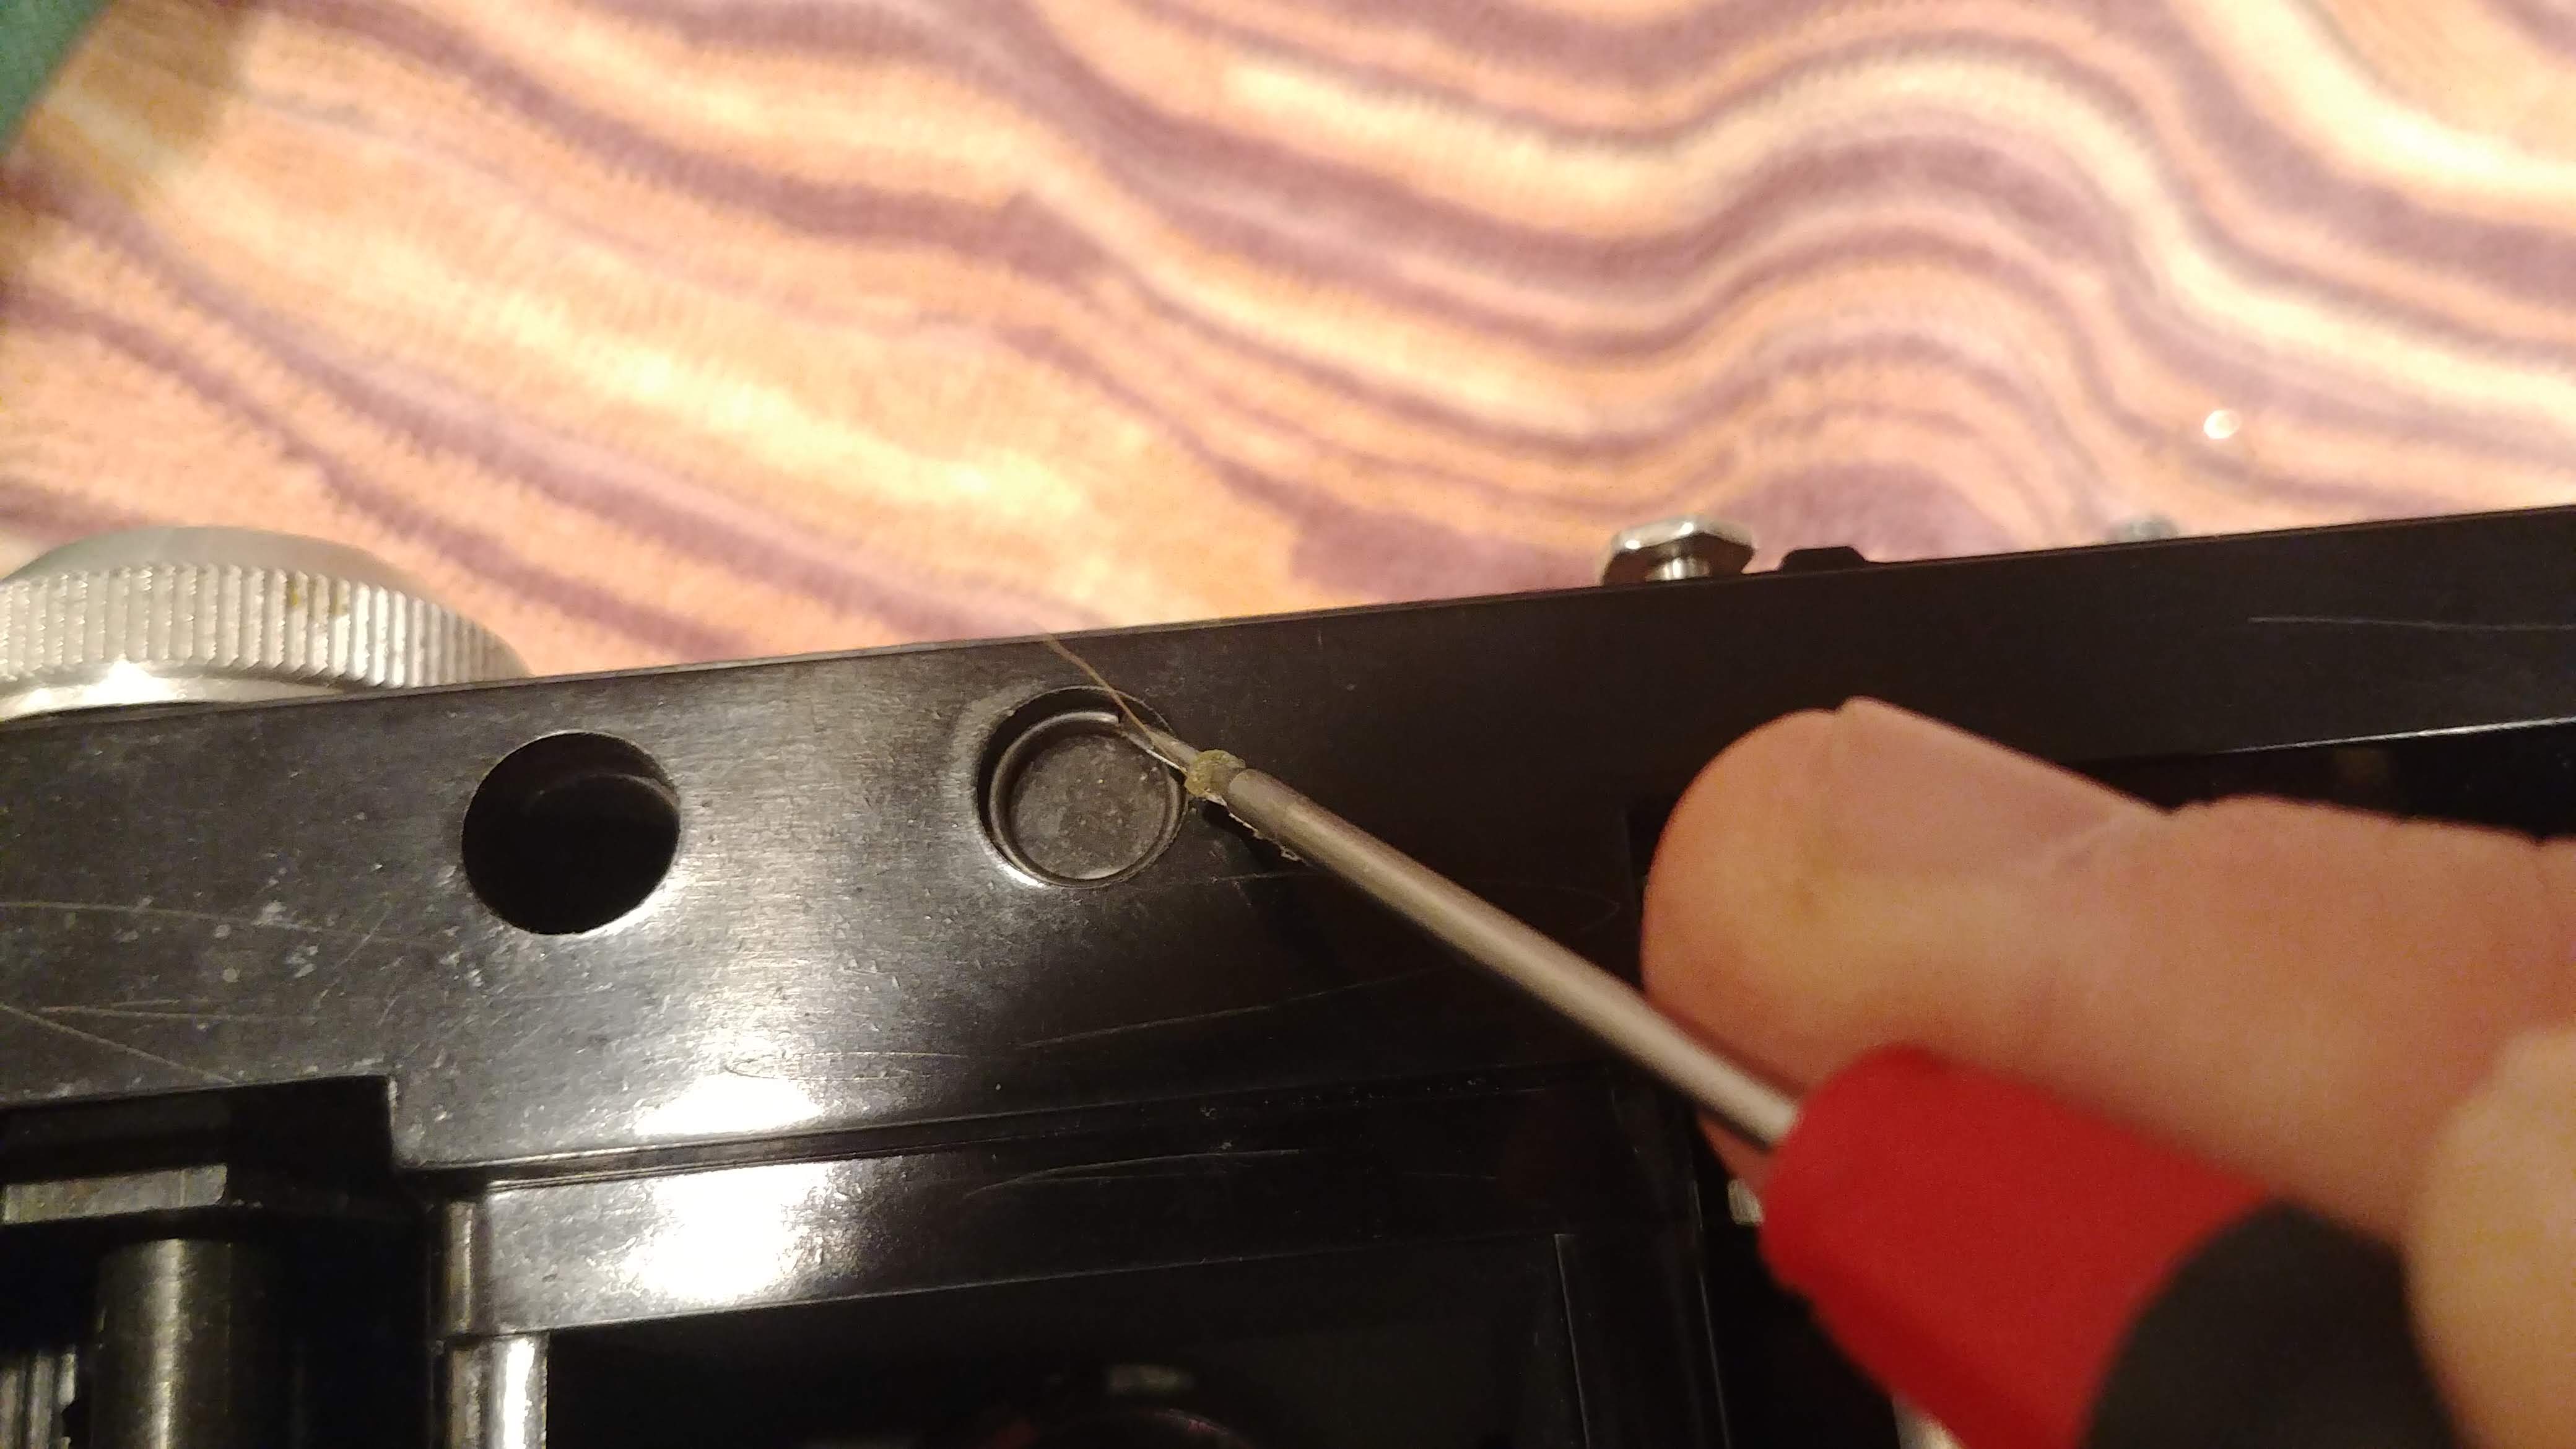 All you’ll need to do is use your screw driver and gently pry this retaining ring out. It is only in there with friction, so it will come out with a small amount of force, just be careful not to damage the glass lens. These also have a tendency to go flying, so its a good idea to lay a paper towel or something else above the camera to deflect this retaining ring in case it flies out of the camera once you get it out.
In later Arguses, once you get the glass element out of the rangefinder side, there will be a black plastic tube that will also fall out. Just set this aside and don’t forget to put it back in when reassembling things.
With each of the retaining rings out, the glass lenses just fall out of the camera and you can clean them with simple glass cleaner. Using a Q-tip, you can clean the inside of the front viewfinder window and another glass piece in front of the rangefinder. You won’t be able to clean the rangefinder mirrors this way, so if they’re cloudy, you’ll need to remove the rangefinder to give that a good cleaning, which I discuss in the next section.
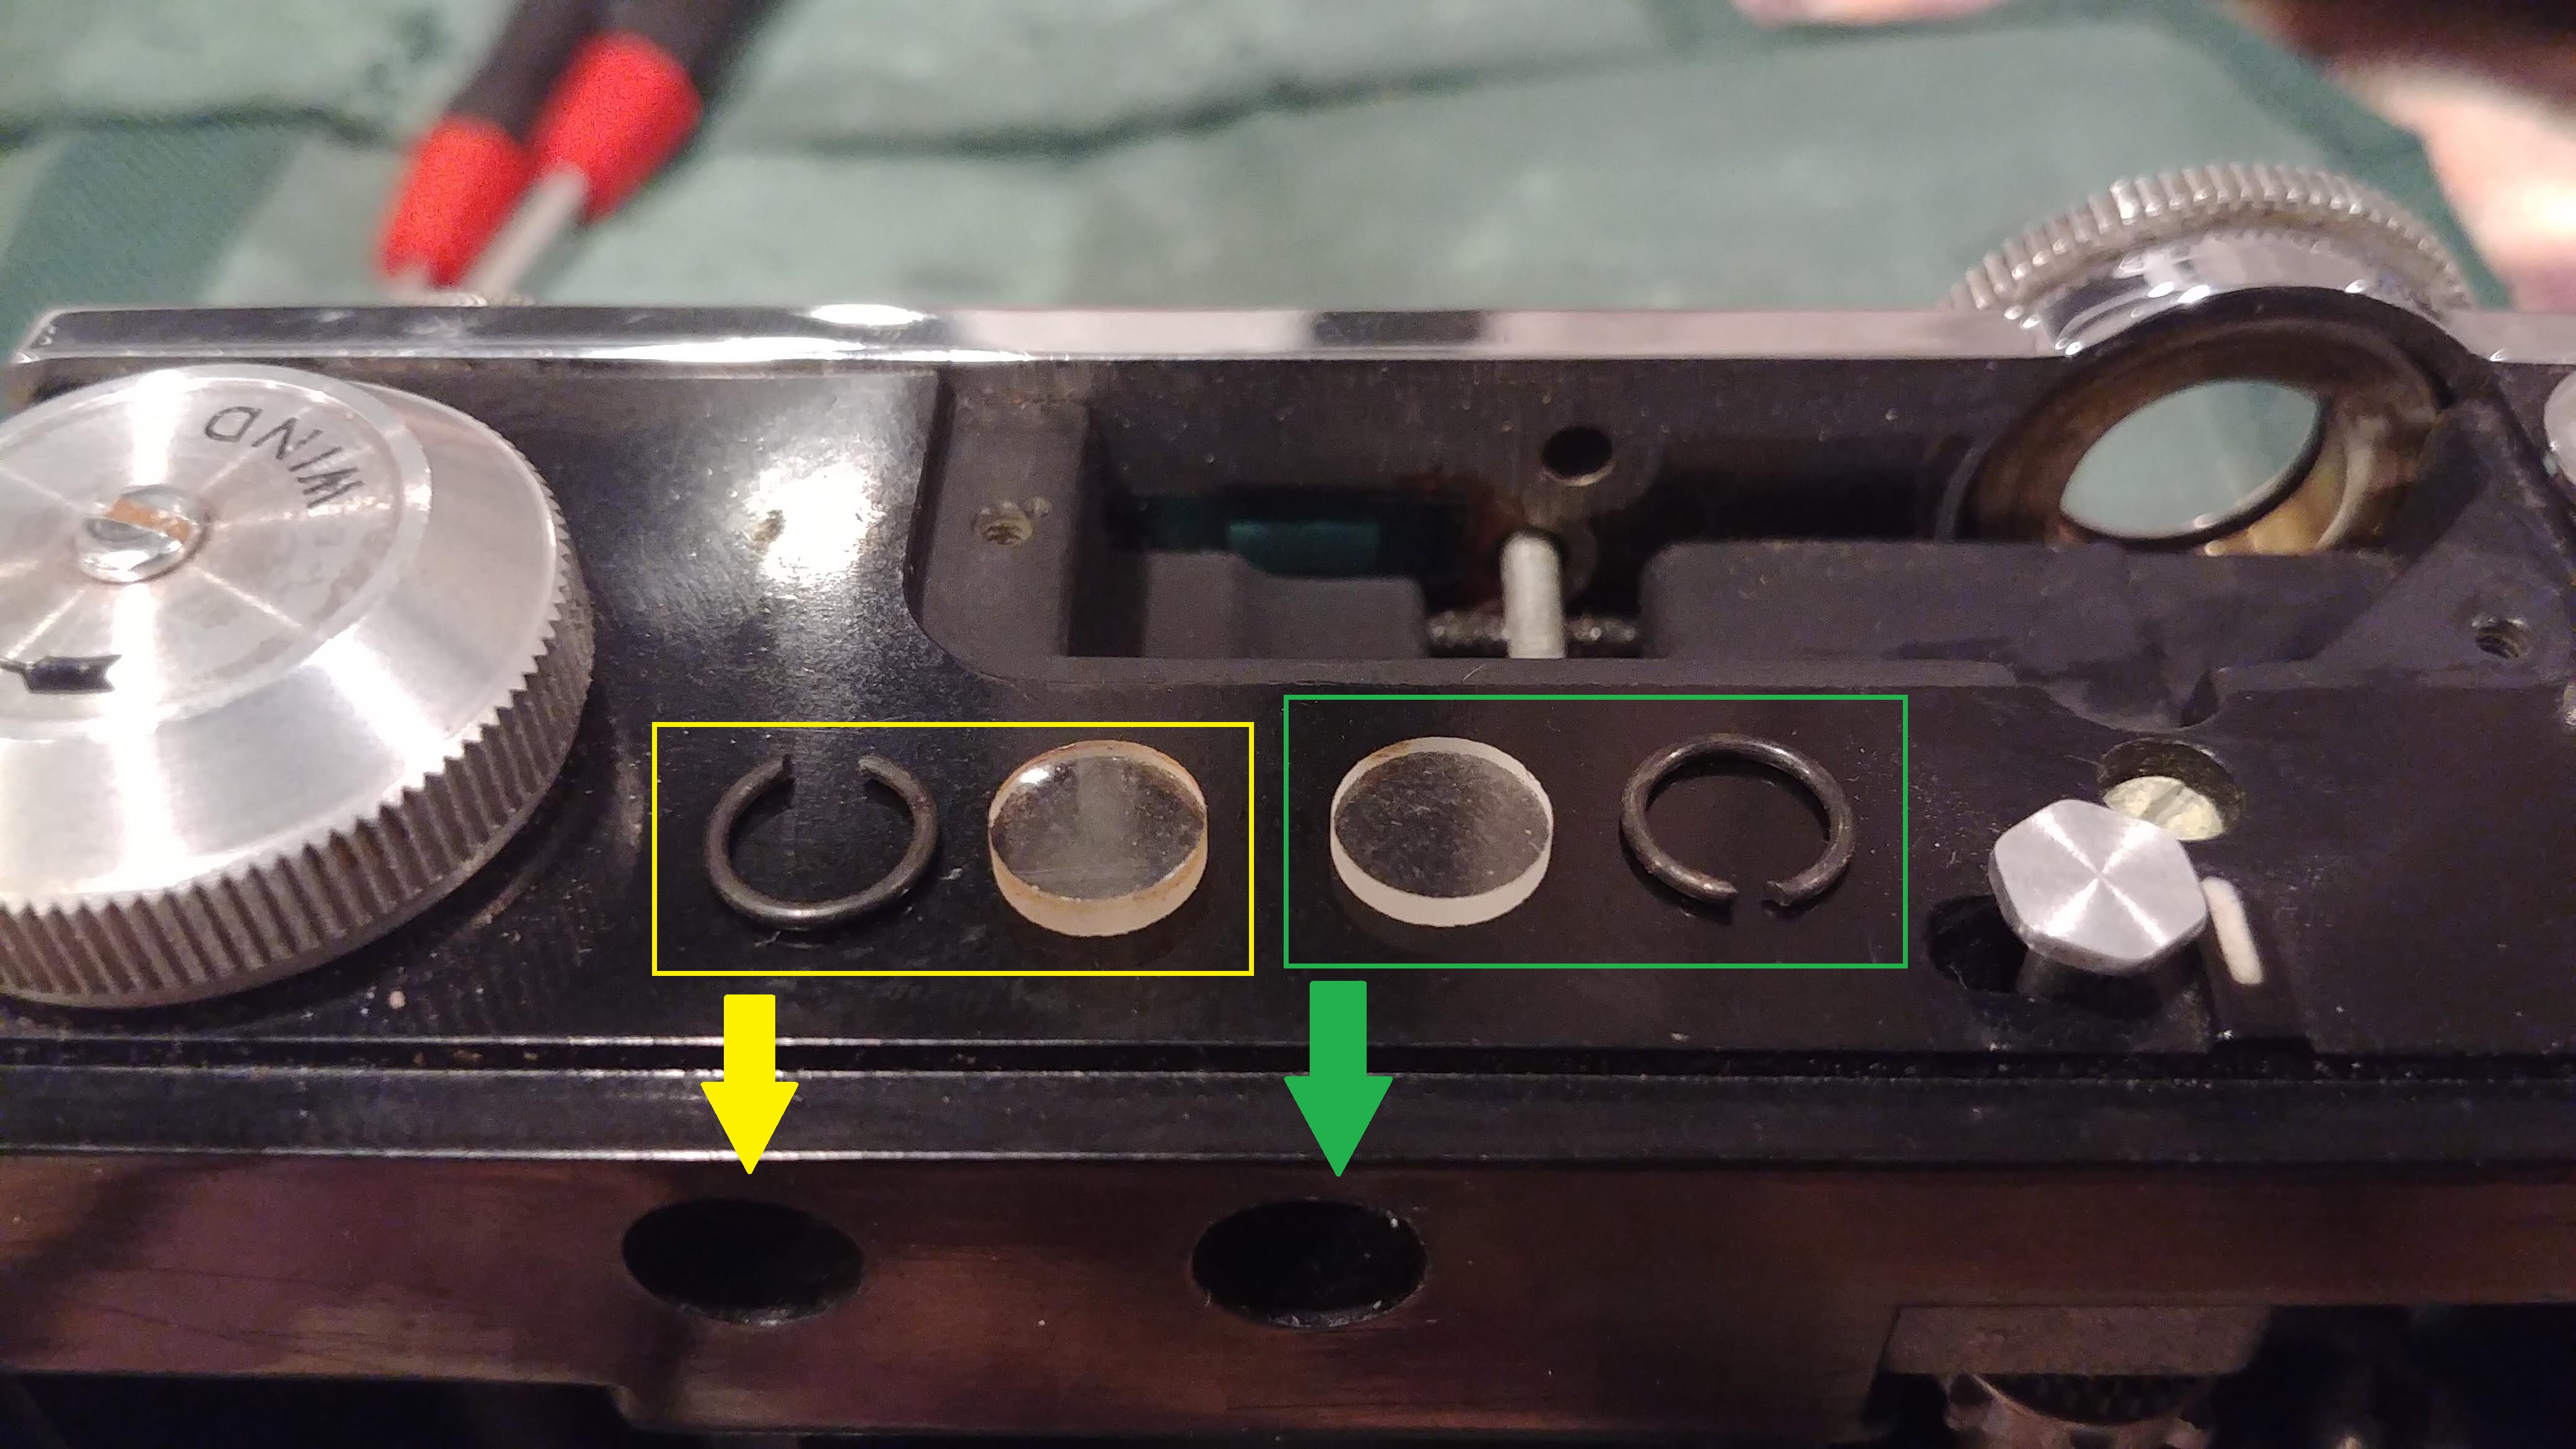 When putting the viewfinder and rangefinder back together, the two pieces of glass are not the same. On earlier Arguses, the one that goes in the rangefinder is flat on both sides and it does not matter how it goes in, but on later models one side of the glass has a concave shape that must face inward to the camera. The viewfinder lens on all models, is convex on one side and flat on the other. The convex side must face inward to the camera with the flat surface facing the back of the camera.
Adjusting/Cleaning the Rangefinder
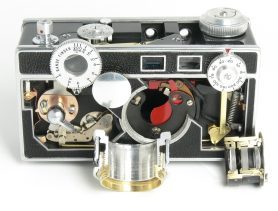
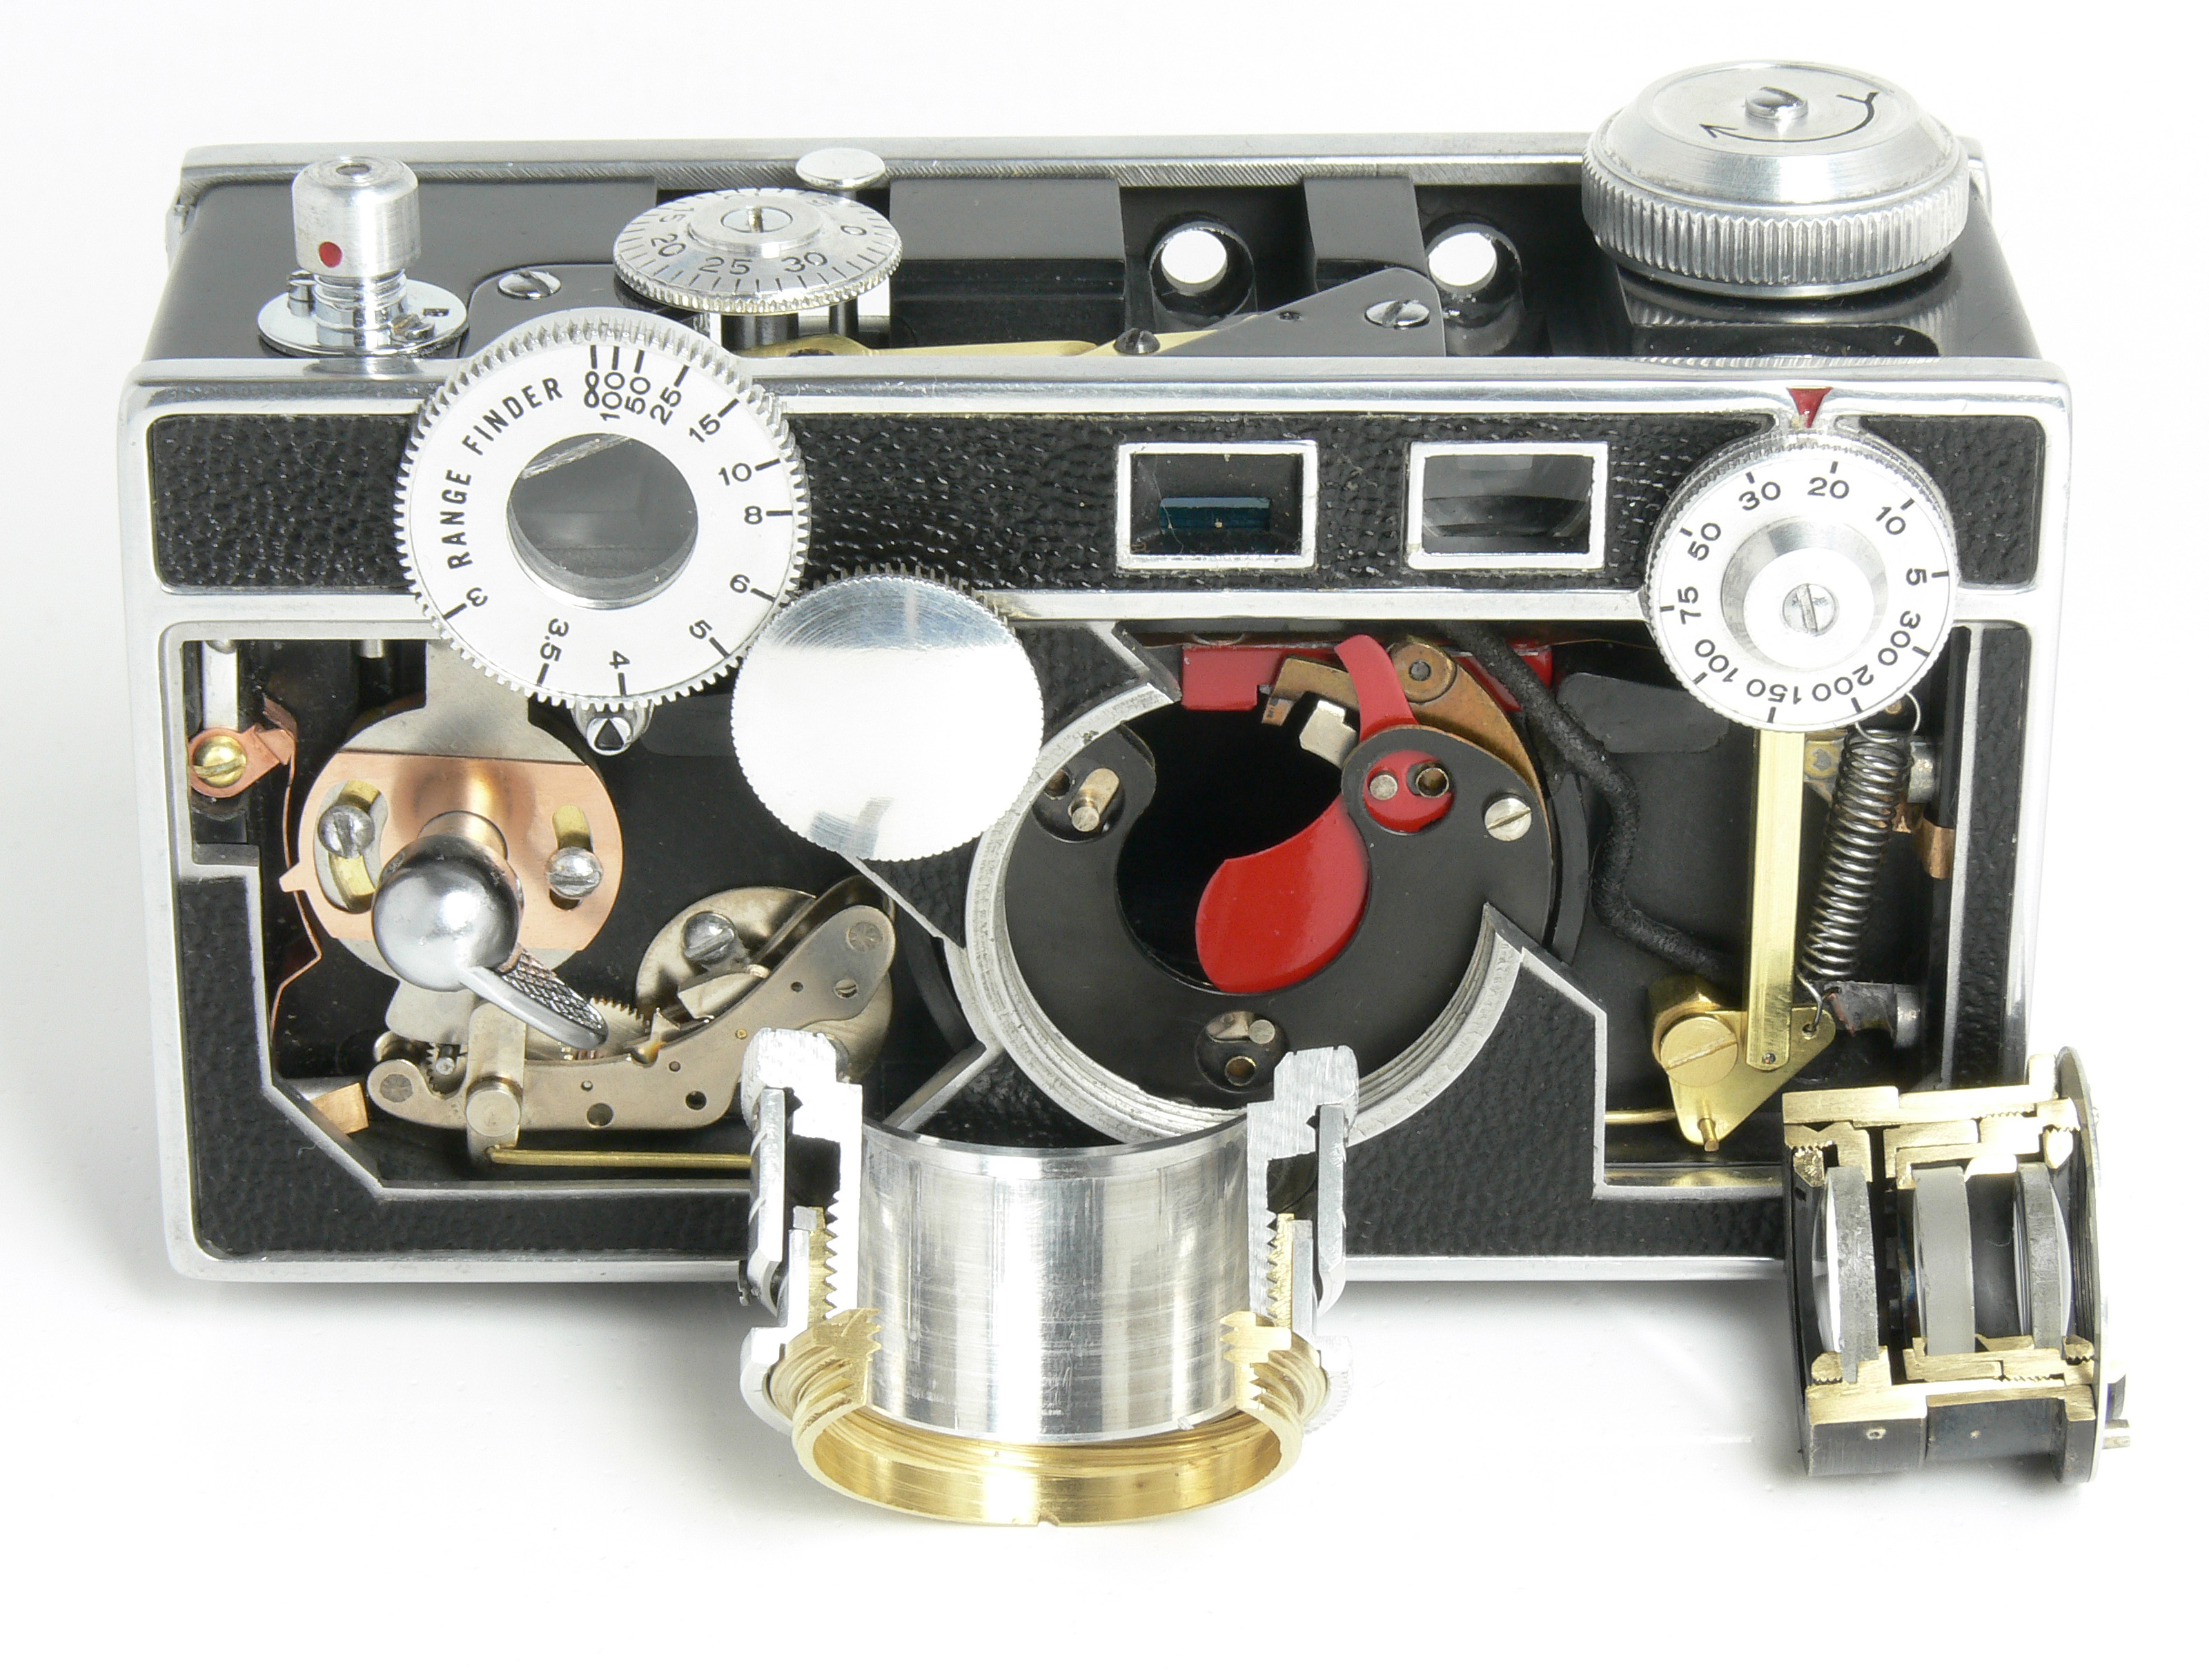
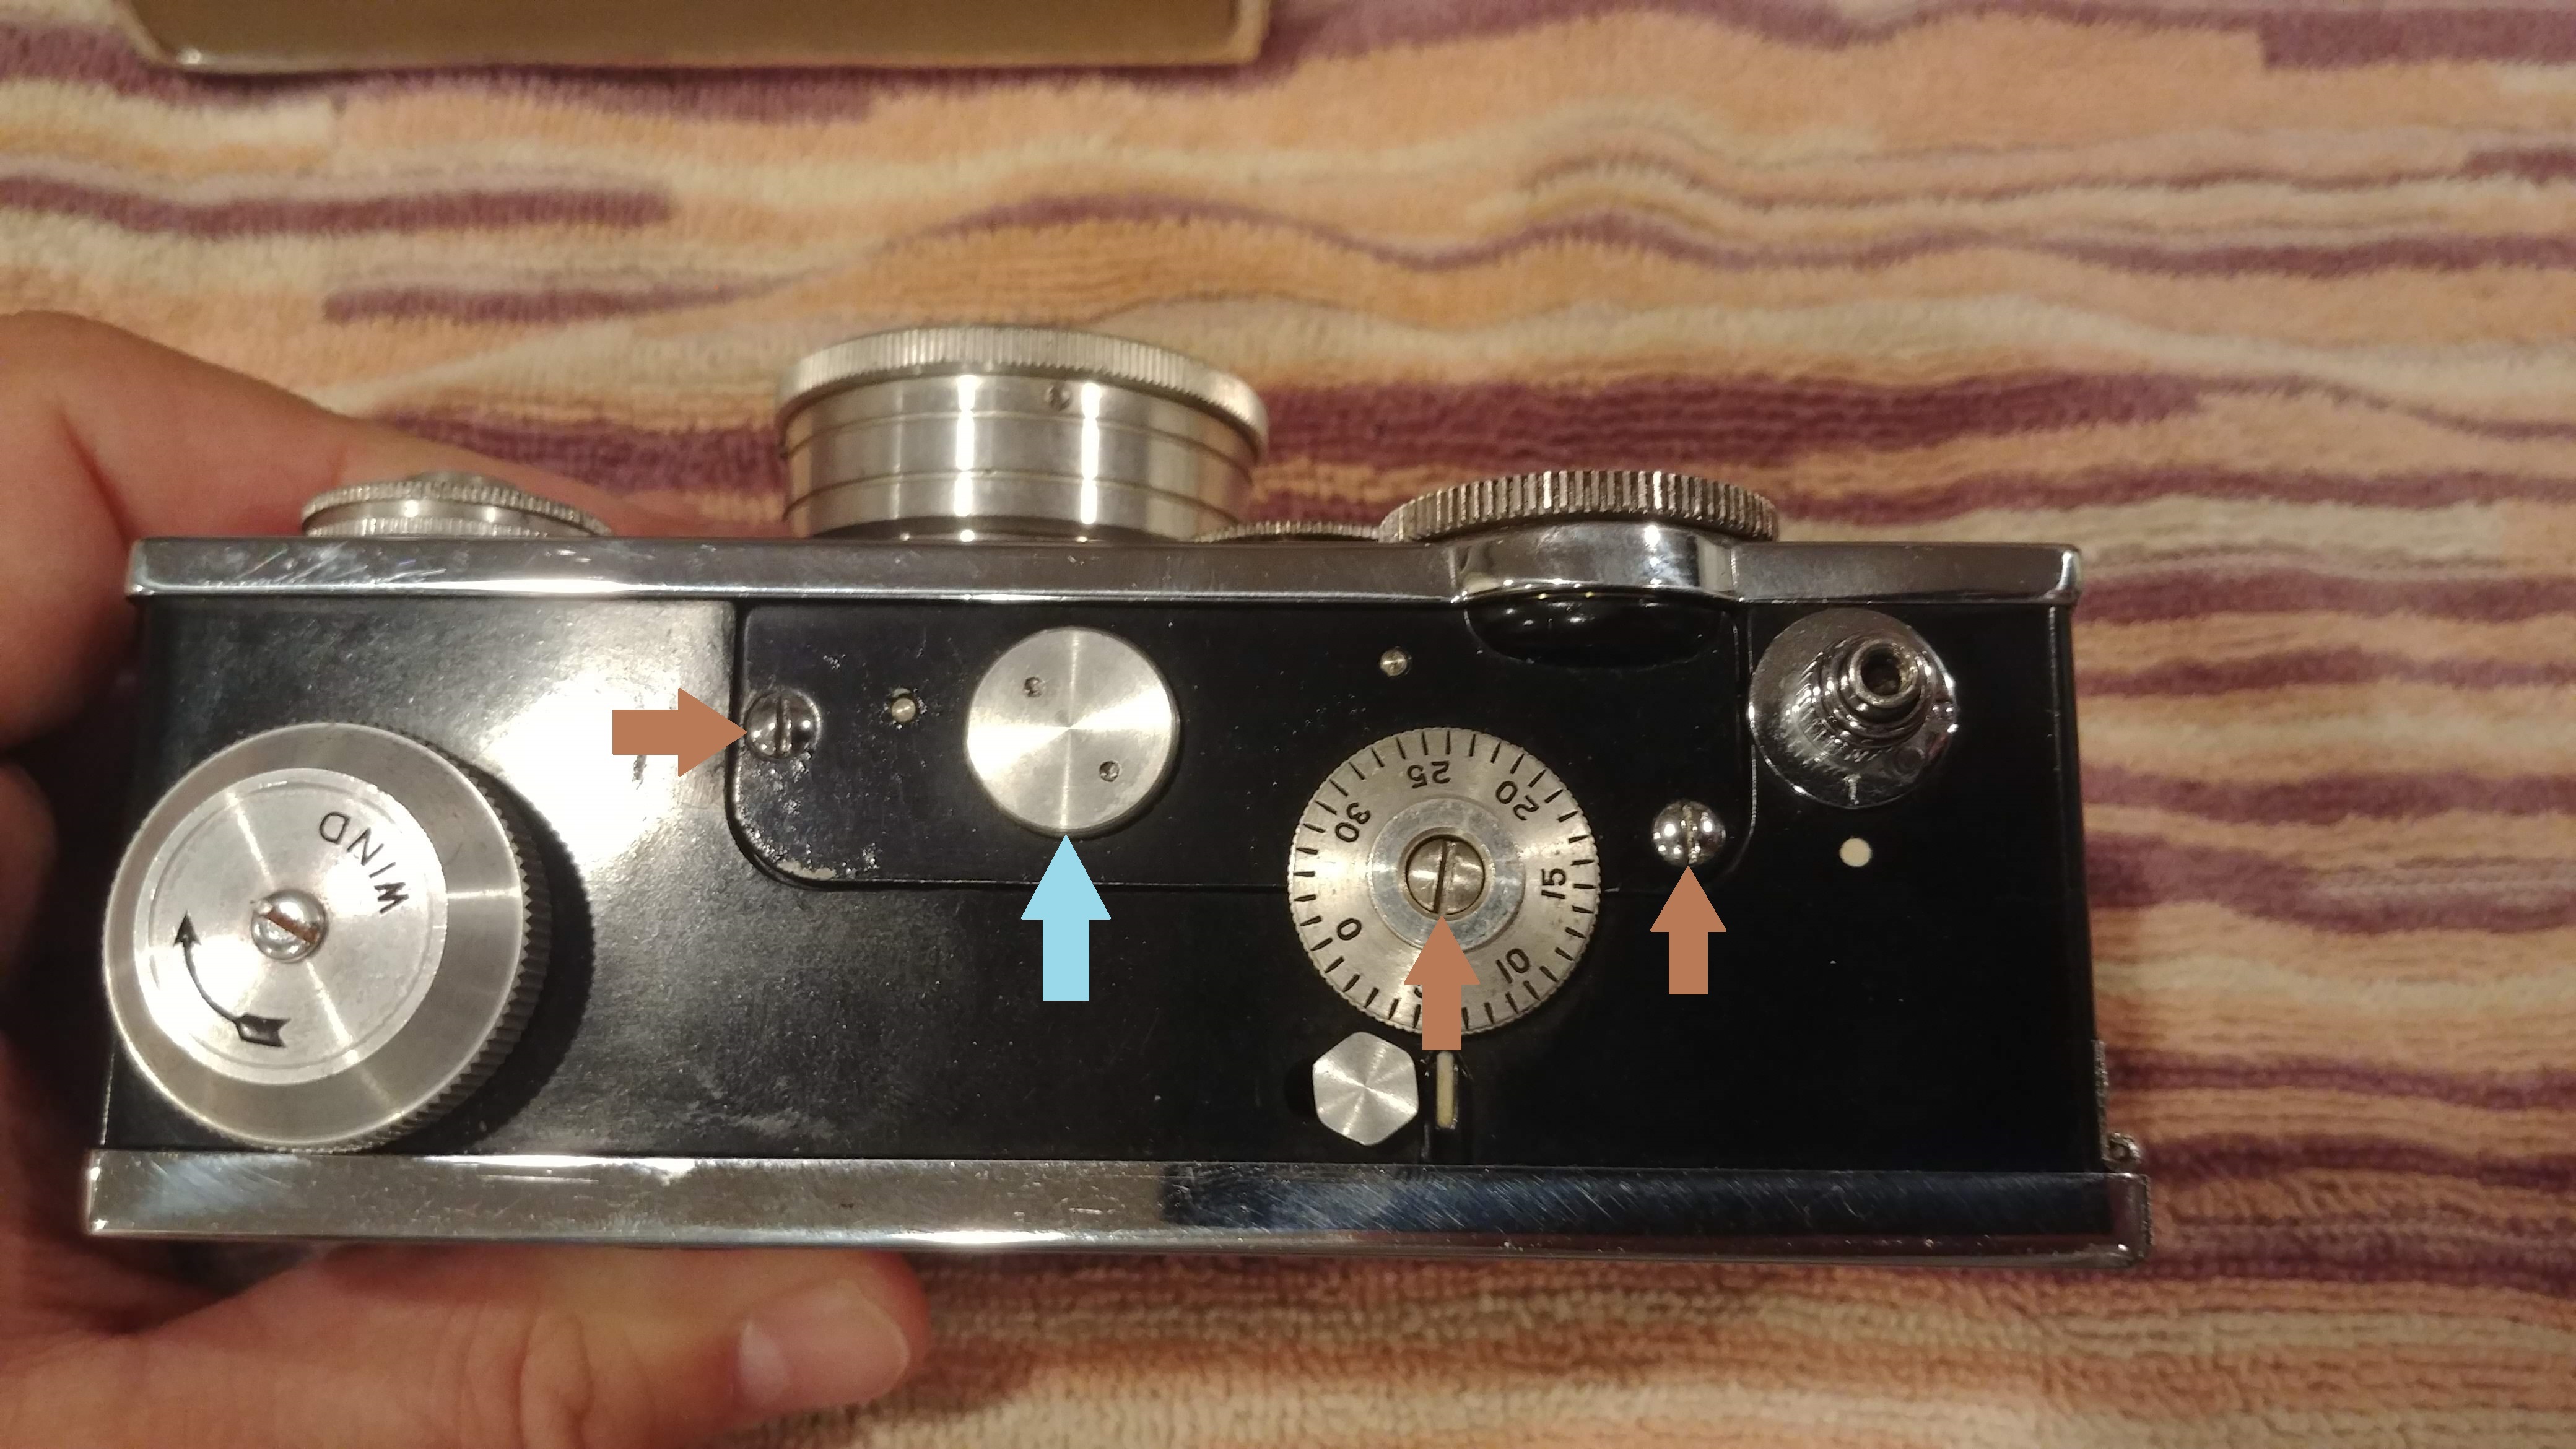
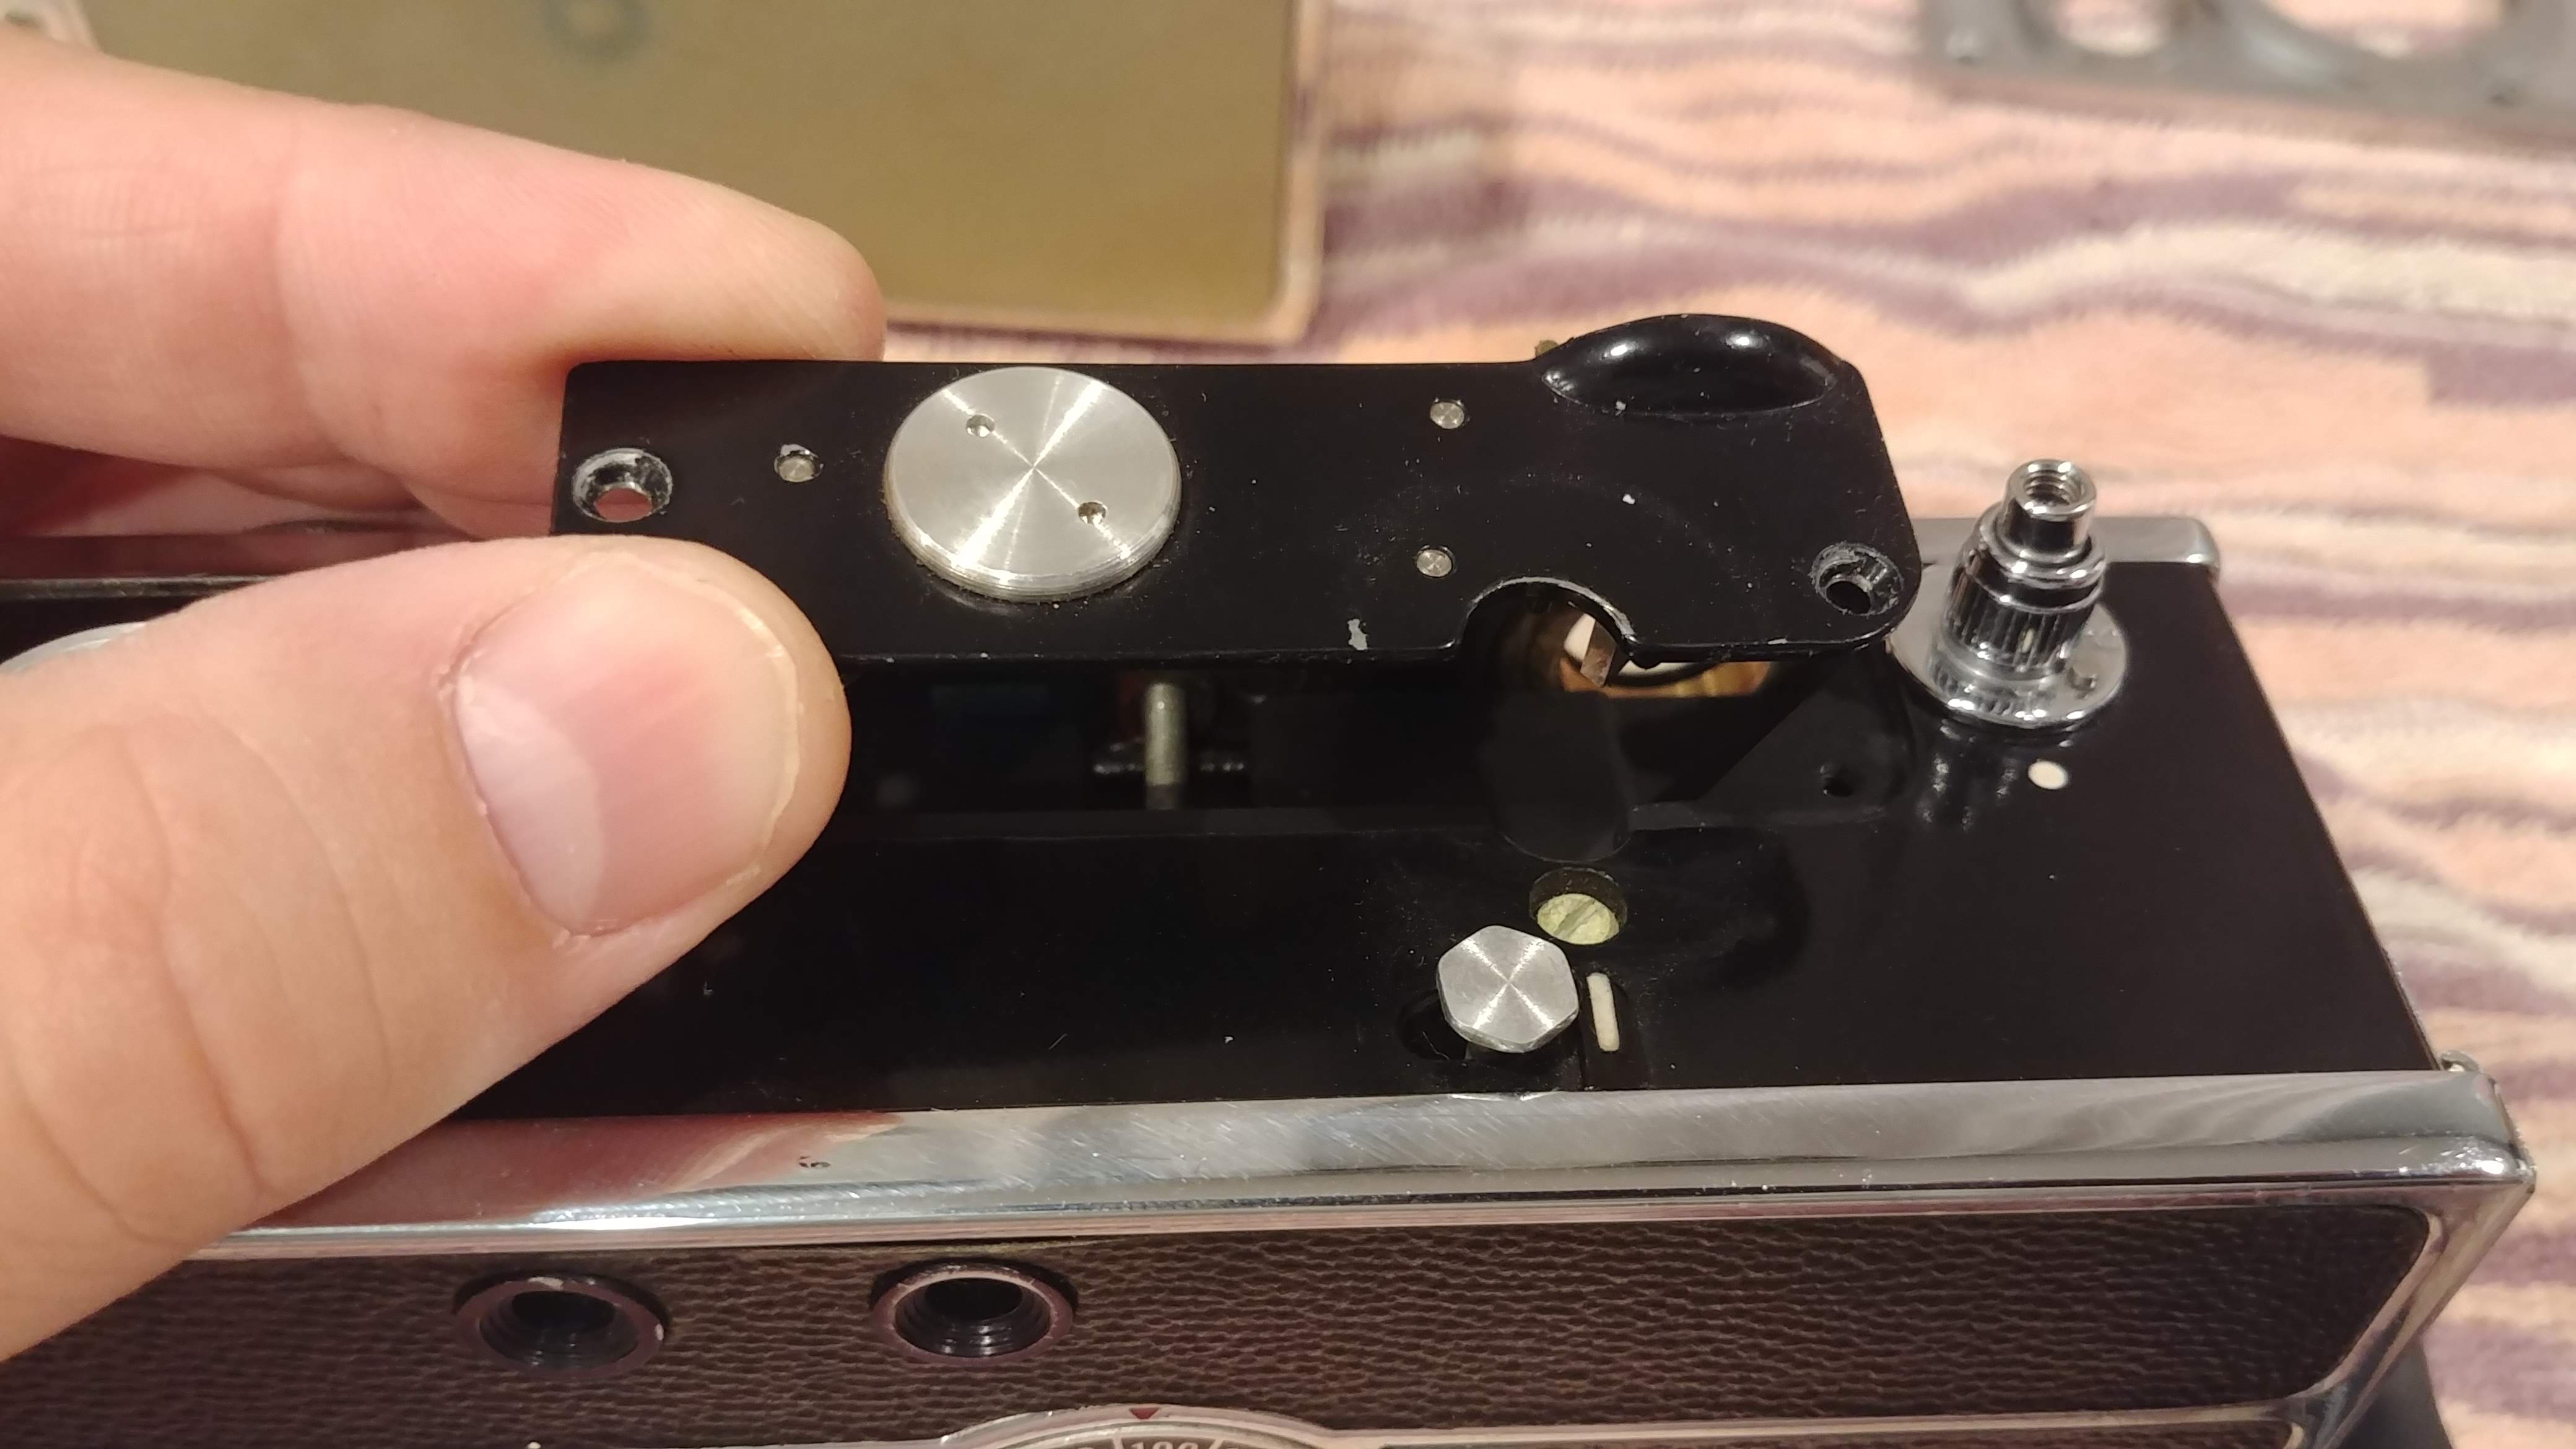
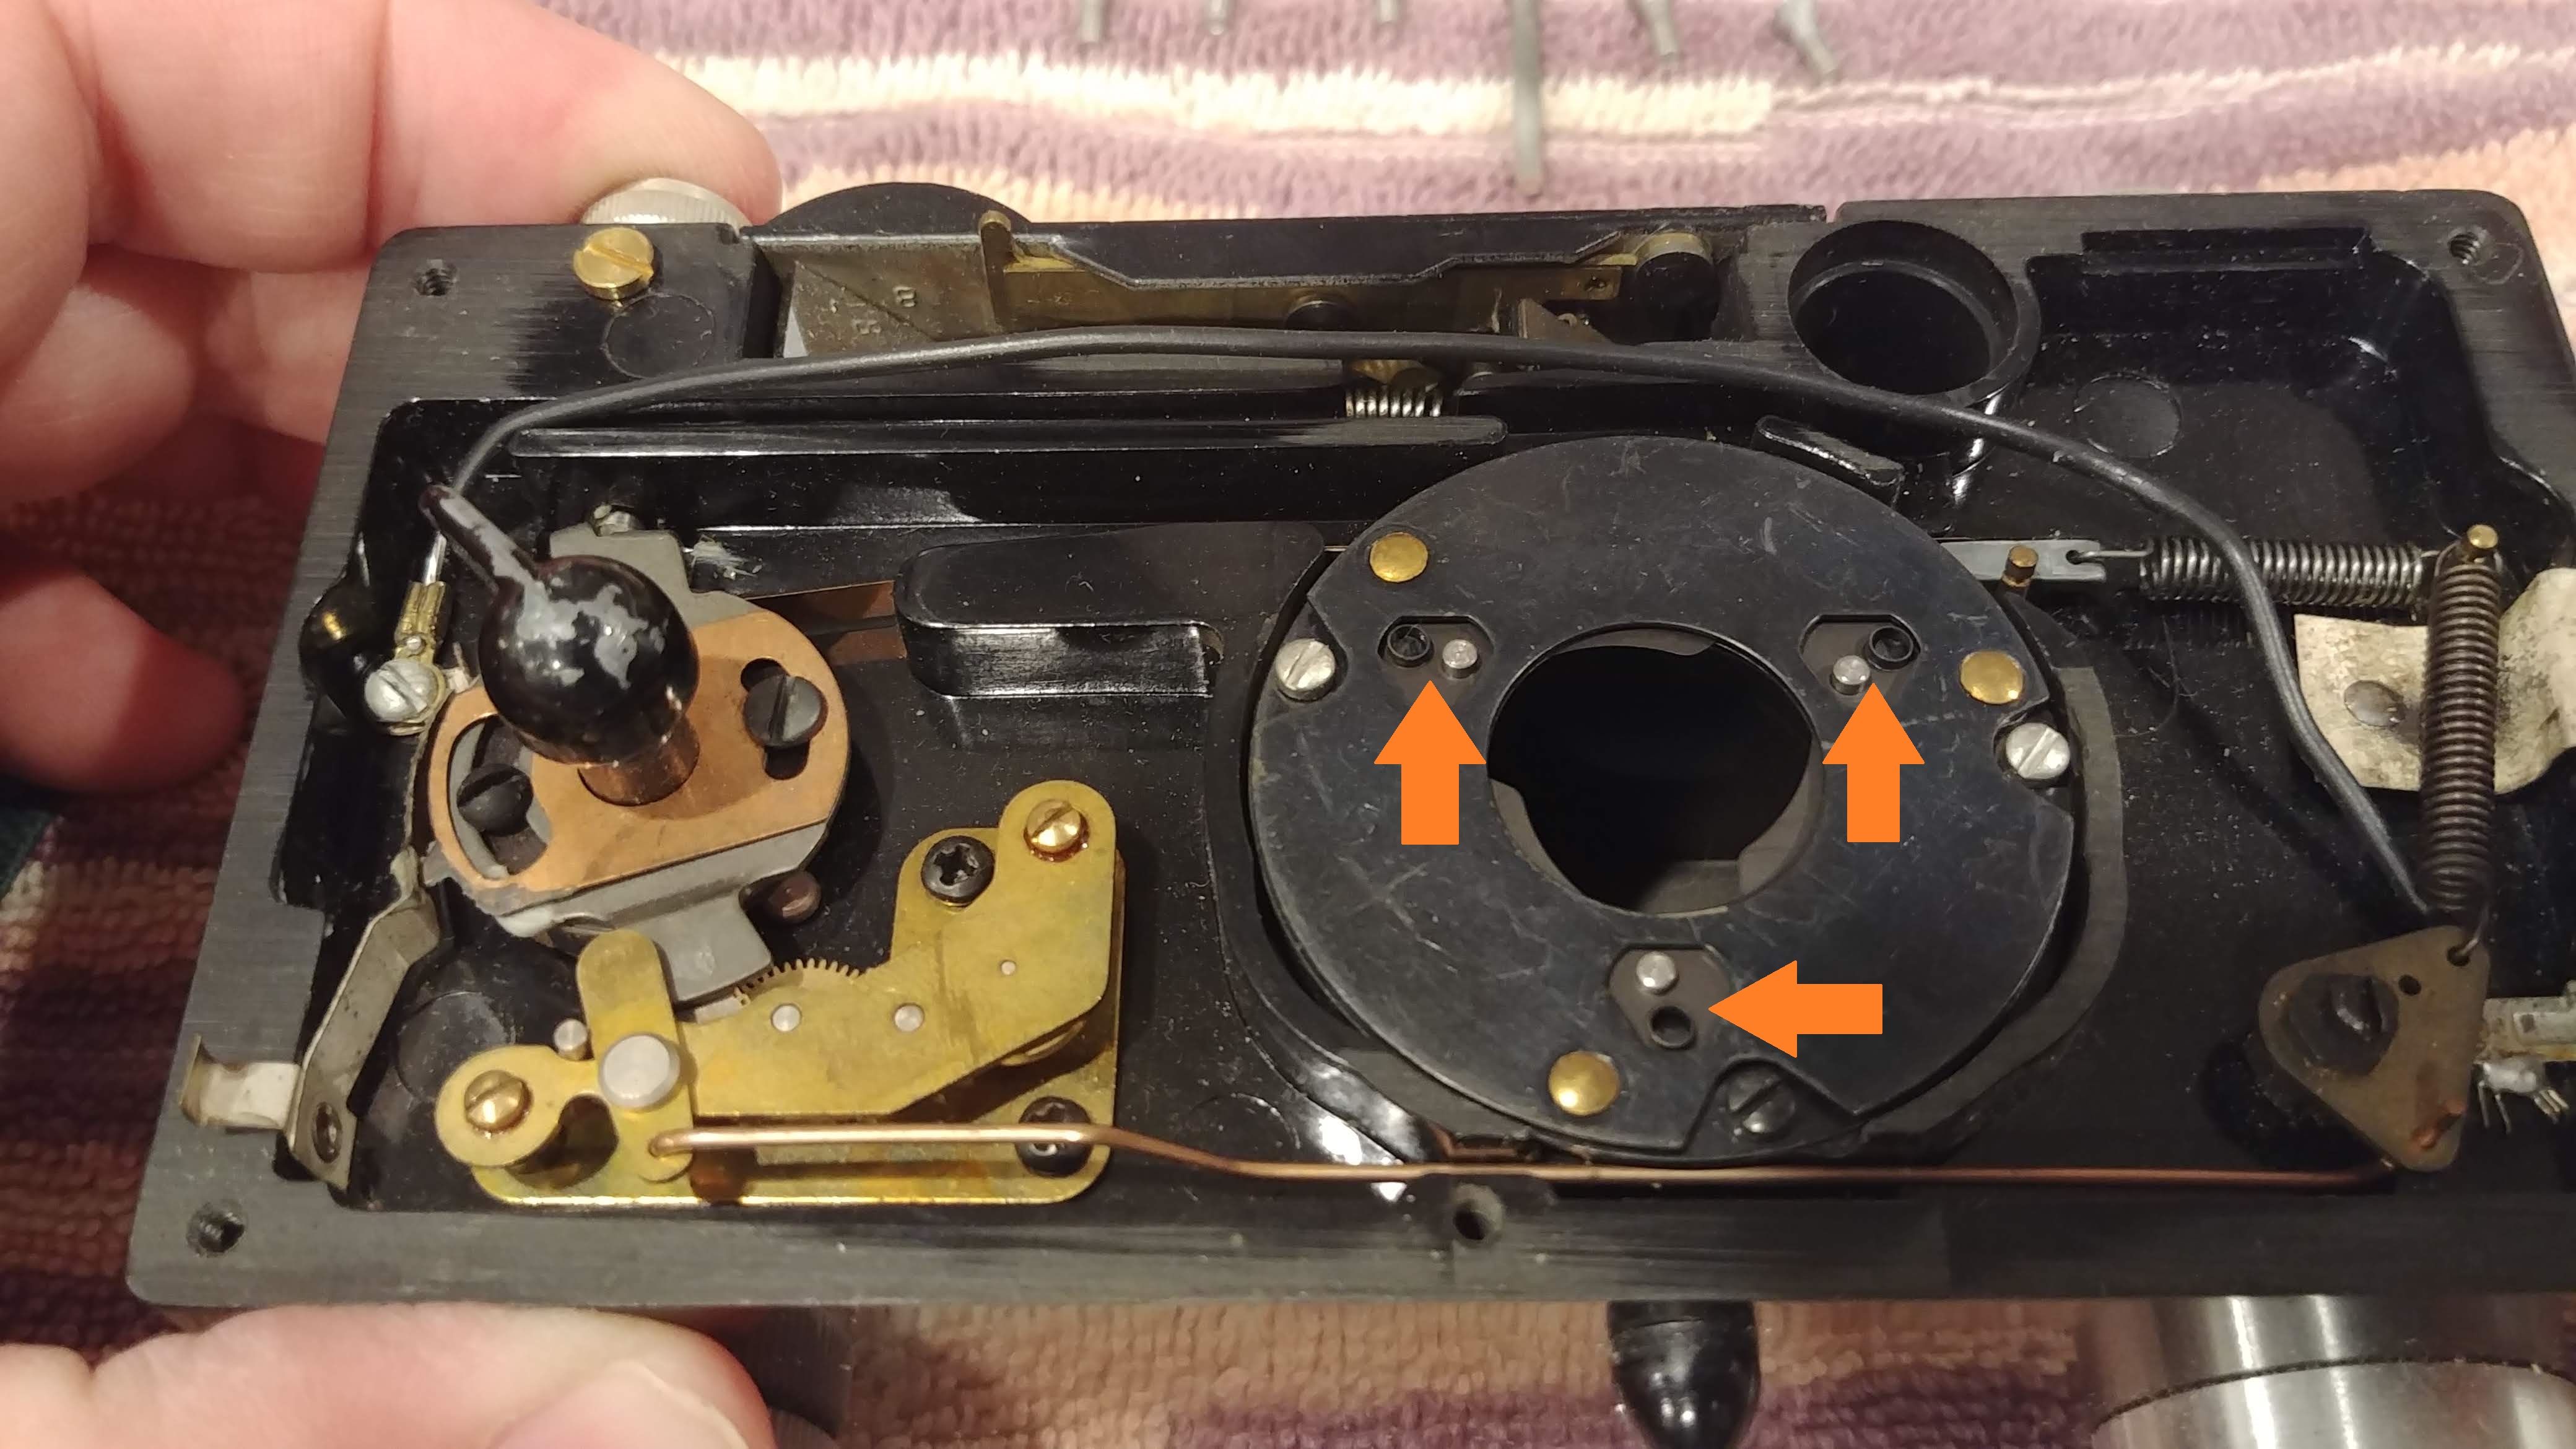
If all you need to do is adjust the rangefinder, there is a circular access port on the top of the camera that has two divots for a spanner wrench. Remove the circular cover indicated by the LIGHT BLUE arrow in the following image, and you’ll have access to an adjustment screw for the horizontal access of the rangefinder.
 In some cases, you may need to give the rangefinder a thorough cleaning, or perhaps there is a problem with one of the mirrors that has become unglued from it’s mount, or perhaps it has desilvered and needs to be replaced. To do this, you need to remove the entire rangefinder, which is incredibly easy to do. Like cleaning the viewfinders, there is no top plate of the camera to remove in order to access the rangefinder. The entire rangefinder assembly can be removed through the top of the camera.
On earlier Arguses there are a total of three screws indicated by BROWN arrows in the image to the right, which are holding the rangefinder into the camera, two of them are simply screwed in the top plate, and the third is through the center of the exposure counter. On later Arguses, there is a fourth screw behind the exposure counter disc. You’ll need to remove that first before you can remove the fourth screw. A word of caution is when you unscrew the exposure counter, you’ll feel a gear shaft drop inside of the film compartment. Don’t worry, this is normal, you’ll address this later when reassembling. Some models will have a spring around the exposure counter shaft that you’ll need to set aside as well.
 With all of the screws out, the rangefinder simply lifts off. There is a protruding “finger” from the rangefinder that goes into the circular compartment behind the rangefinder adjustment wheel that sometimes gets caught, but just be careful and it will come out. I’ve found that it is easier to get the rangefinder out of earlier Arguses. Later models have a slightly different design to the rangefinder which makes it a little trickier to get out. Don’t worry though, it will still come out.
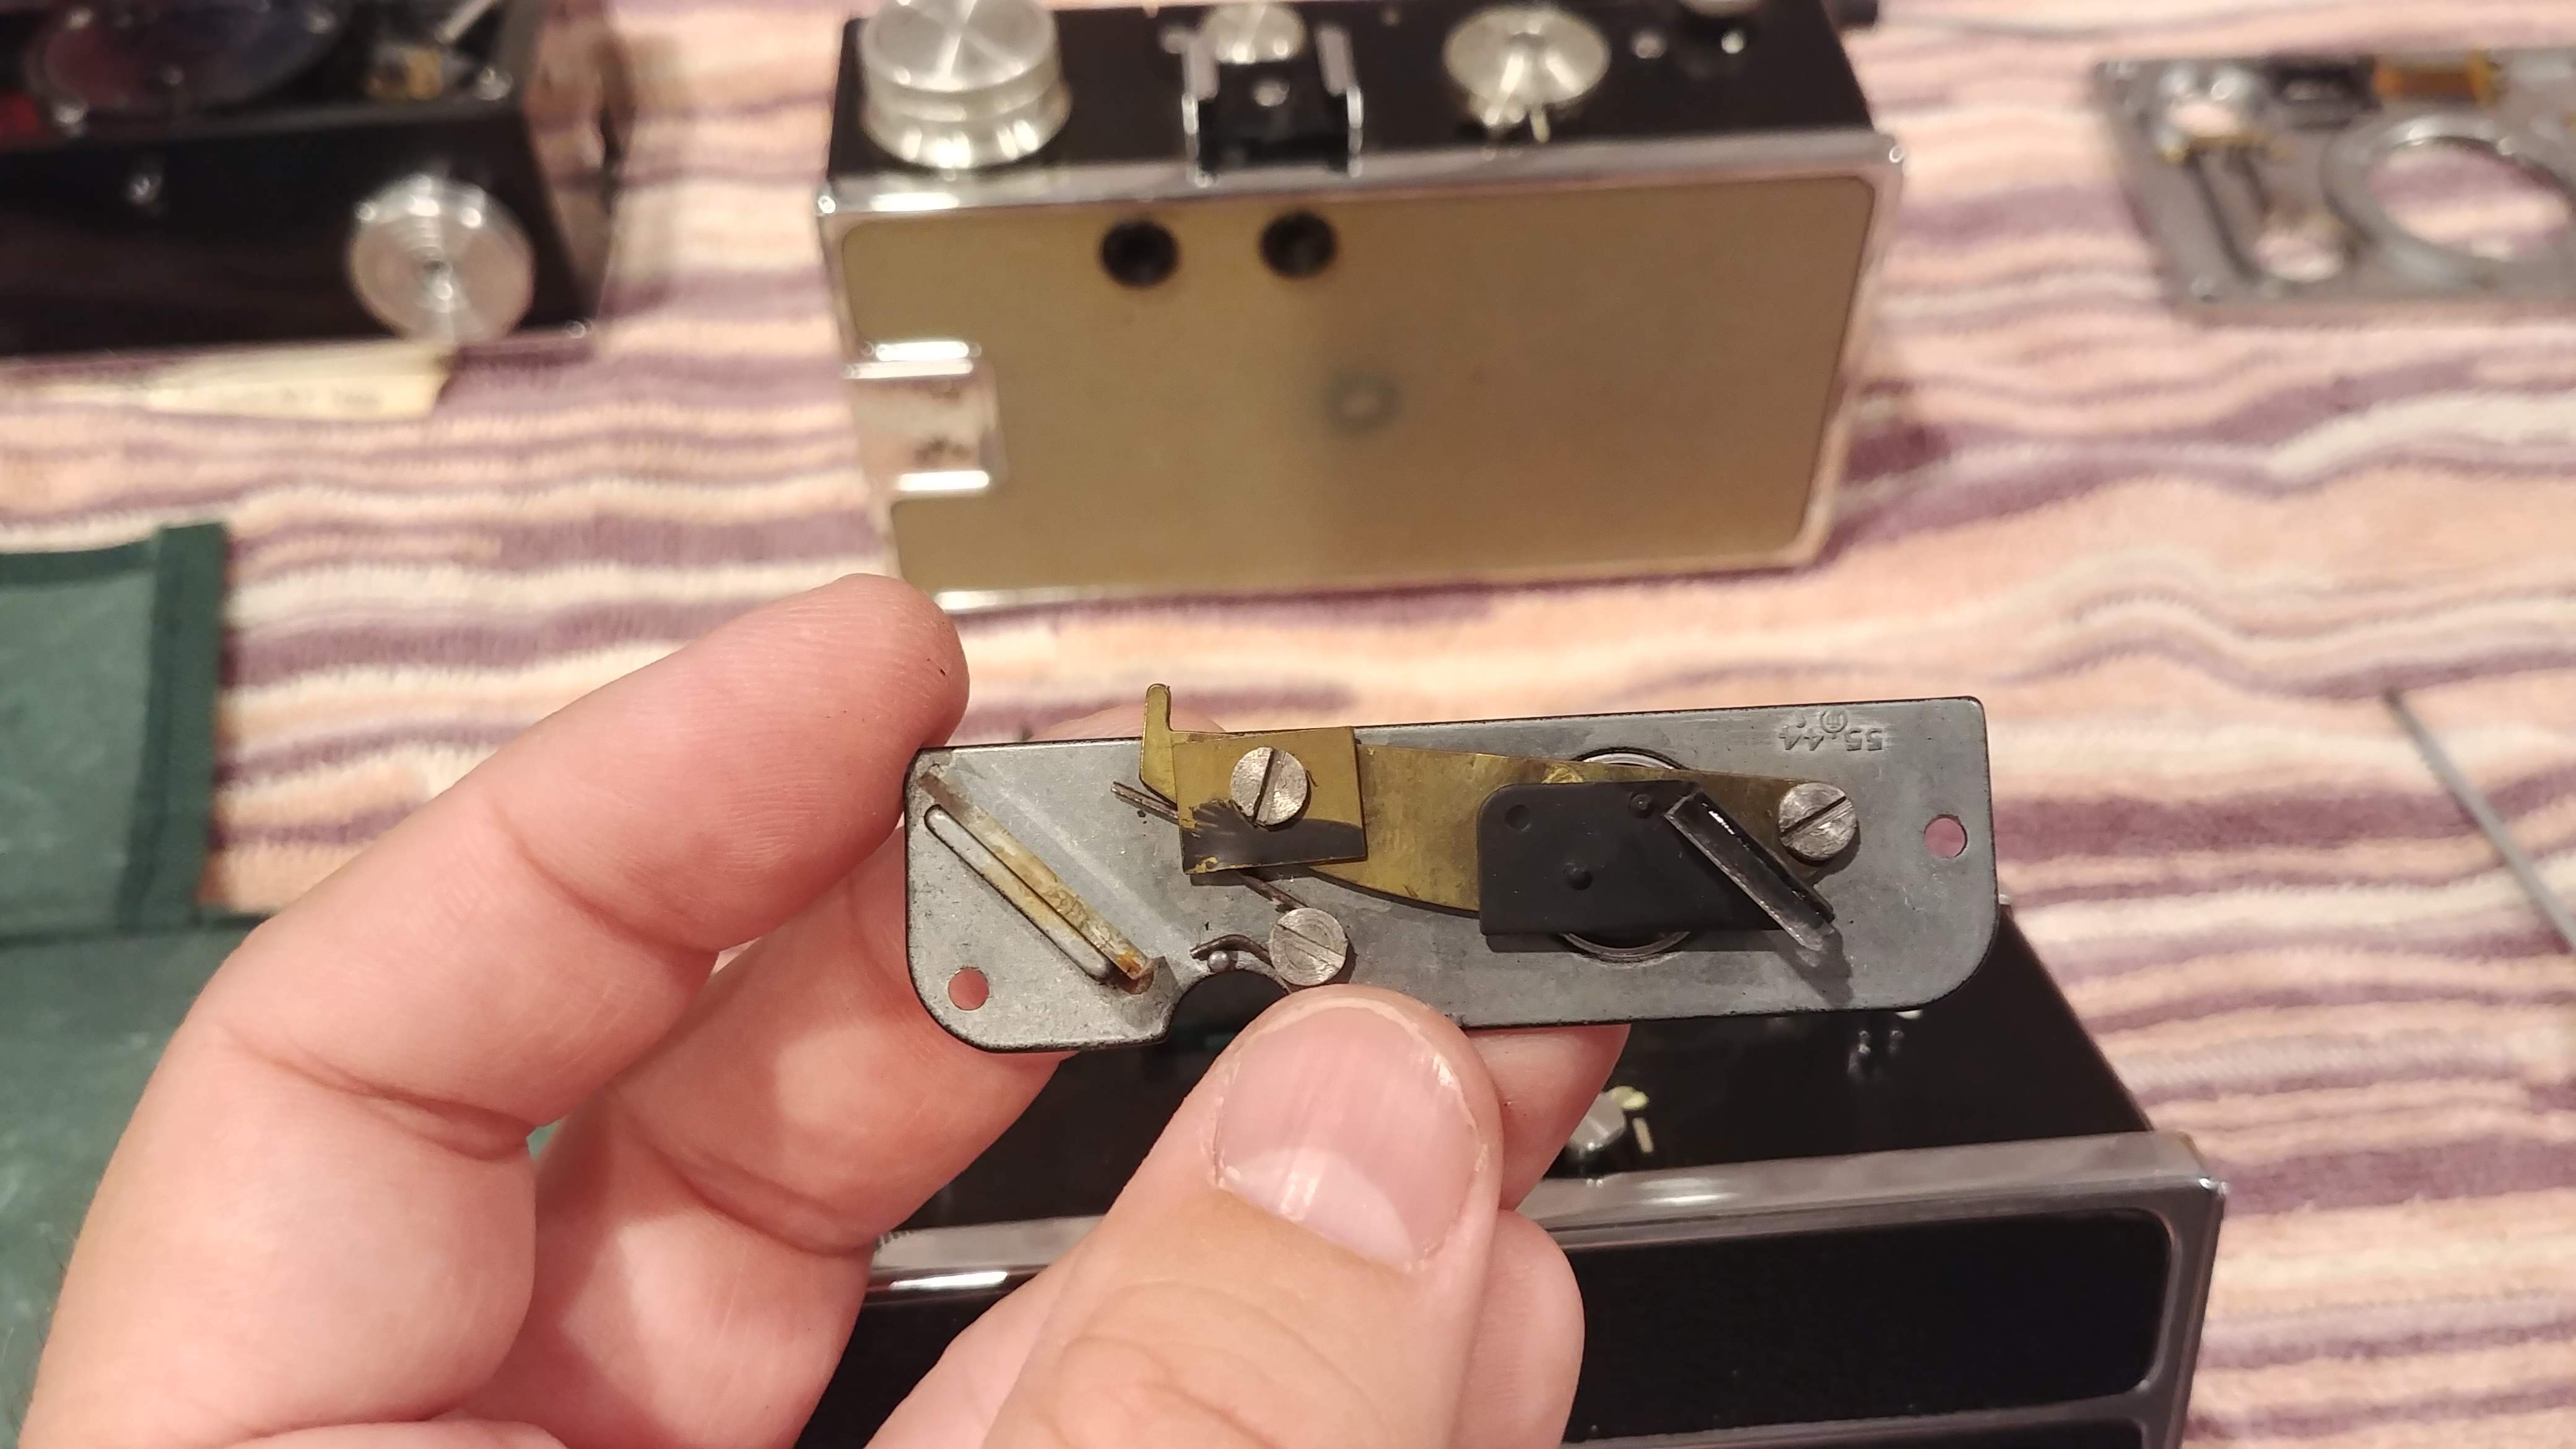 Now that the rangefinder is out, you can give both mirrors a good cleaning. If they have become unglued, simply reglue them into position. I have used rubber cement for this with great results. The rubber cement won’t damage the mirror, and is soft enough to withstand vibrations without having the mirror fall again. You should also be able to reach the inside of the tinted rangefinder window on the front plate of the camera to give it a good cleaning.
Once you’re done with the rangefinder, you put it back together the opposite of how you took it apart. Be careful of that finger that needs to go behind the rangefinder adjustment wheel. You may need to use a small screwdriver to hold the finger back while sliding it into position.
With the rangefinder back where it belongs, screw in the first two screws holding it into position and then for the one that goes through the exposure counter, you’ll need to open the film compartment of the camera. Near the top of the film sprocket shaft, you’ll see two gears. One of them is permanently attached to the sprocket shaft, the other connects to the exposure counter, but has fallen out of position.
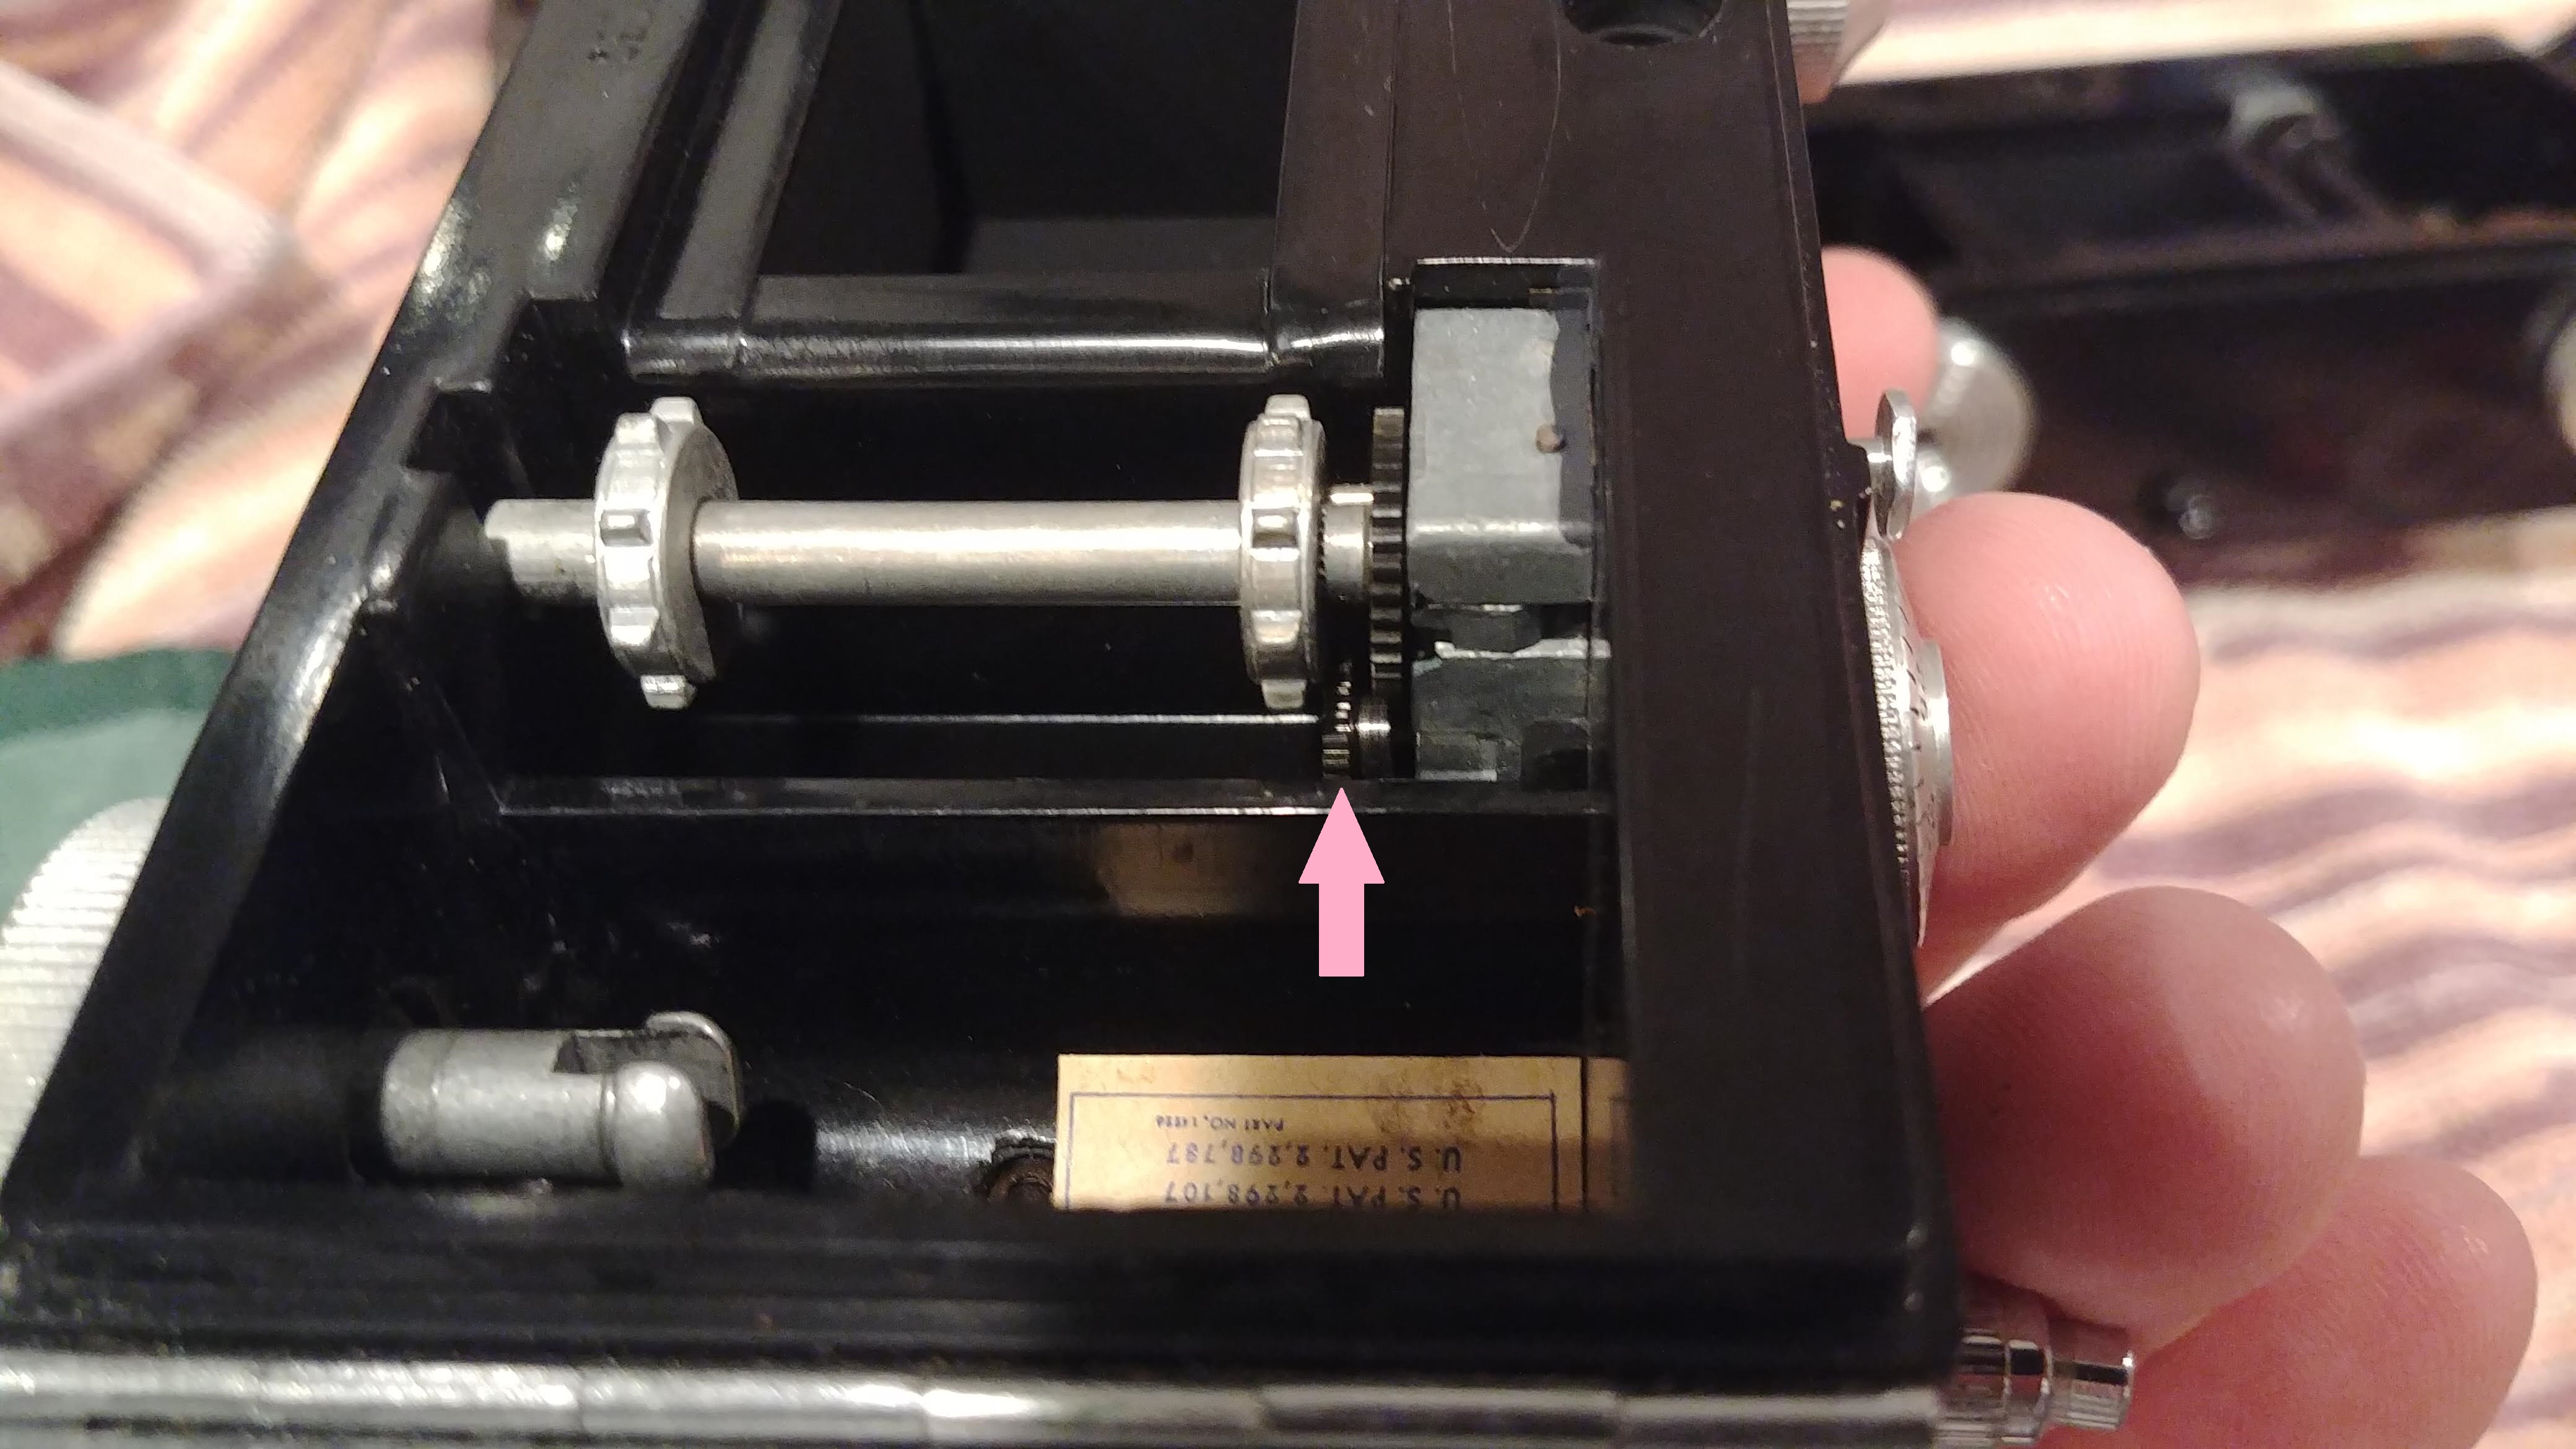 Look at the image to the left and you can see the bottom gear, indicated by a PINK arrow, is not aligned. This is wrong. They must be aligned with each other, or else you won’t be able to screw the exposure counter back in.
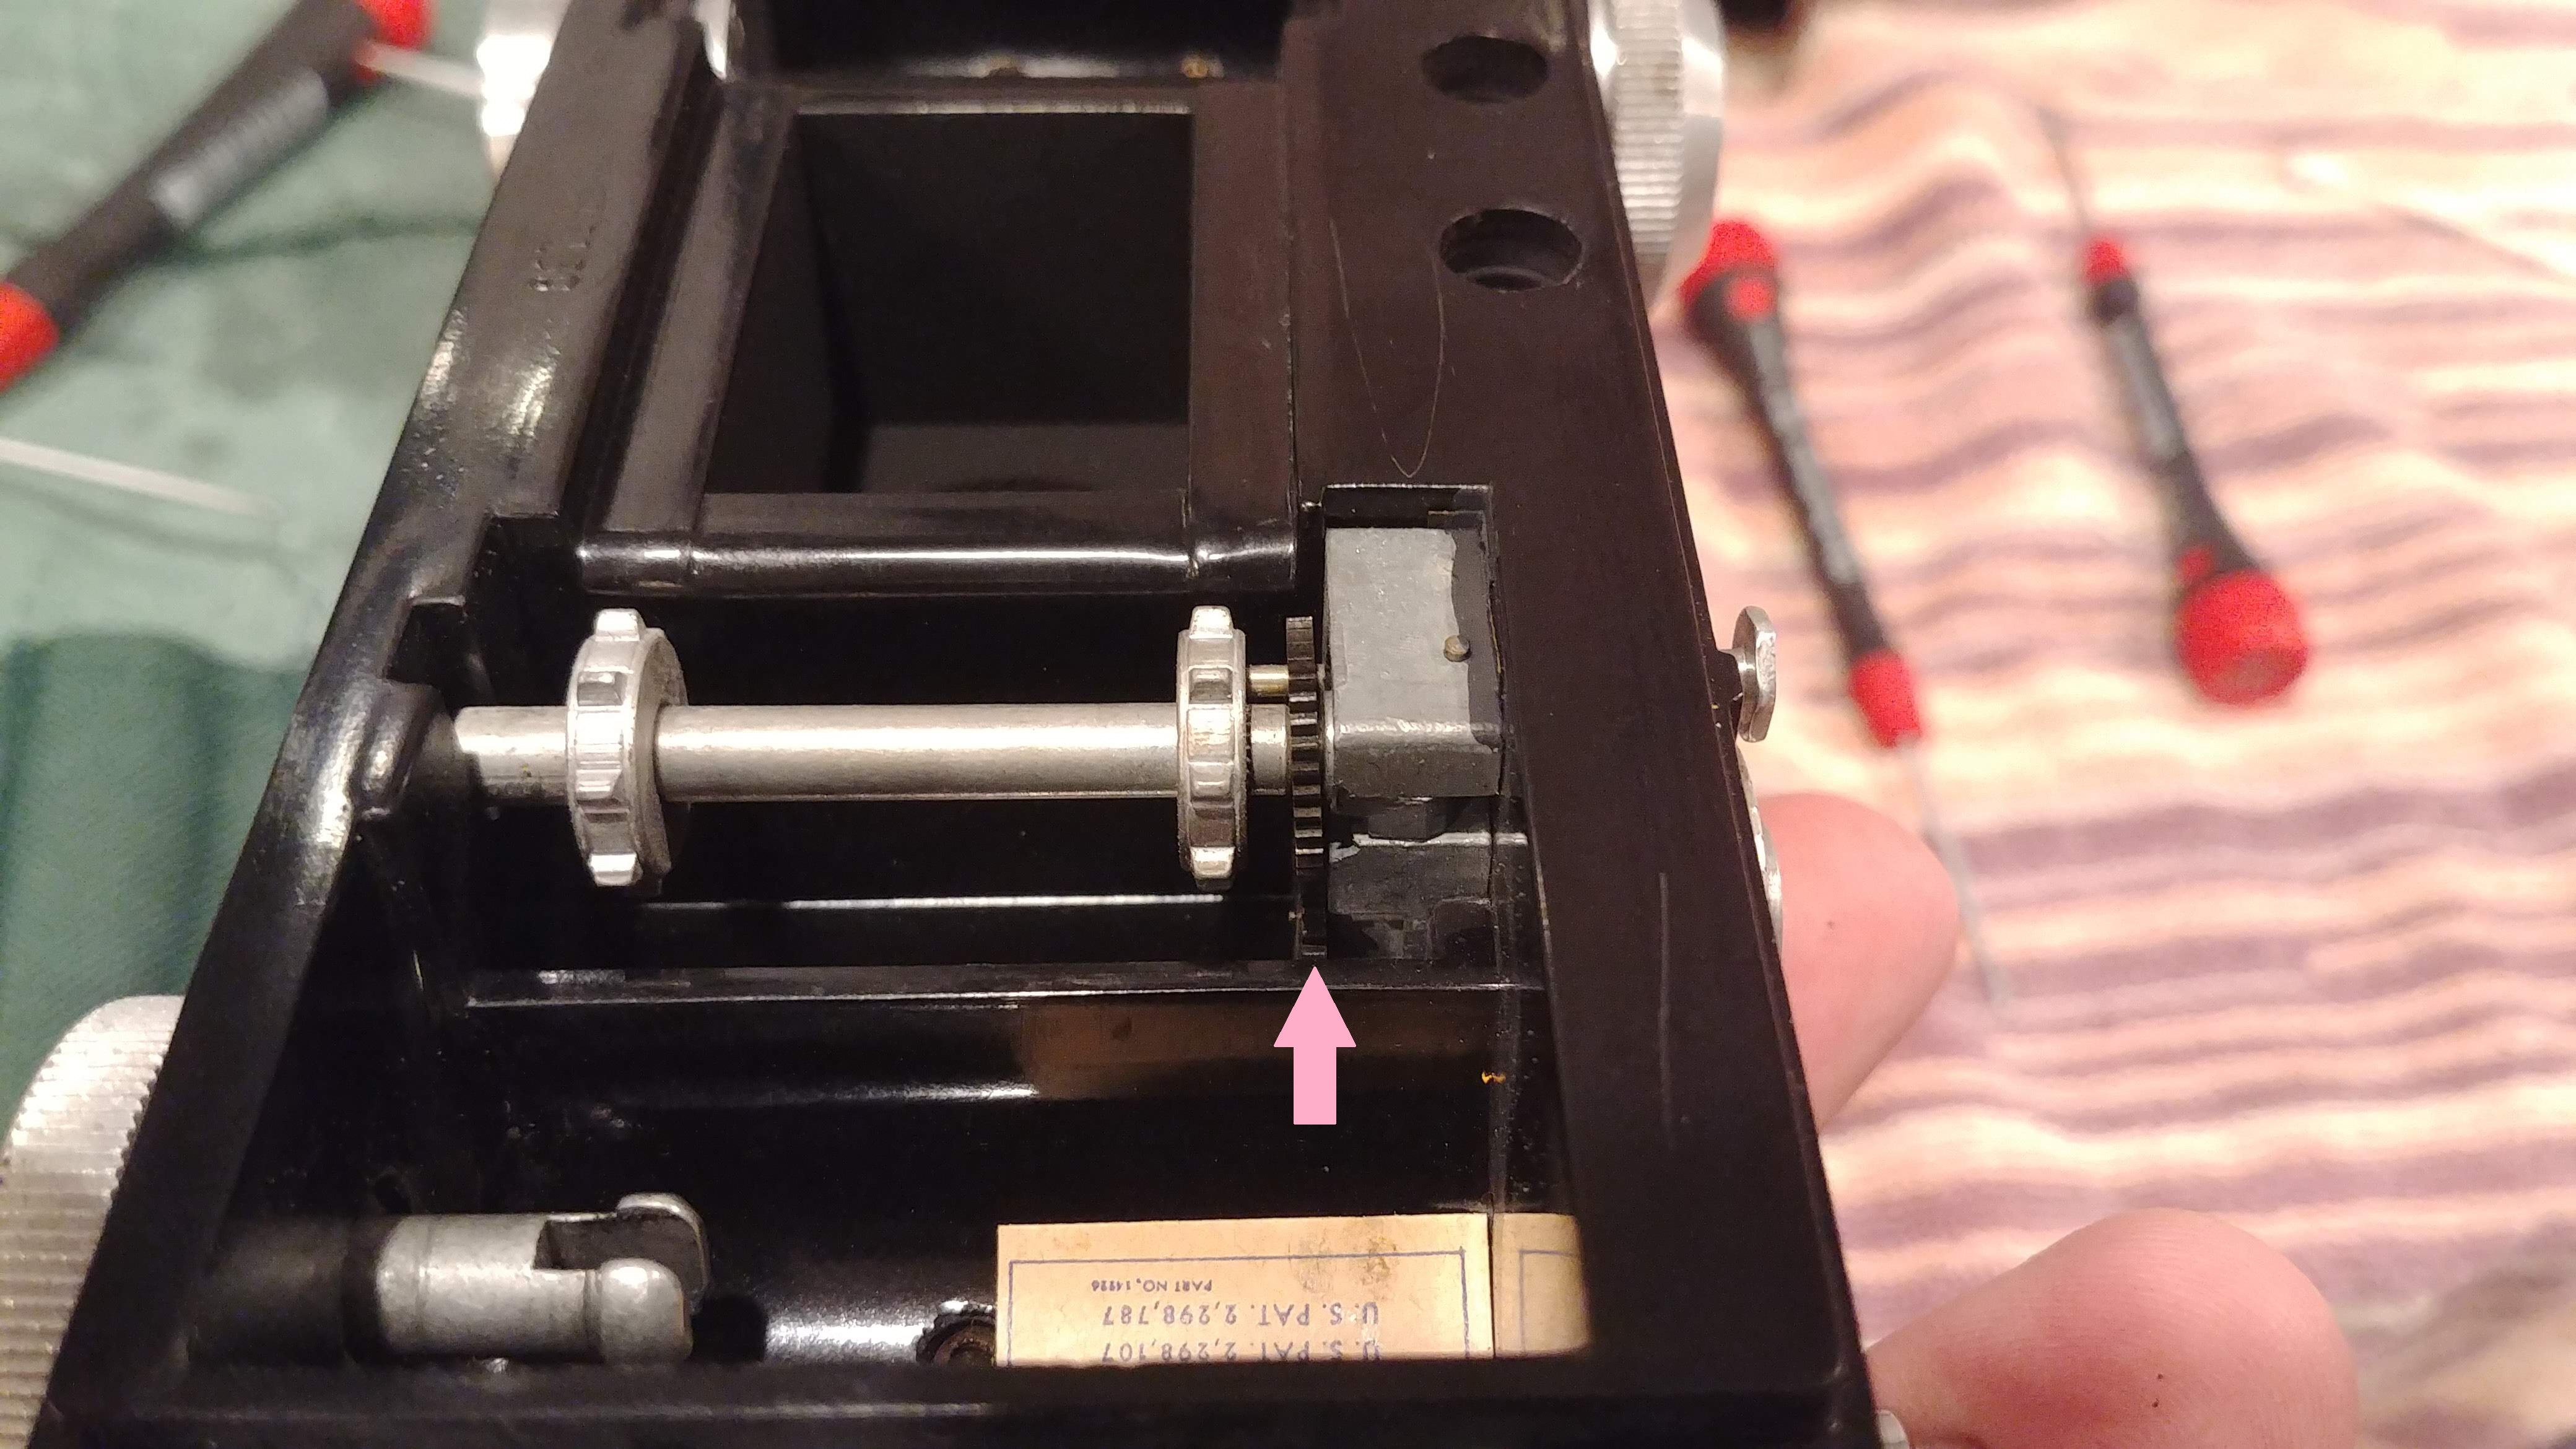 You’ll need a screwdriver (Rick Oleson uses a Popsicle stick for this) and possibly a second person to put upward pressure on that second gear, so it stays aligned with the first gear, and then you’ll be able to screw the exposure counter screw back in. The image to the right shows the same gear indicated by a PINK arrow, in it’s correct location.
This likely sounds much harder than it really is. Basically, with the second gear too low in the film compartment, the threads for the screw on the exposure counter won’t reach it, and you need to hold it in the upper position.
Cleaning the Shutter
The Argus C-series uses a fairly stout leaf shutter that is more tolerant of dirt and debris over time that would prevent it to from working, but any shutter has it’s limits, and many Argus cameras are found with an inaccurate shutter. I’ve never actually seen an Argus with a shutter that wouldn’t fire at all, usually the problem is that the shutter fires either too fast or too slow for the chosen speed and just needs to be cleaned.
It’s normally a pretty controversial by professional camera repair technicians to clean a camera shutter using naphtha oil or lighter fluid, I know this was a camera served by the US military on battlefields using whatever solvents they could find, so in this case, I feel no hesitation in recommending a lighter fluid flush on an Argus C-series shutter. You can use any brand name of lighter fluid such as Ronsonol or Zippo, or you can buy Naphtha Oil in bulk from your hardware store. A local chain where I live sells half gallon metal cans for about $7 each.
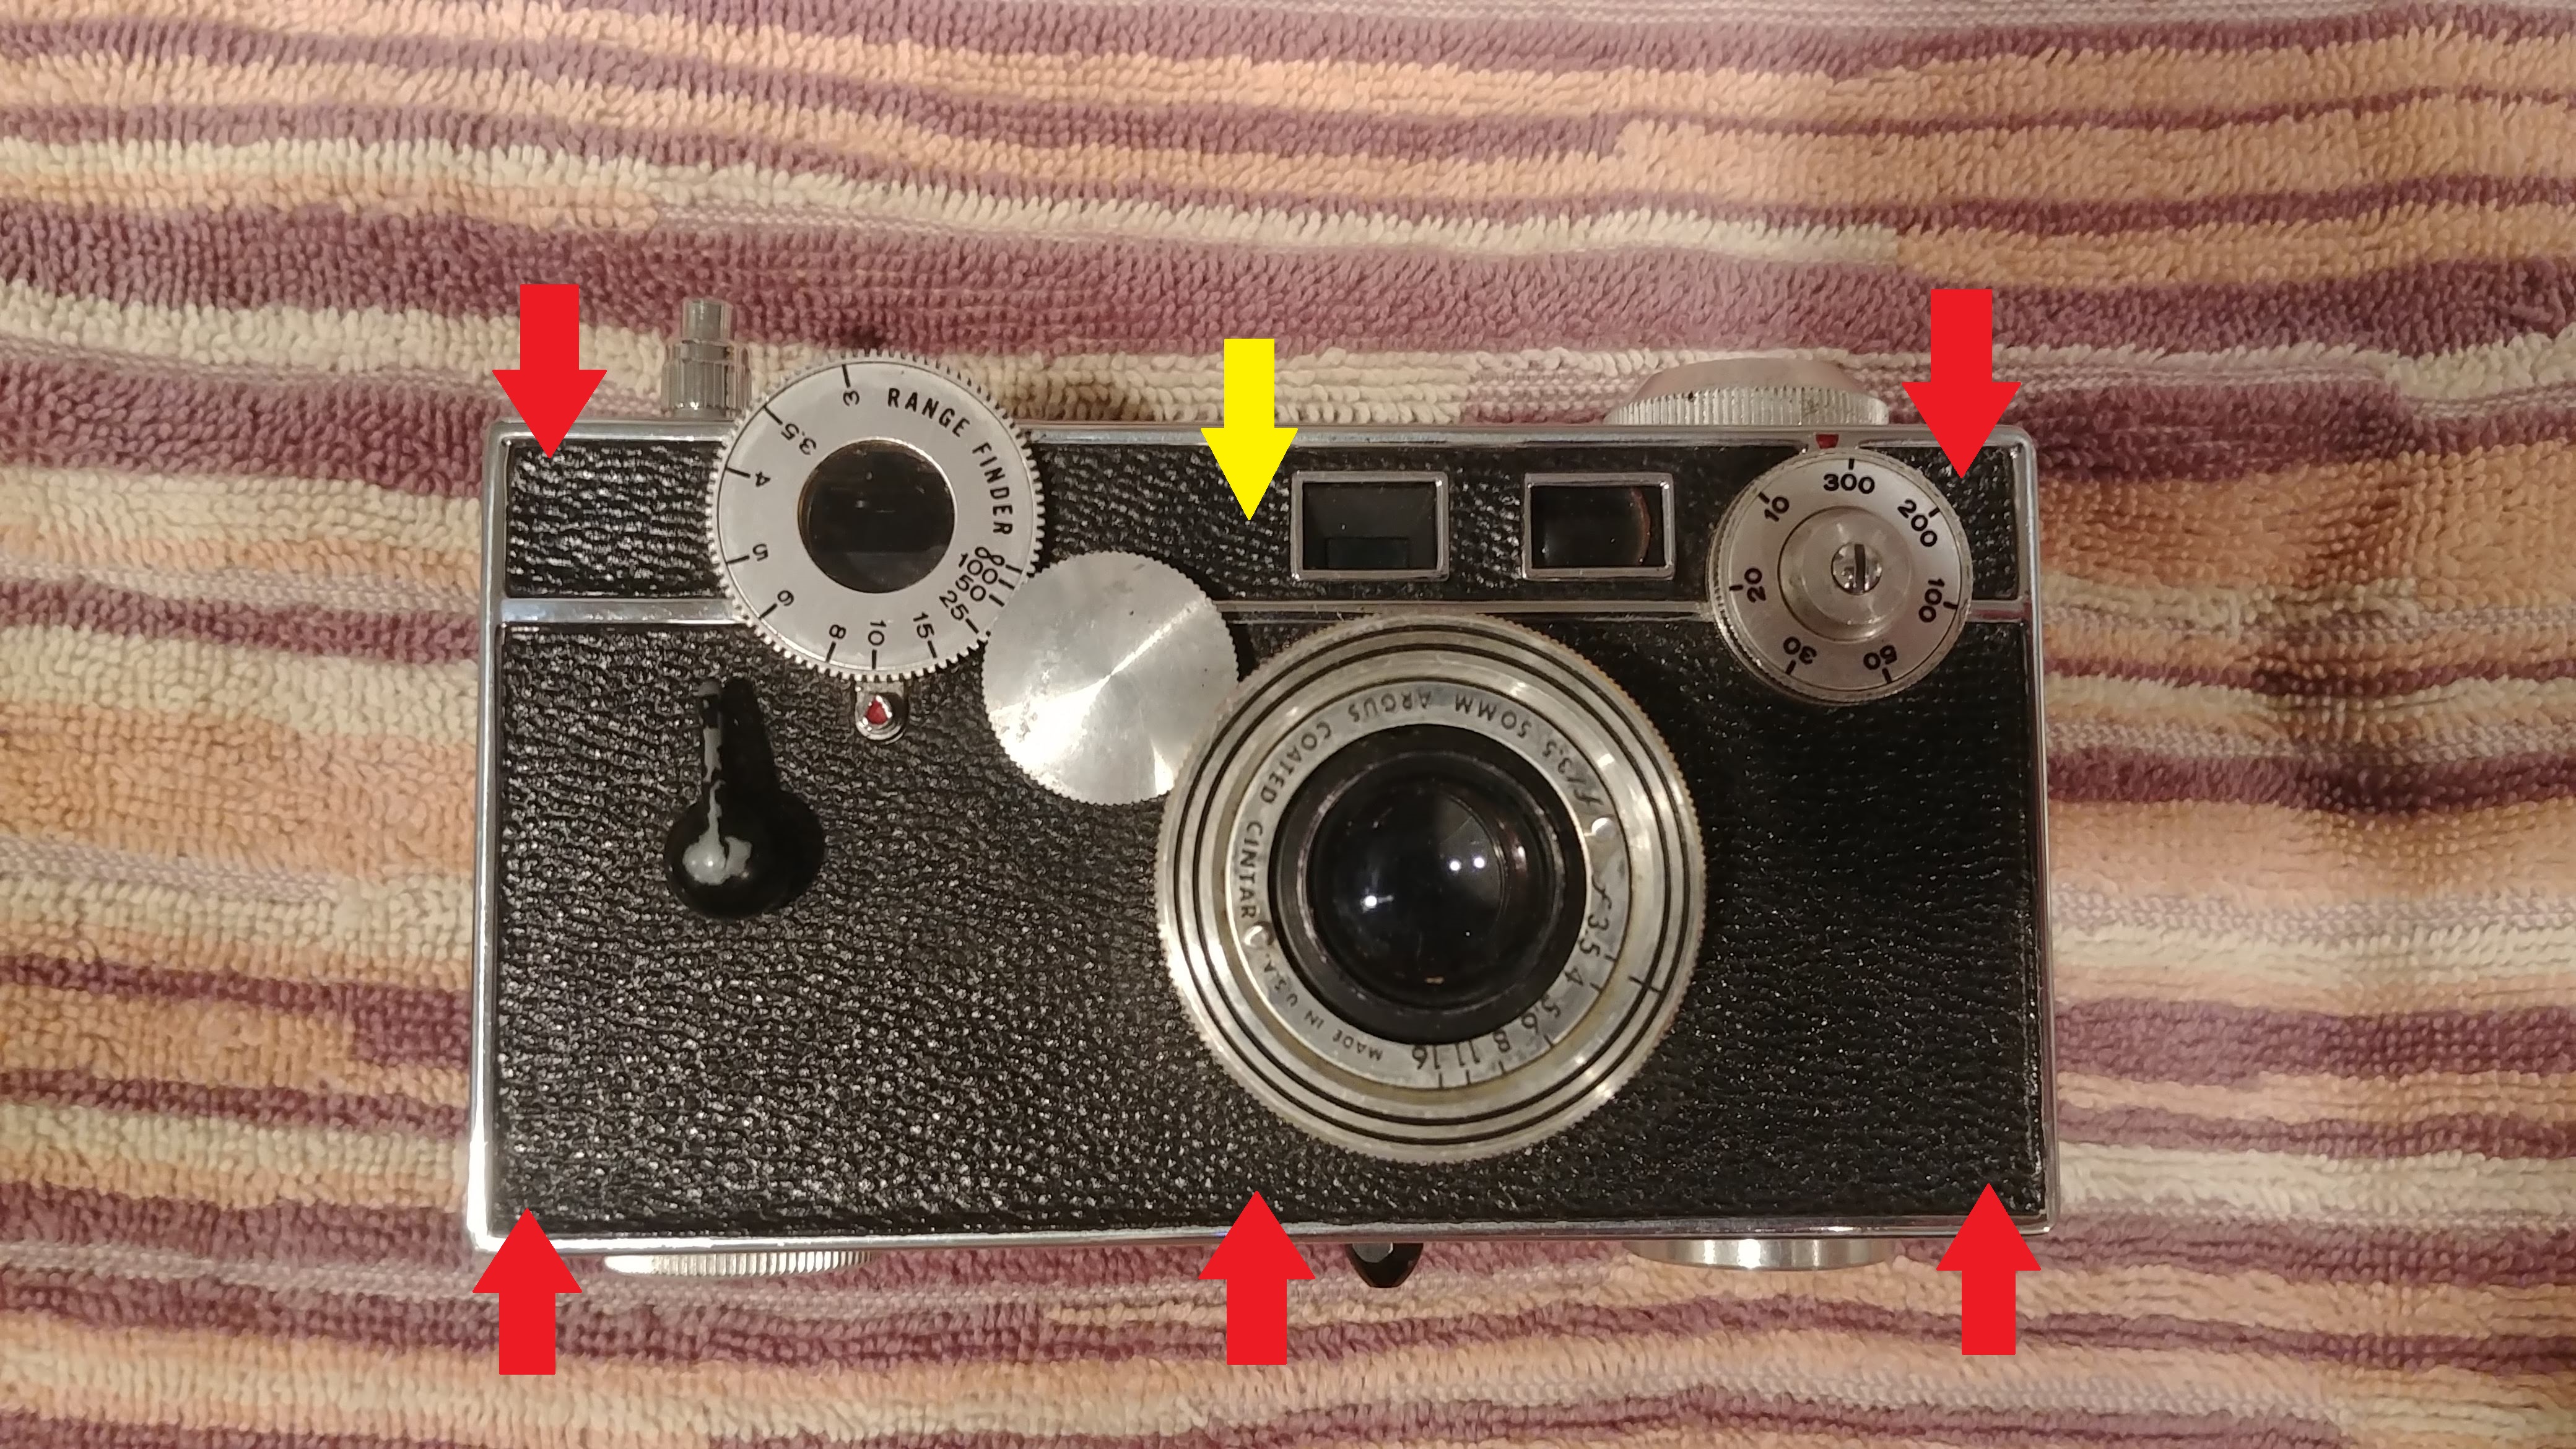
Gaining access to the Argus shutter is as simple as removing the entire front plate off the camera. There are 6 screws that hold the plate on, but they’re all behind the body covering of the camera. On older Arguses, the body covering can usually be peeled back with a small screwdriver to gain access to the screws without damaging it. Of the six screws, each of the five indicated by RED arrows are the same length with the last one, indicated by a YELLOW arrow is considerably longer.
 I’ve noticed later cameras, like the Match-Matic models use a paper thin material that tears very easily and won’t likely be removed without being destroyed. This is why the Match-Matic in my collection is blue and black. Since I destroyed the body covering, and no camera leather places offered a tan skin that matched the original color, I decided to just do something completely different.
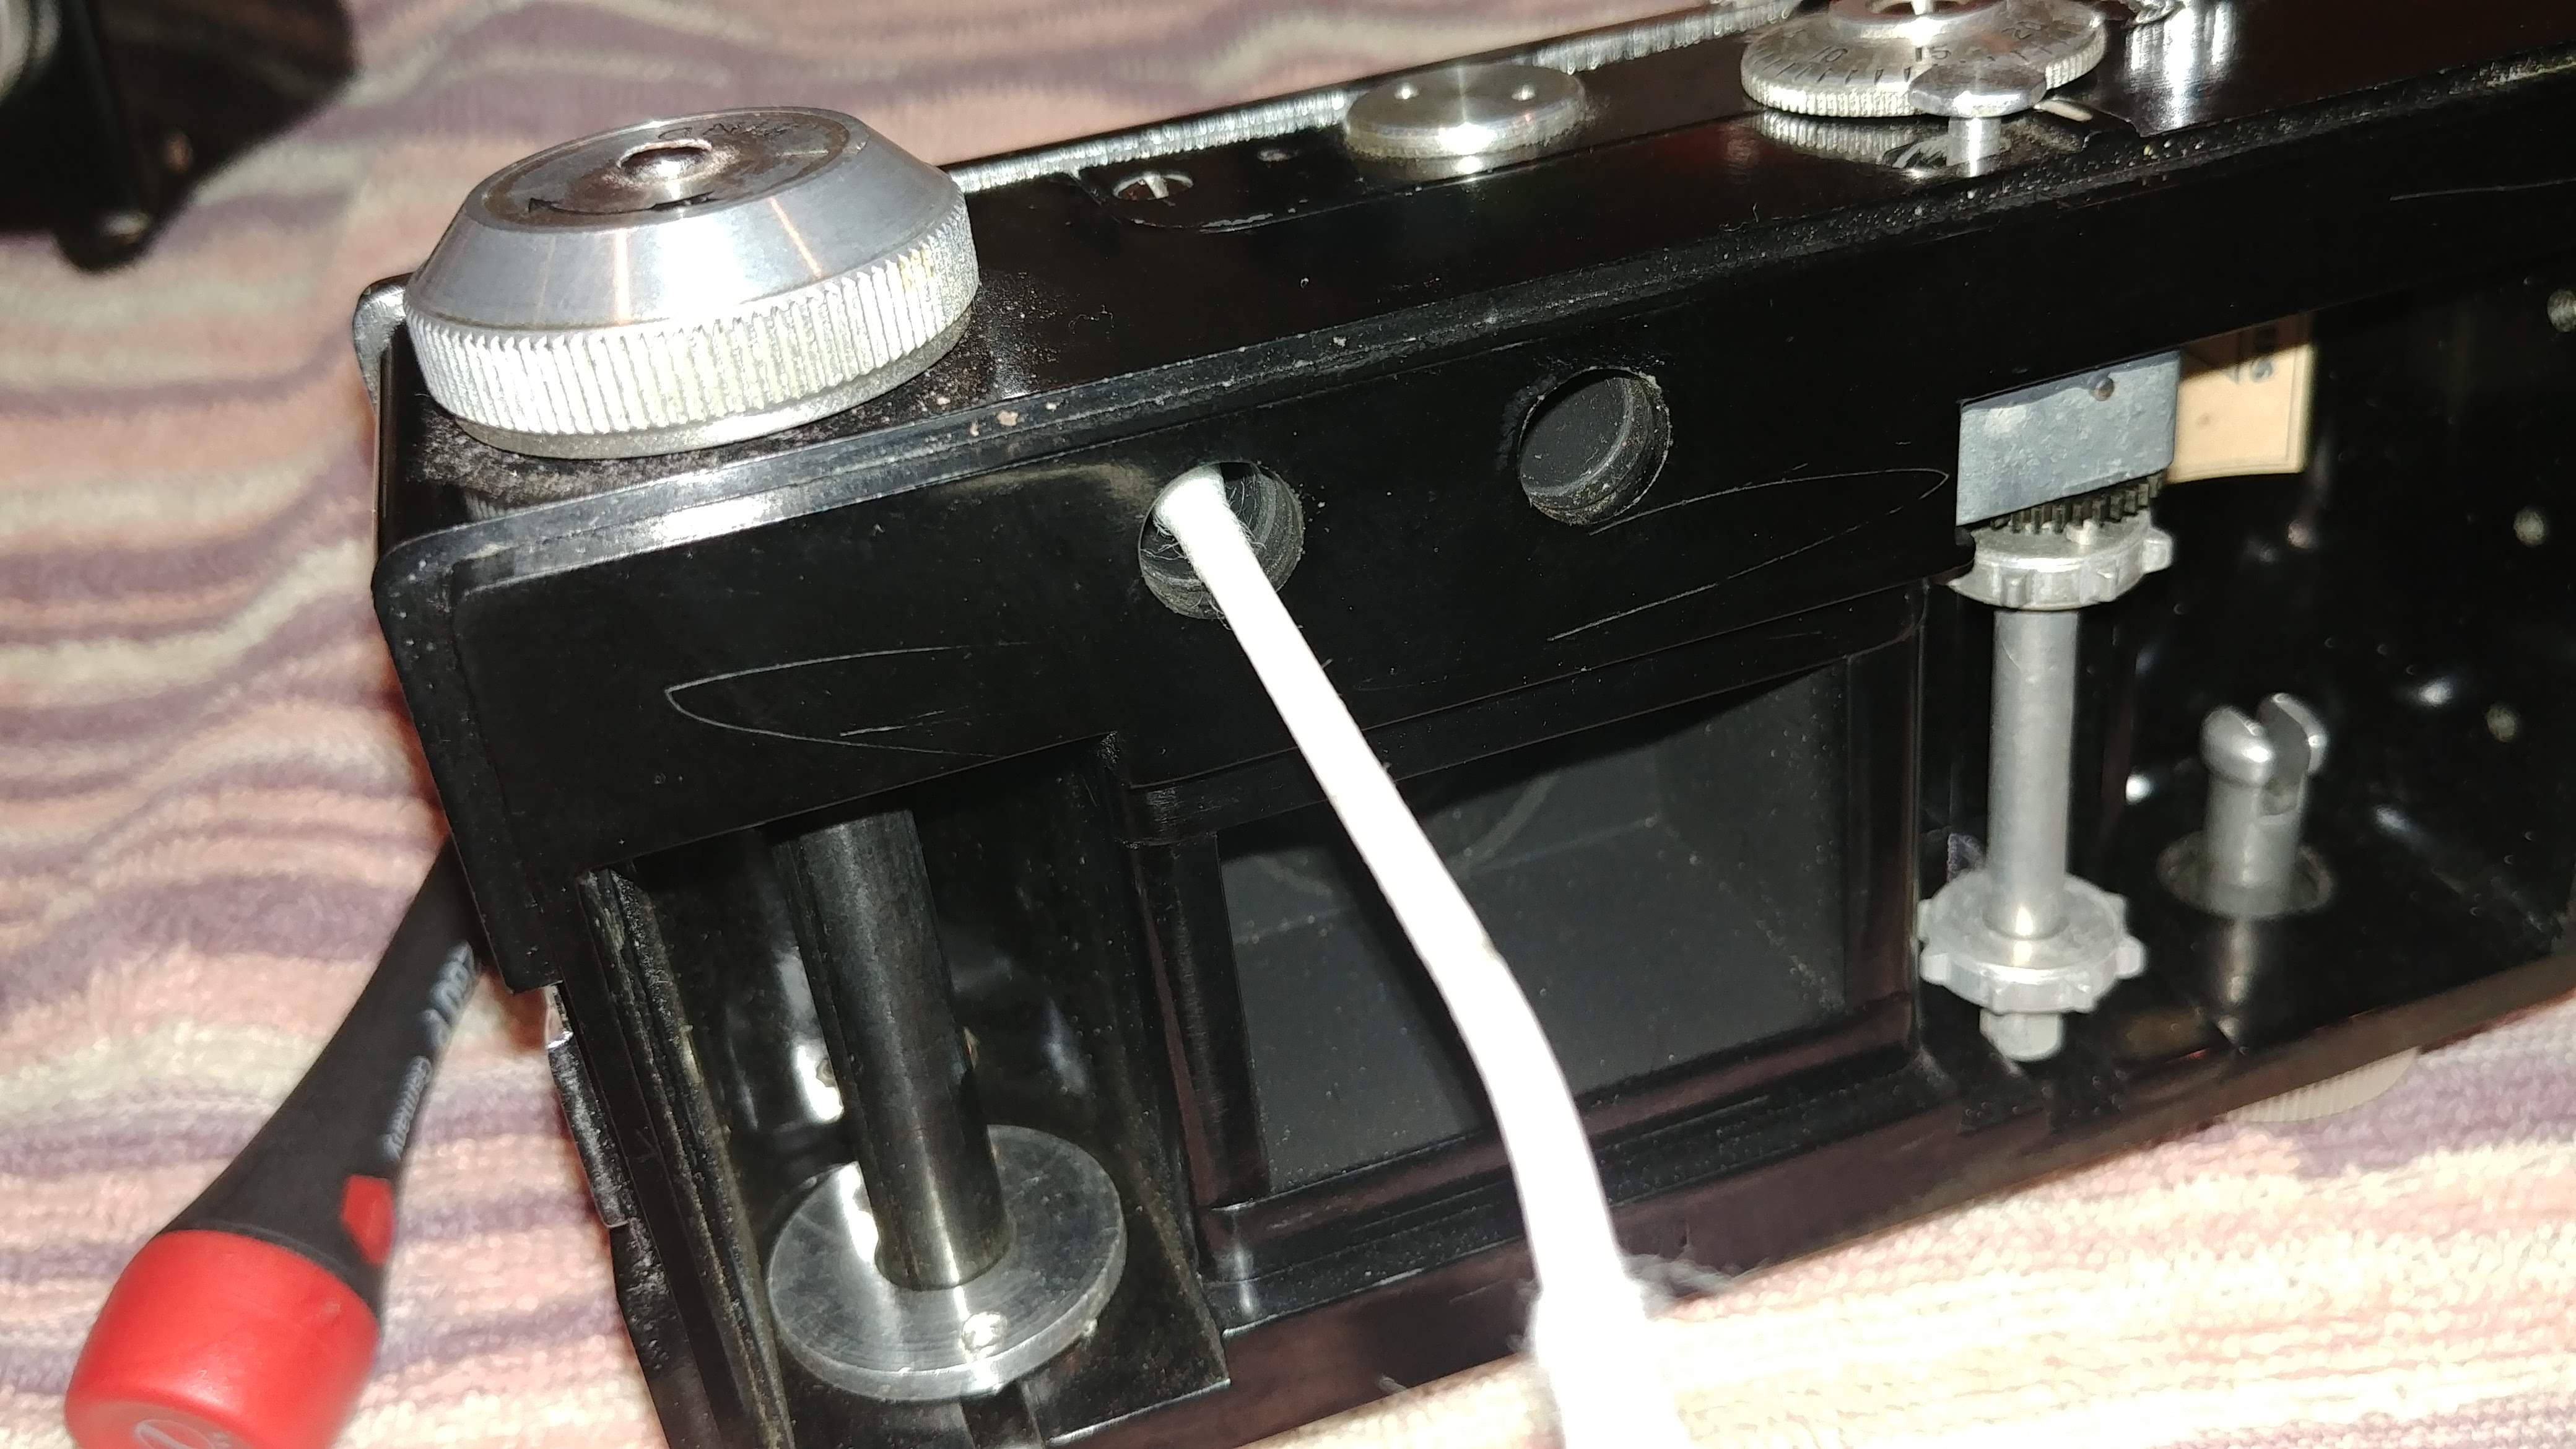
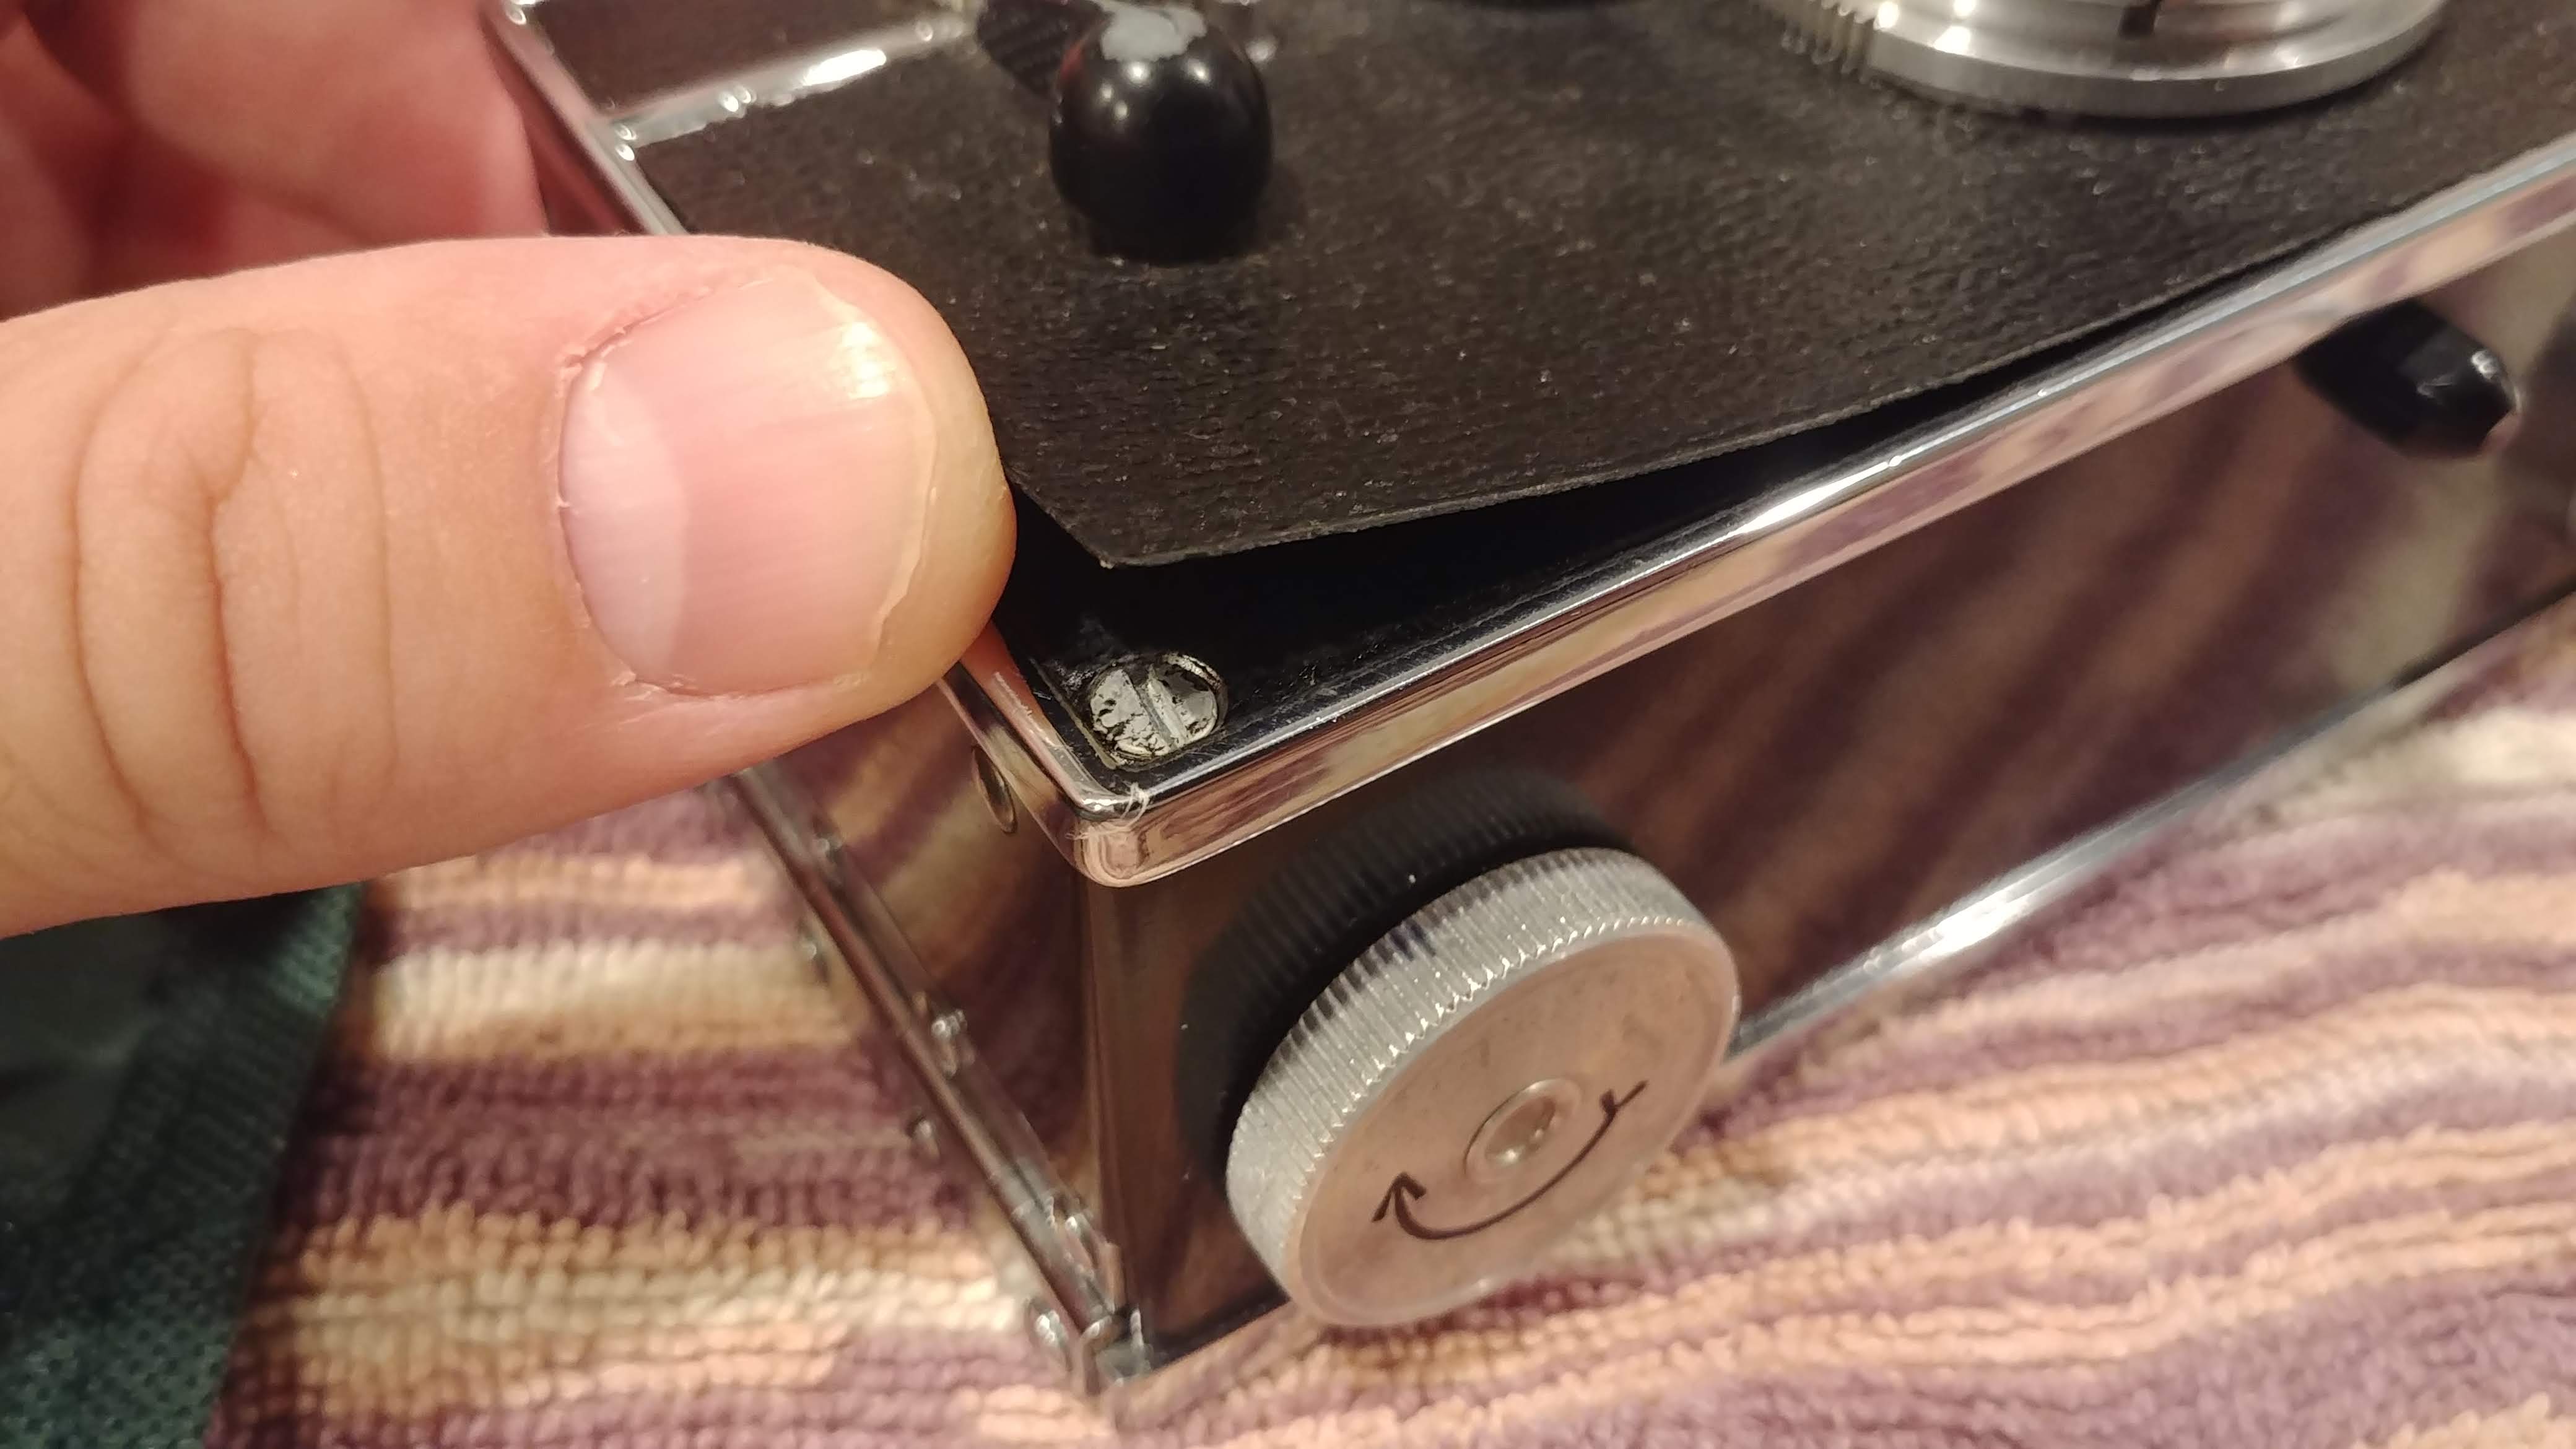
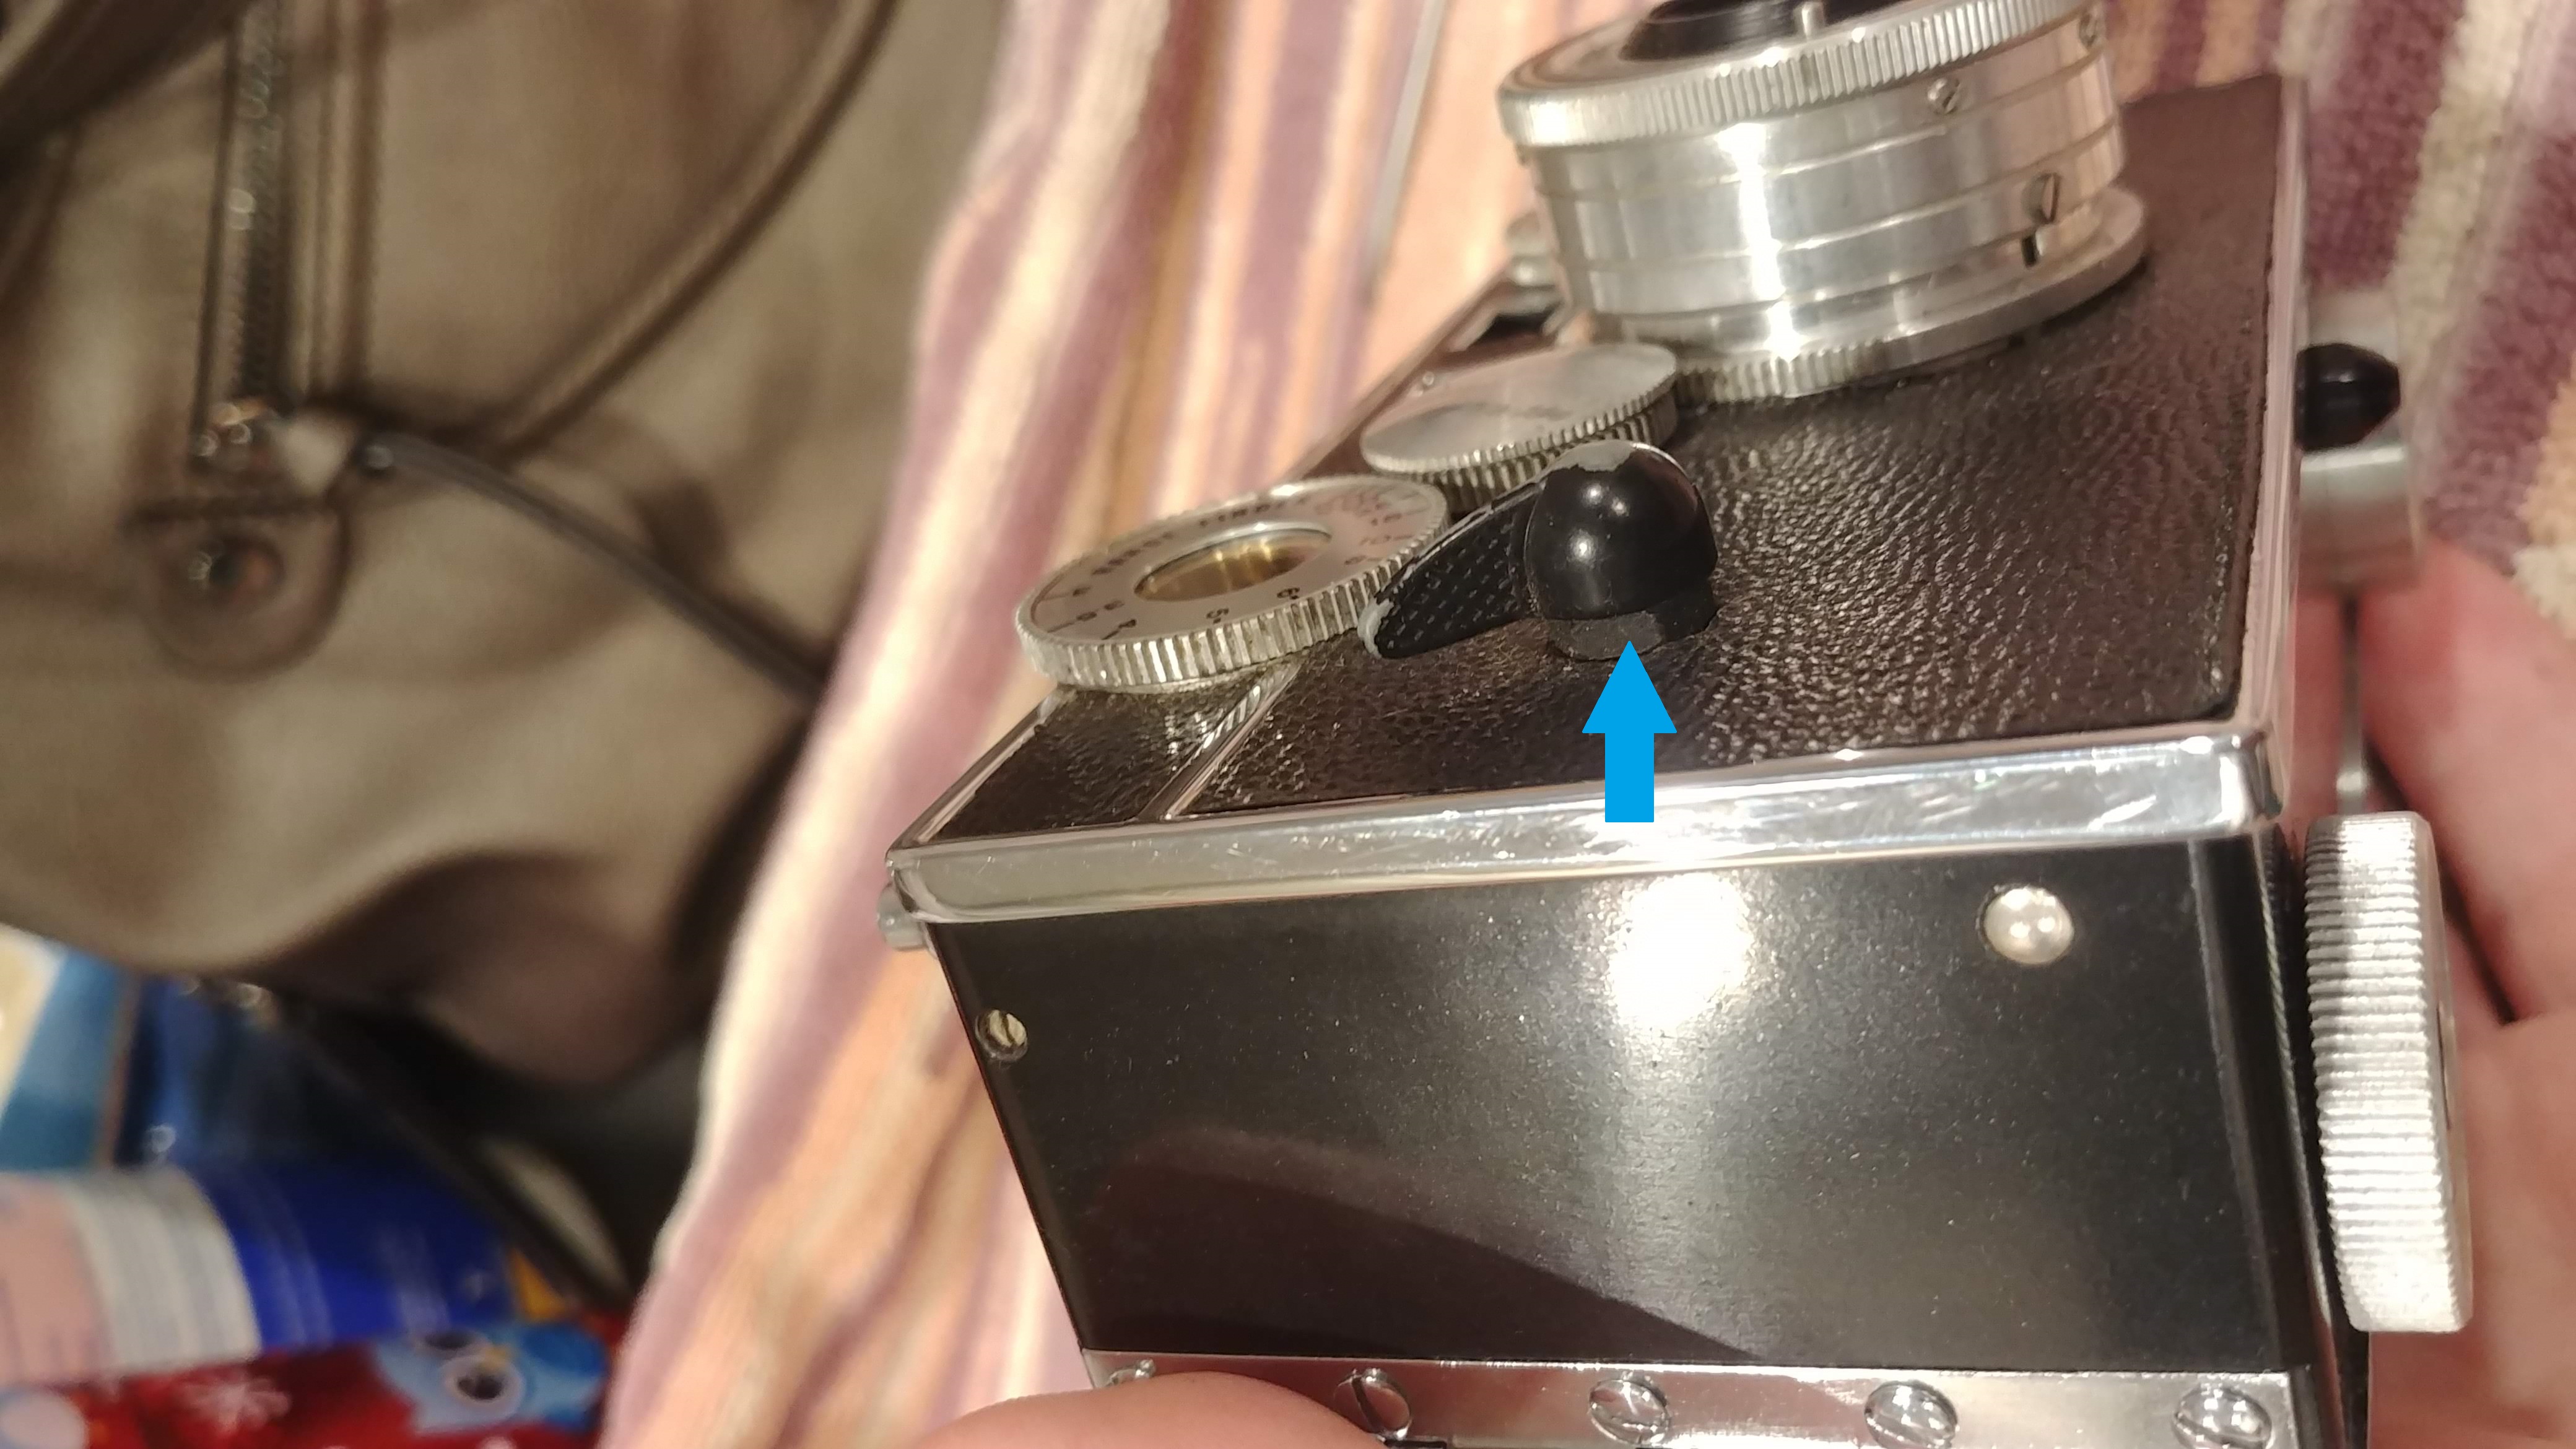 Before removing the front plate, you’ll need to remove the cocking lever. This lever is screwed on, but the threads are reverse thread, so lefty tighty, righty loosey. With the lever off, you’ll see a hex nut indicated by the BLUE arrow in the image to the left, behind it, remove this also.
Assuming you’ve either peeled back the body covering or removed it entirely, remove all 6 screws, set them aside, and the top will lift off. The screw in the top center beneath the rangefinder window is considerably longer than the other 5, so make sure you keep track of that when putting the camera back together.
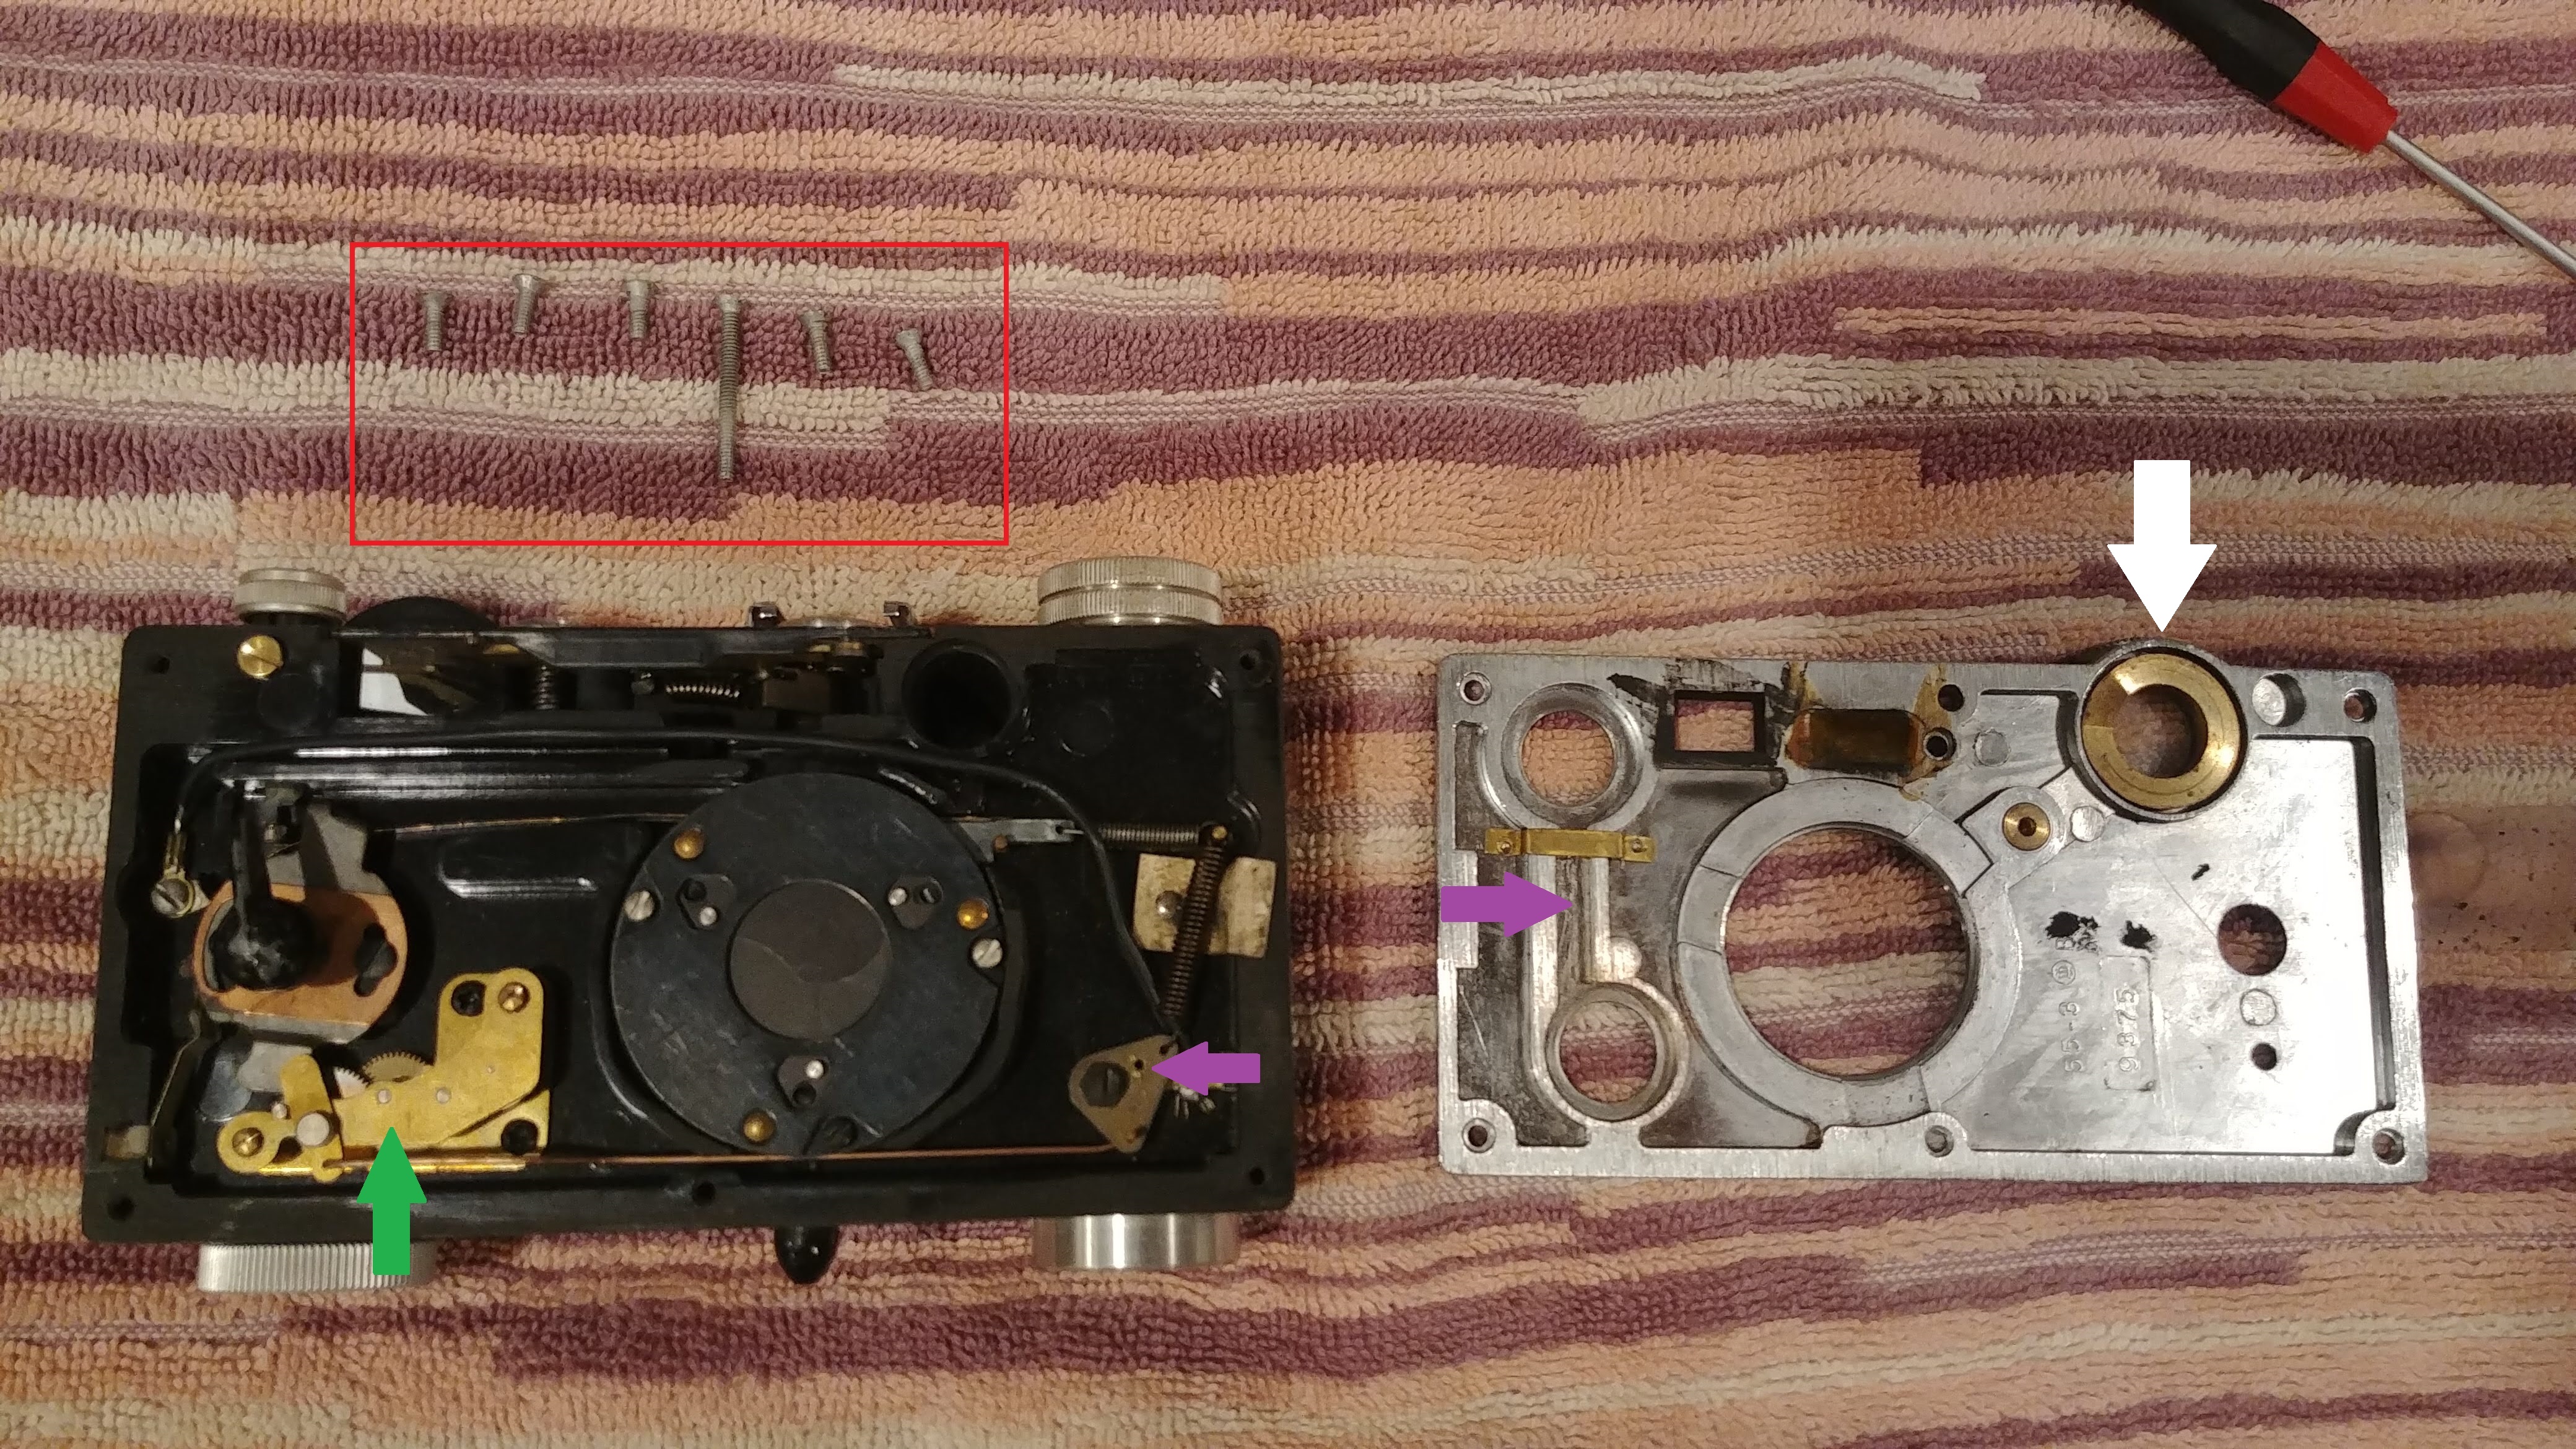 With the cover off, you can see a couple of different things. The first is the slow speed governor for the shutter indicated by a GREEN arrow in the image to the right. The Argus shutter is actually a single speed leaf shutter. It is able to vary it’s speeds by the use of this governor. Without a delay, the shutter fires at 1/300. With a tiny bit of delay, 1/100, with even more delay, the speeds continue to slow down. If the shutter on your camera is sluggish on the slow speeds, you’ll need to flush this out with lighter fluid or naphtha oil. Be generous with you, you won’t hurt anything. Get this governor clean and you’ll have more accurate speeds.
Next, is a brass ring behind the focus wheel on the front of the camera. This brass ring pushes on a finger connected to the rangefinder which allows you to see what focus distance the camera is set to. This ring can get dirty and sticky, so I recommend cleaning it thoroughly with some Q-tips.
Finally, on the back of the front cover, there should be a metal bar with a pin on the end which sadly, is missing in the previous image. I did not notice it wasn’t there when shooting these images, and by the time I noticed, the camera was already back together. What this bar does, is connect the shutter speed dial to the rotating disc, indicated by a PURPLE arrow, which rotates, pushing a long metal rod that activates the governor, depending on the position of the shutter speed dial. If this bar is out of position, bent, or missing like on the image above, the shutter will only fire at one speed. Make sure this piece is connected correctly and is clean before putting the camera back together.
 The shutter blades themselves might also be dirty and in need of a cleaning. Using a naphtha soaked Q-tip, clean the blades as best as you can, and also clean the three pivot points indicated by ORANGE arrows in the image to the left. A very small drop of white lithium or synthetic grease on these pivot points can also help improve things.
That’s all there is to cleaning the shutter on the Argus. If it is physically damaged, or parts are missing, the camera is likely beyond repair and it would likely be more cost effective just to locate another Argus at that point.
With the cover still off, you have easy access to the rangefinder and front viewfinder windows. If you have not done the previous steps of cleaning the rangefinder and viewfinder windows, here is another chance to do it.
Make sure everything is in it’s correct position, put the front plate back on, and put the screws back in making sure to put the long one in the correct location and you’re all done.
Other Repair Information
If you’d like more information about repairing Argus C-series cameras, the Argus Collectors Group has a couple of different guides on their site with information on cleaning and repairing the C3. Those guides are here, here, and here.
Rick Oleson also has several drawings of the Argus in various stages of disassembly showing how things like the shutter works, how the lens is assembled, and how to repair the film counter disc.
Aly’s Vintage Camera Alley has a video showing how to give an external wipe down and cleaning of the viewfinders in an Argus Match-Matic.
Finally, Mektar Polypan has an excellent guide on his site with pictures showing how to completely service an Argus C3 and the Cintar lens.
Please come back tomorrow for Part III – Identifying the Argus C-Series.
Thanks for this, Mike!
I’m glad you found the article useful, Dan!
Mike, I would suggest that no lubricant be used in the shutter. The shutter and escapment were designed to run dry. Any lubricant will attract debris and cause problems. Also some lubricants out gas as they age and will cloud the rear element of the lens and make the shutter blades sticky.
Vaughn is right, a liquid lubricant would gum up the shutter blades. Graphite lock lubricant is a better substitute if you feel you must apply something to the shutter blades.
I definitely agree that liquid lubricants are not ideal for camera shutters. I suggested using a very small drop of white lithium grease or a synthetic grease on the pivot points. I have successfully used white lithium grease inside of Compur and Prontor shutters on pivot points for years. The key here is to use a very small, barely larger than a grain of sand, drop of it.
But I do respect people who prefer running shutters dry. Frankly, the Argus shutter is pretty robust it probably doesn’t need it, but it’s worked for me.
How can I remove the range finder plate without breaking one of the mirrors? I think I have one of the later models of the c3
Your graphics and instructions helped me to accomplish my first overhaul of a matchmatic (sticky shutter and dirty rangefinder). I used Ronsonol applied carefully to the cover material, and with some gentle help from a jewelers flat blade, the skin came right off. If it looked like it was going to fight me, I just added more lighter fluid. Thank you very much for your clear, concise information. The arrows in the pictures helped too, as I am not yet up to speed in the terminology, and would have been a bit lost without them.
Very informative, thank you. The shutter cocking lever on my recently purchased C3 is out from the normal position. Looking at the front of the camera, in the uncocked position, my lever points to about the 4 o’clock position. Can this lever be reoriented so that the lever points to the 9-10 o’clock position? Thank you.
Mike, I am glad you found the post helpful. Yes, you can reorient the cocking lever, but if I were you, I’d leave it where it is. The “correct” orientation is for it to stick out to about the 9 o’clock position, but doing this, it gets in the way of your hand when using the camera. If while shooting the camera, this lever comes in contact with your hand as you fire the shutter, it will impact the speed of the shutter and you’ll get a blurry photo. A common workaround by many Argus users, myself included, is to rotate it like how yours is to the 3 or 4 o’clock position as it keeps it away from your hand. If you absolutely do want to put it back, look behind the cocking lever, up against the body is a hex nut. Using some needle nose pliers, back it off a little (I believe it is reverse threaded) and when it is, you can then rotate the cocking lever freely. Once you have it where you want it, tighten the hex nut again to keep the lever where you had it.
Mike, thank you so much for the information. It has been incredibly helpful. One issue I ran into while cleaning the viewfinder and rangefinder windows, is that when I removed the retaining rings three pieces came out of each window: the glass element, the plastic tube, and another glass element. So in my camera the plastic tube is sandwiched between two glass elements. The front and back elements are also different. Per your detailed instructions I know how to orient the back element, but not the the one the goes in before the plastic tube. Any suggestions?
It has been a while since I opened up an Argus, but as I recall, the front element is flat on one side and curved on the other. I believe the flat side goes up against the tube. Try putting it in that way and see how it looks. It should be very obvious if you have it wrong as the image through the viewfinder will be extremely distorted if it is backwards. If so, just take it out and flip it around again!