
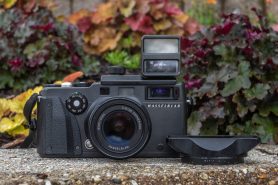
This is a Hasselblad XPan, a 35mm rangefinder camera that exposes 24mm x 65mm panoramic images on regular 35mm film. The Xpan was made in Japan and was a name variant of the Fujifilm TX-1. The Xpan was an extremely expensive and high quality camera with a focal plane shutter, a modern automatic exposure system, a fully motorized film transport, and a selection of high quality lenses. In addition to true panoramic images, it can also shoot regular 24mm x 36mm images making it the first purpose built dual format 35mm camera on the market.
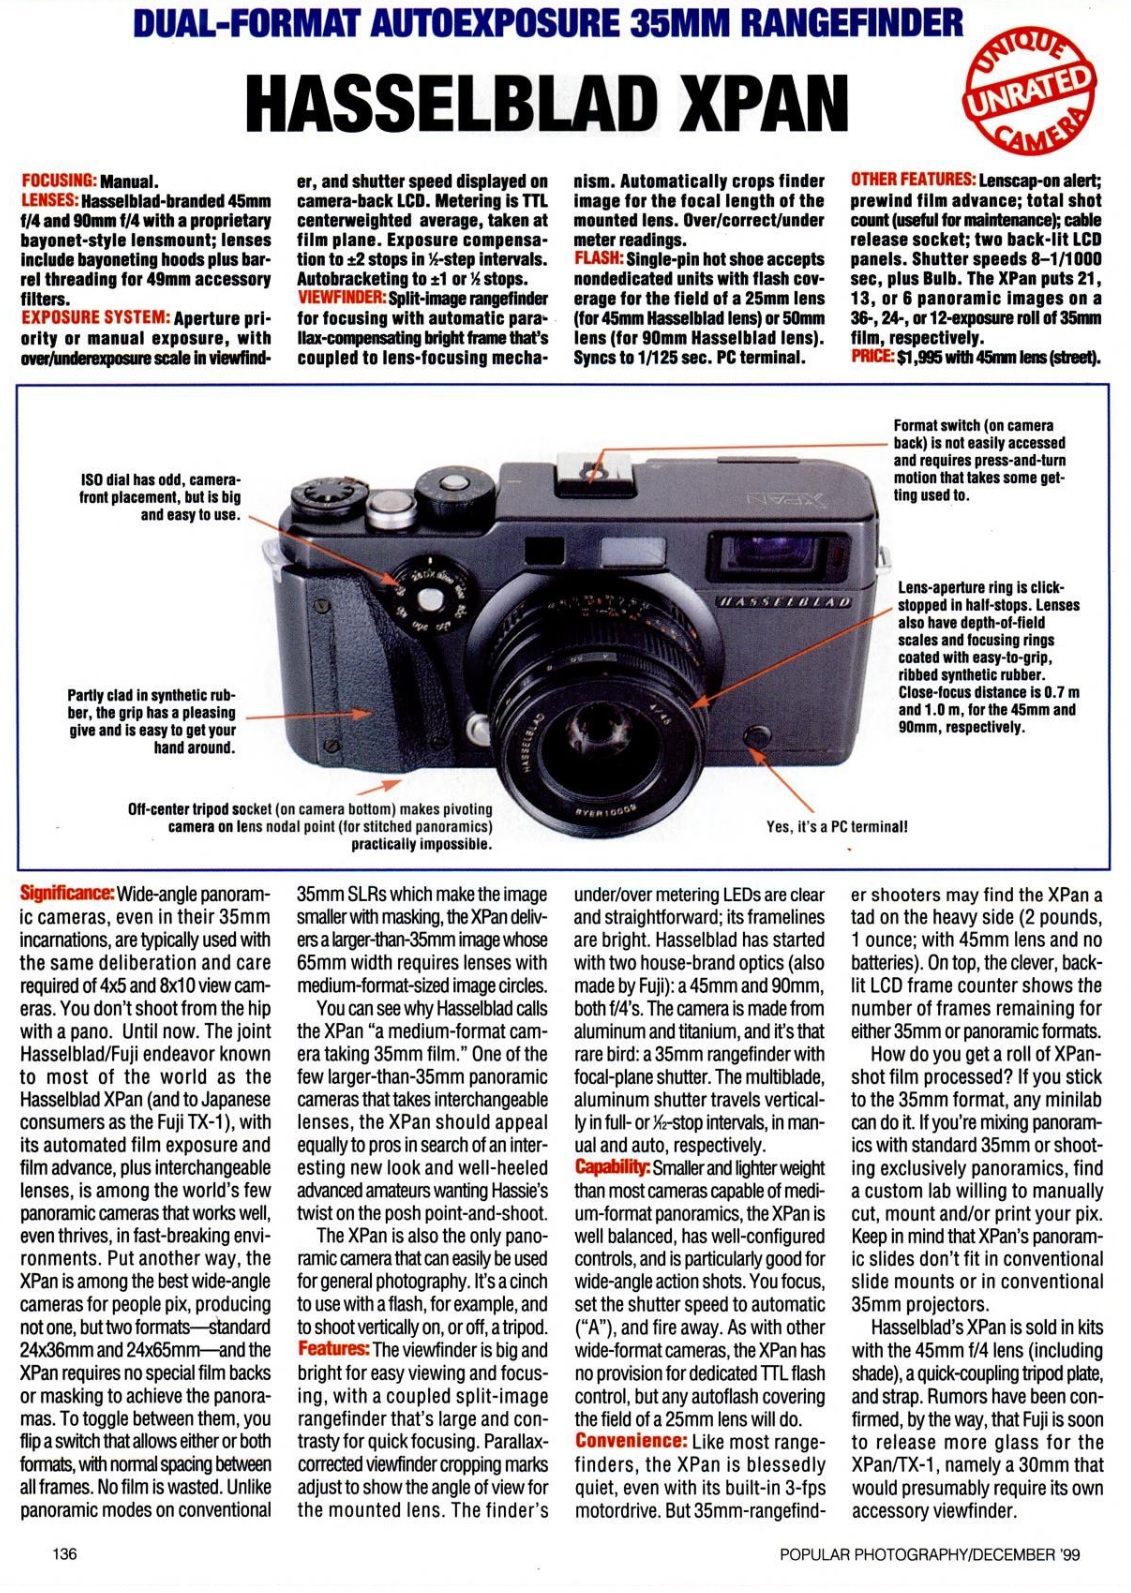
 Film Type: 135 (35mm) Dual-Format 24x65mm Panoramic and 24x36mm
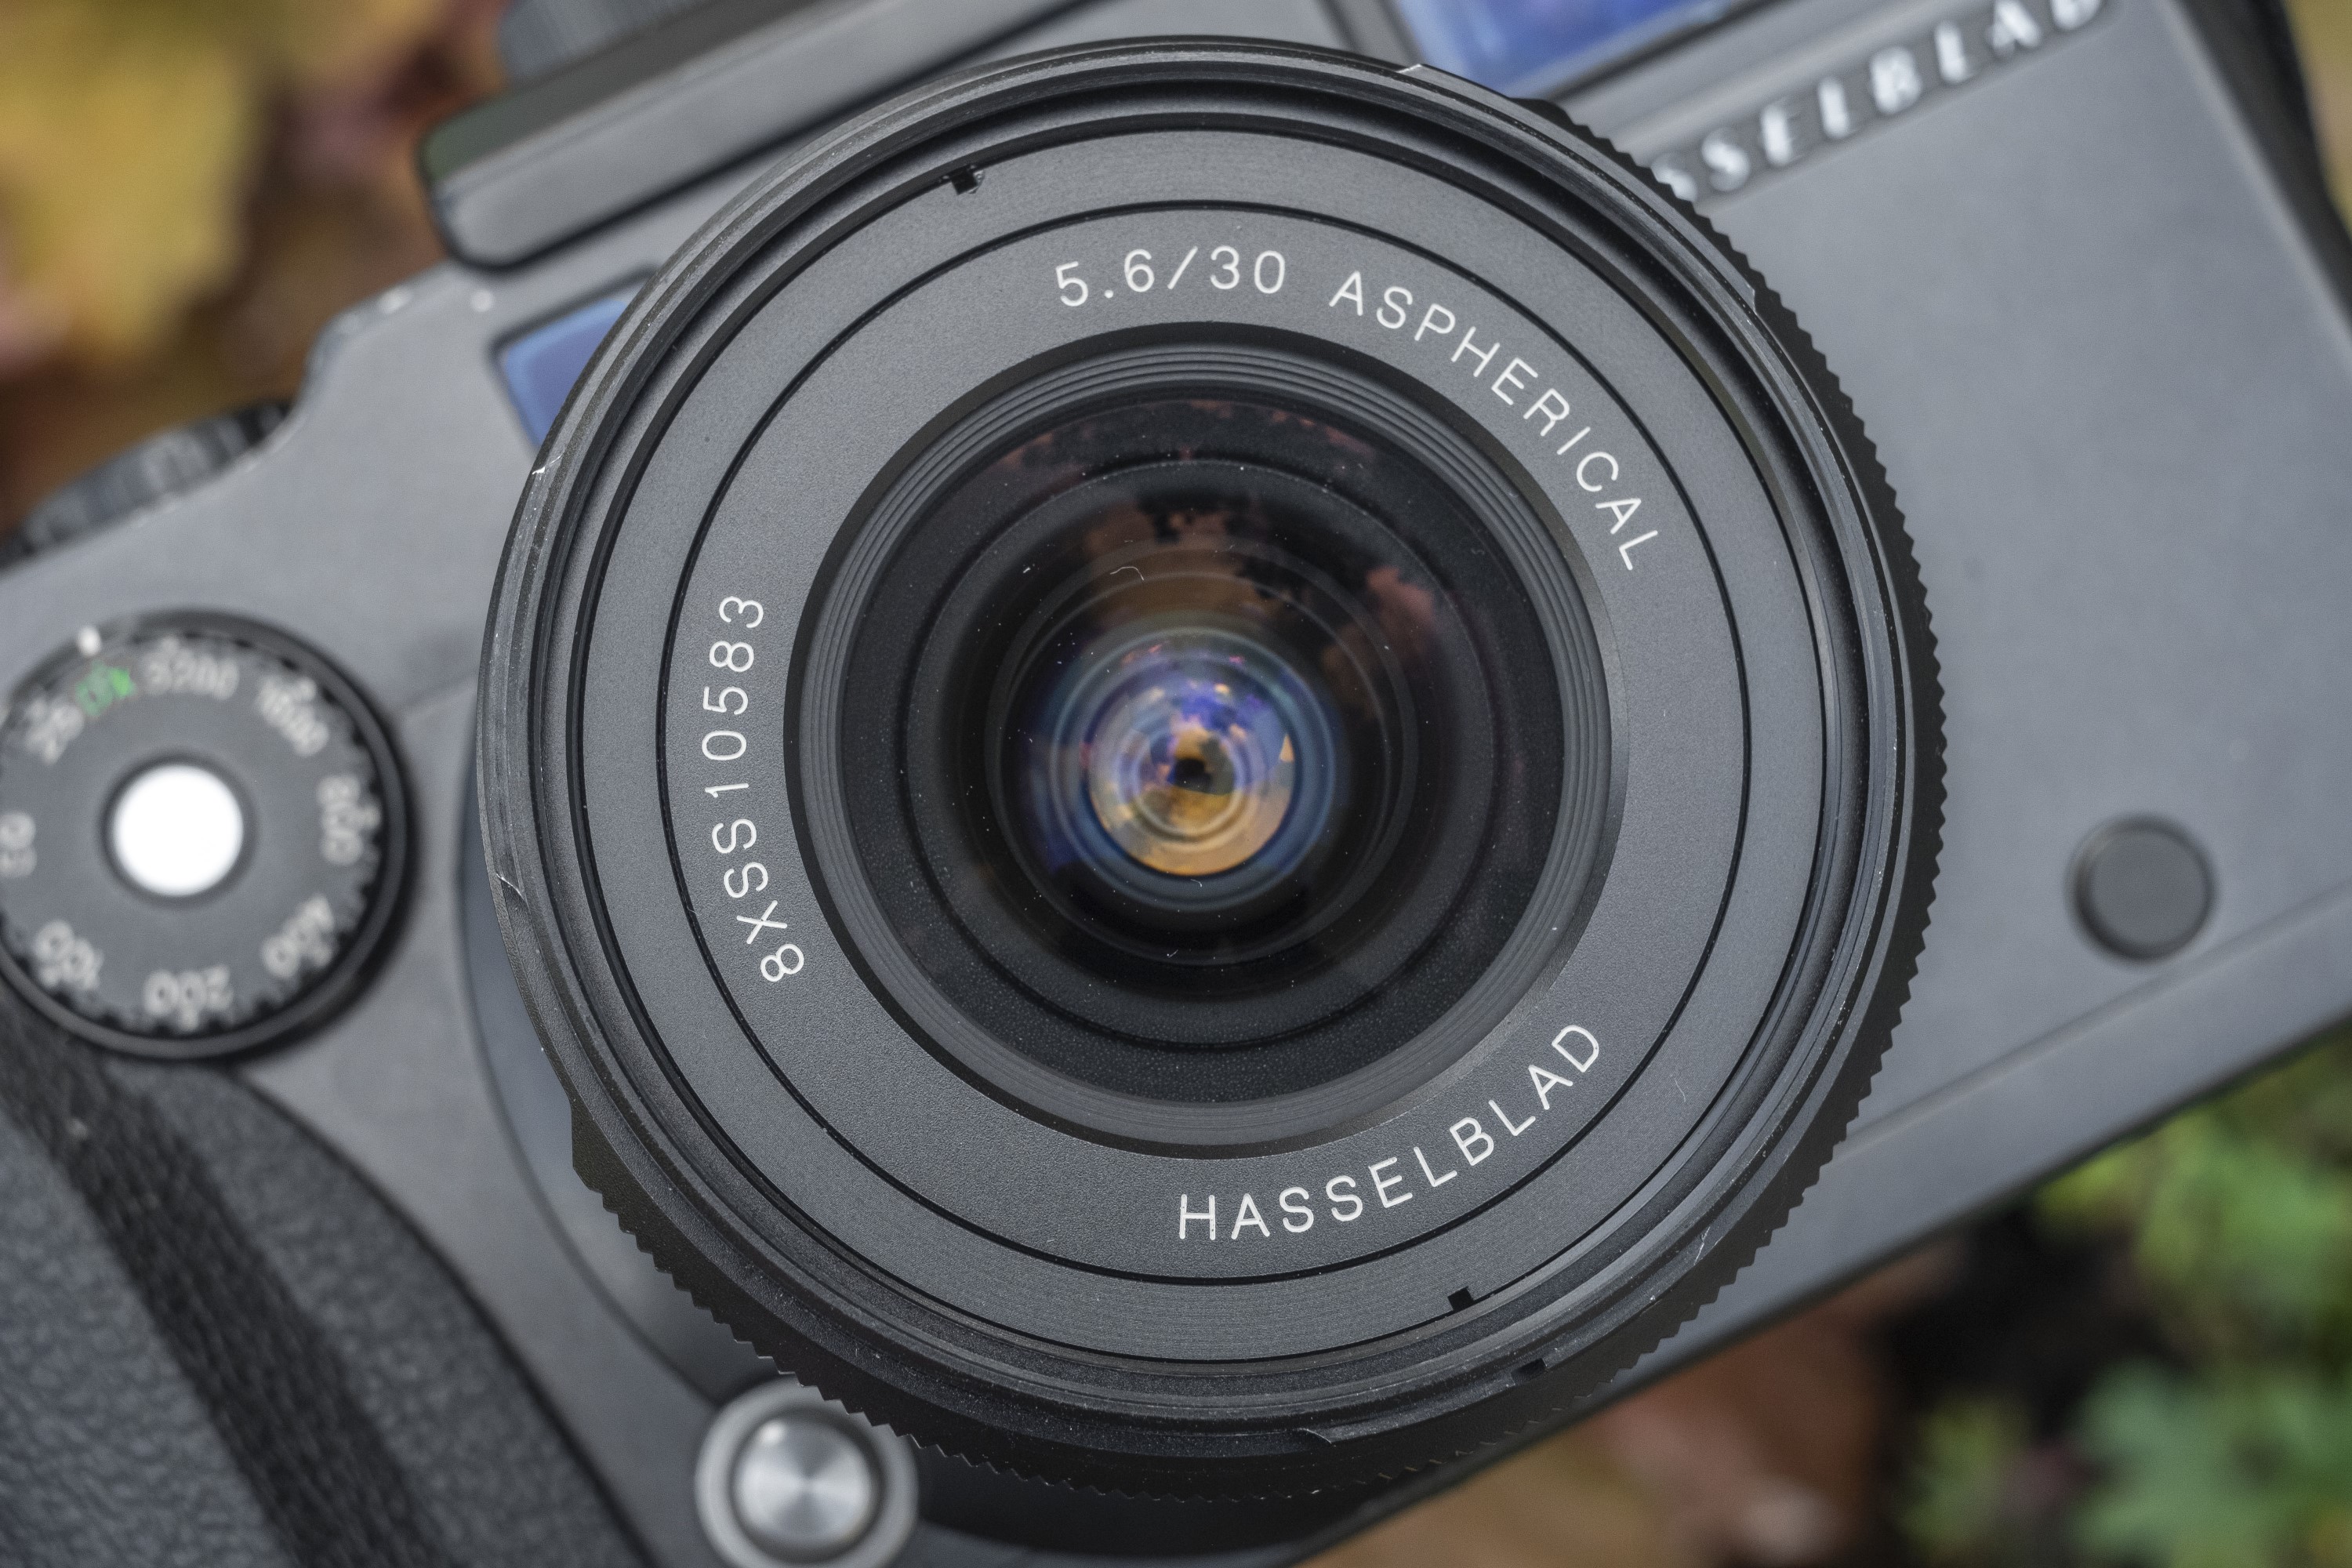
Lens: 30mm f/5.6 Hasselblad coated 10-elements + Others
Lens Mount: XPan Bayonet
Focus: Manual Focus, Variable
Viewfinder: Coincident Image Coupled Rangefinder w/ Adjustable 45mm and 90mm Framelines
Shutter: Vertically Traveling Metal Focal Plane
Speeds: B (max 270 seconds), 1 – 1/1000 seconds
Exposure Meter: TTL SPD Measured at Focal Plane
Battery: 2 x 3v CR2
Flash Mount: Hot Shoe w/ 1/125 Max Sync Speed
Weight: 1170g (w/ 30mm lens, shade, and viewfinder), 1073g (w/ lens only), 755g (body only)
Manual: https://www.cameramanuals.org/hasselblad/hasselblad_xpan.pdf
How these ratings work |
The Hasselblad XPan is a 35mm rangefinder camera which shoots unique 24mm x 65mm panoramic images. It’s got a great viewfinder, an excellent exposure system, and a fully motorized film transport. Using the Xpan is a lot of fun and the image it makes look unlike any shot by any other camera ever made. Although it can also shoot regular 24mm x 36mm images, for someone to pay the astronomical prices for this camera and it’s lenses, you really should take advantage of it’s panoramic mode and that’s the camera’s biggest con, which is it’s so expensive, you have to REALLY want to shoot panoramic images to fully utilize what it is good at and that’s a big pill for many to swallow. | ||||||
| Images | Handling | Features | Viewfinder | Feel & Beauty | History | Age | |
| 2 | 1 | 1 | 2 | 2 | 2 | 0% | |
| Bonus | +1 for a breathtaking viewfinder and images unlike that shot of any other camera ever | ||||||
| Final Score | 11.0 | ||||||
History
The earliest origins of Hasselblad date back to 1841, but the company that exists today as Victor Hasselblad AB does not have a straight line back to that original company. As often happens with many companies, the history bounces around a bit.
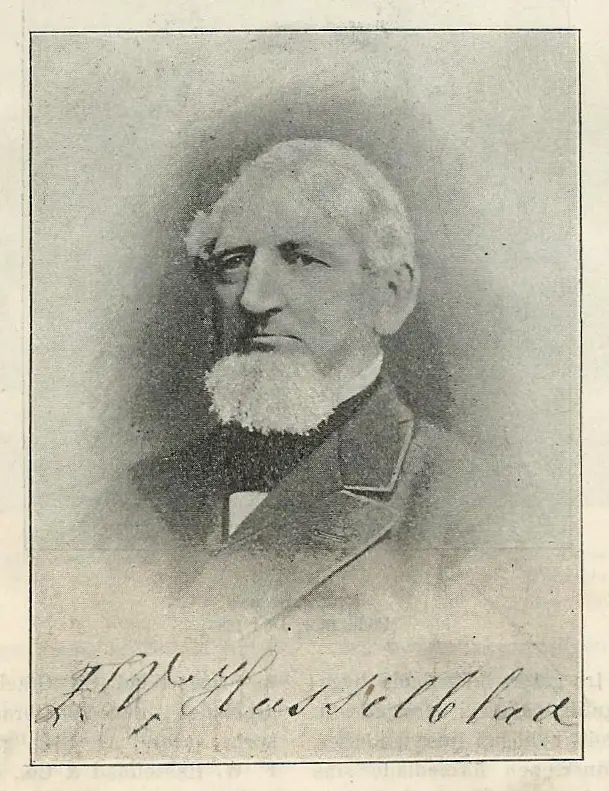
The name “Hasselblad” comes from it’s original founder, Fritz Viktor Hasselblad, who in the 1830s worked as a merchant servant for his older brother Carl Henrik Hasselblad in Gothenburg, Sweden. At the age of 25, young Fritz was very ambitious and in early 1841 he left his brother’s company to try and make it on his own.
On May 15, 1841, Fritz Hasselblad filed paperwork with the local magistrate to do business under the name F. W. Hasselblad and Company. Hasselblad’s new company worked in the trade business, importing luxury items such as sewing machines, household articles, travel accessories and other products into Sweden.
Many years later, Fritz Hasselblad’s son, Arvid Viktor had an interest in photography and on his honeymoon to London in 1885, he met George Eastman and struck a deal making Hasselblad the sole distributor for Eastman’s products in Sweden.
The photographic division of Hasselblad continued to grow, and in 1908 was broken off into a separate company called Hasselblad Fotografiska AB to better meet the demands of the industry at that time. A nationwide network of shops and photo labs was created, and along with their imported goods, Hasselblad was the largest photographic goods company in Sweden, but the company wanted to set their sights even higher.
(Not So) Fun Fact: The names “Viktor/Victor” and “Fritz” were very common back then and all three of the early founders of Hasselblad had combinations of these names in their proper names making research for this article somewhat of a challenge.
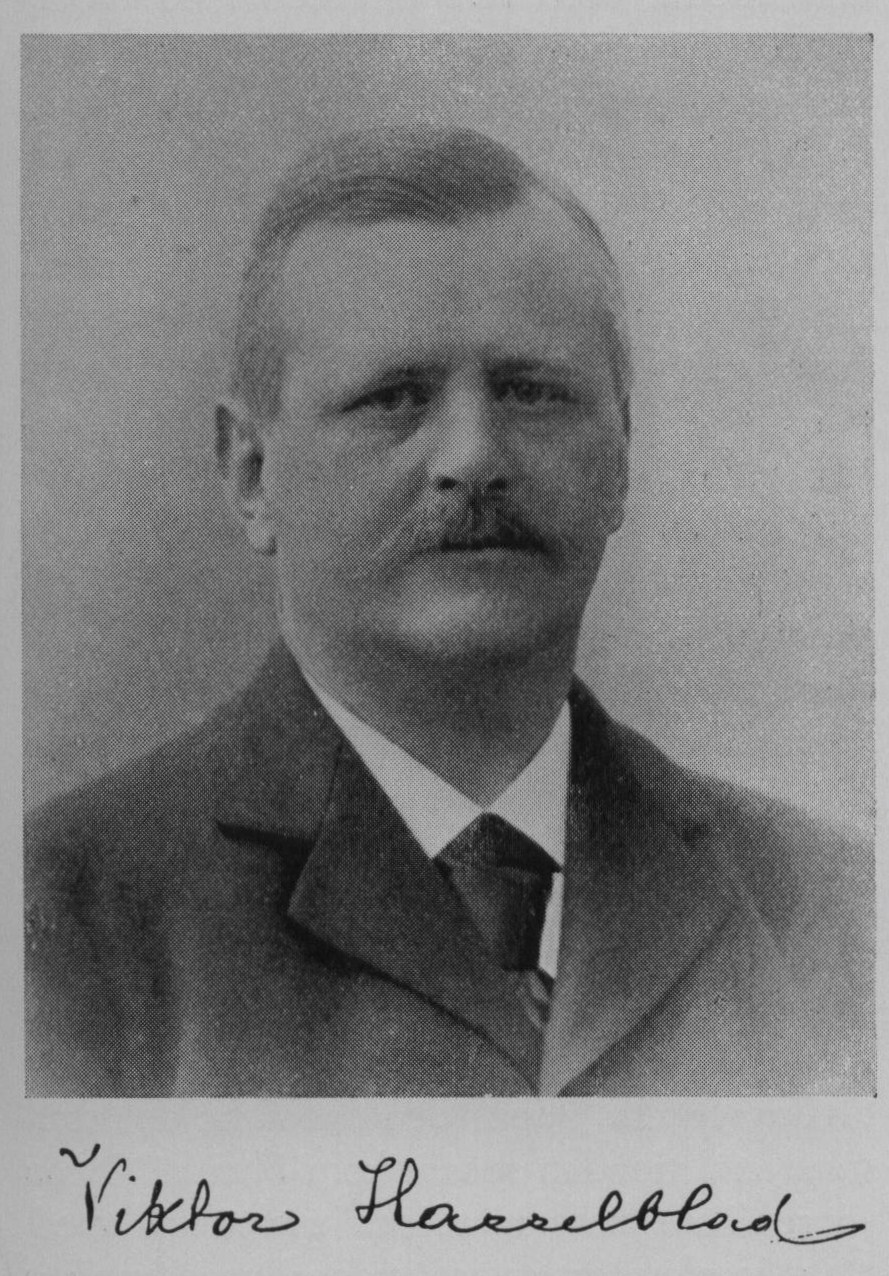
In 1924, at the age of 18, Arvid Hasselblad’s grandson Victor was sent to Dresden, Germany which at the time was considered the photographic center of the world. There, Victor would learn from some of the greatest minds working for the biggest companies about camera and optics design. Over the next several years, Victor took on a variety of jobs working for different companies in France and the United States, studying their designs and processes. In 1926, Victor Hasselblad went to work for George Eastman in Rochester, New York where his family’s connections to Eastman gave him unique access.

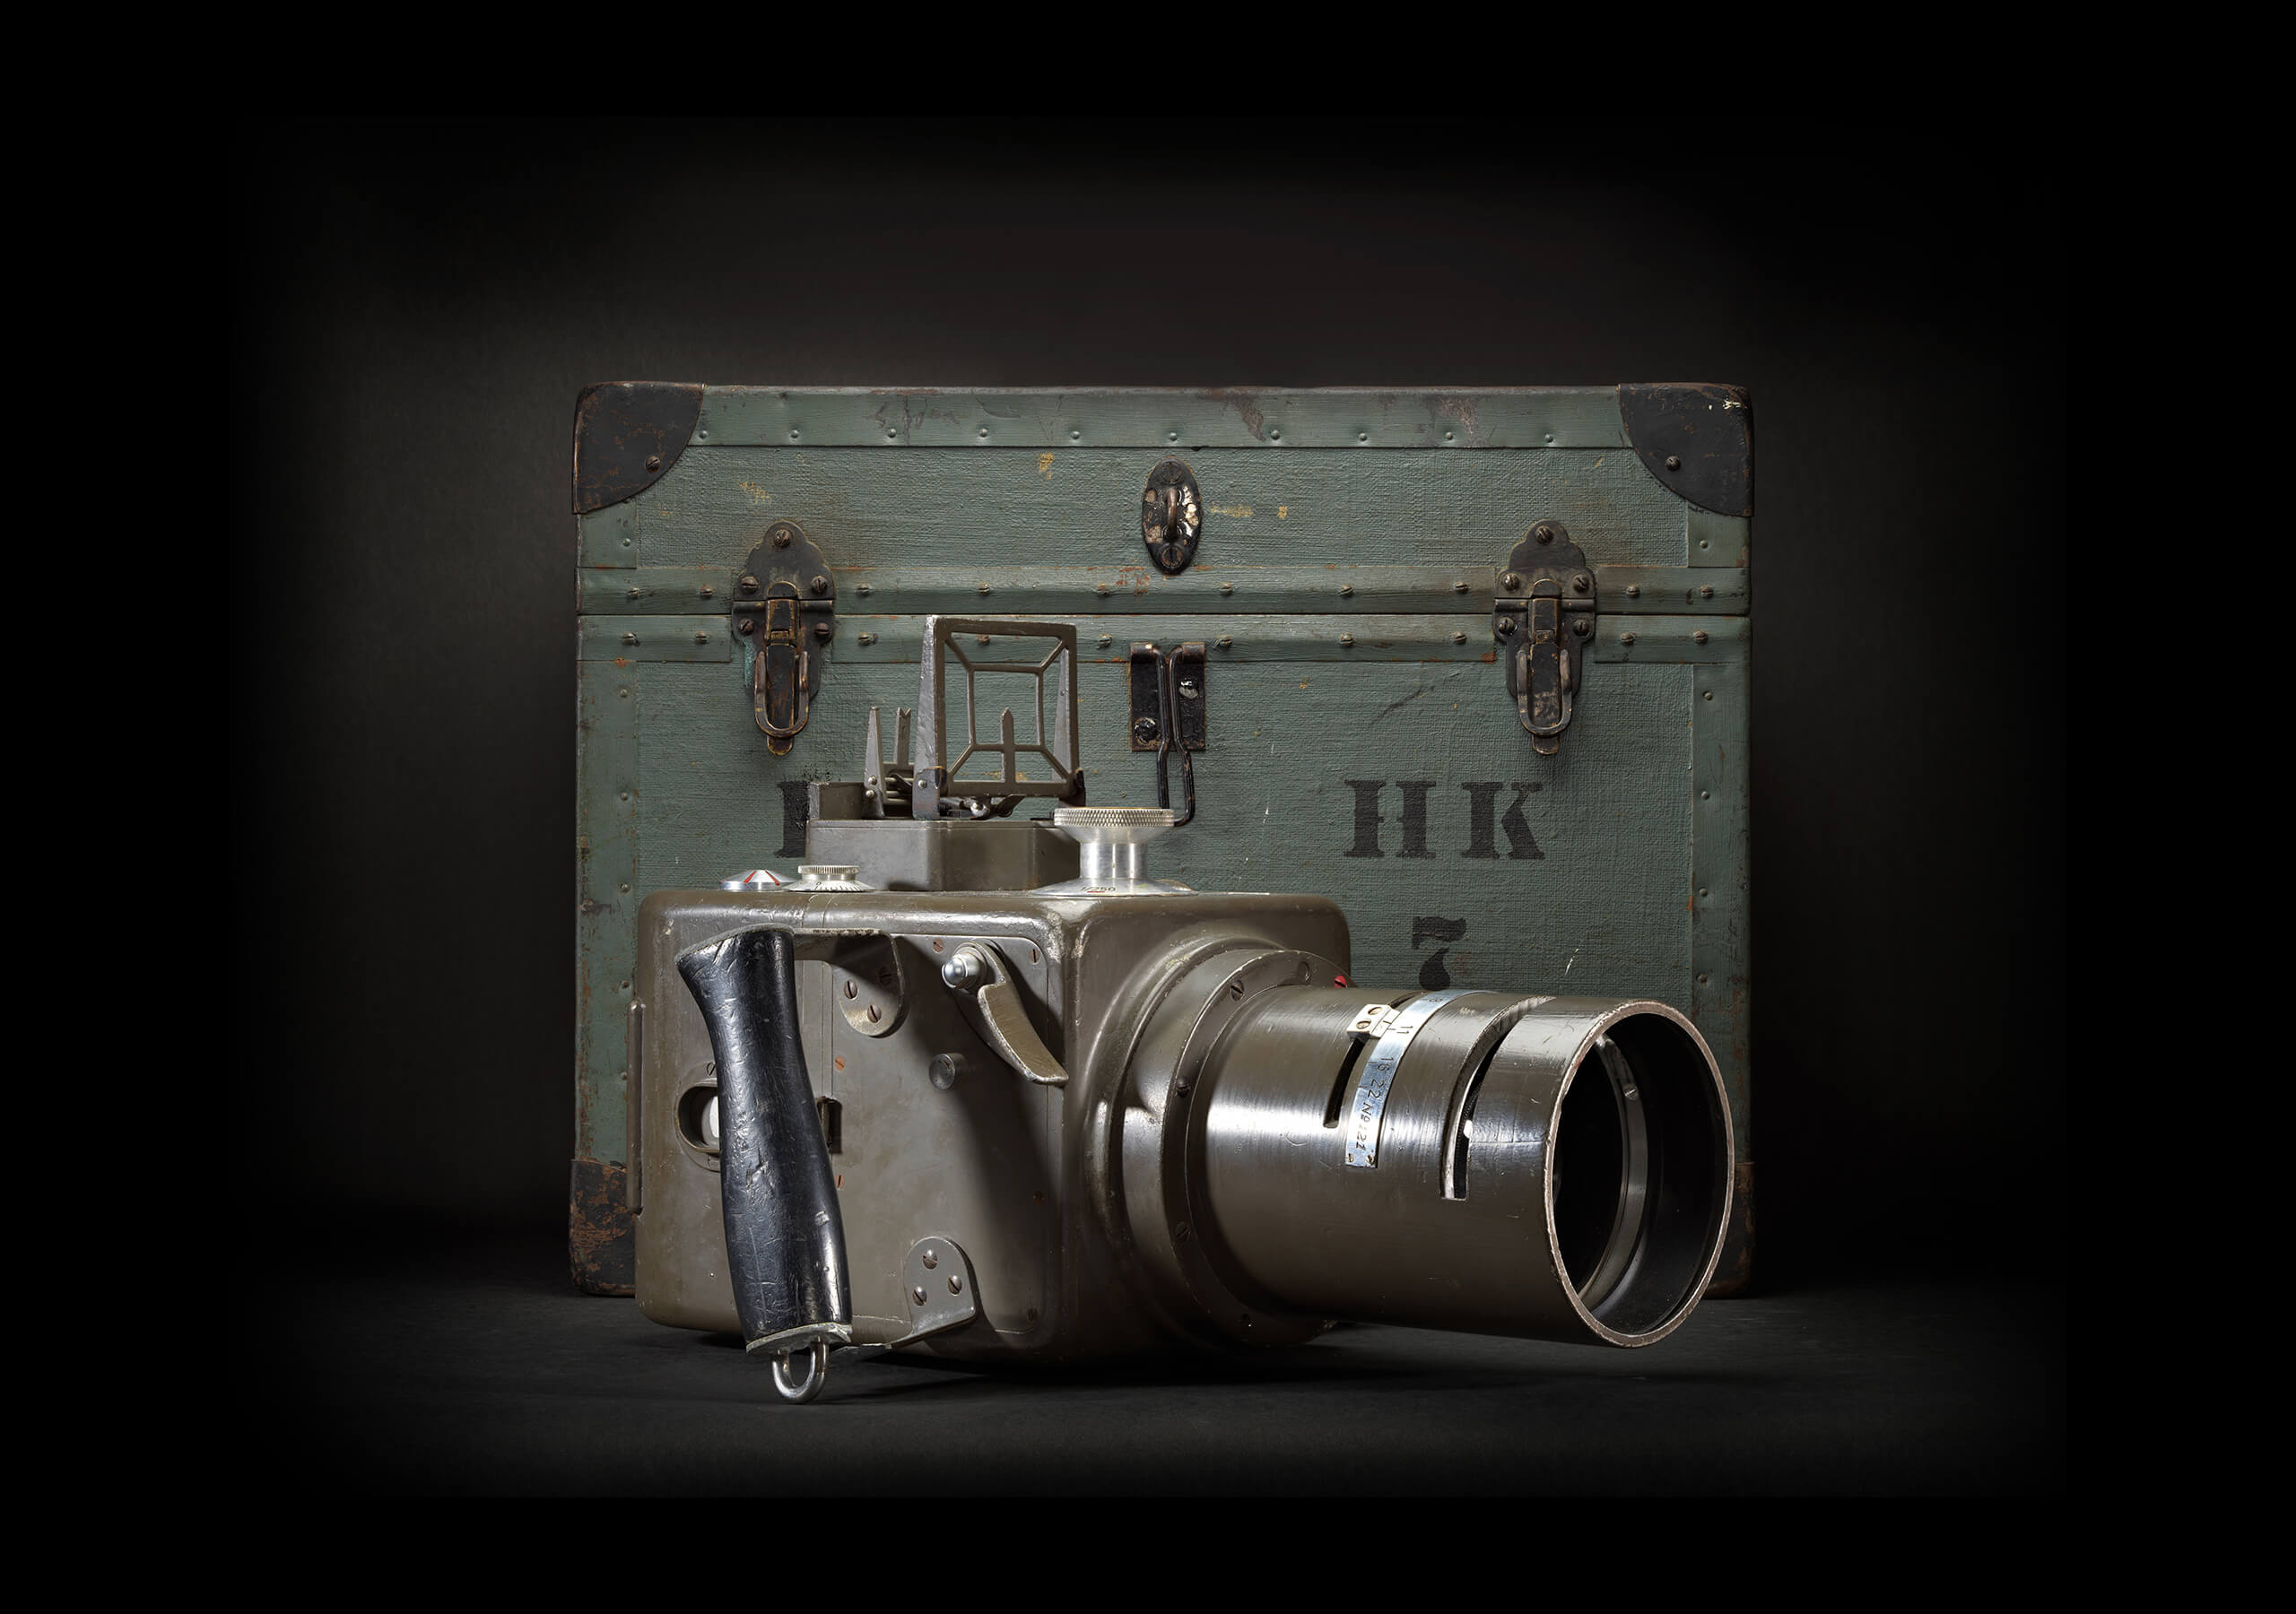
Eventually, Victor would return home to work for the family business, and for reasons I could not discover while researching this article, he had a falling out with his father, which in 1937 resulted in him leaving the business and starting up his own company in Gothenburg, called Victor Foto. In April 1940, Victor Hasselblad would setup a new company, called Ross AB in an old automobile shop with the intent to manufacture his first camera for the Swedish military.
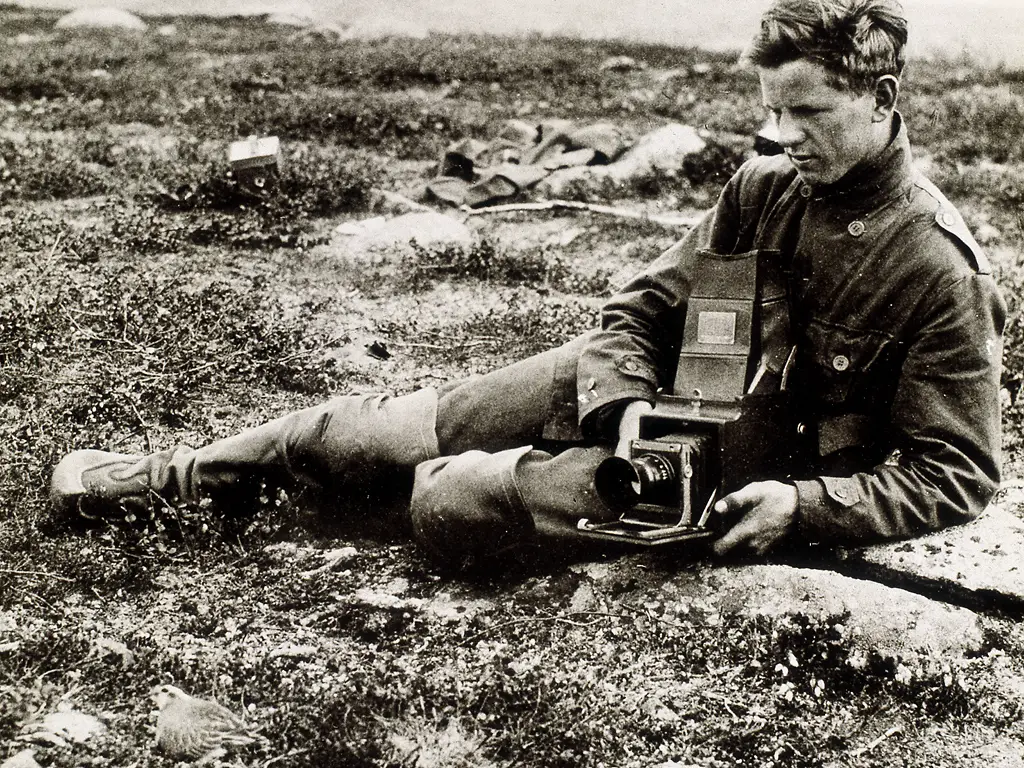
The next year, Ross AB would finish it’s first camera, the HK-7 which was inspired by an aerial camera found in a downed German aircraft during the early days of World War II. At the direction of the Swedish air force, Ross AB would build a number of HK-7s and a second camera called the SKa4 for use in Swedish air craft.
In 1942, Victor Hasselblad’s father and CEO of F.W. Hasselblad & Co., Karl Erik Hasselblad died. As a result, ownership of the company along with it’s photographic division, passed onto Victor Hasselblad, and once again Victor was back working for his family’s company.
After the war, F.W. Hasselblad & Co. would continue to produce many of the same products they had been making before and during the war such as watches and clocks, in addition to it’s photographic products as well. Despite their success at wartime camera production, Hasselblad wasn’t yet turning a profit on it’s photographic products.
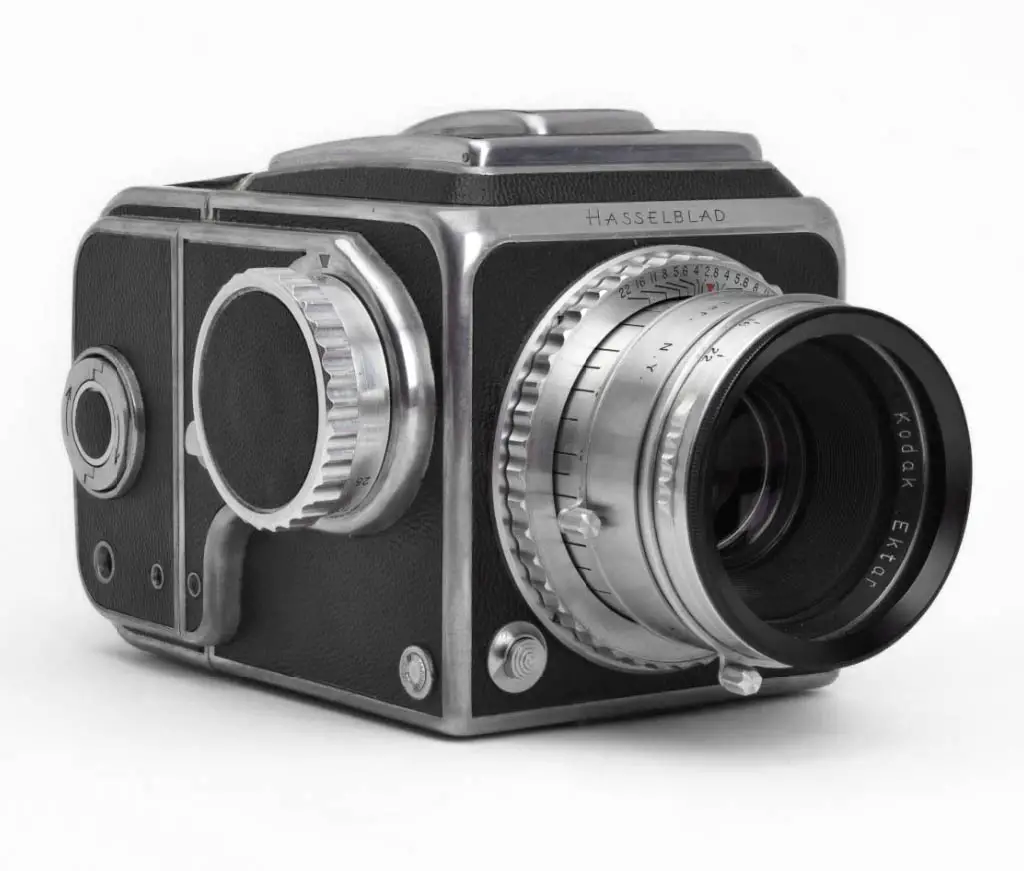
In 1945 a new Swedish Automobile company called Saab would be created to build Sweden’s first automobile using parts supplied by Hasselblad. At this same time, Victor Hasselblad prioritized the creation of a new line of civilian cameras. With the cooperation of Saab industrial designer Sixten Sason, in 1948 Hasselblad would produce it’s first postwar camera, the 1600 F.
Hasselblad’s new camera was very complex and early copies were unreliable. The company’s experience at making clocks helped them to refine their camera making abilities, eventually improving the quality of early cameras. Only a few hundred of the early 1600 F models were made and despite having poor reliability, have become very desirable by collectors.
Despite their early struggles, Hasselblad learned quickly and by 1953, had an all new camera, the 1000 F which improved almost everything about the earlier model. In addition to their cameras, Hasselblad also made available a range of lenses made by the world’s best lens makers including Kodak. Everything from a 60mm Distagon to a 200mm Sonnar could be purchased in a Hasselblad mount, making them very popular for professional photographers.
Hasselblad’s reputation as a camera maker received a huge boost in December 1954 when the American magazine, Modern Photography ran an in-depth test of the 1000 F. In that article, they put over 500 rolls of film through their test camera, intentionally dropping it twice, to see how it would hold up, which it did.

In 1957, the 500 C made it’s debut which would turn out to be the company’s most successful platform. Variations of the 500 C continued to be produced as recently as 2013. Hasselblad cameras developed such a high reputation for quality and dependability that in 1962, NASA started using them on space flights, some even being used on the moon.
Despite their success, Hasselblads were very expensive and were not produced in great enough numbers for the company to make a huge profit off them in those early days, instead having to rely on their many other products the company produced for other industries. It wouldn’t be until the early 1960s that the company was ever able to turn a profit making cameras.
Hasselblad would continue making the 500 series with multiple variants throughout the rest of the 20th century. In 1976, Victor Hasselblad would sell the company to a Swedish investment firm who in 1984 would turn the company into a publicly traded corporation. This wouldn’t last long as by 1991, all public shares of the company were purchased by a single entity, effectively making them a private company again. The company would be sold yet again in 1996 to a multi-national investment banker, making them a fully international company.
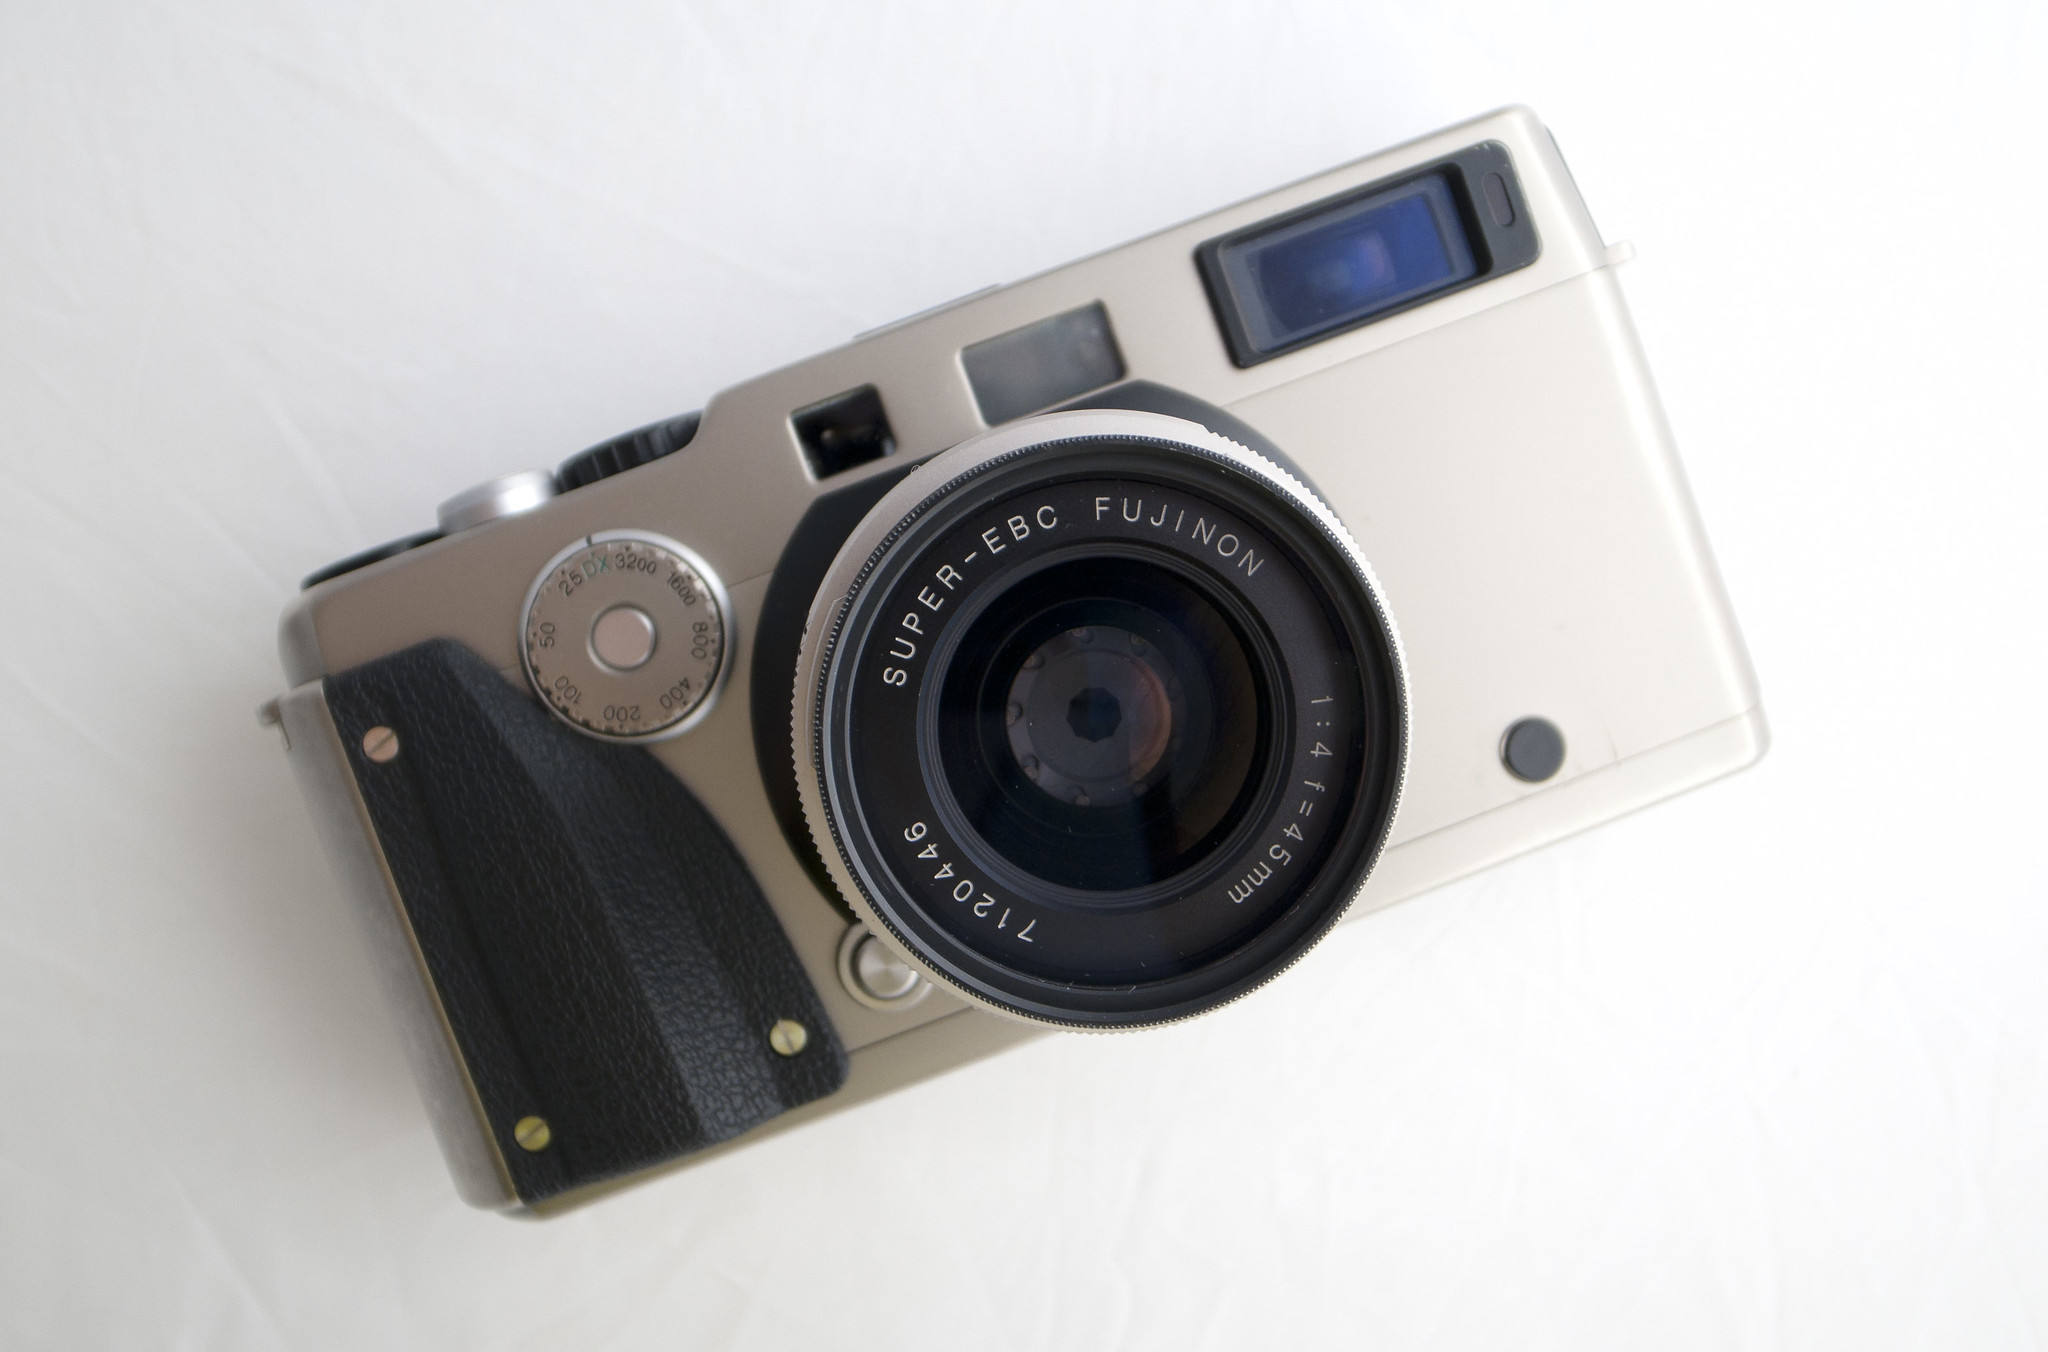
In 1998, in accordance with their more “worldly” management, Hasselblad would partner with the Japanese camera maker Fuji, and sell a rebadged version of their Fujifilm TX-1 as the Hasselblad Xpan. Both the TX-1 and Xpan were 35mm rangefinder cameras that shot in a unique 24mm x 65mm panoramic format. The cameras shared the same lens mount and came with 3 different lenses. The TX-1 had a silver body compared to the Xpan which only came in black, but otherwise, the two cameras were the same. Fuji sold the TX-1 in Japan only, and the Hasselblad in every other country including the United States.
The Xpan first went on sale in mid 1998 with a list price including the 45mm lens for $1995, which when adjusted for inflation is comparable to just over $3000 today. Although three lenses were made for the Xpan, the wide angle 30mm wasn’t announced until October 1999 with examples getting into customer’s hands in early 2000. The 30mm lens came in it’s own special case with an auxiliary 30mm viewfinder, hood, pouch, and 58mm anti-vignetting filter. Since both the 45mm and 90mm lenses used the same 49mm filters, the 30mm required it’s own filter and hood, which came in the kit. The price for the lens with all these accessories was a whopping $2500, which was more than the camera. Click here for a digital copy of a review by Michael Reichmann which first appeared in early 2000 for the 30mm lens.
In 2003, a replacement TX-2 and Xpan 2 would make their debut, keeping the same basic design with only minor improvements. Both the Xpan and Xpan 2 would remain Hasselblad’s only 35mm cameras.
Today, to say that the Xpan is a desirable camera is an understatement. It is expensive, does something that few others can, and even though it was not made by Hasselblad, it has one of the more desirable name plates in the camera industry. If you want an Xpan of your own, be prepared to pay…a lot.
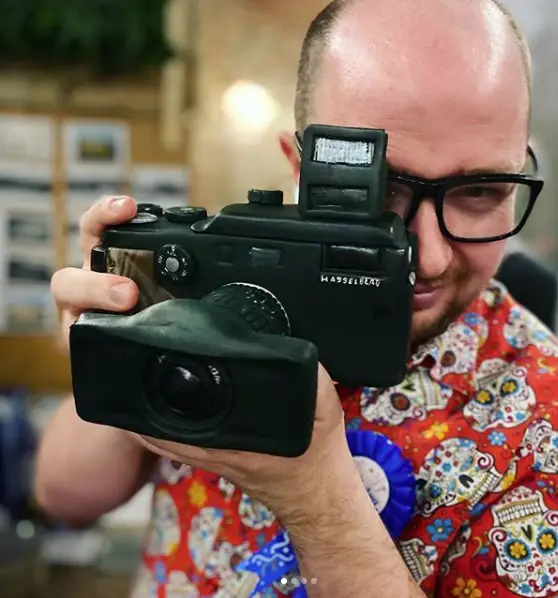
As I write this, there are 12 of them for sale on US eBay and another dozen or so more if you look internationally all in the $4000 and up range. If you try to get creative and hope that the Fuji TX-1 is any cheaper, you’d be incorrect as they’re usually even higher. Sadly, your best bet at owning an Xpan is to do what Instagram user fotodudenz did and have one made out of cake.
My Thoughts

There’s a scene early in Disney’s “Frozen” where the child version of Anna unsuccessfully tries to wake her older sister Elsa in the middle of the night to play, and it’s not until she inquisitively asks “Do you want to build a snowman” does she have any success. While I share very little in common with the CGI animated Elsa, I shared a similar wide-eyed excitement the first time fellow collector Kurt Ingham asked me “Do you want to shoot an Xpan”?
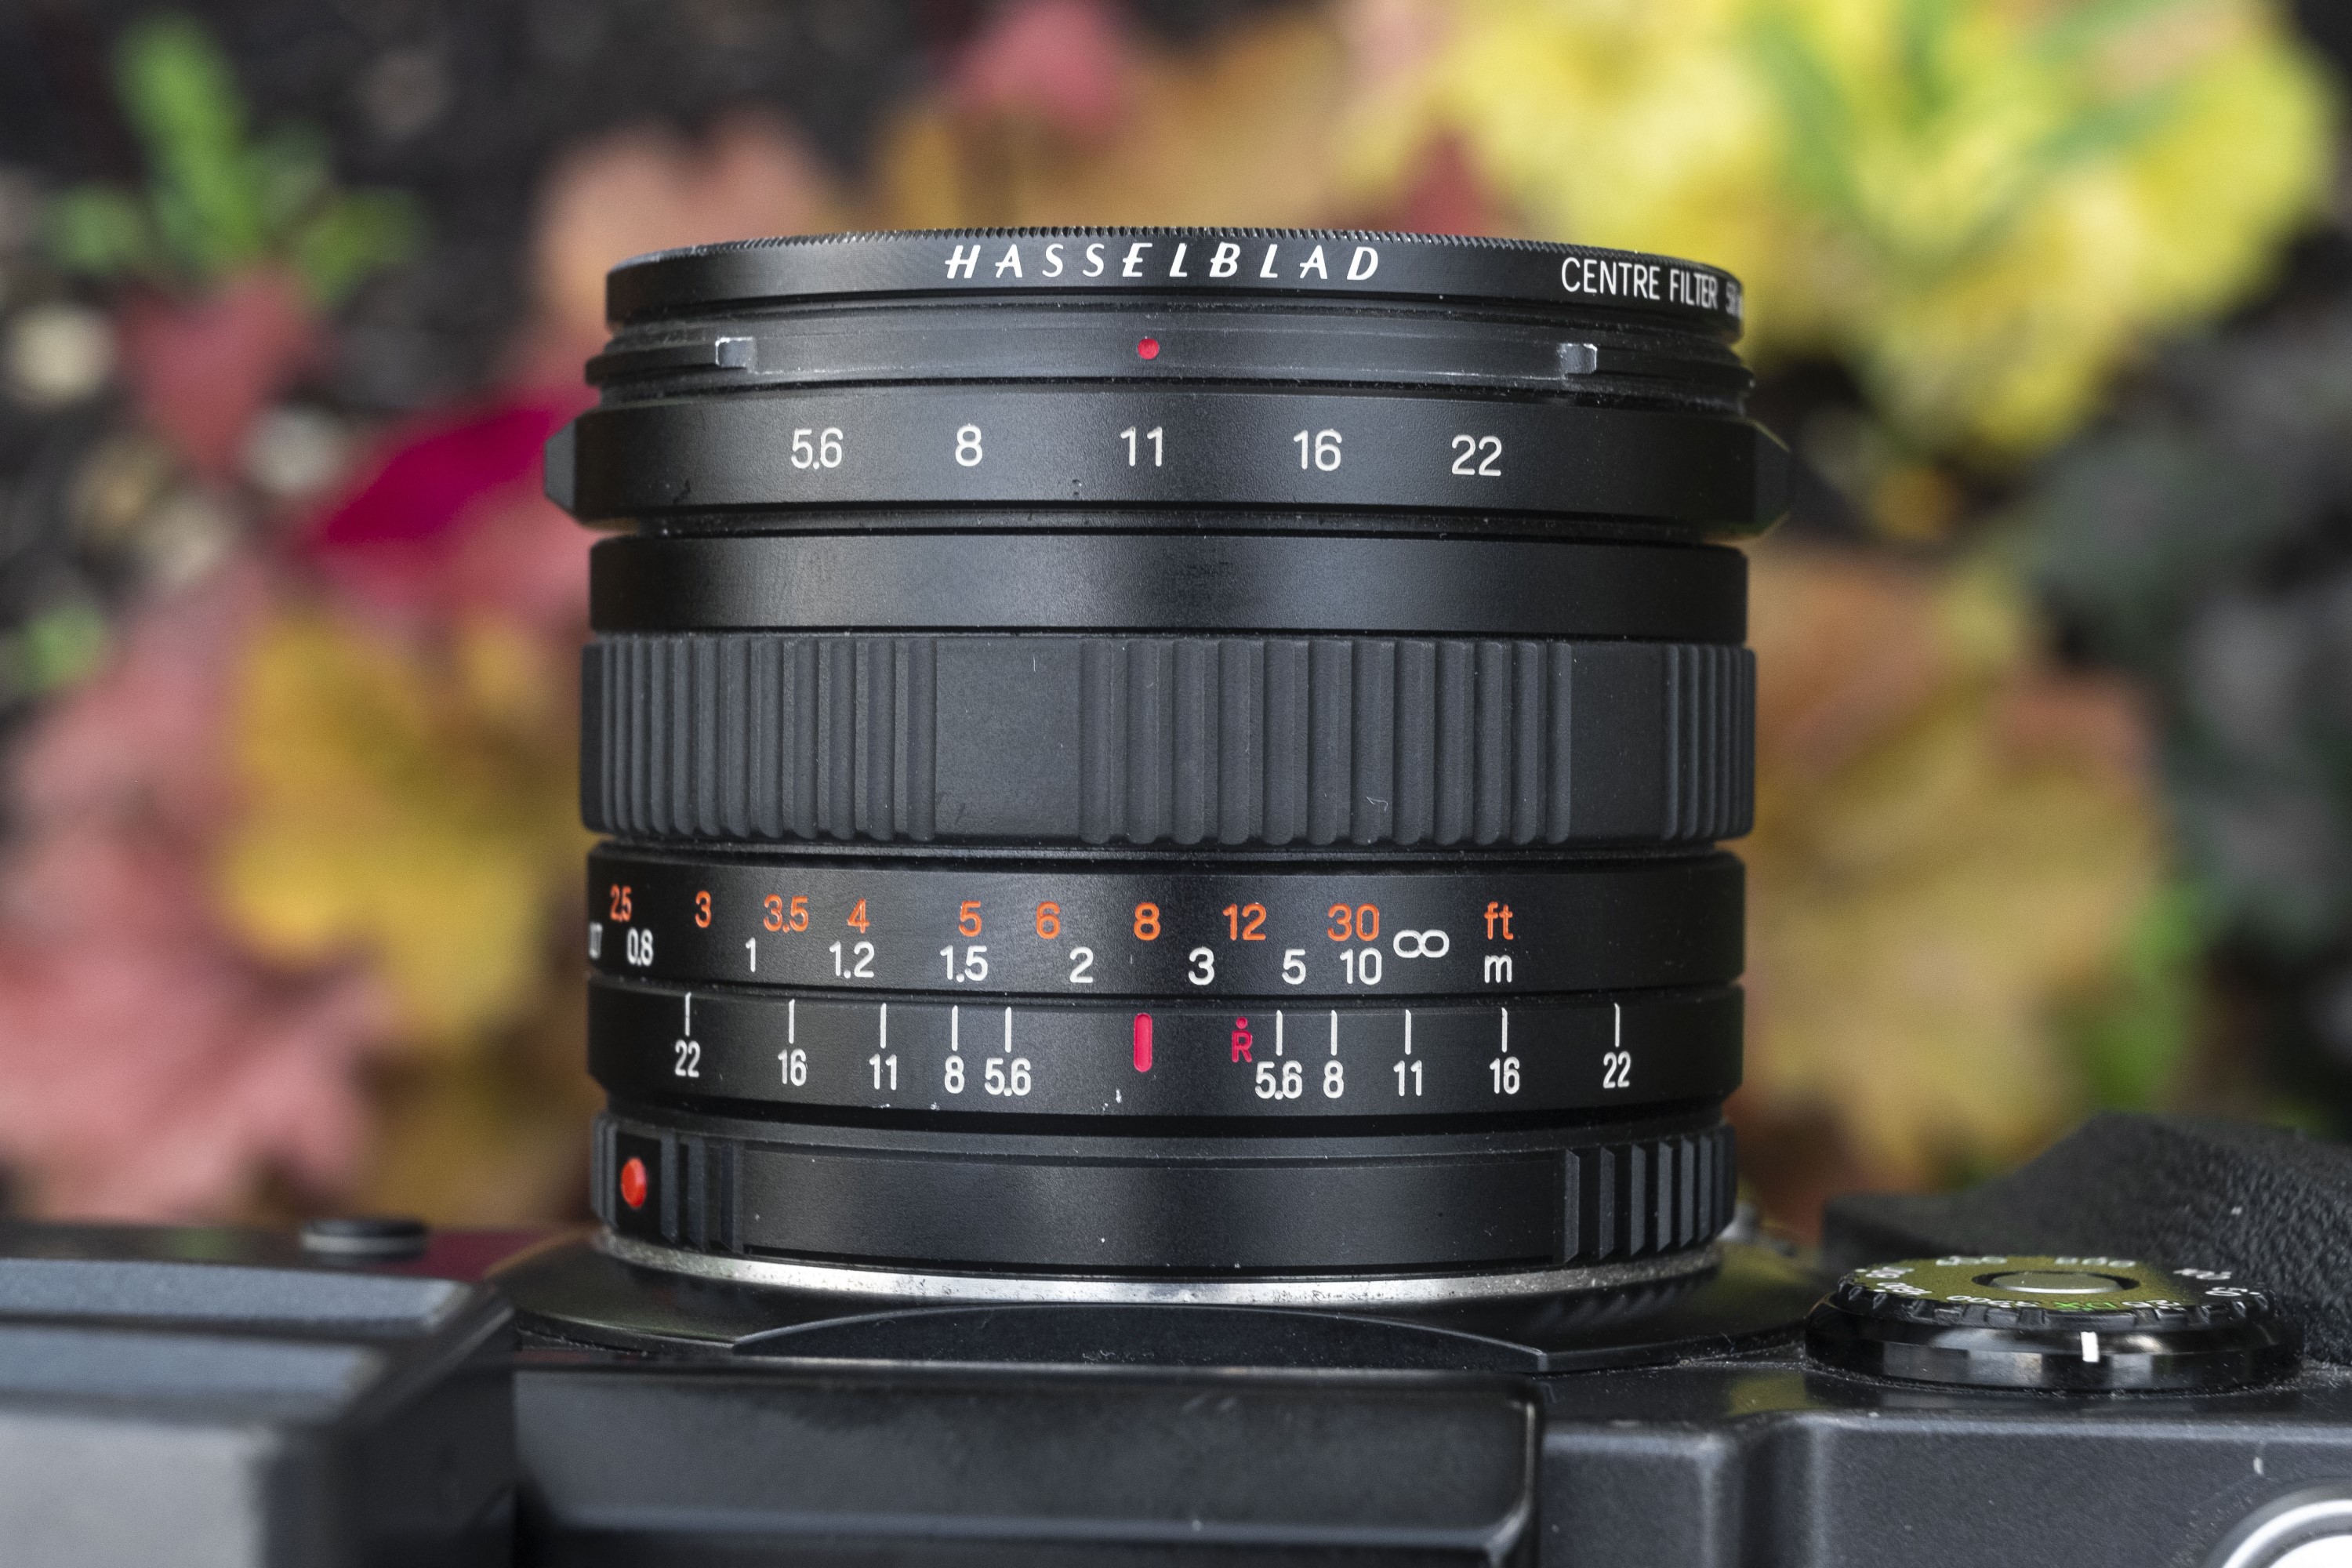
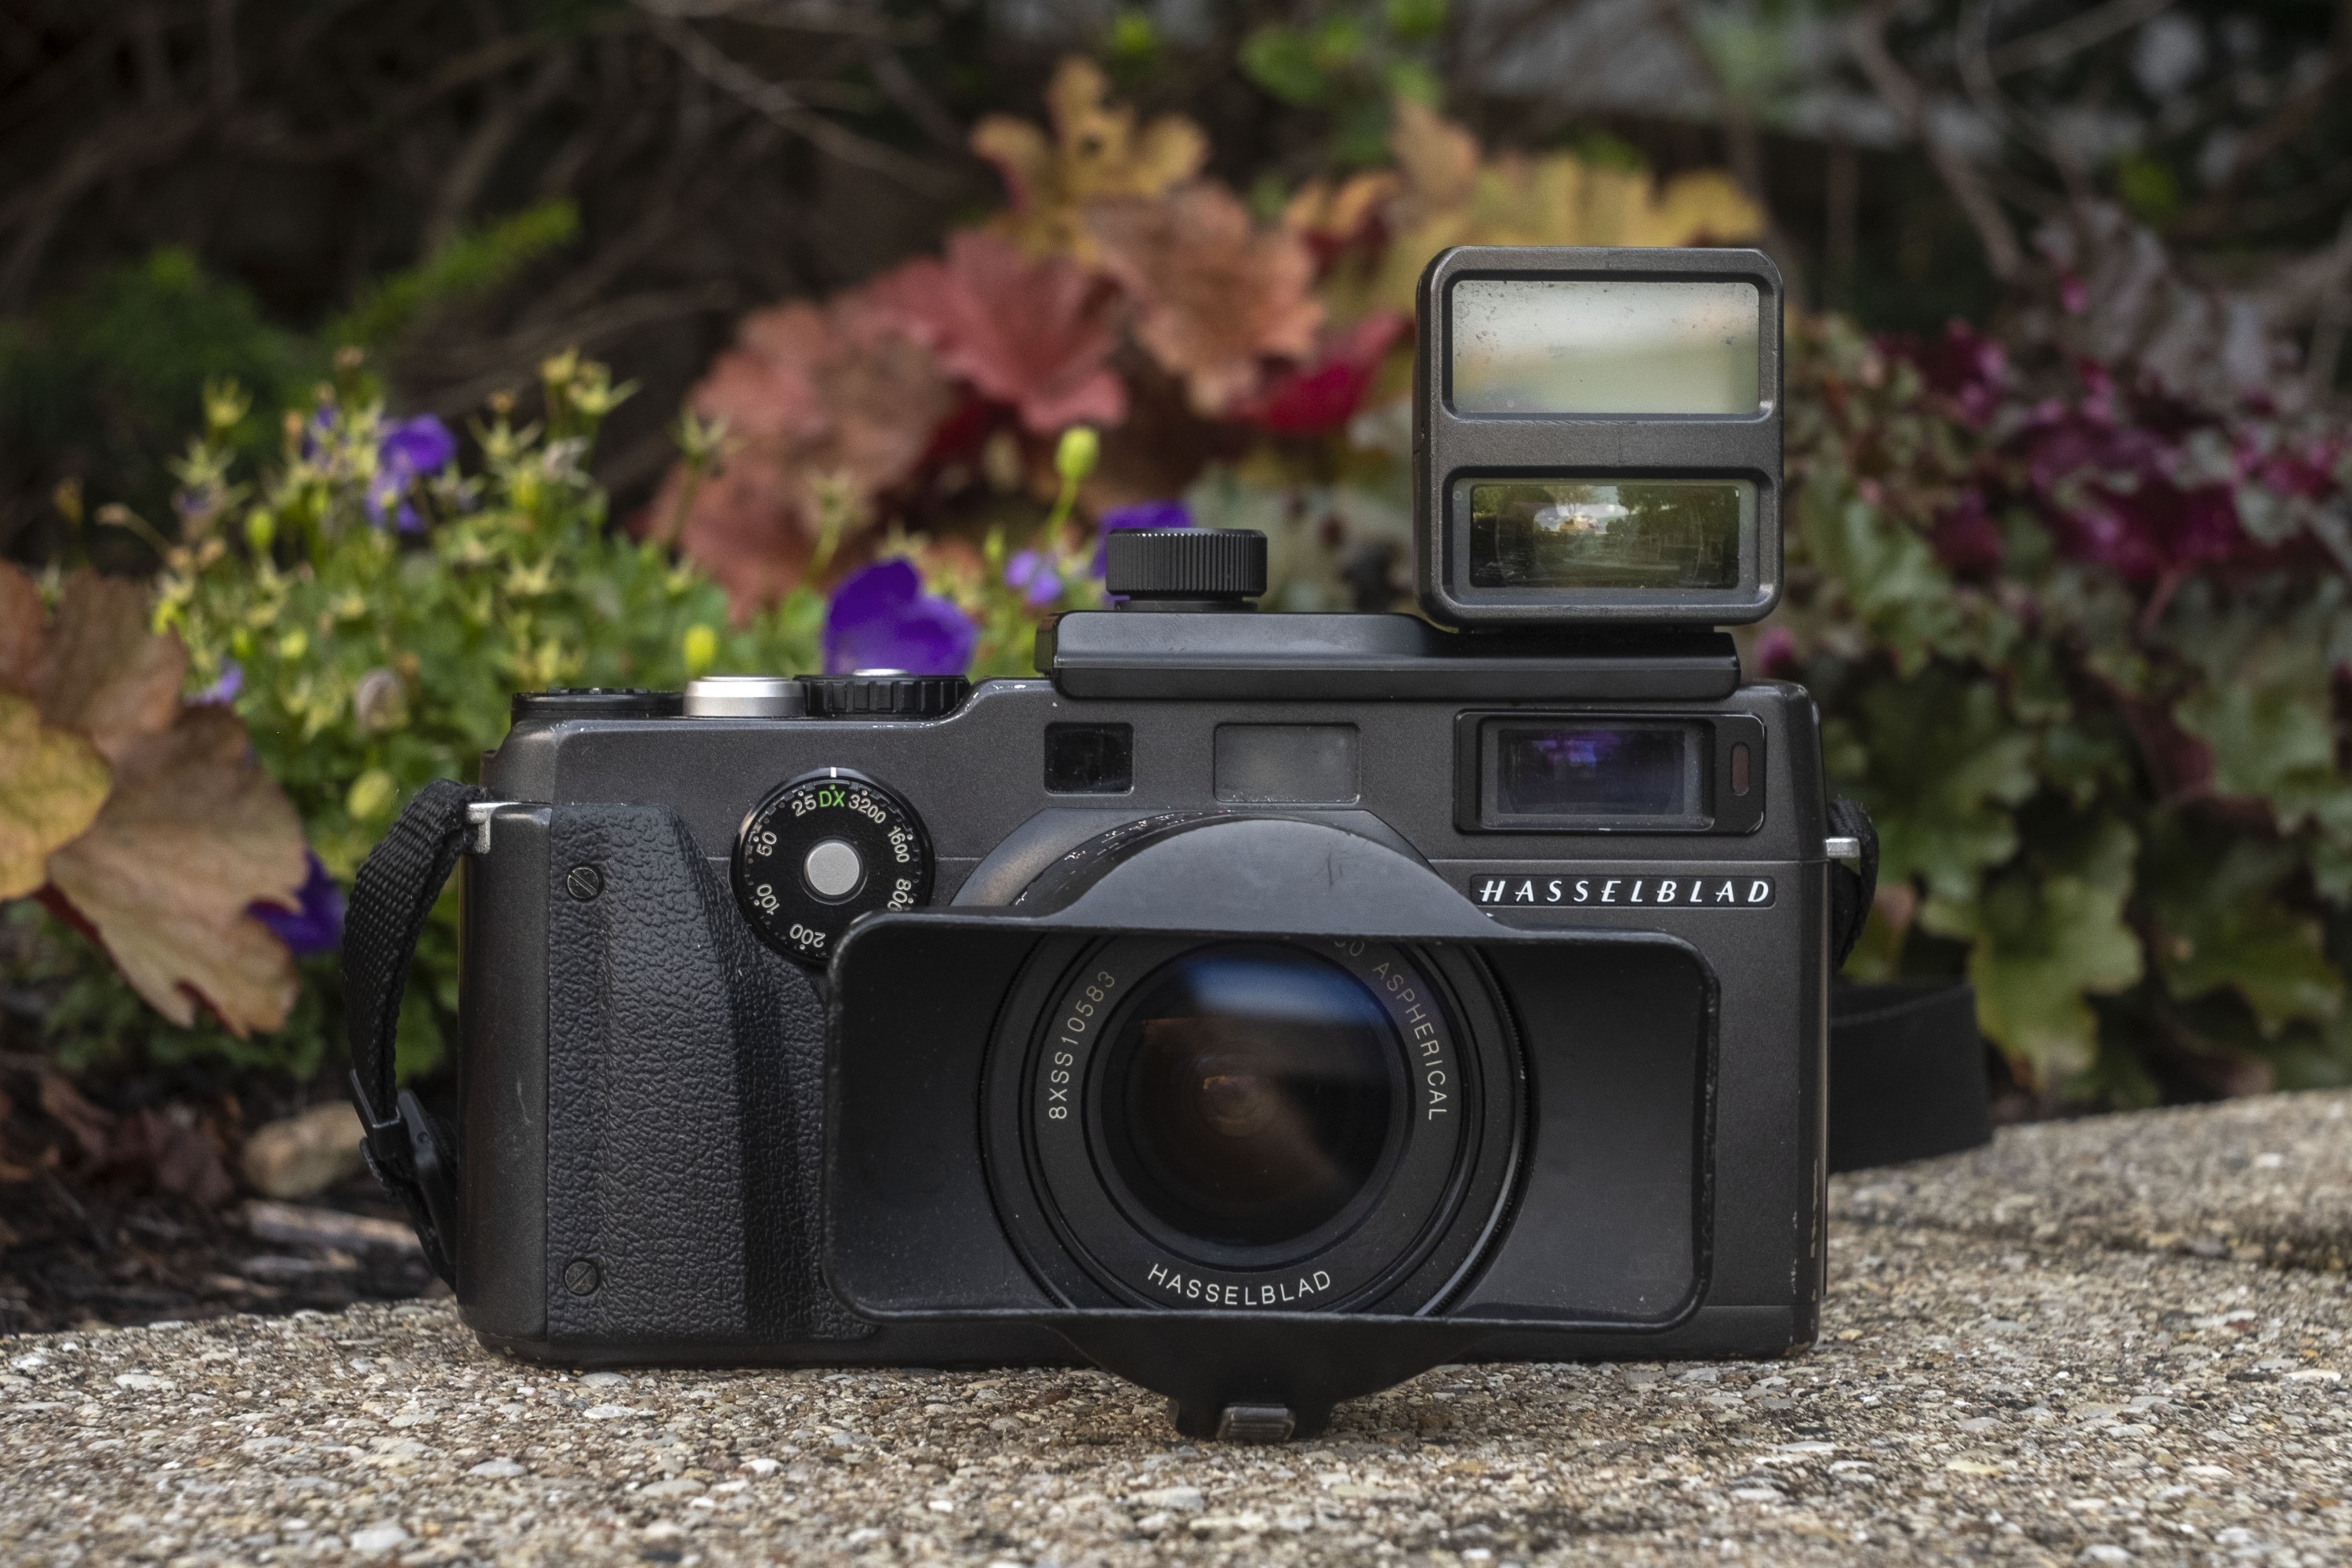
So of course I patiently awaited the arrival of what would be the single most expensive camera I’ve ever used, either film or digital. Sold prices on eBay for working Xpans easily top $3000 with a single lens, this shipment had three lenses available for it, the wide angle 30mm, the standard 45mm, and the telephoto 90mm. It’s worth noting however, that the 45mm and 90mm lenses have a 35mm equivalent of 35mm and 50mm, but that gets confusing so I’ll just refer to them by their stated focal lengths.
It came with the auxiliary viewfinder for the wide angle 30mm lens, lens hoods, and the Hasselblad filters that darken the center of the image slightly so as to minimize the effect of vignetting near the corners of the panoramic image. These filters alone sell for upwards of $250 each. Needless to say, this lot was going to need some insurance before I sent it back!
Like the dangers Anna and Elsa faced in “Frozen”, shooting an Xpan comes with some risks as well. The first of which is the incredible worth of this camera. Panoramic photography can be a lot of fun, but it’s very specialized. You have to want to shoot panoramic images and that means taking it out when you have a specific reason to. When you are carrying around nearly five-grand worth of equipment (especially that doesn’t belong to you), you need to take extreme care of it. I was constantly nervous every time I had this thing around my neck.

Furthermore, knowing that I would only have this camera for a short time, I felt I should maximize the Xpan experience and stick with the wide angle 30mm lens. Why would you shoot a 45mm panorama, when you can fit more in with the wide angle lens, I thought to myself. The horizontal field of view of the 30mm lens is 94 degrees, which on a normal 24mm x 36mm full frame image, is equivalent to a 17mm lens.
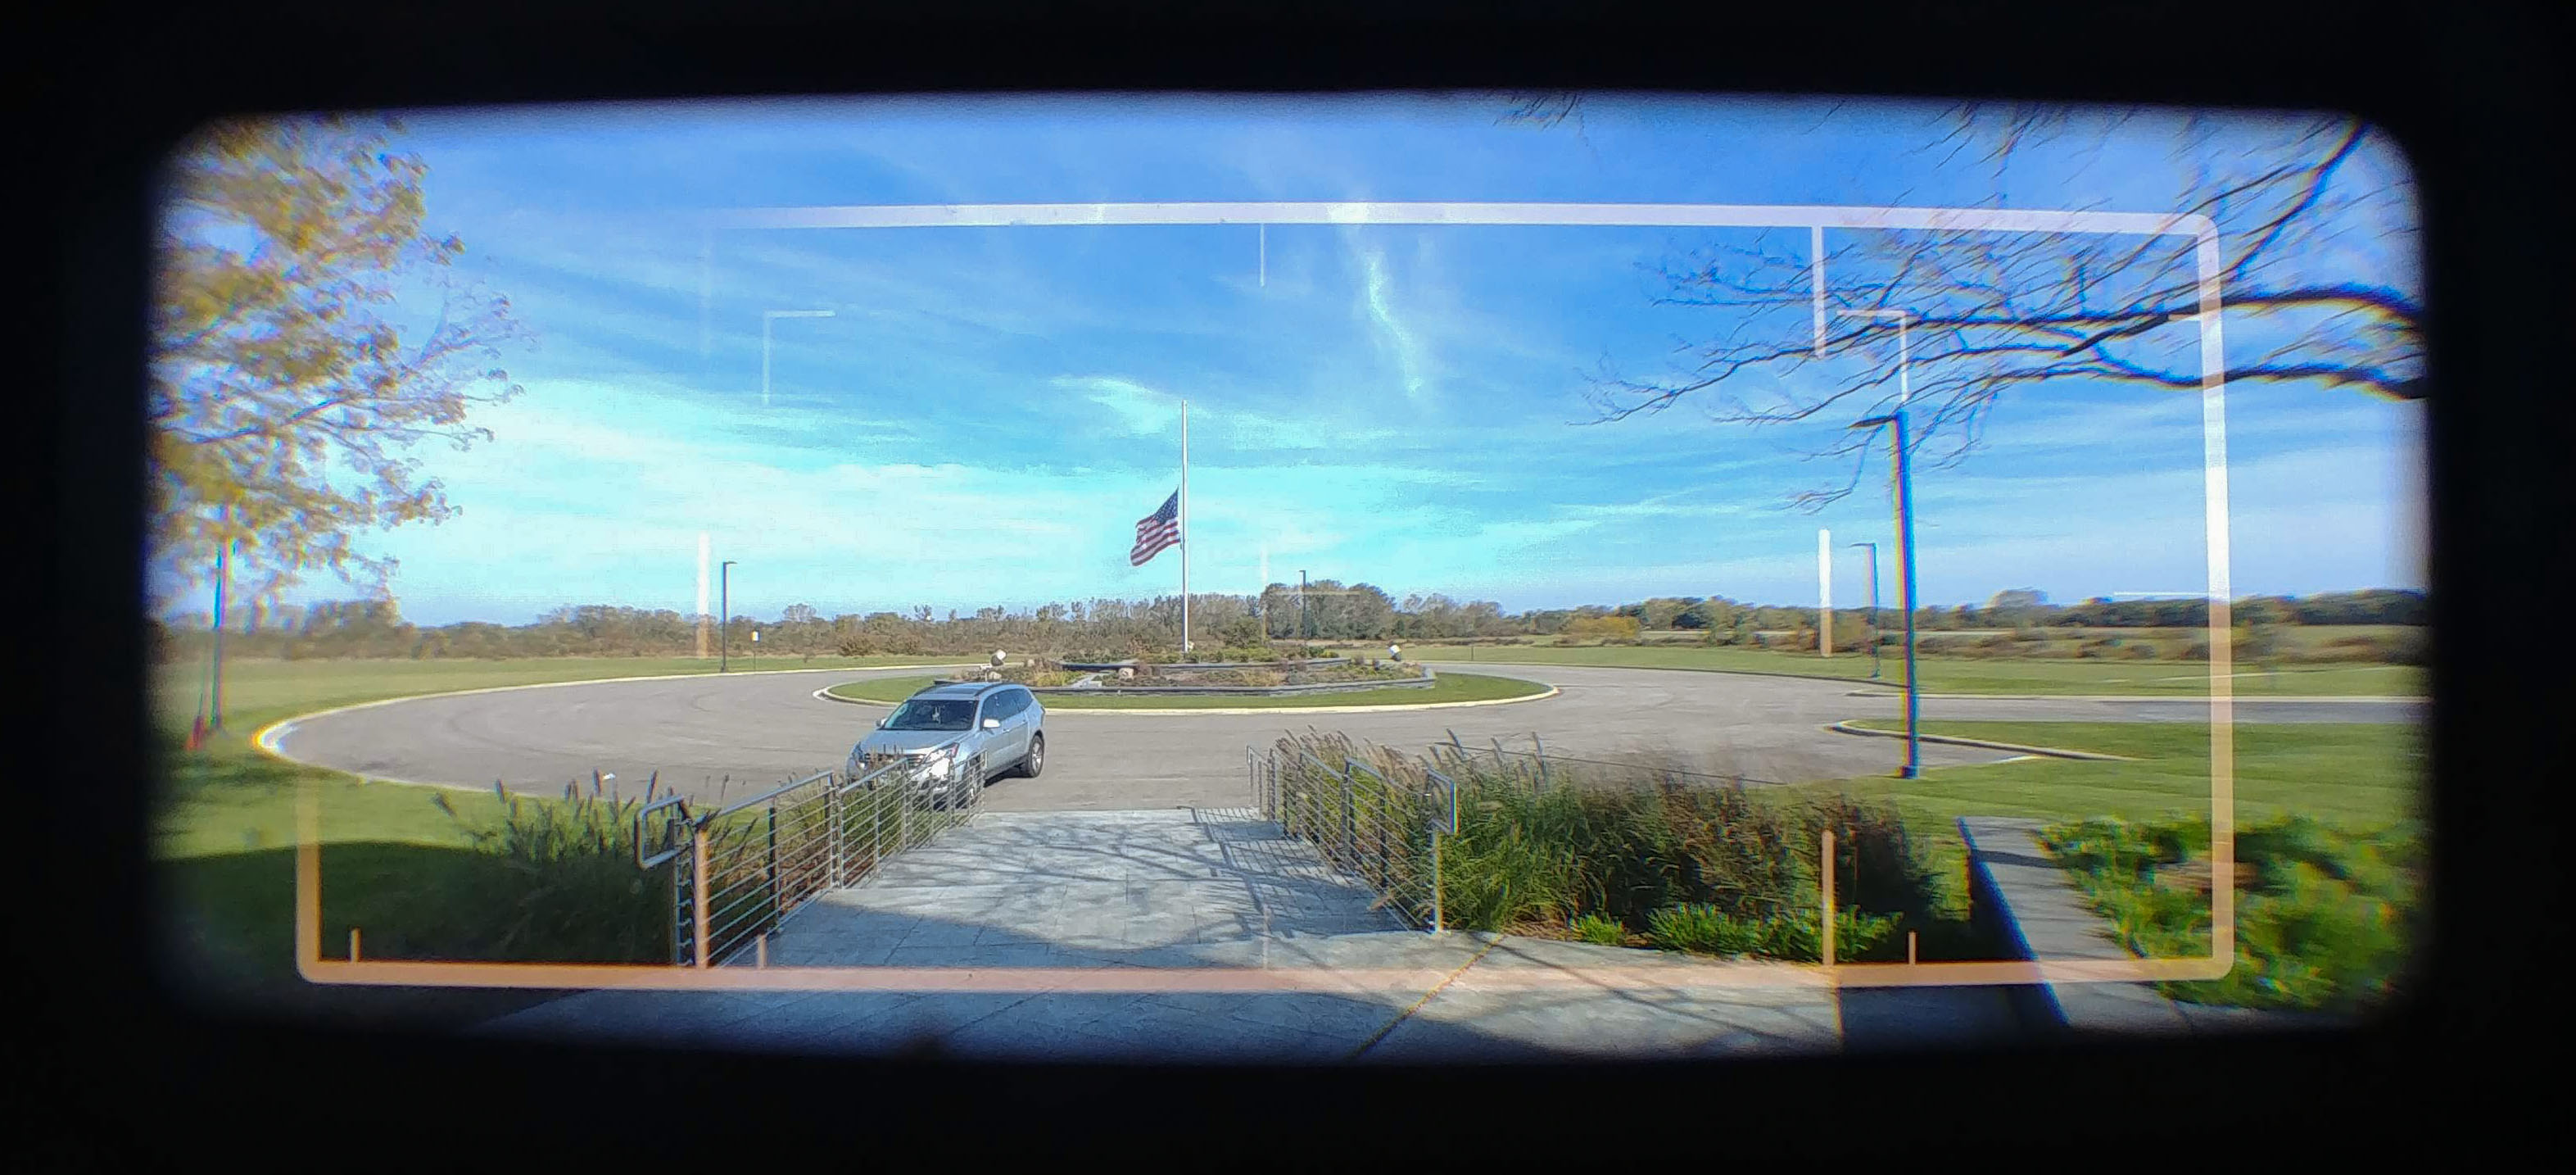
Looking through the auxiliary viewfinder is breathtaking. The scope of the full image is unlike any I’ve seen before, and while it was a lot of fun, it definitely required me to rethink my compositions. I don’t think the average person naturally sees in a 24×65 aspect ratio, so that took a little while to get used to.
The good news is that the camera is very well designed, and other than the shock of looking through the viewfinder, the rest of the camera’s controls are very natural and easy to use for the first timer. The camera’s body is quite a bit wider than a normal 35mm cameras and feels solid in your hands. Fuji built this camera for Hasselblad and I would consider it’s build quality to be on par with modern Fuji digital mirrorless cameras like the X-T20 digital mirrorless that I use to shoot all of the beauty pics for these articles.
At 755 grams with no lens, the weight of the body is kept in check due to it’s aluminum and titanium construction. What parts are aluminum or titanium is anyone’s guess, but I have to imagine that this camera would have been a lot heavier had other metals been used. It’s heft is reasonable considering it’s size, but that changes quite a bit depending on which lens you have mounted, or whether you have a hood or viewfinder attached. At it’s heaviest, with the 30mm f/5.6 lens, hood, and aux viewfinder attached, the camera weighs 1170 grams, making it heavier than many TLRs.
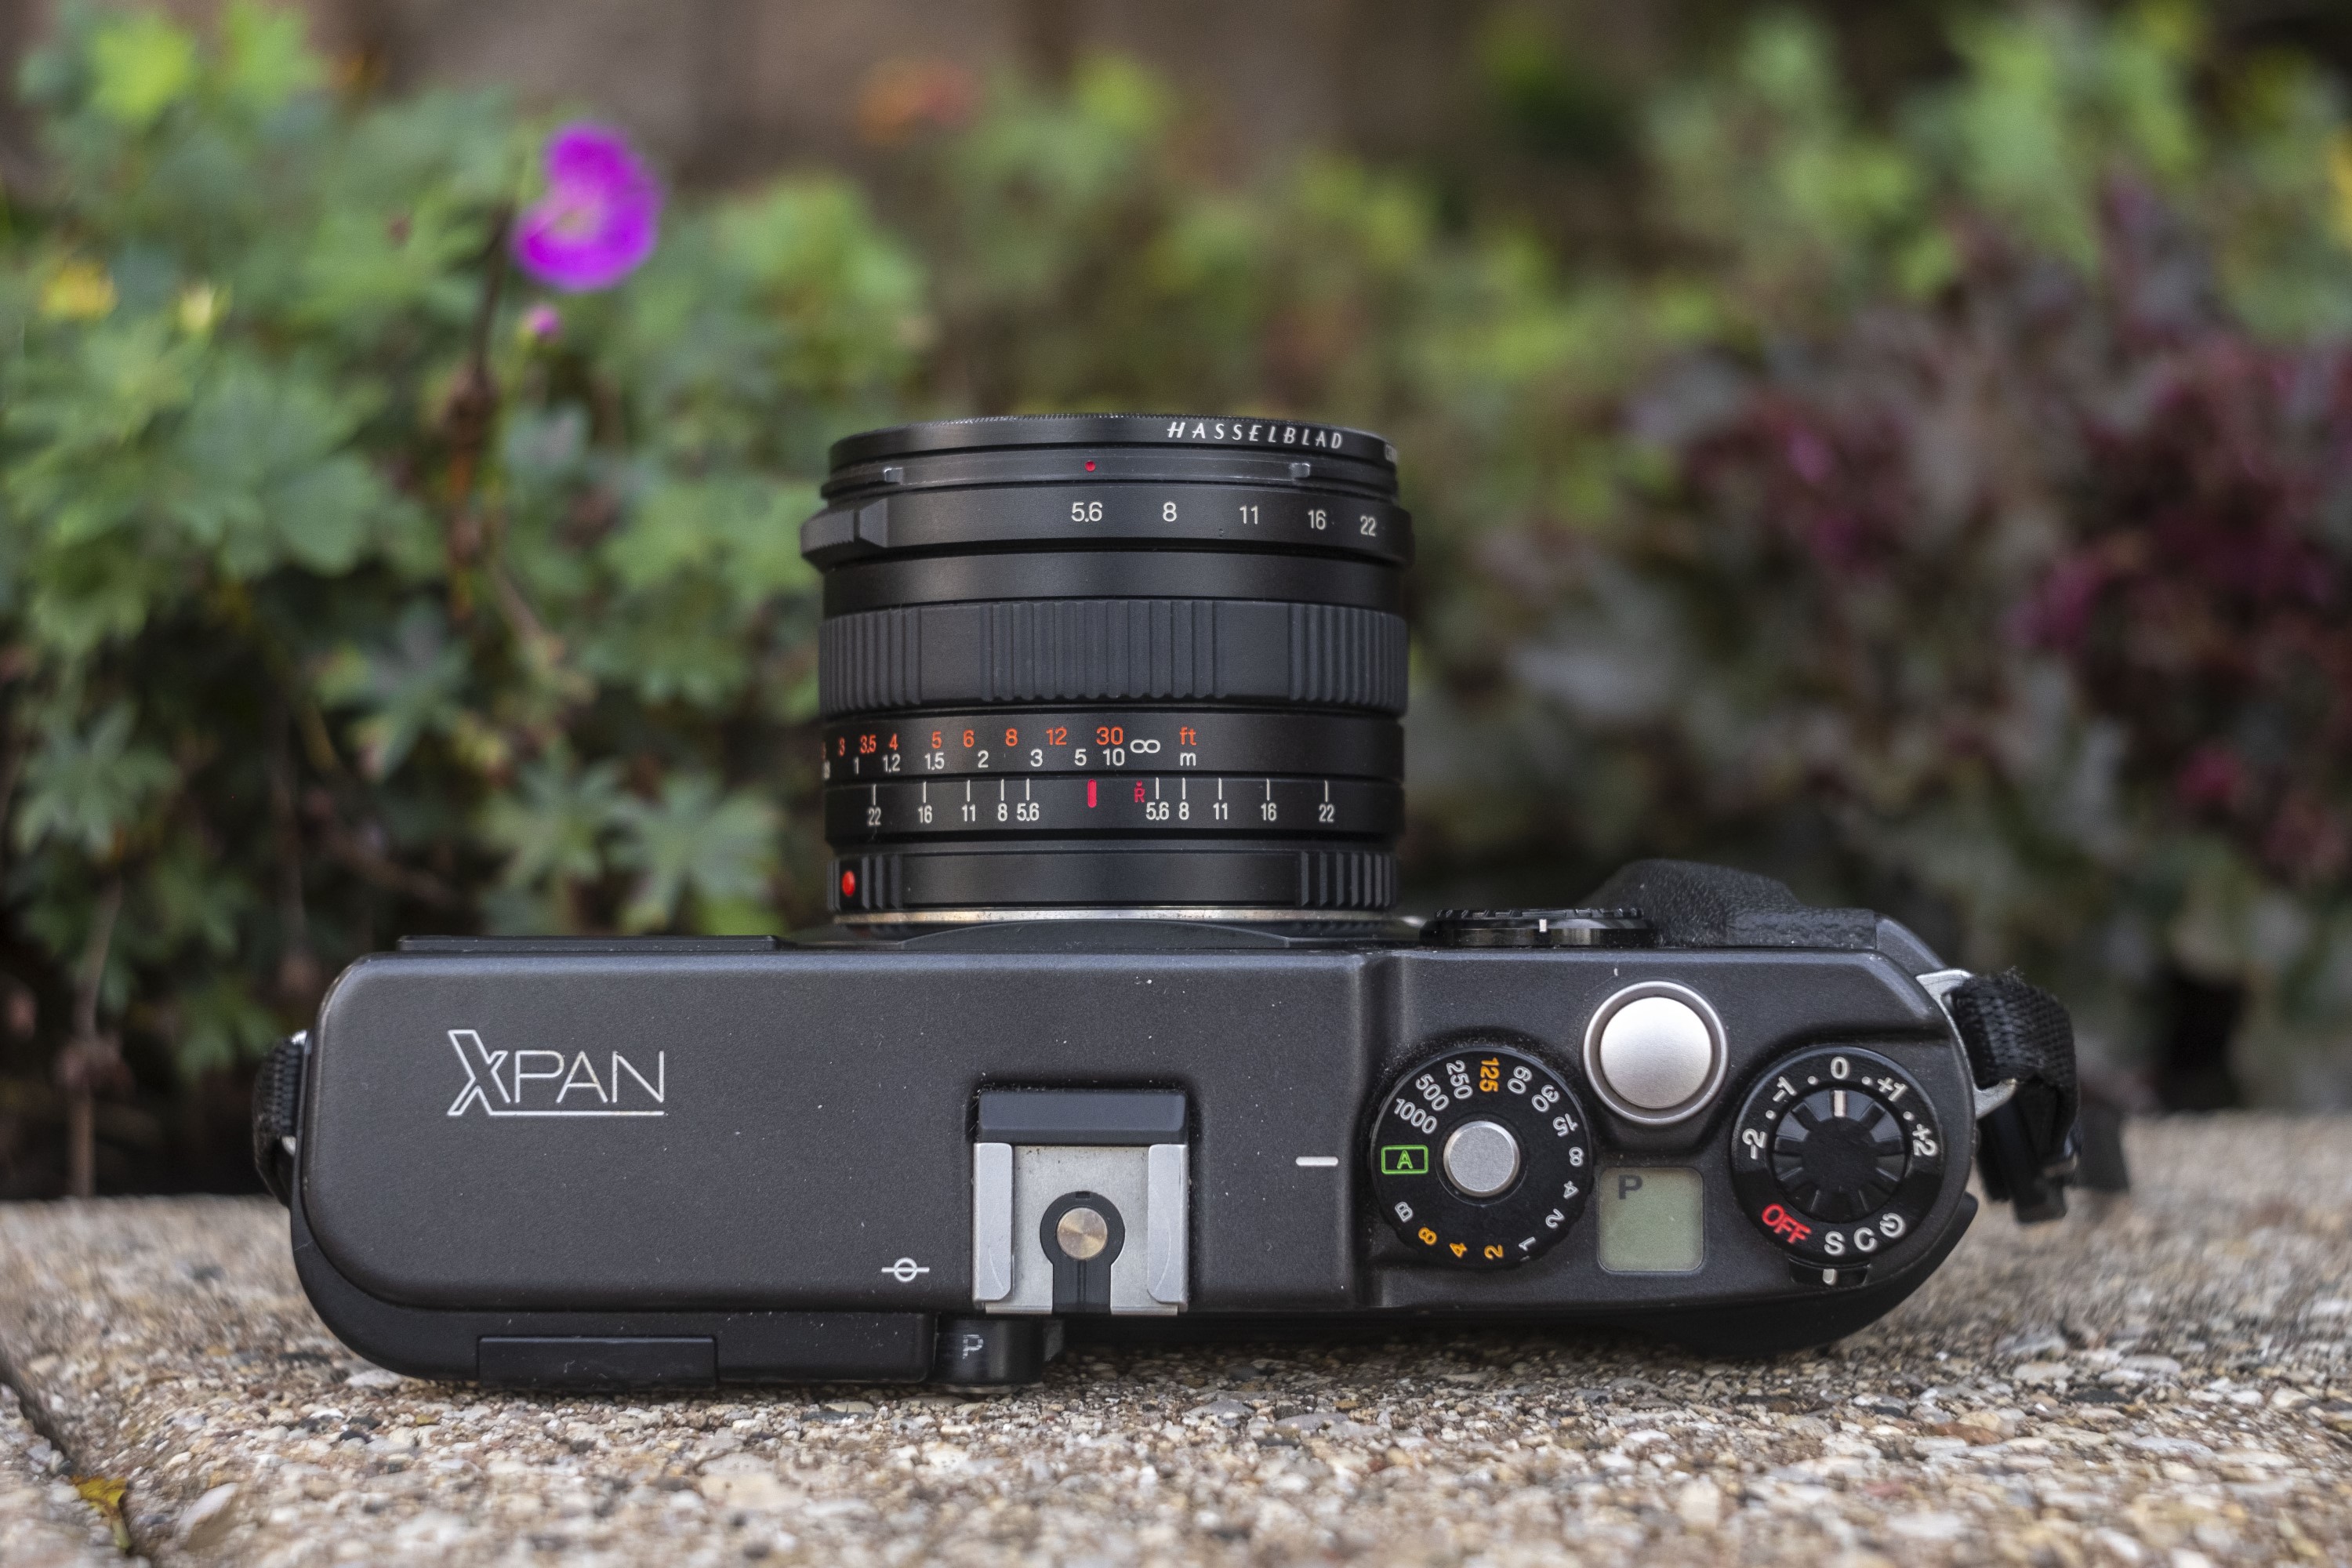
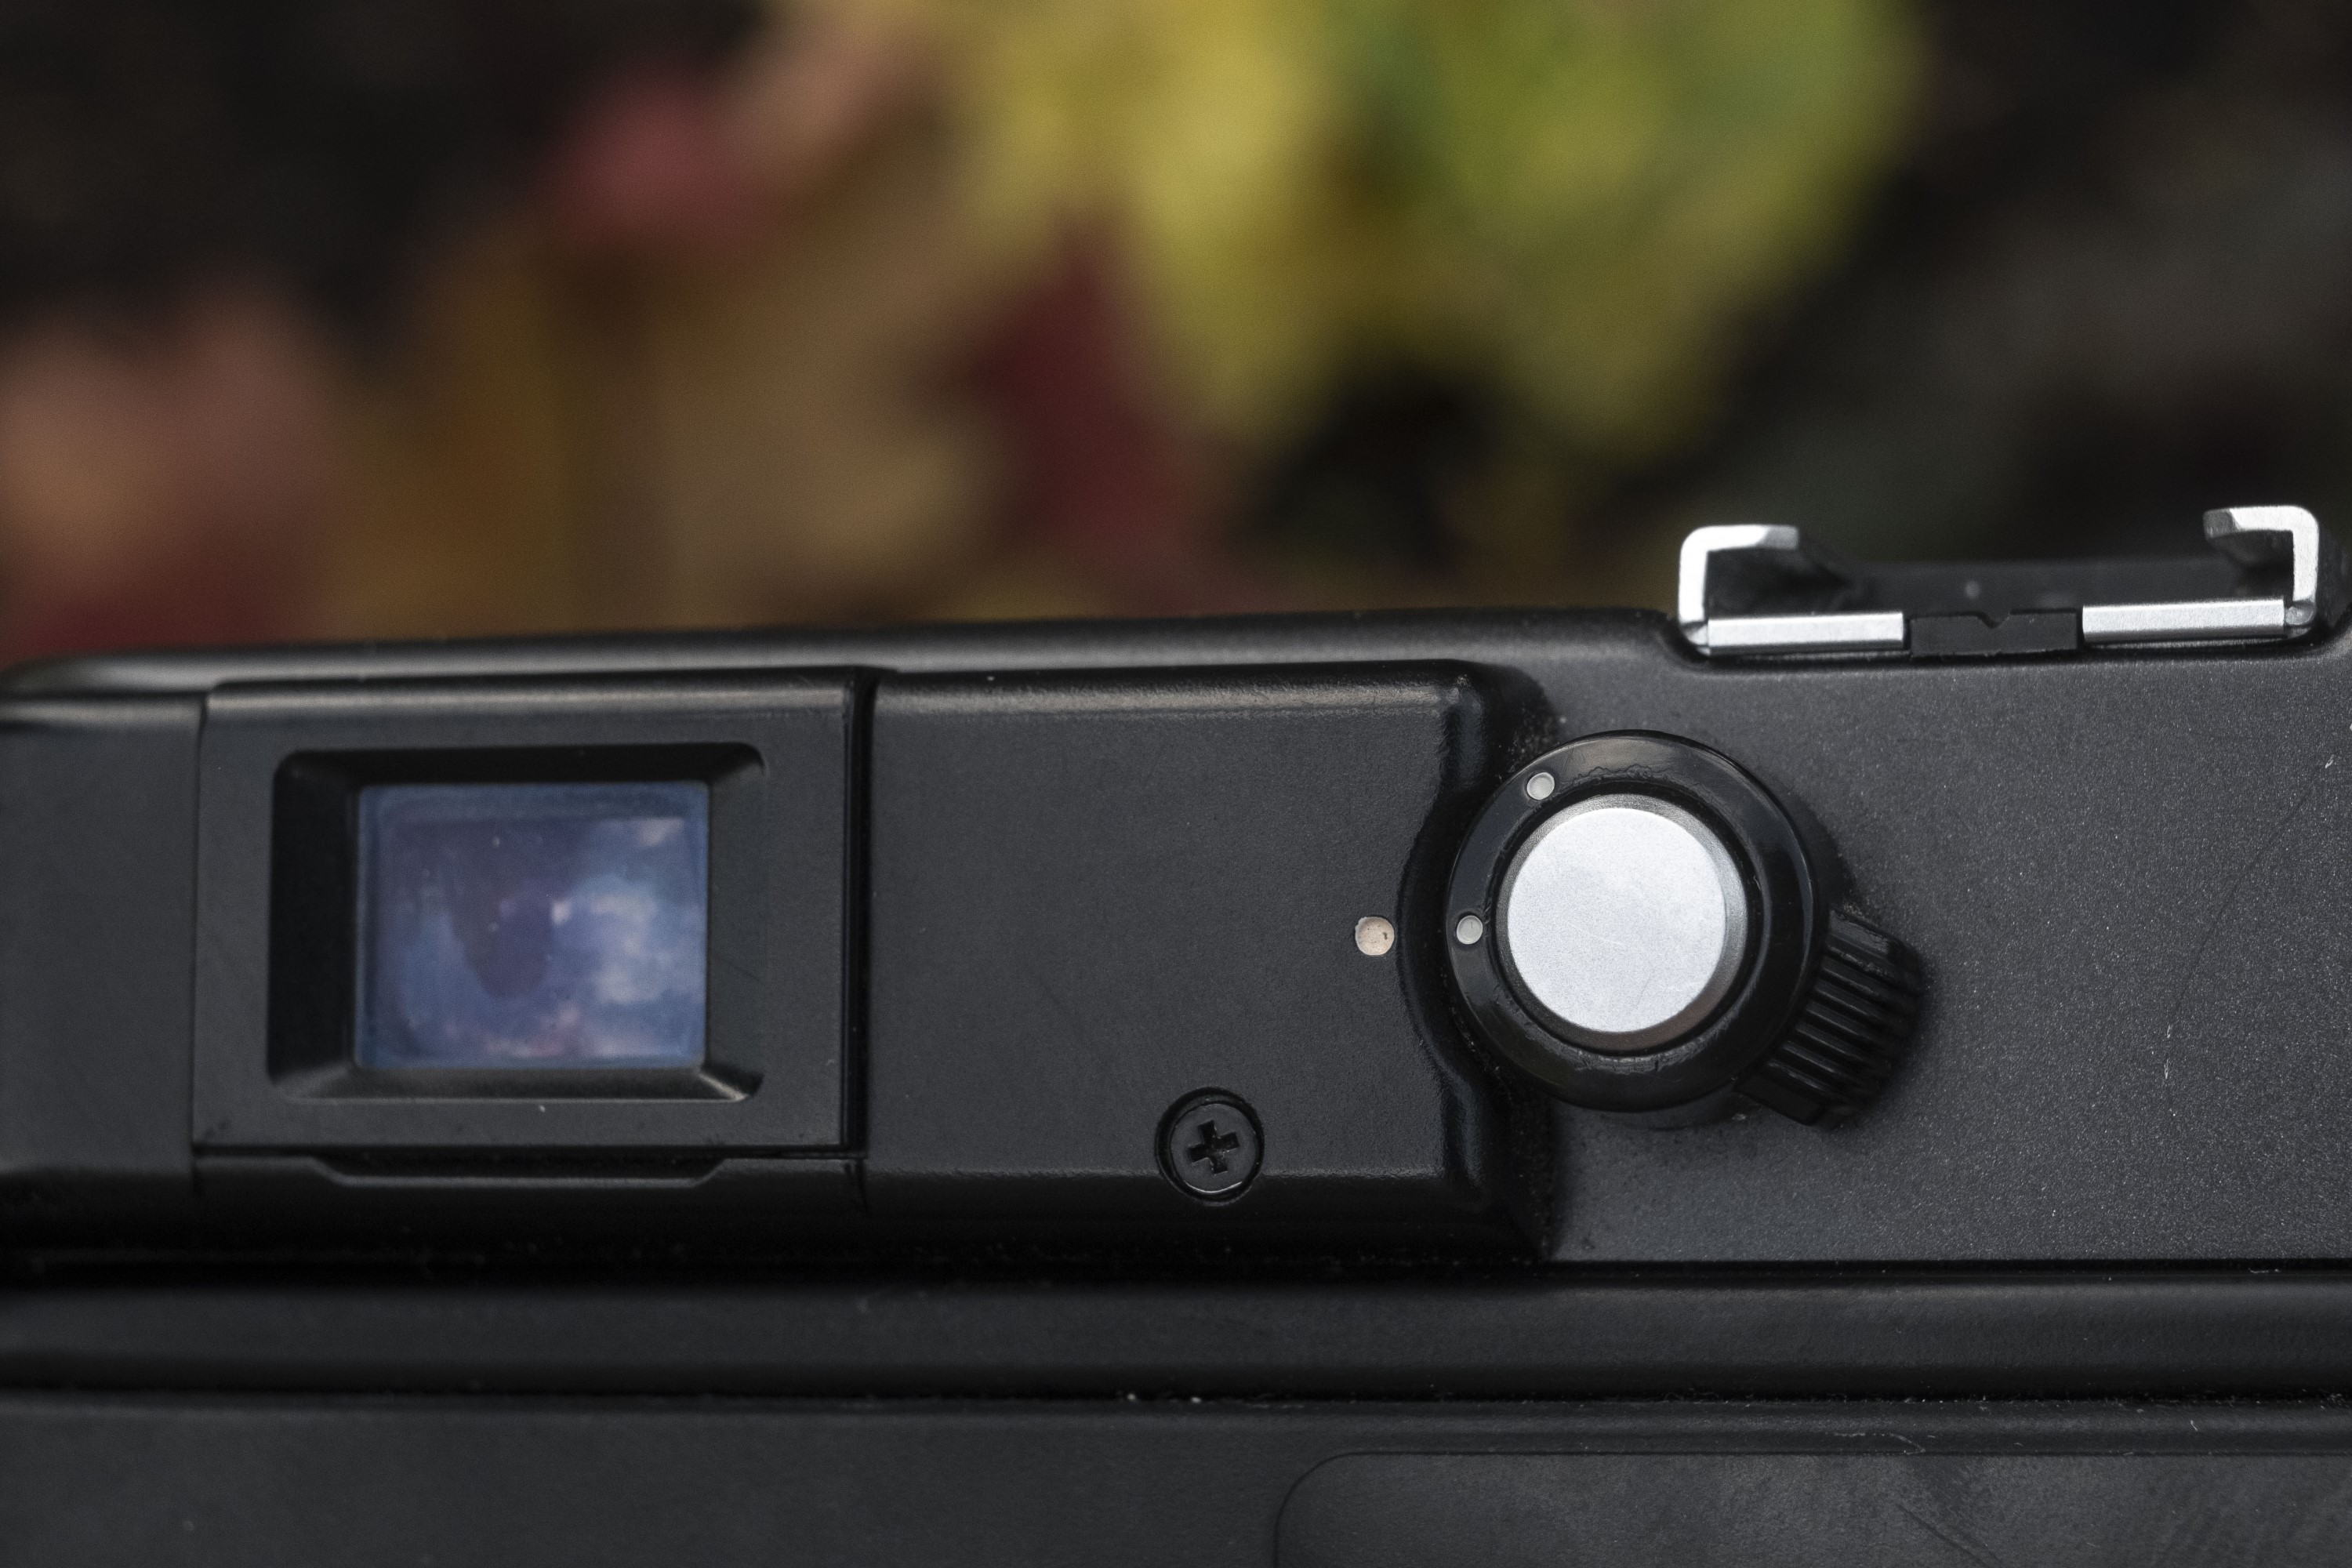
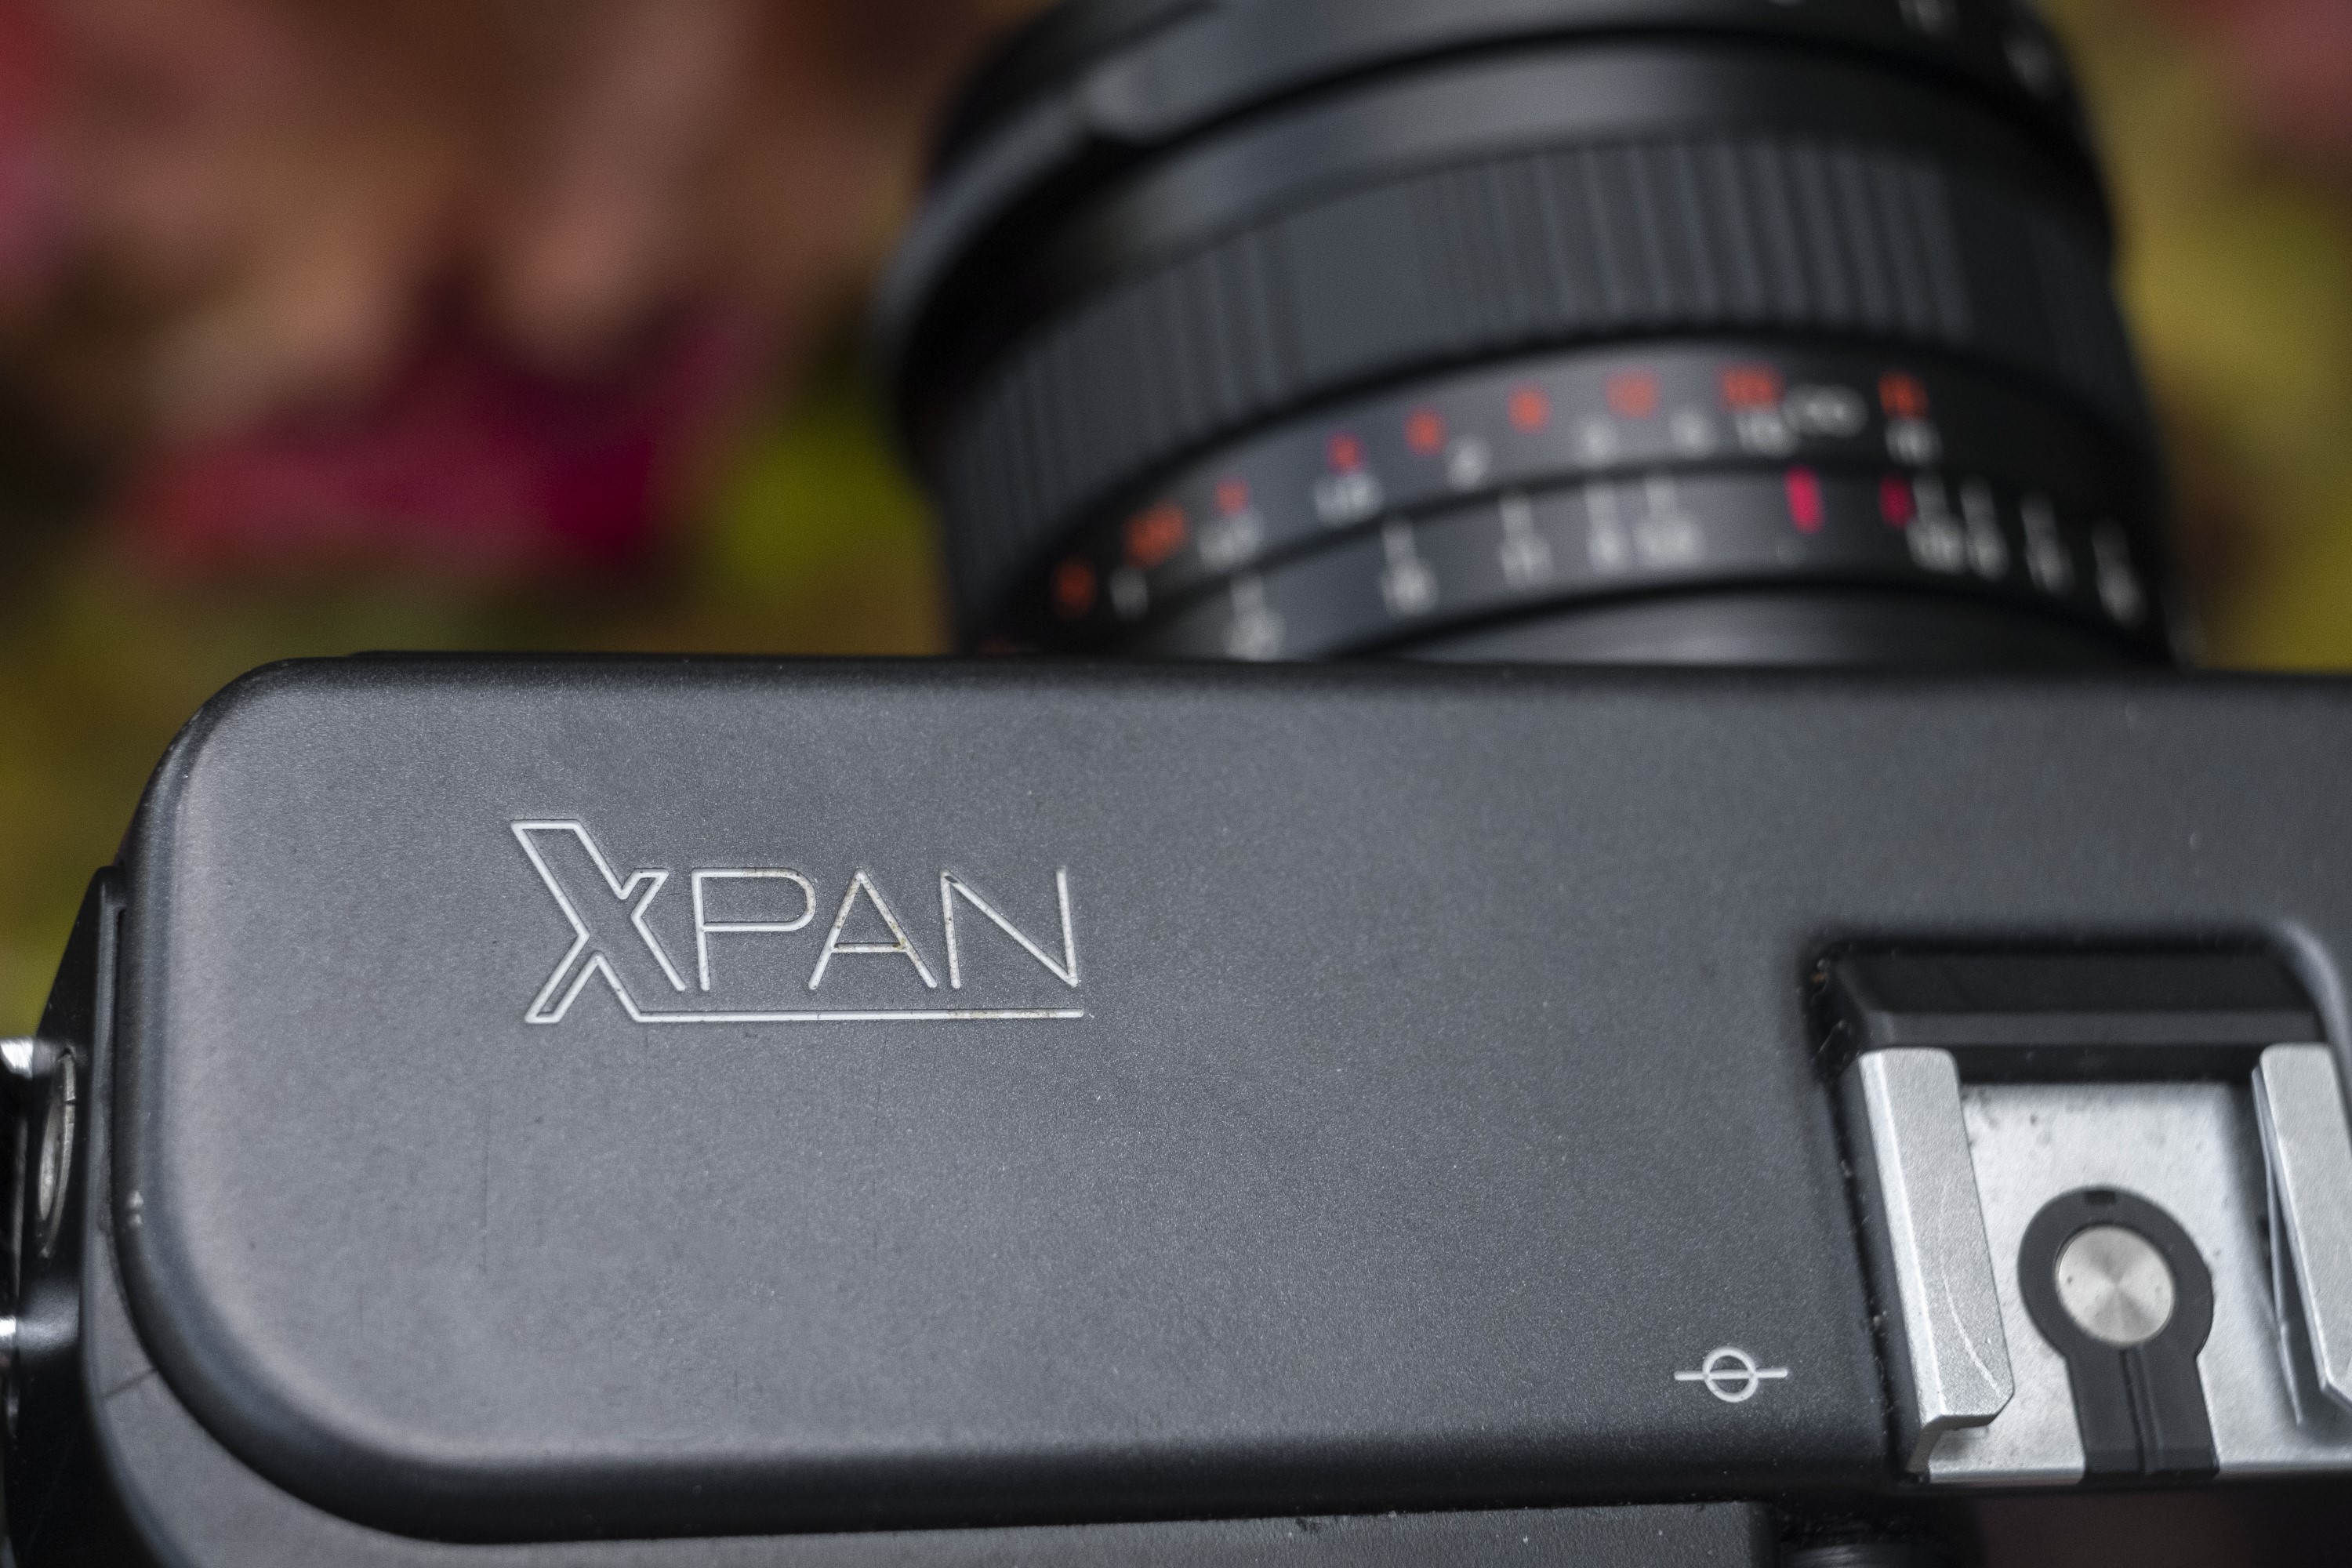
The top plate is elegantly designed with a large Xpan logo engraved into the entire left side. Since the Xpan has a fully motorized film transport, there’s no need for things like a rewind knob or film advance lever. In the center is a standard flash hot shoe, which I imagine means it works with any electronic flash out there. I did not test the camera with flash, but with only a central contact point, I doubt things like TTL flash metering are supported.
On the right is the mechanical film speed dial with speeds from 8 seconds to 1/1000 plus Bulb and Auto. With the camera in Auto mode (which I am not ashamed to admit is what I used), the speed dial locks into position, requiring that you press on a central button in the middle of the dial to prevent the camera from accidentally leaving Auto mode.
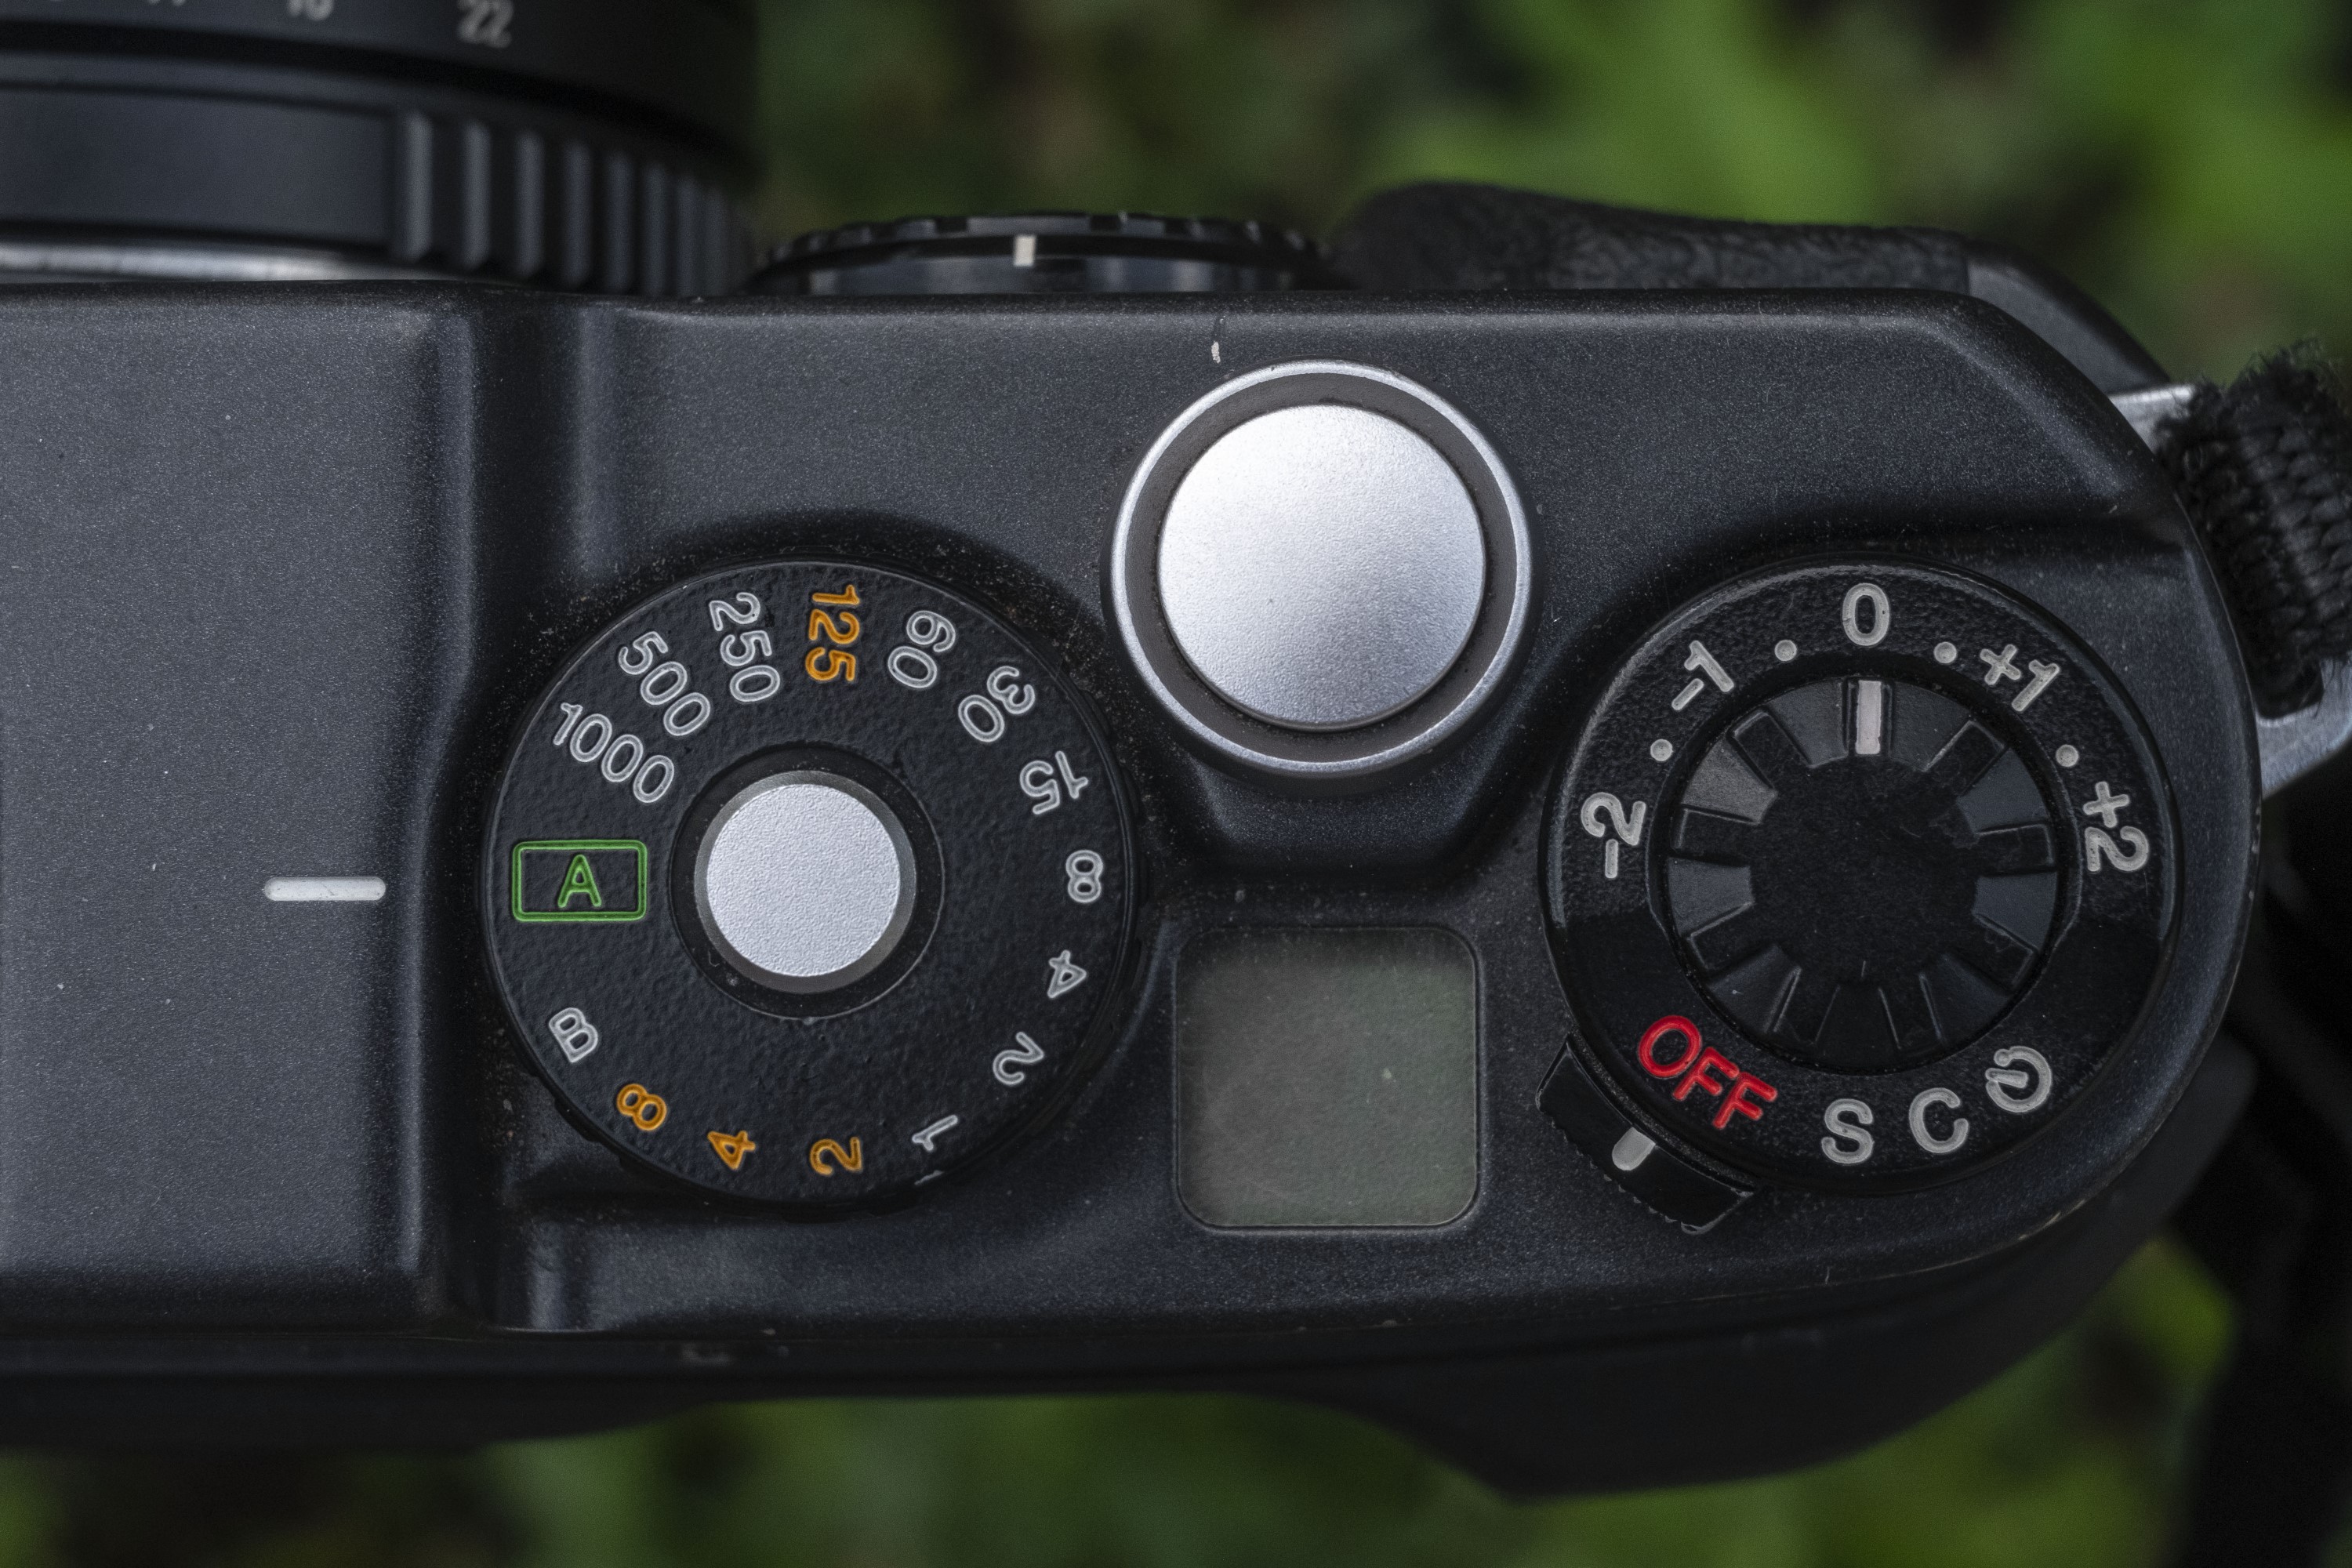
Next is the silver shutter release button that is comfortably located exactly where your right index finger naturally falls while holding the camera. Beneath it is a small LCD screen that shows the remaining number of exposures left, and a little “P” for when the camera is in Panoramic mode. The number of exposures remaining on this screen changes depending on whether the camera is in P mode or standard mode. You can seamlessly switch back and forth between panoramic and standard images on the same roll and the exposure counter will always show you how many remain at any point.
Finally, is a dual mode dial that functions as both an over/under exposure compensation switch, and the camera’s power and drive mode selector switch. There are three modes, single, continuous, and self-timer, which activates a 10 second countdown before firing the shutter.
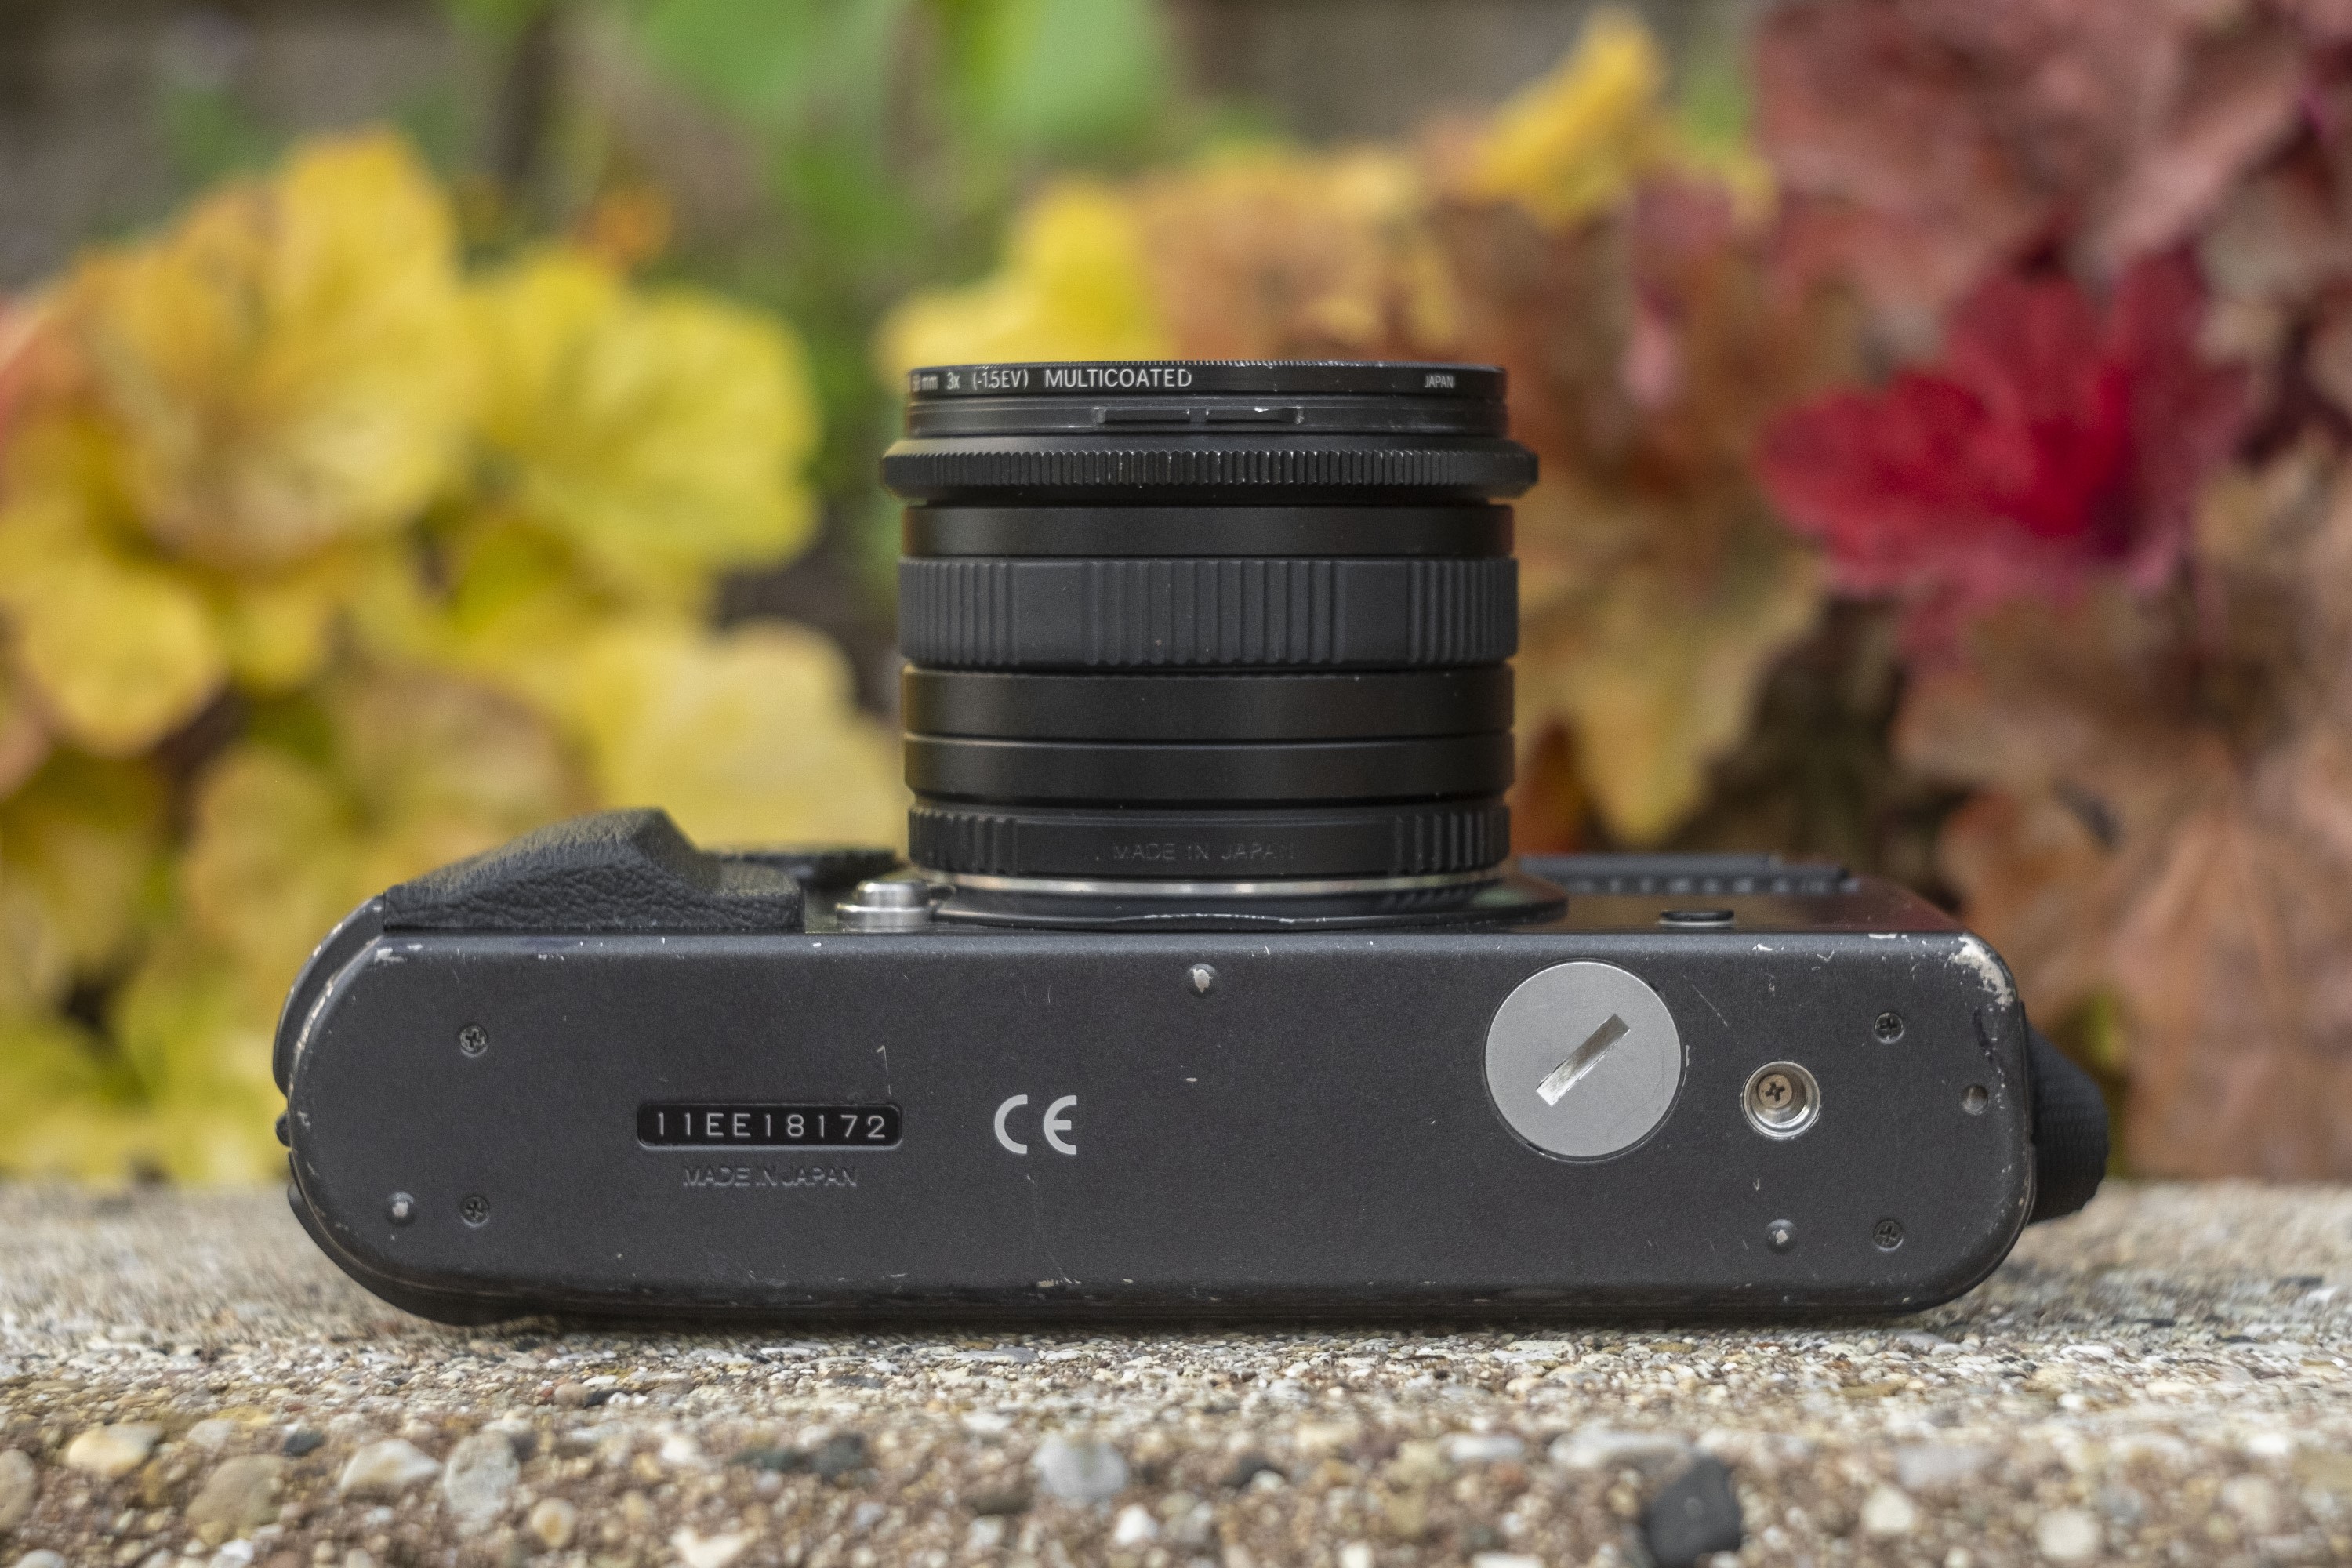
On the bottom of the camera, there’s little to see. The words “Made in Japan” appear below the serial number and eliminate any doubt that this camera wasn’t made in Sweden. Near the right side is the circular battery compartment that houses the two CR2 batteries required to operate the camera and to the right is the 1/4″ tripod socket. Although I had no need to use a tripod in my test with this camera, I’d consider the location of this socket to be one of the few design missteps of the camera. With a lens, hood, and viewfinder mounted, the Xpan tops the scales over 2.5 lbs and when mounting a camera that heavy, I prefer seeing tripod sockets in the center of the base plate, not off to the side like this.
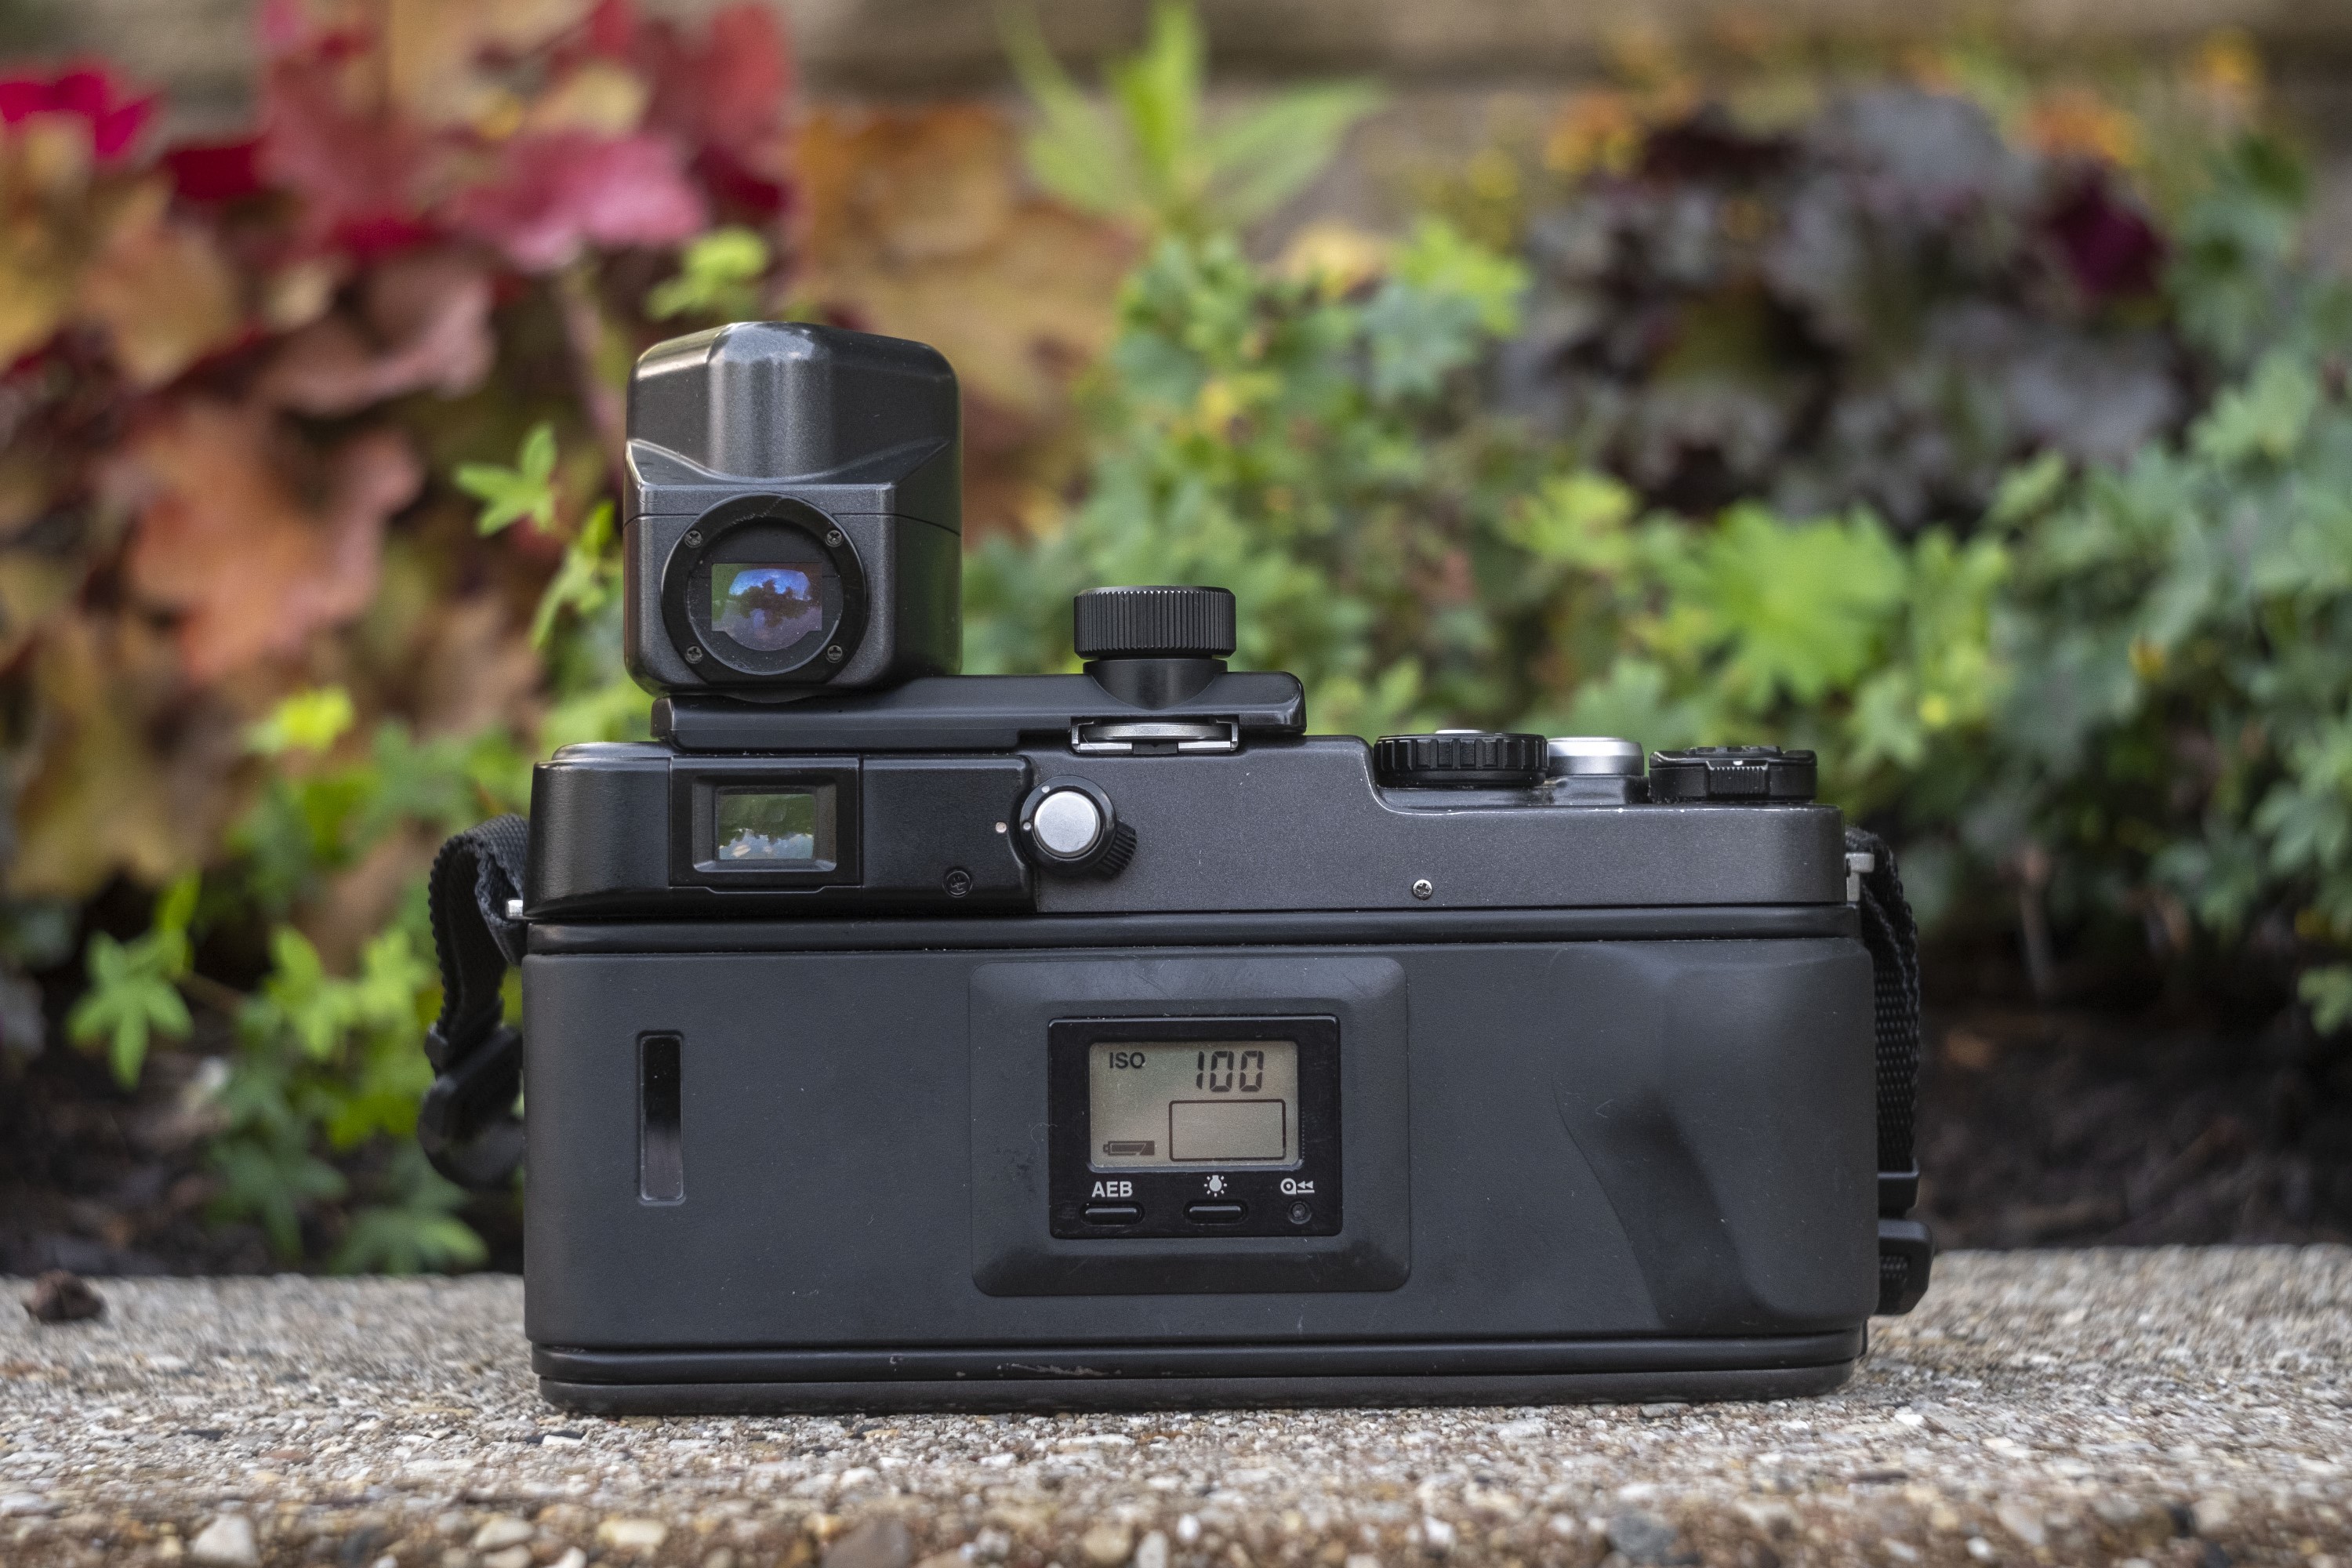
Turning the camera to the side you’re most likely to see while shooting it, you’ll see a second LCD screen in the center of the rear door that shows the status of the battery, the detected ISO film speed when DX is selected, and the manual speed selected otherwise, and exposure EV compensation (if set). To the left of the LCD screen is a clear peep hole into the film compartment which allows you to see what kind of film is loaded in the camera.
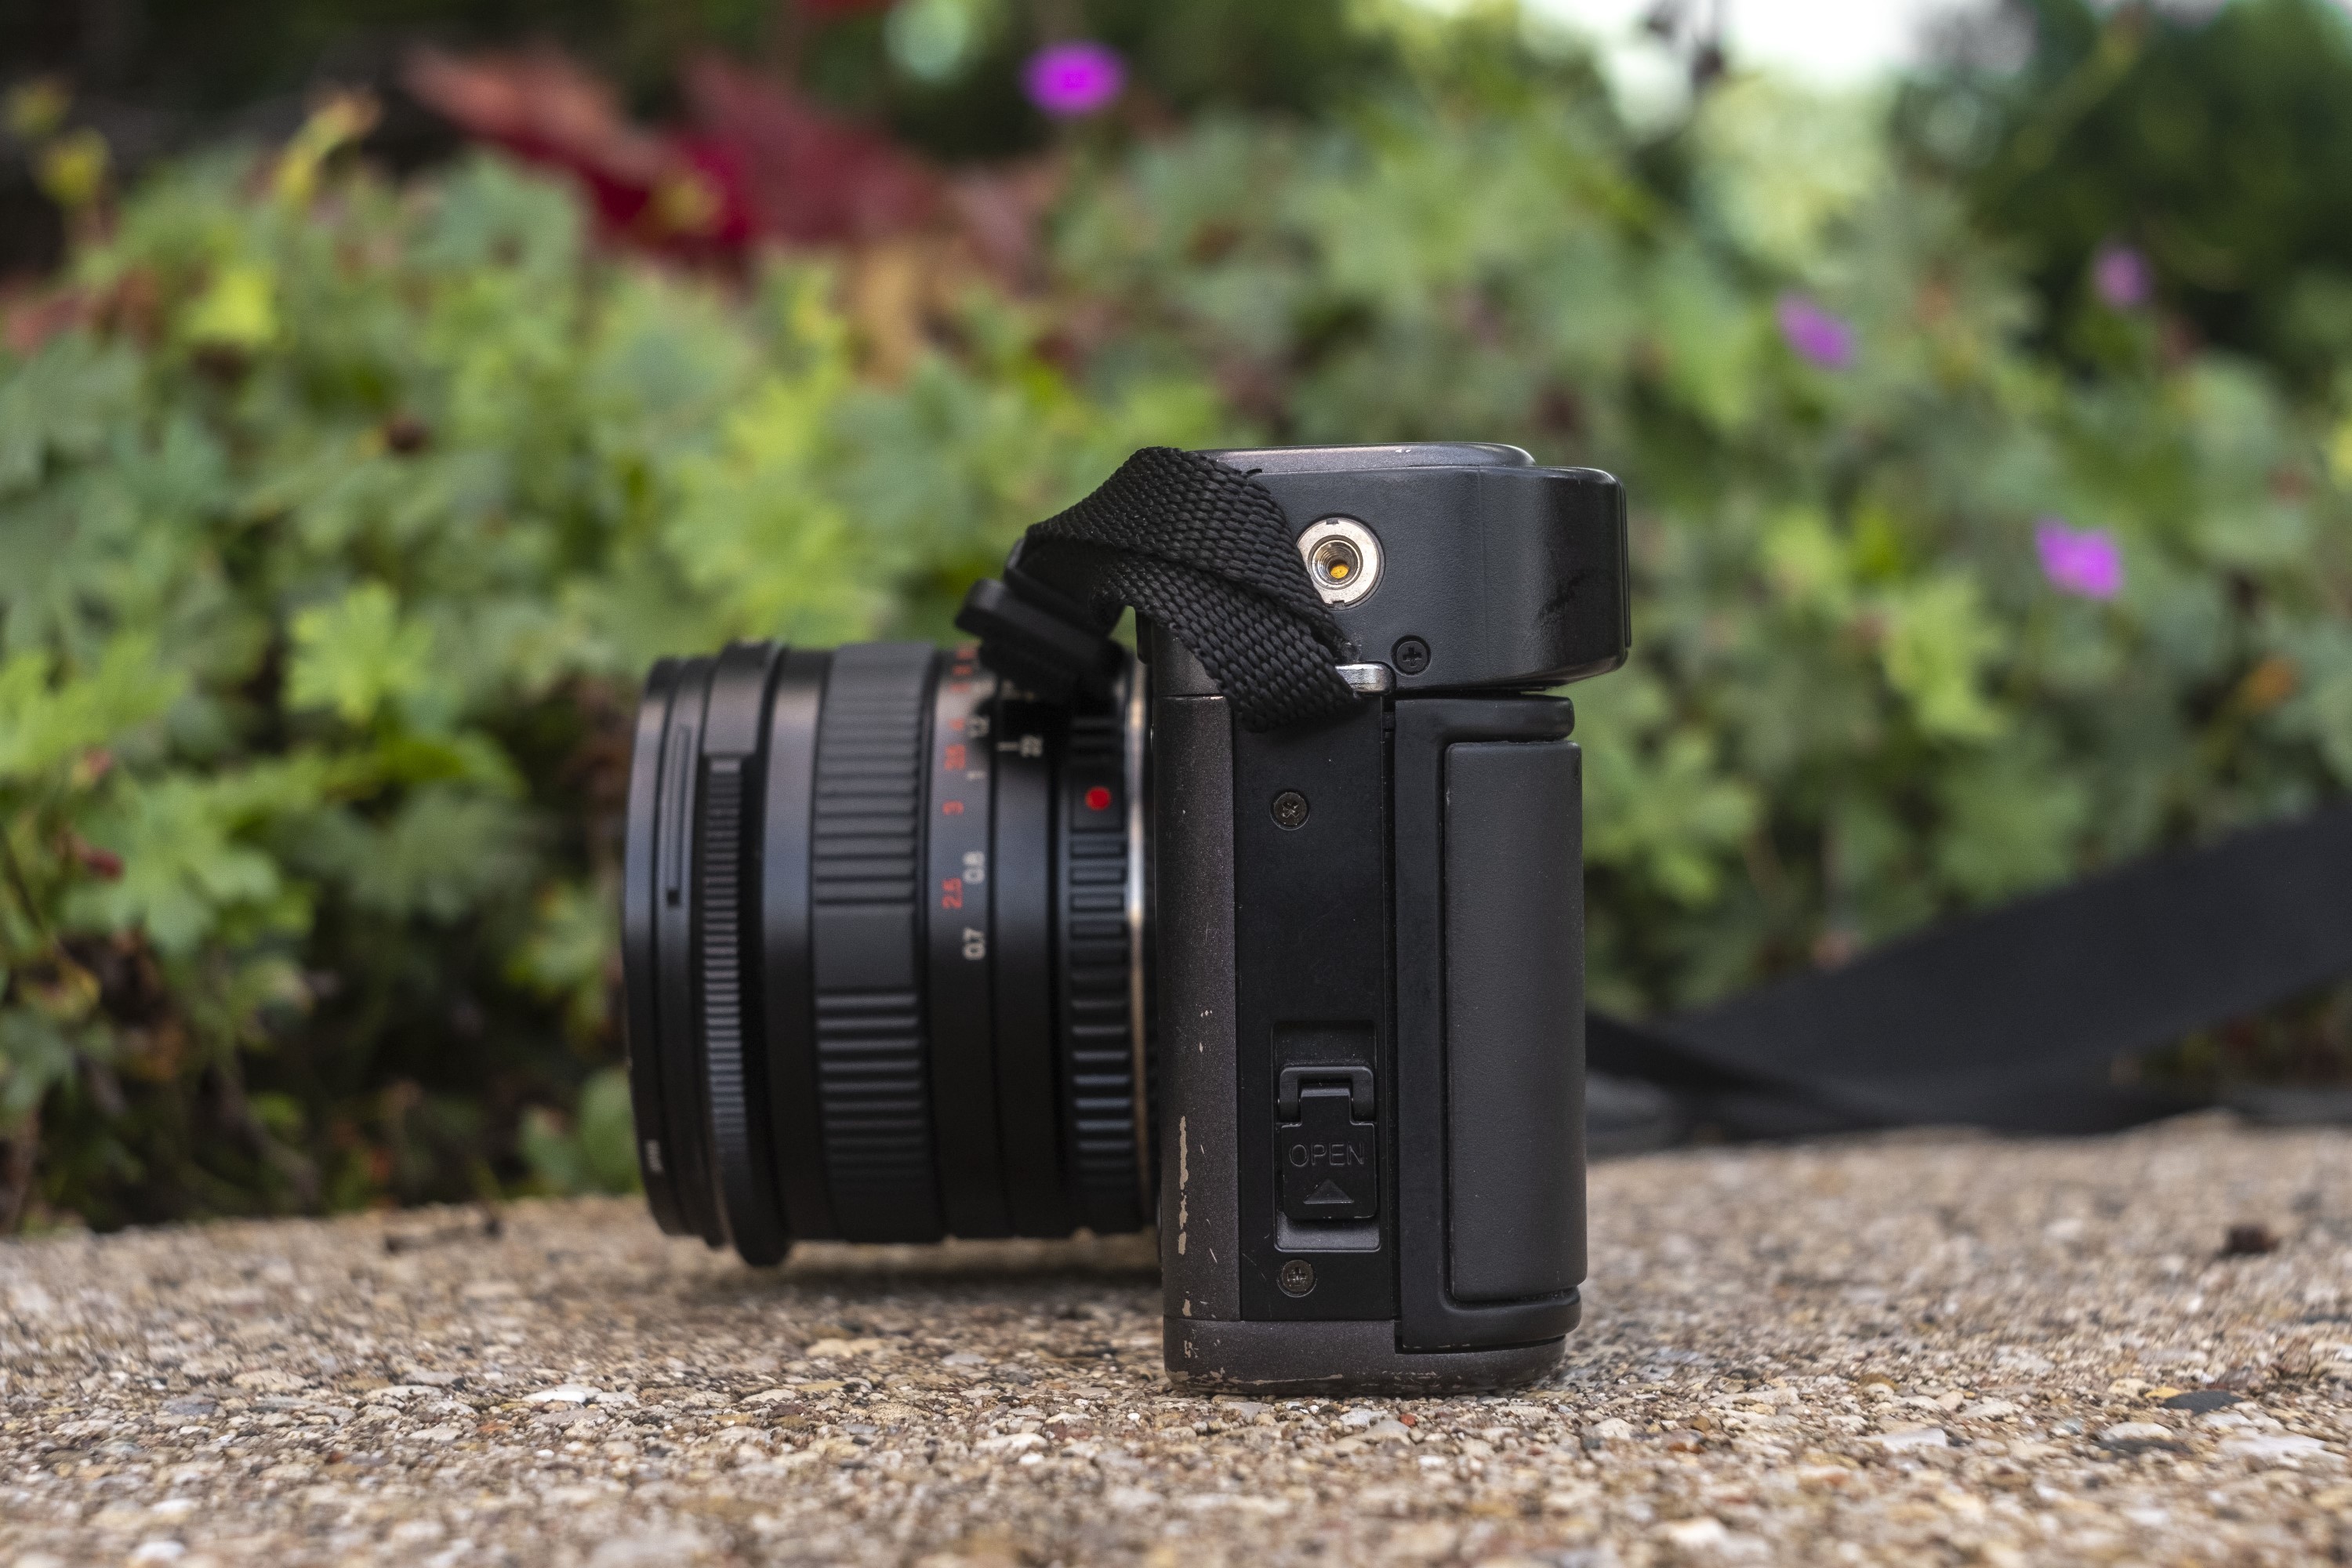
To gain access to the film compartment, there is a folding door release on the cameras right side. Simply lift up on the small tab that says “Open” and press up until the door pops open.
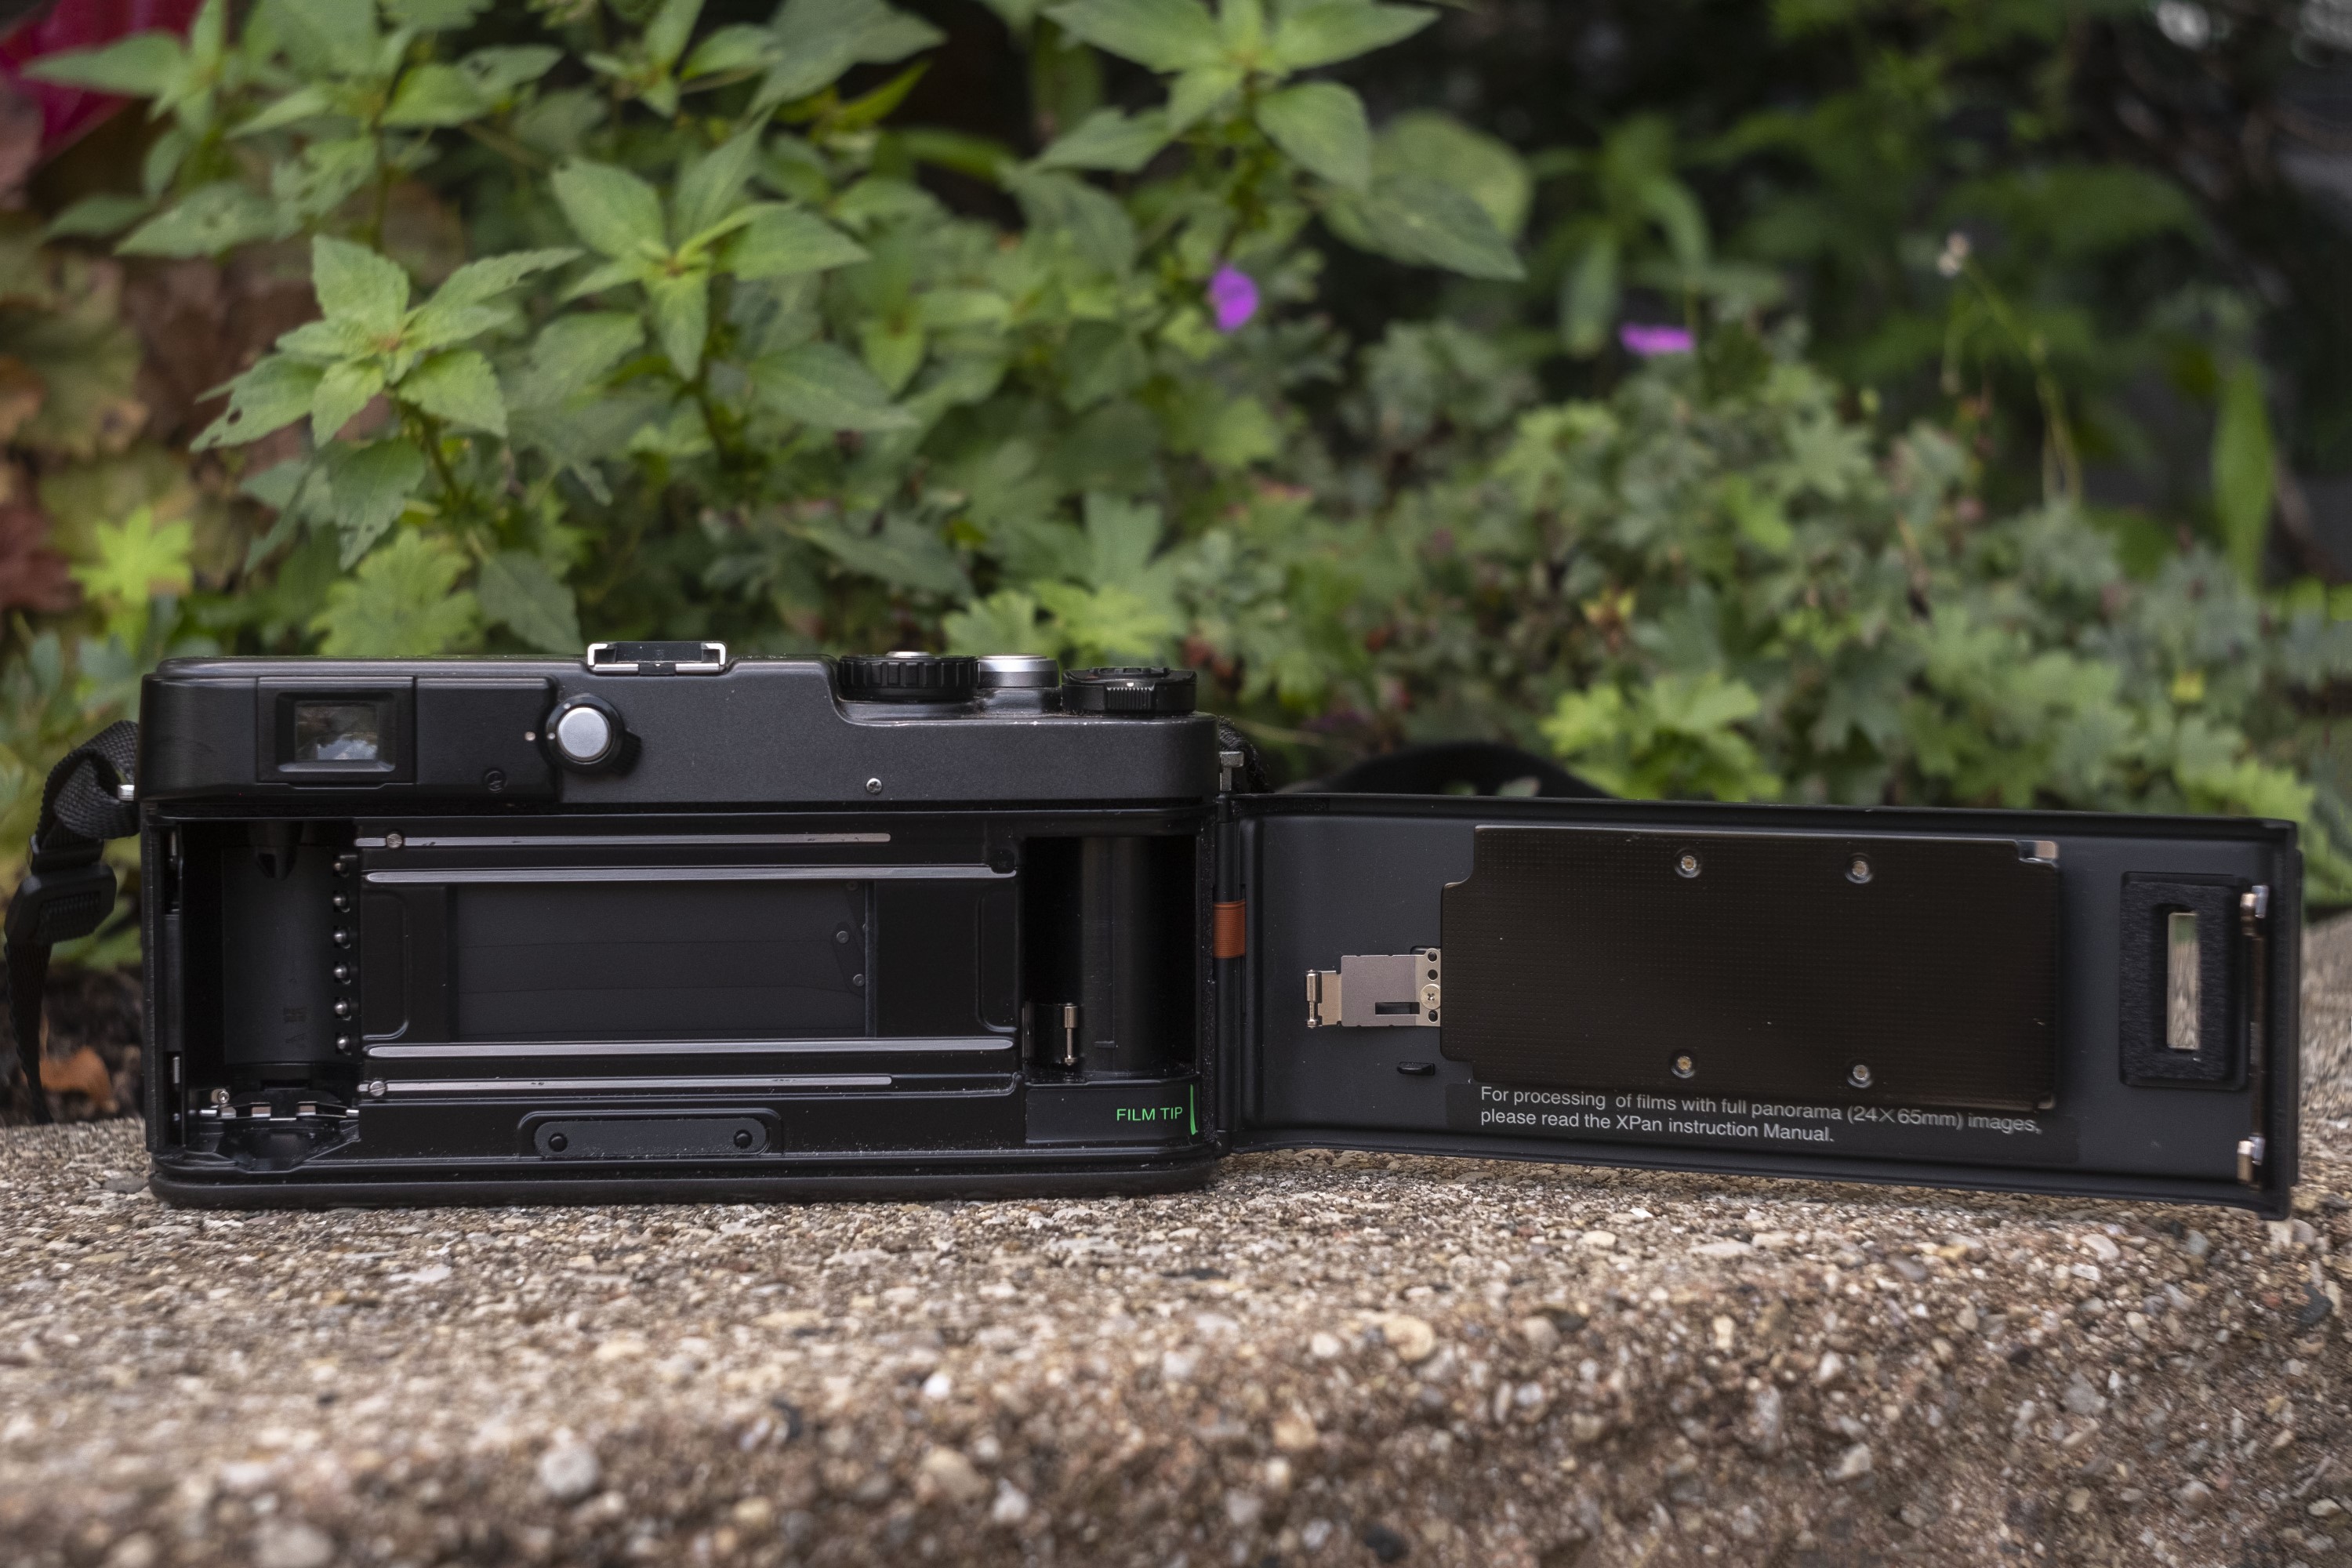
The Xpan’s film compartment looks like most other 35mm camera film compartments, except much, much wider. It is here where you can fully appreciate the size of the 65mm exposures that this camera makes.
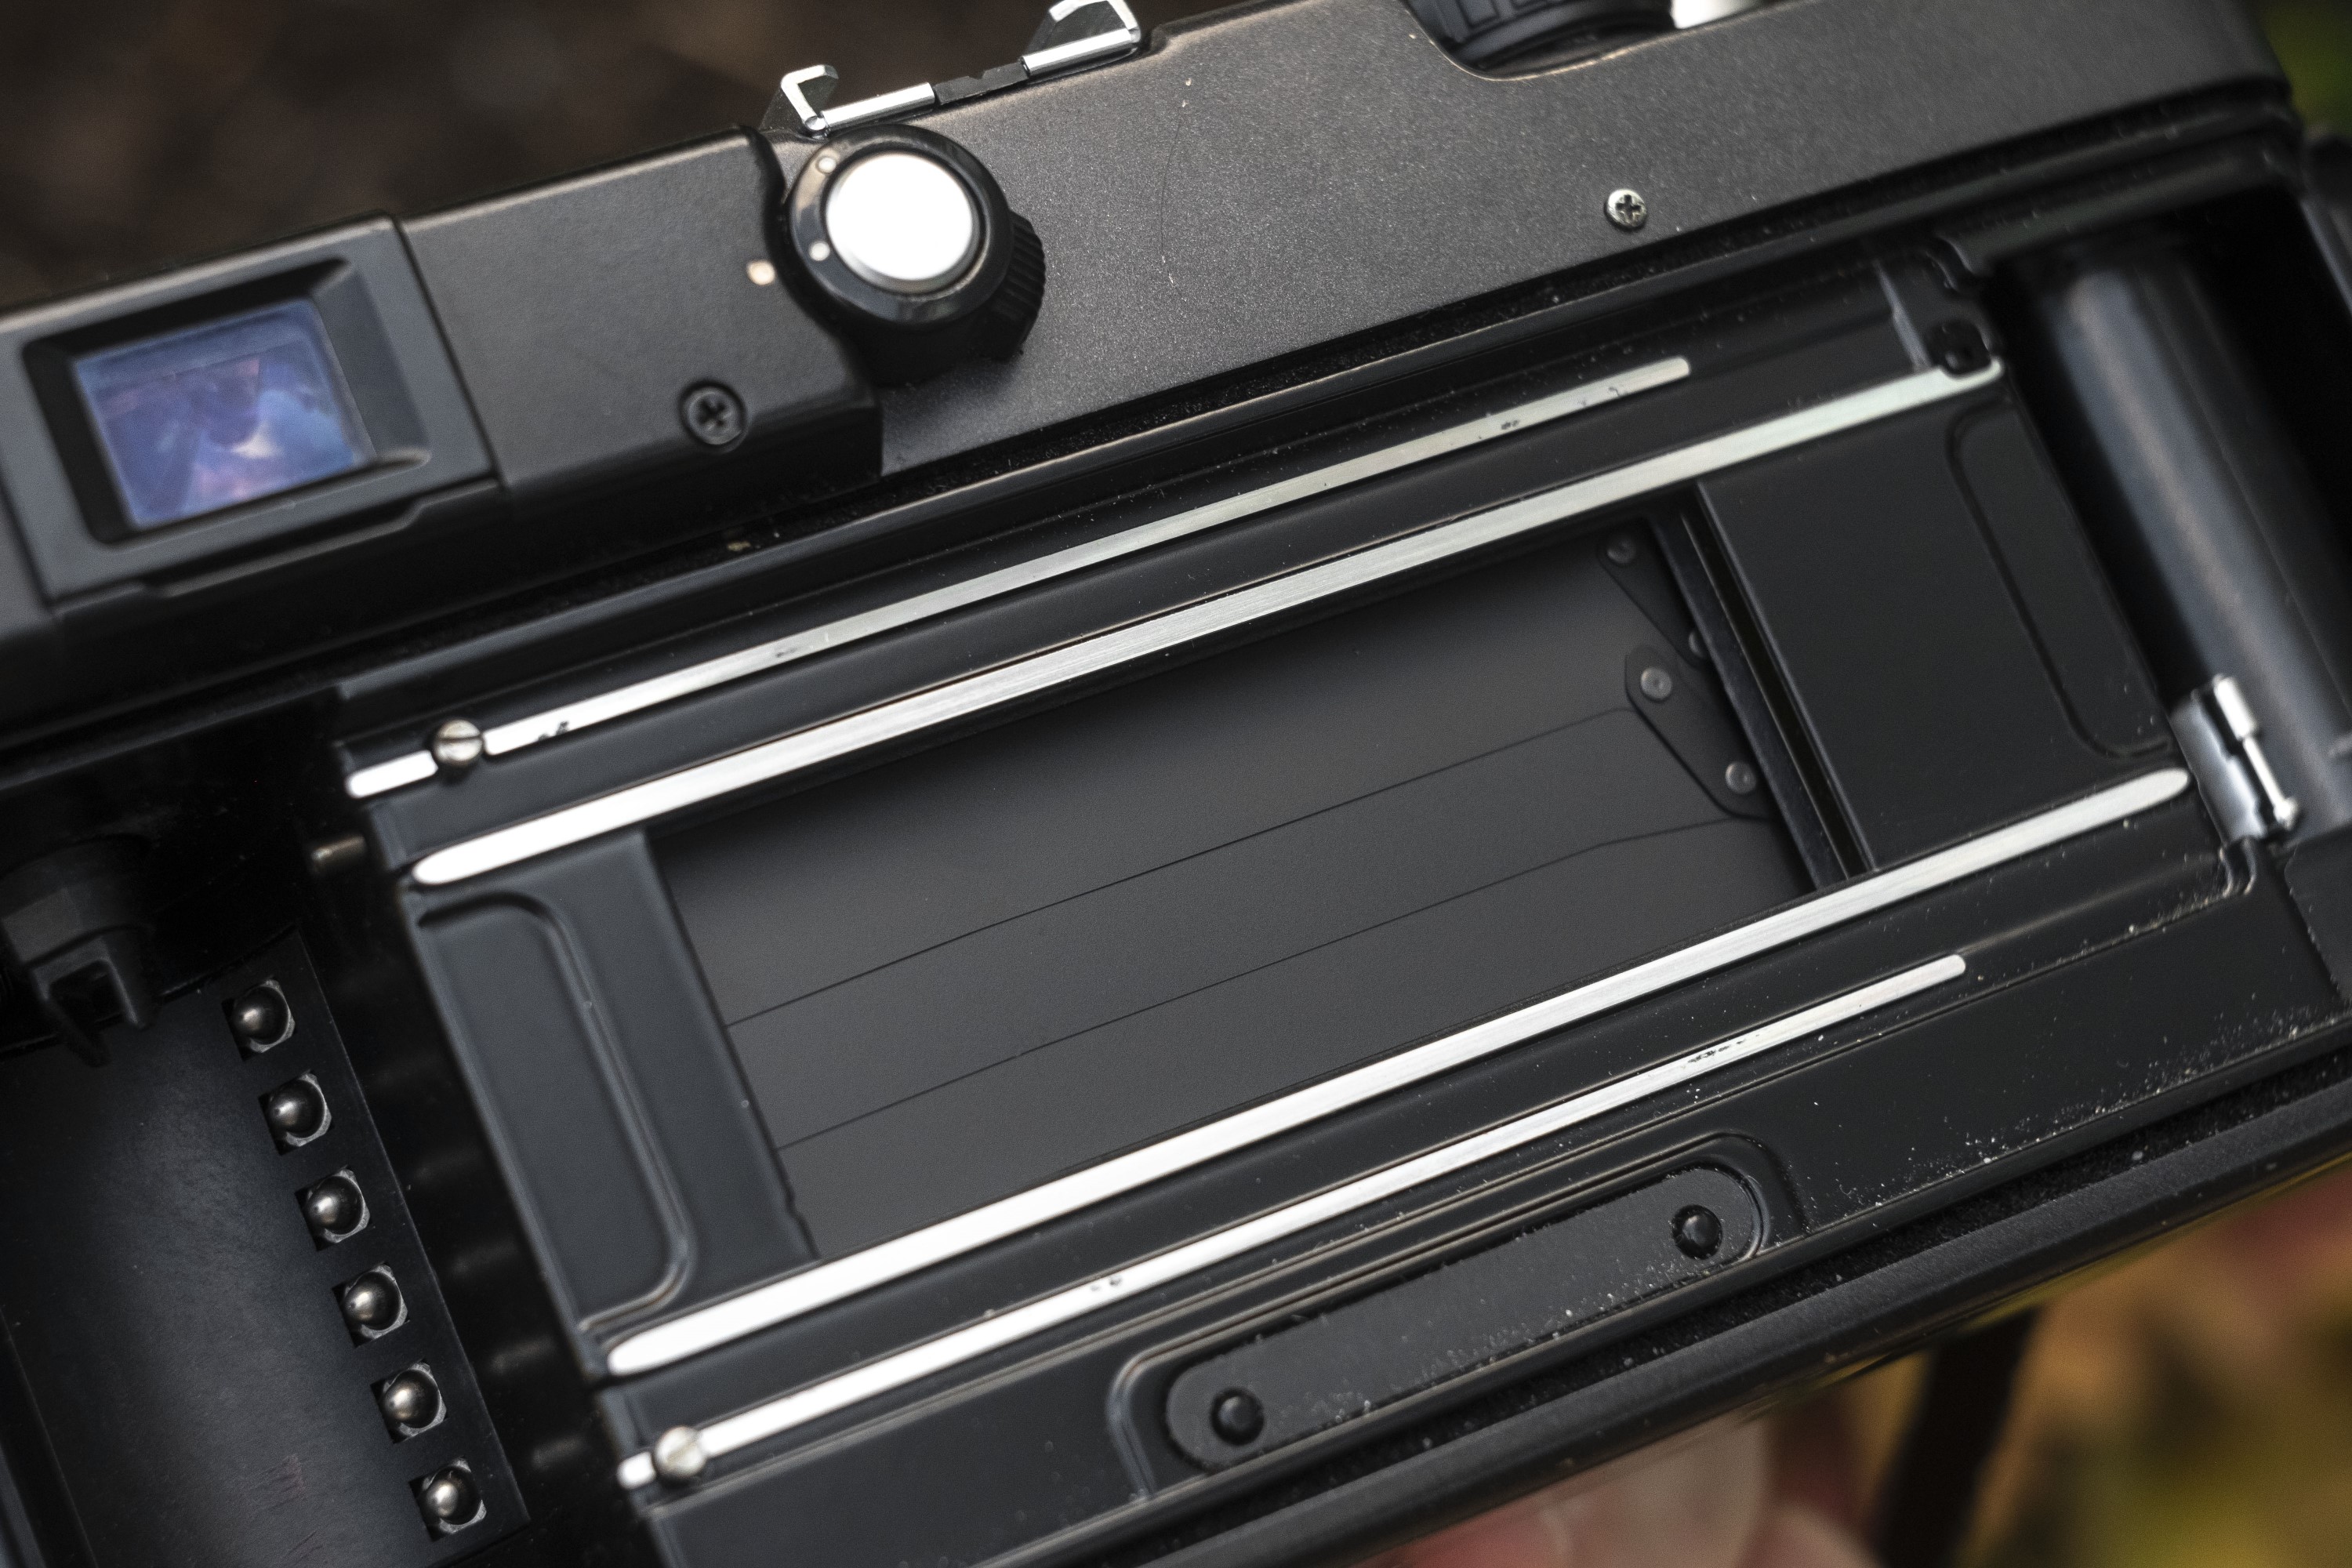
The shutter is a pretty standard looking vertically traveling focal plane design, except once again, wider.
Film loading is from left to right onto a quick loading take up spool. Simply extend the leader of a new roll of film to the green “Film Tip” line and close the door and the camera does the rest. The first time you load a roll of film into the Xpan, it might seem like it takes a lot longer to load than most other fully automatic 35mm cameras, and that’s because the Xpan uses a backwards film transport which means the camera automatically advances the entire roll of film all the way to the end of the cassette and shoots the exposures in reverse order until it gets to the beginning.
There’s two advantages to this in that since exposed images are immediately rolled back into the cassette after they’re made, if the film door were to be accidentally opened with film still in it, your exposed images would be already protected in the cassette, lessening the chance of ruining previously exposed images. Another advantage to this is to get a more accurate measurement of how many exposures remain on a roll of film. It doesn’t matter if you use a 12, 24, 36, or even a bulk loaded roll of film, since the camera knows exactly the length of film that’s loaded, it can always give an accurate number of panoramic or standard exposures remaining on the roll.
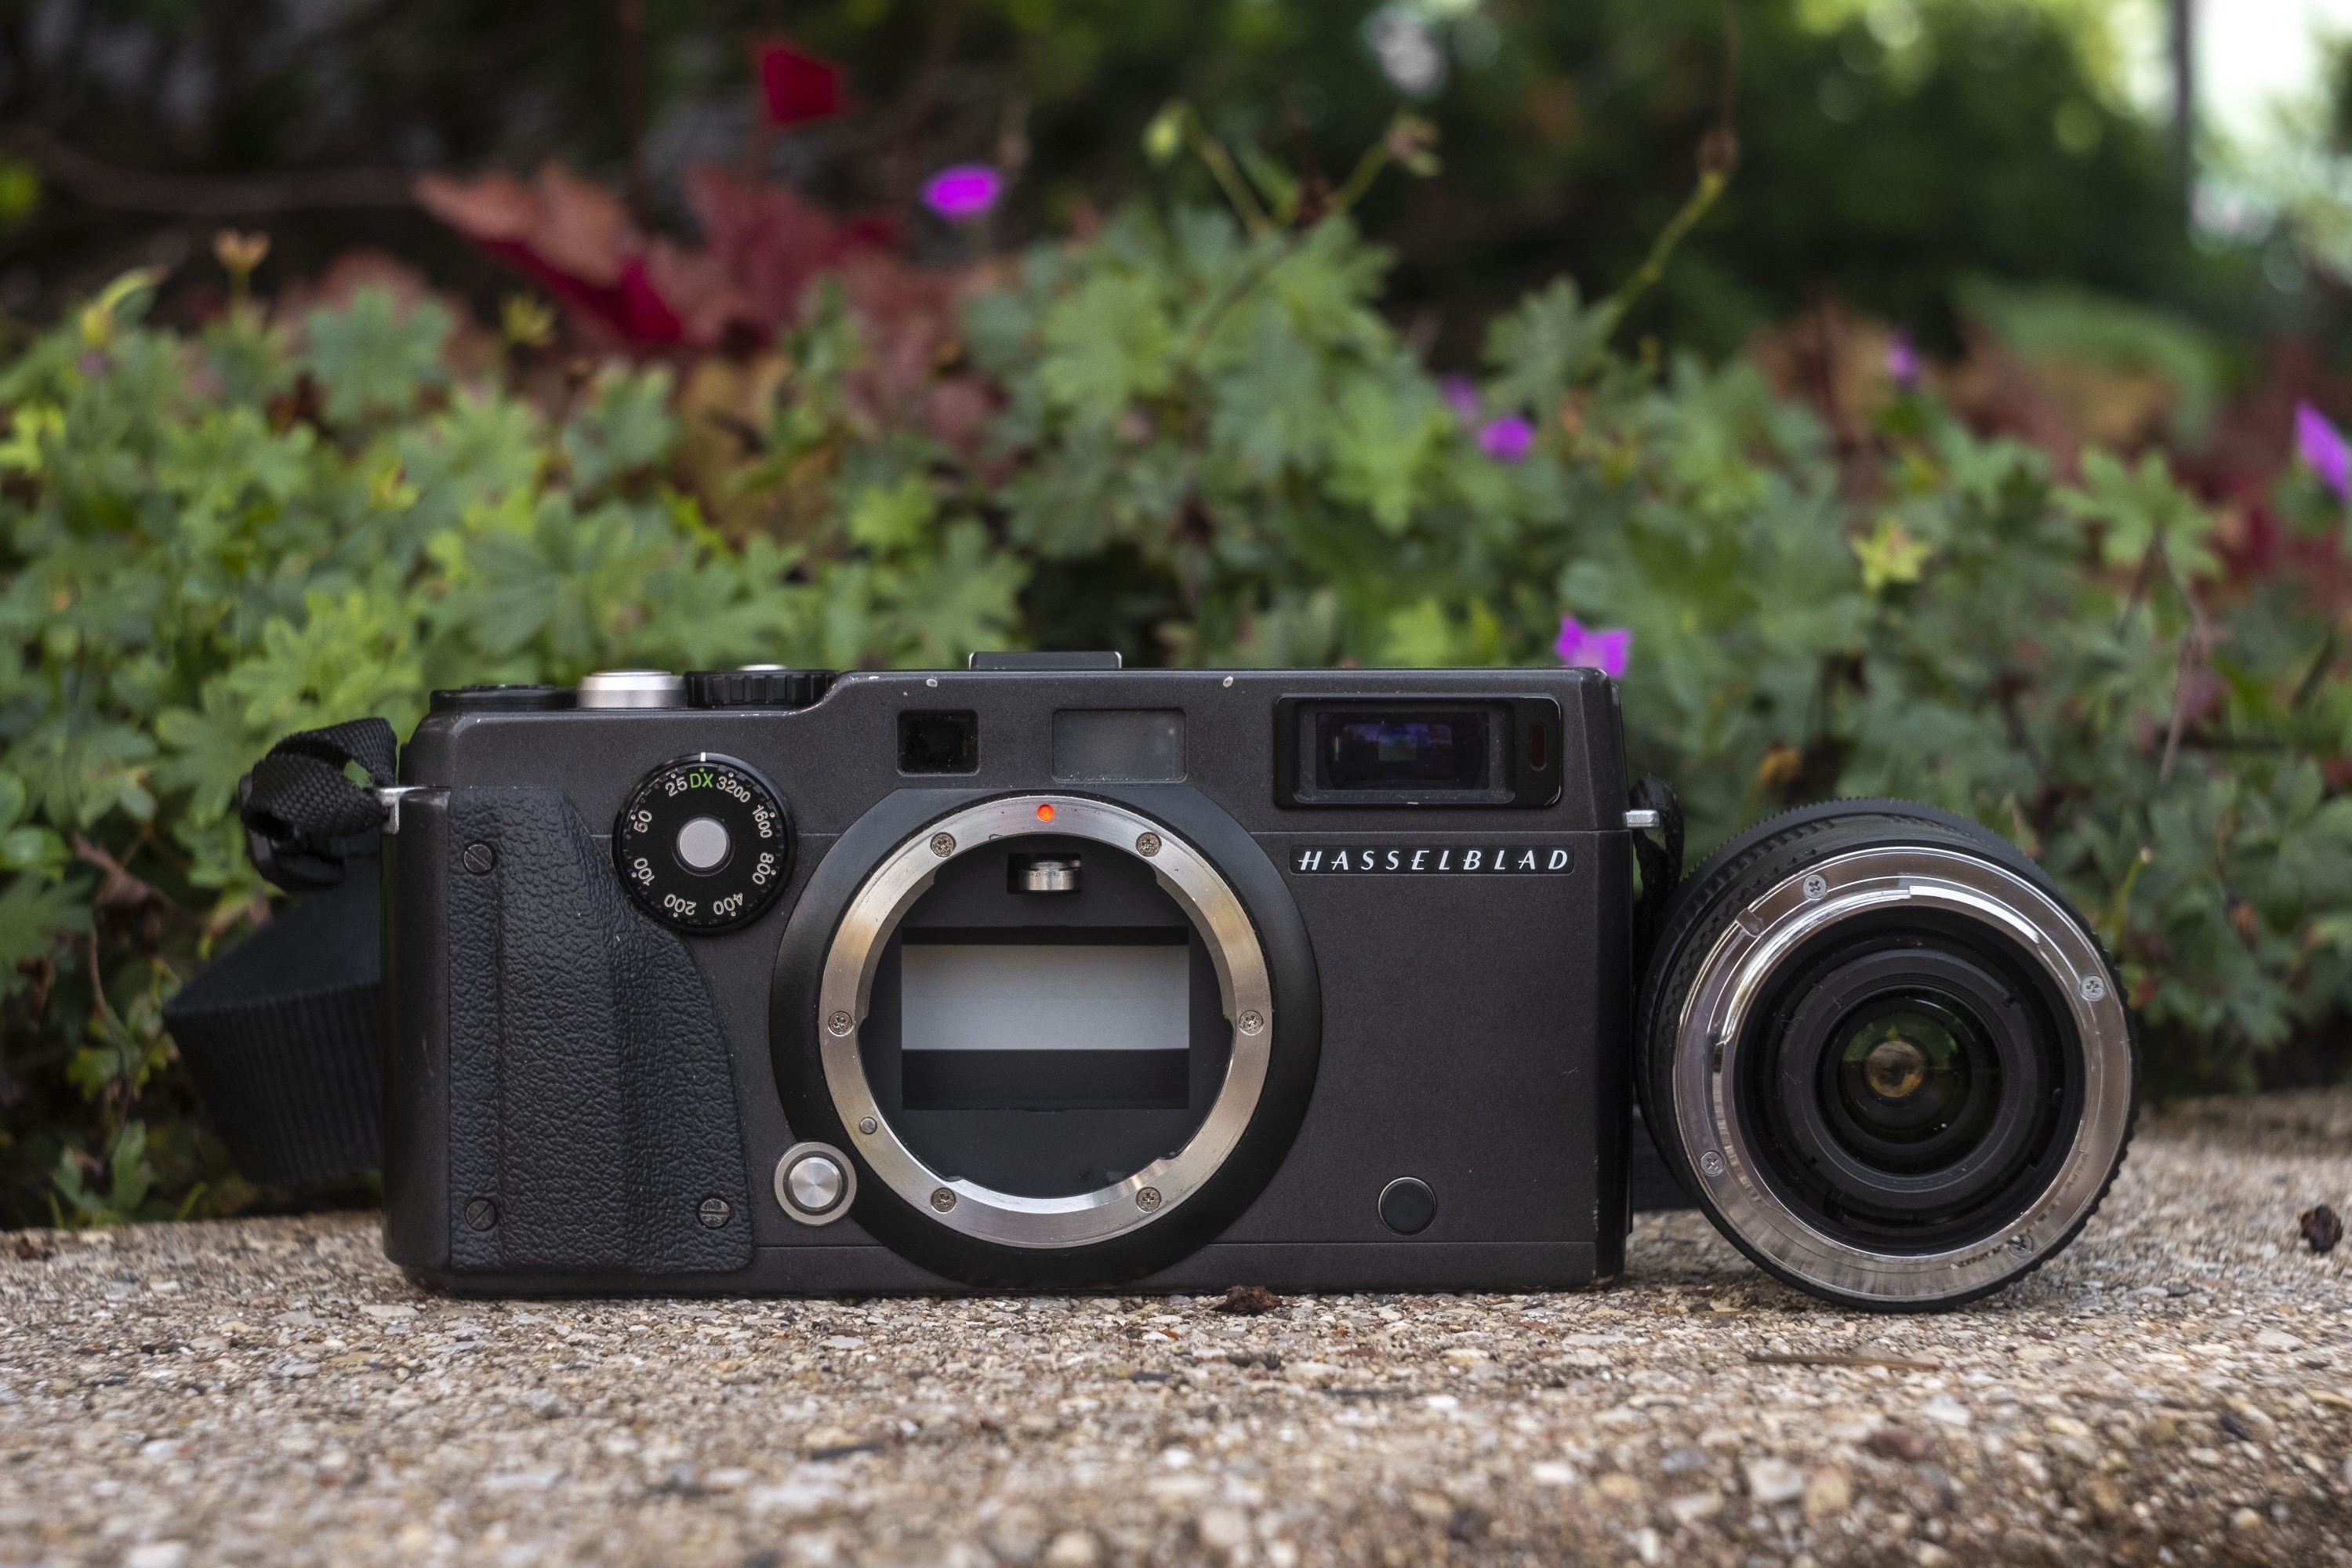
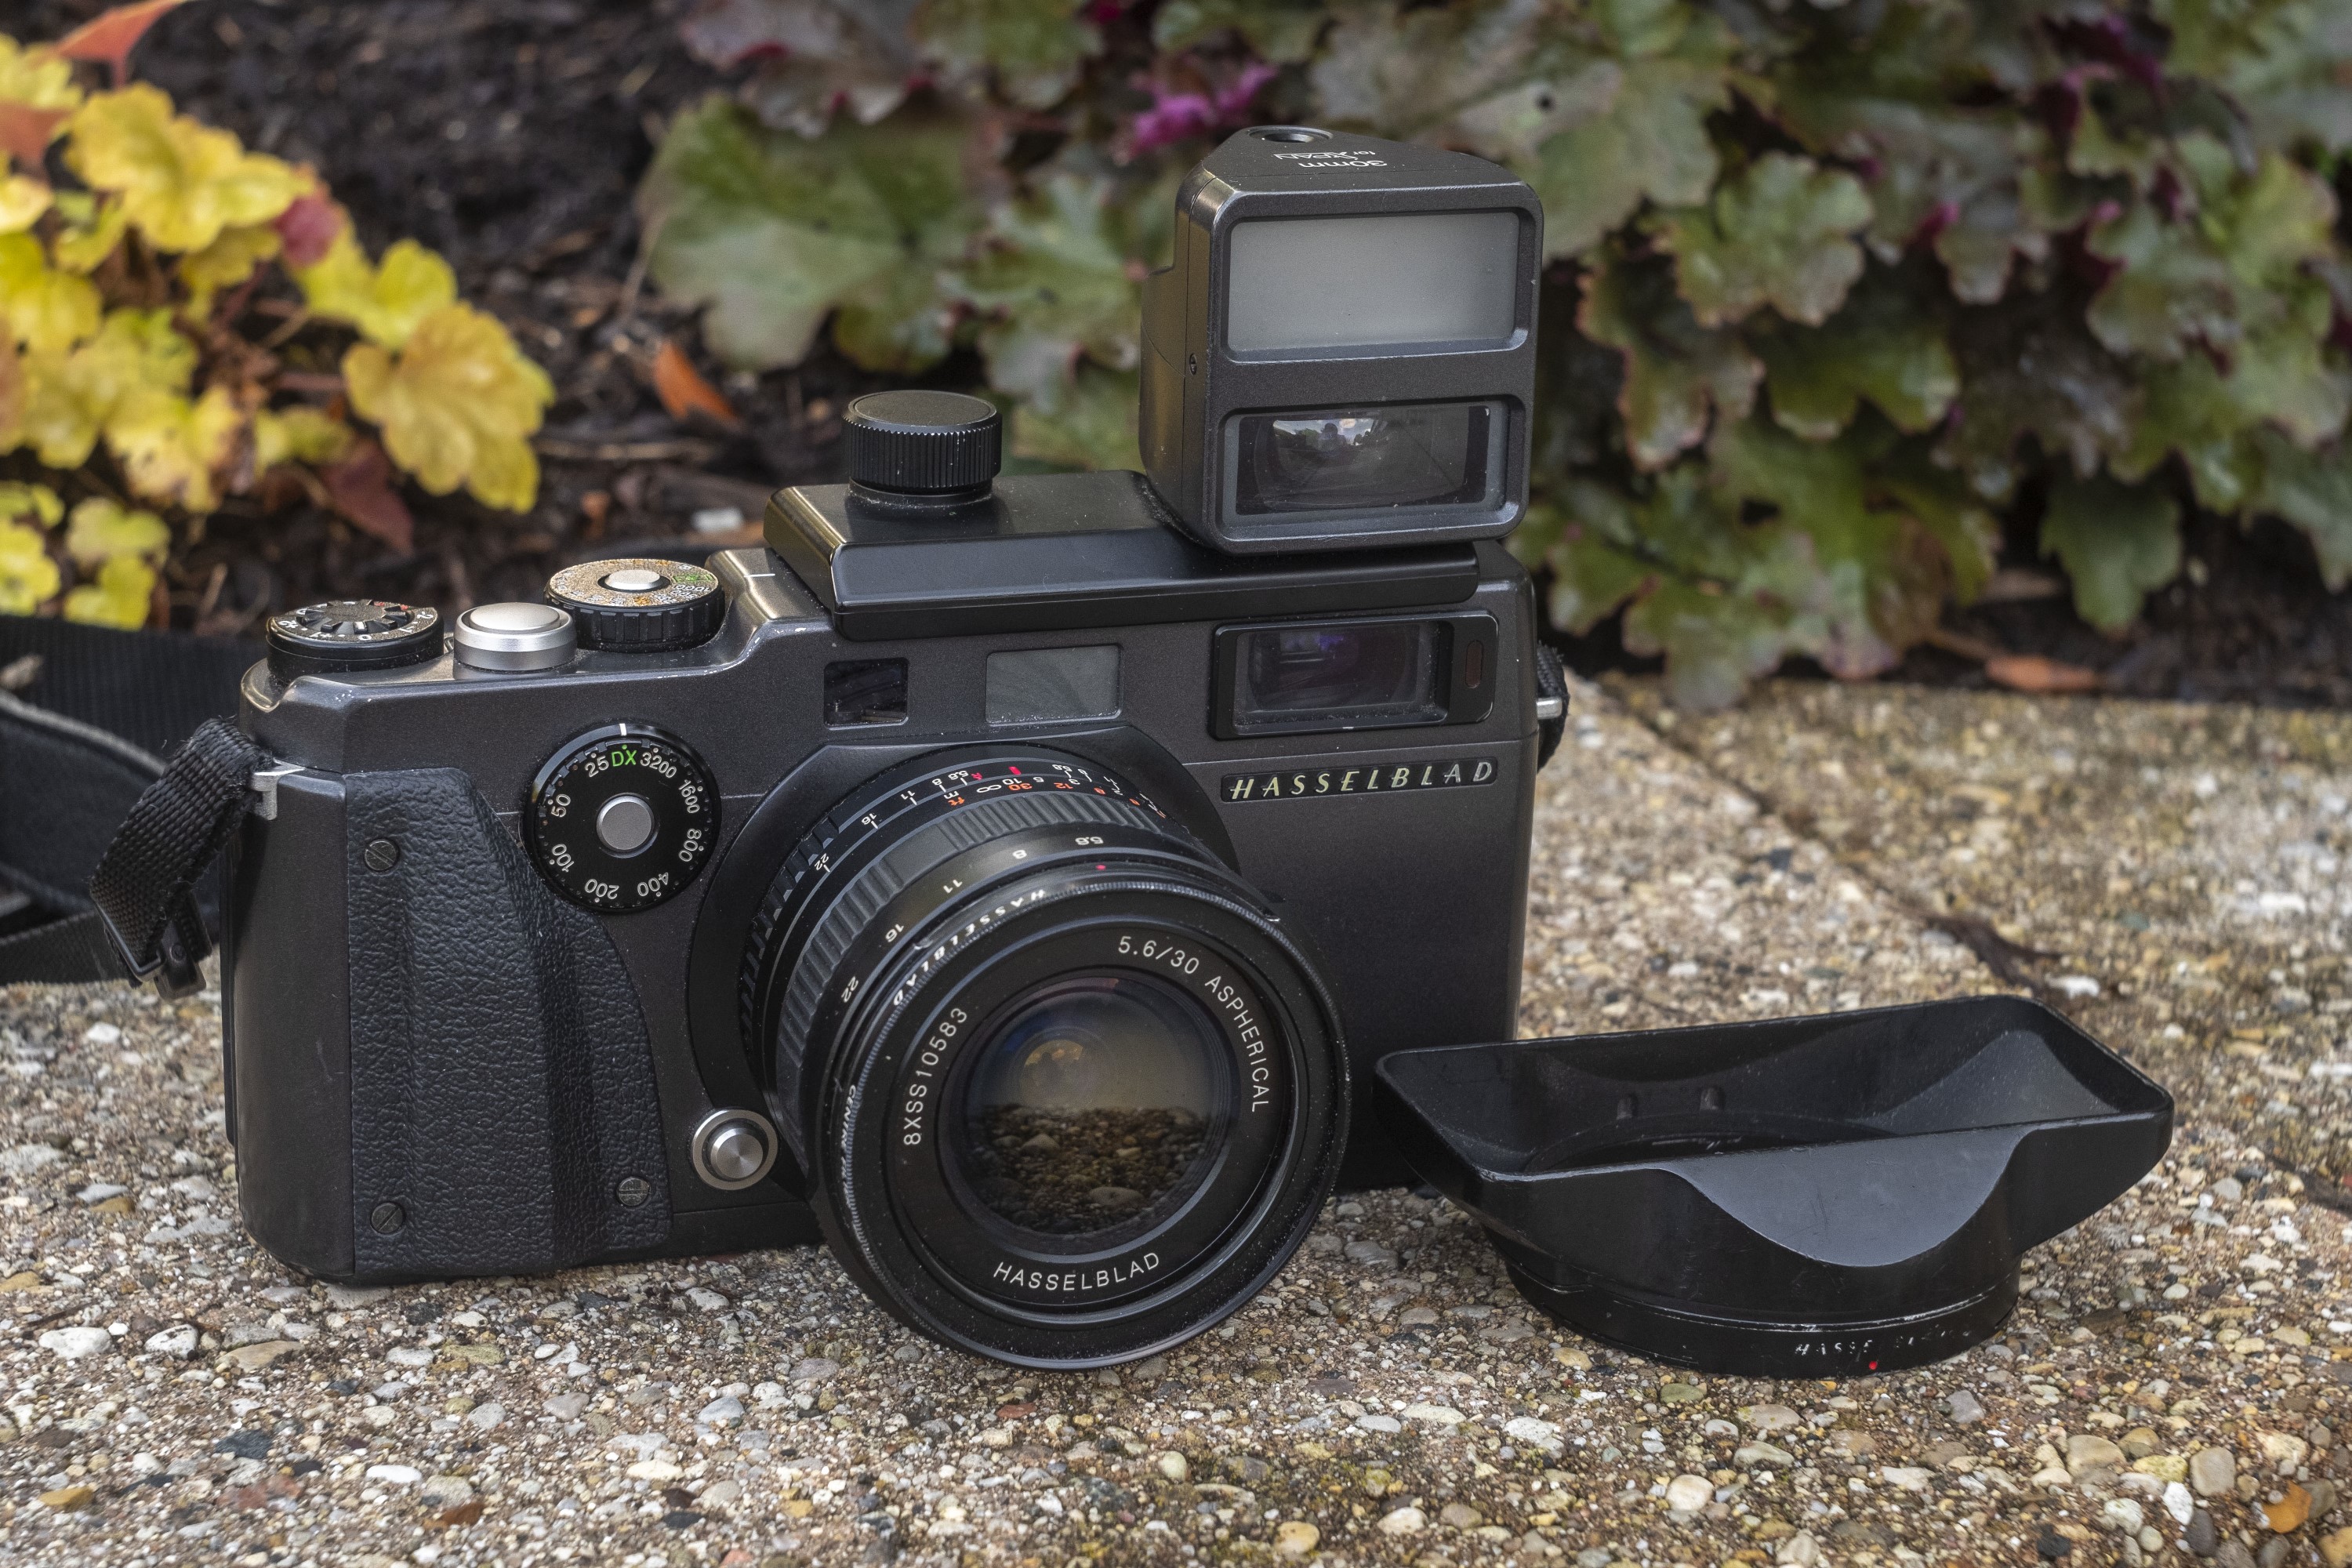
Up front at about the 10 o’clock position of the lens mount is a circular dial for manually selecting the ISO film speed from 25 to 3200. I found the location of this dial in such a prominent spot of the camera to be a curious one considering that not only would most people leave it on the automatic DX setting, but also that the film speed can already be displayed on the rear LCD panel. I can’t imagine it would have been too difficult to use one of the buttons below the LCD to be used to manually set a film speed. While this is hardly a deal breaker, I am obviously not alone in thinking this dial didn’t need to be there as it was removed on the replacement Xpan II, released in 2003.
Near the 8 o’clock position around the lens mount is a release button for the bayonet mount. Like any other bayonet lens mount, lenses can be removed and reattached easily to the Xpan with a small twist of the wrist.
From the moment you hold an Xpan, you can tell this camera is a bit different from others, but it’s not until you peer through the viewfinder do you really appreciate how different it is. Although there were many cheap point and shoot, and even some SLRs in the 1990s that had a switchable panoramic mode, they only used masks over a standard 24×36 image to create the panorama. Only with a camera like the Xpan where panoramic is the native aspect ratio, can you fully appreciate the format.

For starters, the parallax corrected projected frame lines and central combined image rangefinder are incredibly bright. If you’re used to half century old rangefinders like I am, the difference is night and day. Even cooler, when you switch the camera to shoot 24×36 images, the frame lines automatically adjust to show the correct aspect ratio.

The frame lines in the above two images are using the standard 45mm lens. If you attach the 90mm telephoto lens, they adjust to show that aspect ratio in both panorama…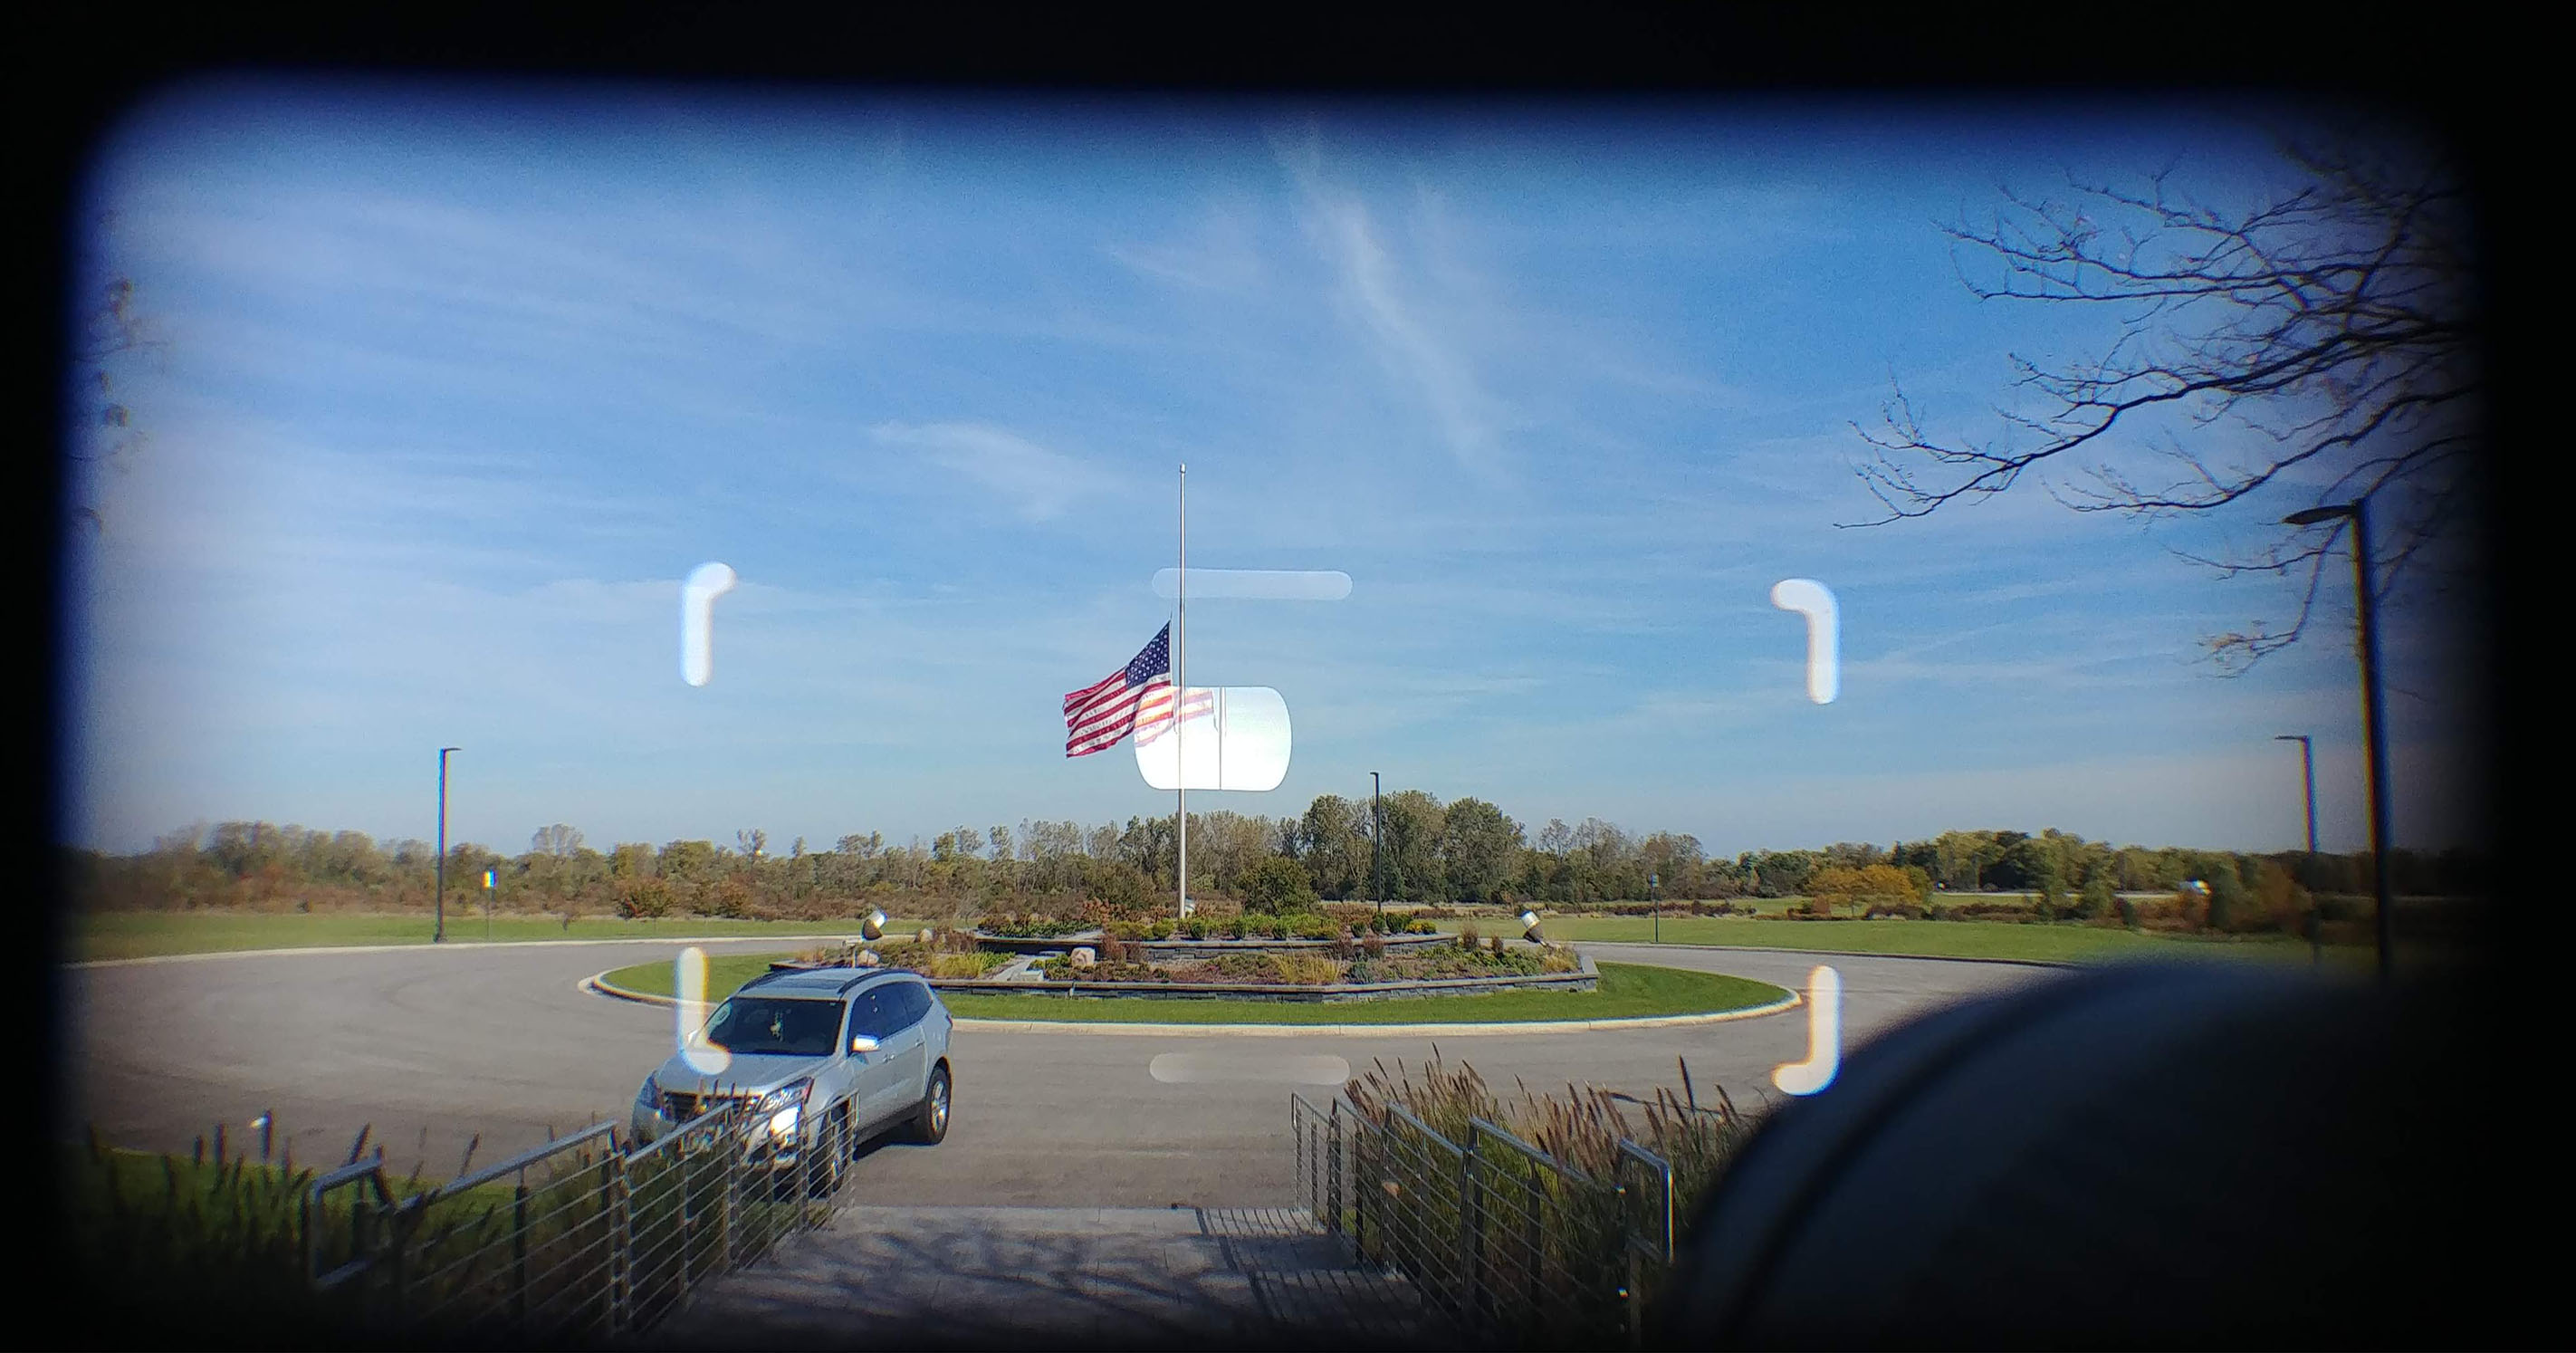
…and standard modes. But why anyone would shoot 24x36mm images on a camera like the Xpan is beyond me.

Although not shown in any of the above images, the main viewfinder also has a red exposure confirmation dot with + and – over and under exposure LEDs below the visible viewfinder image.
The Xpan does not have built in frame lines for the wide angle 30mm lens which I used primarily in my tests, so for that, you have to use the accessory 30mm viewfinder which mounts to the flash hot shoe on top of the camera. With this viewfinder attached, you still use the rangefinder in the main viewfinder for focus, and then move your eye to the 30mm viewfinder for composition. This is less of a problem however, as the huge amount of depth of field for a 30mm lens at anything but close-ups allows you to shoot like a focus free camera.
The accessory viewfinder is not parallax corrected like the main viewfinder is, so you’ll need to make sure you take that into consideration with closeups.
This switch next to the rear viewfinder opening is what switches the camera between panoramic and standard formats. Although the Xpan makes for a very capable 35mm rangefinder in standard format, I never once had the desire to shoot 24×36 images in the camera. I guess that perhaps while out in the field, if you can clearly see an image that would not benefit from a panoramic aspect ratio, you can switch back to standard in an effort not to waste film, but otherwise, I doubt it would be used much.
Handling the Xpan before ever loading in any film, one thing that I was immediately drawn to was how familiar I was with the camera’s controls. It is very much laid out like a classic rangefinder, with a shutter speed dial on the top plate, aperture f/stops on the front of the lens, followed by a nicely damped and wide manual focus ring. Even the viewfinder, once you get used to it’s size, is familiar in the layout and use of the rangefinder. Aside from having to reprogram your “mind’s eye” to see in a panoramic format, this is a camera that someone (me) could pick up for the first time, and immediately start shooting. So….what’s it like to shoot?
My Results
I shot two fresh rolls of film in the Xpan while I had it. The first was Kodak Pro Image 100 which is part of their Kodak Professional lineup. This was the first ever roll of this film I had ever shot, as it’s rather new to the US market, although I believe it’s been available overseas for quite some time. Considering I shot this roll in the midst of summer on a bright sunny day, I figured it would do well. The second roll was plain Jane Fuji 200. A film that I have a ton of experience with.
I should point out that anyone shooting an Xpan who sends their film into a lab for processing will need to make a note on their order form identifying it as being in a panoramic format as this could cause difficulties with the cutting of the negatives. If you opt for digital scanning of your negatives, panoramic images will often incur an additional charge as well. Since I develop and scan my own film at home, this was not an issue for me.
Note: Due to the nature of the large sizes of these panoramic sample images, I strongly recommend viewing these on a desktop computer and clicking through to each image to see it full size. It will be very hard to appreciate the detail of the images on a mobile device or even a desktop computer without looking at each image full screen.


Prior to shooting the Xpan, I did some research online to read other people’s thoughts of using the camera and I found a number of people who said they struggled to compose in a 24×65 frame. There are those who are so used to one aspect ratio, that their “inner eye” struggles to make good use of the additional space. This is something I’ve observed with many 6×6 medium format cameras like TLRs, in that I still compose them as if they were in a rectangular format, wasting space above and below my composition.
With the Xpan, I didn’t experience any of the struggles that some other reviewers had with the panoramic format as it felt natural to me. The extreme wide angle nature of the 30mm lens allowed me to fit a LOT of image into each frame. I experimented with offset images like the one of the blue Chevelle and the train pic and I think they turned out really nice.
I even tried a number of vertical panoramic images too which I think came out great. The shot of the alley has a perspective you couldn’t have achieved any other way, and in the one of the power lines, I am standing about 10 feet from the base of the structure, yet I was able to fit everything in, with space to spare.
I am not sure how many Xpan shooters try vertical panoramas, but I did notice that in almost every instance, the lack of parallax correction with the 30mm viewfinder was much more noticeable when shooting vertically. It is very obvious in the two of the crosswalk in front of the courthouse and the one from the highway overpass. In each of these shots, I tried to frame these images as symmetrically as possible yet, I clearly missed it. This might have been less of an issue with either the 45mm or the 90mm lenses, but sadly, I did not try it.
Not surprisingly, the Xpan works best with panoramic scenes such as the ones in downtown Crown Point, Indiana, the highway overpass, and the corn field images. Duuuh, you’re probably thinking, of course a panoramic camera works best with panoramas! But therein lies one of the inherent weaknesses of the Xpan. This is a camera that is so good at one particular style of photography, that it feels like a waste to shoot anything else, and unless you’re the kind of photographer who only shoots panoramas, the excessively high cost of this camera with it’s accessory lenses is a very hard pill to swallow. I am not sure that even if I had the funds to afford everything that was loaned to me, that I would invest it in this system for something I would only rarely use it for.
This is a debate beyond what I hope to discuss in this article, so coming back to the images, I was floored when I saw them. Despite having an identical vertical resolution of a normal 35mm camera, the images have a sort of medium format sharpness to them. The quality of the Hasselblad lenses are excellent. I kept the specialized “anti-vignetting” filter on the lens while shooting and for the most part there isn’t obvious darkening near the corners. Lens sharpness, color rendition and all of the other common standards to which lenses are judged, were all excellent.
I don’t think I struggled with composition like some other reviewers online suggested. My two biggest concerns with this camera are both a side effect of it’s cost. This is a LOT of money to invest in a system with such a specialized purpose. Even if I did find myself in need of panoramic images, the thought of carrying around nearly $5000 worth of gear around my neck would constantly keep me on edge.
I am extremely grateful to Kurt Ingham for loaning me his camera, and I really did enjoy shooting it. If you find a CGI princess willing to loan you their Xpan, I absolutely recommend trying it out as there’s simply nothing else like it.
Related Posts You Might Enjoy
External Links
https://www.hasselblad.com/history/xpan/
https://www.photothinking.com/2019-05-23-hasselblad-xpan-xpand-the-panoramic/
https://luminous-landscape.com/hasselblad-xpan/
https://petapixel.com/2017/10/02/looking-viewfinder-hasselblad-xpan/
Welcome back to blogging, Mike! And what a barnburner camera you picked for your first review of 2020. I’m thinking of the engineering that went into that shutter. Imagine the inertia in those yuuge curtains … and they accommodate 1/1000 second exposures. Next we need to find you a Fuji 6×17 to play with!
Thanks Roger! The Xpan was definitely a lot of fun and has ignited a desire to shoot more panoramic cameras. While I don’t have a Fuji 6×17 in the queue, I do have one more dedicated panoramic camera that I’ll get to sometime this year!
When I see “wide field” cameras like this example of “photographic unobtainium,” the name “Simon Nathan” comes to mind. A long time ago, when Modern and Popular Photography magazines were the “Eastman Kodak” of the photographic press, Simon Nathan began his wide field camera quest.
He’d used 4X5 cameras to try and make “wide field” images of aircraft, buildings, etc. with an emphasis on getting a feel for the span of an object. He noted that what he ended up with was a somewhat wide image of the object swimming in the middle, with dead space above and below the subject. What to do?
His quest took him to Japan, to see if any camera company had any interest in making a custom wide field format camera. Mamiyia finally looked at the problem without disdain, and the first “Simon/Wide” was created, in what has become the 6X17 format. Nathan Simon continued to make stunning wide field images with his handbuilt camera for years, while the photographic world moved on to The Next Big
thing.
Aside from the Russian Horizon panoramic camera, the Simon/Wide format didn’t take off for years, since this was a super niche product. So now it is 2020 and wide field cameras using roll film and 135 film are (sorta) common and the “how wide is it?” image can be found on Smartphone camera images. As I recall, Eastman Kodak tried the “wide filed on 135” on a disposable camera a while back, which was…wide.
It’s nice to see that a “real wide field 35mm” camera exists in the world, even if it’s a “Hasselblad” and commands a premium price. I’ve seen wide field images for years, but not details the image making device. I find it interesting that “the complete kit” has three lenses for varied magnification of the panorama, where ever it may be. Welcome back, your articles on “interesting cameras I’ve used or owned” along with the history behind it remind me of the days when photography wasn’t digital or required Photoshop to “process images to perfection.”