
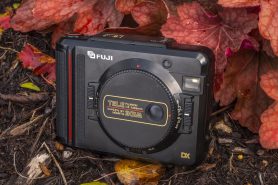
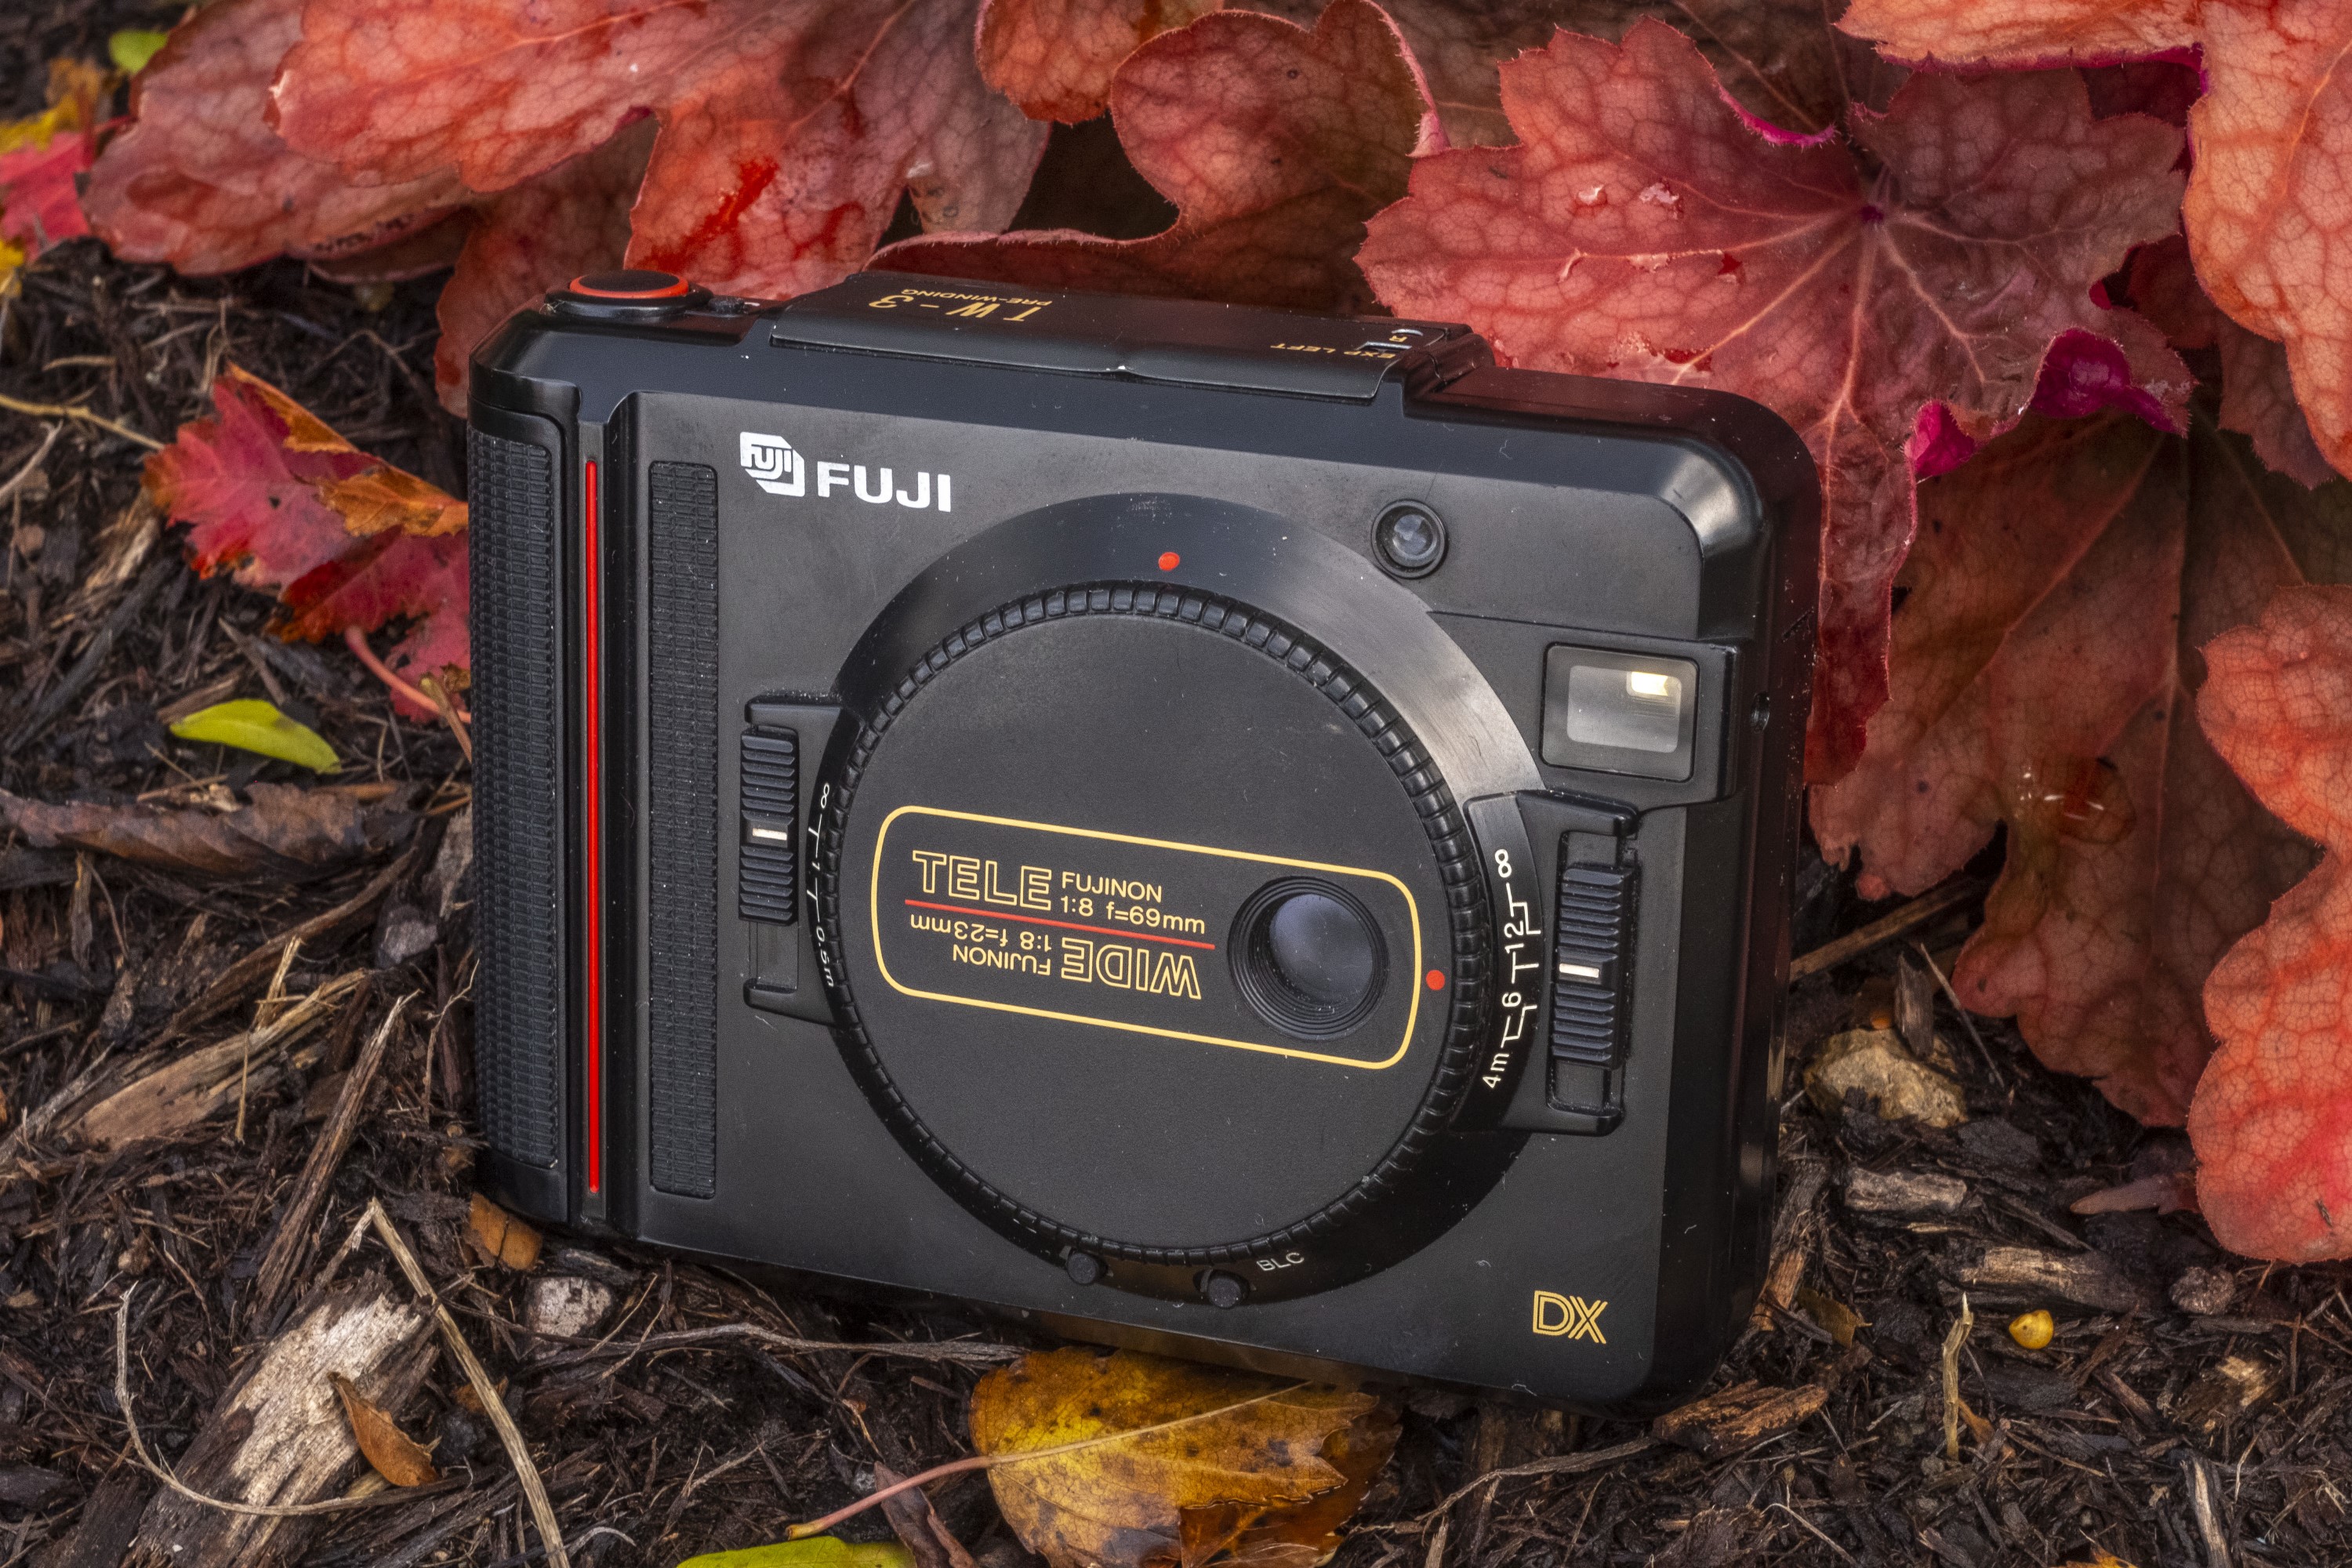
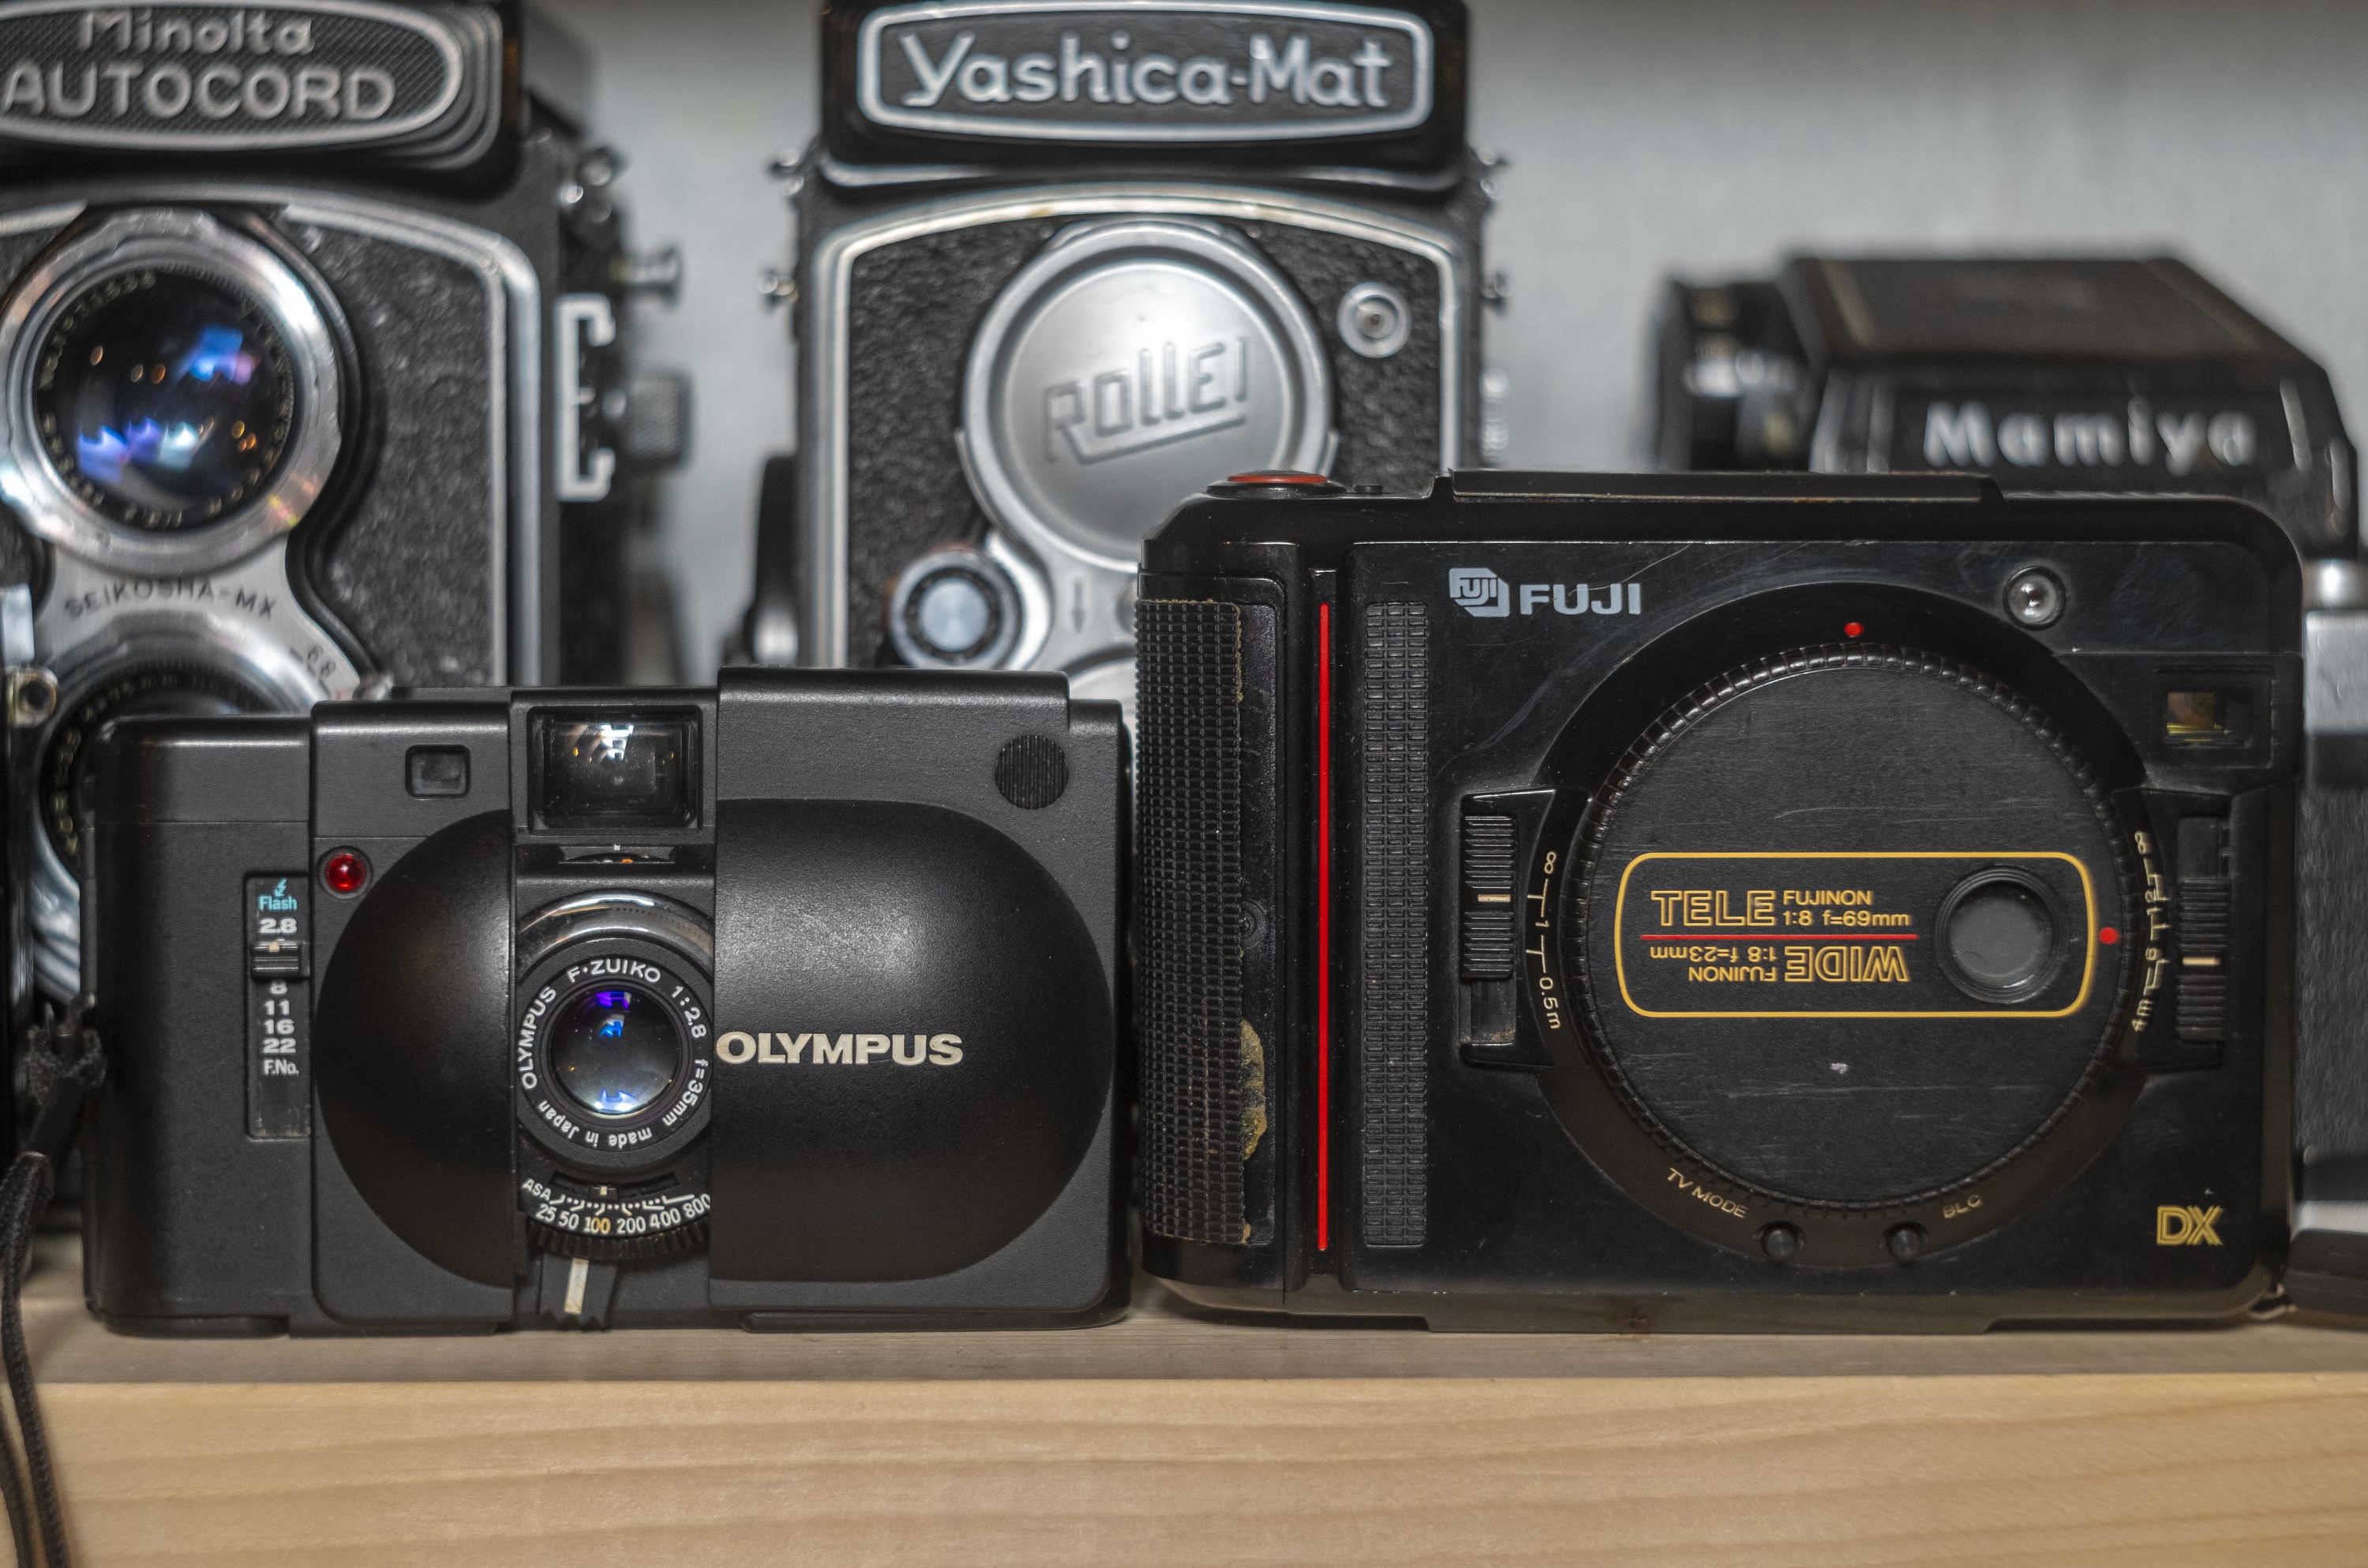
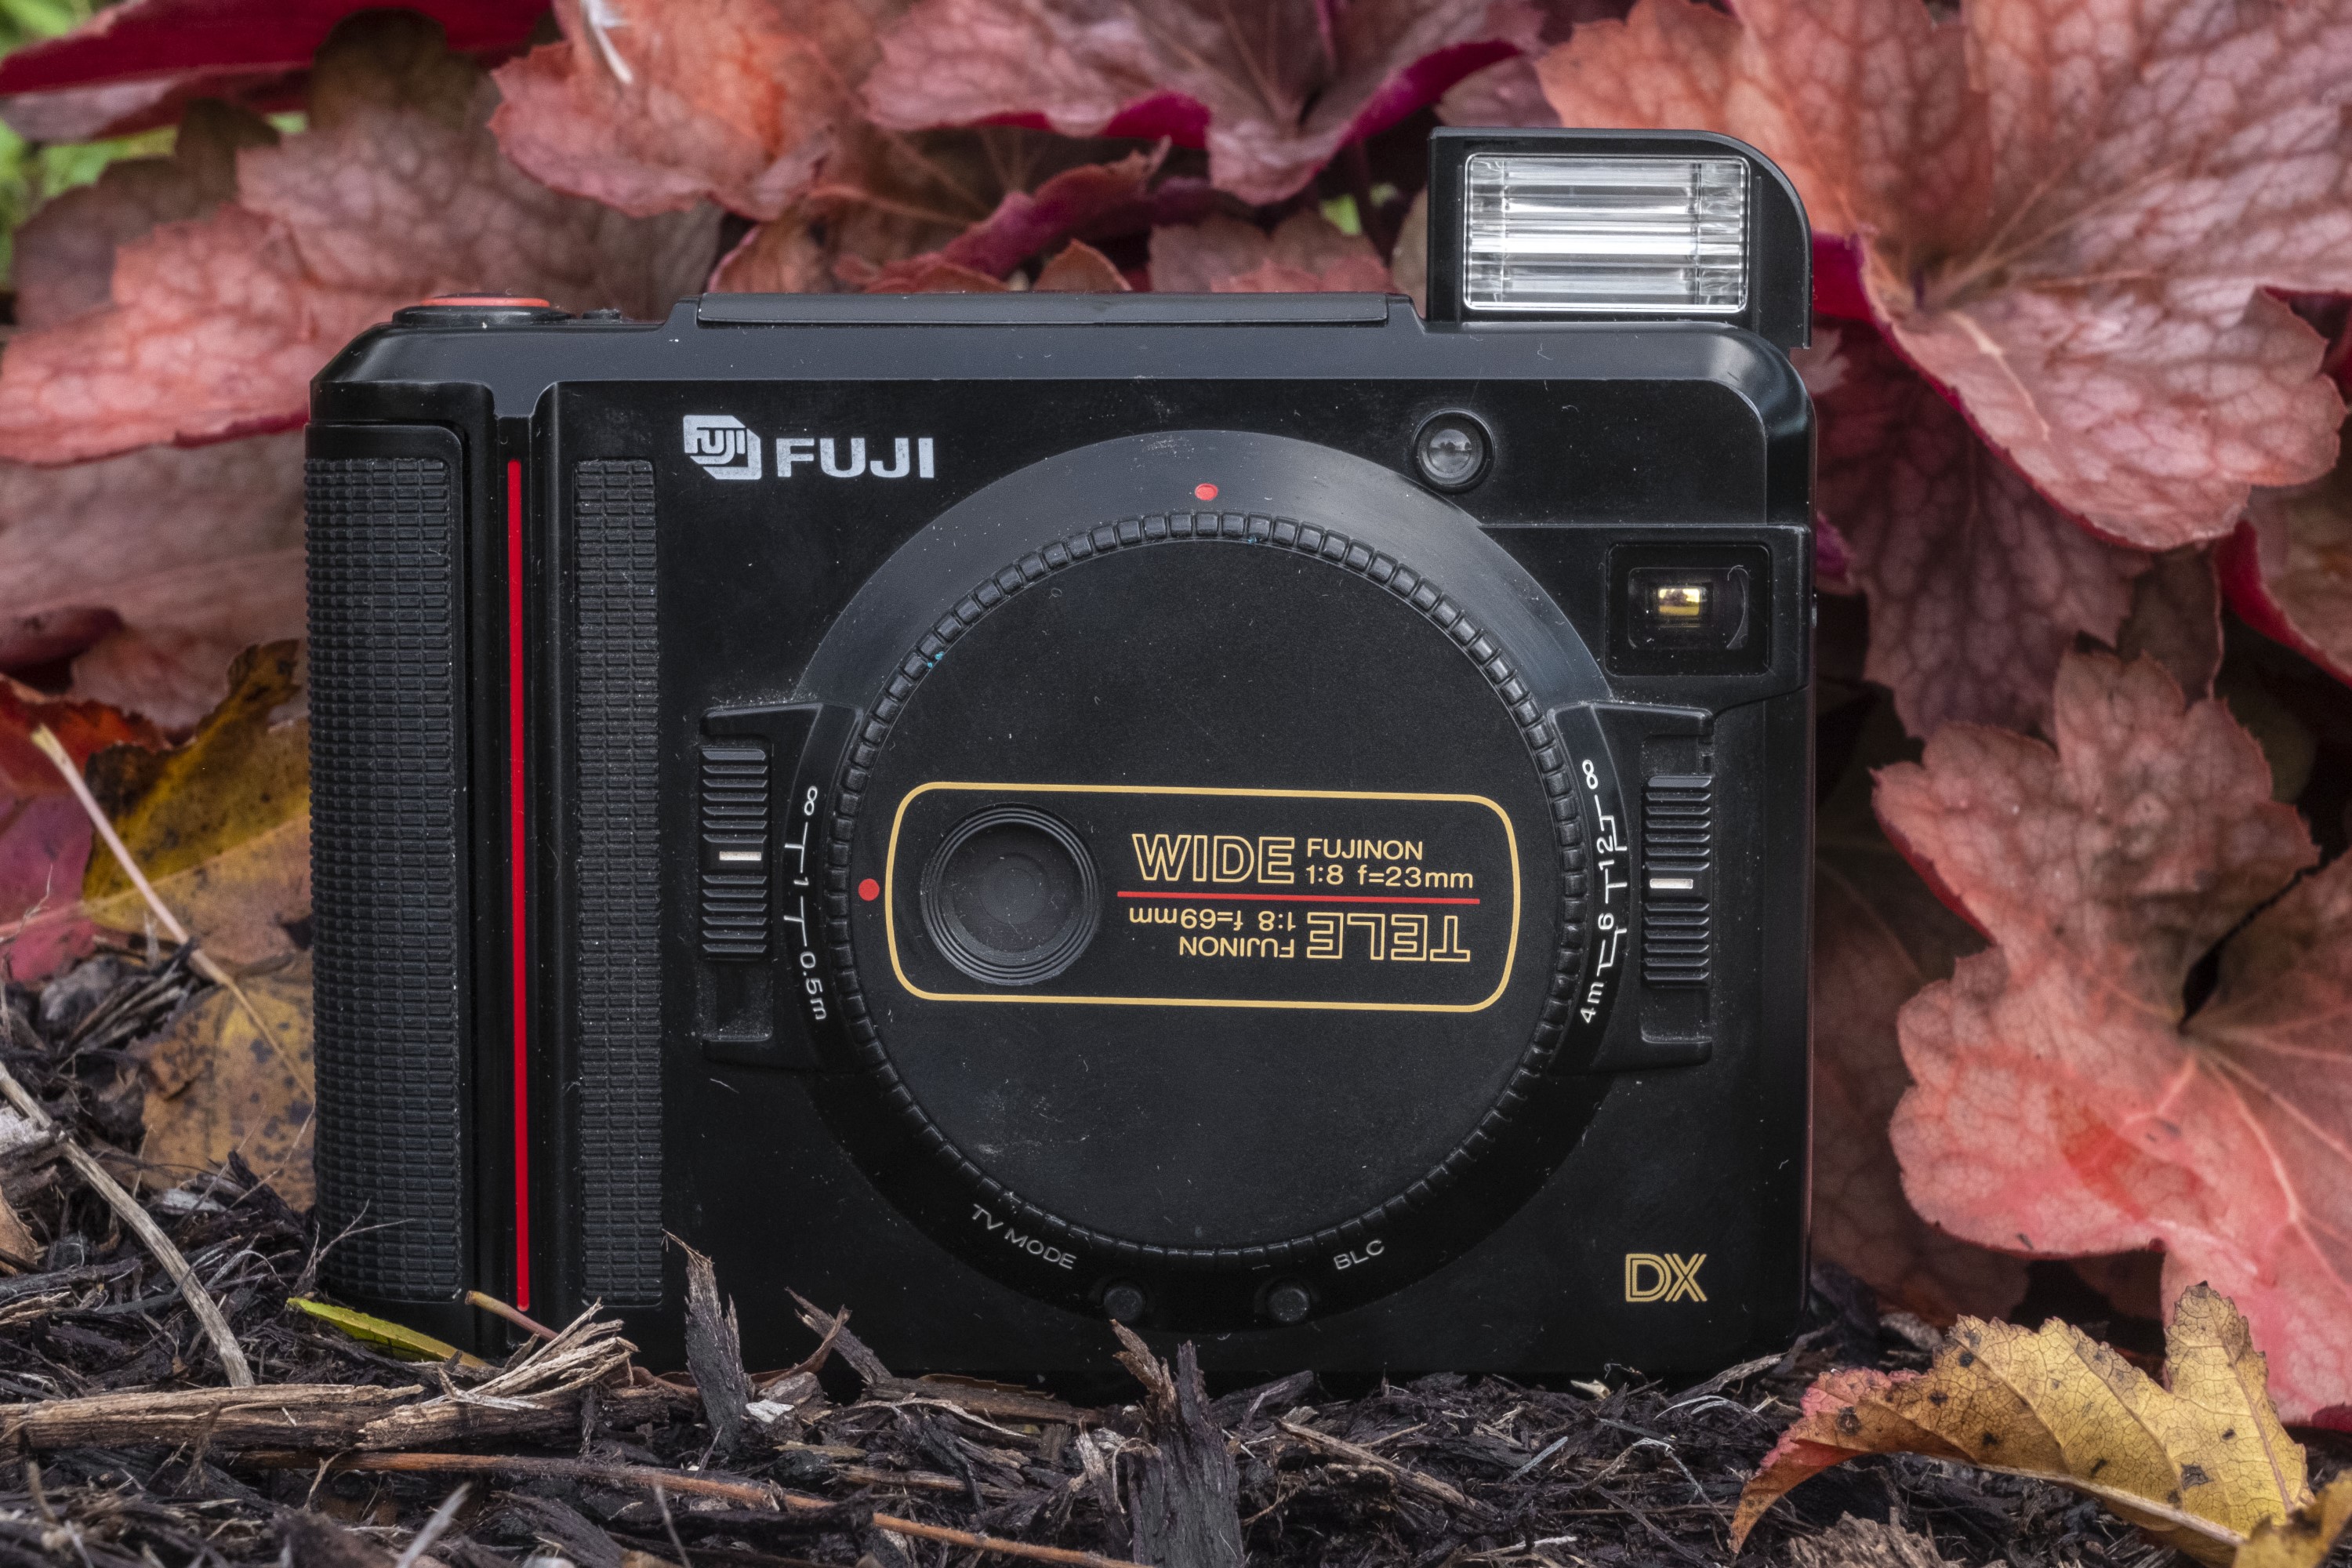
This is a Fuji TW-3, a compact 35mm dual lens point and shoot camera that shoots half-frame 18mm x 24mm images on regular 35mm film. The Fuji TW-3 was produced by Fuji in Japan for a short while starting in 1985 and has a curious feature set of separate wide angle mid-telephoto lenses, both with small f/8 apertures allowing for two zone in wide and three zone in tele modes. It’s twin non-rechargeable lithium batteries were soldered into place and not designed to be changed by the user. The camera has fully programmed auto exposure and no manual control other than selecting which lens you use. The pop up flash only works in wide mode, and when switching between the two modes, a mirror in the viewfinder changes the focal length.
Film Type: Half-Frame 135 (35mm)
Lens: 23mm f/8 and 69mm f/8 Fujinon coated unknown elements
Focus: 0.5m to 1m and 1m to Infinity (wide), 4m to Infinity in three zones (tele)
Viewfinder: Scale Focus Albada, Switchable to Wide and Tele Modes
Shutter: Programmed Behind the Lens Electronic Shutter
Speeds: 1/30 – 1/500 seconds, Step less
Exposure Meter: CdS, Full Programmed AE
Battery: (2x) 3v CR123 Lithium Cell, Not User Changeable
Flash Mount: Popup Electronic Flash in Wide Mode Only
Weight: 292 grams
Manual: https://www.cameramanuals.org/fuji_pdf/fuji_tw-3.pdf
How these ratings work |
The Fuji TW-3 is a unique camera with a curious feature set that not many cameras could match. With it’s dual lenses, fully motorized operation and compact size, the TW-3 could be the ultimate point and shoot, but a really tiny viewfinder and a few other unfortunate design choices turn this into an oddity. If you like strange and unusual cameras, this might be perfect for you, but as a shooter, there’s far better options. | ||||||
| Images | Handling | Features | Viewfinder | Feel & Beauty | History | Age | |
| 0 | 2 | 2 | 0 | 1 | 1 | 0% | |
| Bonus | +1 for unique form factor and incredible portability | ||||||
| Final Score | 7.0 | ||||||
History
The Japanese camera industry of the mid 1980s was in the midst of much change compared to their stance in the previous few decades. In the early 1950s, David Douglas Duncan helped introduce the world to Nikkor lenses which for the first time showed the world that the Japanese were capable of producing more than just cheap toys. In the 1960s, Japanese camera companies were no longer underdogs and proved that they could produce cameras with the same level of quality and innovation as the Germans. Nippon Kogaku’s Nikon F set the standard for professional 35mm SLRs and a huge number of models by Minolta, Canon, Asahi Pentax, and Topcon topped the charts as the best selling models out there. The dawn of the electronic age defined the 1970s as electronic circuits, CPUs, and motors began to replace gears, springs, and levers. Cameras were getting smarter and smaller with features like auto exposure hitting the mainstream and auto focus on the horizon.
By the 1980s, Japan’s prowess at manufacturing was evident in industries outside of the photographic world. Companies like Honda and Toyota, once thought of as makers of low powered, poorly built, small cars began to outsell American models by GM and Ford. Sony, Mitsubishi, and Panasonic televisions, stereos, and other electronic devices started to replace Zenith and General Electric models. In the computer industry, new devices by IBM and Apple who were both American companies, used CPUs and circuits made in Japan. The Nintendo Entertainment System became synonymous with home video games, an industry once dominated by companies like Atari and Intellivision.
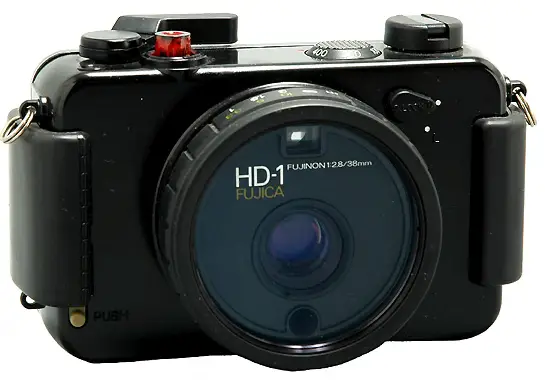
With such a diversification of electronics from all segments of industry, it was probably not a surprise to see some long time camera makers get creative too. One such company was Fuji, who in 1979 branched out into the word of “site supervisor” cameras with the Fuji HD-1, a rugged and waterproof camera that came inside of a thick plastic shell, designed to be used on construction worksites, or other areas where traditional cameras would be too fragile to work reliably.
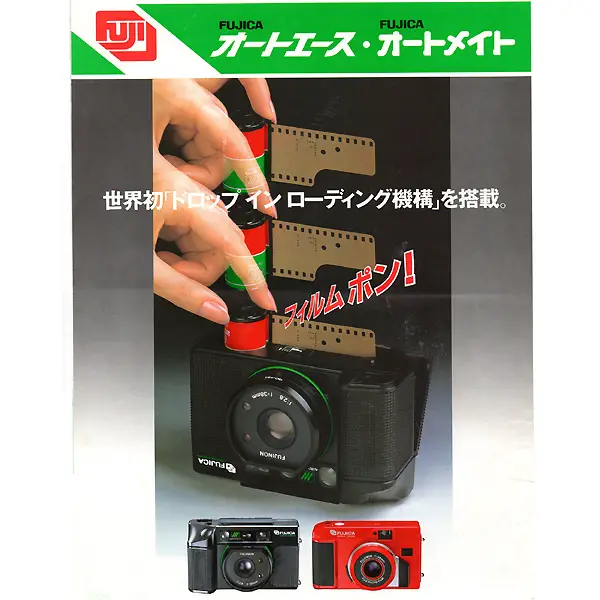
In 1983 came the Fujica DL-20 and DL-100 which were the first 35mm cameras to feature “drop in loading” in which the film door opens only wide enough to drop in a new cassette of film, and upon closing the door, the camera pulls out the leader and winds the camera automatically. Such a feature would be used in Kodak’s APS film format released in 1996, but this was the first 35mm camera to have the feature.
In March 1985 came the Fuji TW-3 “Twing”, a strange looking half frame, dual lens camera that could shoot 18mm x 24mm images using either a 23mm or 69mm lens connected to a large wheel on the front of the camera. The camera was fully automatic and offered no manual exposure modes other than a +1.5Ev button and another used specifically to take photos of a television screen. Using the wide angle lens, the camera was focus free from 1m to infinity, but offered a special closeup mode that worked from 0.5m to 1m. A popup flash would always be used in Wide angle mode, but strangely didn’t work in Tele mode which used a three position zone focus switch.
Perhaps the camera’s strangest feature was that it used a non-rechargeable lithium battery built into the camera’s body that wasn’t changeable by the user. When new, the battery was said to be good for up to 5 years, or 100 rolls of film with no more than 50% flash use.
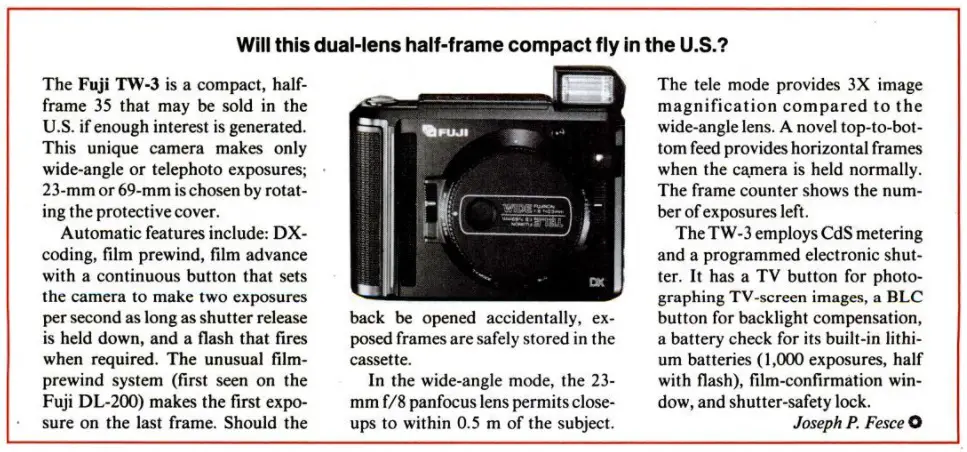
From the preview above that appeared in the June 1985 issue of Popular Photography, the Fuji TW-3 likely sounded like an interesting camera, but no matter what features it had, half frame 35mm cameras were not in high demand in the United States in the mid 1980s. Even in Japan, where the half frame resurgence began with the Olympus Pen, the mid 1980s were a bit of a last hurrah for the smaller format.
I couldn’t find any promotional material for the TW-3 in the US, but a back page ad for AAA Camera Exchange in June 1989 showed the Fuji TW-3 on sale for $84.69. This price would have been four years after the release of the camera in Japan suggesting these might have been surplus cameras offered at a steep discount. Whatever the case, it was clearly not a popular model here.
The Fuji TW-3 might have been a blip on the radar in the history of Fuji cameras, but the company would continue on for several more years in the point and shoot 35mm segment before making a strong push in the 1990s with digital SLRs. The company would partner with Nikon and Canon, producing some aspirational and innovative digital cameras such as the Fujix DS-505 in 1995 and the Fujifilm Finepix S-Pro series in the 2000s.
Today, there’s a market for both oddball and half frame cameras and the Fuji TW-3 being both an oddball half-frame camera, it definitely falls within the realm of collectability. It’s unique feature set and form factor makes it just as compelling to add to a collectors shelf as it is to have some film loaded and taken out for a spin. Although the battery was not intended to be replaced by the end user, it’s pretty easy to do yourself, and only requires an entry level knowledge of how to use a screwdriver and soldering iron to do yourself.
Replacing the Battery
Back in June 2019, I reviewed the Canon Sure Shot del Sol, which was another compact point and shoot camera with a non-removable battery that in order to be replaced, requires the camera to be partially disassembled and a new one soldered in. Unlike that camera however which requires somewhat of a deep dive into the camera, the battery in the Fuji TW-3 is extremely simple to replace. So simple in fact, that I cannot understand why Fuji couldn’t have spent a few more seconds to design a removable door so that users could just replace the batteries themselves.
If the prospect of disassembling a camera and soldering a battery makes you nervous, don’t be as it’s incredibly easy. If you’ve ever handled a soldering iron and can use a screw driver, this is a project you can do yourself. Besides the tools, the only things you need to complete this project are two fresh CR123 lithium batteries and some electrical tape. This whole project should take less than 5 minutes to complete.
Step 1
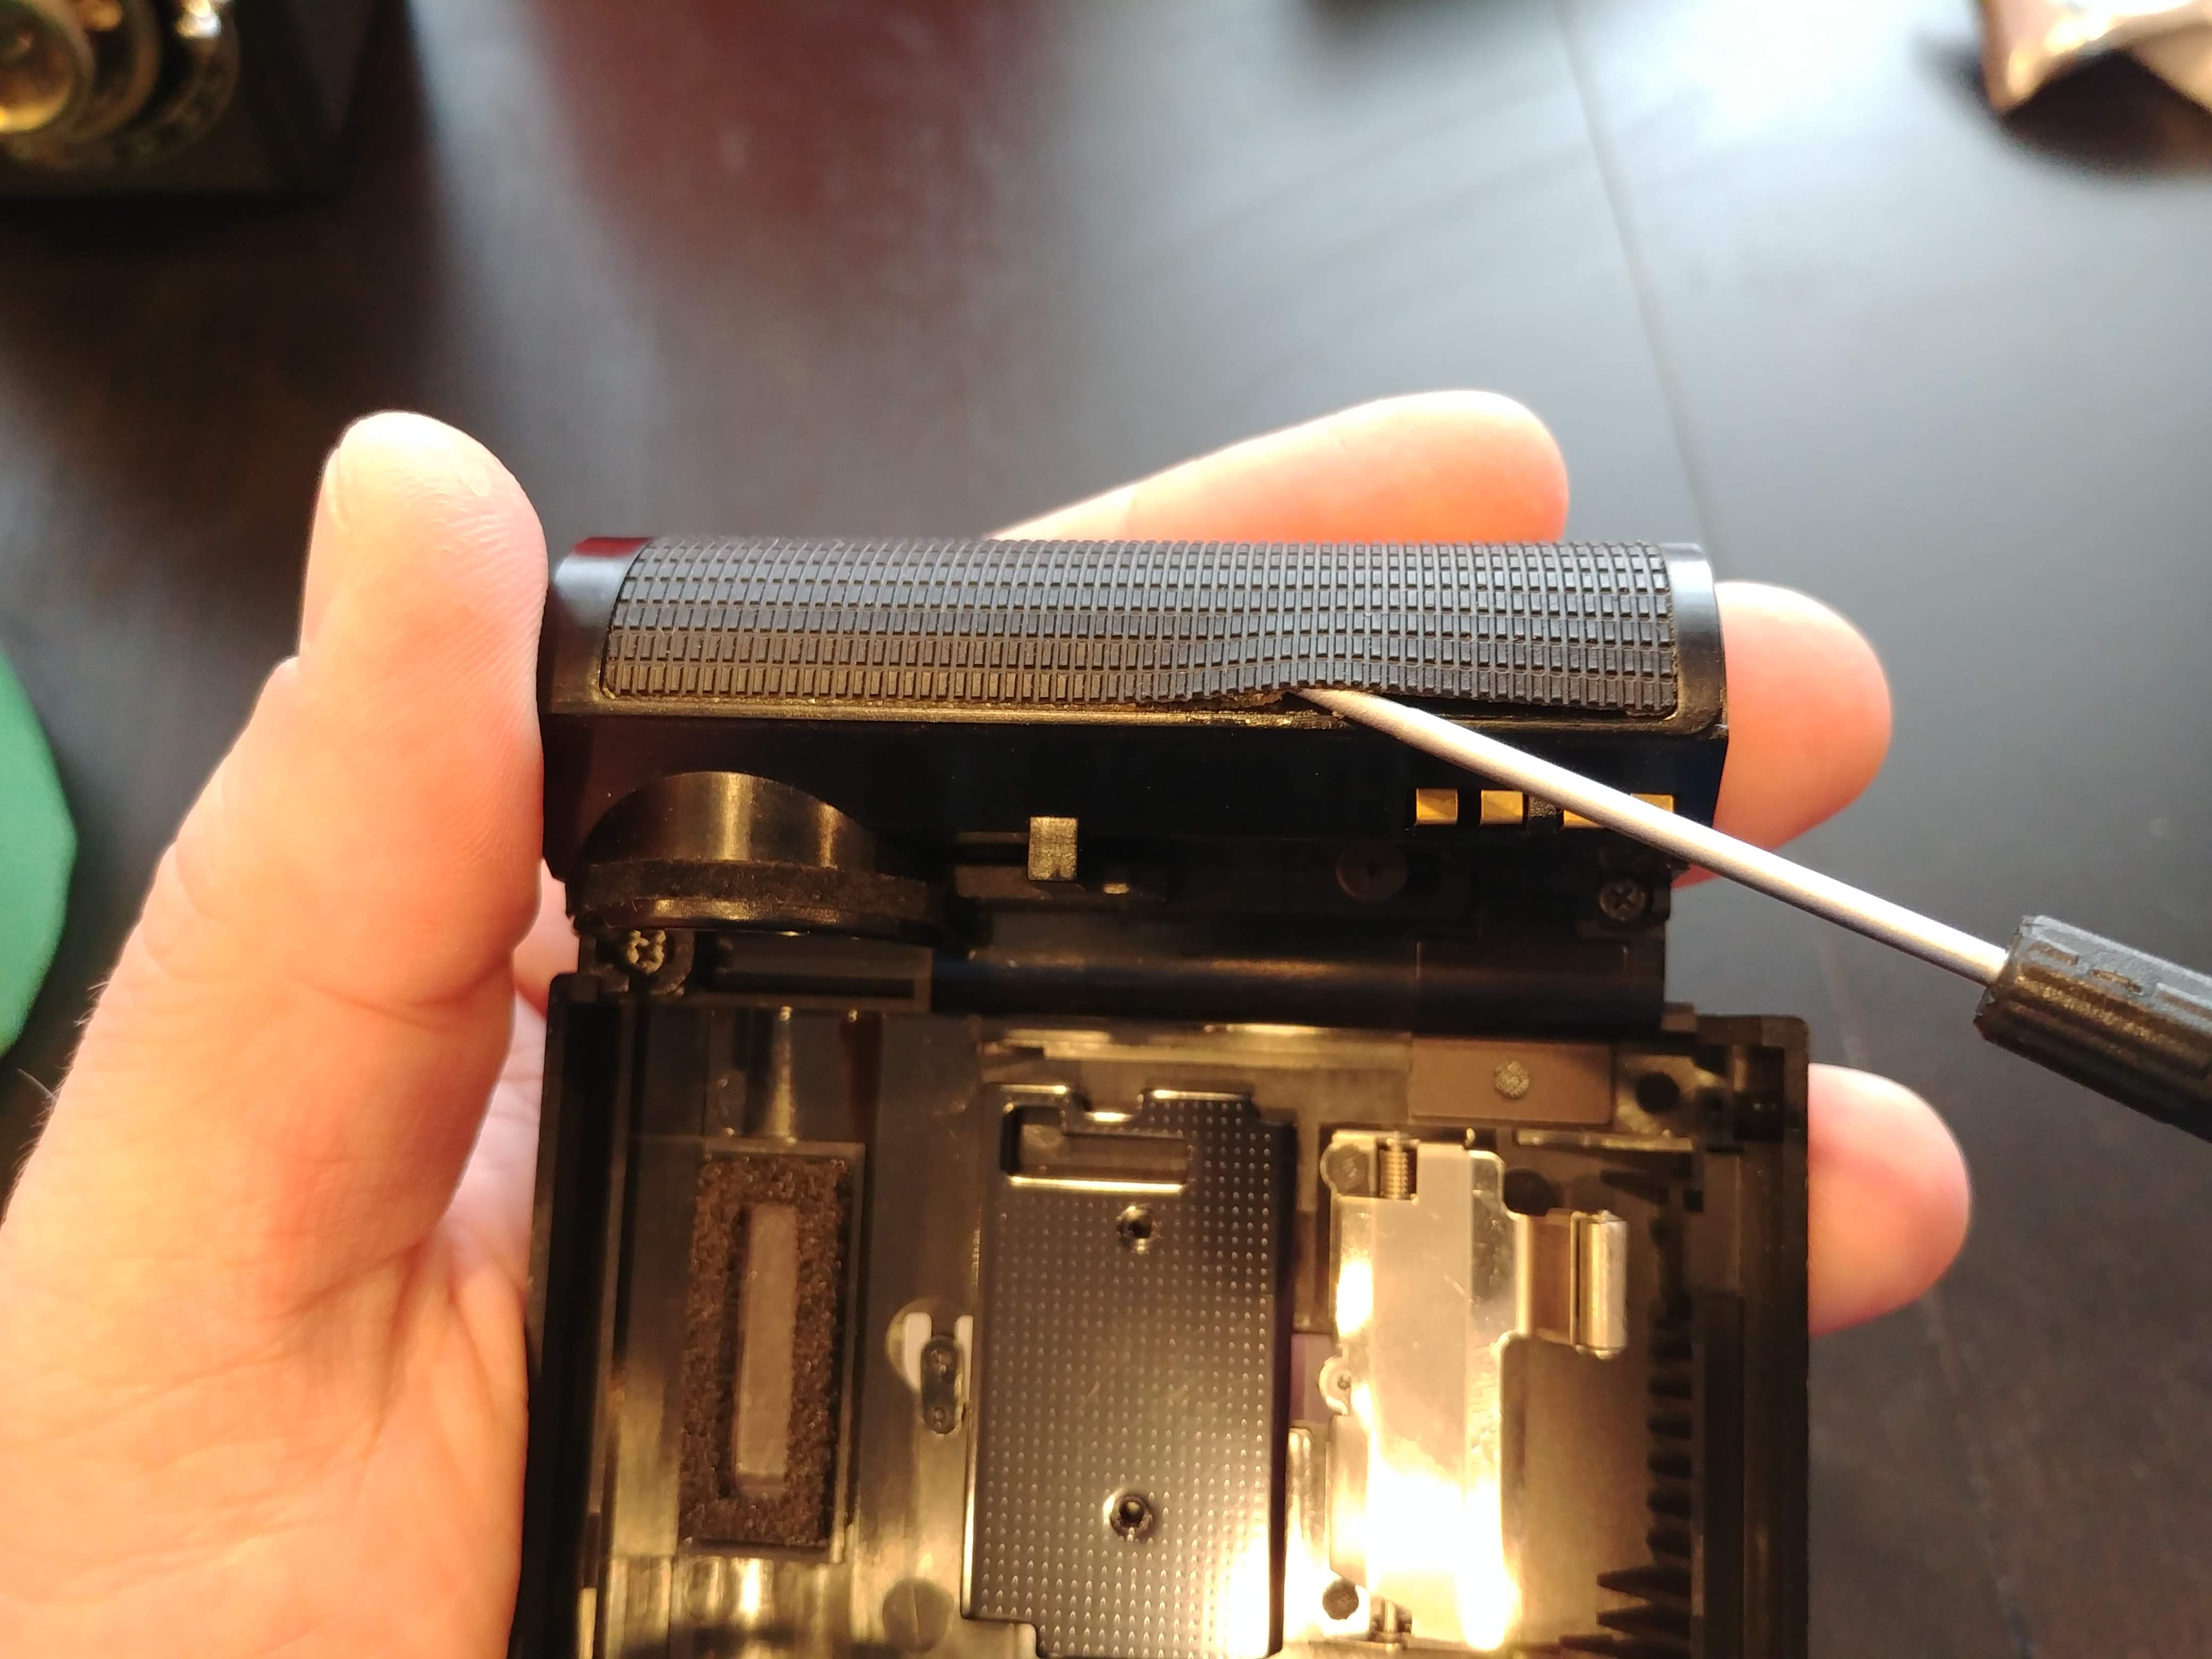
In order to access the battery compartment, you must first peel back the body covering on the side of the camera. The covering is made from a thick rubberized material and is quite tough, so it is unlikely to tear. Just peel it back until you get to the seam in the plastic. You do not need to totally remove it.
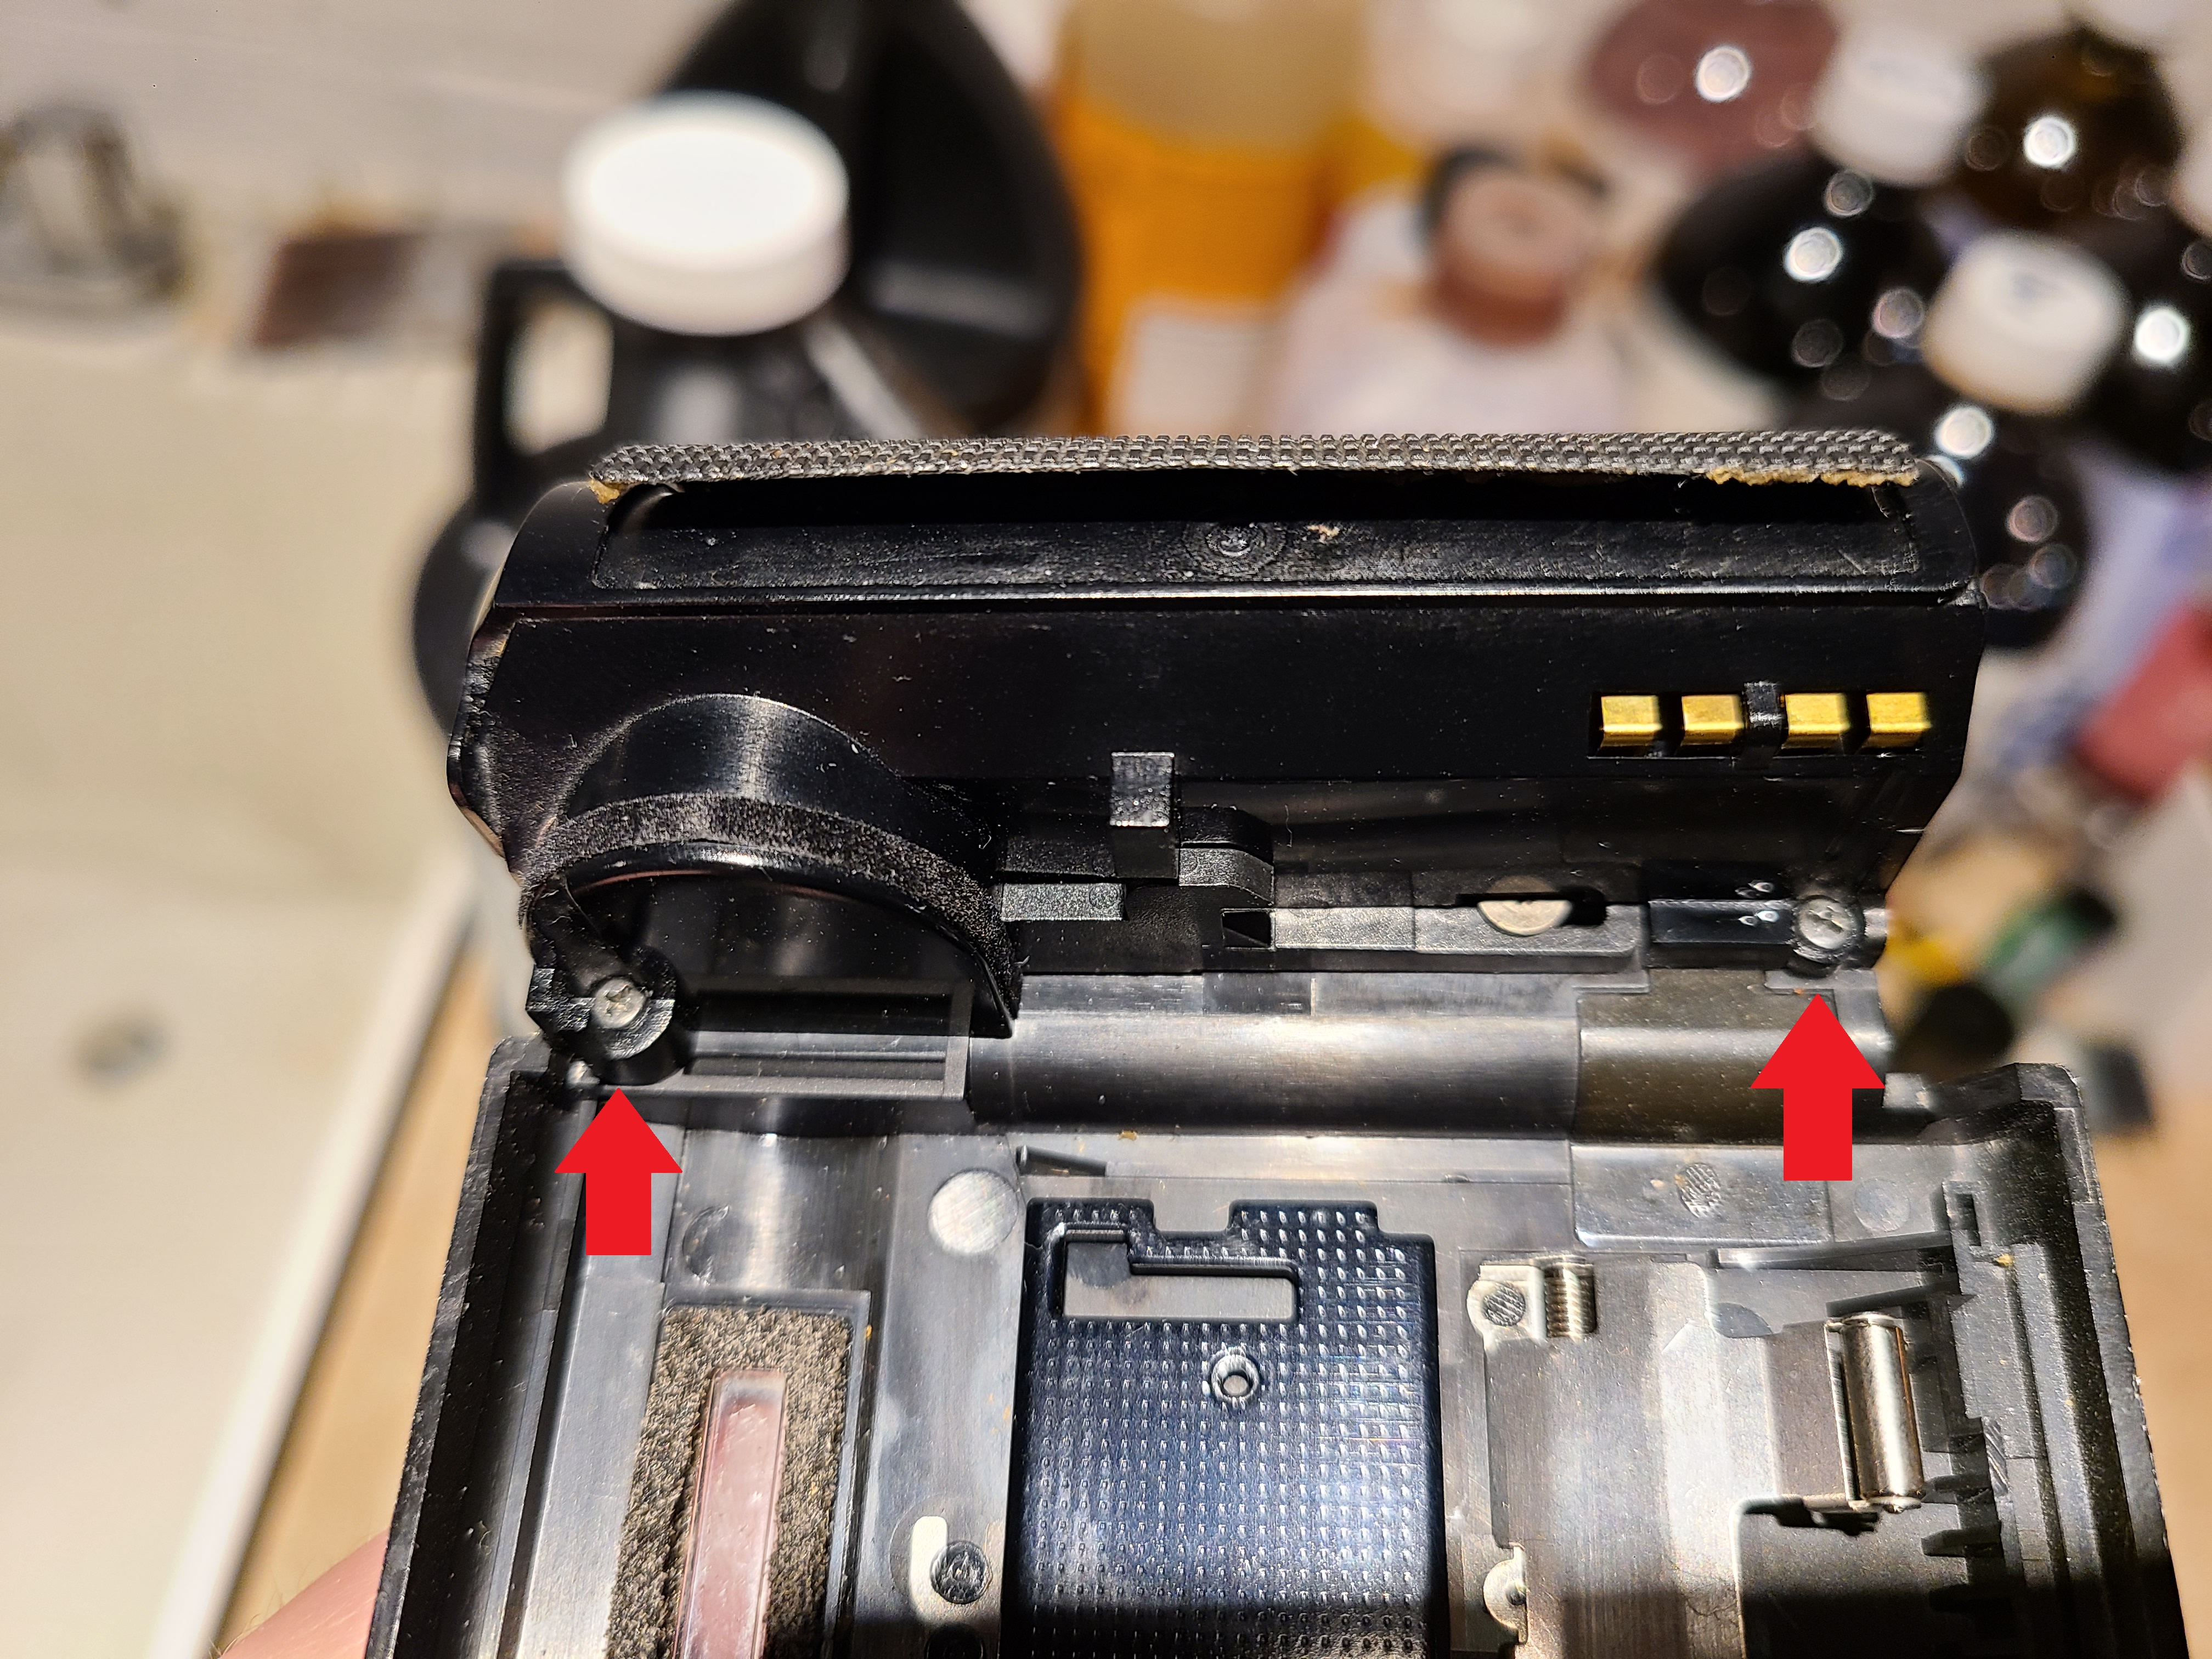
Next, remove the two screws indicated with red arrows. These screws are small and easily lost, so make sure you keep them in a safe location.
Step 2
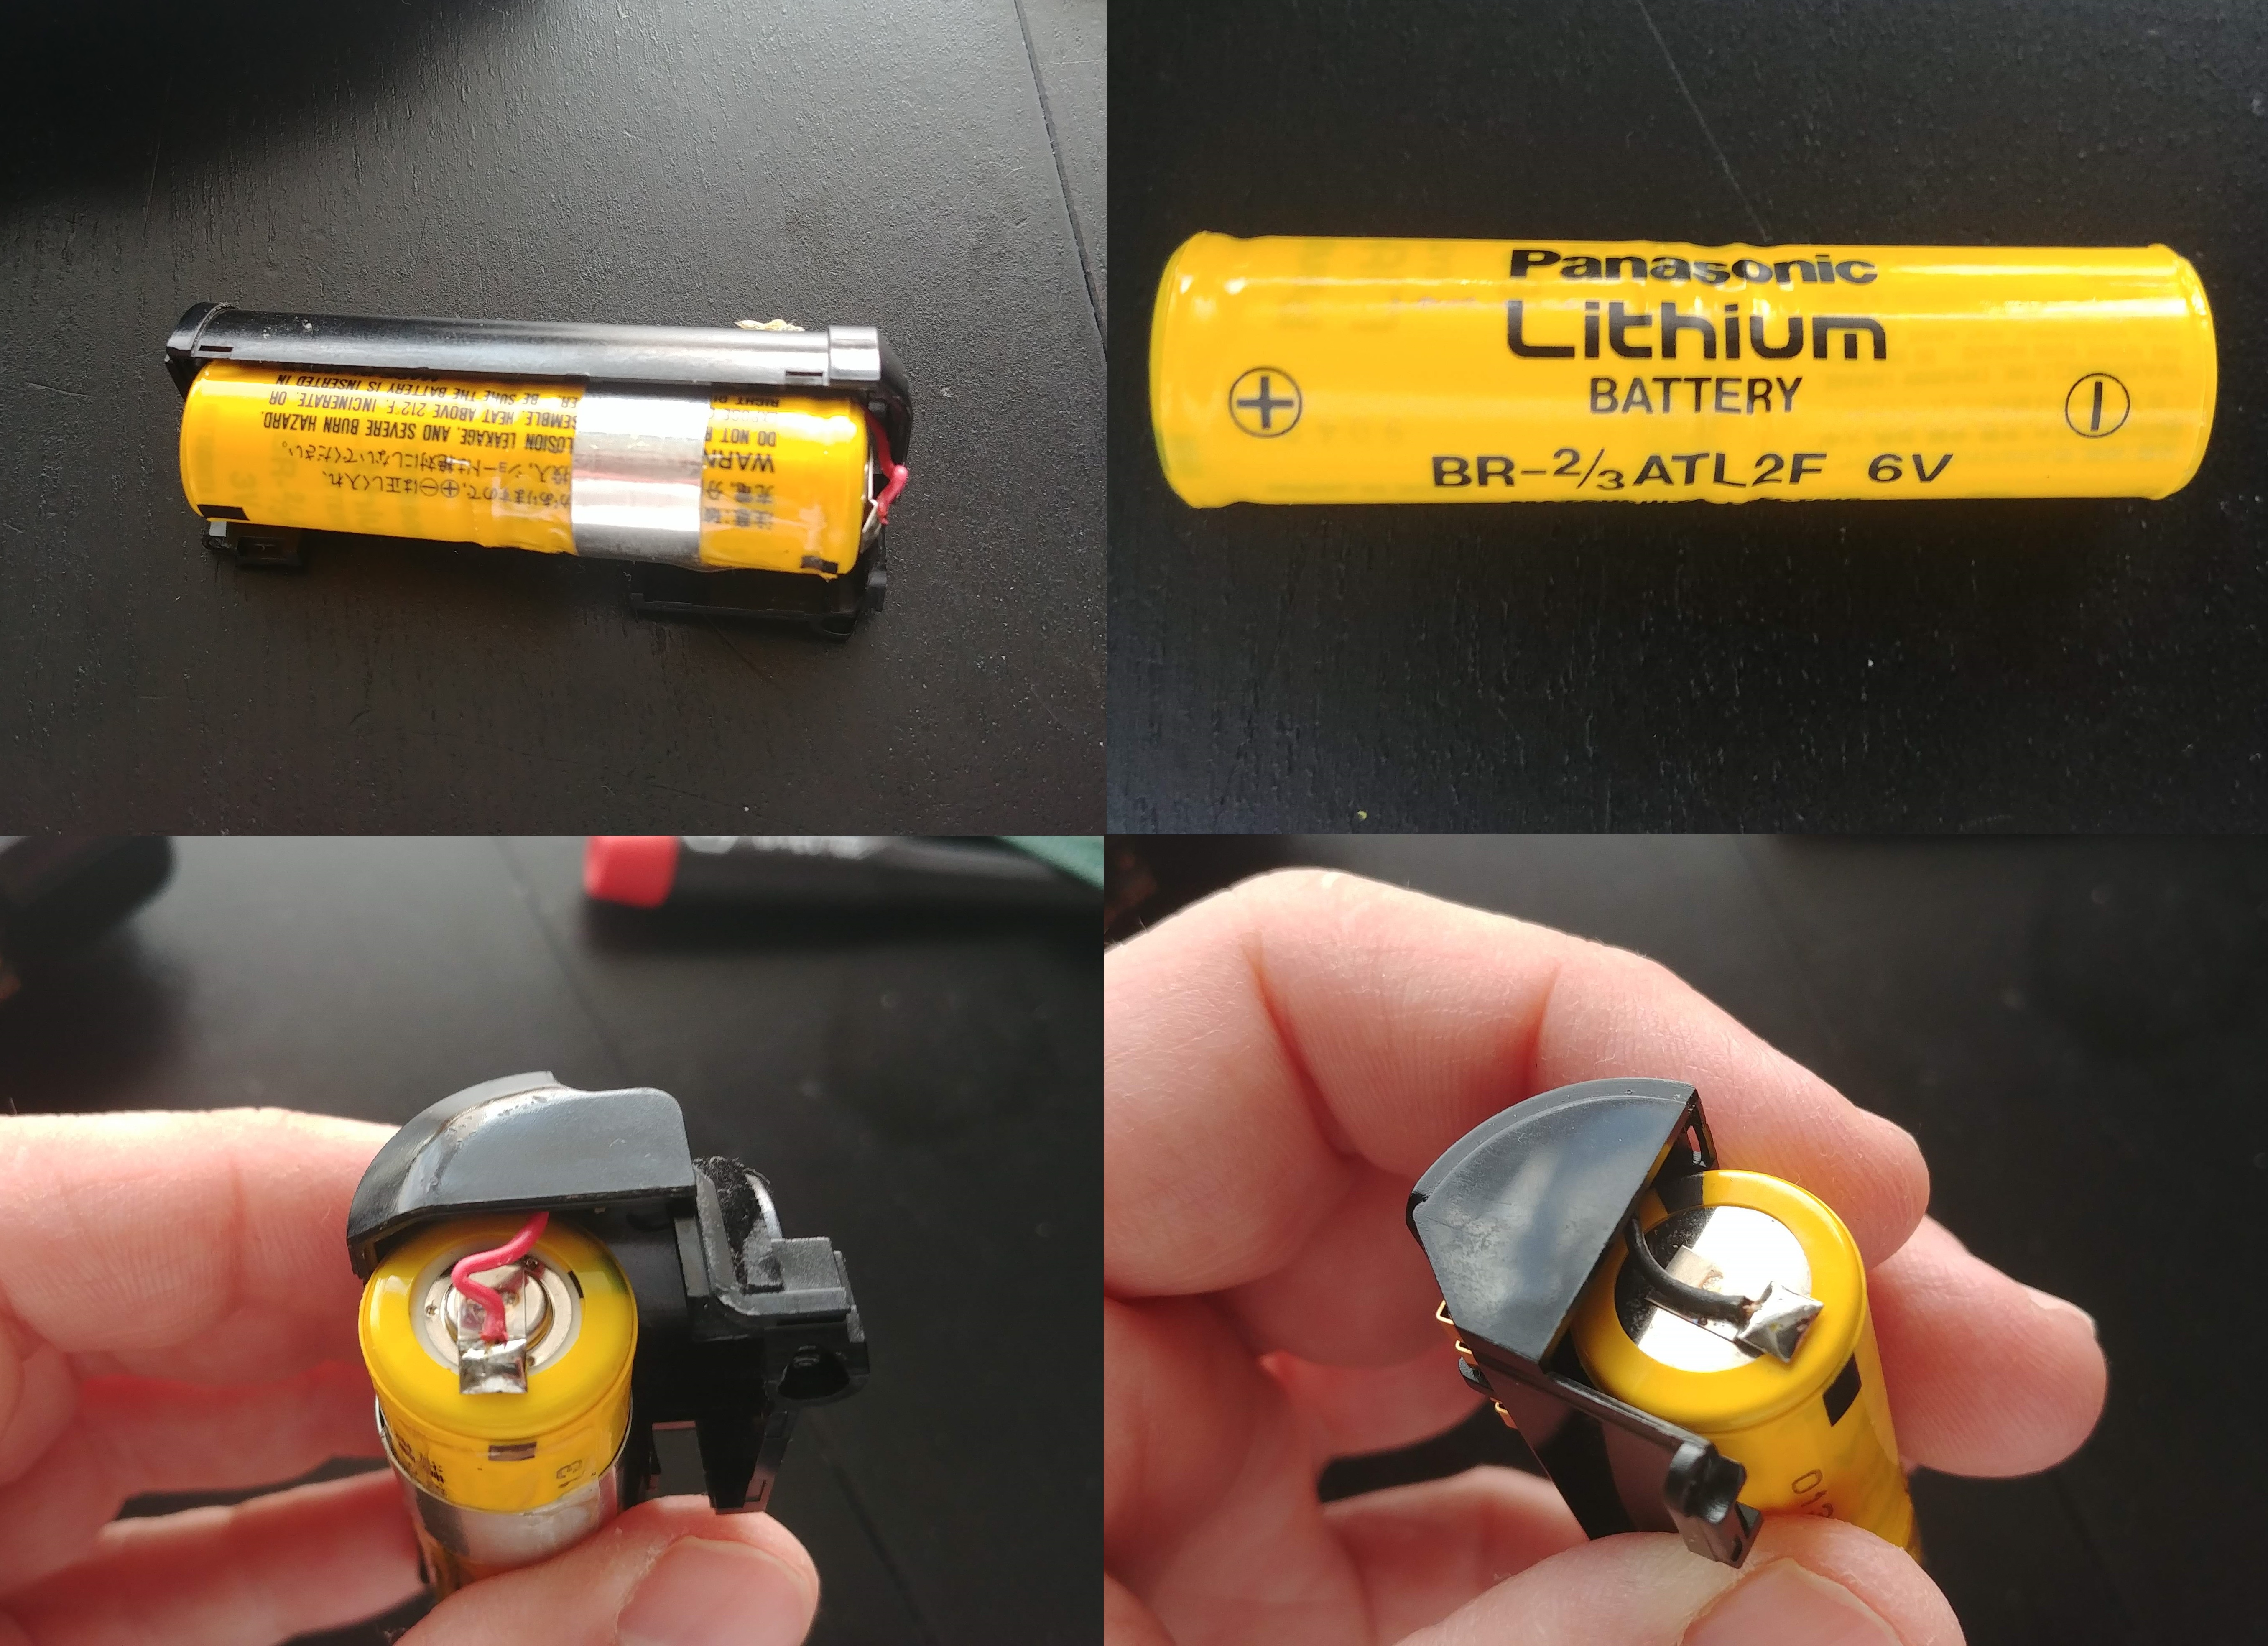
With both screws removed and the body covering peeled back, the battery and half of the plastic battery chamber will lift out in one piece. There are two wires soldered to each end of the battery which are connected to electrical contact points in the plastic. Using your soldering iron, heat up the solder points until they liquify and you can separate the wires from the battery and remove the battery.
In the image to the left, I show the battery still in the chamber, removed, and both sides of the battery where the wires are still soldered. The red wire is the positive side and the black wire is negative.
Once the battery is removed, it can be discarded. As it is a lithium battery, you should respect whatever appropriate guidelines exist in your area to properly dispose of it.
Step 3
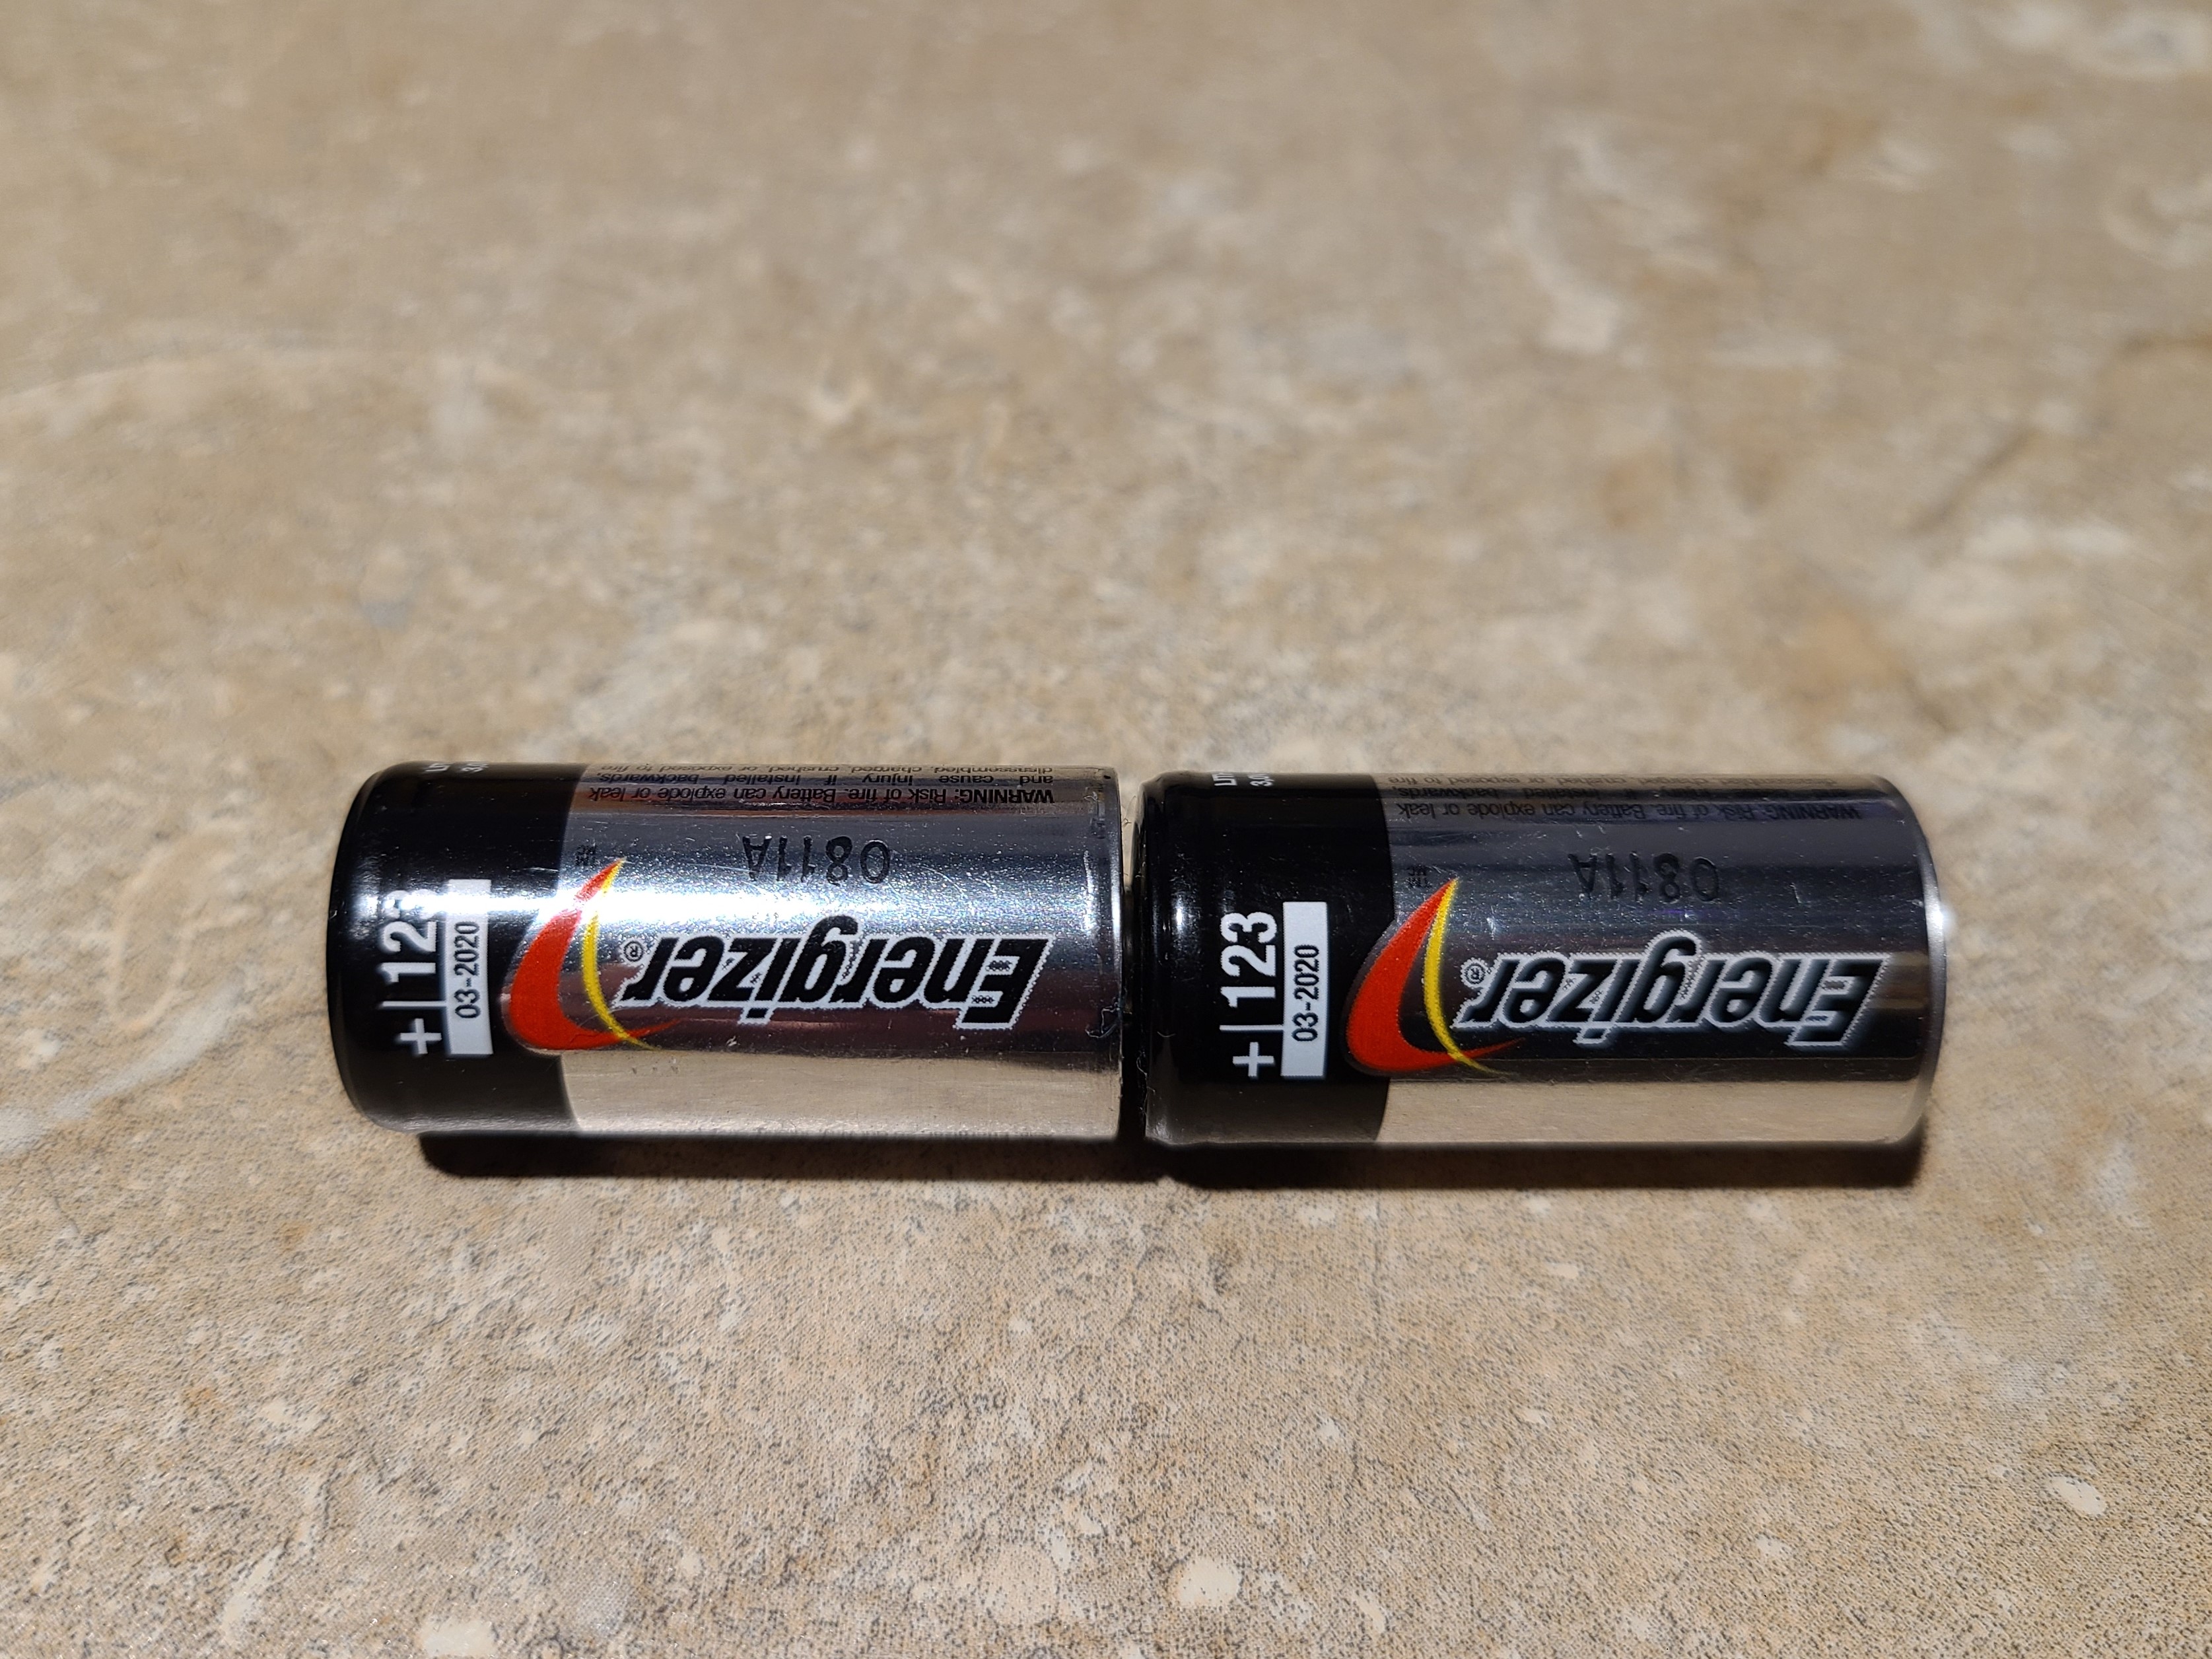
The next step is to insert the two new CR123 batteries back into the chamber so that the red wire touches the positive terminal and the black wire touches the negative. If you are good at soldering, you could attempt to solder the wires onto the batteries like the original one, but I found that taping it to the ends of the battery is good enough.
In the gallery below, I show the two new batteries in the correct orientation with positive on the left. Tape the red wire to the positive side and the black wire to the negative side. As long as they make a good contact and the batteries won’t separate, it will be fine. Also make sure the two batteries are touching each other securely before taping. It has been more than 9 months since I did this and my camera has never failed.
Once the wires are securely connected to the batteries, insert them back into the chamber. Although you want to use electrical tape to secure everything, do not use too much or else it will not fit.

Step 4
Insert the battery and the half chamber back into the camera and replace the two screws. You will not be able to test the camera until you close the film door again, but you’ll know if the camera works by pressing the shutter release. You do not need to have film loaded into the camera to test it.
One last thing is that after peeling back the body covering, you’ll likely need to use some rubber cement to secure the body covering back to the body. Any kind of soft adhesive will work, just do not use super glue!
My Thoughts
Half frame 35mm cameras are popular for a variety of reasons. There’s the economy of getting twice as many exposures on a roll of film, half frame cameras are often smaller and more convenient to carry around in a small bag or pocket, and sometimes people like them because they’re different. When you shrink the size of the camera, you have an opportunity to change things up and do something that you wouldn’t do on a full size 35mm camera.
Each of those three benefits could be said about the Fuji TW-3, you get double the images, it’s very small, and it sure is weird! I’ve actually come across two of these cameras, the first of which some previous owner tried to replace the battery unsuccessfully and no amount of tinkering was going to get it working again. I am unsure if the repair job is what permanently ended the camera, or of it was dead before that.
This second one was spotted on a shelf in the back room of Gary Camera in Merrillville, Indiana one day when I was looking around. I offered the shopkeeper a sawbuck and he quickly agreed to let me have it. I figured, I would pay that much in shipping online, even if I found the camera for free, so getting it instantly was worth the risk. The camera was in fine condition, with the only issue being it was dead. This is to be expected of a 35 year old camera with a non-removable battery. I had seen some tutorials online showing how to replace it yourself so I figured it was worth a shot.
The Fuji TW-3 has a slightly more squared shape than a typical 35mm camera would. It is quite a bit taller, a little wider, and almost the exact same thickness as an Olympus XA. At 292 grams, it is about 60 grams lighter than the XA as well. If you’re thinking it is odd that a half frame camera is dimensionally larger and heavier than a full frame camera, keep in mind that the TW-3 adds a second lens, a large lithium battery that needed to keep the camera powered for up to 5 years, and it has an in body flash, all things the XA lacks.
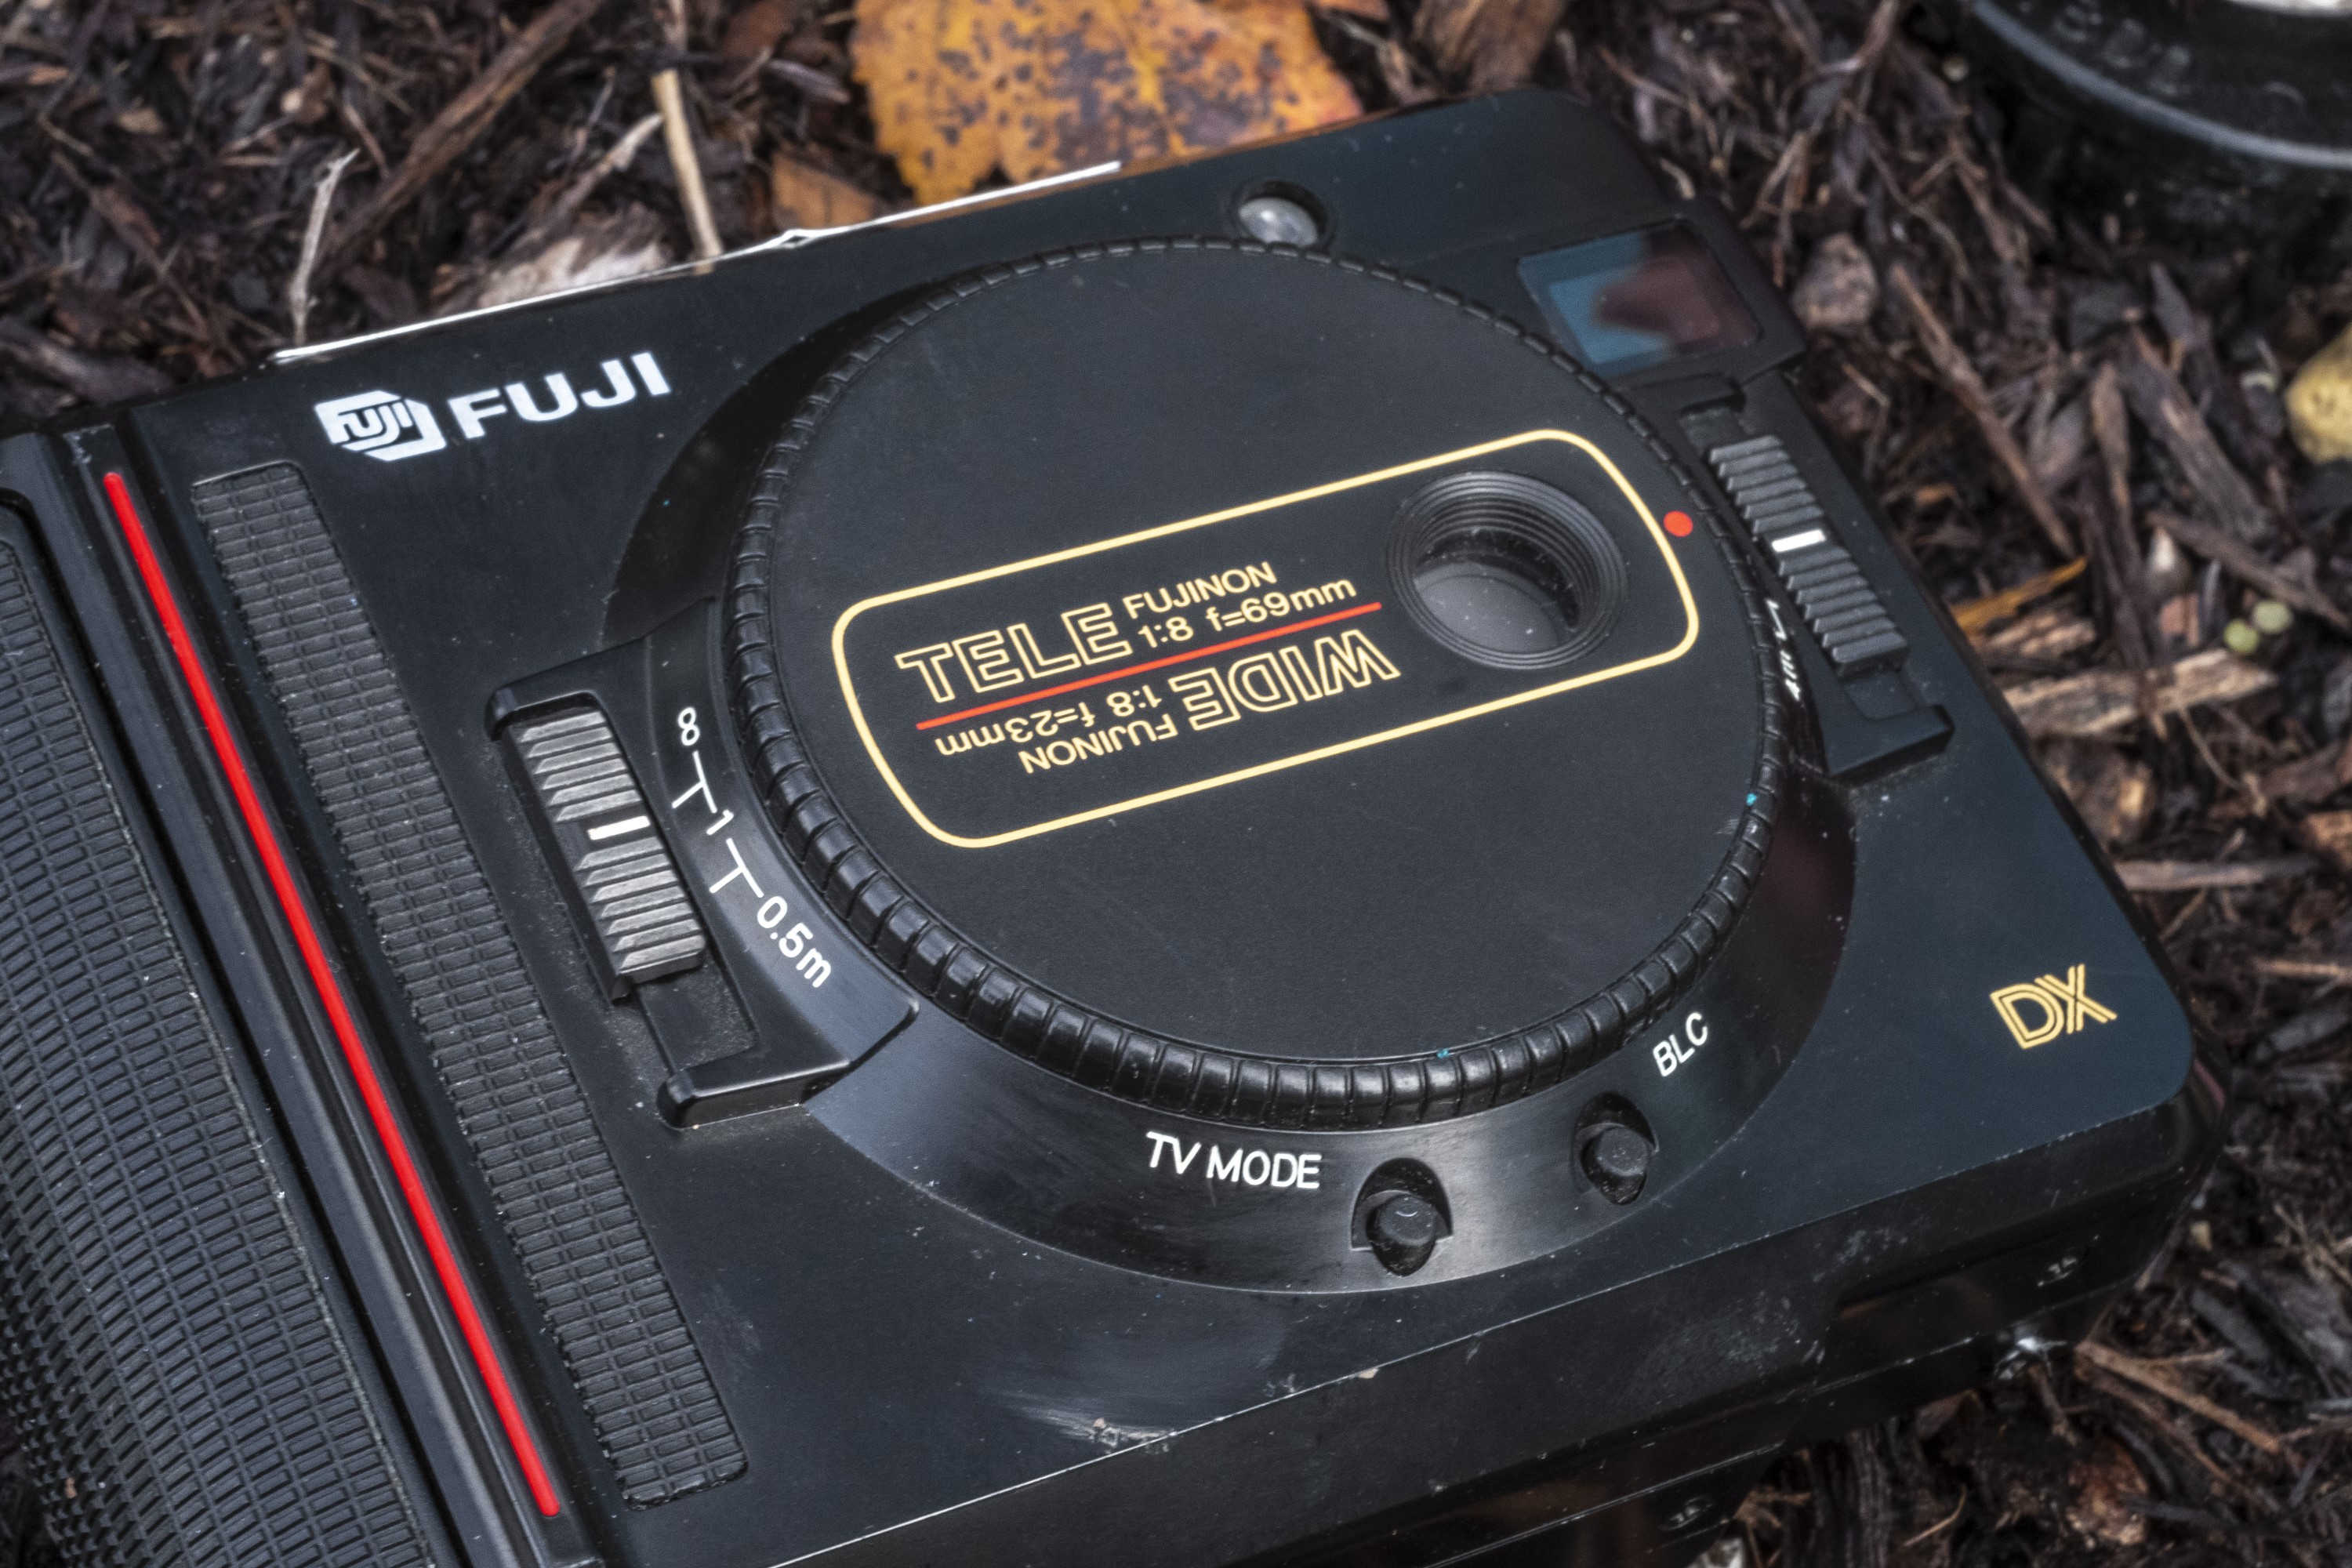
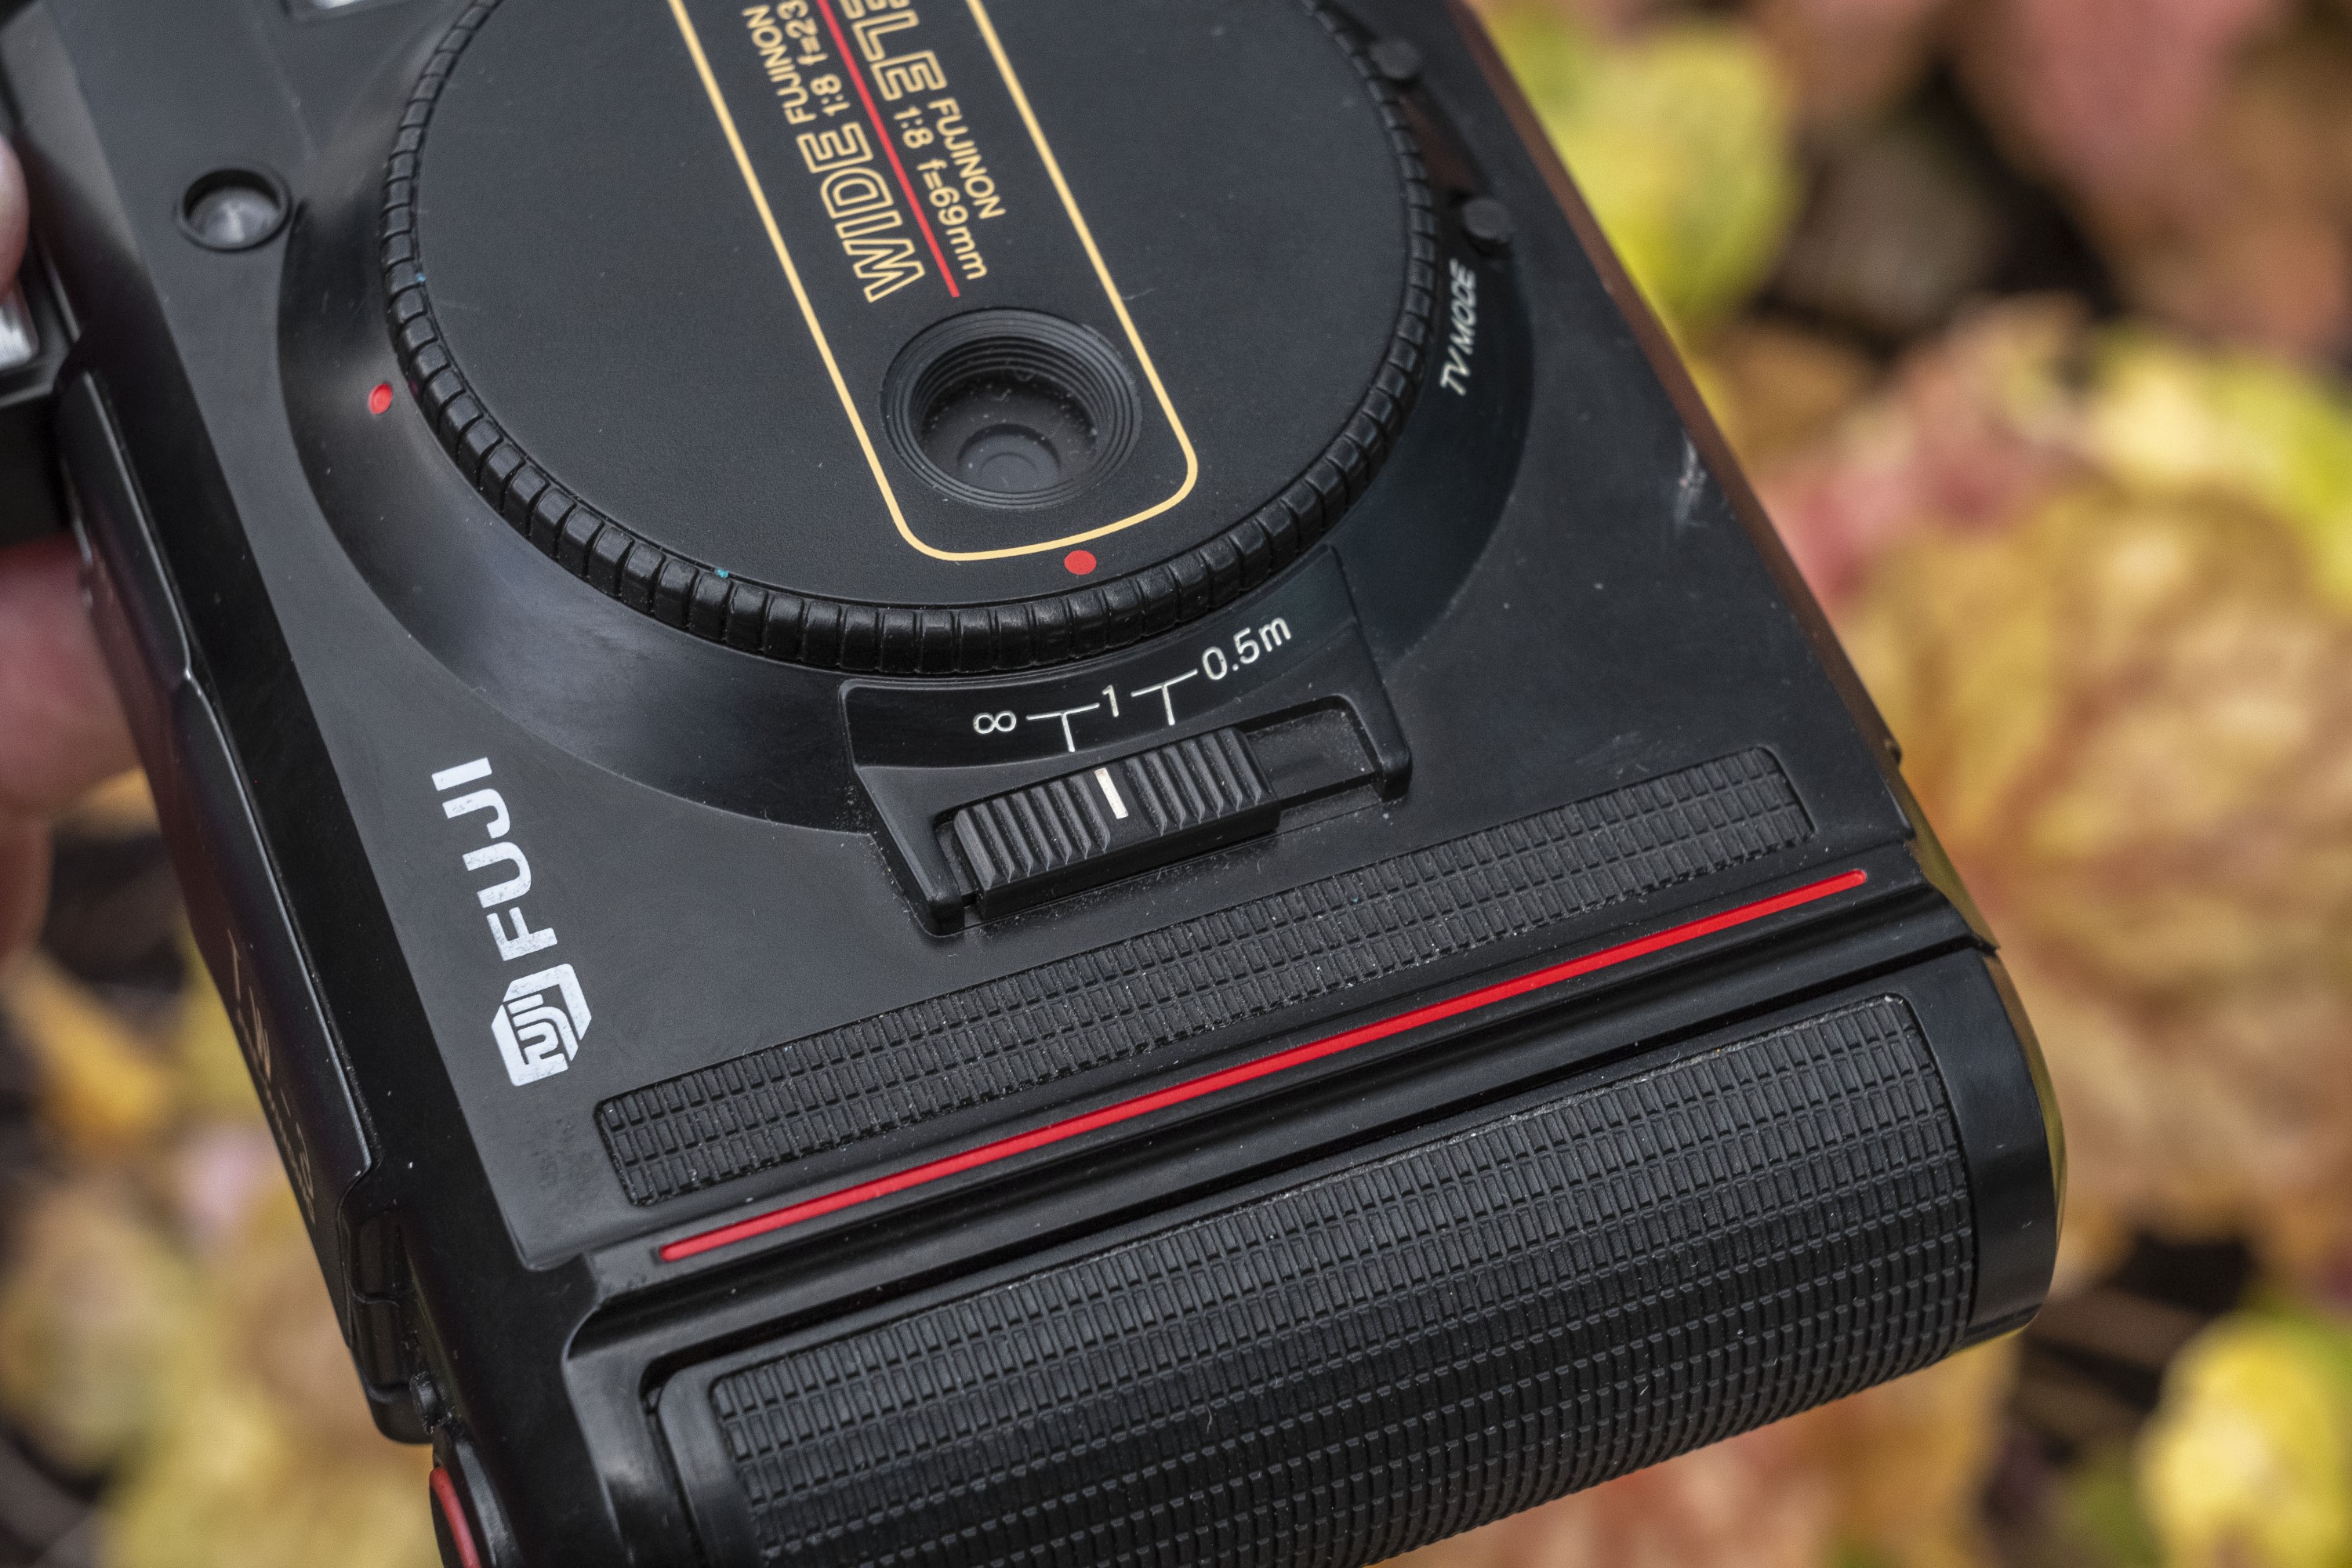
The first time you see a TW-3, the stand out feature is the large circle with the 23mm wide angle and 69mm telephoto lenses.
Switching between the two is just a matter of turning the large dial so that a red dot lines up with the telephoto focus scale on the right, the wide angle focus scale on the left, or the camera’s off position up top in the center.
Neither lens offers automatic focus, but you really don’t need it as the depth of field afforded by the smallish f/8 aperture of both lenses only allows for focus free operation from 1 meter to infinity in wide angle mode and a three zone focus distances with the telephoto lens. The wide angle lens has an optional close-up mode which allows you to focus between 0.5 meters to 1 meter.
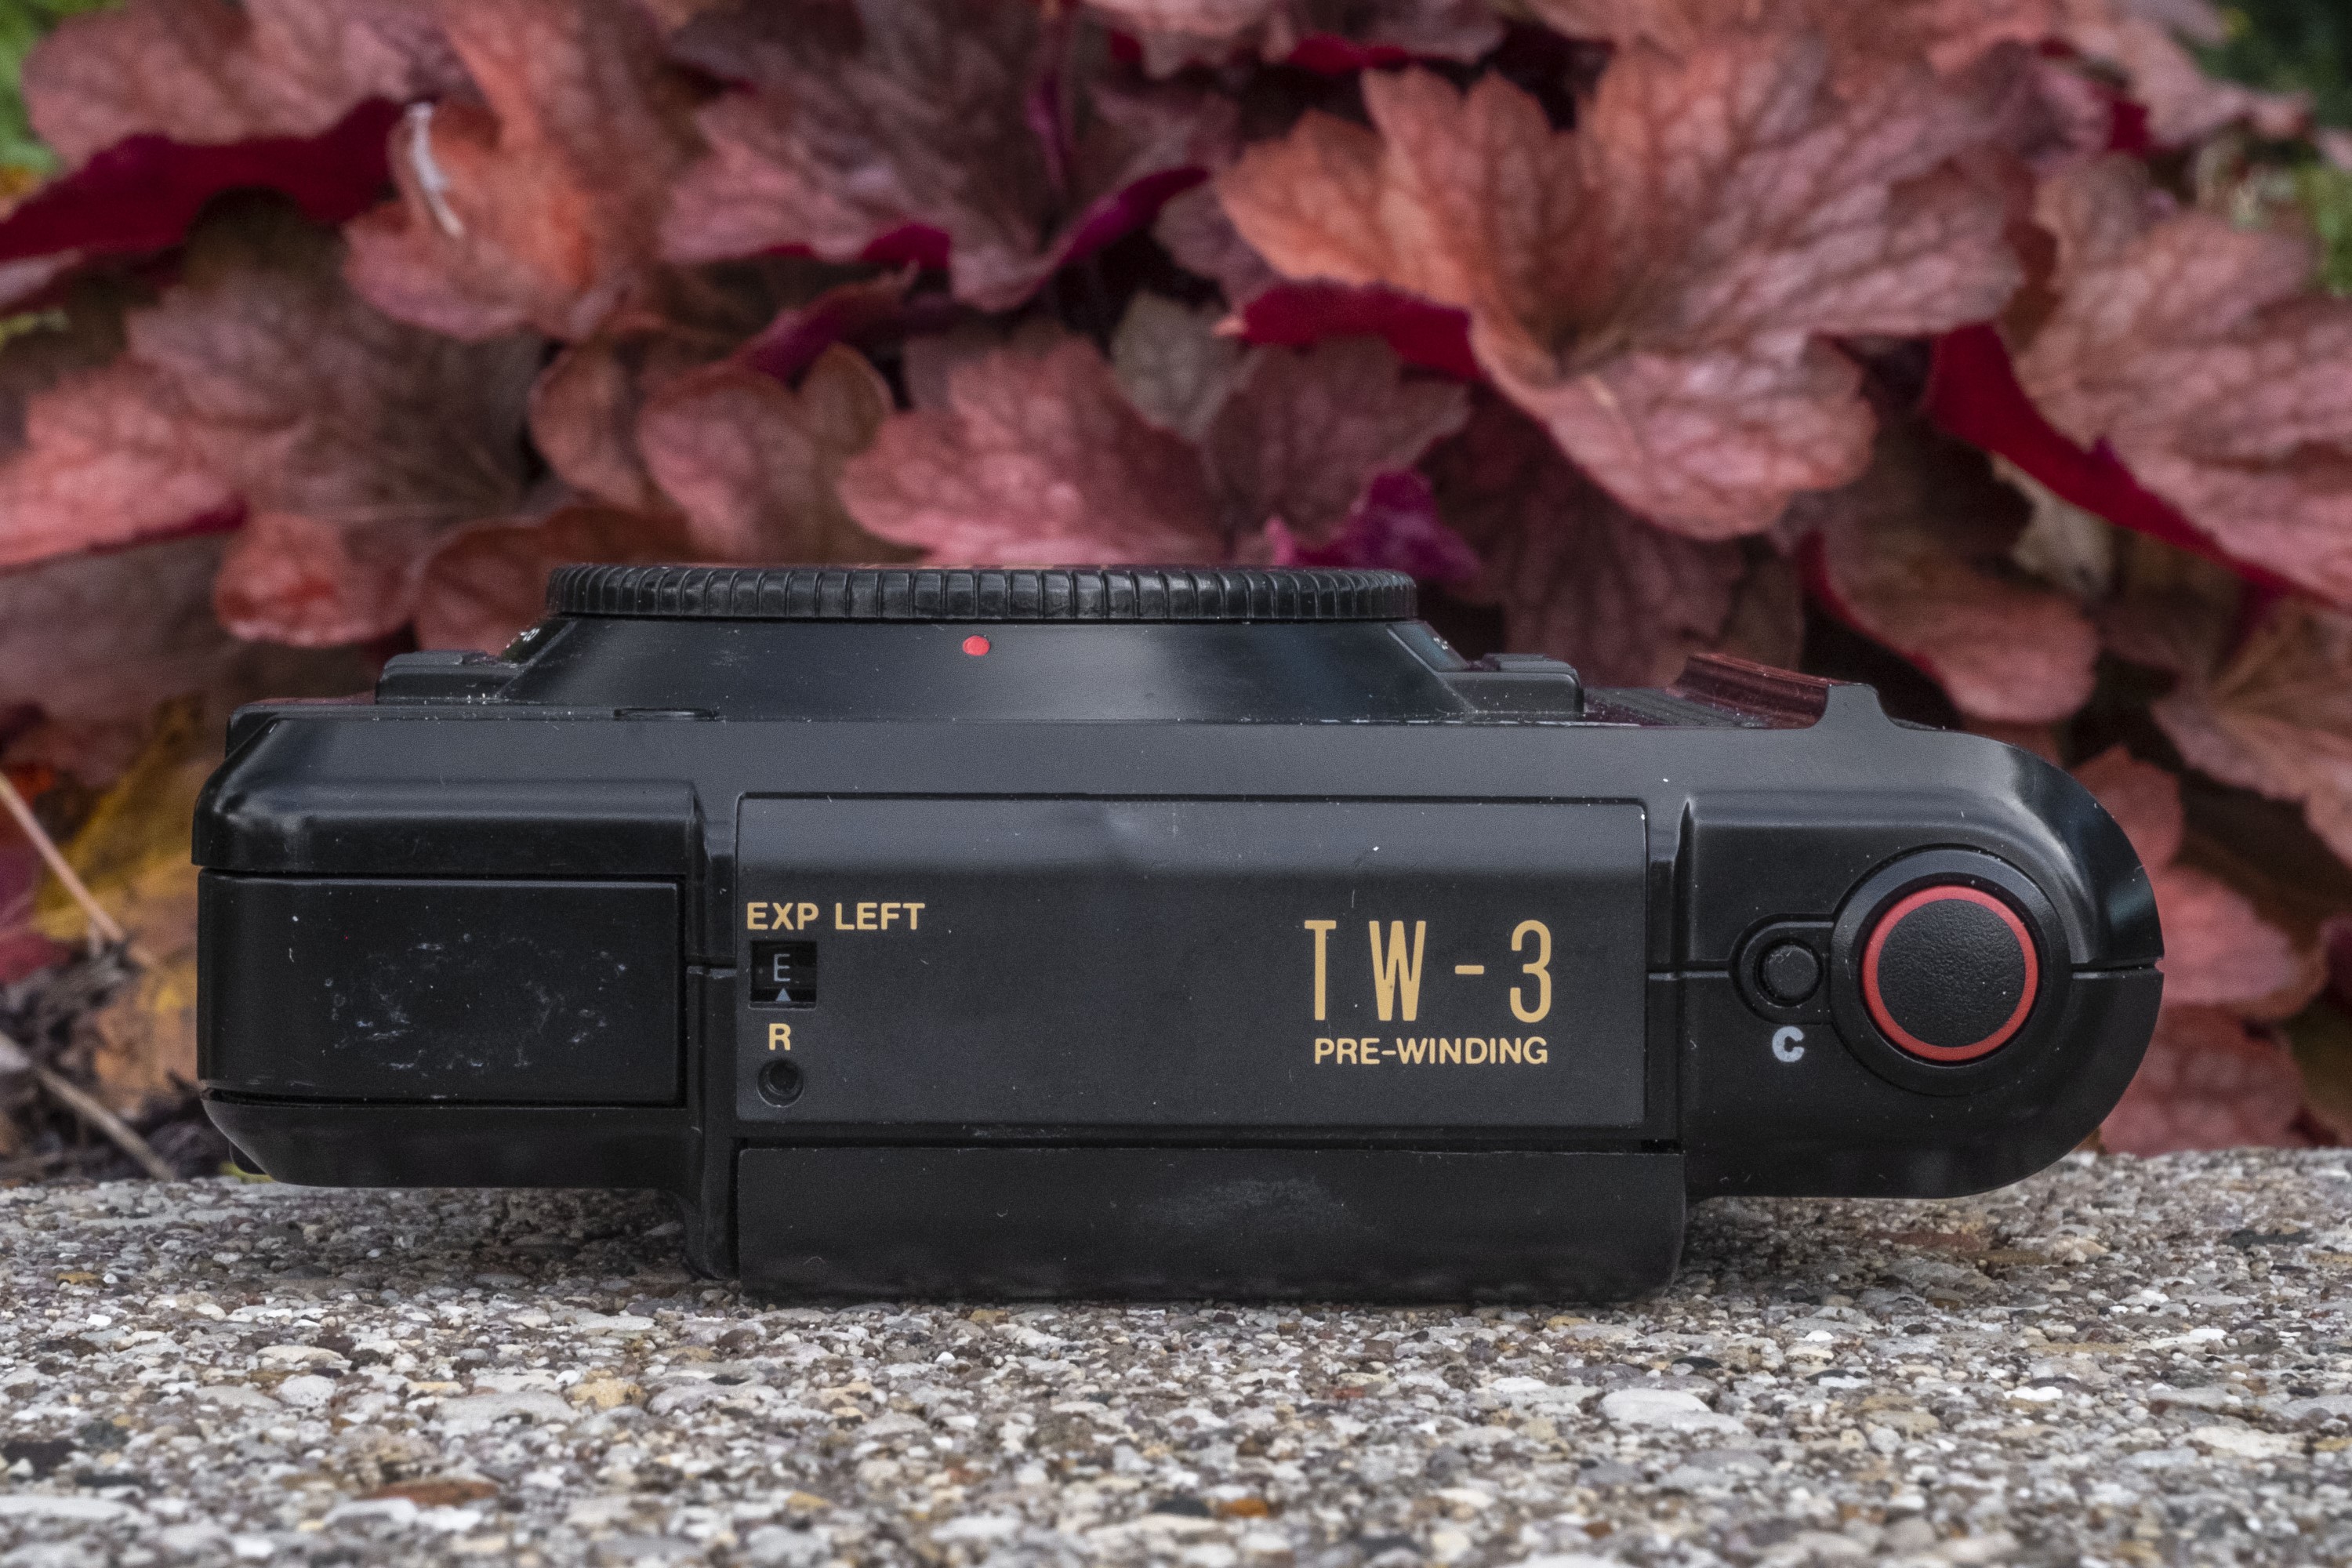
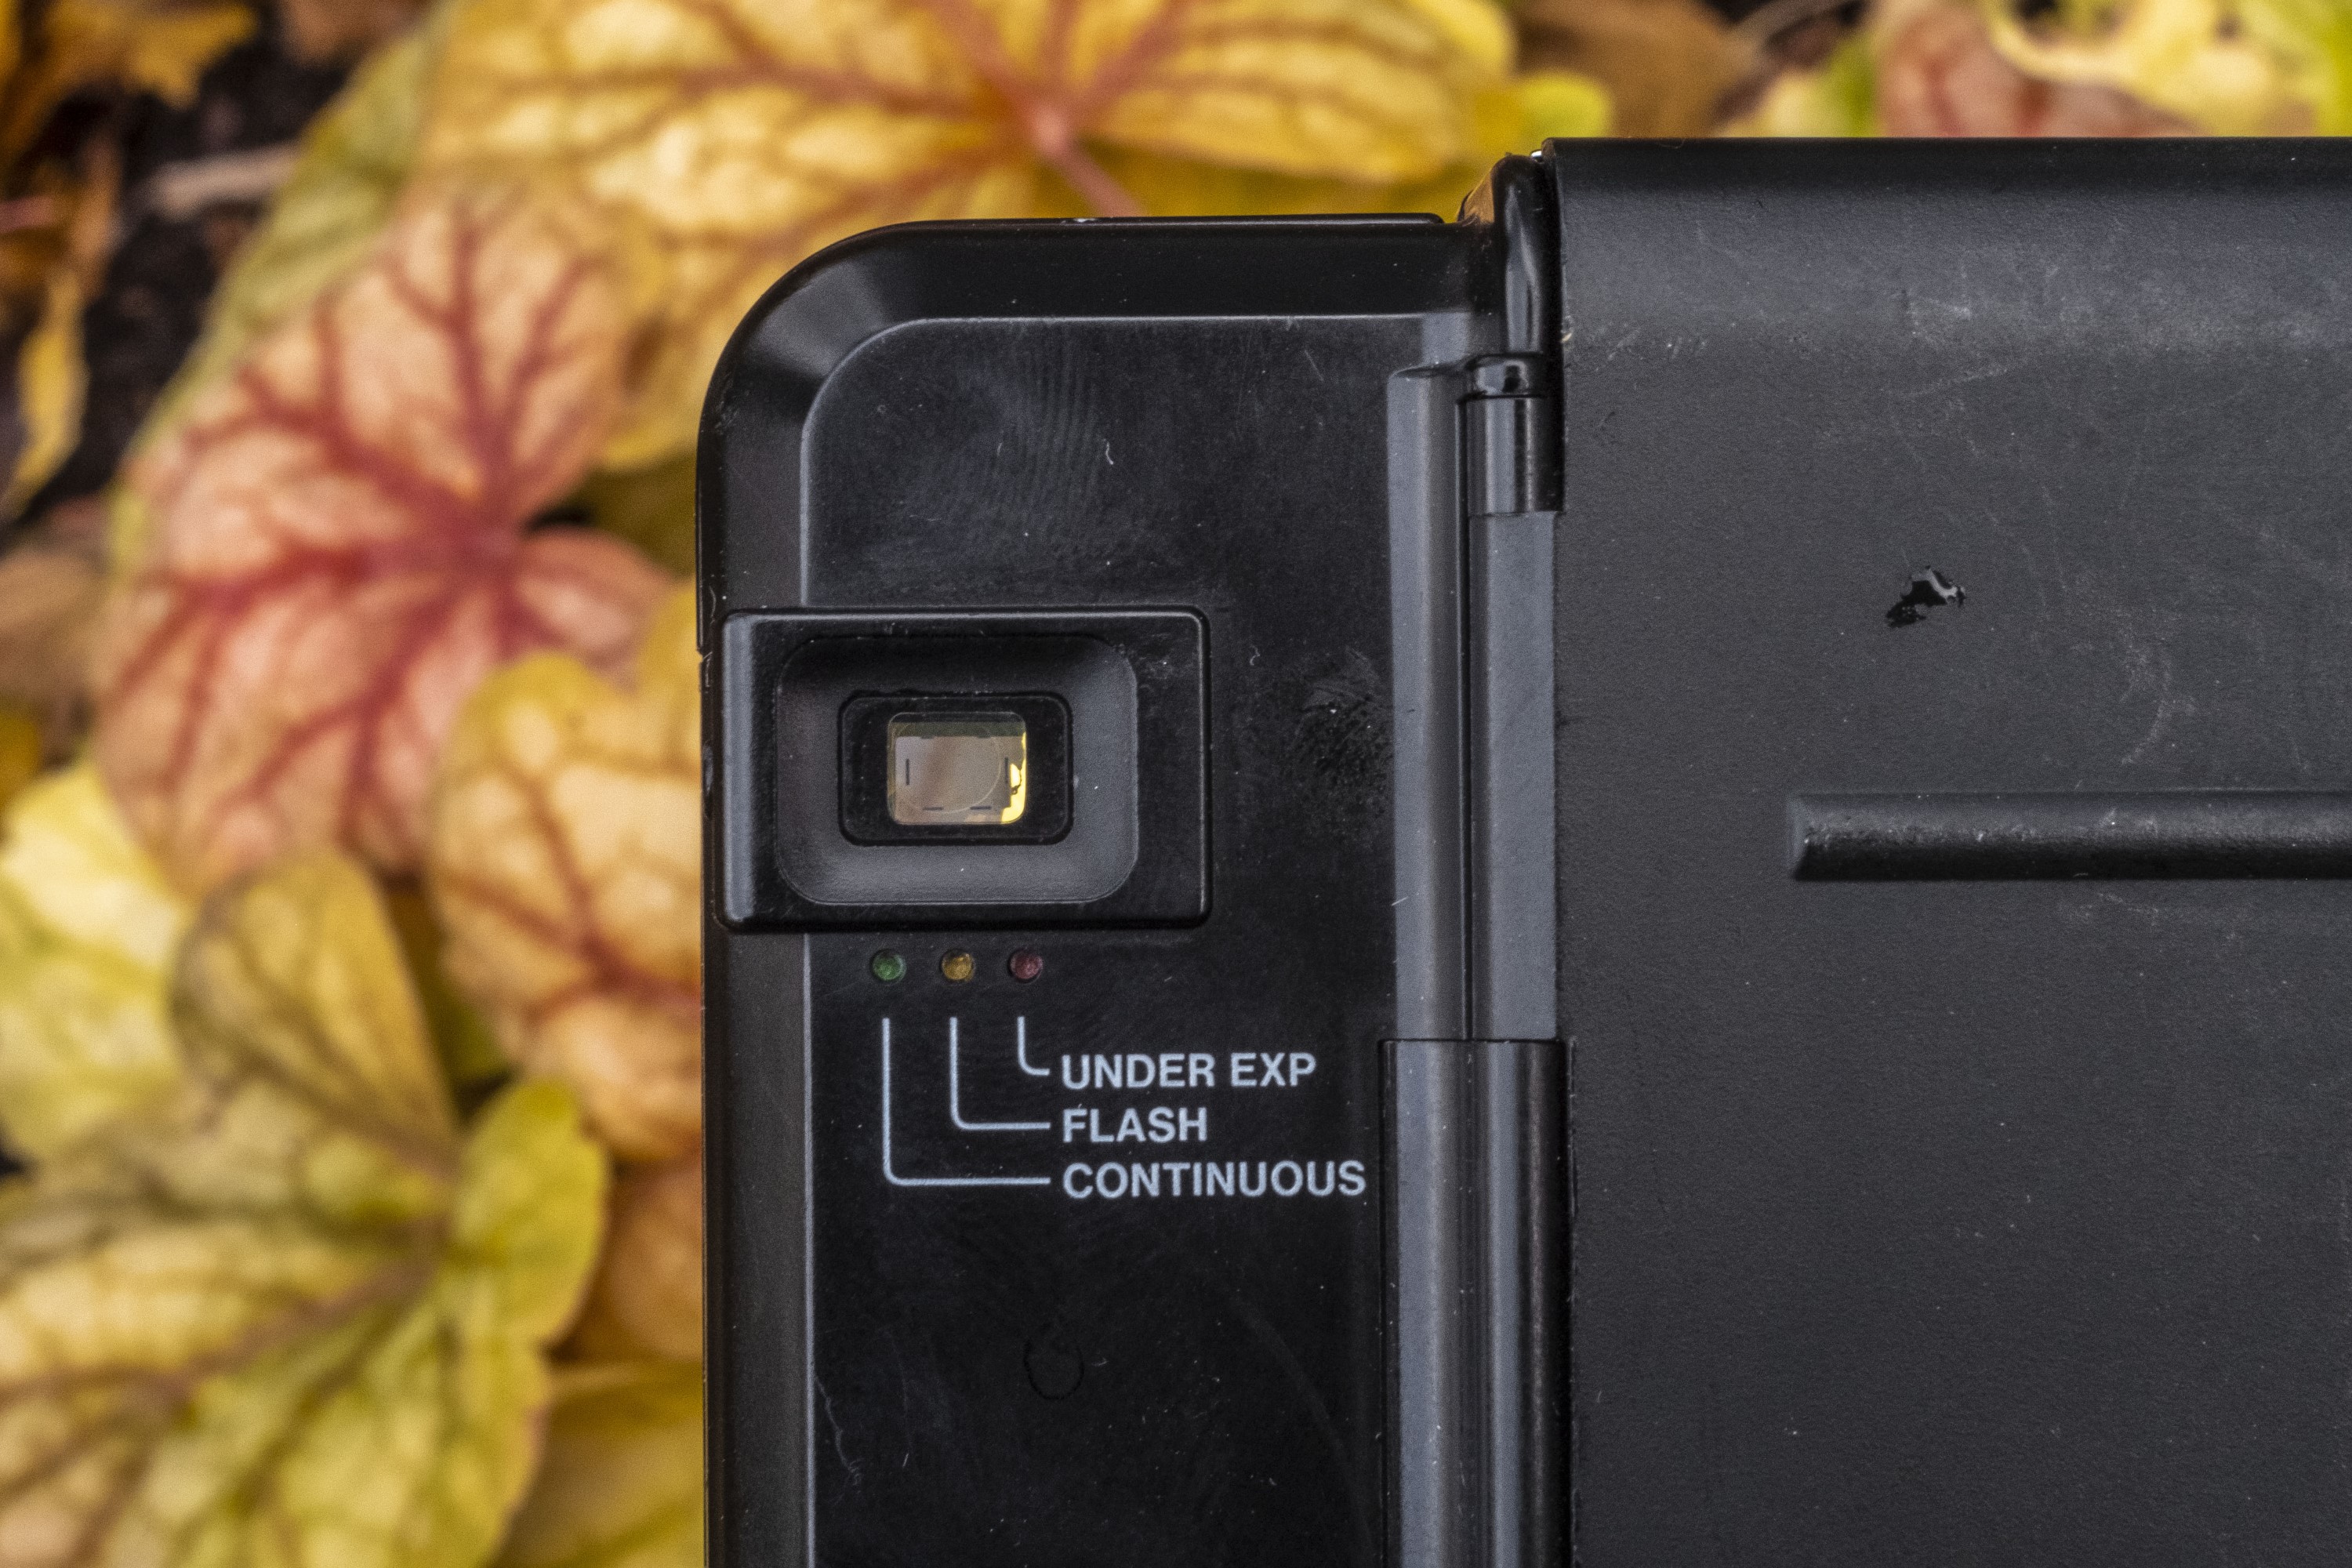
The TW-3 is a mostly automatic camera, so there’s not a lot of manual controls anywhere on the camera. Up top we see the backwards counting exposure counter, a manual rewind button, a silk screened logo, and shutter release button. To the left of the shutter release button is a smaller button with the letter “C” that is used for continuous shooting. Pressing this smaller button illuminates a green LED below the viewfinder to notify you that continuous mode is on. The shutter will not begin firing until you press and hold the shutter release. It will keep firing at a rate of about 2 exposures per second until you release it. Once you release the shutter release, continuous mode is automatically cancelled. With the wide angle lens selected, shooting in continuous mode disables the flash.
The bottom of the camera has the serial number and nothing else. Since the TW-3’s slowest shutter speed is 1/30 and there is no option for a Bulb model, a tripod socket isn’t necessary.
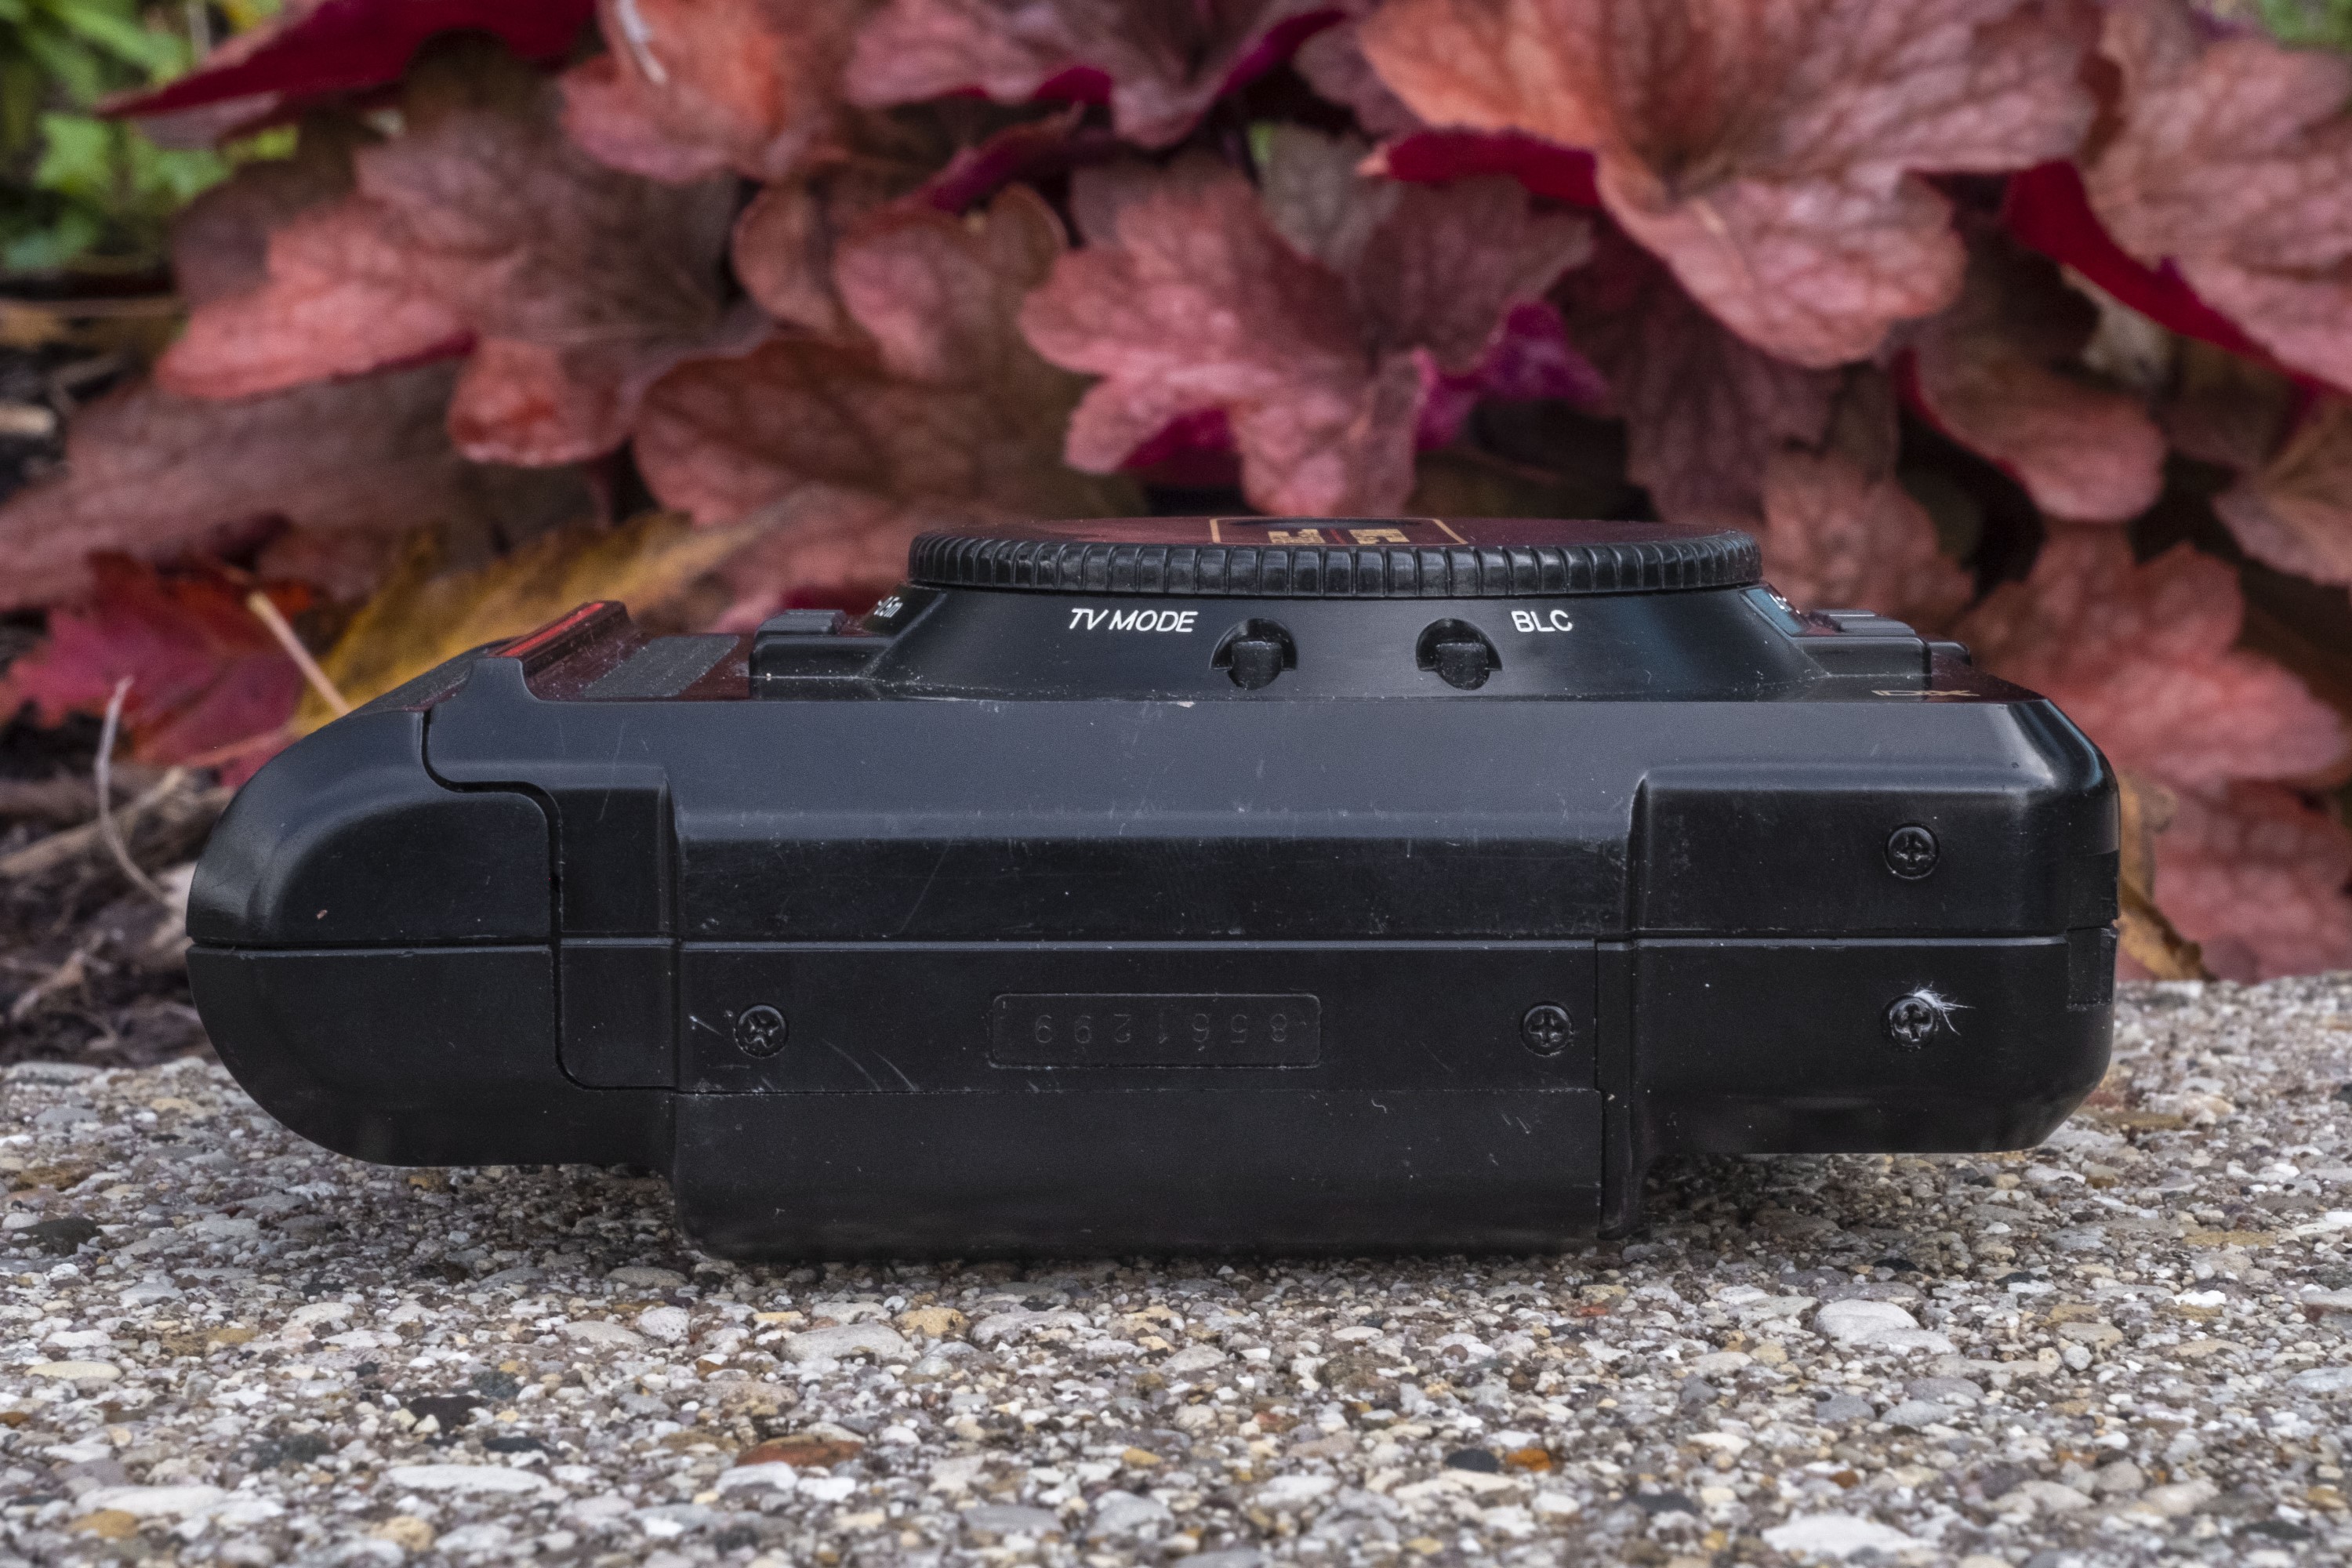
Although on the bottom edge of the front of the camera, in the image to the right, you can see two buttons, one for something called TV Mode, which was a gimmicky mode popular in some Japanese cameras that allow you to take photos of television screens. Doing this sets the shutter at 1/30 and disables the flash, even with the wide angle lens selected. Special TV modes were necessary as analog televisions in the 1980s operated at a refresh rate of 50 or 60 Hz which would often cause problems with fast shutter speeds because large parts of the screen would show up black in photos. Shooting at 1/30 would ensure the whole screen is captured. Although this wouldn’t be useful today, a side benefit of using this mode is that it deactivates the flash with the wide angle lens selected.
The second button is labeled BLC, and activates a +1.5 EV back light compensation mode for when shooting dark subjects in front of a light background such as a window or a bright sky. Both the BLC and TV Model buttons must be held down while pressing the shutter release to be used.
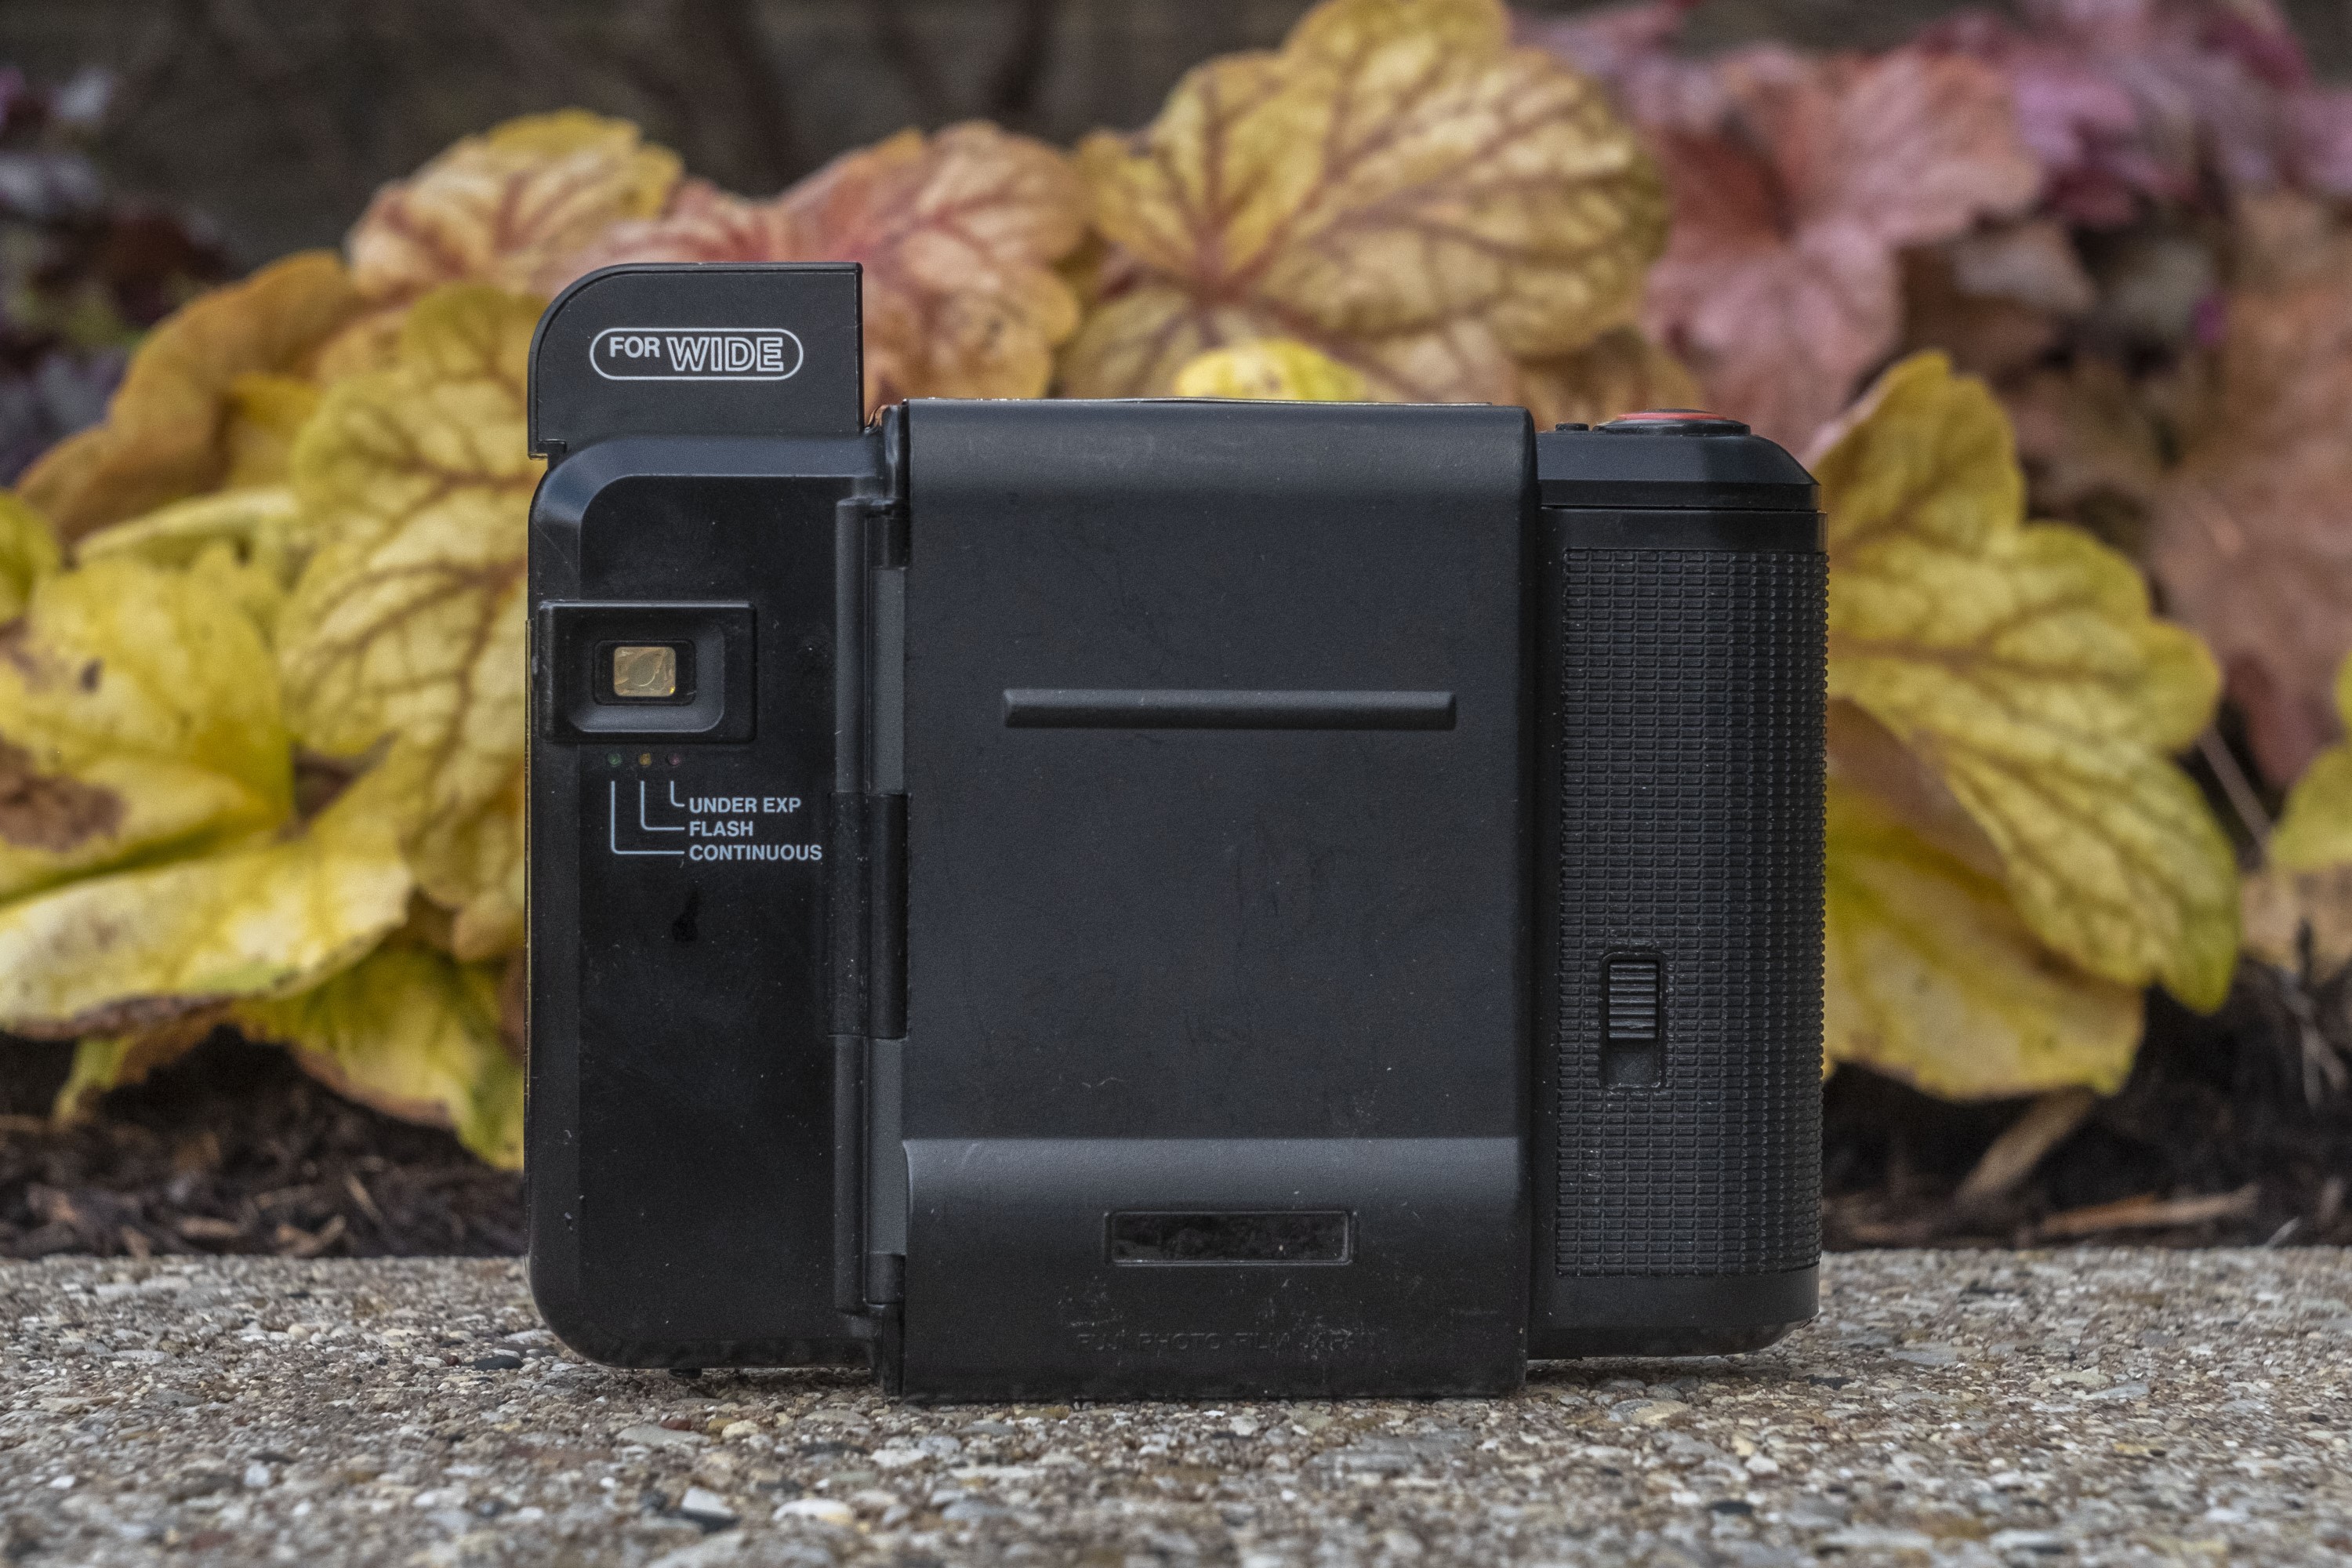
A variety of features are scattered across the back plate of the camera. Starting in the upper left corner, with the lens in wide angle mode, the flash automatically pops up and has a reminder that it is only to be used for Wide angle shots. Even if the flash is up, when shooting in low light with the telephoto lens selected, the flash will not fire.
Beneath the flash is the eyepiece for the viewfinder. The view through the viewfinder changes depending on which lens you have selected, so as to show an accurate representation of what will be captured. I’ll cover more about this later.
Beneath the eyepiece are three LEDs, one each to indicate continuous shooting model, flash, and an underexposure warning. Near the bottom of the camera, on the end of the door is a small window allowing you to see what kind of film is loaded into the camera, and on the right is the door release for the film compartment.
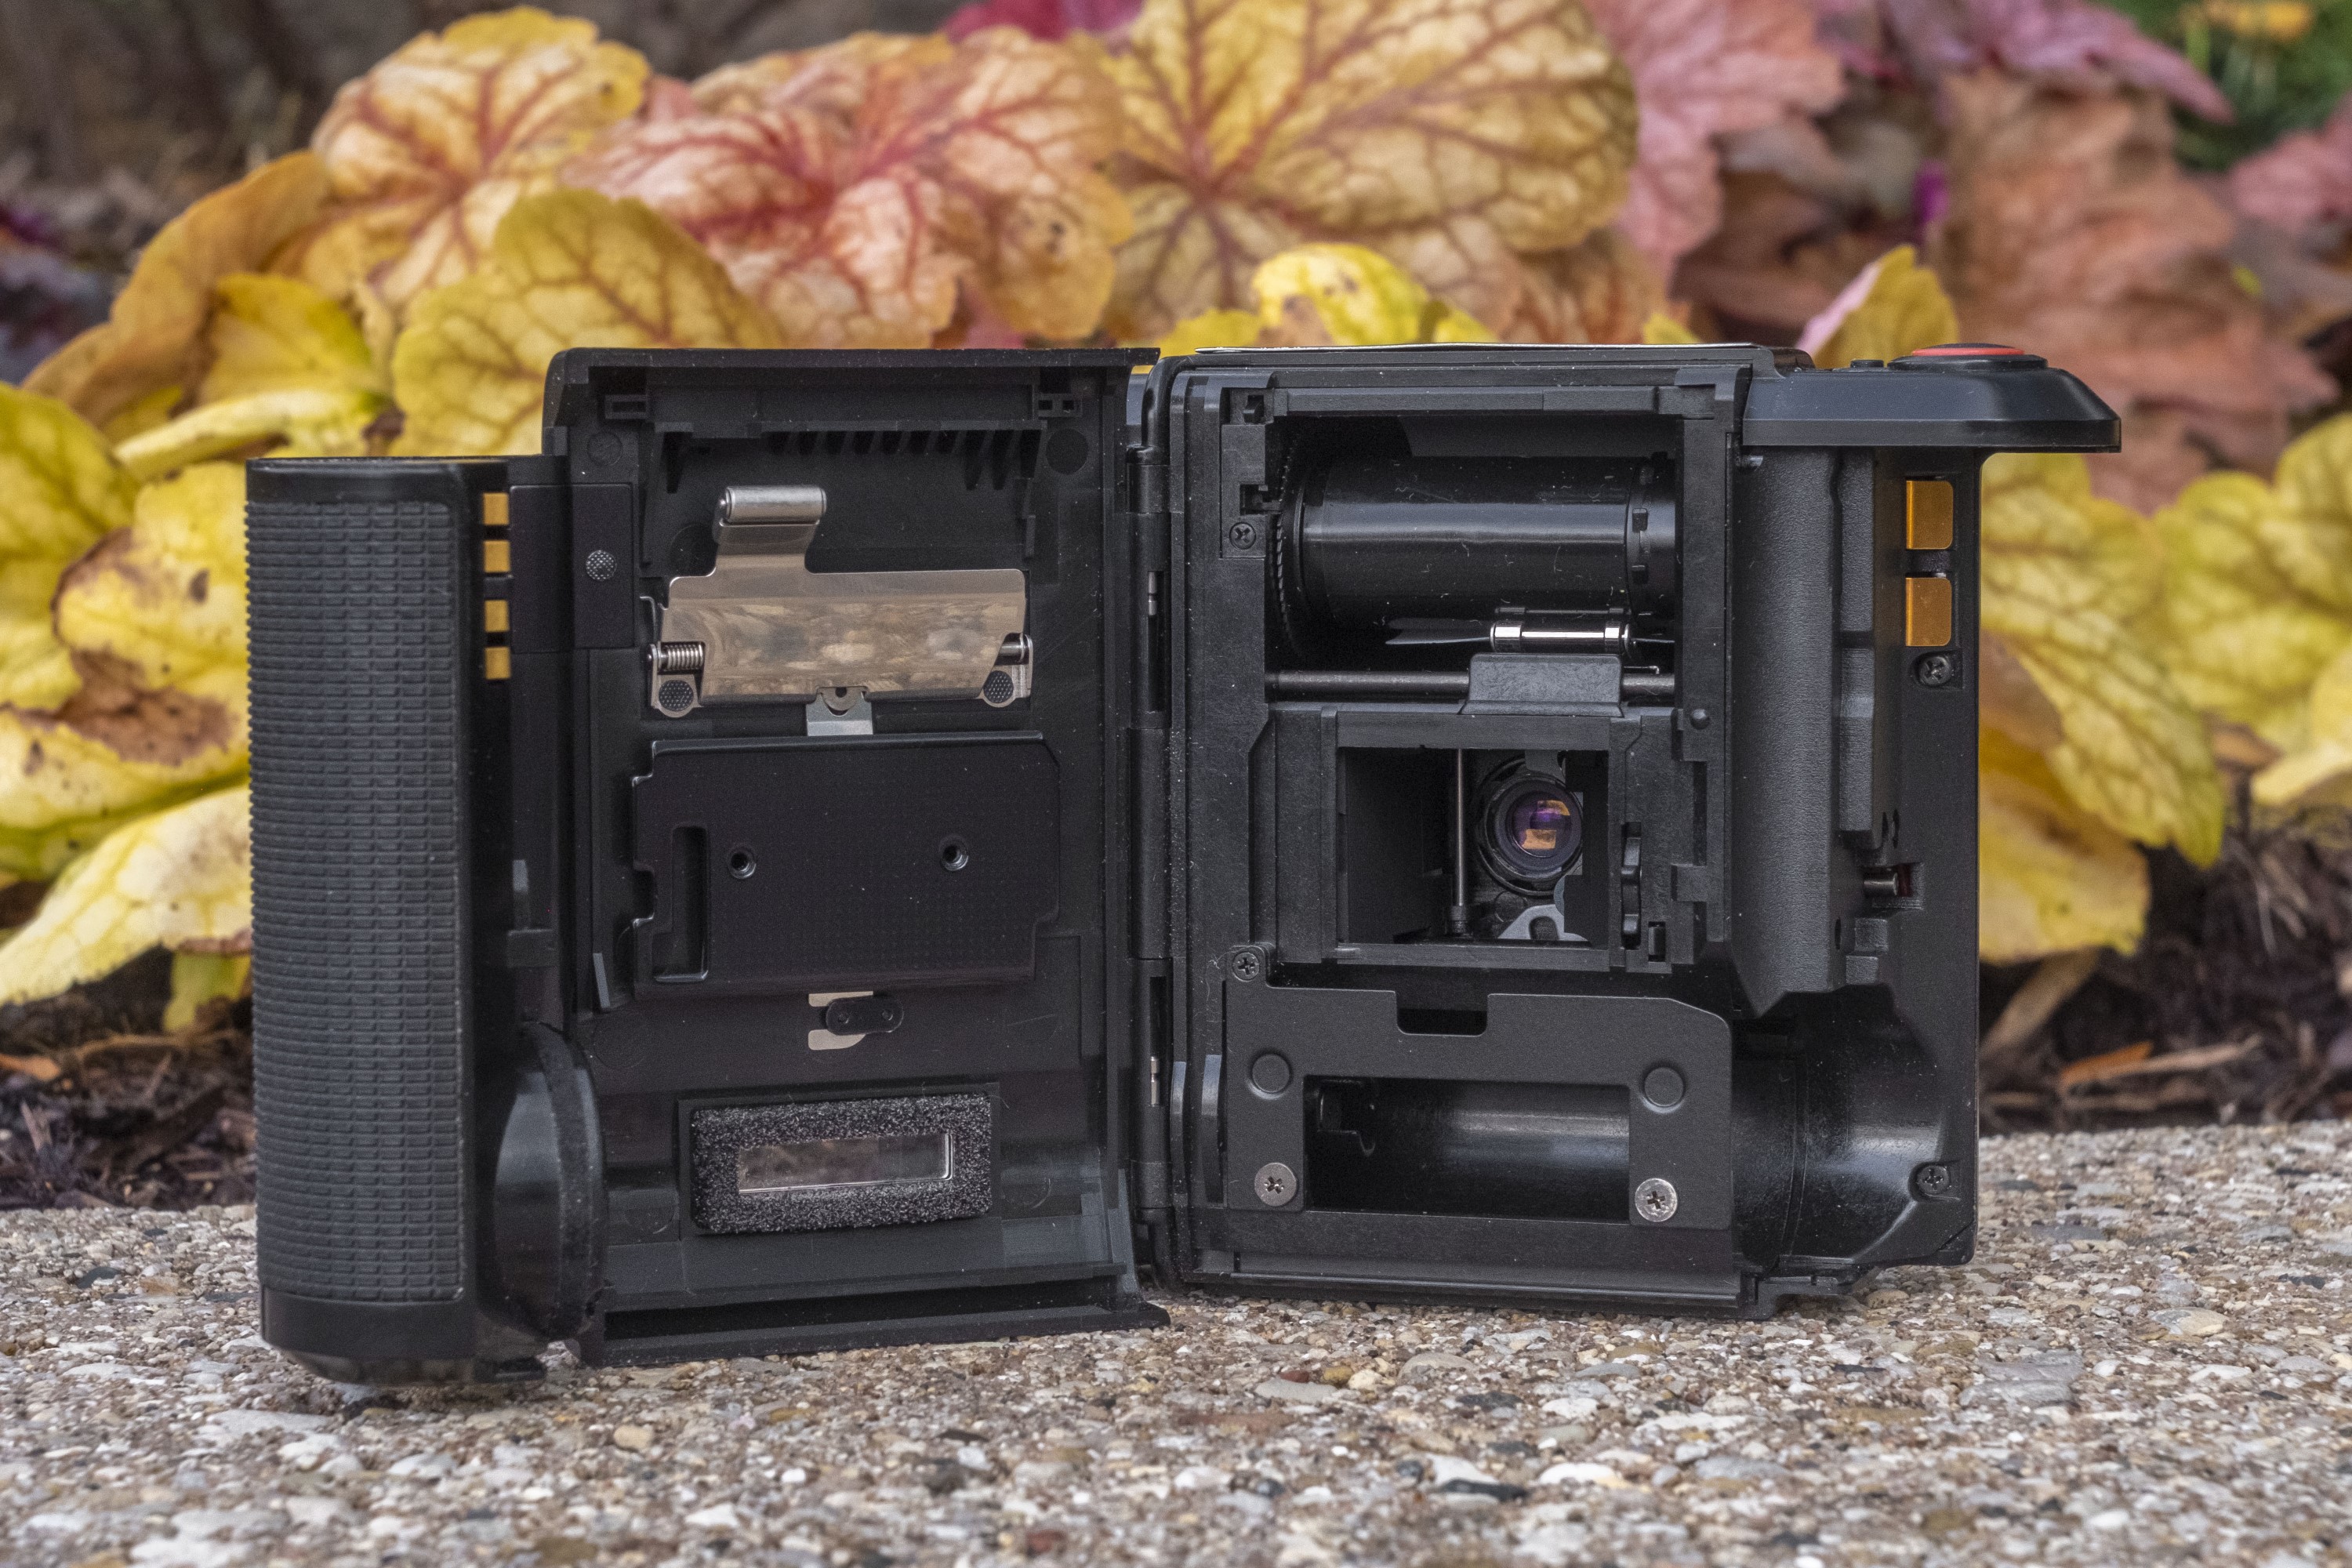
Opening the camera is a bit awkward as the entire right side of the camera which doubles as the battery chamber, comes with the door as it opens. The door is hinged on the left, revealing the film compartment. Film transports vertically, from the bottom to the top onto a fixed take up spool. The TW-3 supports DX film encoding and automatically detects film speeds from ISO 100 to 1600. If non-DX coded film is loaded, the camera assumes 100.
Loading film is super simple thanks to the quick load feature in which you just extend the film leader to a mark above the take up spool, close the door, and the camera does the rest. Inserting a new cassette must be done by sliding it in from the right, which is quite helpful because it holds the cassette in place while you are extending the leader.
The TW-3 uses a backwards film transport, in which immediately after inserting a new cassette, the entire length of film is drawn out onto the take up spool. The exposure counter counts up to how many exposures are remaining. As you press the shutter release, the film is advanced backwards into the cassette. After the last exposure, the cassette does not need to be rewound as you are already at the beginning.
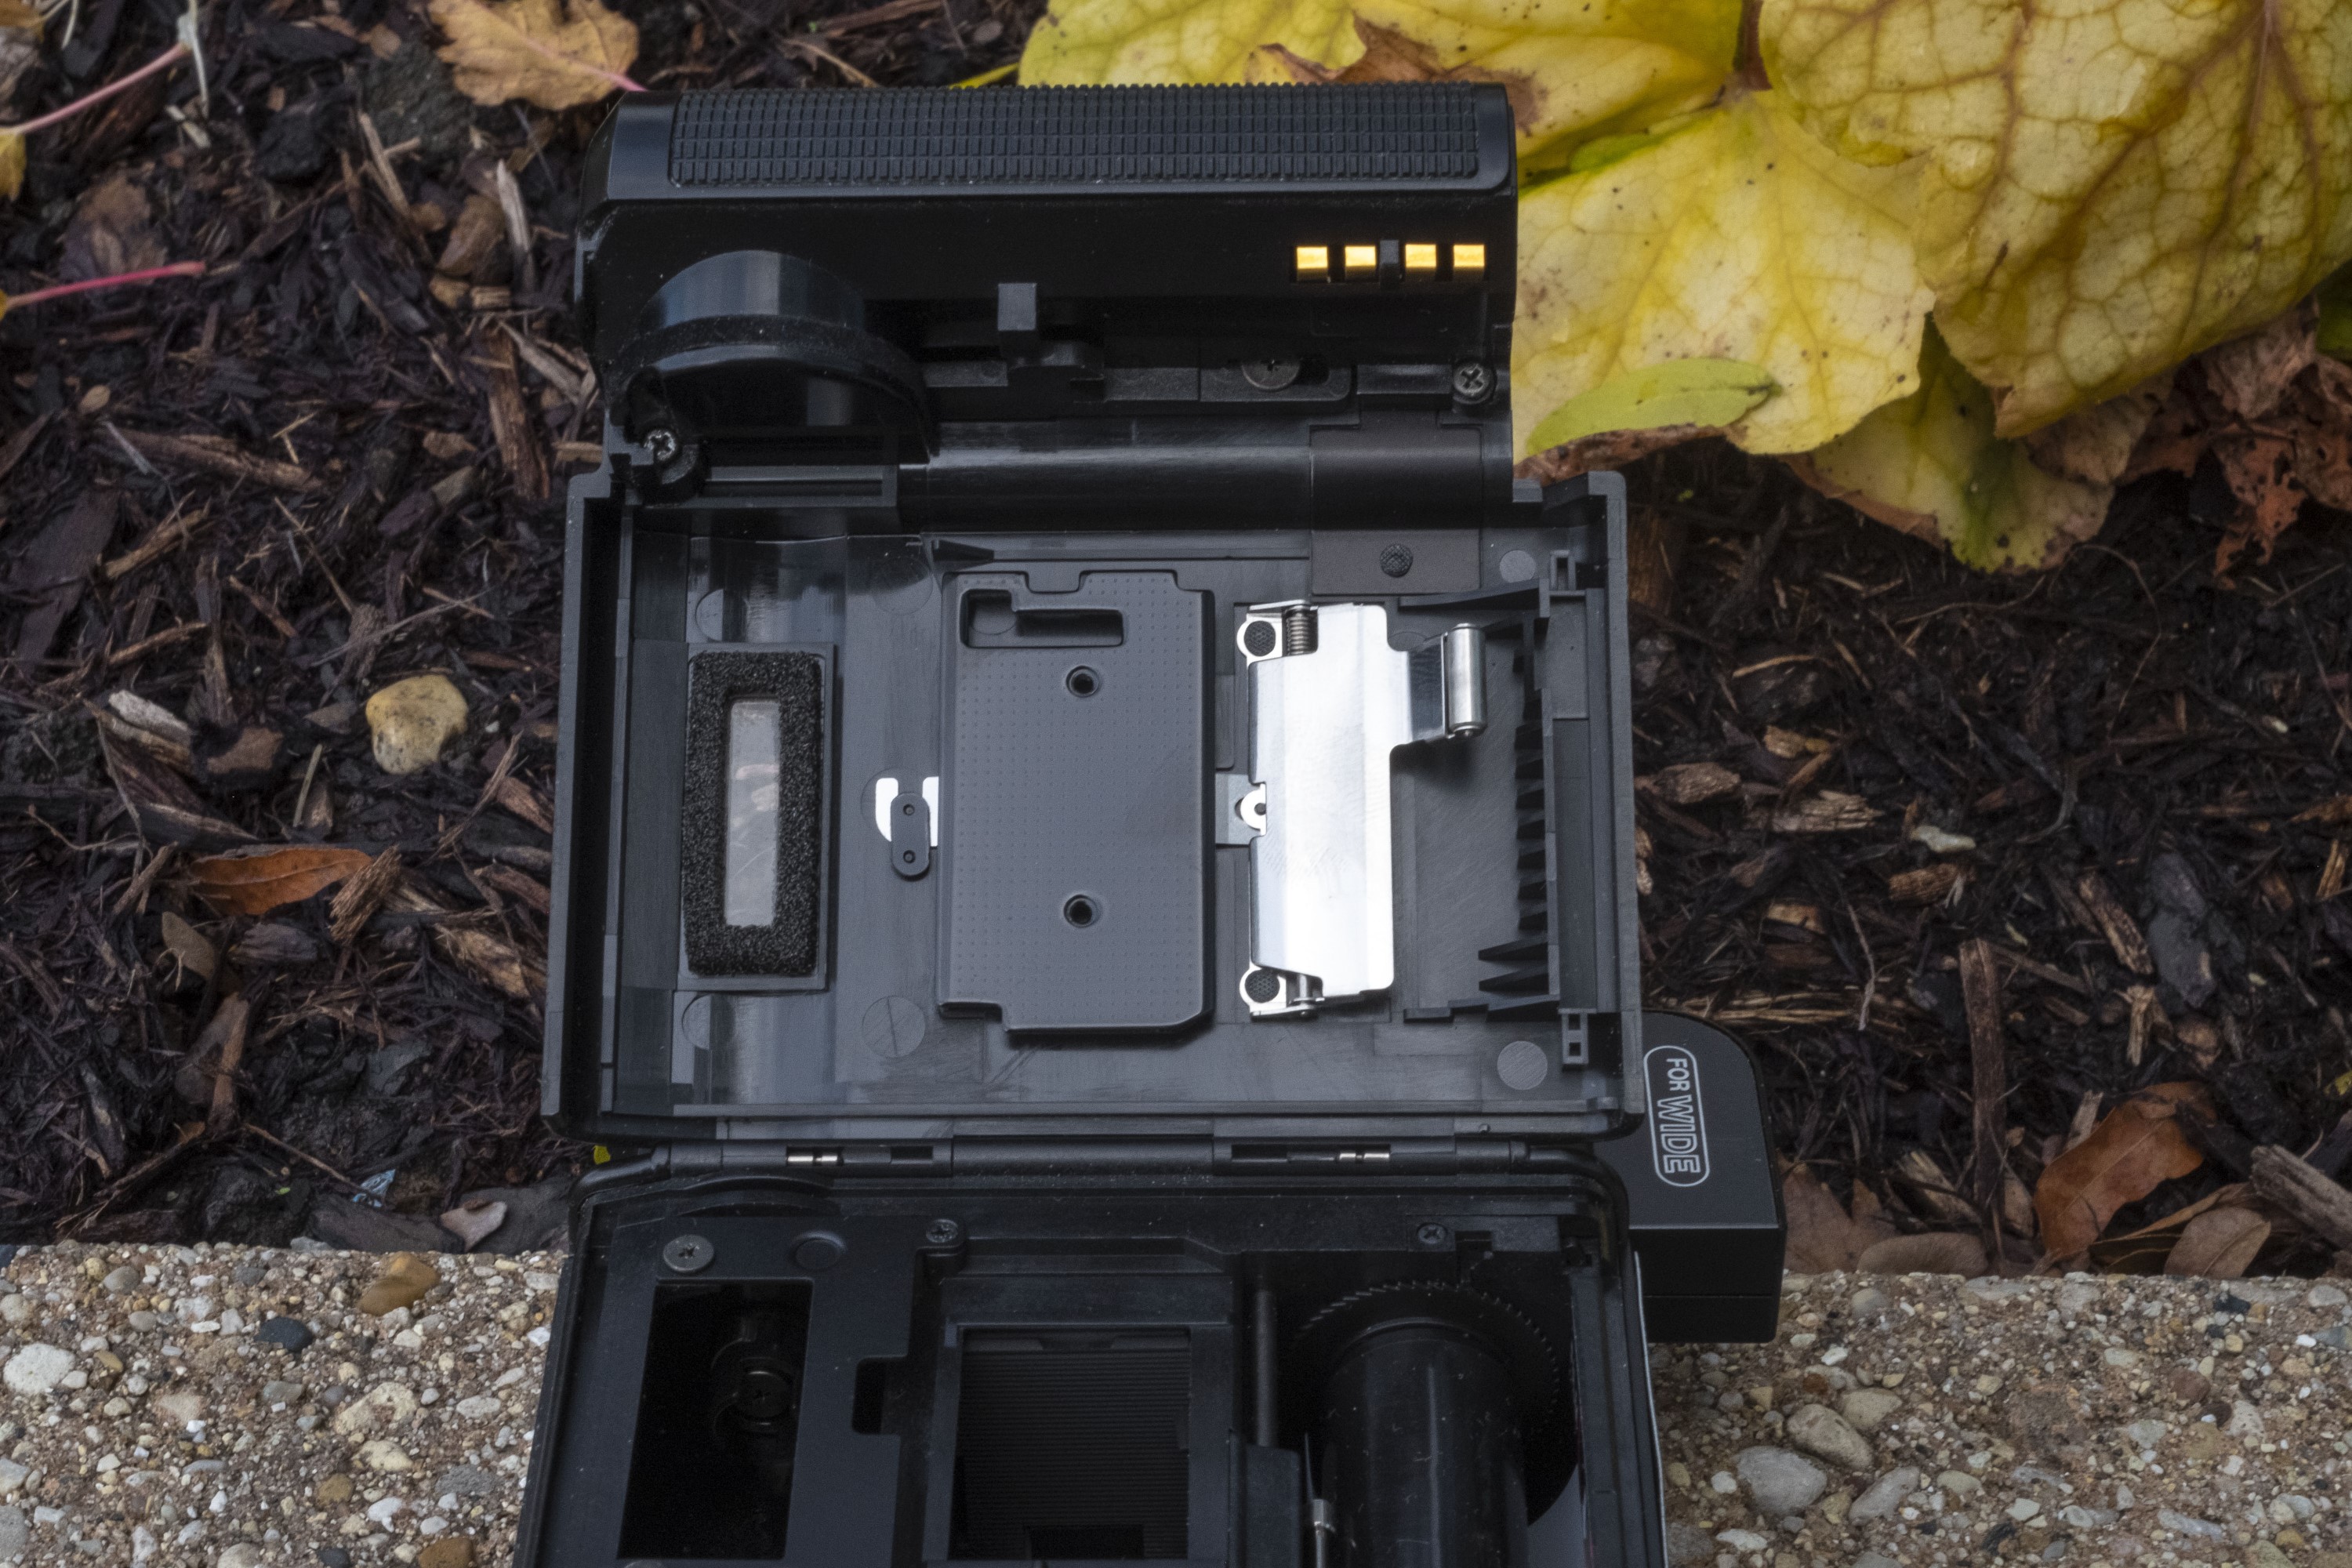
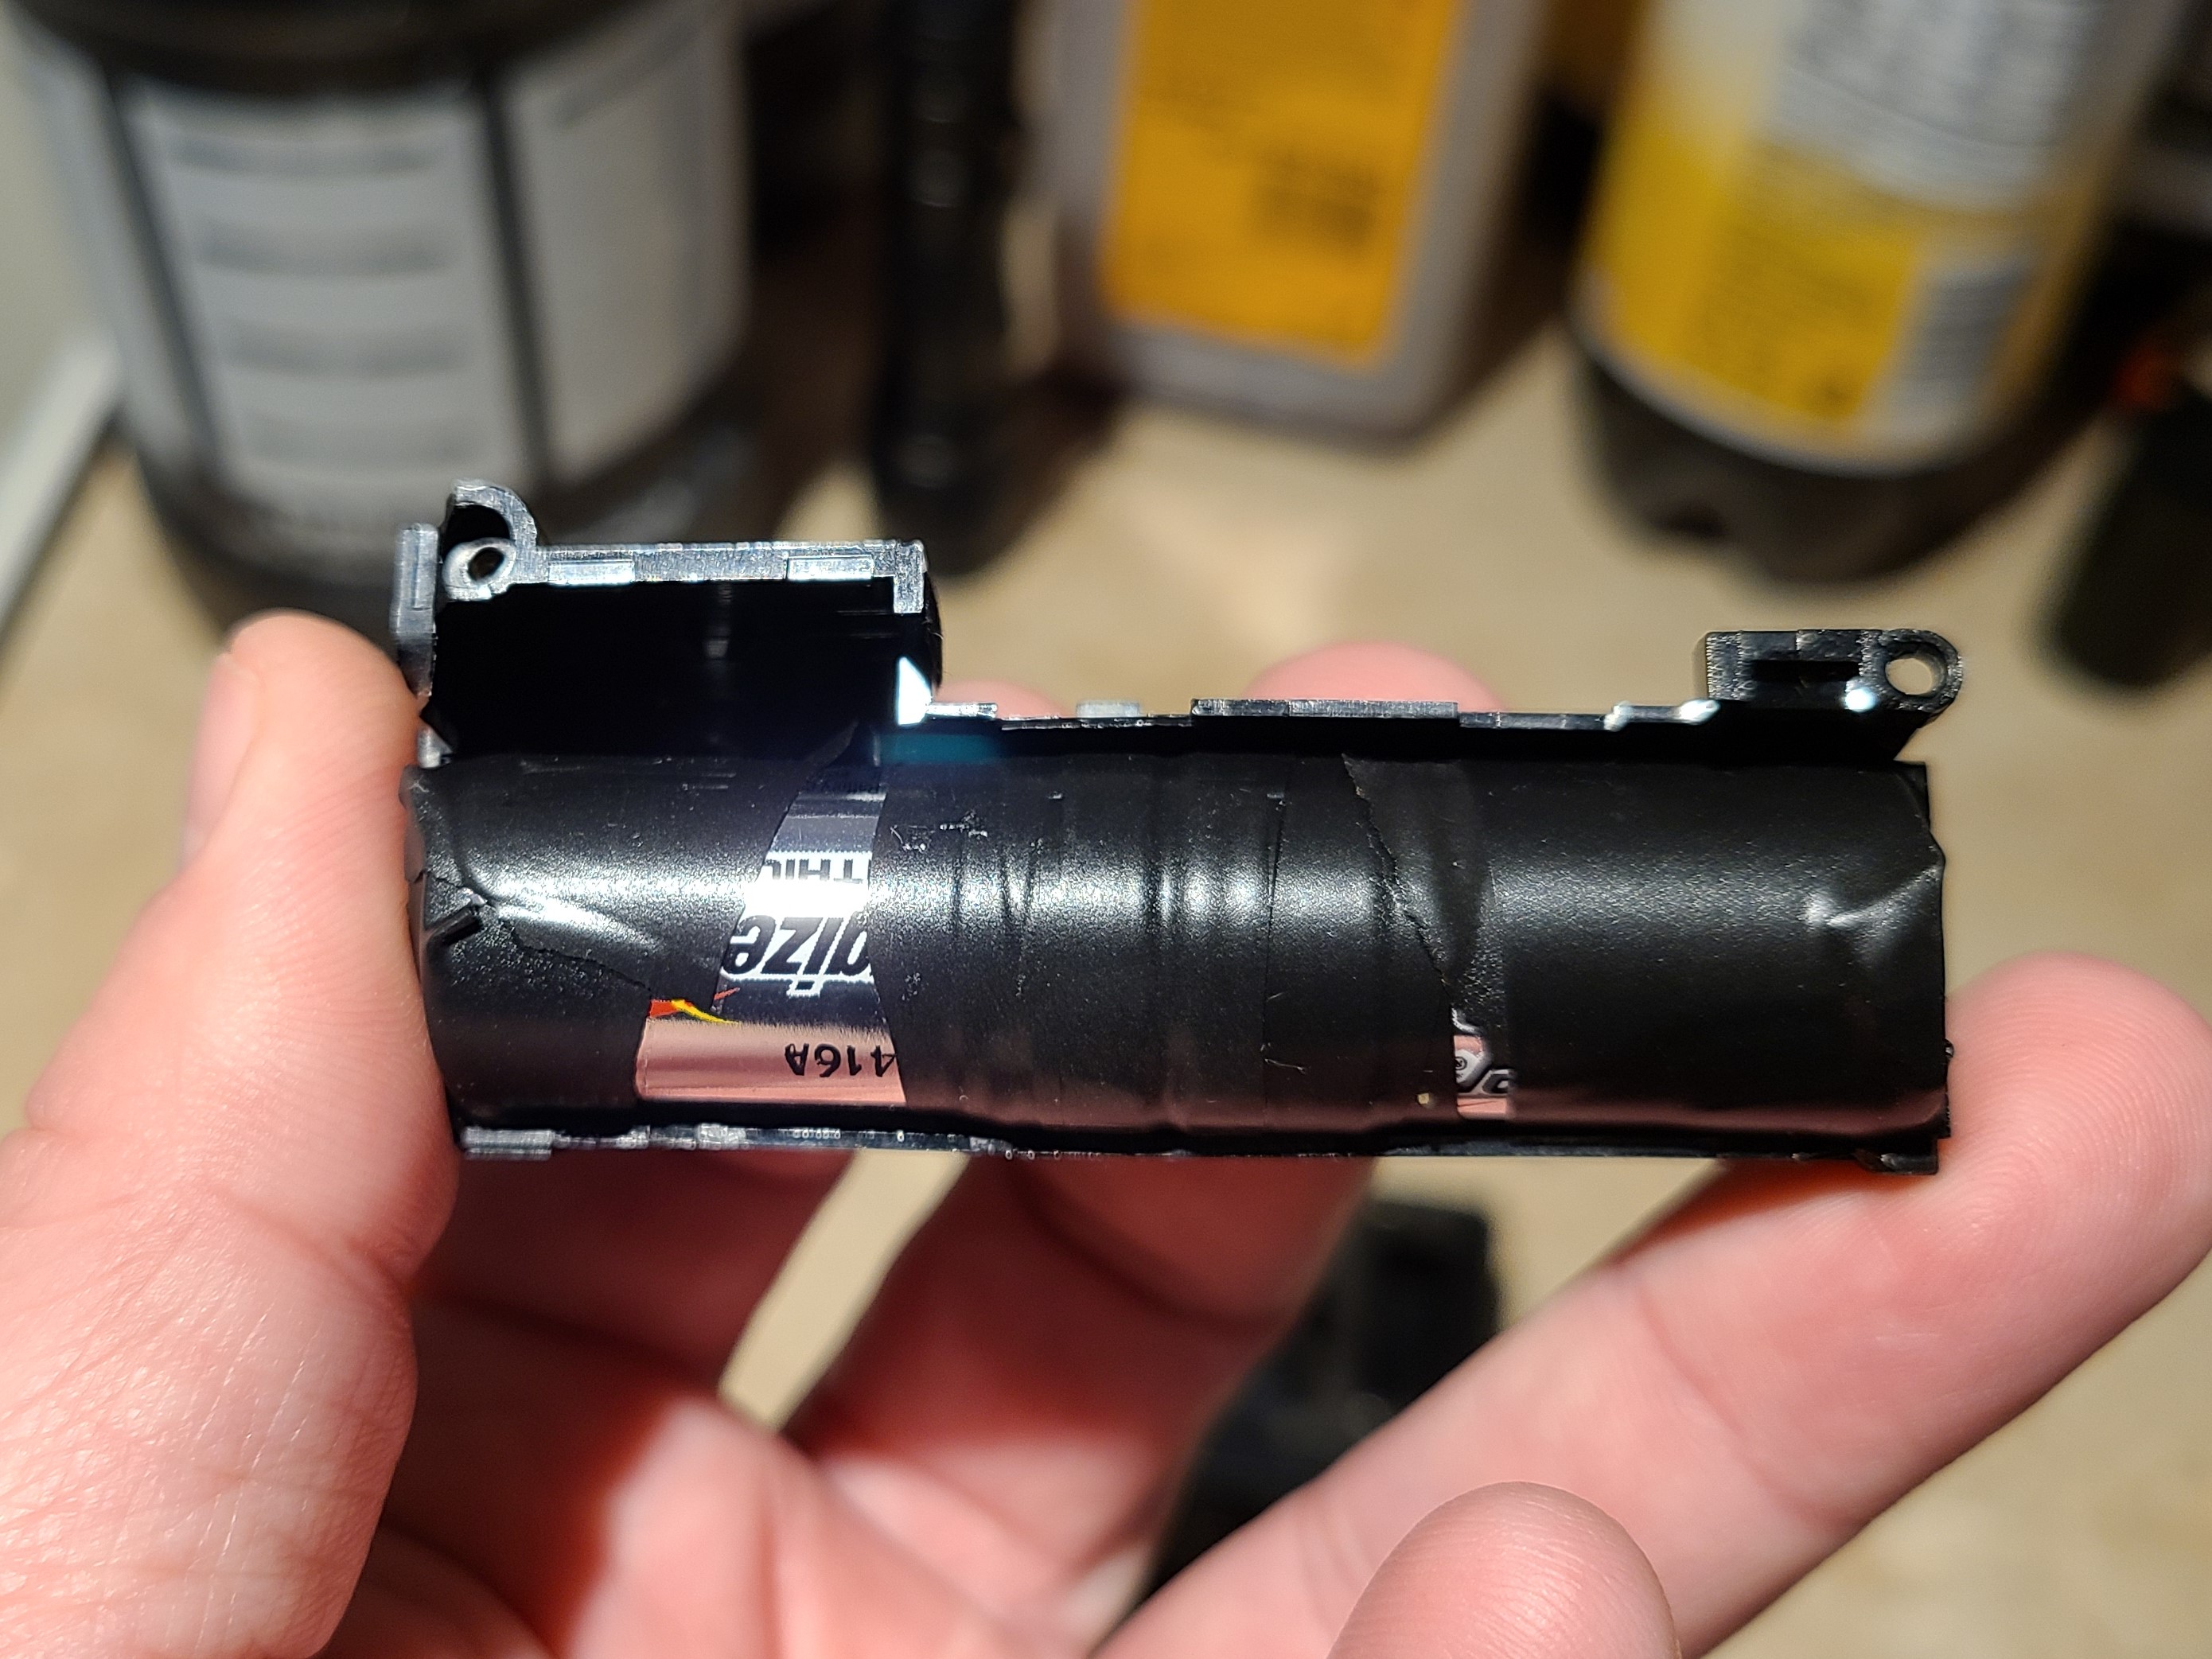
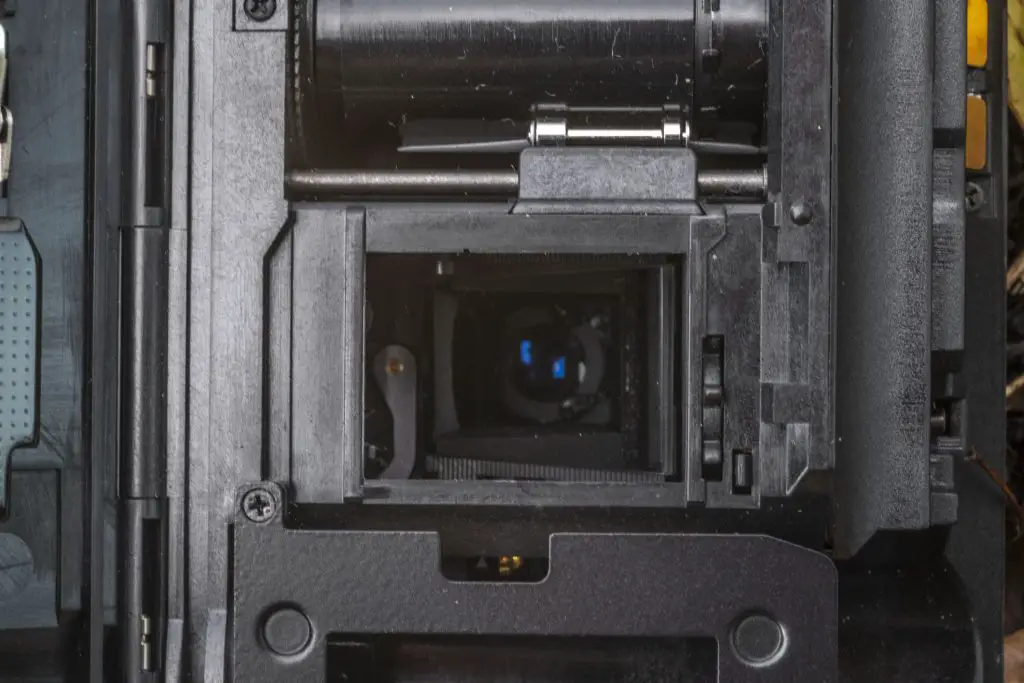
The film pressure plate is appropriately small for the camera’s 18mm x 24mm exposures and is dimpled to reduce resistance as film transports across it. There is a spring loaded clip with a metal roller on the tip which helps with the quick load feature. In the image to the left, the large piece of plastic with the four brass electrical contacts is the battery compartment, which is not changeable without partially disassembling the camera.
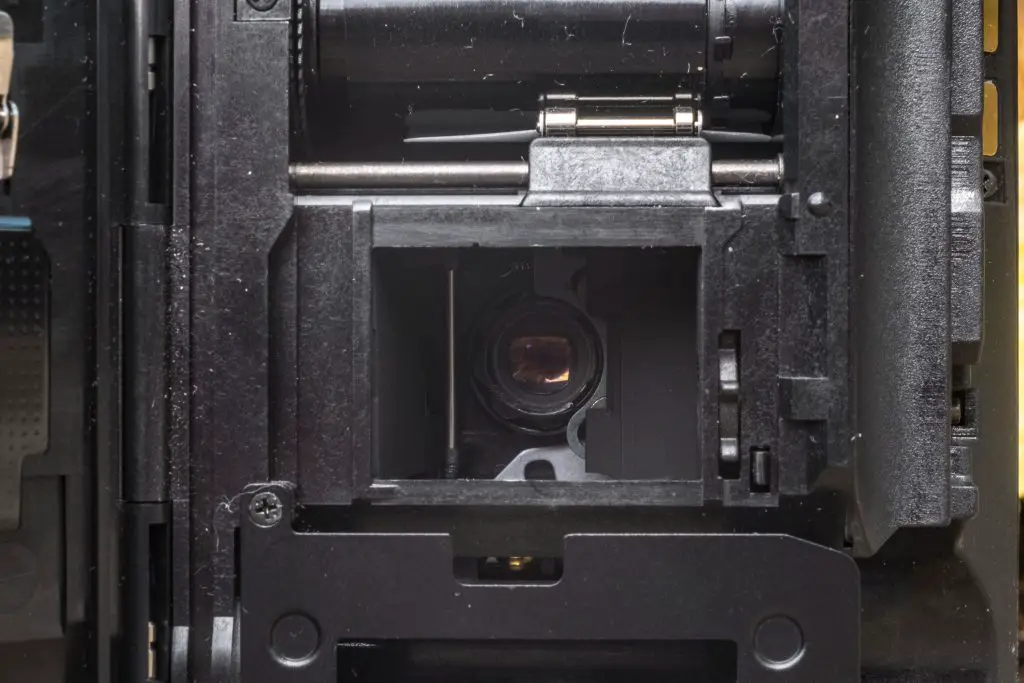
Looking into the film gate, we get an interesting look at how the dual lens system works. If you look at the location of the film gate compared to the two lenses, only when using the wide angle lens does the light path go straight from the lens to the film gate. When using the telephoto lens, a reflex mirror swings into position, redirecting the light to that lens, blocking the light path from the wide angle lens.
In the two images below, I show the wide angle lens on the left, in which light passes from the lens directly to the film plane, and in the right image, the telephoto lens is selected, causing a mirror to move into position.
Changing between the 23mm wide angle and 69mm telephoto lens also makes a corresponding change to the viewfinder in which the focal length is modified to show a correct approximation of what will be captured by either lenses.
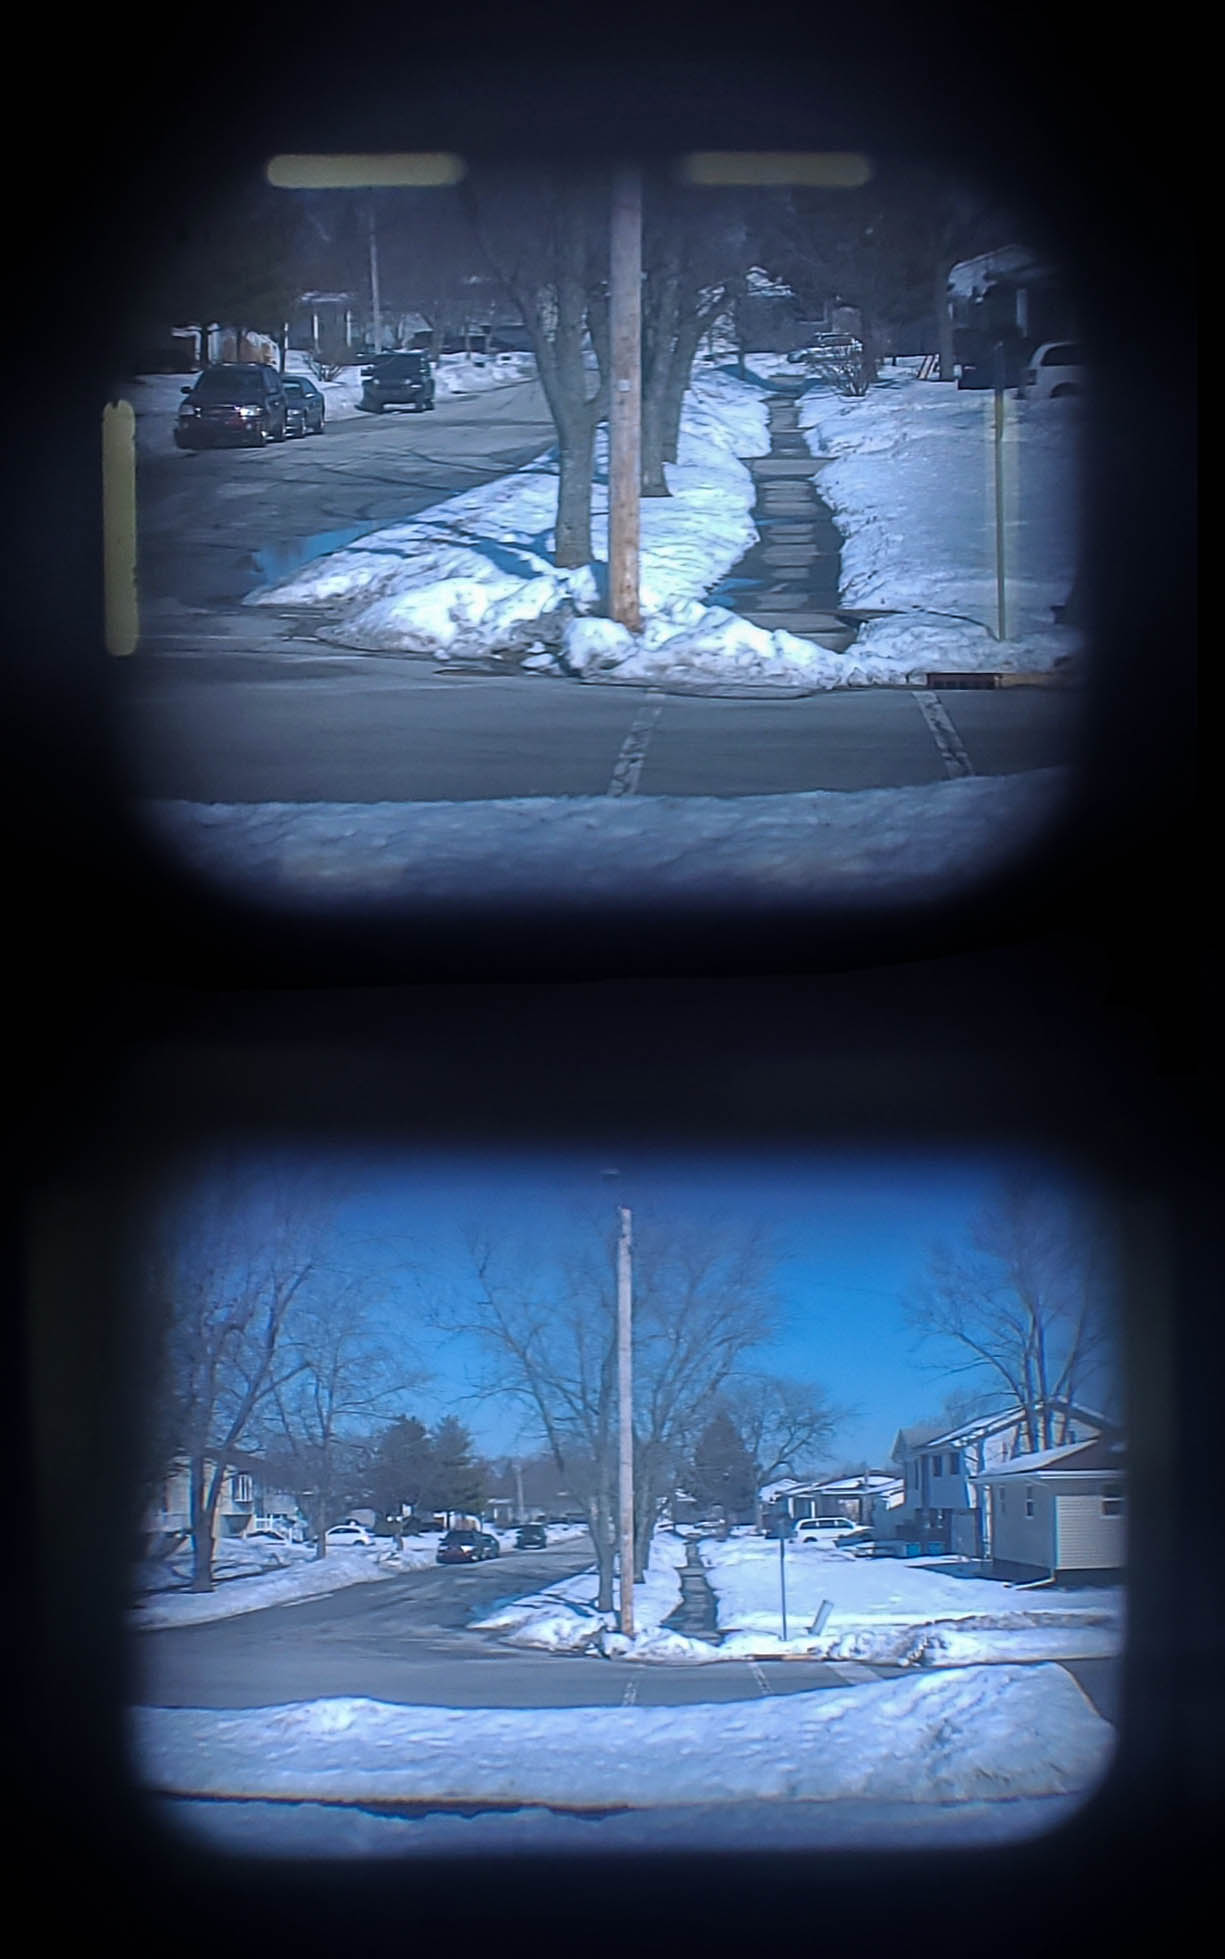
In the image to the right, the telephoto lens is selected in the top image and the wide angle on the bottom. In both cases, I am standing in the same spot and you can clearly see a “zoomed in” view in the top image. They’re hard to see, but in the telephoto image, projected frame lines exist to show the telephoto image, but strangely, these aren’t there for the wide angle view.
Although this is a very clever implementation, the size of the viewfinder is extremely small, making it difficult to use with either lens. Wearing prescription glasses, I cannot see the telephoto frame lines or the edges of either view. While I give Fuji credit for giving somewhat of a through the lens experience, this is my least favorite part of the camera.
The Fuji TW-3 offers very little manual control, and using the wide angle lens, offers a focus free point and shoot experience that would have catered to beginning photographers. I think that potential customers of this camera would have been just as happy with a simple optical viewfinder with telephoto frame lines in the middle. Getting rid of the complex variable viewfinder not only would have simplified the design, made the camera cheaper to produce, but it could have also allowed them to make the viewfinder much larger. I think that with a large wide angle optical viewfinder with telephoto hash marks in the middle, the TW-3 would have been an immensely more useful and easier to use camera.
It is obvious the viewfinder’s size and usability took a hit to accommodate the camera’s signature dual lens feature, but the rest of the camera is easy to use and it’s controls allow for one handed operation if the user desired. I’ve shot many cameras with tiny viewfinders before with good results, so would the TW-3 continue in that tradition? Read on.
My Results
In January 2021, in the midst of a lingering pandemic and some unusually cold weather in the Midwest United States, I found myself putting on some extra pounds, so I made an effort to not let the miserable weather be an excuse not to get out and walk more. Each week, I set a goal for walking around my neighborhood and as an added incentive to doing it, I would bring with a camera to take photos of things I saw.
Being cold, I needed something that was small, easily portable, and would work with gloves, so it couldn’t have tiny controls or require me to turn small knobs or buttons to work. One day, while looking at my wall of cameras, I picked up the TW-3. This would be a good walk around camera I thought. It had auto exposure, was small, and it’s mostly focus free operation meant I could easily shoot it one handed while wearing gloves. The only control it had was the large wheel on the front used to switch between the two lenses, which I could easily operate with gloves on.
Satisfied with my selection, I loaded in a roll of expired AGFA APX 100 and started walking.


As I walked around my neighborhood, I alternated between the wide angle and telephoto lenses without any trouble. As I had hoped, the camera was easy to use with gloves. I didn’t love the viewfinder, but I’ll get to that more in a minute. As I finished that first roll I was certain this would be a camera I’d love to come back to again.

When I developed the roll and scanned in the images however, I was a bit disappointed. For starters, the expired AGFA film didn’t seem to age well. I’m not sure exactly why, as most black and white 100 speed films generally handle a couple extra decades well. Perhaps this one wasn’t one of them though.
Beyond the exposure issues, the images just weren’t that sharp. I’ve shot many Fuji cameras, and found their Fujinon lenses to be quite good, even on basic point and shoots like this one. I could never find any technical information about either of the lenses, but my best guess is these are probably triplets, yet they all have a soft look to them.
I wasn’t ready to give up yet though and thought the camera’s uniqueness and generally positive shooting experience warranted a second roll. For the second roll, I chose some Kodak Vision3 500T. This is a Tungsten balanced cinema film that in my experience renders strong blues and slightly muted colors indoors.


As you can see, the results from the color gallery are less than inspiring and consistently underexposed. I’ve shot this 500T film before in other cameras with much better results than what you see here. The reasonably fast speed of the film should have been well within the camera’s limited exposure range. The colors of the outdoor images took on an almost pastel hue which is curious as that is not characteristic of the film, and the few indoor pictures I took were unusable. The only indoor pic I show is a mirror selfie which is grossly underexposed. In order to fire the shutter without the flash, I had to hold my finger on the TV Mode button to force the flash off and to use a slow shutter speed. I’ve shot this same pic in the same mirror, in the same lighting, with many other cameras so I have a feel for how it should expose, yet the TW-3 really struggled.
I also noted that the few times I shot the camera in telephoto mode, the images all came out improperly framed which suggests either something is wrong with that mode, or I just really did a terrible job with it. Finally, there was a shocking lack of contrast in all of these images. Every image in the gallery above had some contrast and clarity tweaks applied in Photoshop CC to get them this far.
Despite the off colors and questionable exposure, I feel as though I can still draw the conclusion that the images probably satisfied most owners of the camera, but definitely do not compare in sharpness to better half frame cameras like Fuji’s own Fujica Drive or an Olympus Pen F. Perhaps a different camera with different film, and a different person using it could have delivered better shots, but this was the best I could get from two different rolls.
By the time Fuji had released the TW-3, half-frame 35mm cameras were completely extinct in the United States, and on their way out in Japan. A few other models by Konica, Yashica, and probably one or two other companies would follow the TW-3’s release, but it was definitely a niche market.
There is a lot to like about the TW-3 like it’s dual lenses, offering a choice of two different focal lengths without the additional complexity of a zoom lens. The choice to go with manual focus was a good one in that most casual shots would be within the depth of field of the wide angle lens, and choosing one of three zones for the telephoto wasn’t a big deal. I like vertically traveling half frame cameras as they more naturally orient the image in landscape mode, just like full frame 35mm cameras. Sure, you could just rotate an Olympus Pen 90 degrees to accomplish the same thing, but then the camera is no longer in it’s natural position. I don’t even mind the gimmicky TV Mode which actually serves a useful purpose of defeating the flash in wide angle mode.
For every good thing I can say about the TW-3 however, there are three two very annoying things that Fuji could have simply just not done, and not changed the overall design of the camera much.
The first is the most obvious, which is the non changeable lithium battery. In 1985 lithium batteries weren’t as common as they would later become, so finding a replacement likely would have been difficult, but within a year or two of the TW-3’s introduction, CR123 batteries would be much easier to find. The user manual suggests contacting your Fuji dealer to get them changed, so they had to have known there would be a demand. They already made room for two CR123 cells to be in the camera, all they needed to do was to put a plastic cover that allowed easy access to the battery chamber without having to take apart the camera.
The other really poor decision was making the viewfinder so small. Fuji clearly was going for wow factor by designing the viewfinder to change focal lengths depending on which lens you selected, but this resulted in an incredibly small viewfinder that is impossible to use with prescription glasses. A simpler wide angle viewfinder with telephoto hash marks would have allowed for a much larger viewfinder, without detracting from the user experience. I have no stats to back this up, but I would be willing to bet that of all the users who ever bought the TW-3, that they used it in wide angle mode far more than telephoto mode, so by creating a simpler, and larger viewfinder that was already in wide angle mode, wouldn’t have caused any complaints.
In an early draft of this review, I complained about the decision to disable the flash in telephoto mode, but then I realized that the 4 meter minimum focus for the telephoto lens would have already been stretching the flash’s range. Trying to use the flash with the telephoto lens would have resulted in underexposed shots, so they wisely disabled it.
I wonder if Fuji would have offered a simpler TW-1 with just the wide angle lens and a simpler viewfinder, whether it would have sold better. I know that personally, I would have loved a compact half frame 35mm camera with vertical transport, a focus free wide angle lens, and motorized film transport but it was not to be. The Fuji TW-3 was a one of a kind model that produced no other models in it’s form factor.
I actually had fairly high hopes for this camera, but was disappointed by the viewfinder and the poor images I got from it. Perhaps I’m being a bit too hard on what was then an inexpensive point and shoot likely sold to novice photographers, but I’ve also learned that even at modest price points, companies like Fuji have consistently delivered in the past, so I guess I expected more.
Related Posts You Might Enjoy
External Links
http://camera-wiki.org/wiki/Fuji_TW-3
https://cameragocamera.com/2017/12/20/fuji-tw-3/
http://mailch.blogspot.com/2012/12/the-users-review-fuji-tw-3-half-frame.html
https://www.zogue.com/blog/2019/photo-chat-vlog-fuji-tw-3-and-half-frame-photomontage/
http://www.filmwasters.com/forum/index.php?topic=2513.0
https://cafe.toylab.jp/column/vintage-camera/10872/ (in Japanese)
http://minophoto.web.fc2.com/minolook/02_fuji/tw3.html (in Japanese)
http://rikkie-camera.sweet.coocan.jp/Camera/Junk/TW3/CAMTW3a.html (in Japanese)
http://tnn704.blogspot.com/2008/02/fuji-tw-3.html (in Chinese)
I love half frame cameras and own several, but I won’t be getting this one, based on your experience. Have you tried the Canon Sure Shot Multi-Tele? It shoots full or half frame and is an excellent point and shoot camera. Mine also has an accessory close-focus attachment. And the lithium battery is replaceable.
I got this one very cheap and decided just to go for it and change the battery, so easy as you said. Well, worth trying if you like half frames that is.
Olympus made a similar dopey battery decision with their 1984 AFL Quick Flash, one of their first – if not THE first – point & shoot 35mm cameras. Changing the battery requires disassembly and a soldering gun.
Oh wow, I love half frame so I’ve kept a search for this on the ol’ auction site and I could swear I’ve never seen one for less than at least $80, and only one or two that people were willing to vouch for as functioning. It’s a shame that this is seemingly rare and fragile, and that the Konica is similarly hard to come by, because point and shoot seems like a good fit for half frame. Anyway, fun to read about!
Keep looking, they do show up from time to time for cheap. I bought both of the cameras used in this review for under $20 each.
Very comprehensive post about this curious camera! Thanks for the link to my own article about it 🙂