
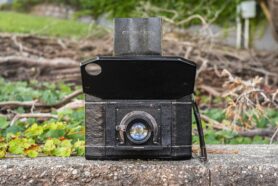
This is a National Graflex Series II, a single lens reflex camera made by the Folmer Graflex Corporation in Rochester, New York, USA between the years 1934 and 1941. The National Graflex makes ten 2¼” x 2½” exposures on a roll of 120 roll film, has a cloth focal plane shutter with top 1/500 shutter speed and has an interchangeable lens mount, although only two lenses were ever made for it. The National Graflex Series II was a refresh of an earlier model released the year before adding support for a new lens, and several other enhancements. At the time of its release, the National Graflex was the most compact camera in the Graflex lineup and proved to be very popular with photographers on the go capturing fast motion objects. The standard 75mm Bausch & Lomb lens included with the camera is an American built lens based off the Zeiss Tessar and produces images of very high quality. The control layout of the camera is very different from SLRs that would soon follow, but with practice is easy to learn and uses modern shutter speeds and aperture f/stop values.
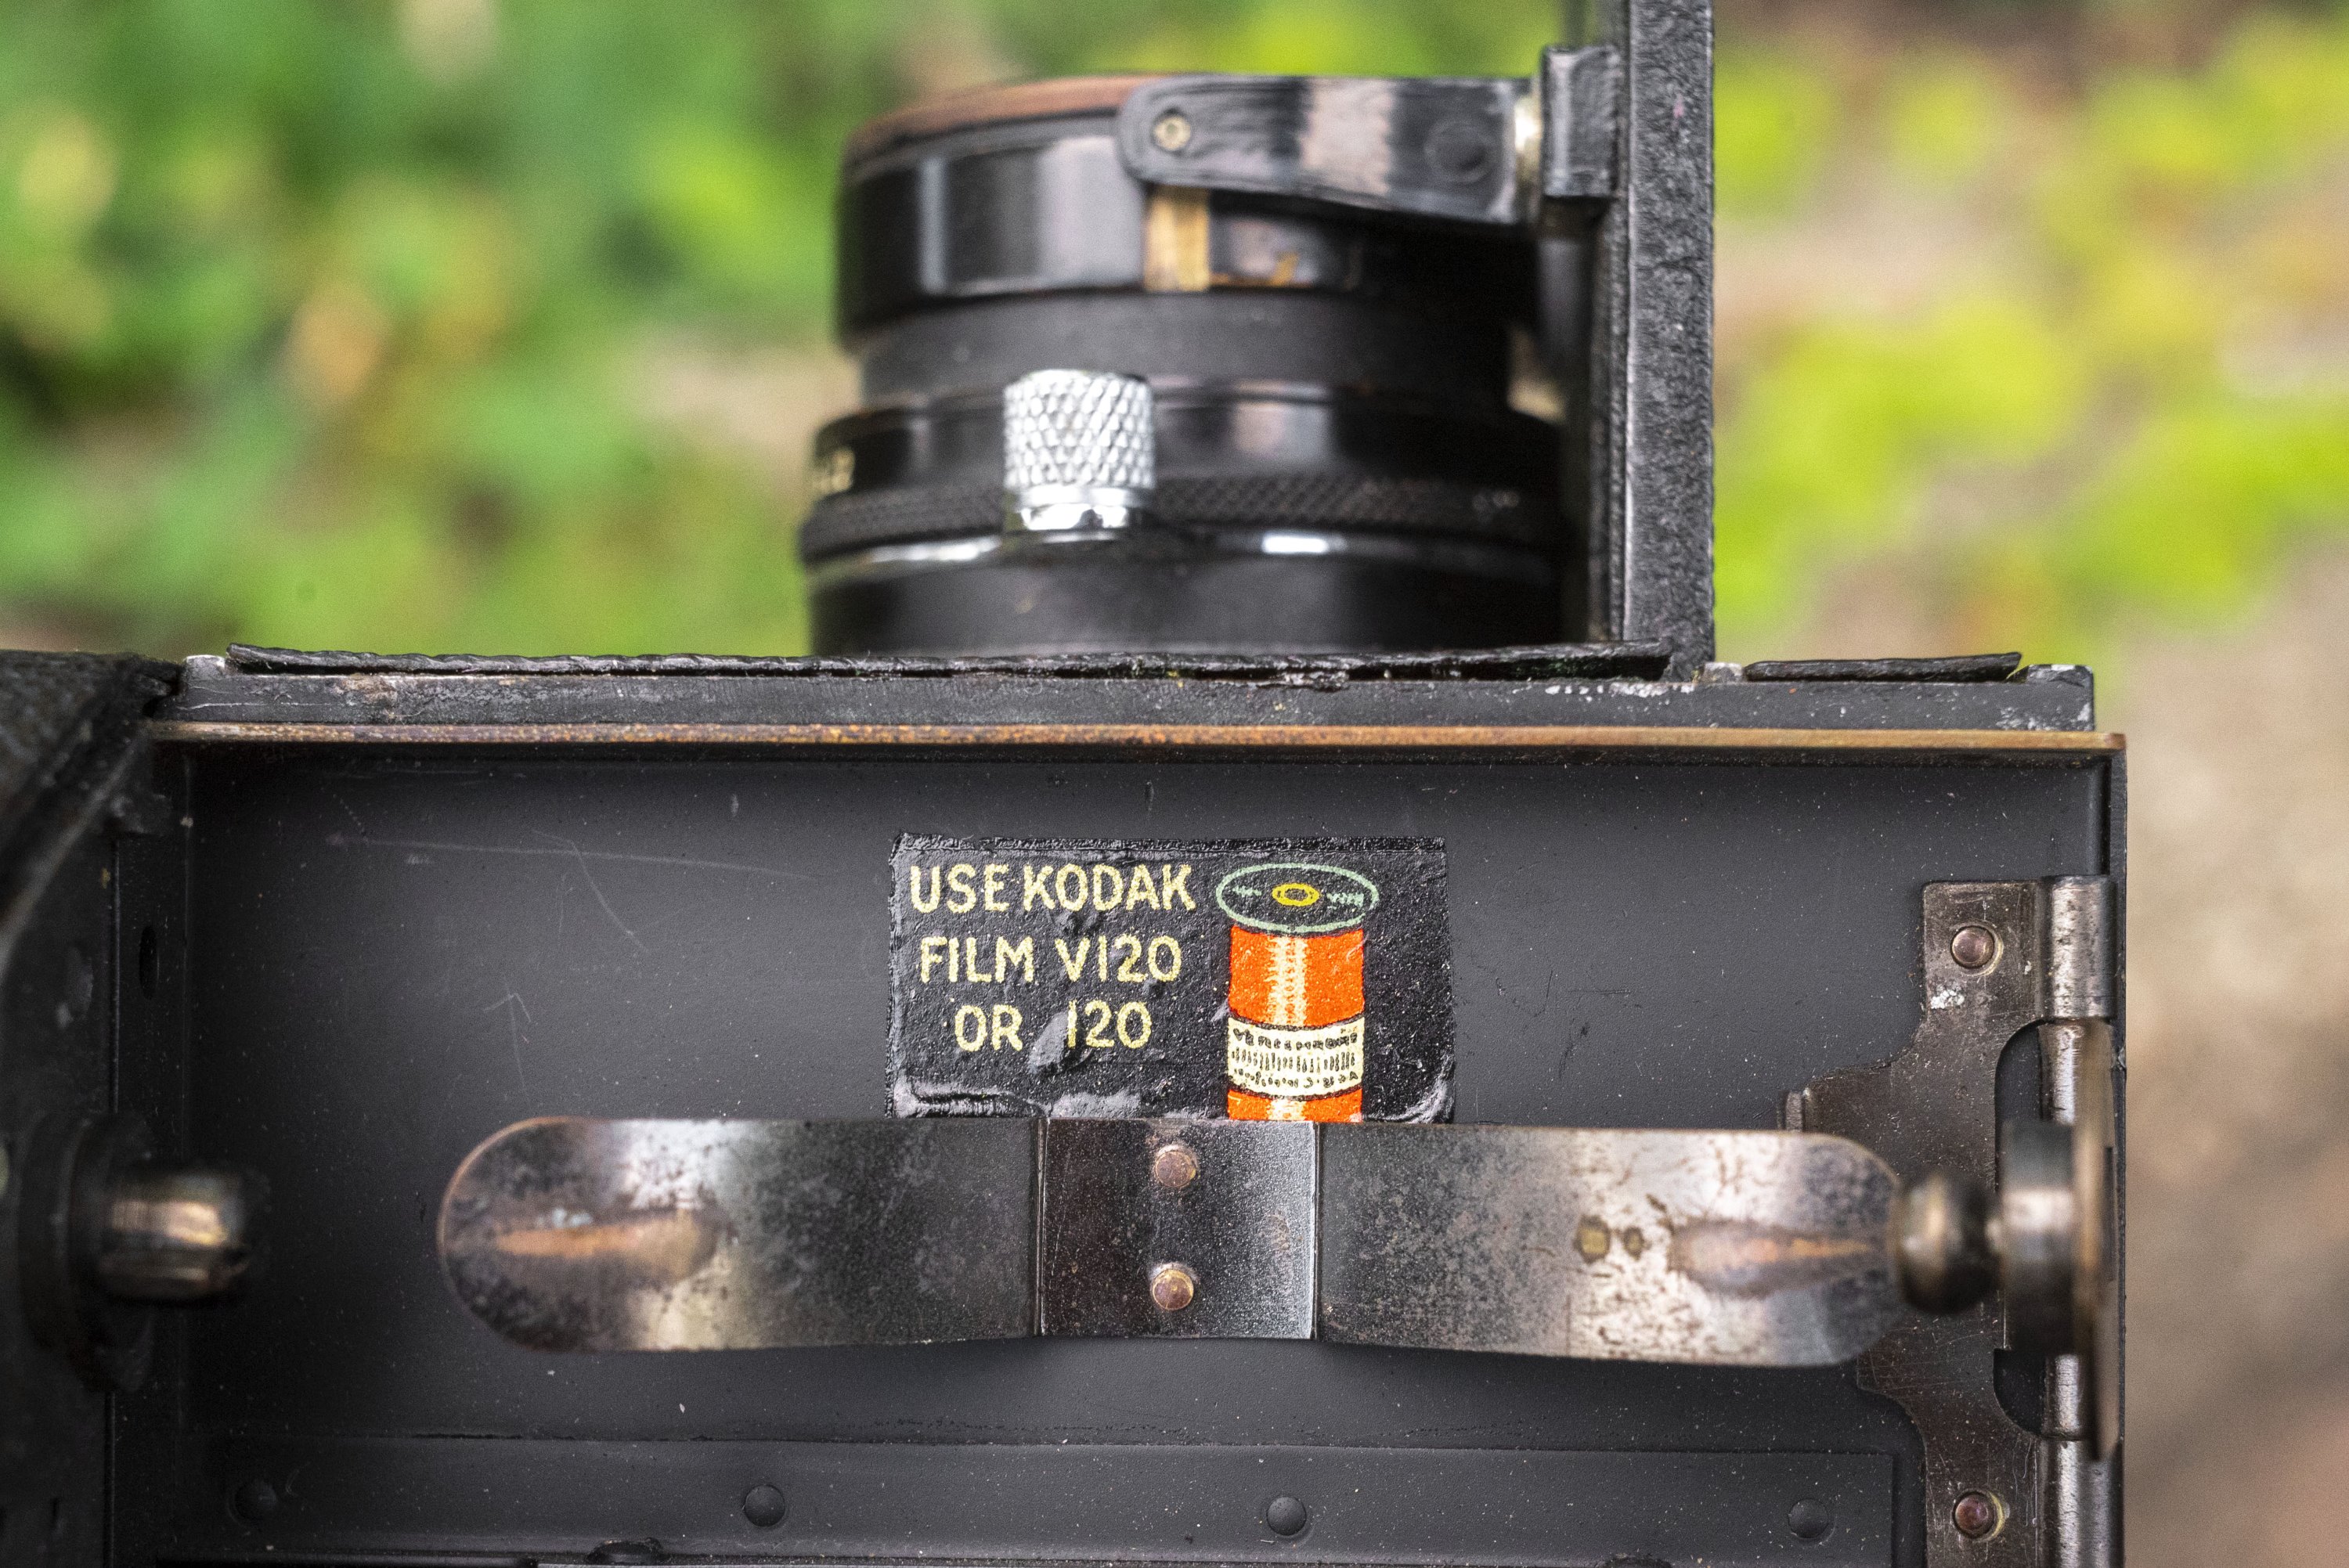
Film Type: 120 Roll Film (ten 2¼” x 2½” exposures per roll)
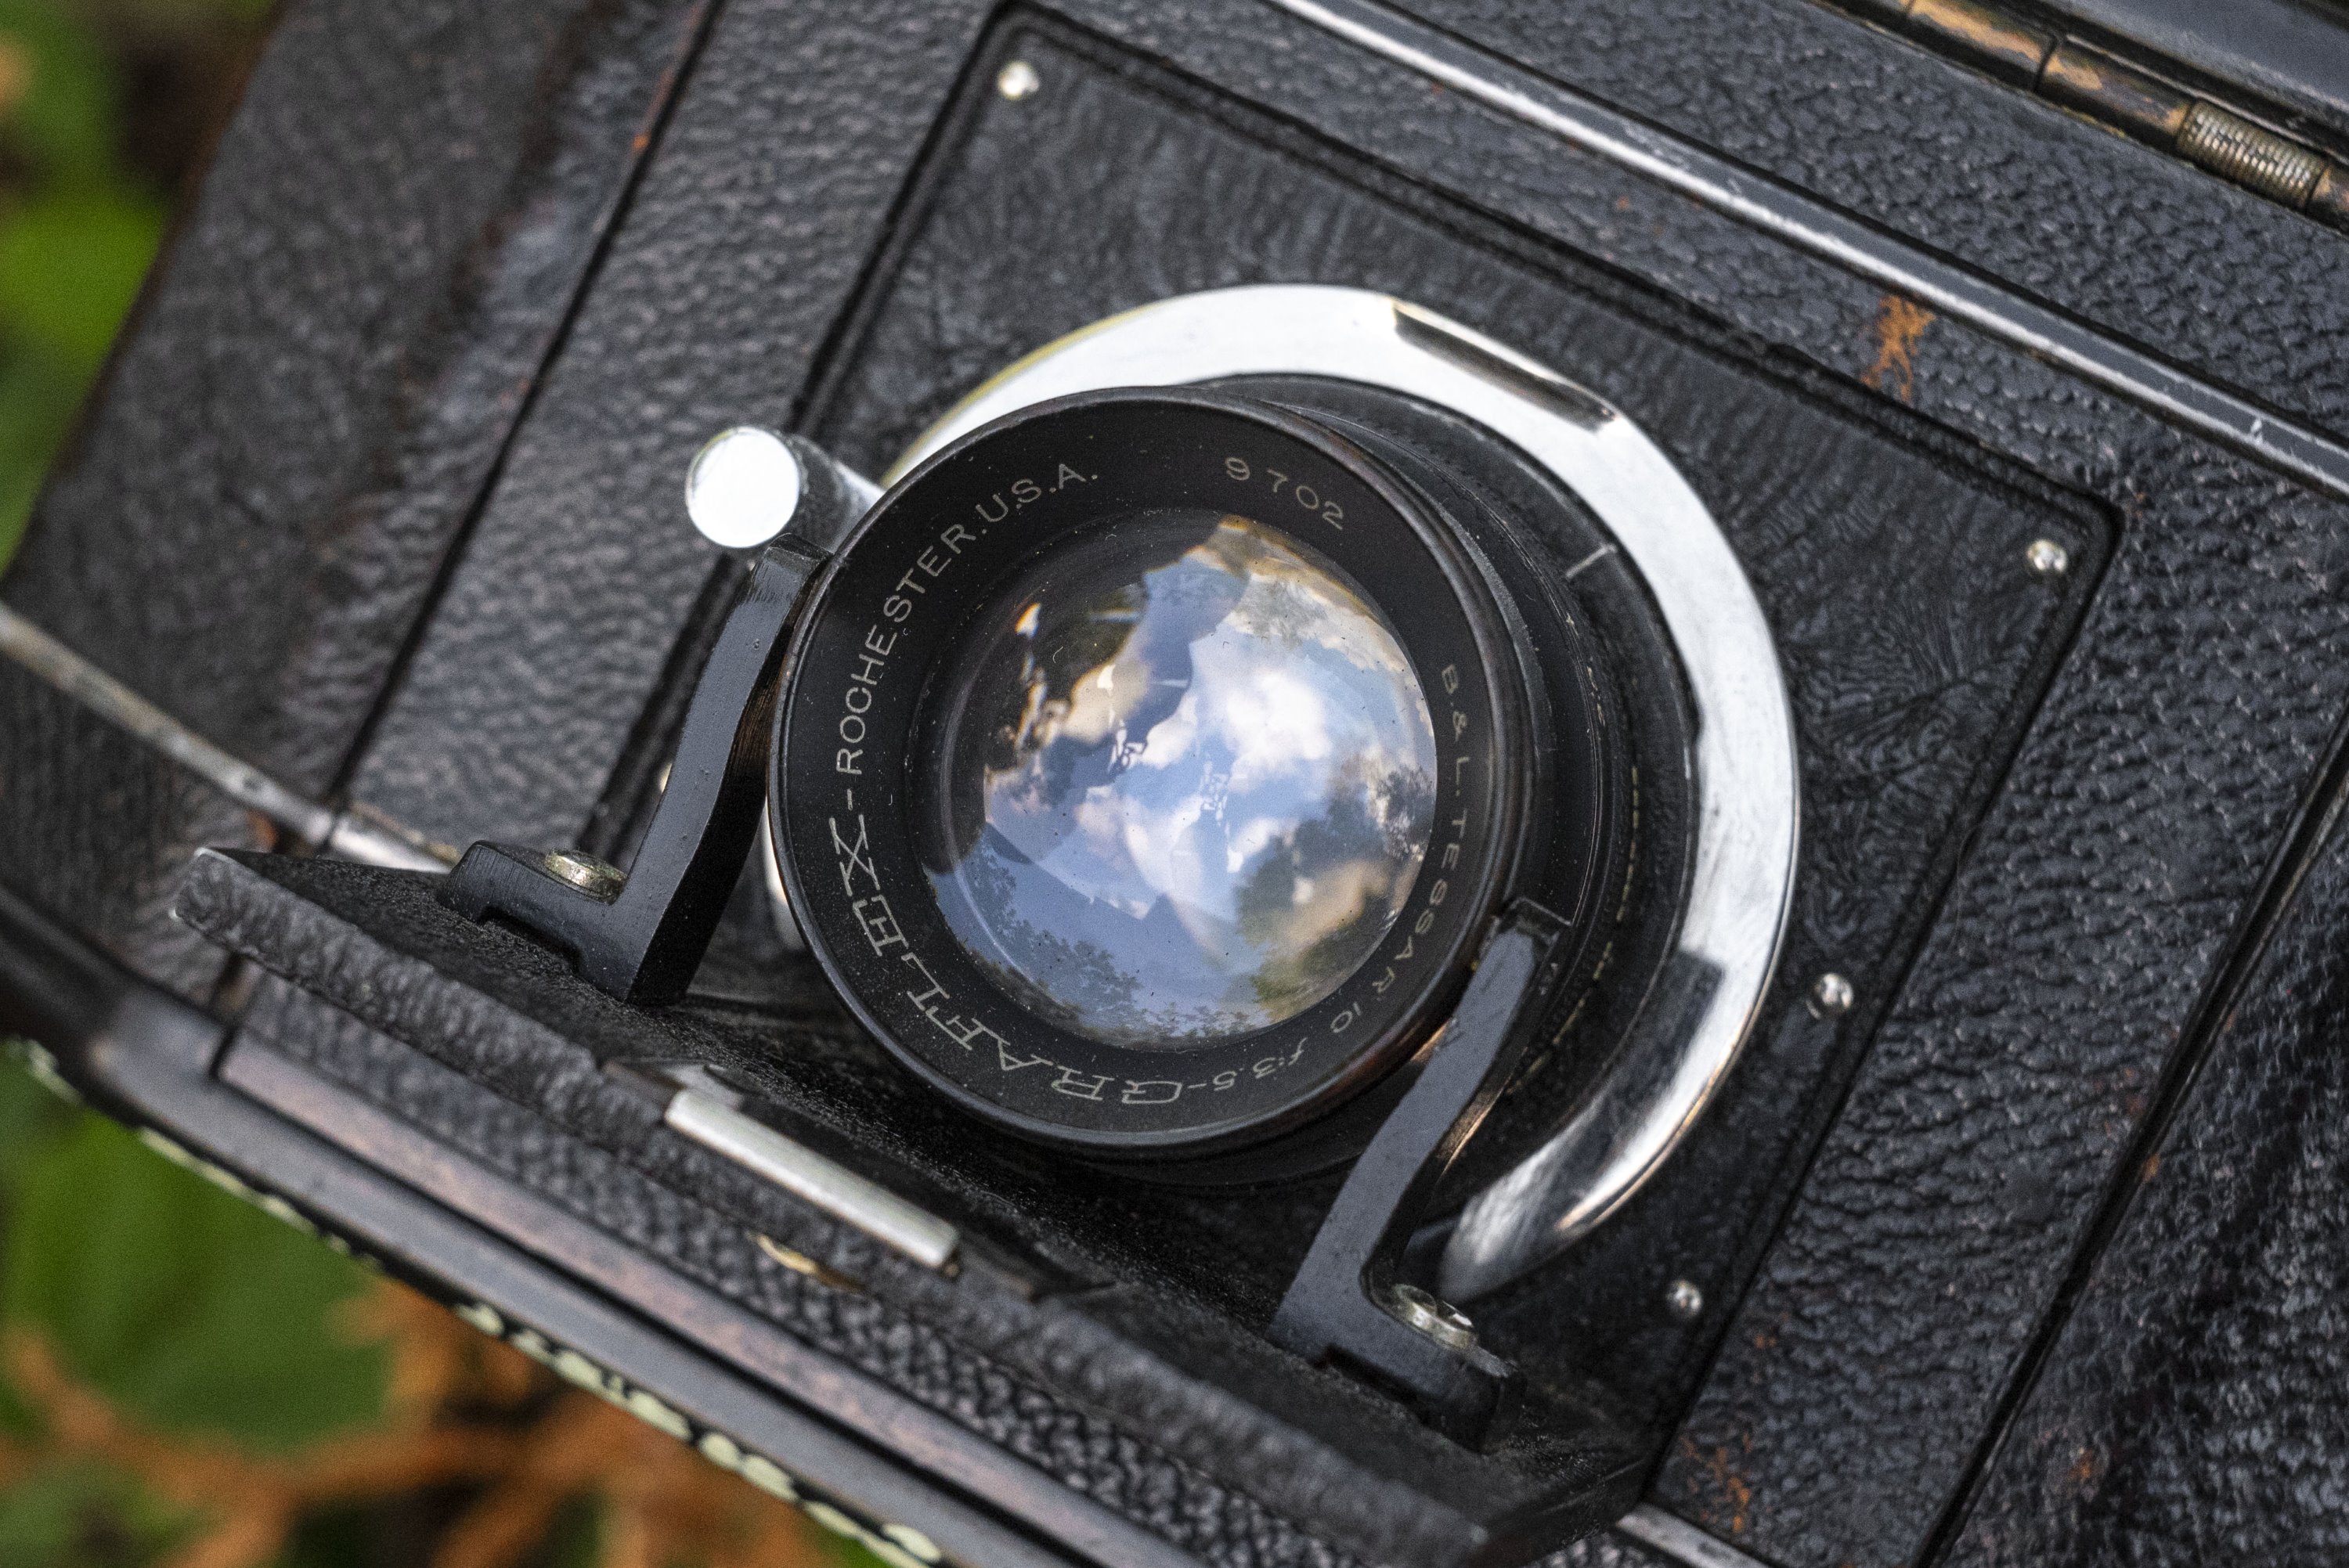
Lens: 75mm (3 inches) f/3.5 Bausch & Lomb Tessar uncoated 4-elements in 3-groups
Lens Mount: National Graflex Horseshoe Clip
Focus: 4 feet to Infinity
Viewfinder: Coupled Waist Level Reflex Viewfinder
Shutter: Cloth Focal Plane, Non-Self Capping
Speeds: B, 1/30 – 1/500 seconds (Indicated Numerically 1-7 and 9)
Exposure Meter: None
Battery: None
Flash Mount: None
Other Features: None
Weight: 949 grams
Manual: https://www.cameramanuals.org/prof_pdf/graflex_national_series_ii.pdf
Manual (Alt Version): https://www.pacificrimcamera.com/rl/00224/00224.pdf
Repair Manual: https://journal.graflex.org/journal-2022-02-1.pdf
How these ratings work |
The National Graflex Series II was a pioneering camera as one of the first “miniature” medium format SLRs ever made. It is a fully featured SLR with an 8 speed focal plane shutter, Bausch & Lomb Tessar lens, interchangeable mount, and a full reflex viewfinder. Although billed as an easy to use camera, the controls are unlike anything modern photographers would be used to, so using this camera is a challenge and one you definitely want to read the manual before using. | ||||||
| Images | Handling | Features | Viewfinder | Feel & Beauty | History | Age | |
| 2 | 1 | 2 | 1 | 2 | 2 | 40% | |
| Bonus | None | ||||||
| Final Score | 14.0 | ||||||
History
The name Graflex has a long and storied history in the photography industry. With a legacy lasting nearly a century, some of the world’s most important photographers used Graflex press cameras along with their other medium format and 35mm offerings. Originally formed in 1887 as the Folmer and Schwing Manufacturing Company by William F. Folmer and William E. Schwing, the company produced a variety of gas lighting fixtures, lamps, bicycles, and starting in 1898, cameras. Their Graflex Reflex series came with focal plane shutters and proved to be popular and competed with the likes of the Scovil & Anthony Companies line of similar cameras.
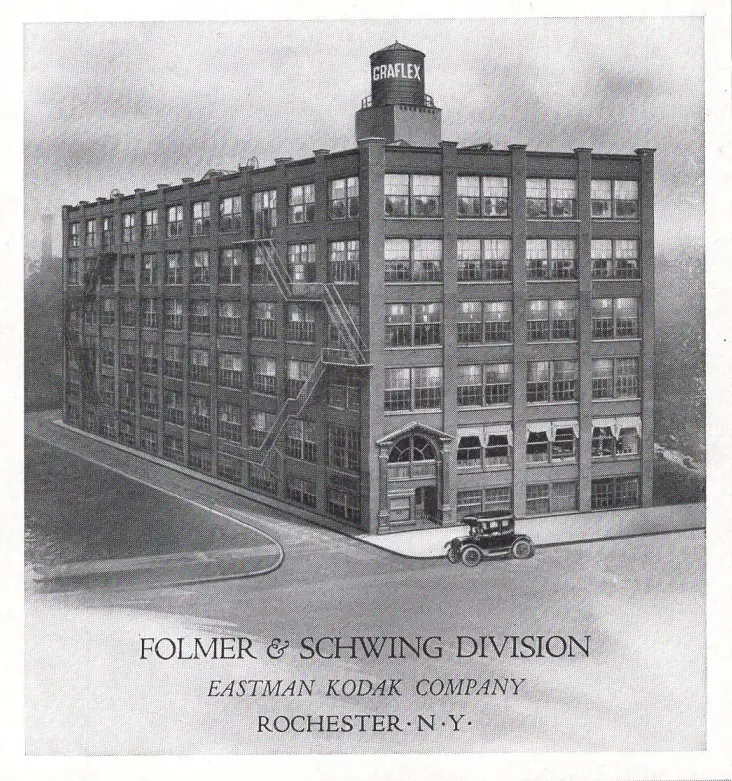
Between 1905 and 1906 the company was acquired by George Eastman and became the Folmer & Schwing division of Eastman Kodak. A variety of new twin lens, stereoscopic, sheet film, and roll film cameras were released by the company over the next couple of years.
In 1912, the first Speed Graphic press camera would be released that would be the foundation for a successful line of press cameras that would stay in production until the early 1970s. The Speed Graphic would launch several other models, some with focal plane shutters and others with leaf shutters.
The rapid success of the Folmer & Schwing division of Kodak was so successful that in 1926 the company was found by the US government to be in violation of the Sherman Anti-Trust Act and two years later, was forced to split off its Graflex division into a separate company which would be known as the Folmer Graflex Corp of Rochester, NY.
Back to being an independent company outside of Eastman Kodak, Folmer Graflex continued to produce many of the company’s large SLRs and press view cameras that they had been known for prior to the split, but with an increasing interest in smaller and more portable cameras, the company found themselves lacking in what was then called the miniature camera market.
Companies like Ernst Leitz and Zeiss-Ikon ventured into the market for compact 35mm rangefinder with cameras like the Leica and Contax, but Folmer Graflex didn’t make rangefinder cameras, they made reflex cameras and with no demand for a 35mm SLR, the company did the next best thing and built a miniature roll film SLR.
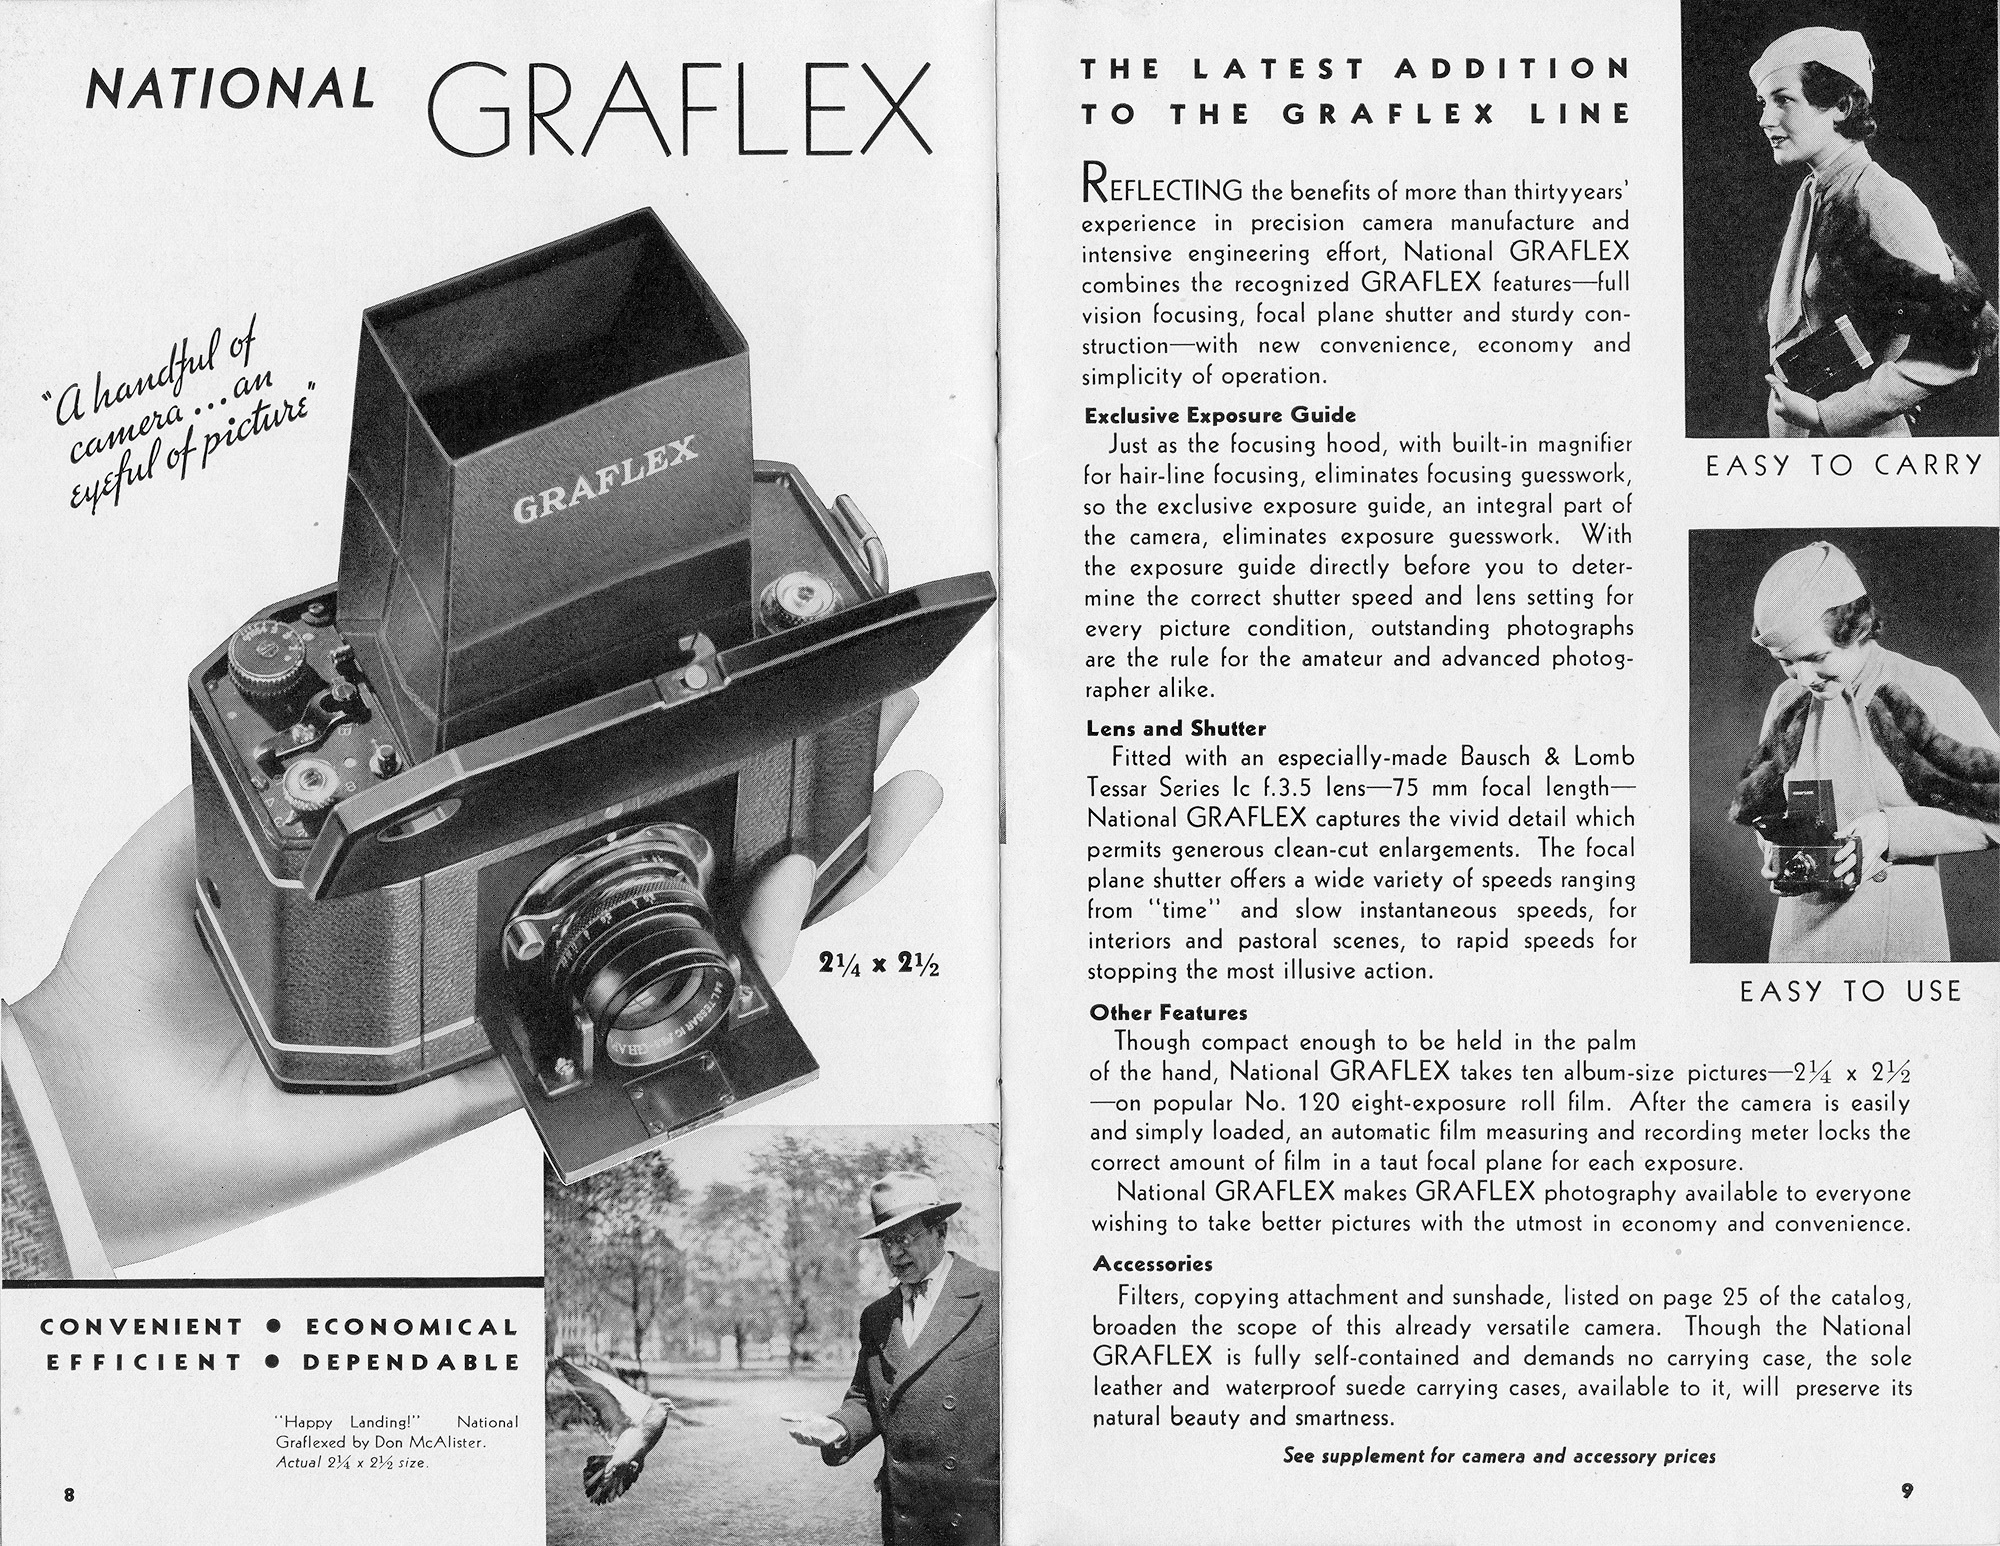
In my research for this article, I found no information on when development of Folmer Graflex’s new miniature SLR started, or who was responsible for it. That the camera would first be released as the National Graflex in 1933 suggests at least a year or two development, so a reasonable assumption for when the camera first began development might be 1931.
When it was released, the National Graflex was unlike any other camera. It was a fully featured single lens reflex camera with a focal plane shutter and a top shutter speed of 1/500, it came standard with a high quality Bausch & Lomb Tessar lens whose formula was licensed by Carl Zeiss in Germany, and it had the economy of making up to ten 2¼” x 2½” exposures per roll of 120 film. The National Graflex camera sold in 1934 for $72.50 which when adjusted for inflation compares to about $1680 today.
A year after its introduction, an updated model called the National Graflex Series II was released with several changes, the most notable was a revised lens mount for a new 140mm Bausch & Lomb telephoto lens whcih sold for an additional $55. In order to fit the larger lens, two metal posts to the side of the lens were redesigned, giving them an outward curve. Another change to the door was that the front door release catch was relocated from the camera body to the outside of the door. Other changes to the Series II were the addition of two cable release sockets for the camera’s two shutter releases, the addition of a sliding door to protect the red exposure window on the side of the camera, a larger film advance knob, and the relocation of the mirror up lever from the right side of the camera to the left.
Note About the Lens Mount: It would seem reasonable to assume that with the Series II adding support for the new 140mm telephoto lens, that the original model had a fixed lens, but this is not true. The original National Graflex still used the ‘horseshoe’ clip of the Series II and the lens was removable, however no other lenses were made for it and the later 140mm telephoto lens will not fit the original model.
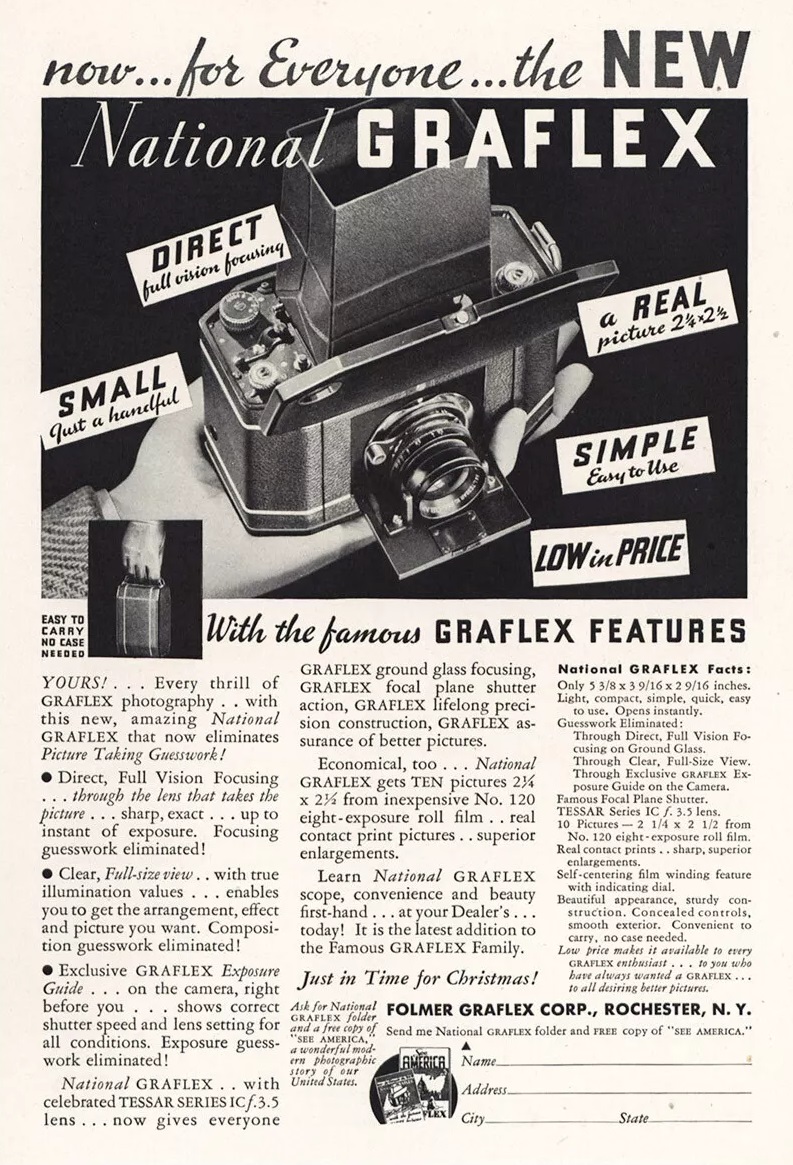
In 1934, the upgraded National Graflex Series II sold alongside the original model for only $10 more, at a retail price of $82.50. Owners of the original model could optionally send their cameras back to the factory to have most of the Series II features retrofitted to their cameras for an upcharge of $35. The original model was sold alongside the Series II, not as the Series I, but as the “Single Lens Model”, but was eventually discontinued in 1935.
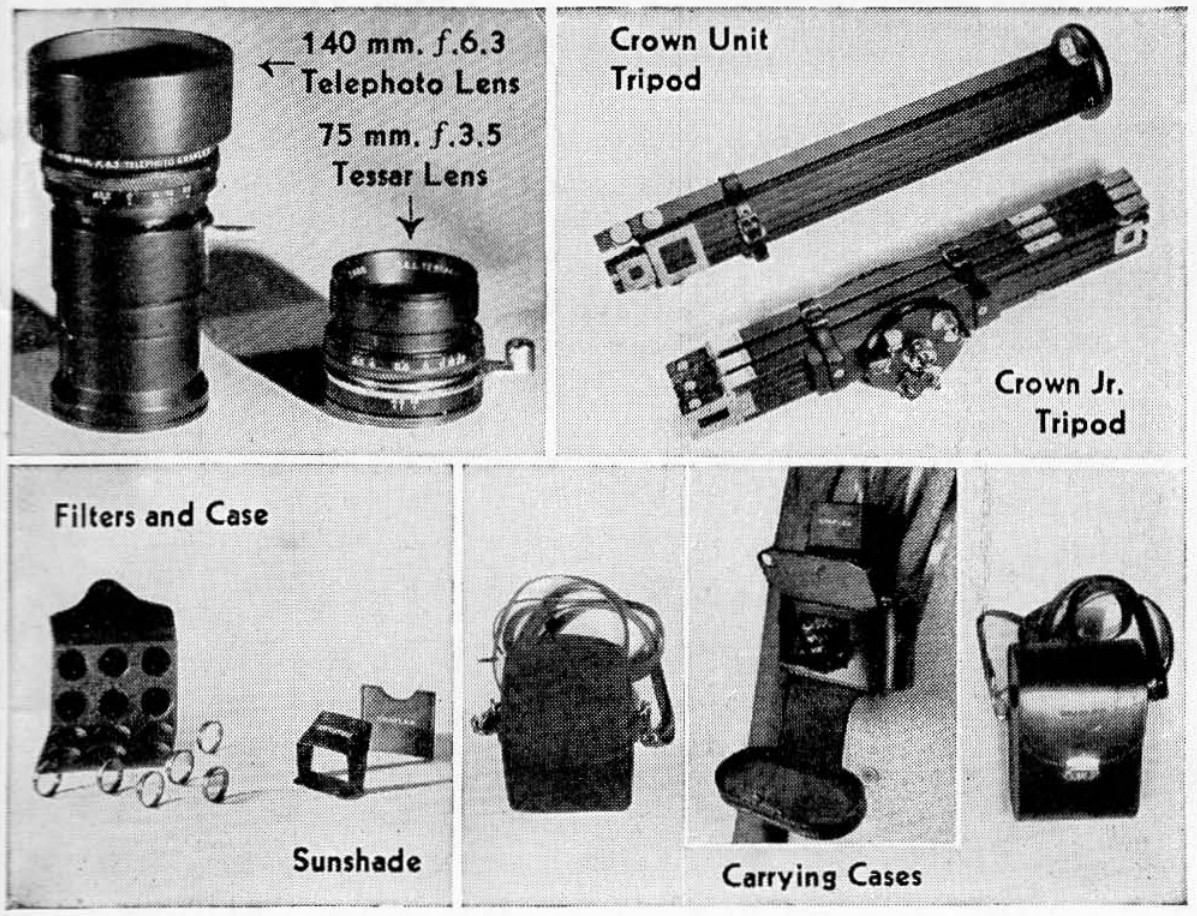
In addition to the 140mm telephoto lens, a variety of accessories were made for the National Graflex. Some highlights include a direct vision viewfinder which screws into the tripod socket on the bottom of the camera, a custom sun shade for the 75mm lens, closeup copying attachments allowing focus down to 12″, a variety of filters, a leather “sportsmans” carrying case, and some sort of self-timer attachment.
I could not find any contemporary reviews or literature describing the reaction from the photographic world upon the camera’s release, but that it was a one of a kind camera that was quickly upgraded a year after its release and remained in production for at least 8 years after that, would suggest that it was well received. According to the “The National Graflex Collector’s Guide” by Ken Metcalf in the Graflex History Quarterly newsletter, volume 14 issue 2, production numbers of the National Graflex models were approximately 2600 units of the first model and 7800 of the Series II model.
As was the case with most camera makers, World War II disrupted supply of cameras from Folmer Graflex, and when production started up again after the war, the National Graflex was no longer produced. The company would largely remain out of the medium format business, save for accessory roll film backs for their larger plate and sheet film cameras, and a TLR model called the Graflex 22 was sold by the company in 1952. Beyond that, the days of medium format Graflex SLRs was over.
The company would continue on primarily as a maker of press cameras until 1968, when it was sold to the Singer Corporation before being liquidated in 1973, ending the history of Graflex and its cameras.
Today, the National Graflex is a desirable but obscure camera for collectors. Its legacy as an early medium format SLR garners some attention for its historical significance, but that the camera is complicated, difficult to use, and often found in nonworking condition limit its appeal to collectors. For those looking for a cool piece of history and a truly unique design however, there is nothing else like it, and for that, makes it an interesting addition to any collection.
My Thoughts
The National Graflex is a difficult camera to categorize. On one hand, it is a medium format roll film single lens reflex camera which shoots ten 2¼” x 2½” exposures per roll of 120 film, on the other hand, it is made by Graflex a company not known for medium format SLRs, and it certainly doesn’t look like a typical medium format SLR, especially when folded up.
The build quality of the camera is quite good and is covered with high quality natural leather, which on this example was still supple and not peeling. The leather and angled corners make the camera very easy to grip without feeling like you are hauling around a large four-sided box. Many early 20th century cameras have inner bodies made of wood, but upon close inspection of the inside of the camera, everything is either aluminum, steel, and brass. Rubbing a magnet over the body, the external shell and internal surfaces are non-magnetized aluminum, but I do see the tell tale signs of brassing on various internal pieces. My magnet stuck to a variety of parts of the film transport, but I suspect aluminum was used as much as possible to keep the weight down. With a weight of 949 grams, the camera is not light weight, but had more steel been used, its weight could have escalated quickly.
I’ll admit that the first time I saw the National Graflex, all nicely folded up and tucked away in a box, I didn’t at first know what it was. I had certainly seen my share of box cameras, but upon further inspection, this was no ordinary box, in fact, it wasn’t a box camera at all, but rather one of the very first attempts at making an easy to use roll film SLR for the masses.
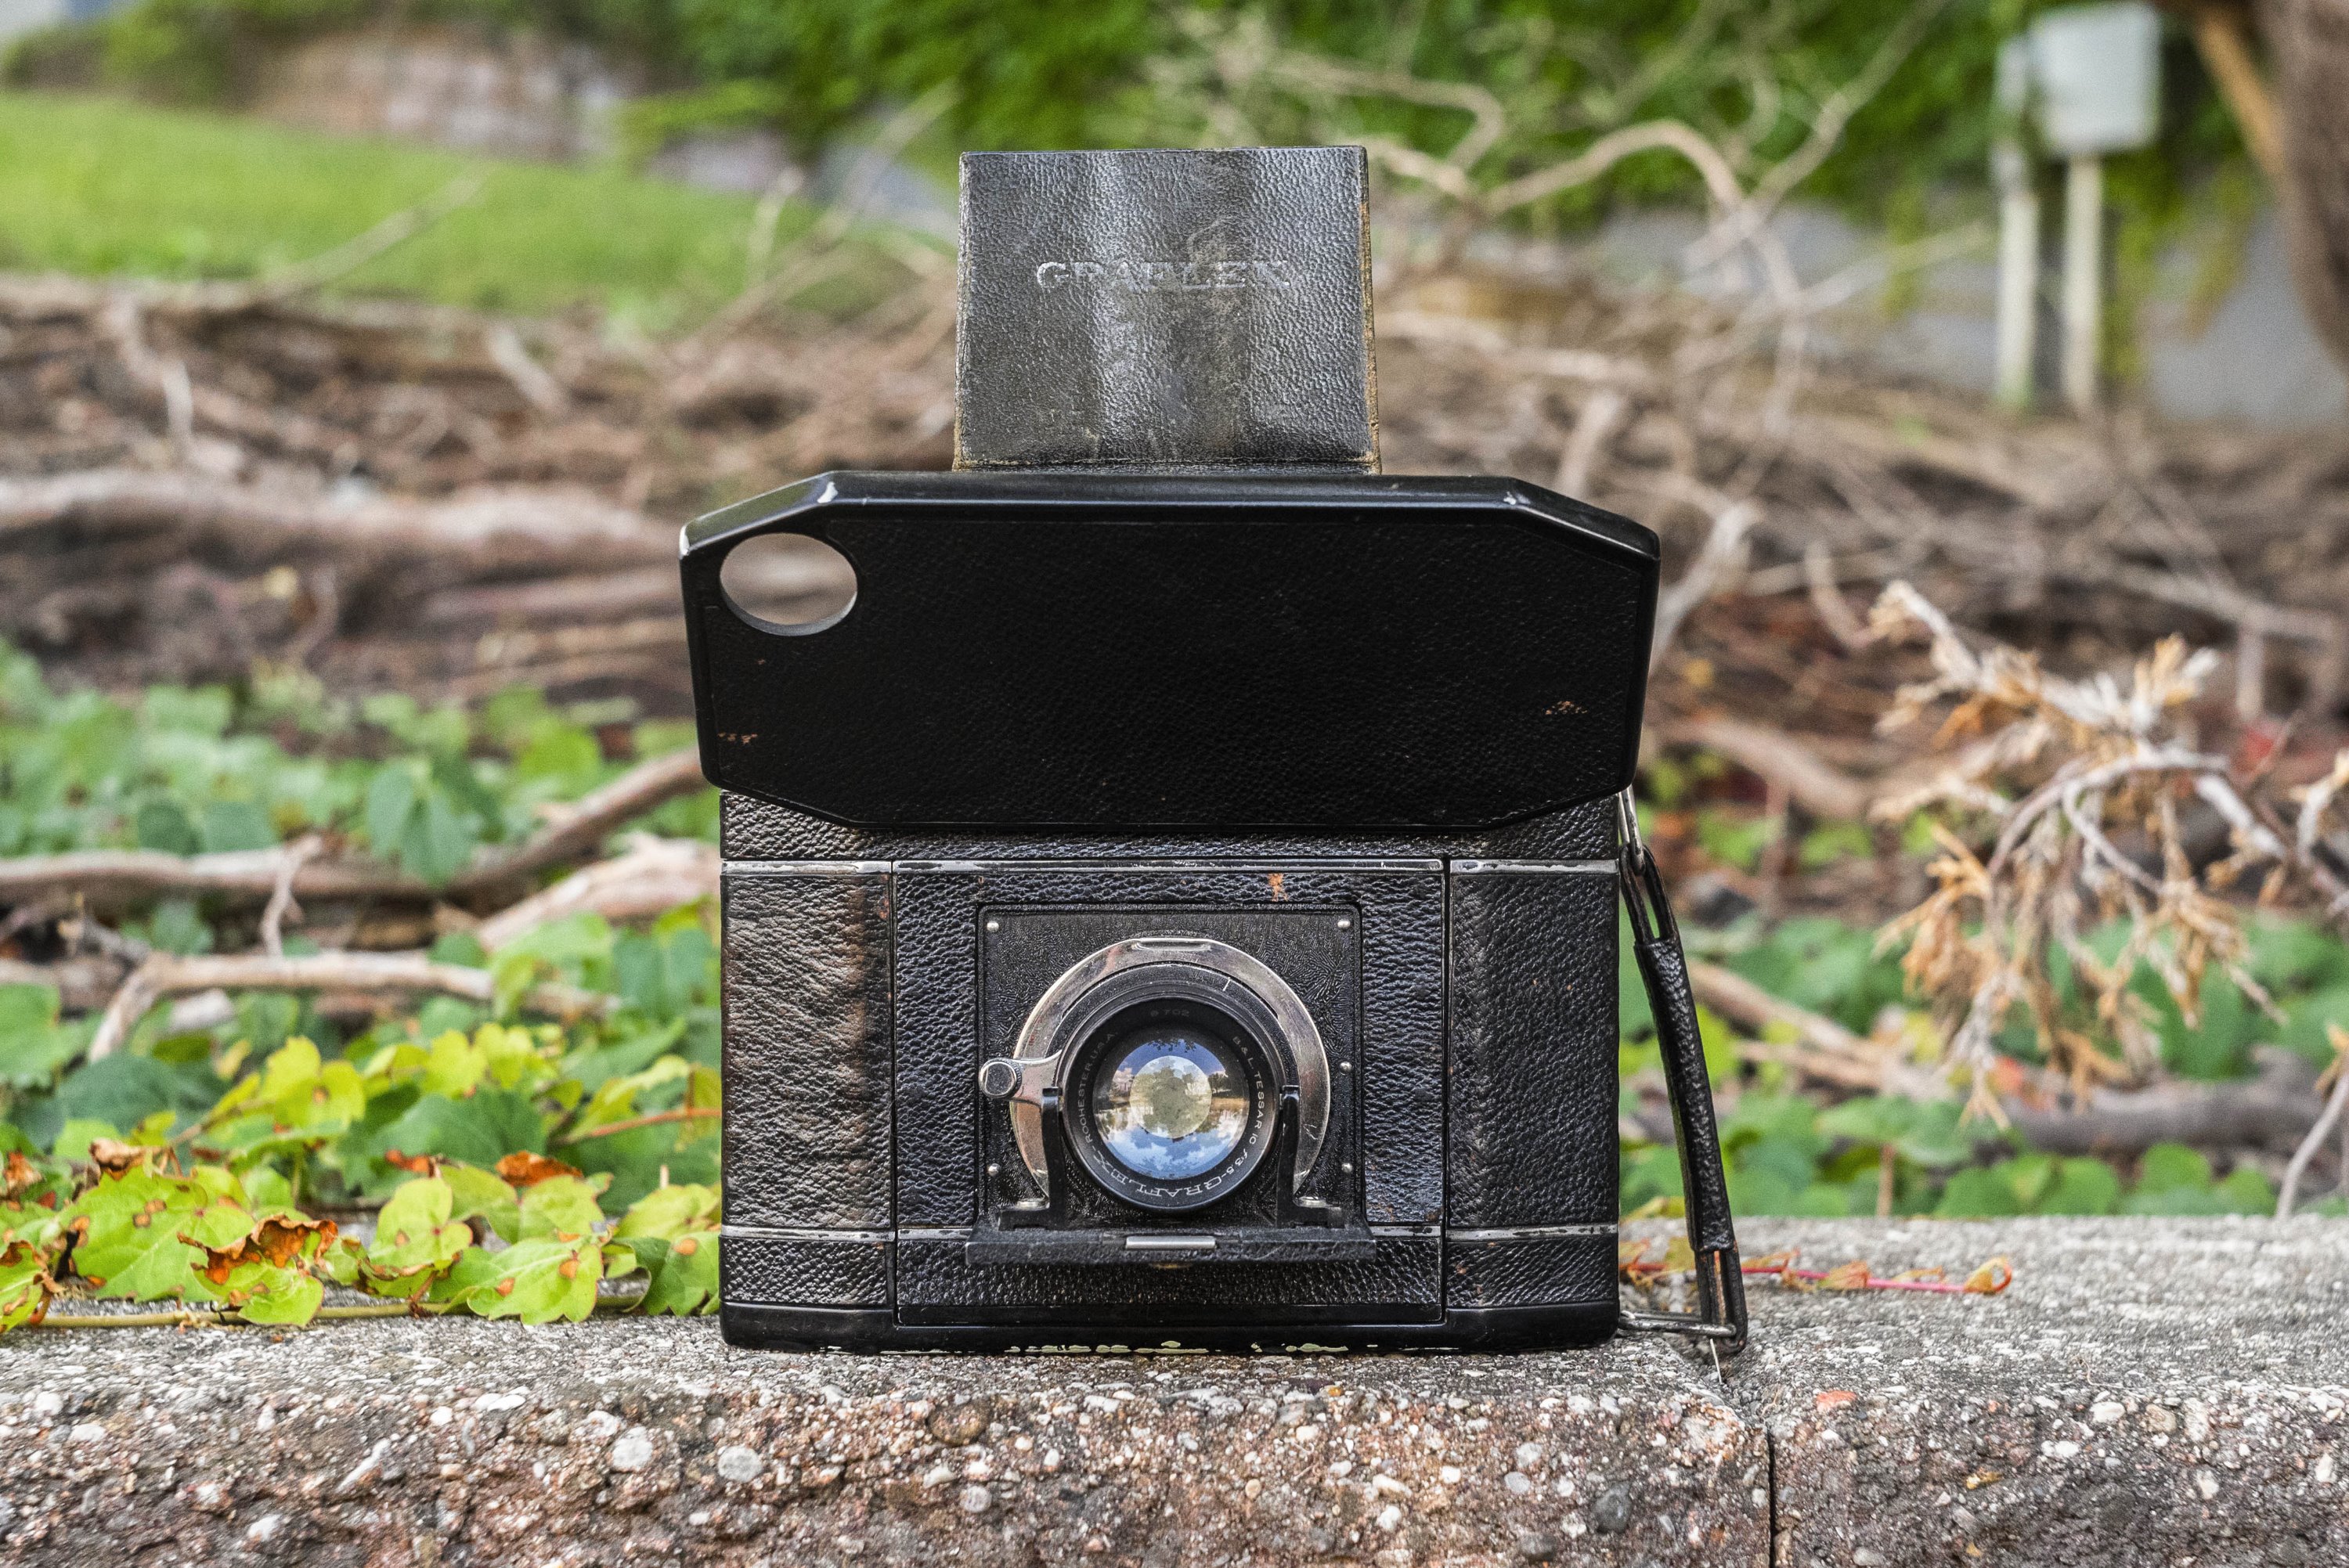
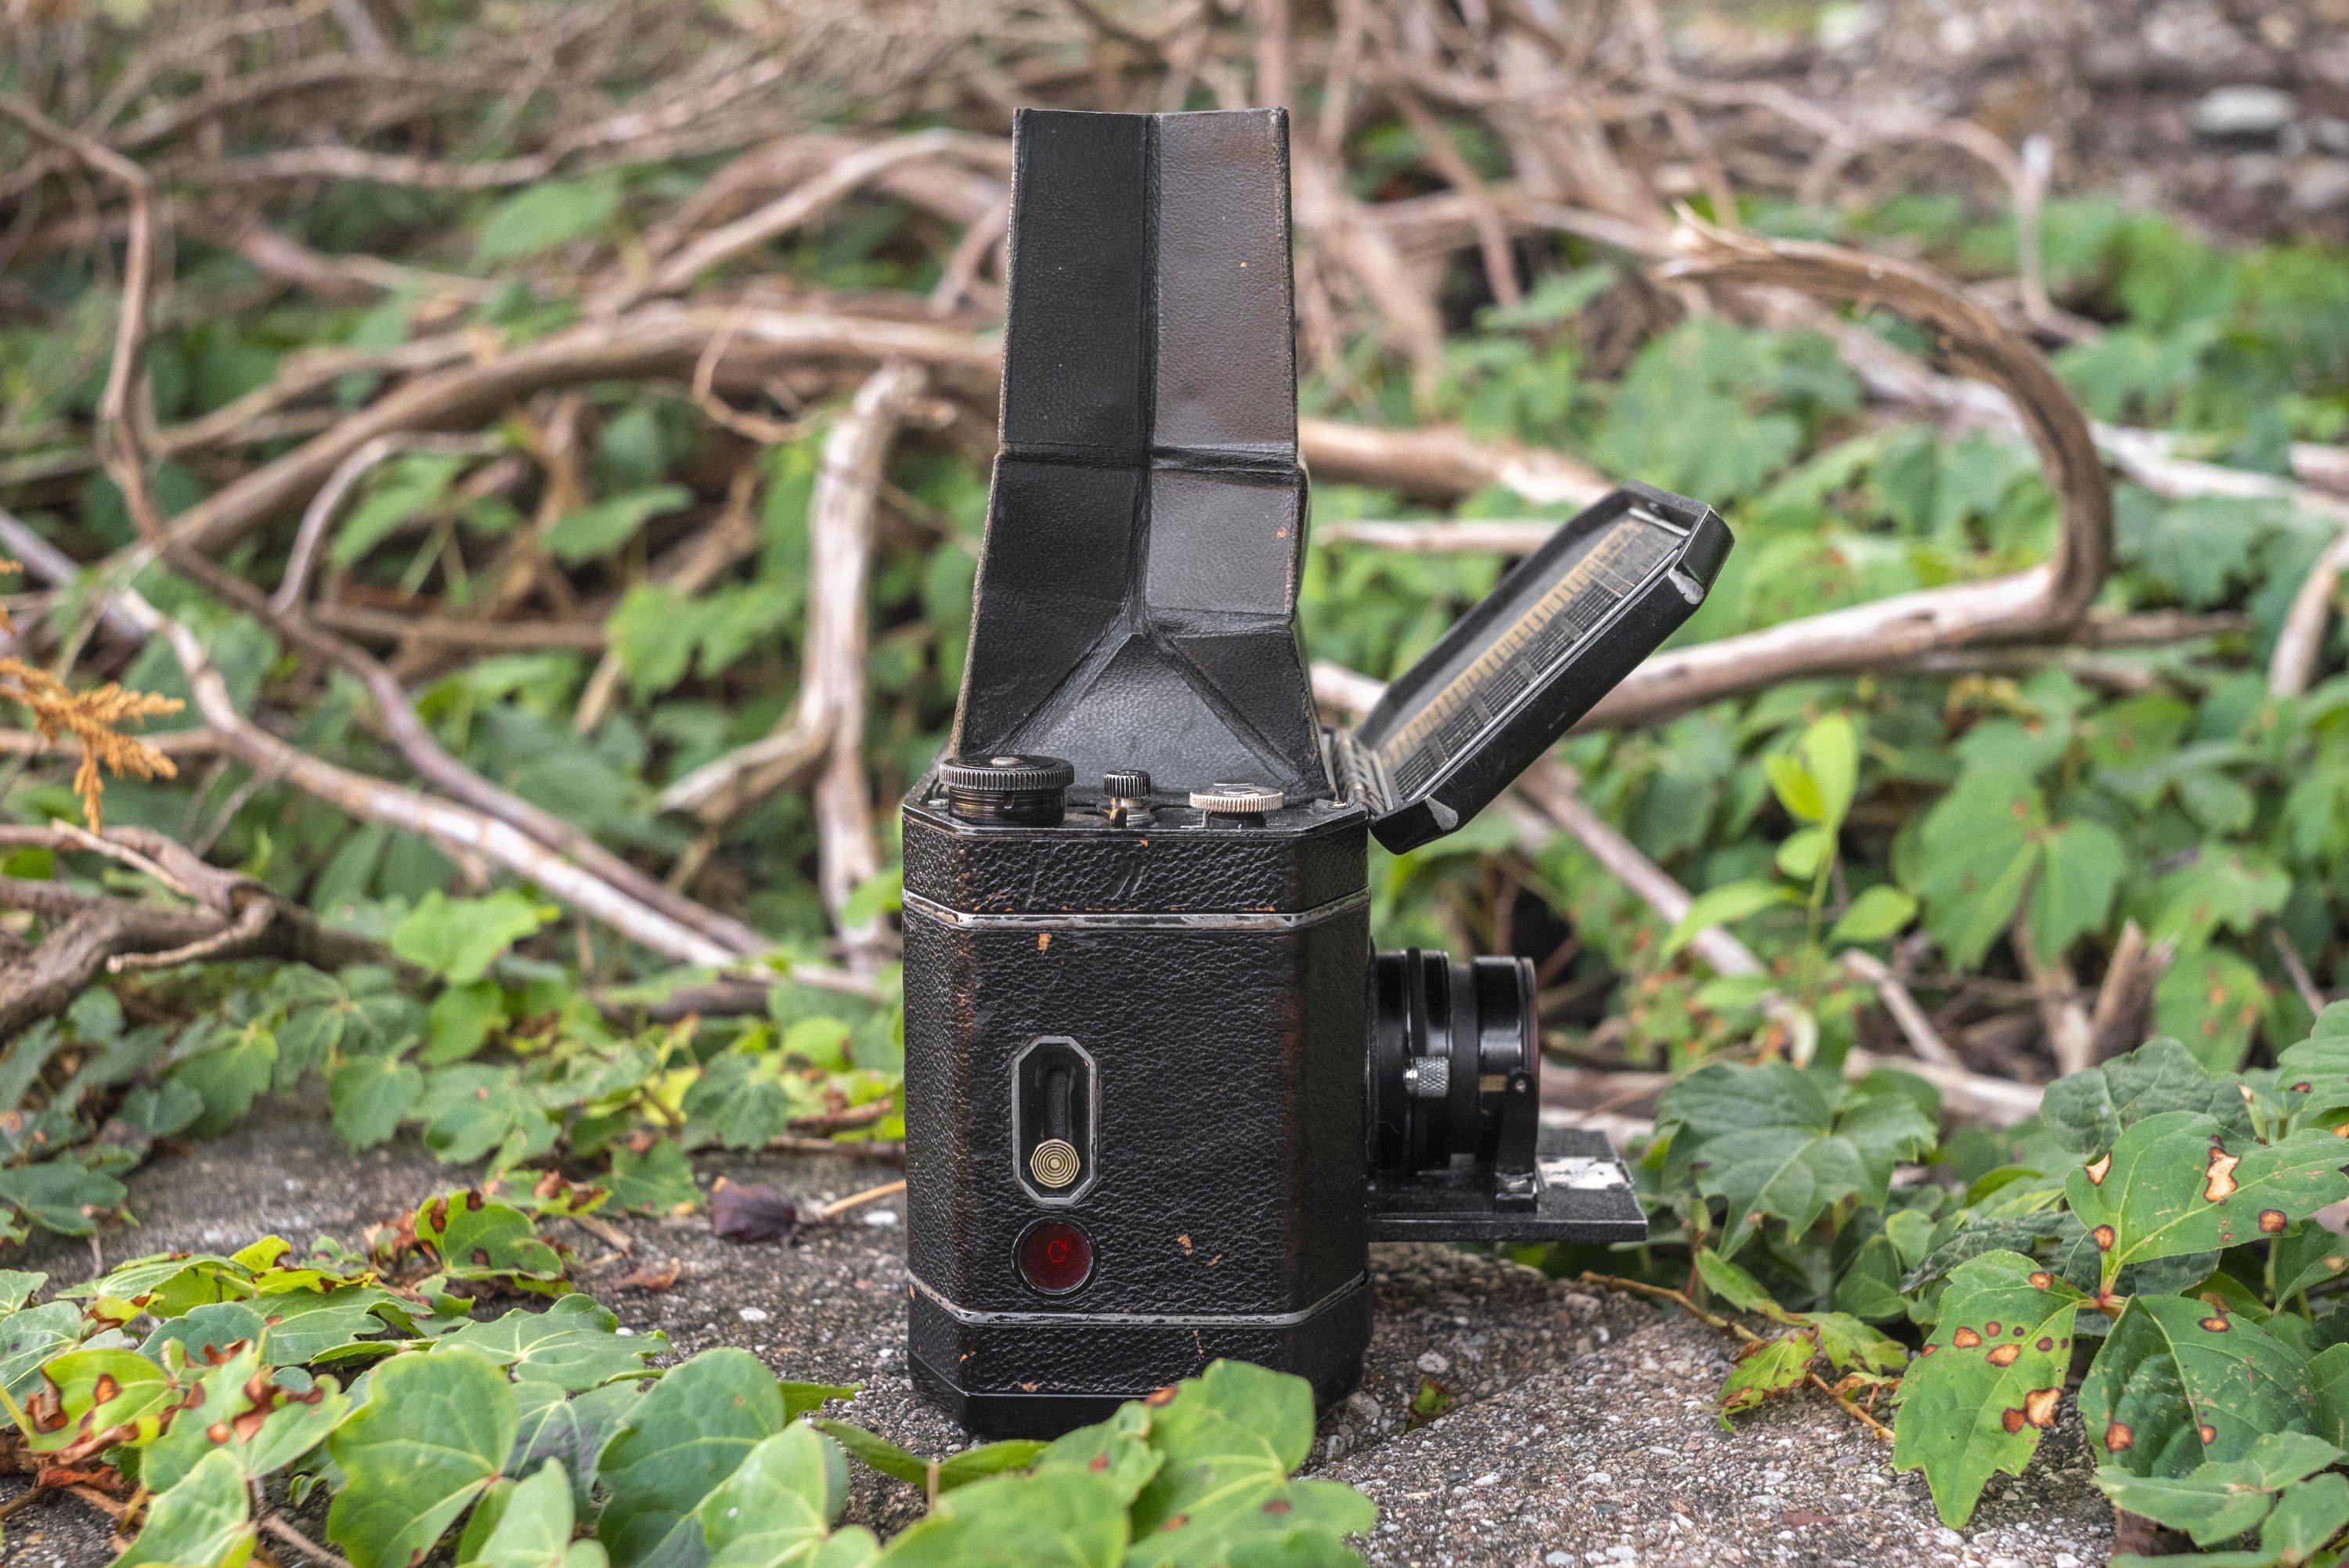
I suppose the word “easy” is subjective however, as upon opening the top lid to reveal the tall leather viewfinder hood and top plate controls, the National Graflex looks nothing like most SLRs you’ve seen.
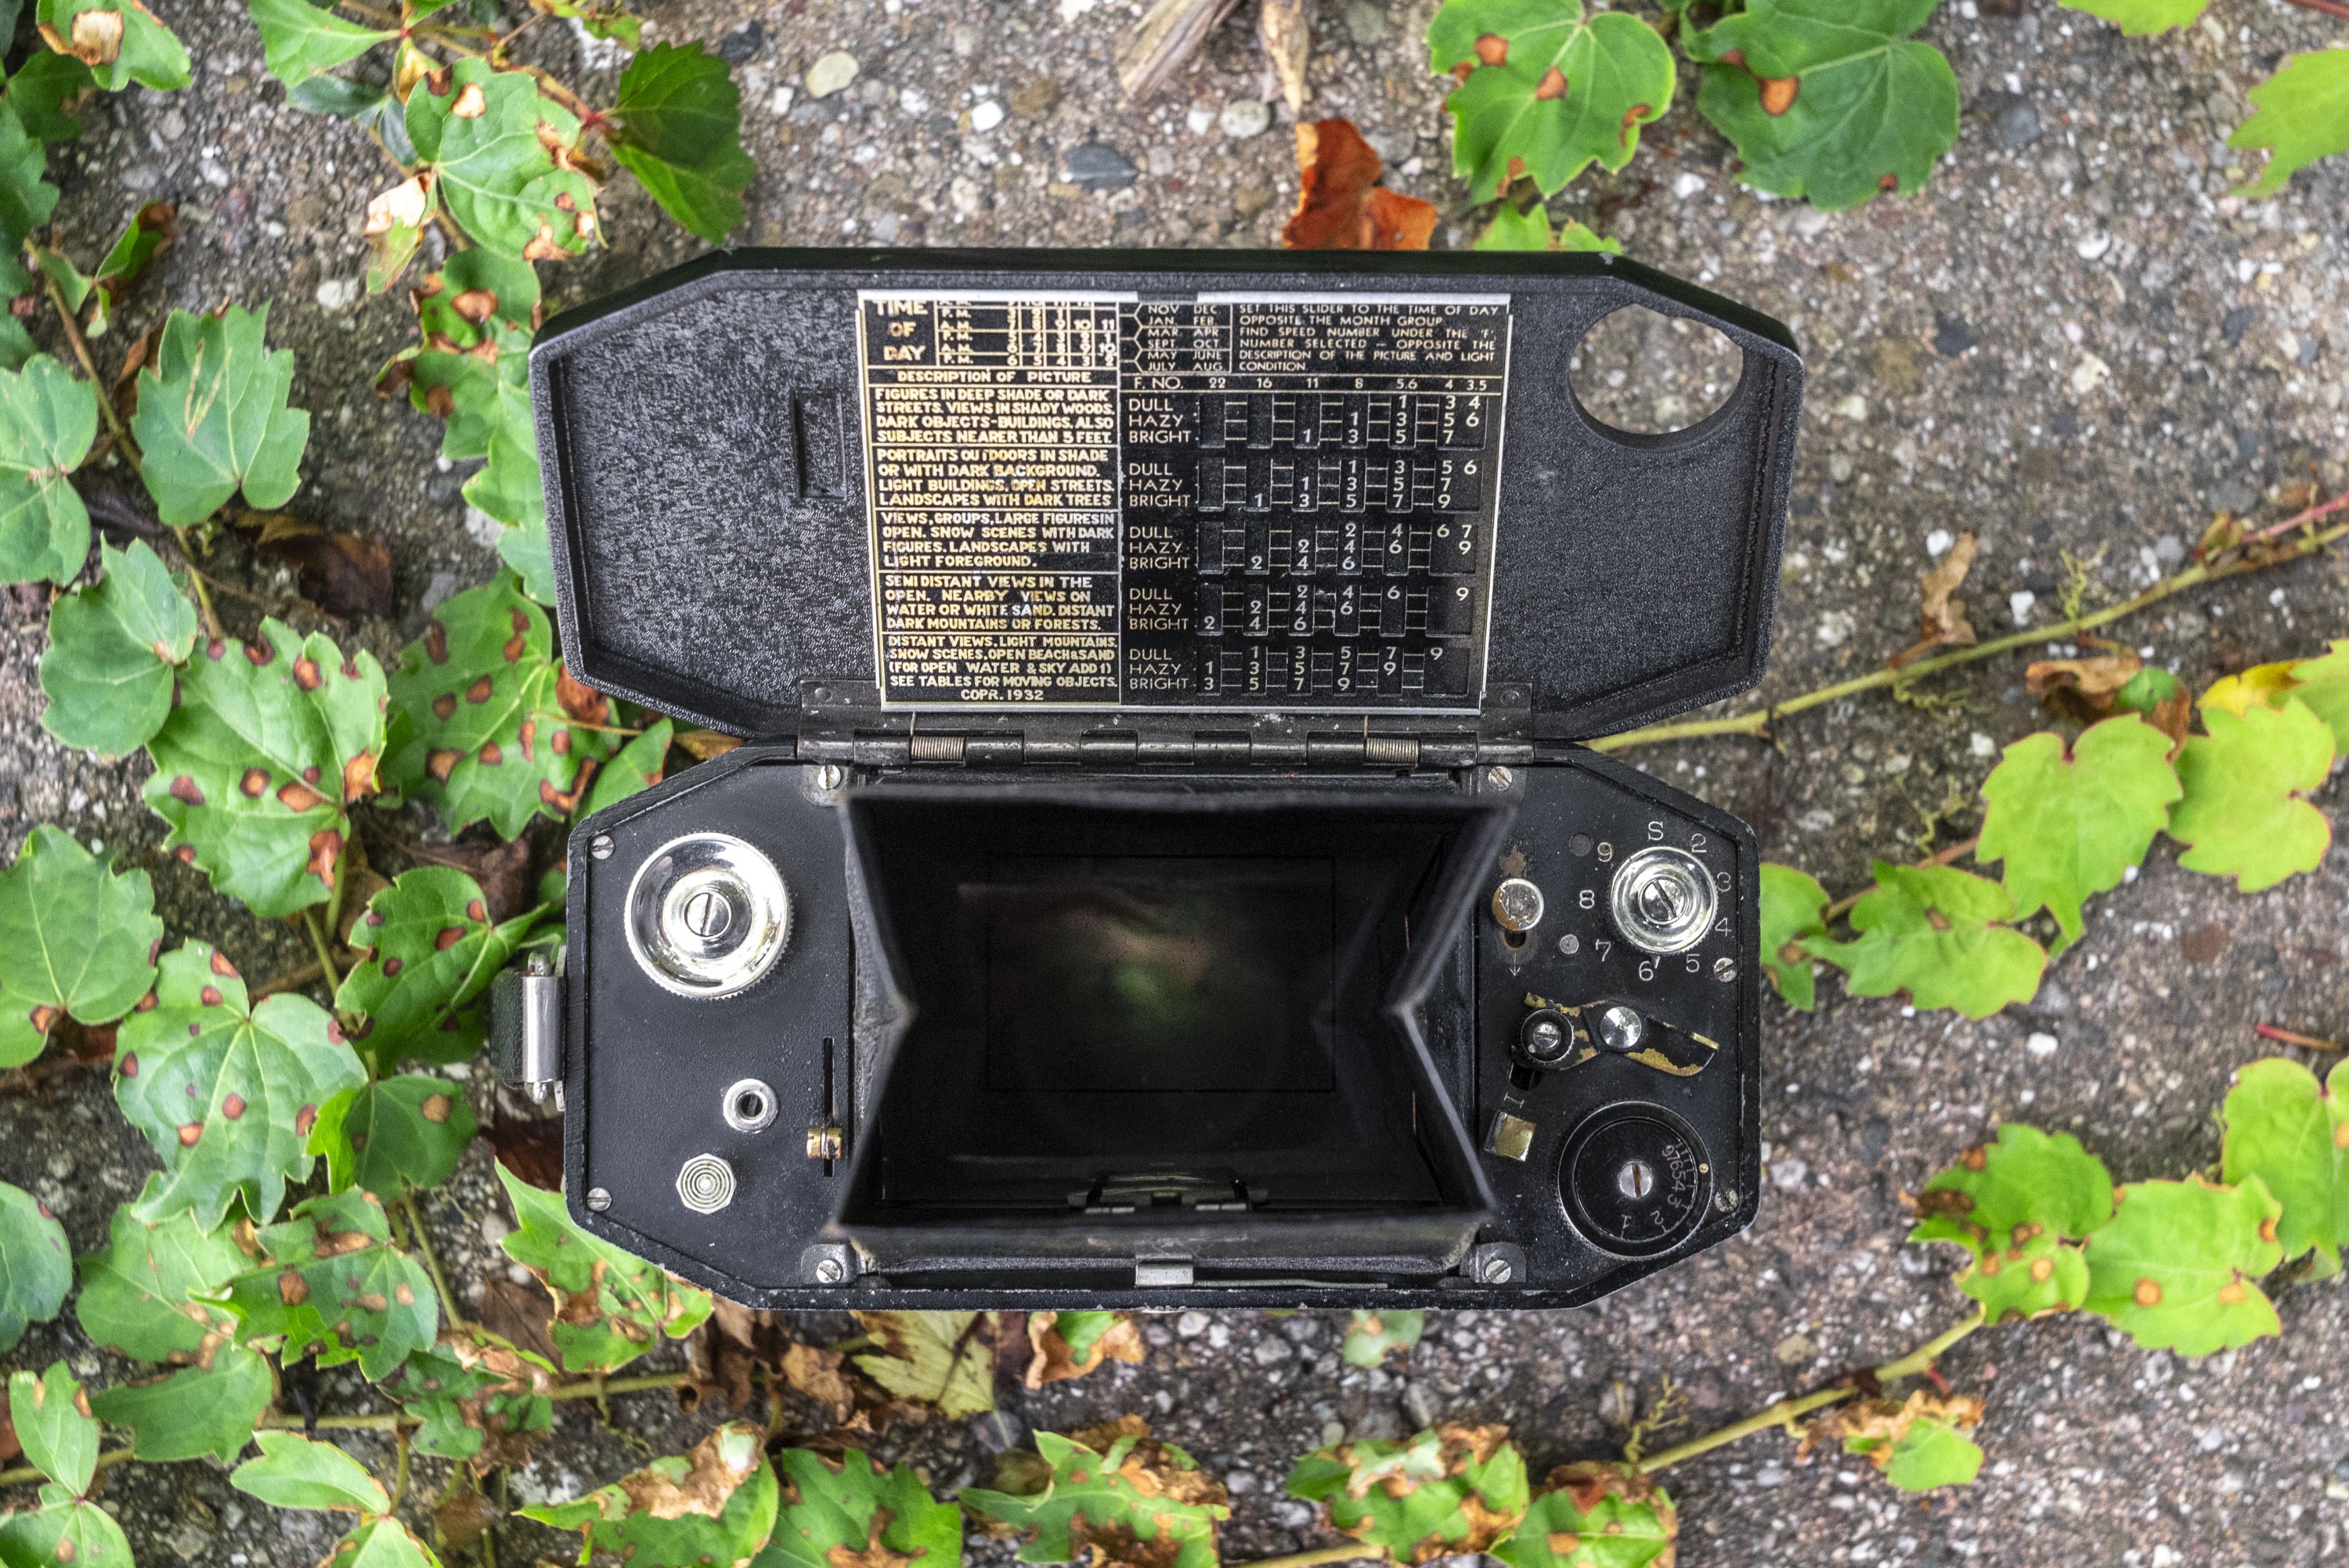
With the camera closed, a lid covers the entire top of the camera including the viewfinder hood, with the only exception being the combined shutter speed dial and shutter setting knob which is visible.
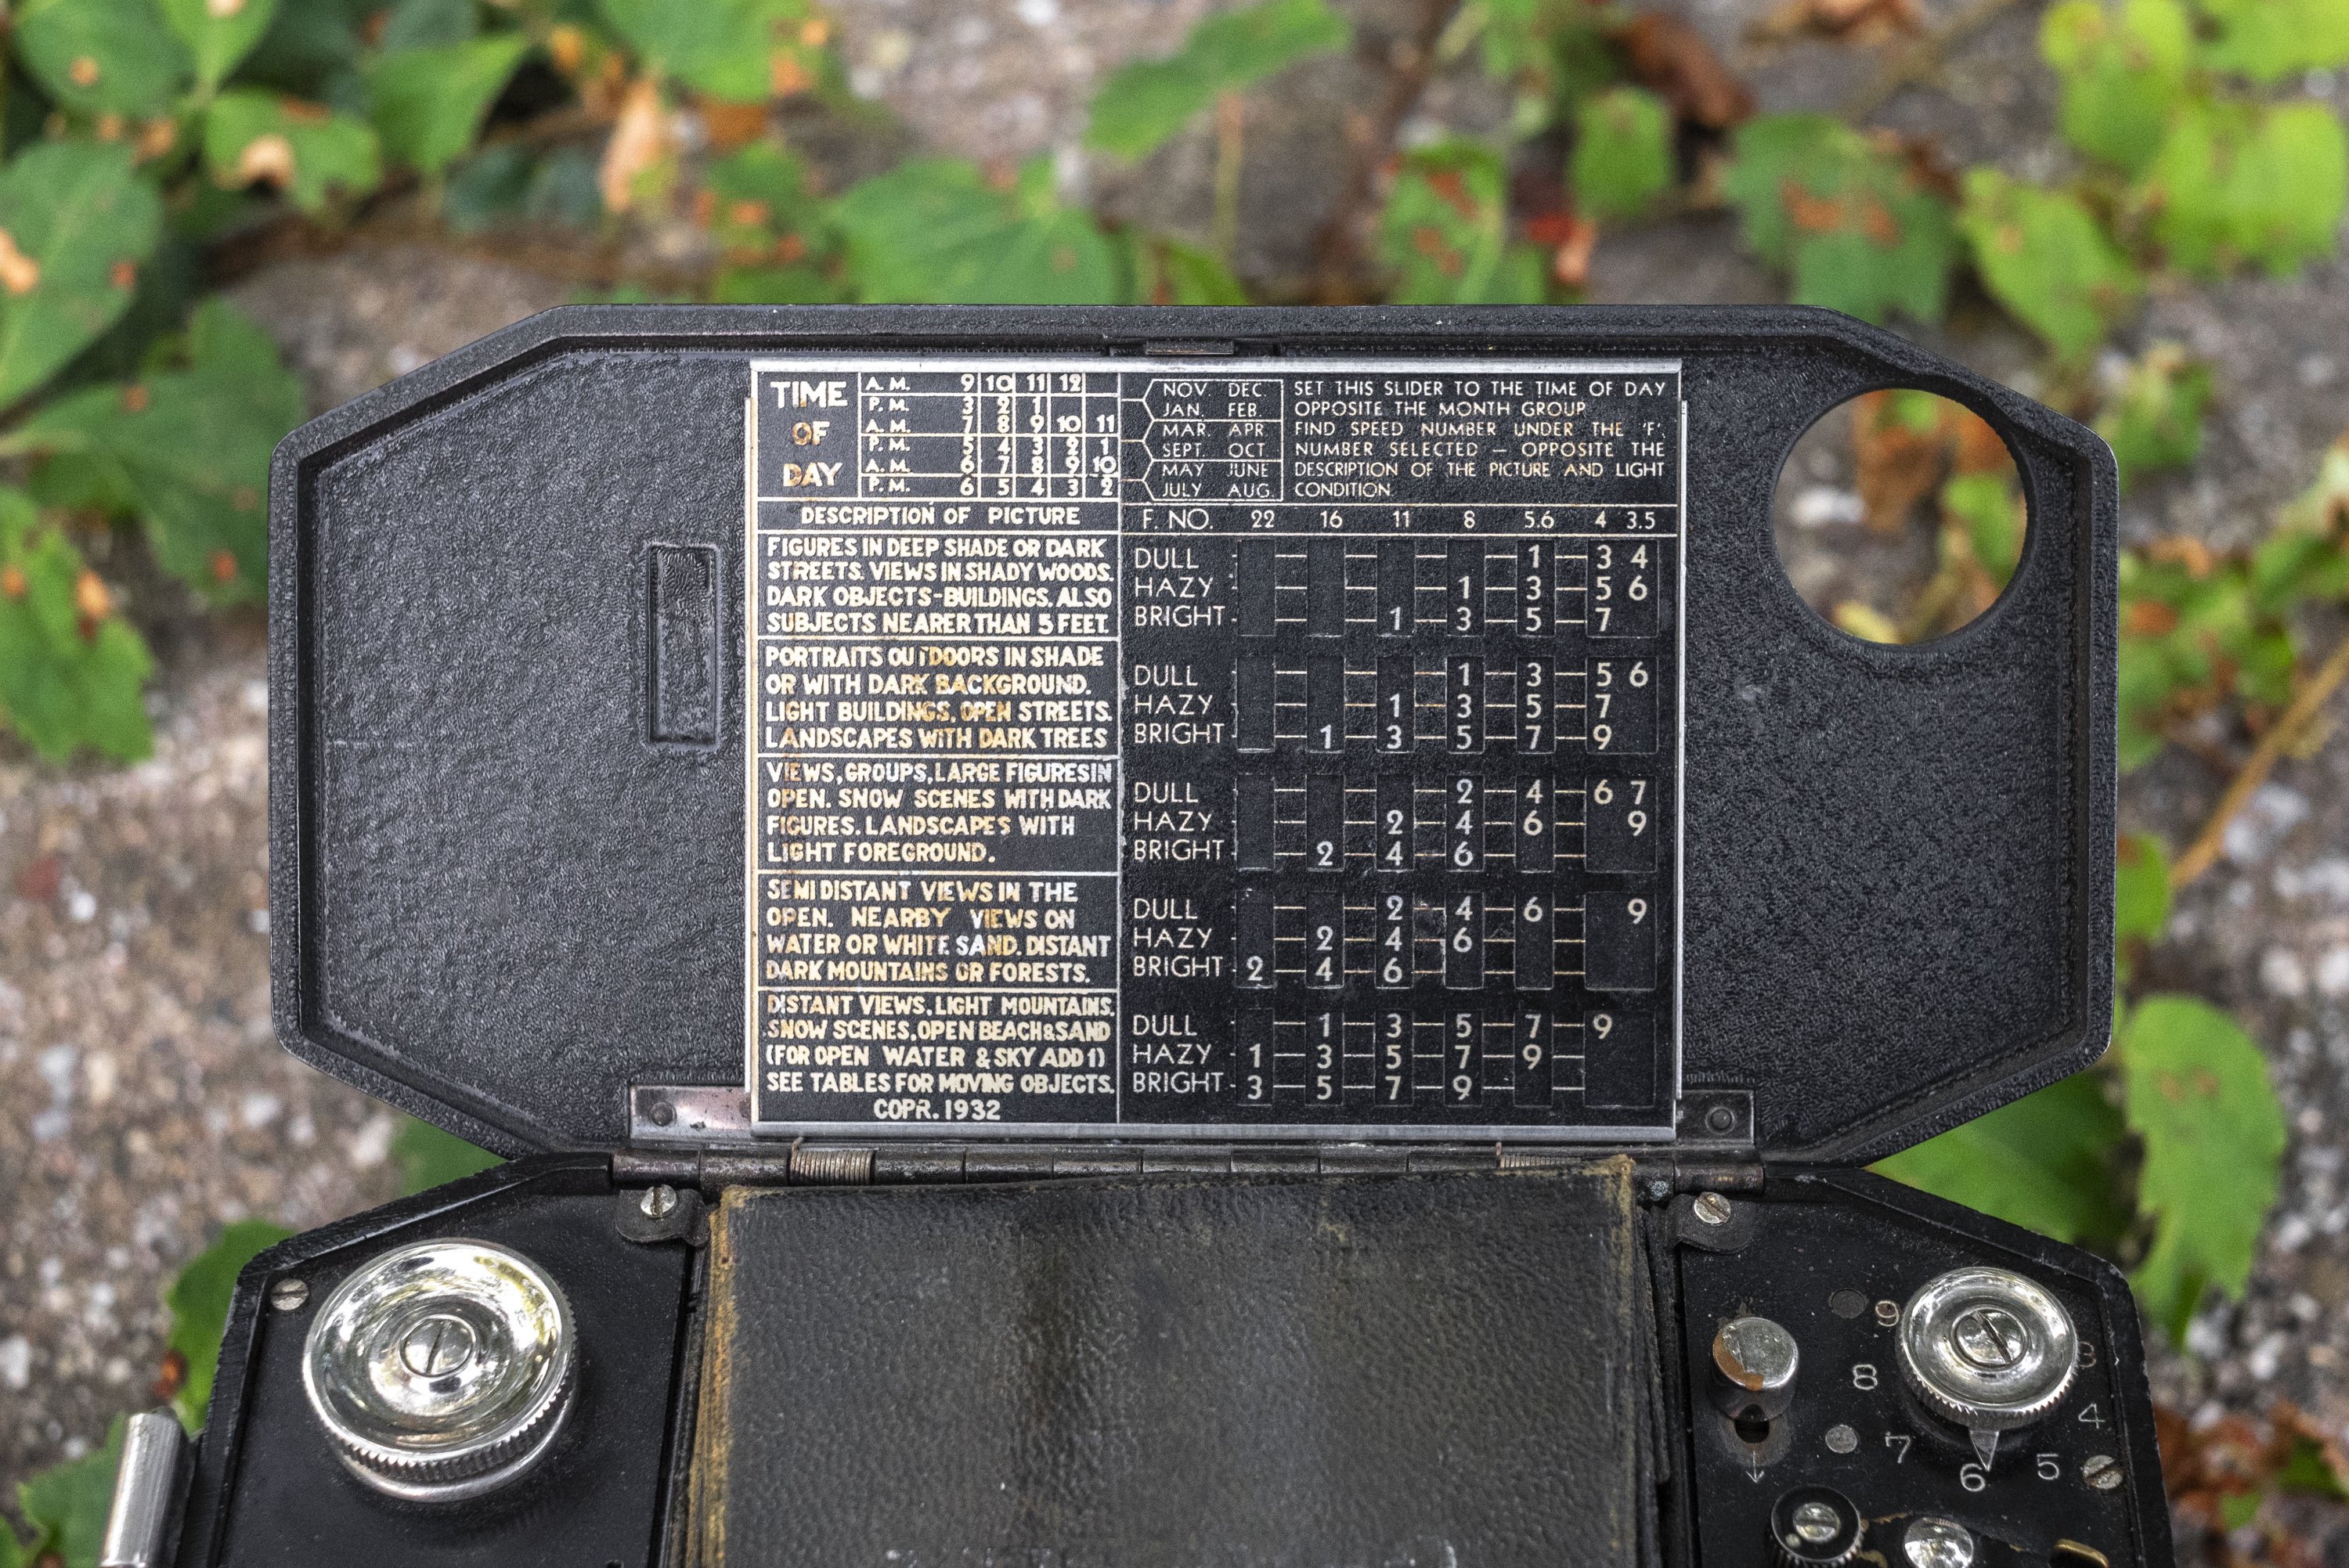
Opening the lid is done by pressing in on a circular catch on the top edge of the back of the camera. The lid is hinged on the front edge, and underneath is a very elaborate and interactive exposure chart and calculator. The left side of the chart has descriptions for five different lighting situations you might use the camera in, ranging from deep shade to distant views of open beaches and snowy scenes. In an effort to make the National Graflex appealing to people who didn’t have a strong understanding of photography, a sliding exposure calculator uses numbers from 1-7 plus 9 as sort of a primitive EV scale in which you match up f/stops from f/3.5 down to f/22 to pick an EV number which you match with corresponding numbers on the shutter speed dial. Printed on a metal plaque on the back edge of the leather viewfinder hood, the camera’s EV numbers are translated to the following shutter speeds:
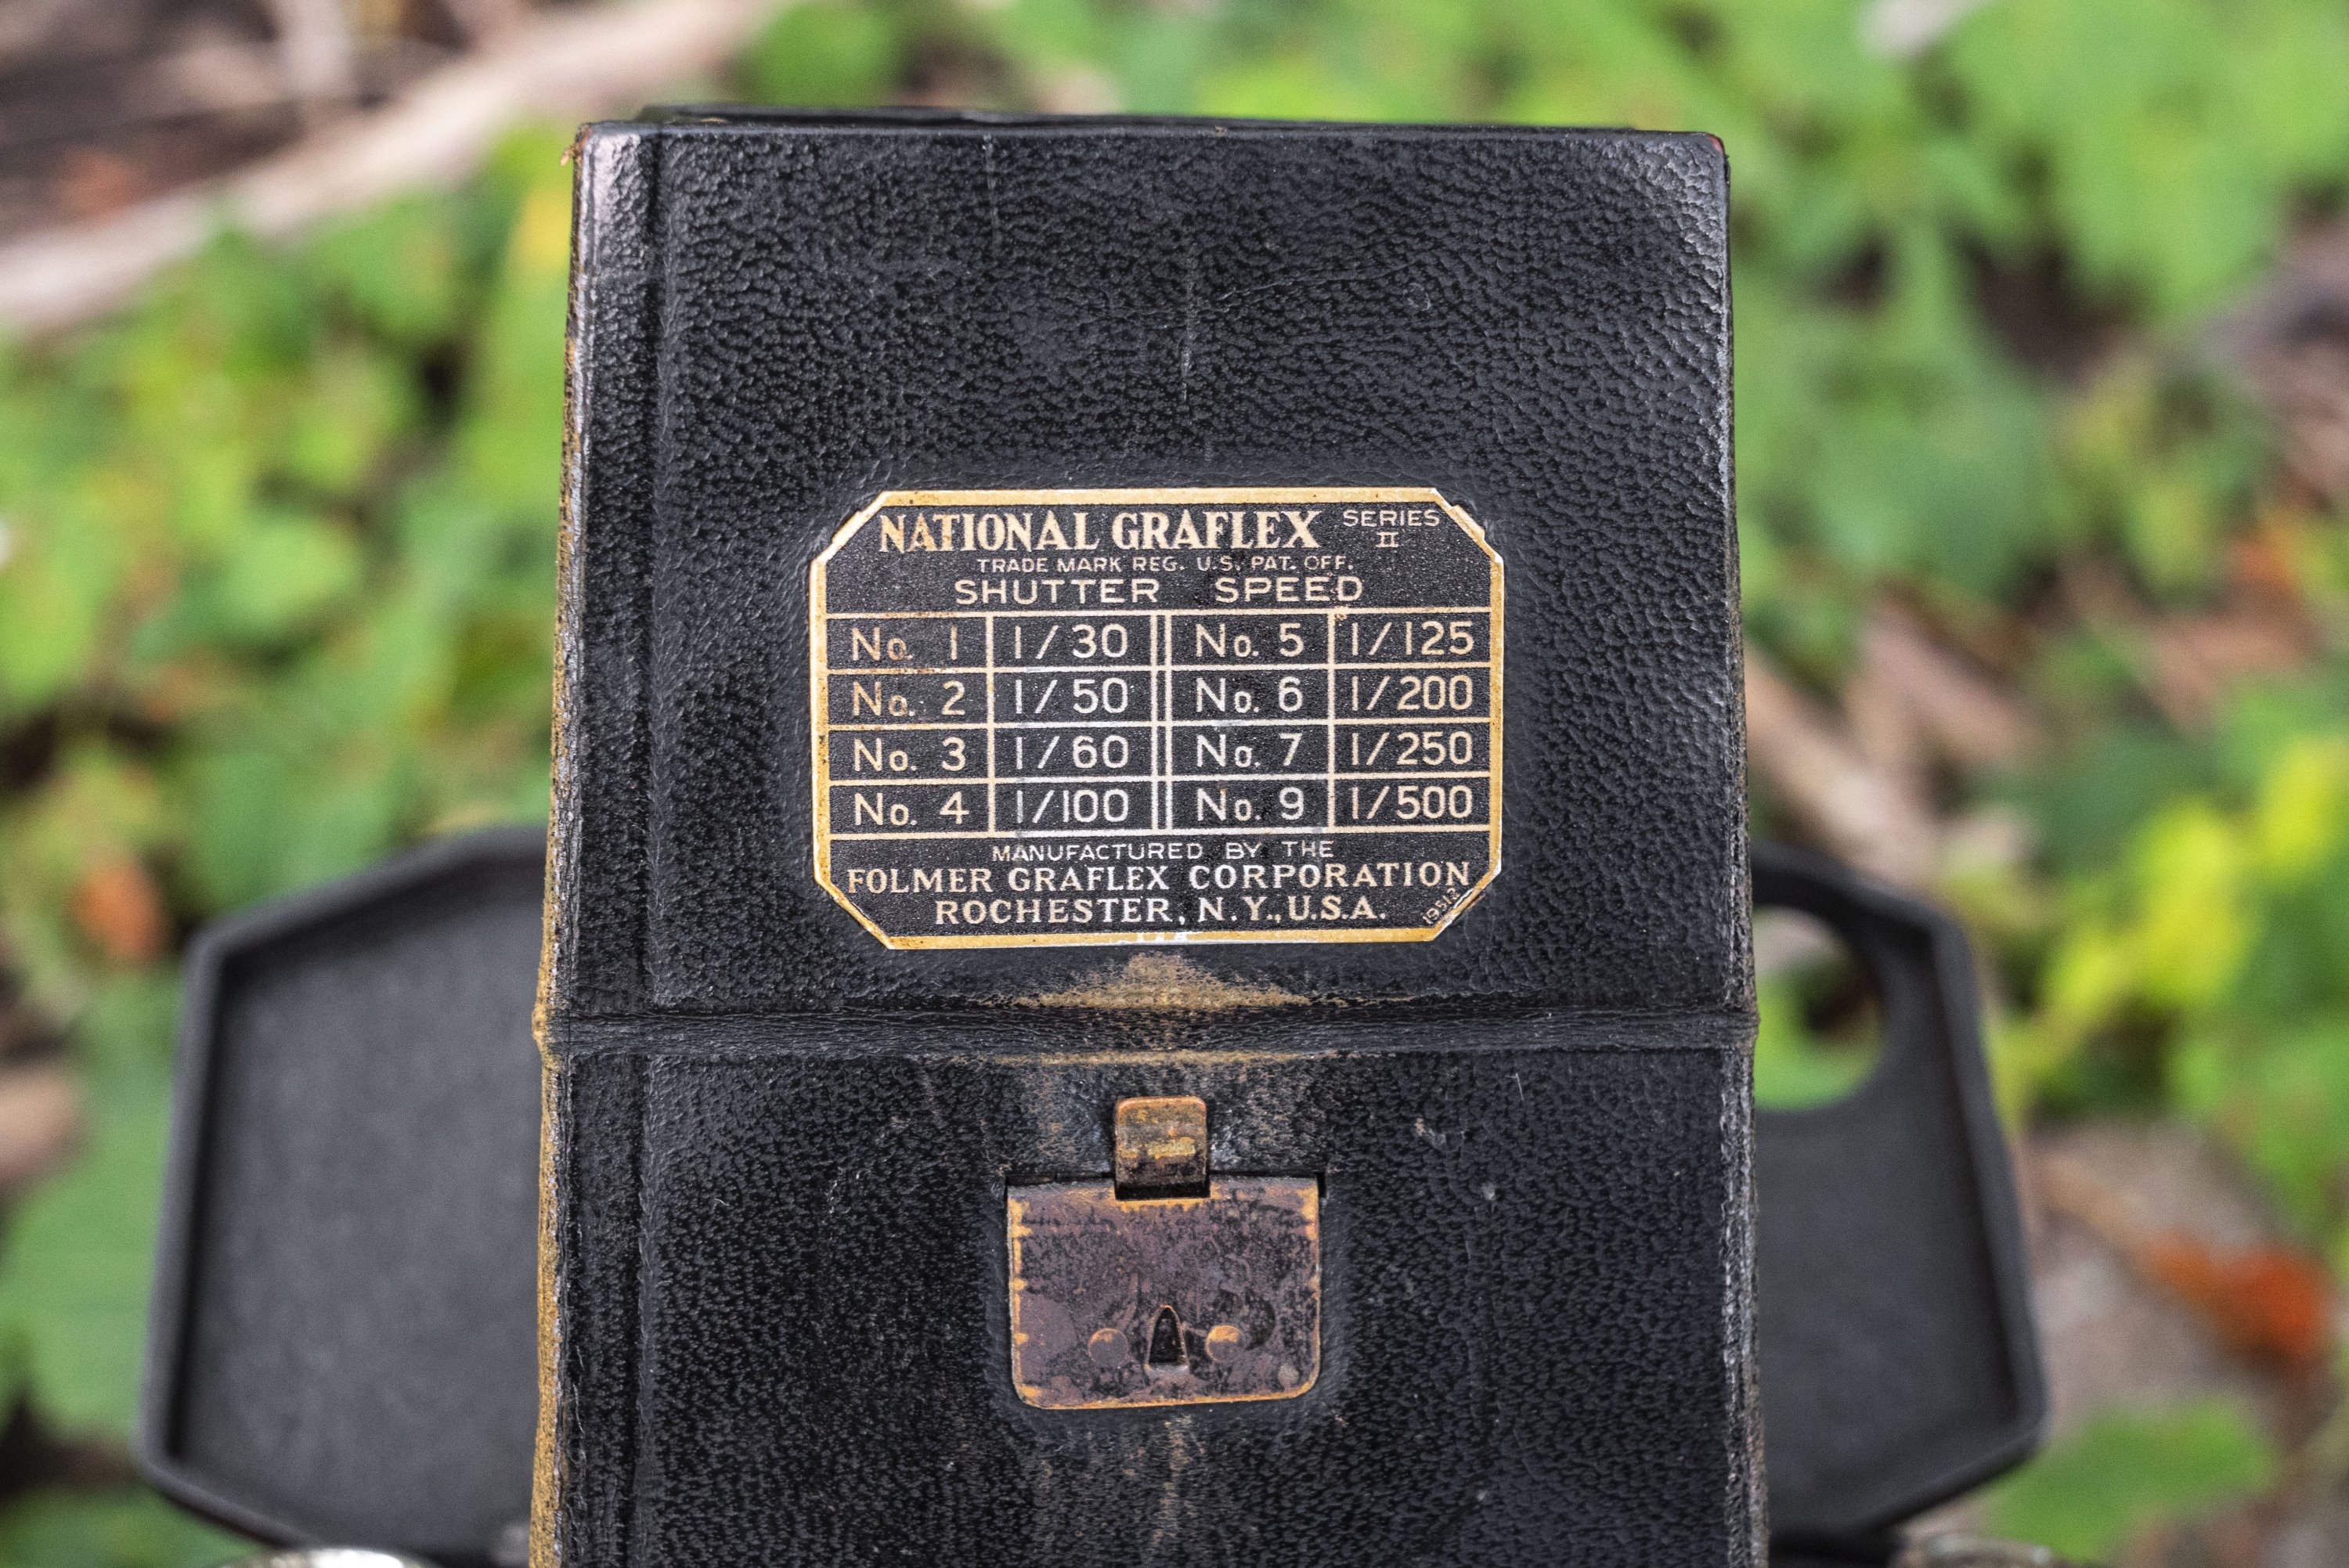
The lack of the number 8 suggests perhaps a shutter speed in between 1/250 and 1/500 might have been planned but omitted. I also find it interesting that if you ignore the speeds 2, 4, and 6, the rest of the shutter speeds follow a mathematical progression which would become the industry standard in the mid to late 1950s. I cannot be certain of this, but the National Graflex might be the first camera that offered shutter speeds following this progression.
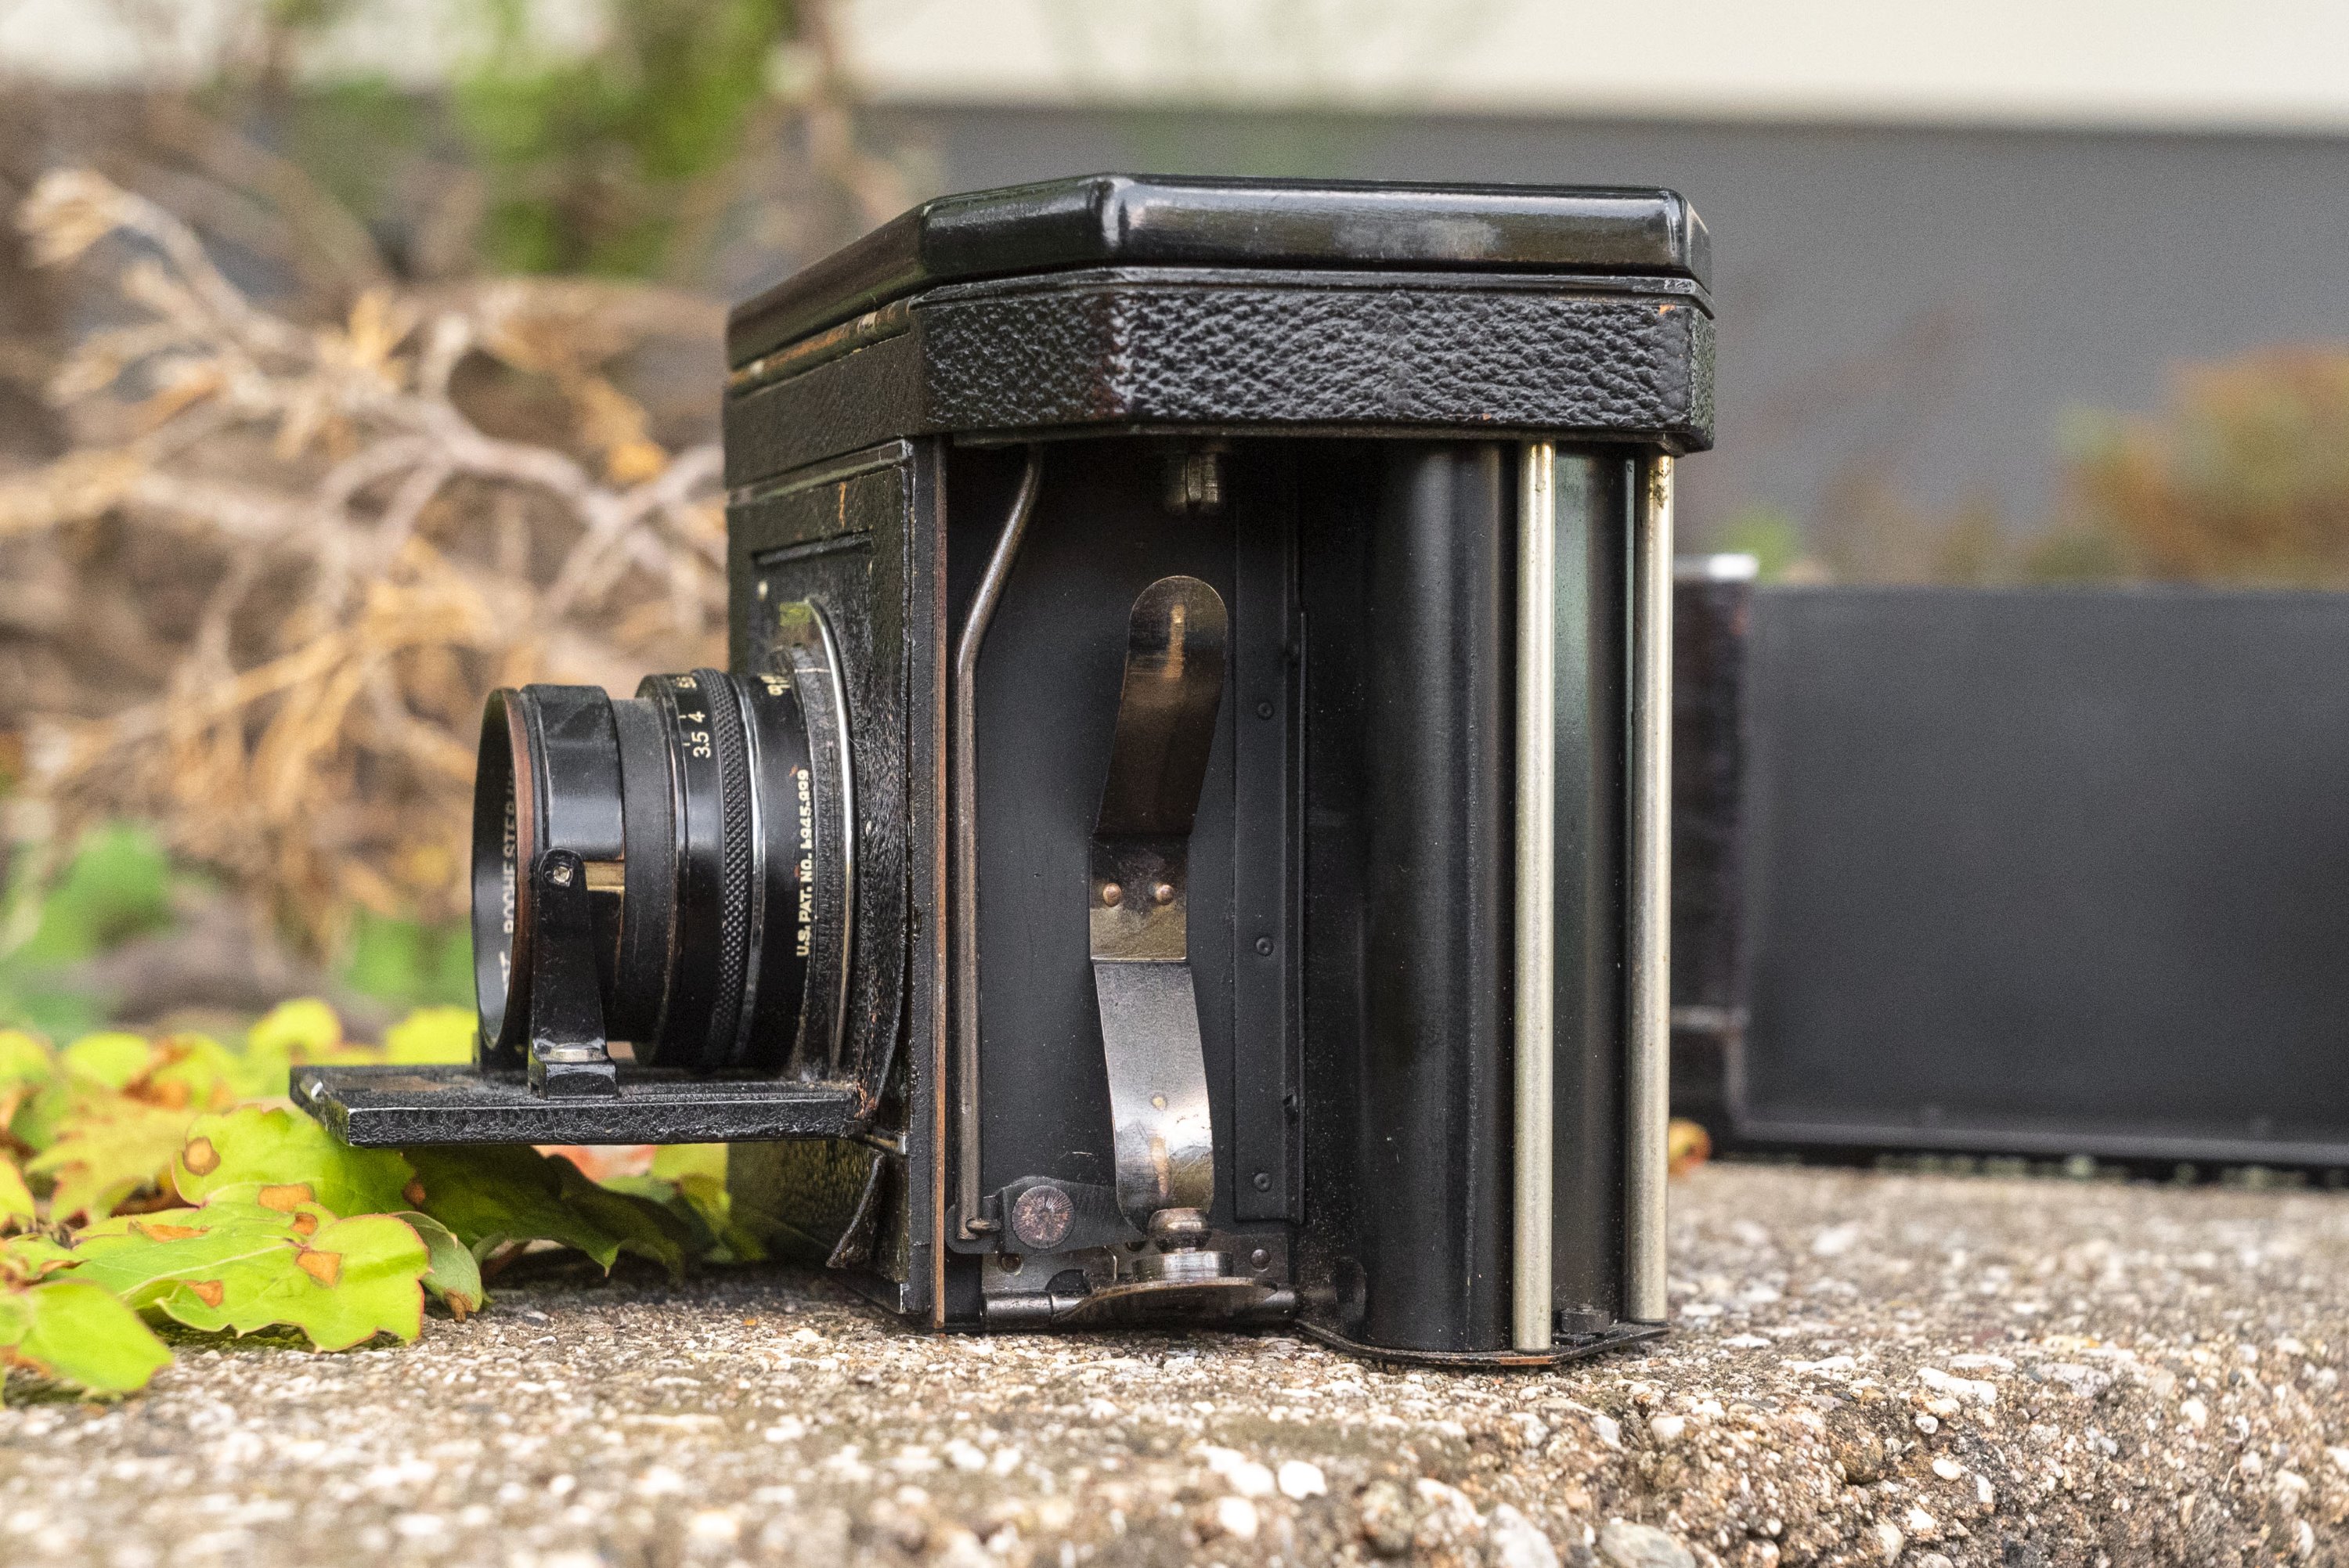
Moving down to the main part of the camera, in the upper left corner is the film advance knob. Like all roll film cameras, this knob only rotates in one direction to advance film from the supply to take up spool. Directly below the advance knob is the shutter release button which is next to a cable release socket. I was able to screw in a standard shutter release cable with no difficulty. I suppose you could also screw in an auxiliary self-timer as the National Graflex does not have one built in. To the right of the shutter release is the mirror up/down lever. With the lever near the front of the camera, the mirror is up, with it near the rear of the camera it is down. With the lever in the down position, it becomes locked in place and you cannot raise the mirror again until you press the shutter release. The shutter release and mirror up/down lever work independently of the focal plane shutter. With the shutter not set, lowering the mirror and pressing the shutter release will not actually expose the film. For this reason, care should be taken to follow the correct sequence of steps for shooting the camera, as the camera will act as though you are making an exposure when in reality you are not.
In the center is a tall leather hood which helps shield light for the waist level viewfinder. The hood is quite effective and allows you to comfortably shoot the National Graflex in well lit areas, while still being able to see the focusing screen. The back edge of the hood has both a shutter speed to EV conversion chart, but below it is a lever which flips up a magnifying glass on the inside of the hood, allowing you precise focus in the center of the screen. To the right of the viewfinder is a highly cluttered mess of dials, sliders, and buttons which quite frankly, I am not looking forward to explaining, but I’ll do it anyway!

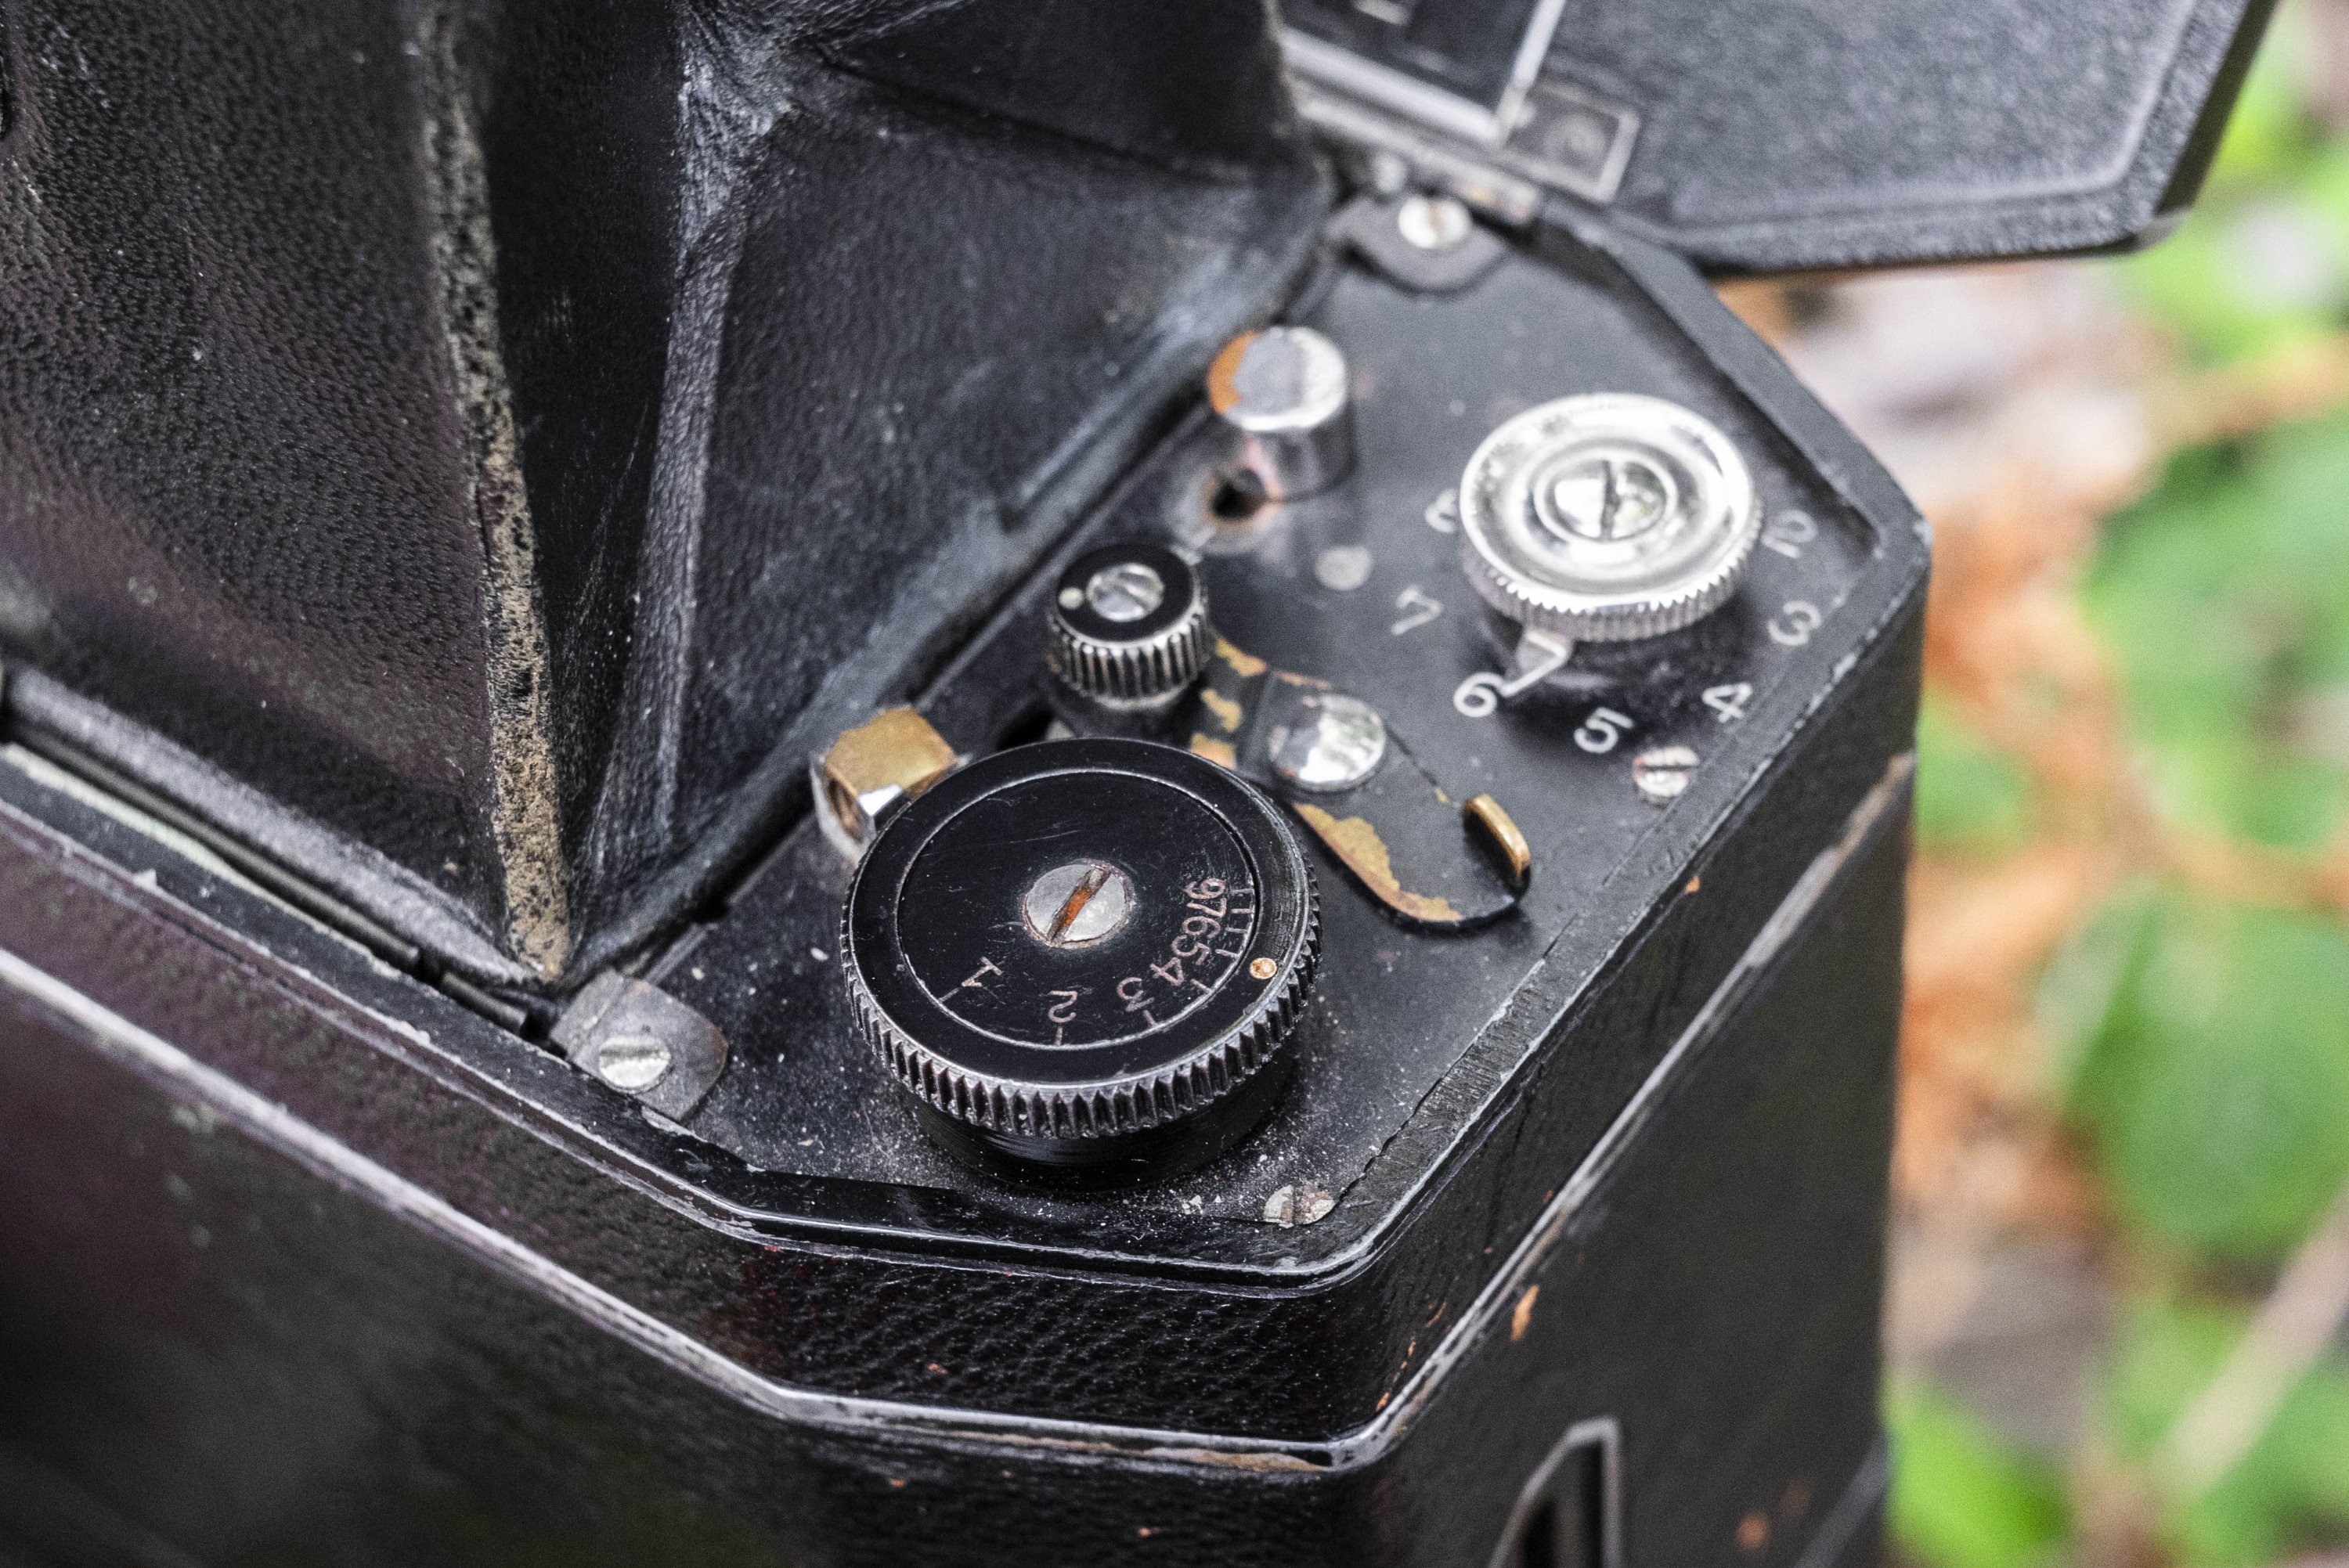
Starting with the previously mentioned combined shutter speed dial and shutter setting knob in the bottom right corner, this is the only control which is visible with the lid closed, although you cannot change it with the lid shut. Numbers indicating the shutter speed EV numbers 1-7 plus 9 are engraved on the inner portion of the dial with an outer ring having a white dot. You can only change shutter speeds with the shutter set. Before setting the shutter however, you must first lower the mirror. This not only releases an interlock which prevents you from turning the knob, but since the National Graflex has what’s called a “capping shutter” in which light passes between the curtains as it is being set, the mirror is used to block light from exposing the film and ruining your next exposure. With the mirror in the lowered position, you may now set the shutter by rotating the knob clockwise as far as it will go. Finally, to change speeds you must lift up on the outer dial and rotate it until the dot lines up with your desired EV number and then lower it until the outer ring is flush with the inner part.
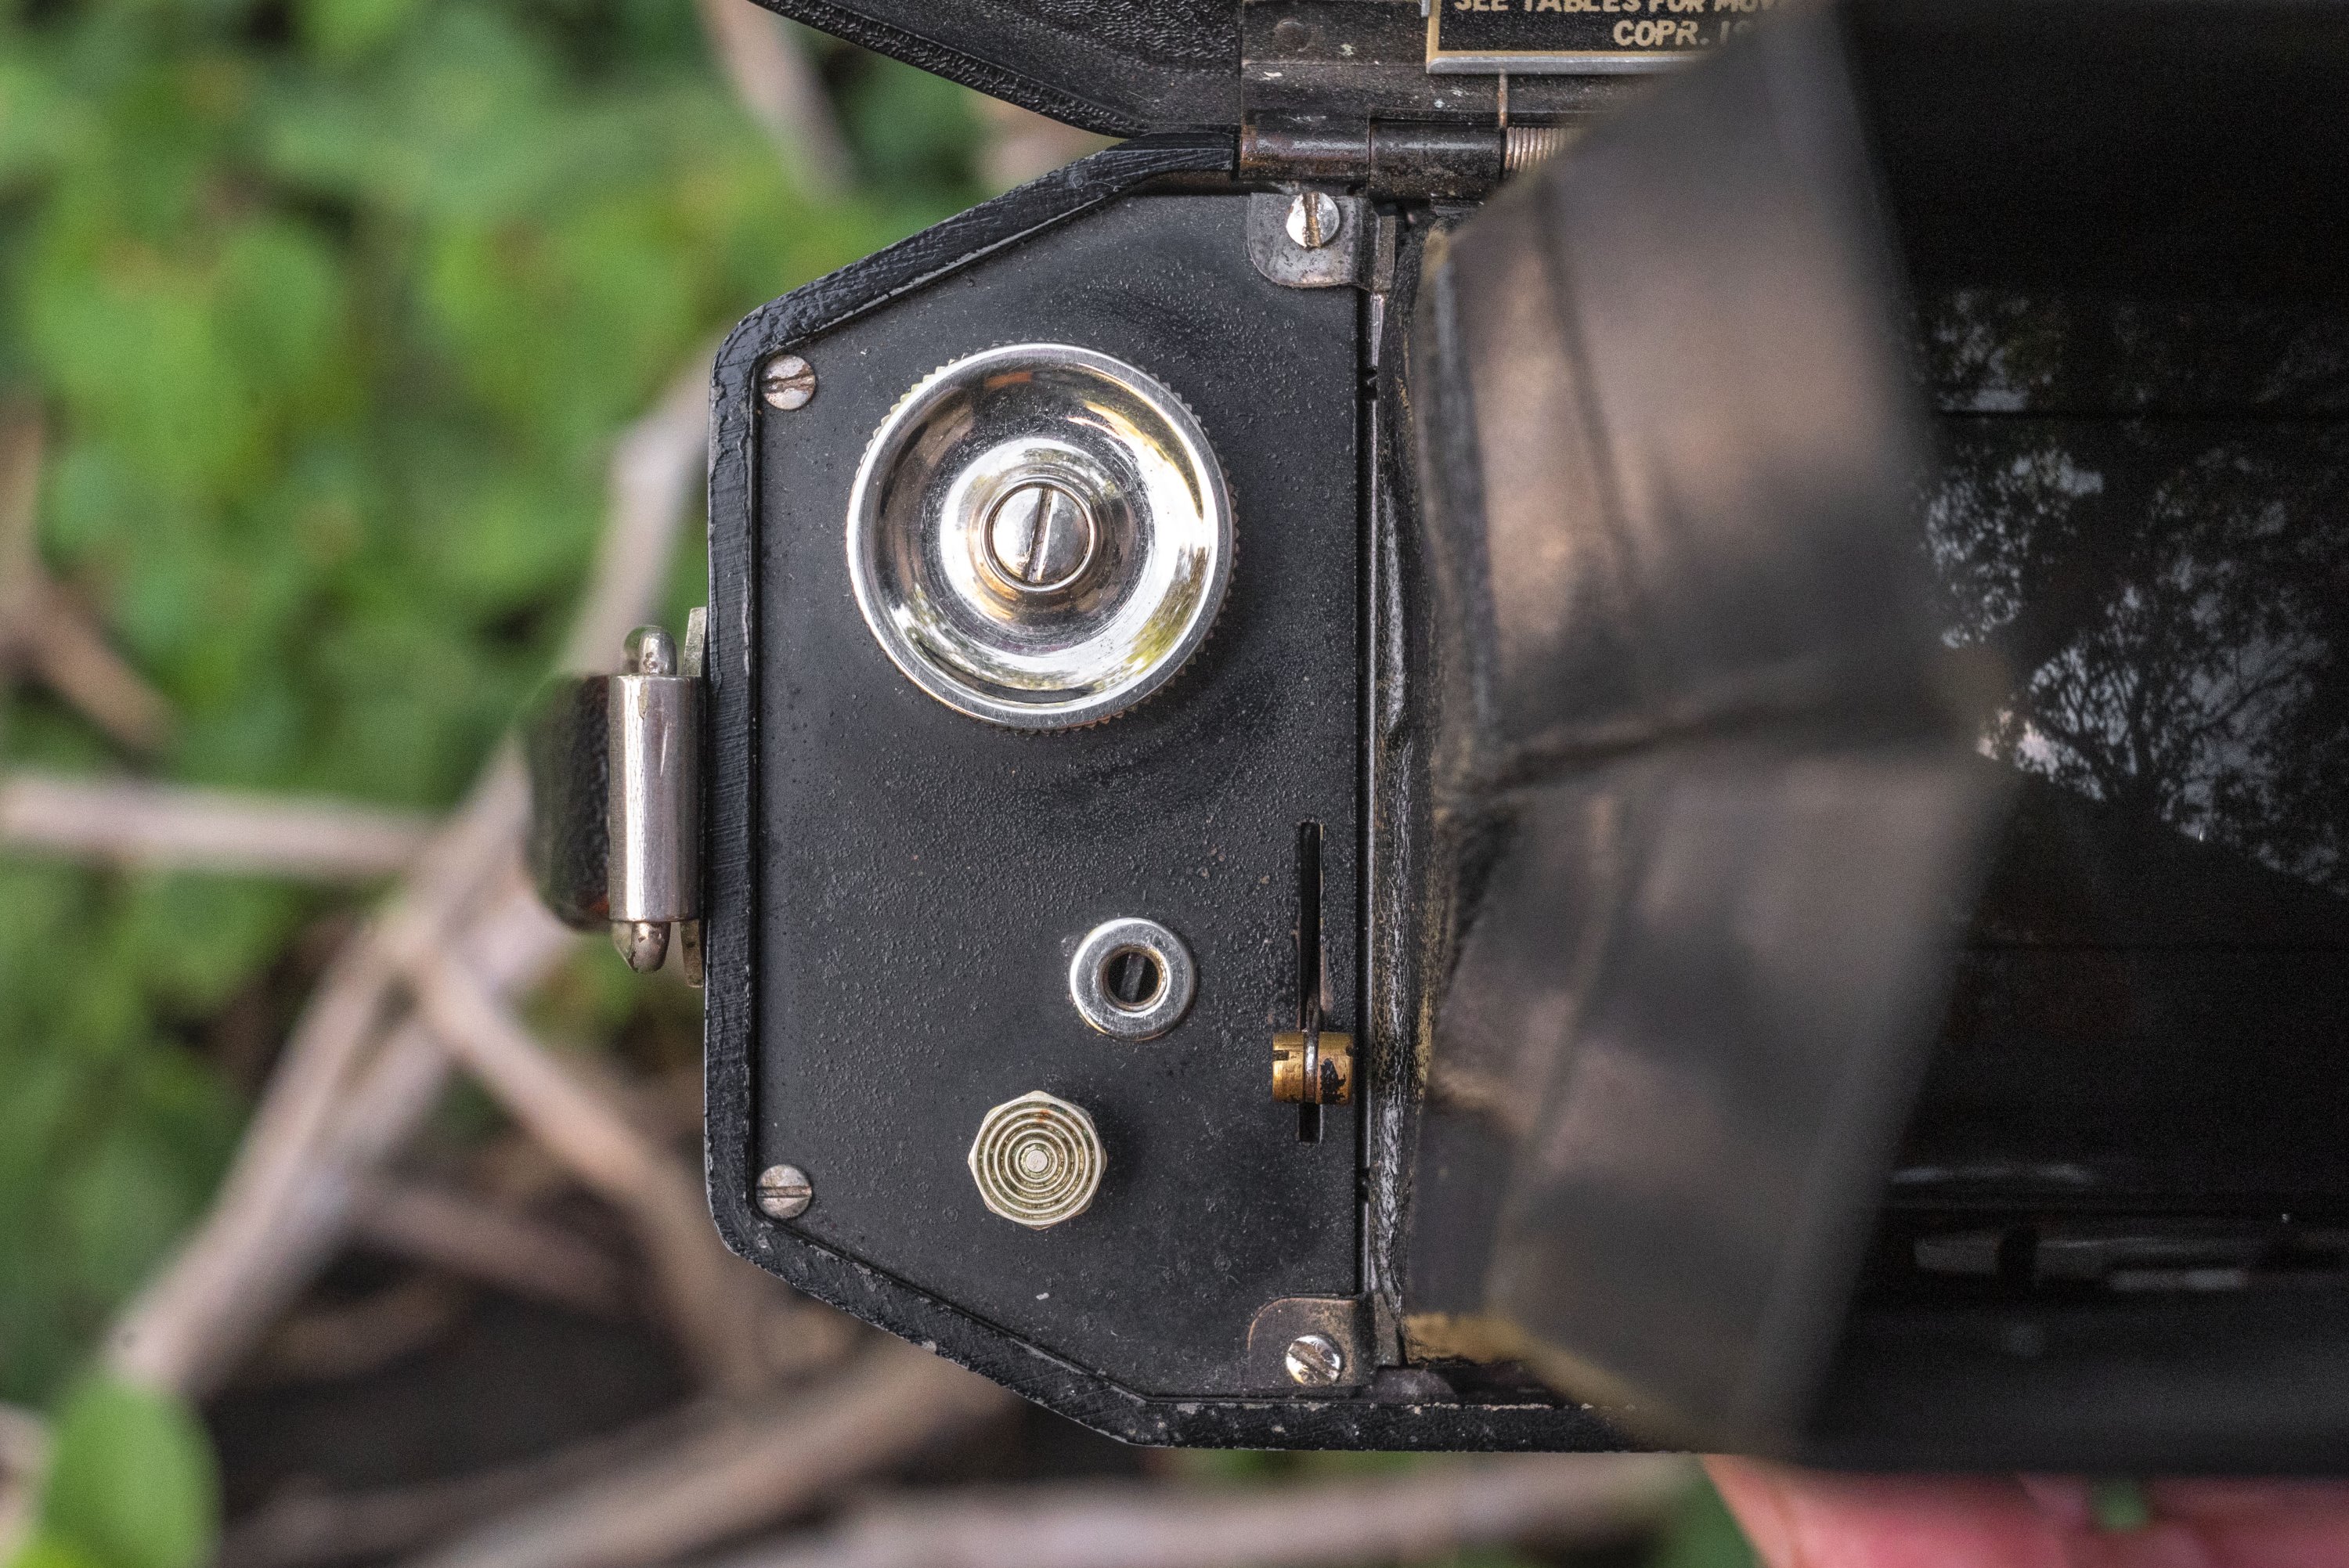
To the left of the shutter speed dial is a square post with a threaded hole through the sides. This is a mounting point for a shutter release cable when shooting long exposures using the camera’s Bulb mode. Above the square post is a lever with a round tip that can be rotated between “I” (Instant) and “B” (Bulb) positions. The process for shooting Bulb exposures is completely different from Instant exposures, requiring the shutter speed dial to be set at the ‘1’ position, the mirror already be in the up position, and the round tip set to the “B” position. The round lever with the B/I tip on it also serves as the Bulb shutter release. Pressing this lever in the direction of the shutter speed dial will open the shutter for as long as you hold it down. In the case where you are using a cable release, you may lock the cable release to keep the shutter open for extended “Time” exposures. Releasing pressure from the Bulb shutter release will close the shutter, ending the exposure.
Above the Bulb controls is the exposure counter with numbers from 2 to 9 plus S which indicates the start of a new roll, plus a catch to its left which releases the auto stop feature after each exposure. The National Graflex shoots ten exposures on 120 film which does not have exposure numbers for this size, so you must rely on the camera’s built in counter to know not only how many exposures have been made, but also when to stop winding so that you do not waste film. After loading in a new roll of film, you must open the red window on the camera’s right side to see the exposure numbers and stop winding when you see the number ‘1’ appear and then close the red window. This is the only time you will use the red window throughout the rest of the roll. With the film ready, the next step is to press and hold the catch in the direction of the arrow, while lifting up on the exposure counter and turning it until the little arrow is just to the left of the letter “S”. Once the exposure counter is in the correct position, let go of the exposure counter allowing it to drop into the down position, and while still holding the catch in the direction of the arrow, turn the film advance knob until the exposure counter is pointing to the letter “S” indicating that you are ready for the first exposure.
In the very likely event that my best attempt at explaining how the shutter settings work doesn’t make sense, I have made a short video which shows how everything I’ve explained above works.
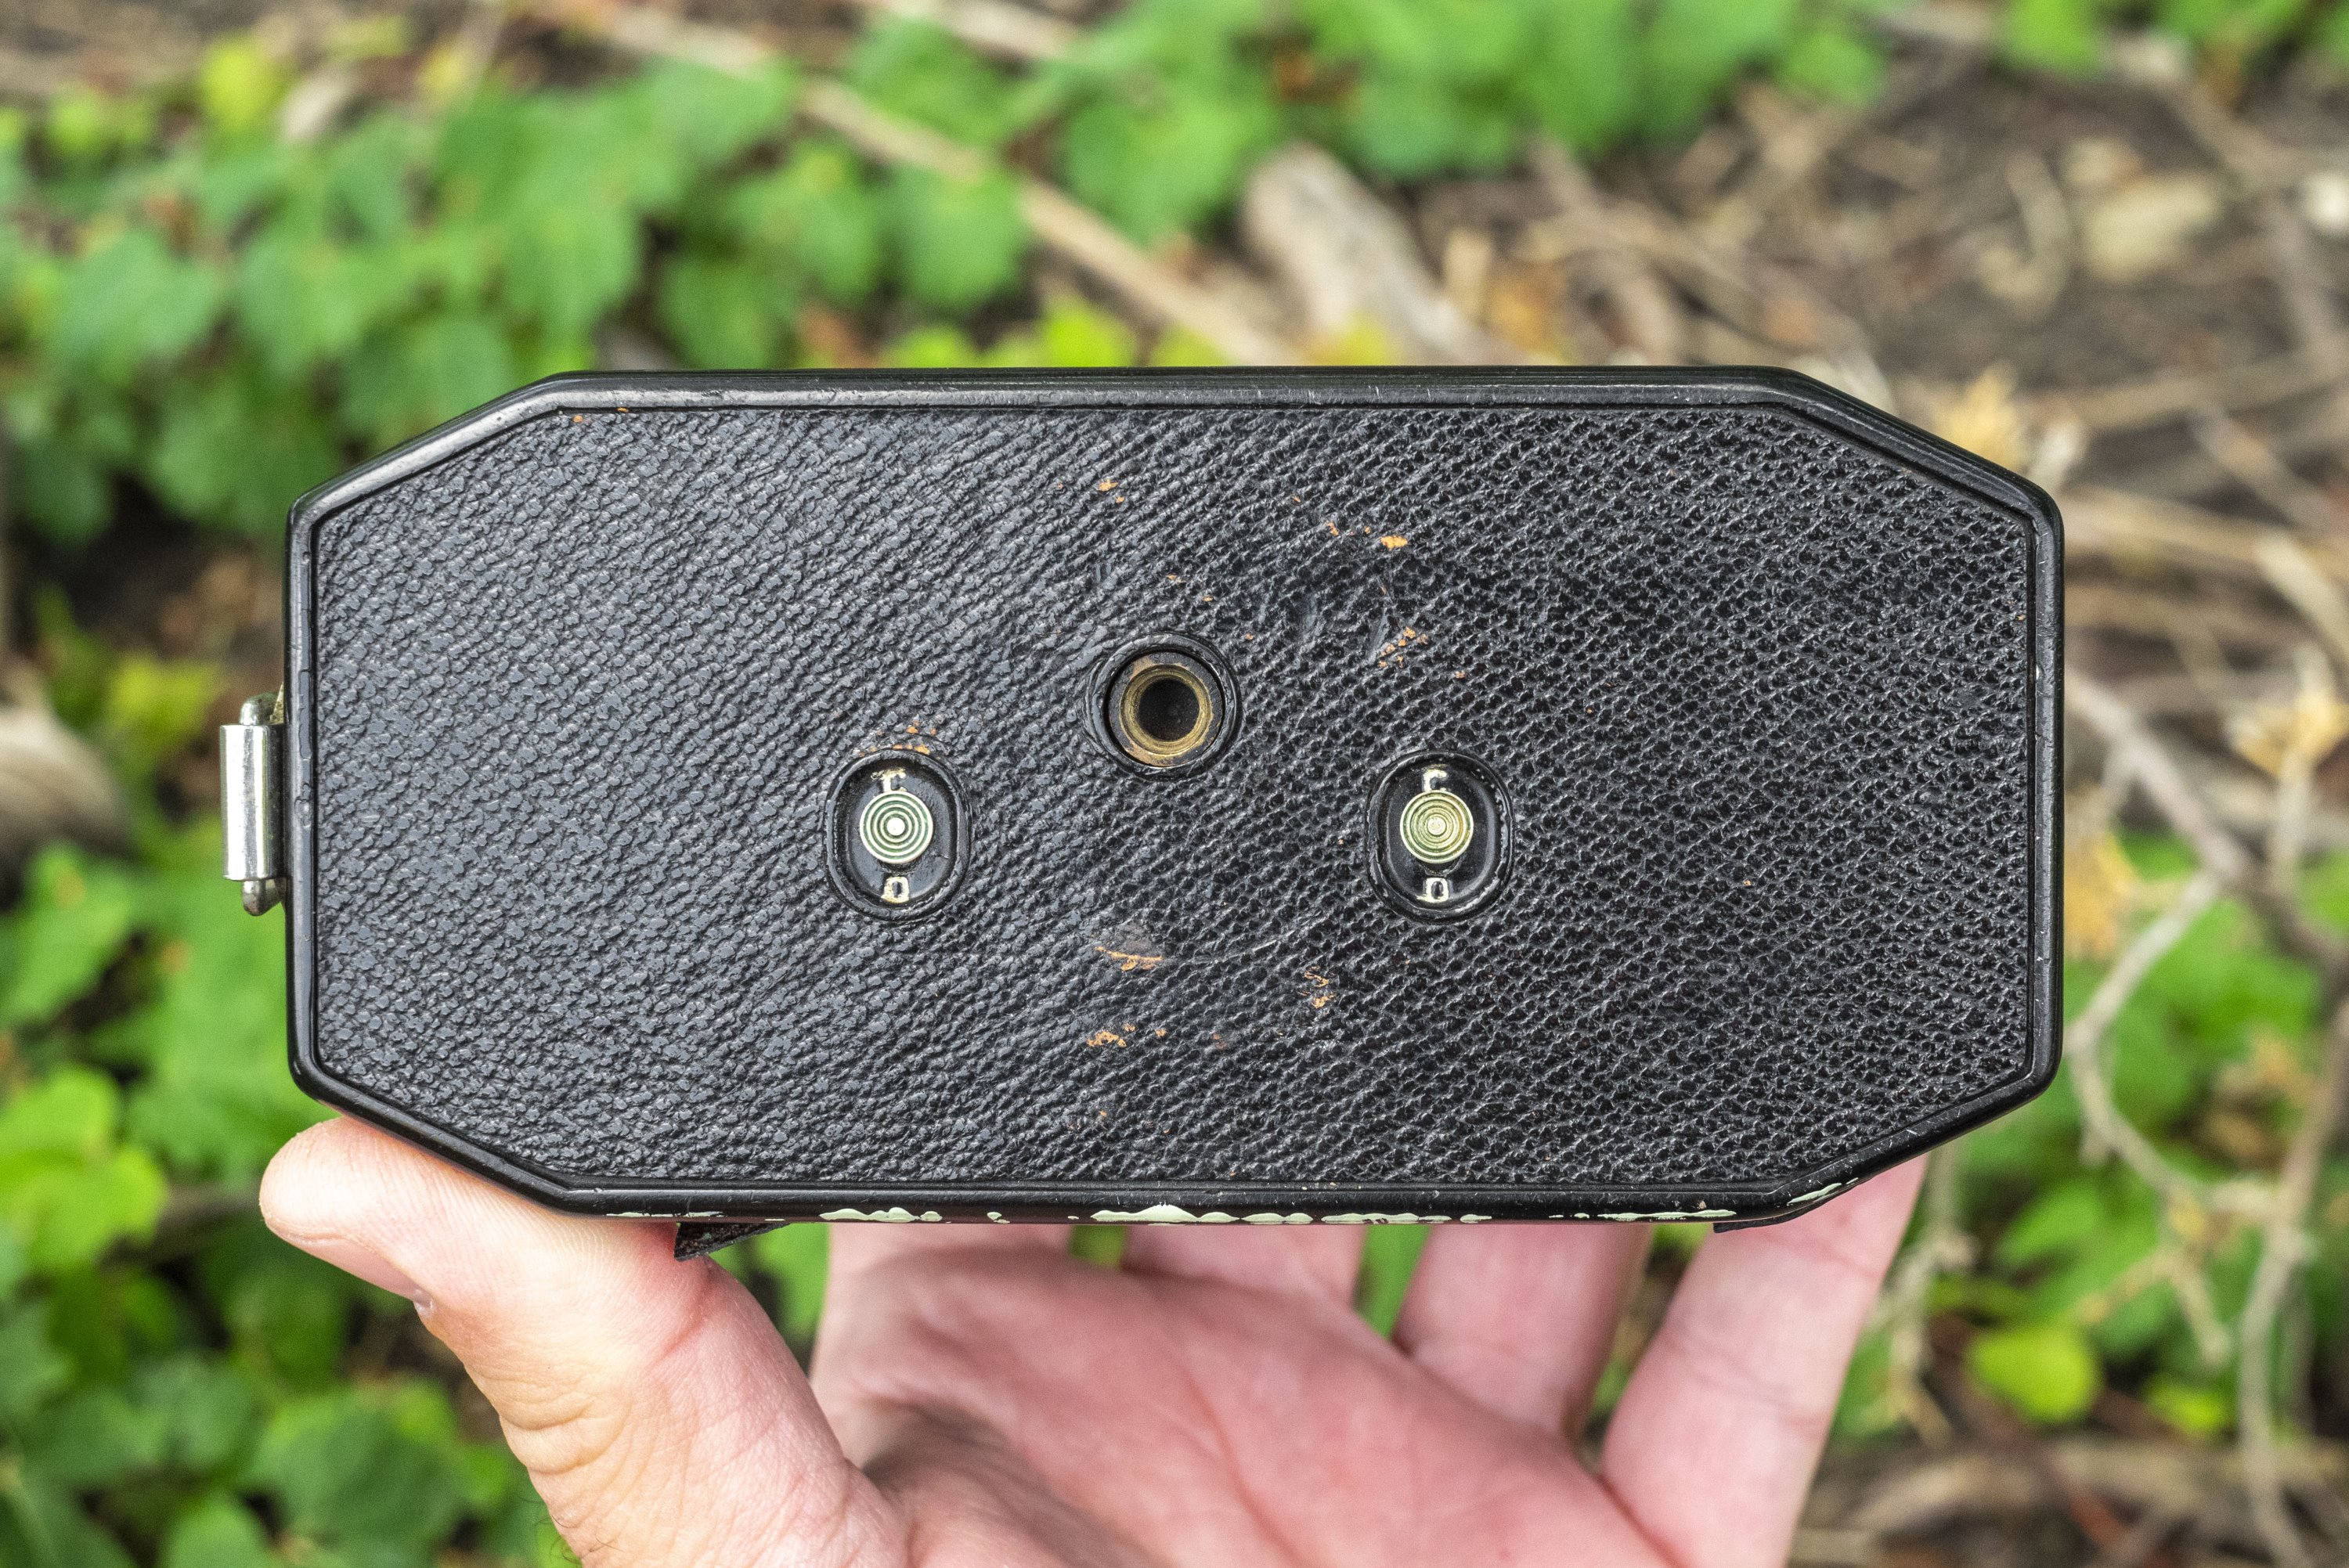
The base of the camera has two catches for releasing the lock on the film door. Both are indicated with the letters “O” for Open and “C” for Closed. Both levers must be moved to the same position to open and close the camera properly. In between the two catches is a centrally located 1/4″ tripod socket which is useful for long exposures.
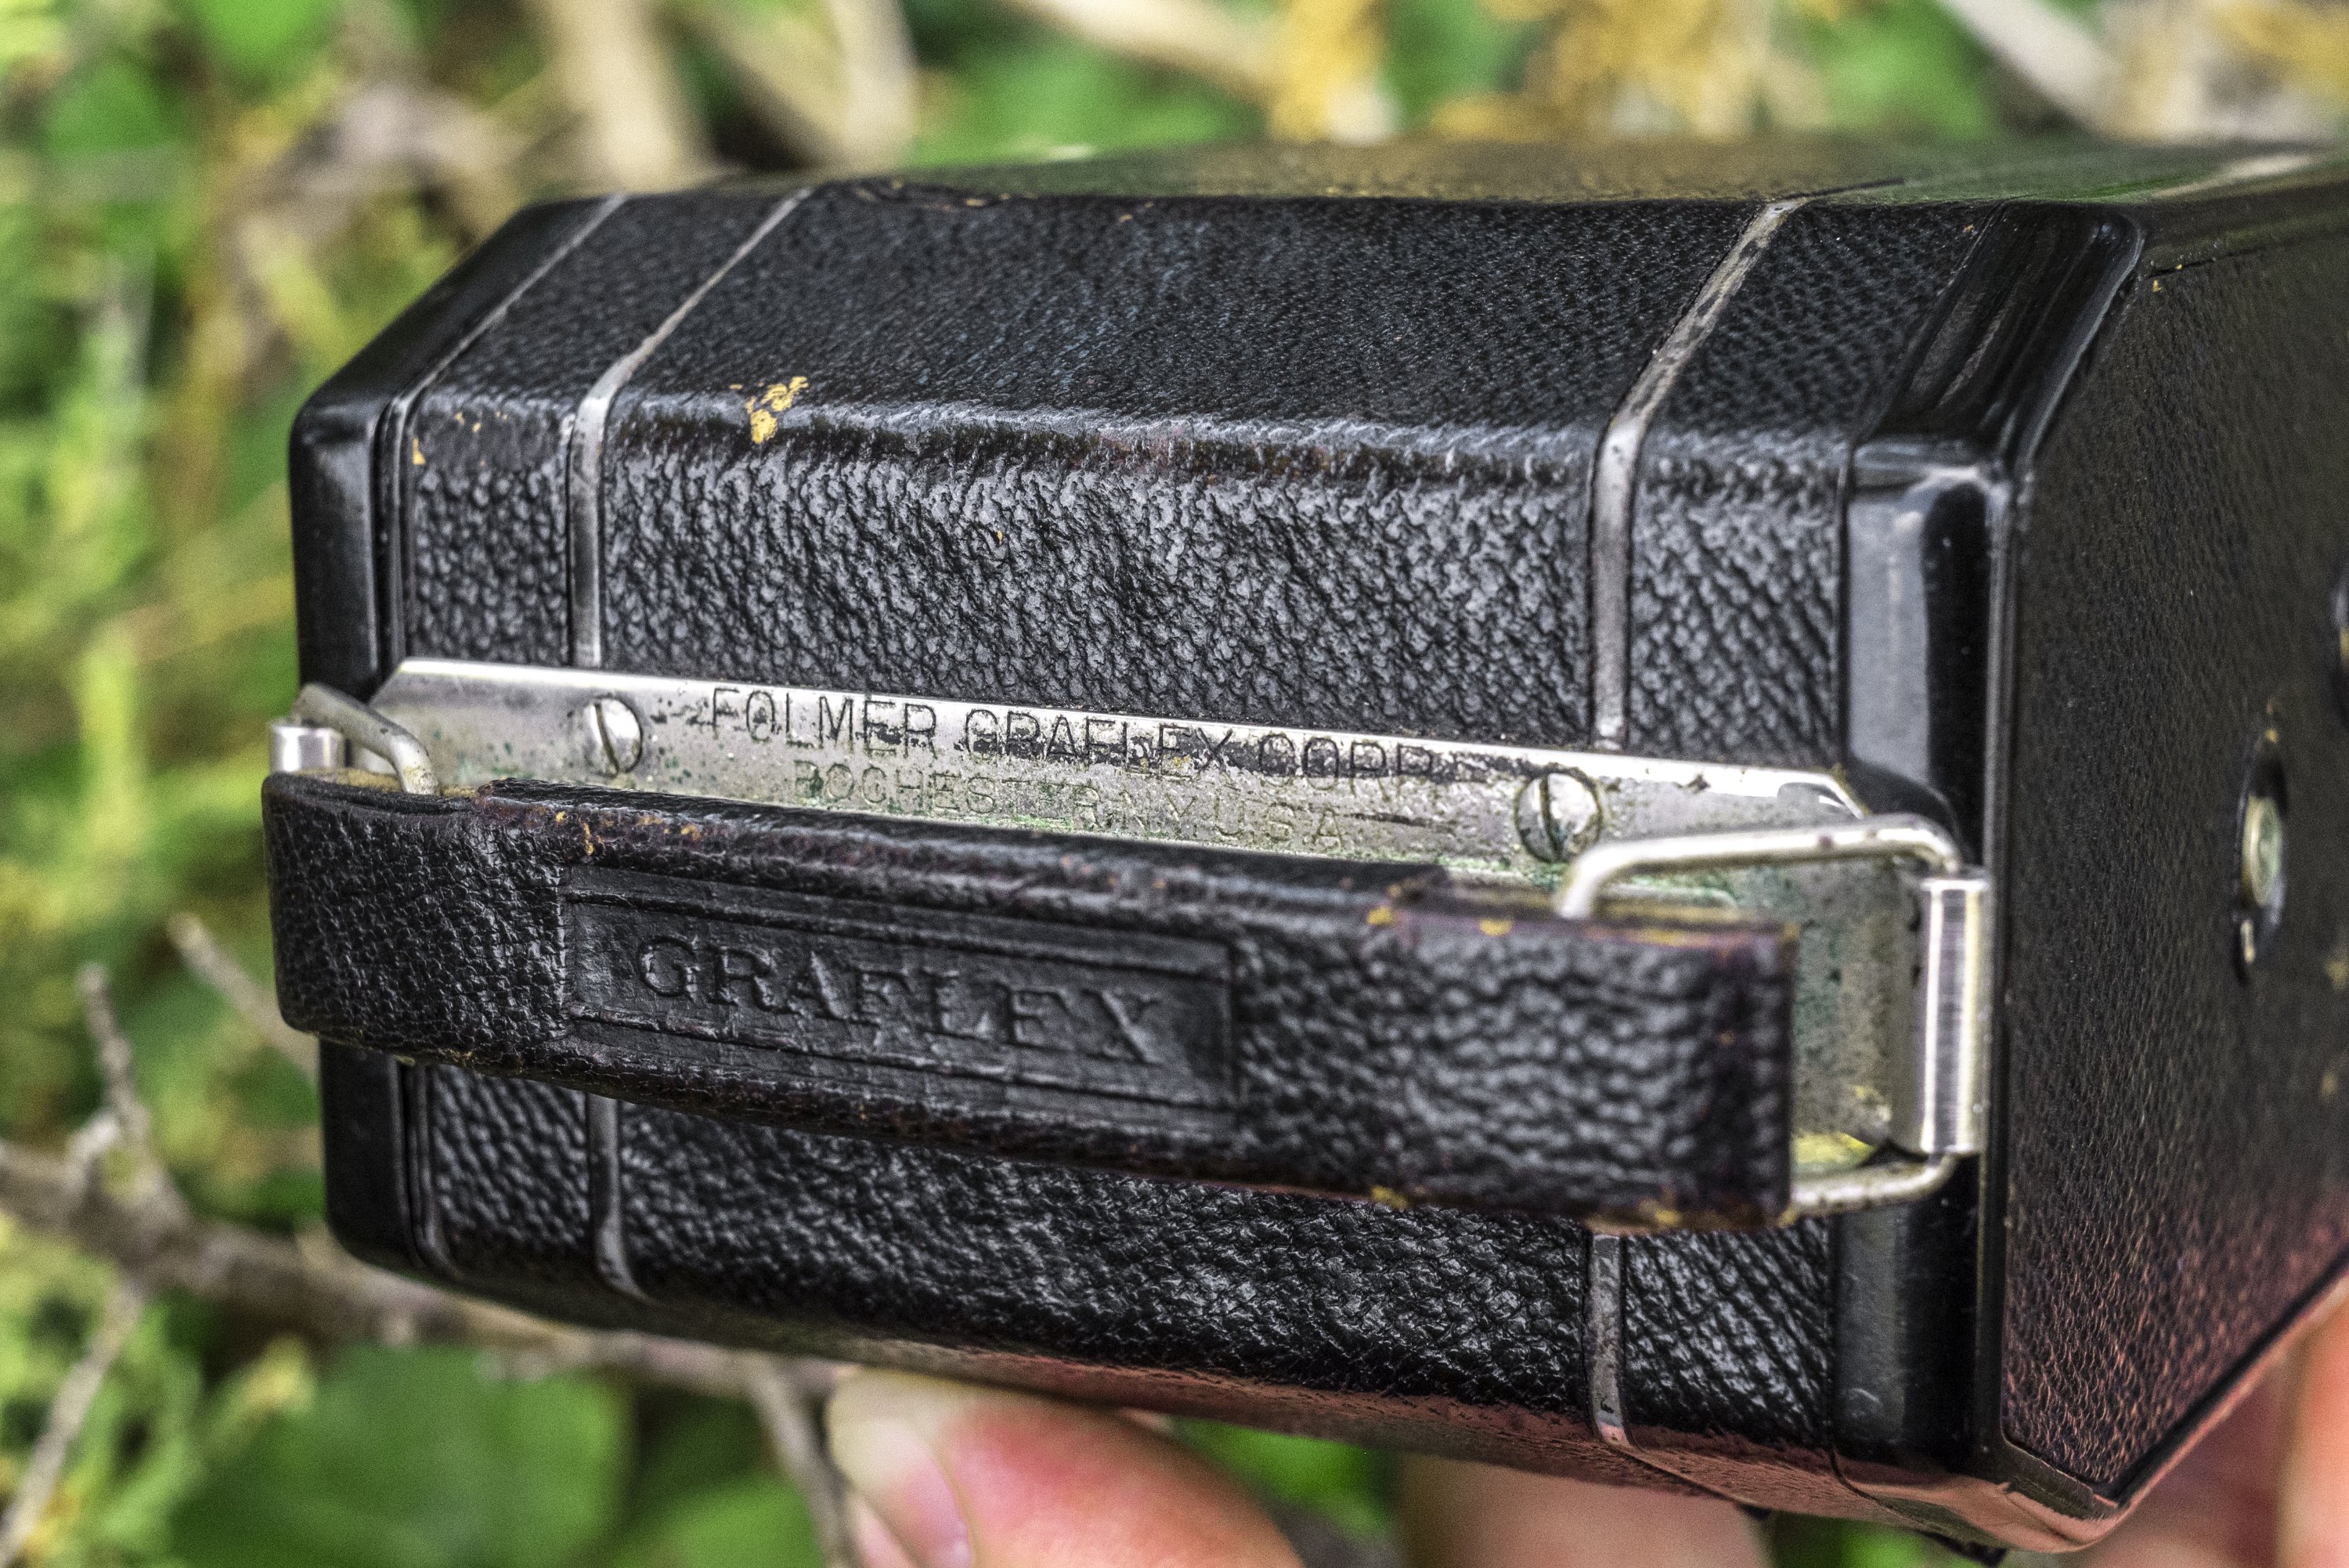
The sides of the camera are symmetrically shaped, with the red exposure counter peep hole on the camera’s right side, and a leather handle on the left. Beneath the lever is a metal plate engraved with “FOLMER GRAFLEX CORP, ROCHESTER, NY, U.S.A.” and various patent numbers.
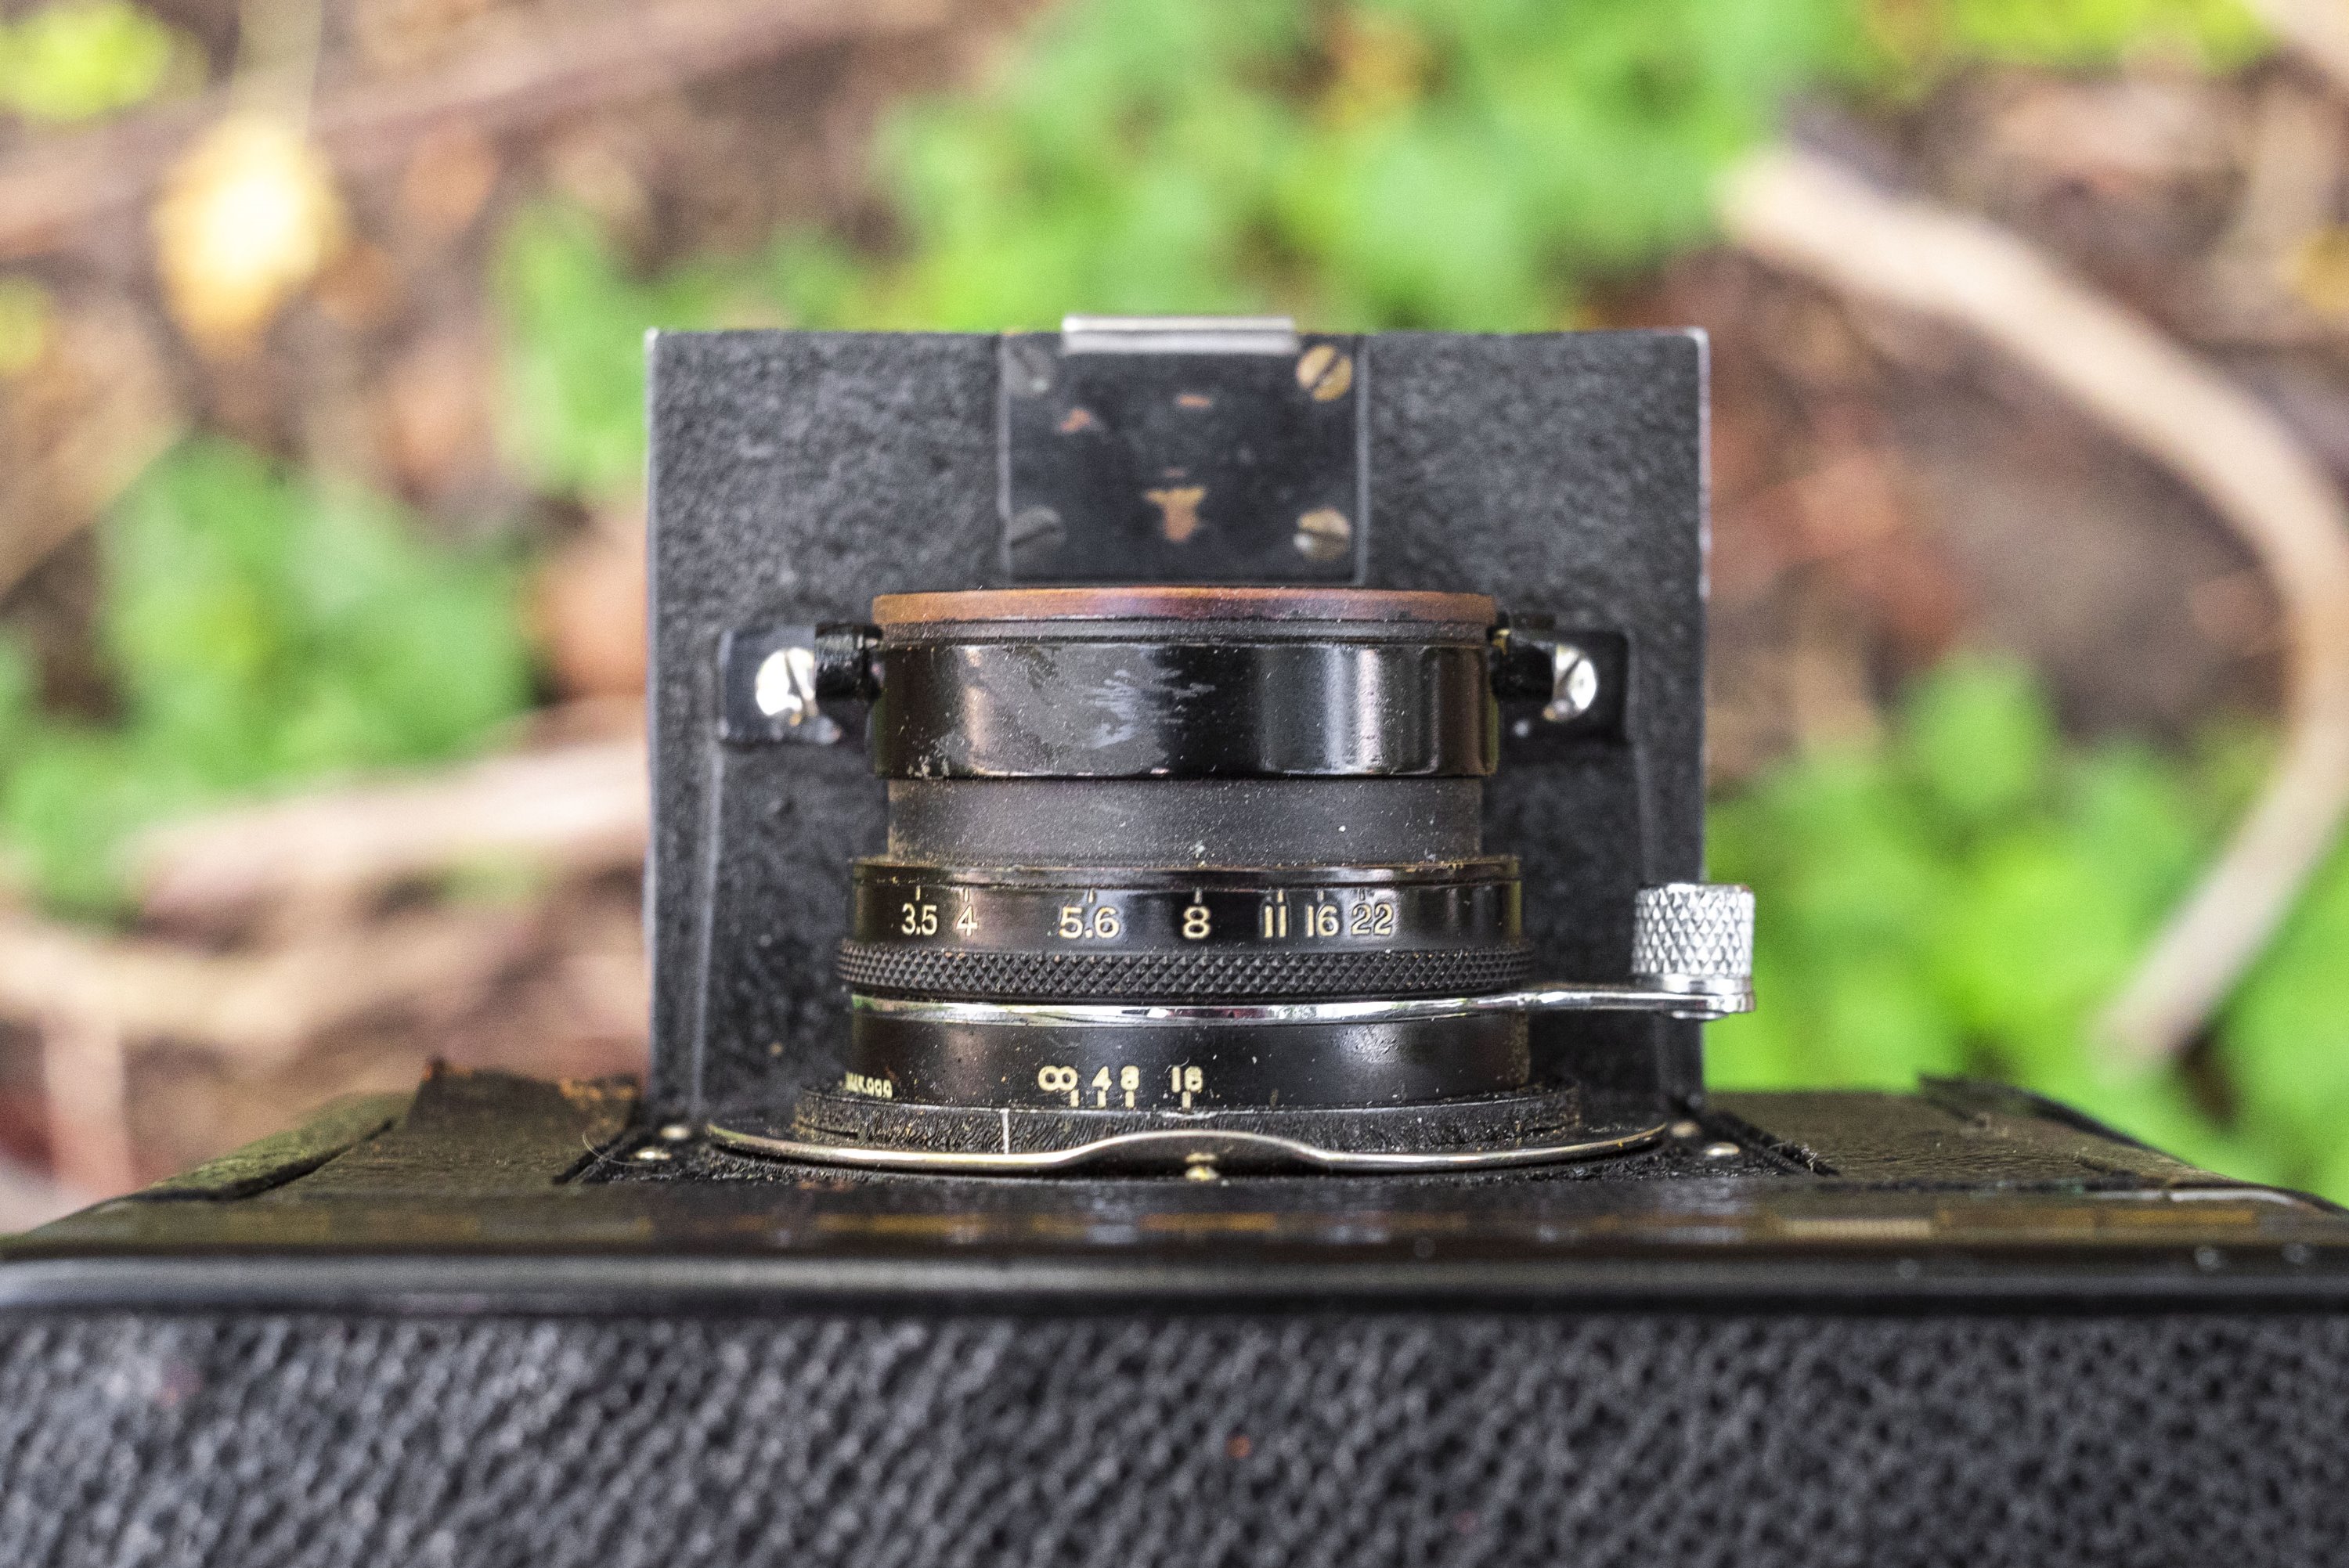
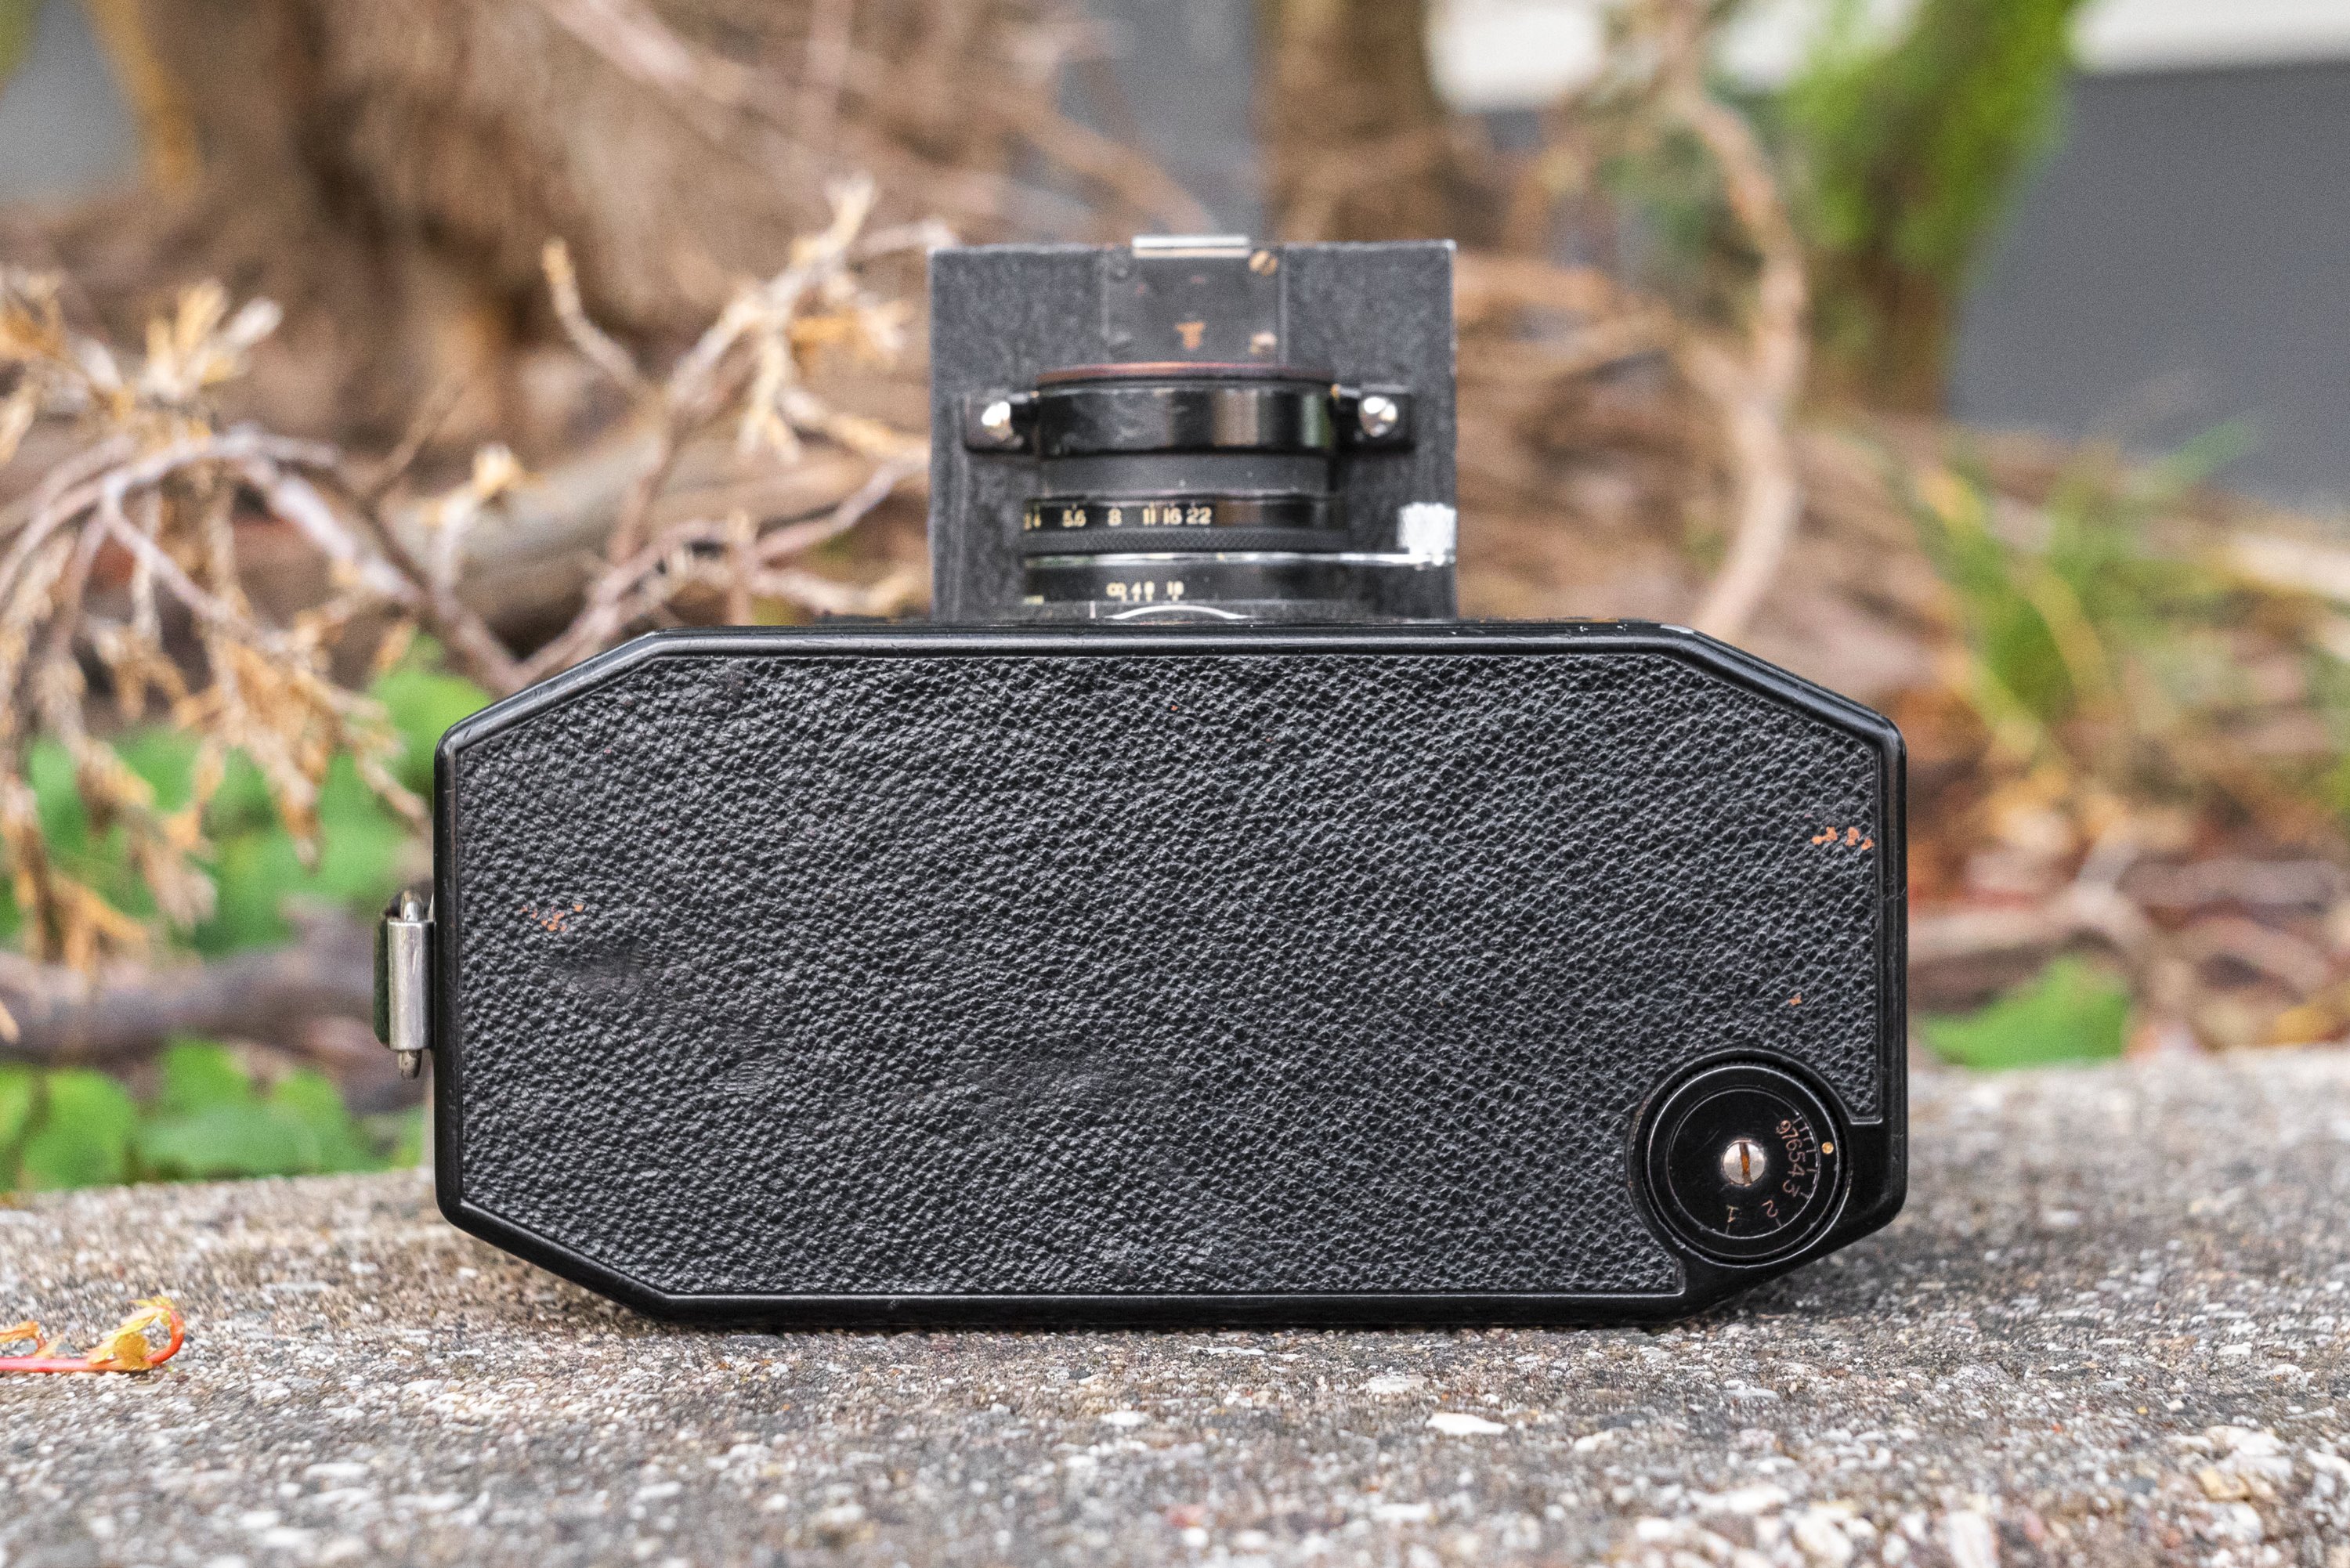
Looking down at the top of the lens we first see four markings closes to the body which are an infinity (∞) symbol, plus the numbers 4, 8, and 16. These are not focus distances as you’d expect to see on a lens, but rather hyperfocal distances for apertures f/4, f/8, and f/16. With the benefit of the National Graflex offering through the lens focus, a photographer would normally look through the waist level finder and rotate the focus arm until the image comes sharply in focus. The manual suggests doing this only with the lens wide open to maximize brightness, but in the event there isn’t sufficient light for accurate focus, or that a quicker way to shoot the camera is desired, you can use one of the 4 hyperfocal distances on the lens. With it set to the ∞ symbol, everything from 125 feet or more will be in focus, regardless of aperture. At the 4 mark and the lens set to f/4, everything from 32 to infinity will be in focus, at the 8 mark and f/8, 16 feet to infinity, and at the 16 mark and f/16, 8 feet to infinity will all be in focus. In front of the focus settings is the aperture ring, with engraved settings for f/3.5 to f/22.
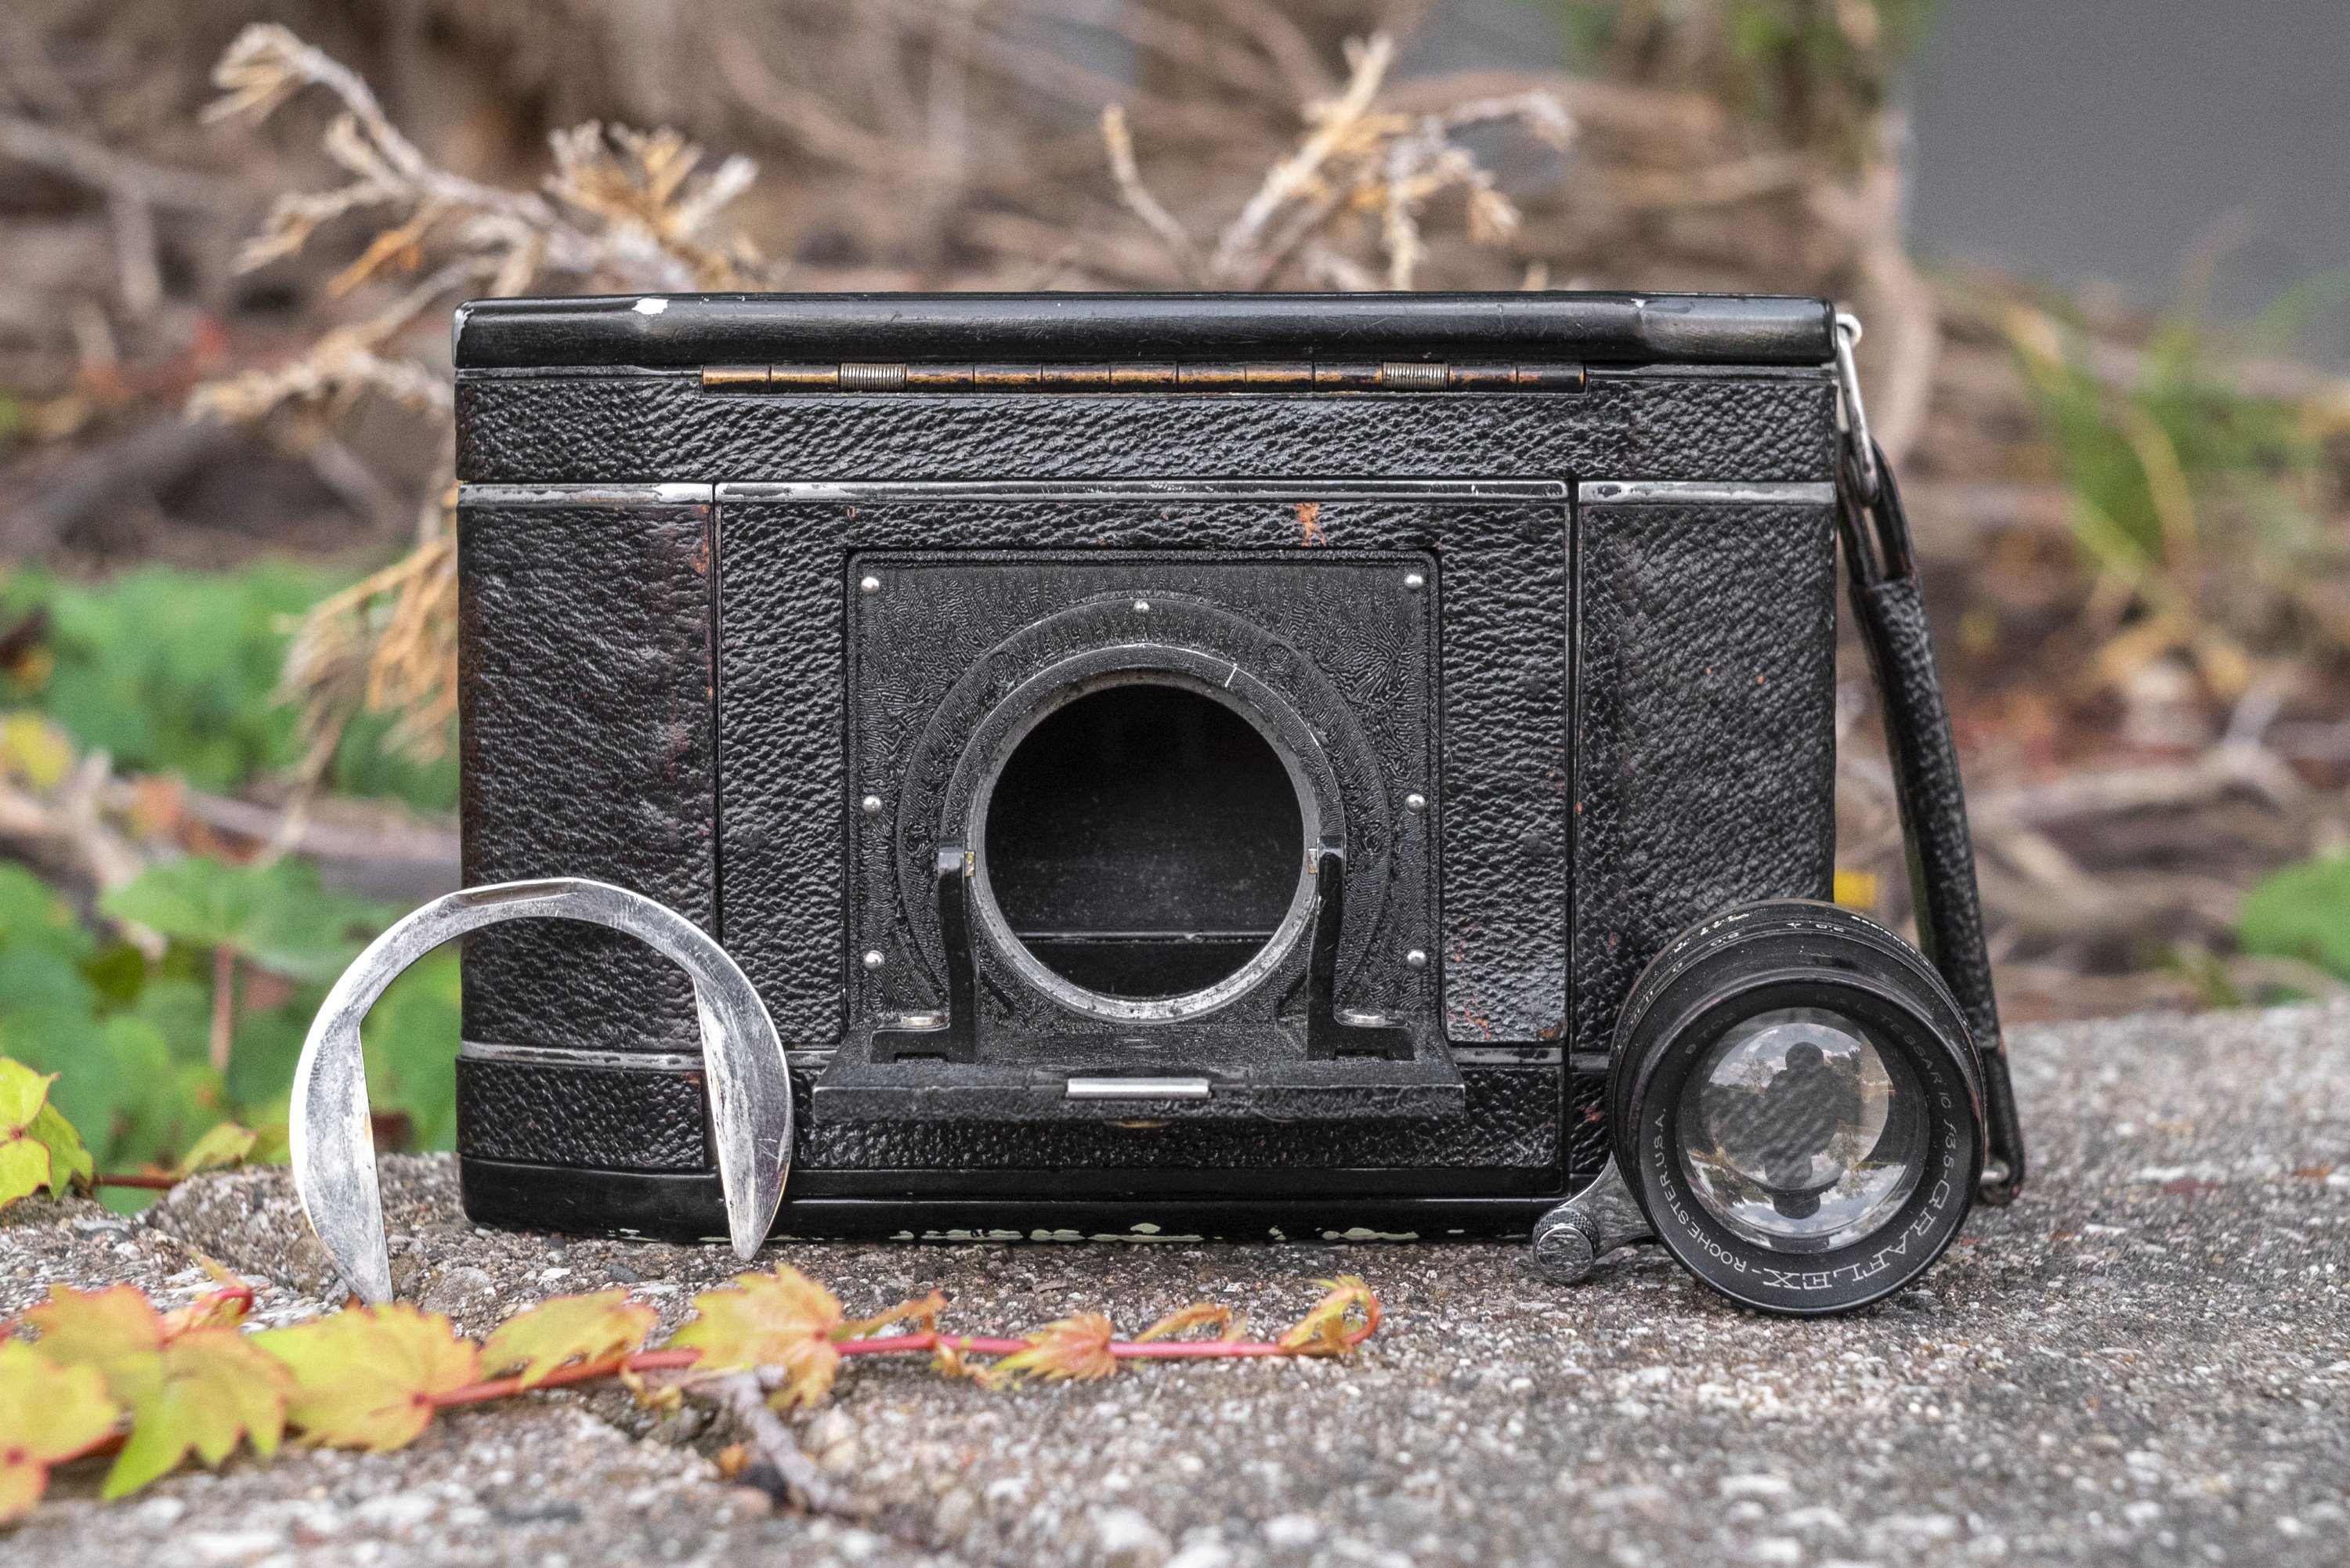
The National Graflex came from the factory with a 75mm f/3.5 Bausch & Lomb Tessar lens, but an optional 140mm f/6.3 Bausch & Lomb telephoto lens could also be attached. To swap lenses a chrome “horseshoe” closest to the camera body holds the lens in place. To remove it, you must lift up on the upper edge of the horseshoe, sliding it towards the top of the camera. With the horseshoe removed (please don’t lose it), the lens pops off quite easily. At both the 3 and 9 o’clock positions around the lens are two notches which line up with guides on the two posts holding the lens in place. To reattach the lens, make sure these notches line up with the guides, and press the lens towards the body of the camera and slide the horseshoe back into position to secure the lens to the camera. No other lenses besides the 140mm telephoto lens were ever made for the camera.
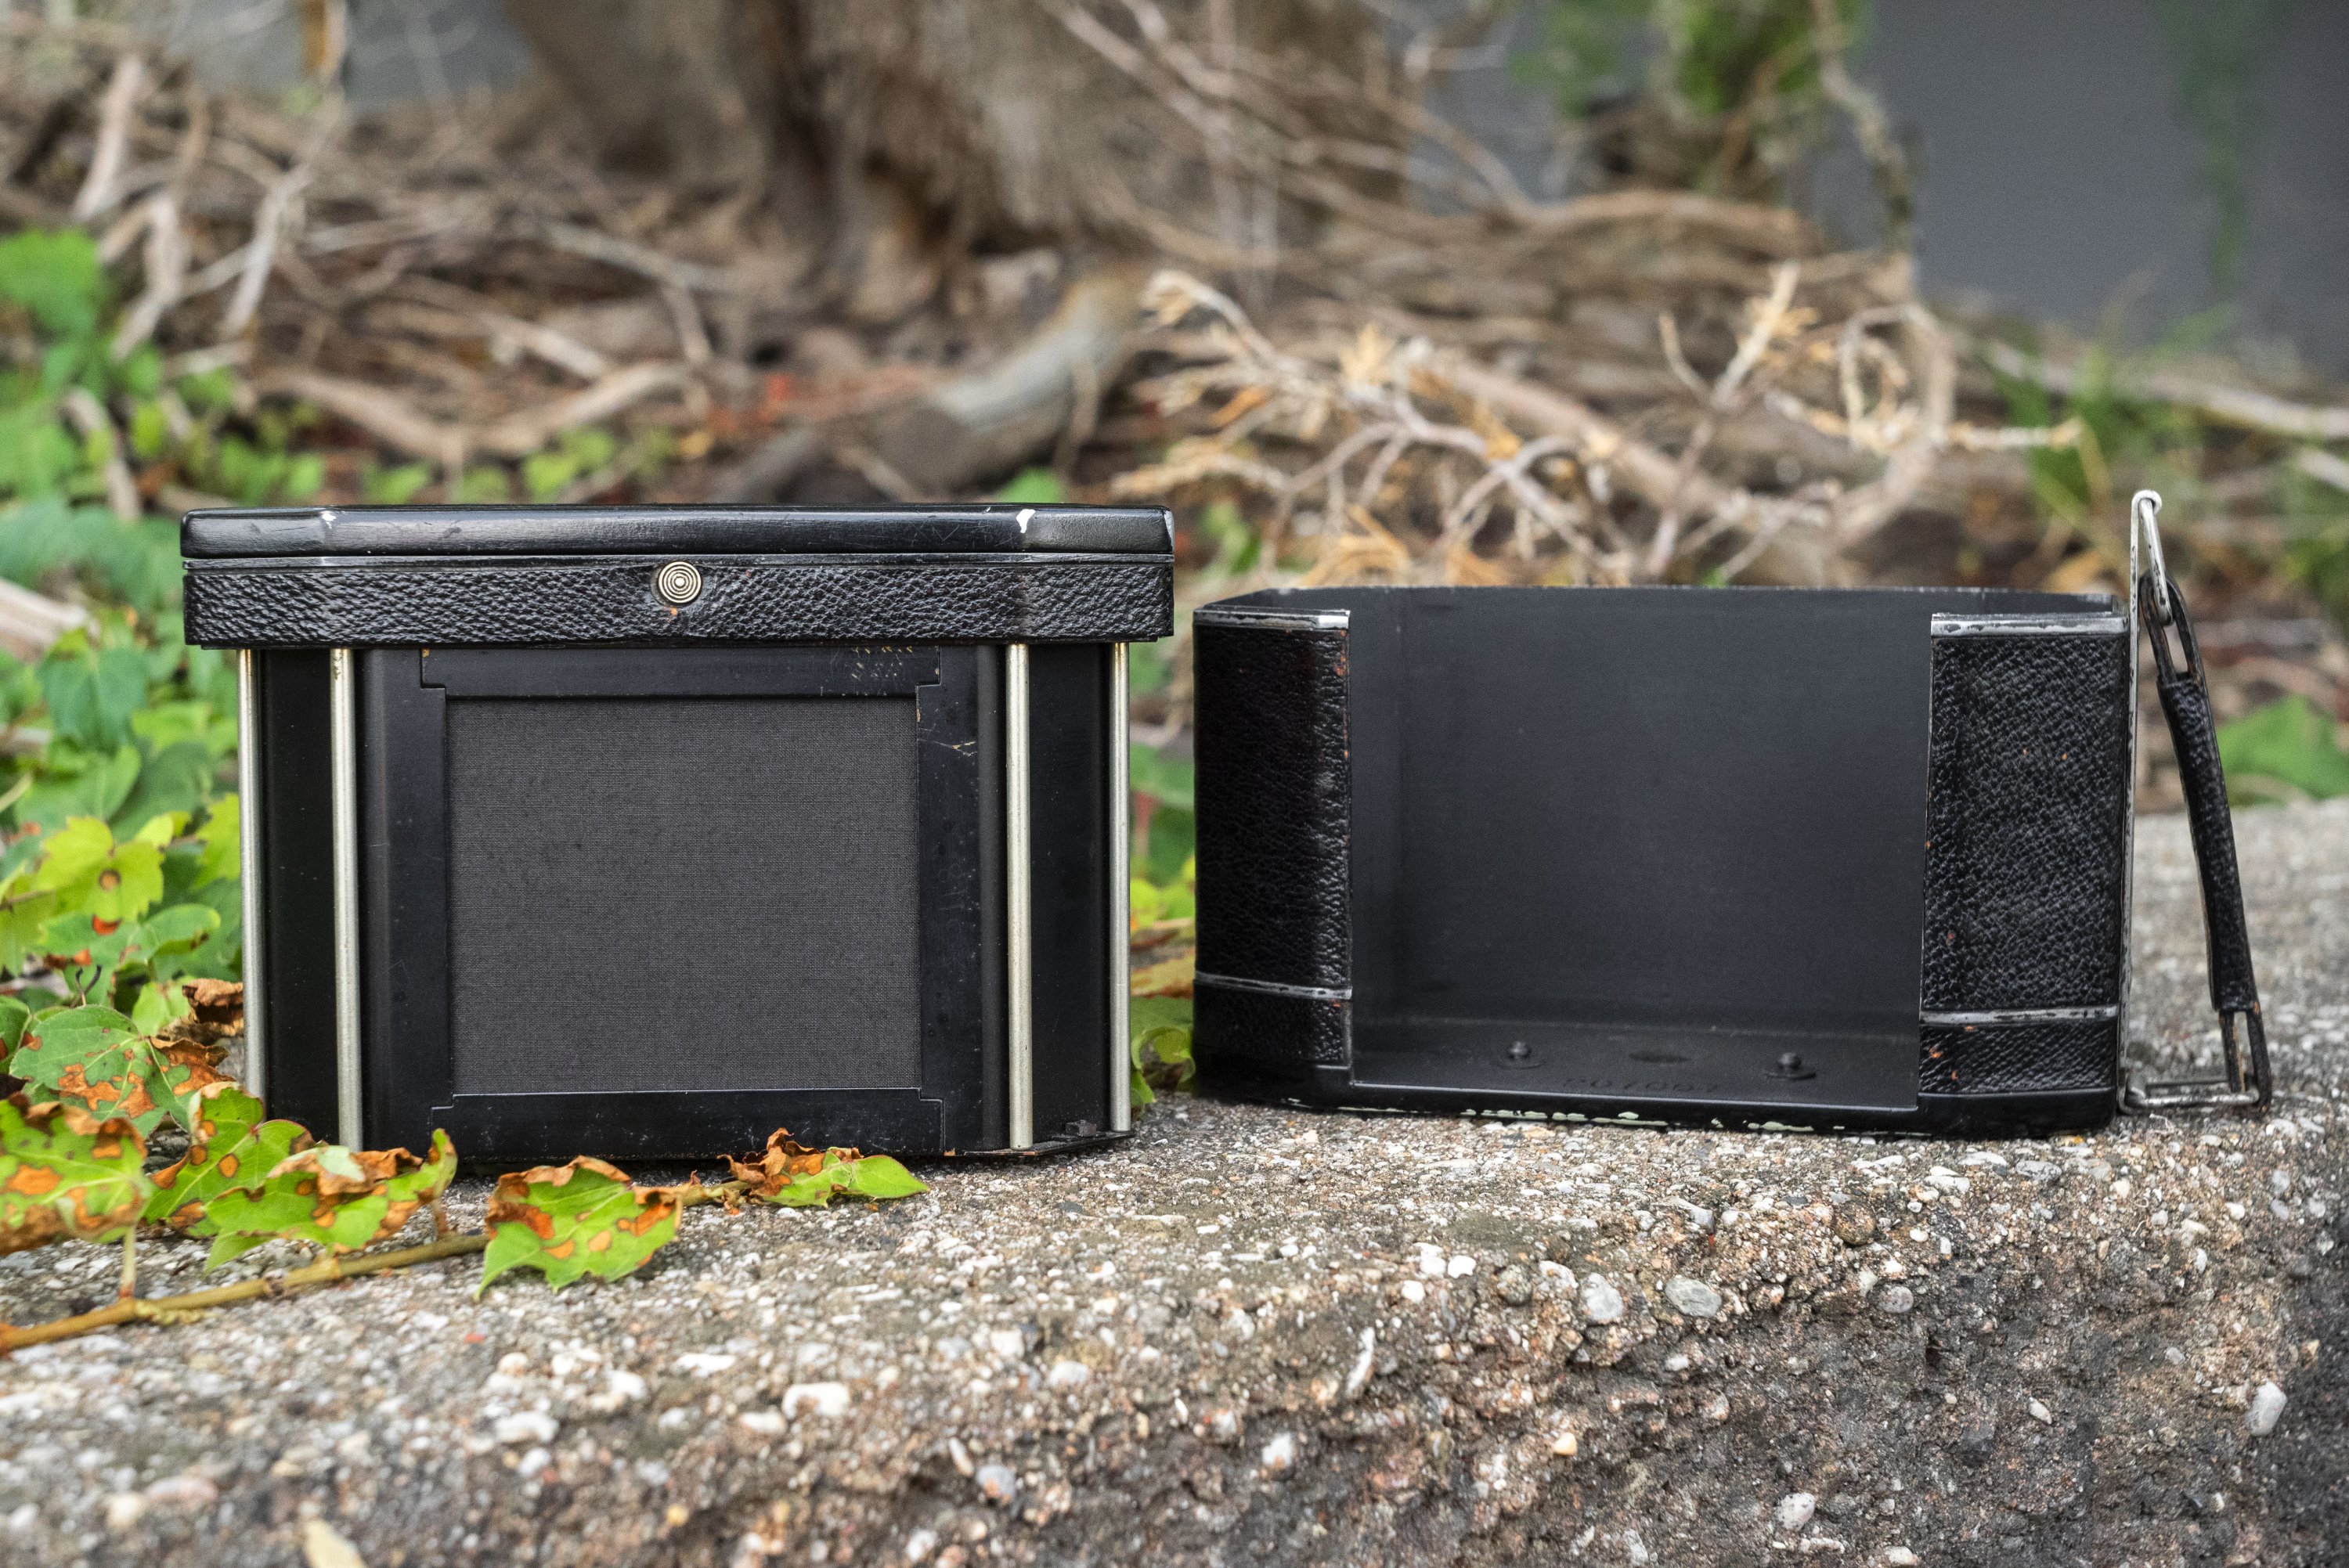
With the two catches on the base of the camera in the “O” position, the entire back and sides of the camera slide off to reveal the film compartment. Film transports from right to left onto standard 120 spools. The compartments where the spools go are around the corner, near the front of the camera, allowing for the film compartment to be slightly more compact.
Hinged plates at the bottom of each side swing out of the way allowing for easy installation of both spools. Installing a new roll of film is very easy to do on the National Graflex, but great care must be taken to not touch the large opening for the cloth shutter. Considering the age of this particular camera, the shutter was in excellent condition with no cracks or pinholes. The National Graflex has a fabric light seal along the upper edge of the film compartment but nowhere else. It also lacks a film pressure plate as the back of the camera door sides tightly against the film compartment, doubling as the pressure plate.
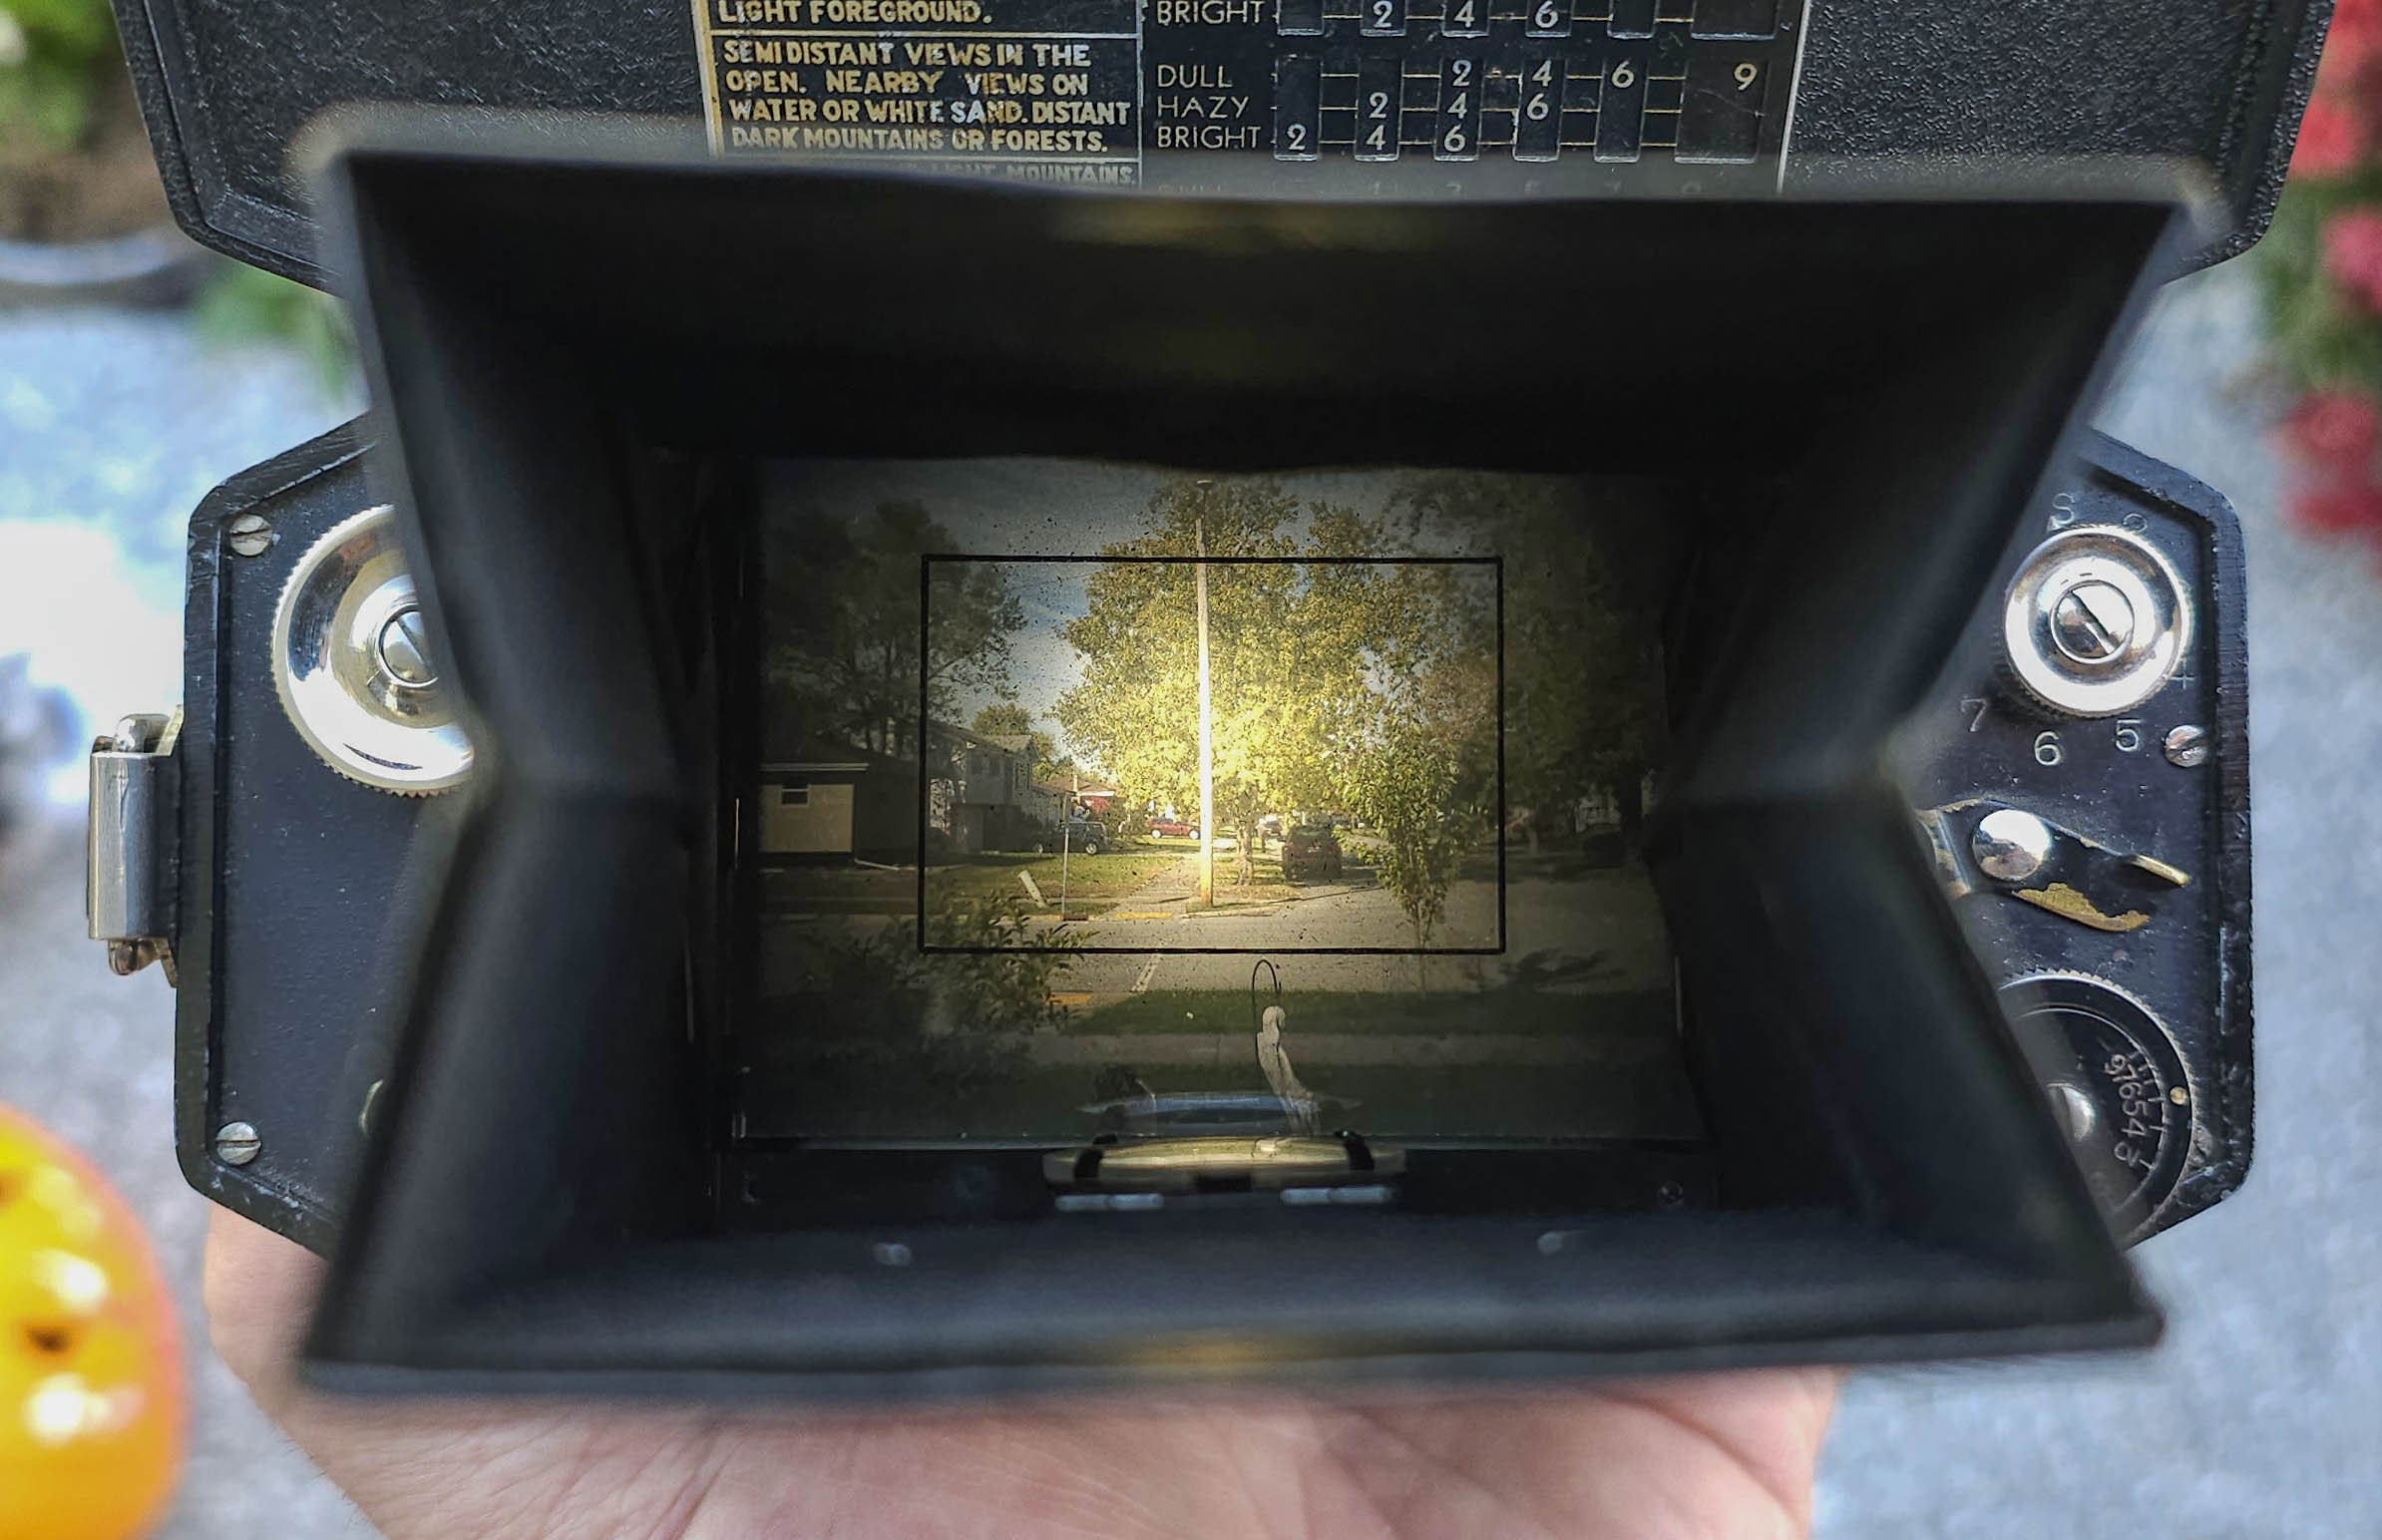
Looking down through the waist level finder, the National Graflex’s viewfinder resembles an early TLR with a large expanse of ground glass which can be very bright in the center, but shows strong vignetting near the corners. In good lighting and the lens wide open at f/3.5, composing isn’t difficult, but as soon as the available light drops off, the image can become extremely dim. The National Graflex predates lenses with automatic diaphragms by a couple decades, so the process of composing through the viewfinder requires you to not only open up the diaphragm each time, but also to remember to close it back down for correct exposure each time.
The ground glass has a painted rectangle in the middle to indicate the focal distance of the optional 140mm lens, should you have it mounted, but otherwise the entire screen is used for the standard 75mm lens. As you might expect, no other information about exposure or camera settings is visible. Notice in the image to the left, the folded up magnifying glass on the inside of the hood.
It is interesting to me that when the National Graflex first came out, it was billed as a convenient and easy to use camera, aimed at someone who wasn’t a professional photographer. While there are elements of using the camera which are familiar to those used to other vintage cameras, the entire process is still very complex and proves how far we’ve come today with the simplicity of point and shoot cameras.
Despite its complexity, there is some logic in how the camera operates, and after a bit of time playing with it, the complexities fade away to something that after a while you’d get used to. Still, for anyone looking to use a National Graflex more than once, I definitely recommend a refresher of the manual before each time you plan on using it.
Now with the camera’s many controls and operations memorized, I felt comfortable enough to give it a go. How did that go you might ask? Keep reading…
My Results
Never having shot a camera like the National Graflex, for the first time in years, I felt like I was in uncharted territory with a camera I was about to shoot. After scouring through the manual and learning how the camera’s various controls worked, I felt pretty confident that I knew how to use it and while observing the movement of the shutter, I felt like it should work, so the only thing left to do was to load in some film and shoot it! Not sure of the results I’d get, but also knowing I had a wide range of shutter speeds available, I loaded in some semi-expired Fuji Acros 400. While I generally prefer 100 speed films for test rolls of film, my supply of medium format 100 was dwindling, while I have many rolls of the Acros 400, so that’s what I chose.


In what should be a surprise to no one, shooting a 90 year old SLR that likely has not seen any service in probably half a century or more wasn’t without struggles. While the camera appeared to work in my pre-film tests, and while shooting gave no signs that anything was amiss, after viewing the exposures from my first test roll, it was clear that there was an issue with either the shutter, the reflex mirror, or both as half of the 10 exposures showed significant light leakage in more than 3/4 of the frame, rendering most images unusable. Strangely, this affliction didn’t happen in every image as half the roll came out OK. What you see in the gallery above were the five usable images.
What I did get were five good images that showed a large amount of sharpness, smooth out of focus details, and very little vignetting. Contrast was predictably low as the uncoated glass caused like to bloom in areas where there was a lot of light. Results like these are very typical of uncoated prewar lenses and not at all something to be concerned about. A regular user of this camera would work to its strengths and avoid strong backlighting photographic scenes with lots of even lit detail. Although I did not attempt to shoot color film in the National Graflex, I can predict that images would show a lack of contrast in addition to muted colors.
With only 5 usable exposures from my first test roll, I debated whether I should shoot a second, but decided against it as it was unlikely I’d learn anything new from a second roll, plus the process of shooting the National Gtaflex is extremely slow, and I generally don’t like carrying 90+ year old cameras with me in my day to day activities to find shooting opportunities for it.
The experience of shooting this camera is best described as ‘memorable’ as I’ve never used another camera like it. Walking around with this thing really transports you back in time, giving a glimpse at what photography was like in the 1930s. The National Graflex is unlike any other Graflex SLR that came before it and SLRs that would soon come from companies like Ihagee and KW would significantly alter the experience, making some of the steps required of this camera redundant. The challenge of developing and using a camera that when it was first released, pioneered a new style of photography means that features which were state of the art in 1933 were quickly improved by others and replaced with easier and more convenient cameras in the years to come. If anything, I’d say the best compliment I can give the National Graflex is that it reminds me of how far we’ve come and makes me appreciate later cameras that much more.
The National Graflex is not an easy camera to shoot, but I really don’t think it is fair to criticize the camera as the designers of this camera did the best they could with what they knew how to do. There are many ways in which this camera could have been improved, and if I have one regret, is that a Series III was never released which further improved on the camera’s controls. I think that with the inclusion of a modern self-capping shutter and a reflex mirror coupled to the shutter release would have gone a long way towards making this camera more user friendly, but I suspect that even if that had happened, a growing interest in 35mm cameras wouldn’t have resulted in a great deal of success.
With just over 10,000 of the two versions of the National Graflex ever made, this camera isn’t exactly rare, but it is certainly uncommon in the US and probably even harder to find outside of this country. I do not know how likely it is to find one of these in even semi-operational state, nor do I know of anyone who would be interested in servicing one if someone were so inclined to get one CLAd, so I realize that opportunities to shoot a National Graflex are very rare.
Whether you actually want to shoot one or just add one to your collection, I feel that that National Graflex is an important camera in the history of photography and one that I am very much happy to own. The camera looks and works like no other and displays nicely on a shelf. Whether you have a thing for prewar cameras, American cameras, or historically significant cameras, the National Graflex has something to offer nearly any collector.
Related Posts You Might Enjoy
External Links
http://camera-wiki.org/wiki/National_Graflex
https://forum.mflenses.com/national-graflex-series-ii-t52672.html
https://oldcam.wordpress.com/tag/national-graflex/
https://jolommencam.com/Graflex%20Cameras/National/index.html
A “miniature” medium format camera …. miniature for Jack the Bear.
Very interesting review – thanks, Mike!
“The National Graflex predates lenses with automatic diaphragms by a couple decades” Graflex introduced the RB Super D in 1941 with an automatic stop down diaphragm, at least with the stock Kodak Ektar lens. So not that far in the future.
That’s good to know. I guess I should have further clarified that automatic diaphragms wouldn’t become a common feature for a couple decades later.
Mike, Thank you for the most detailedand compehensive review of the National anywhere on the net, You’ve answered all my questions and even some I did’t know I had.