
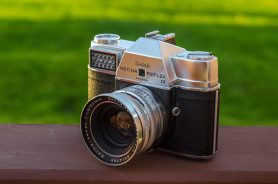
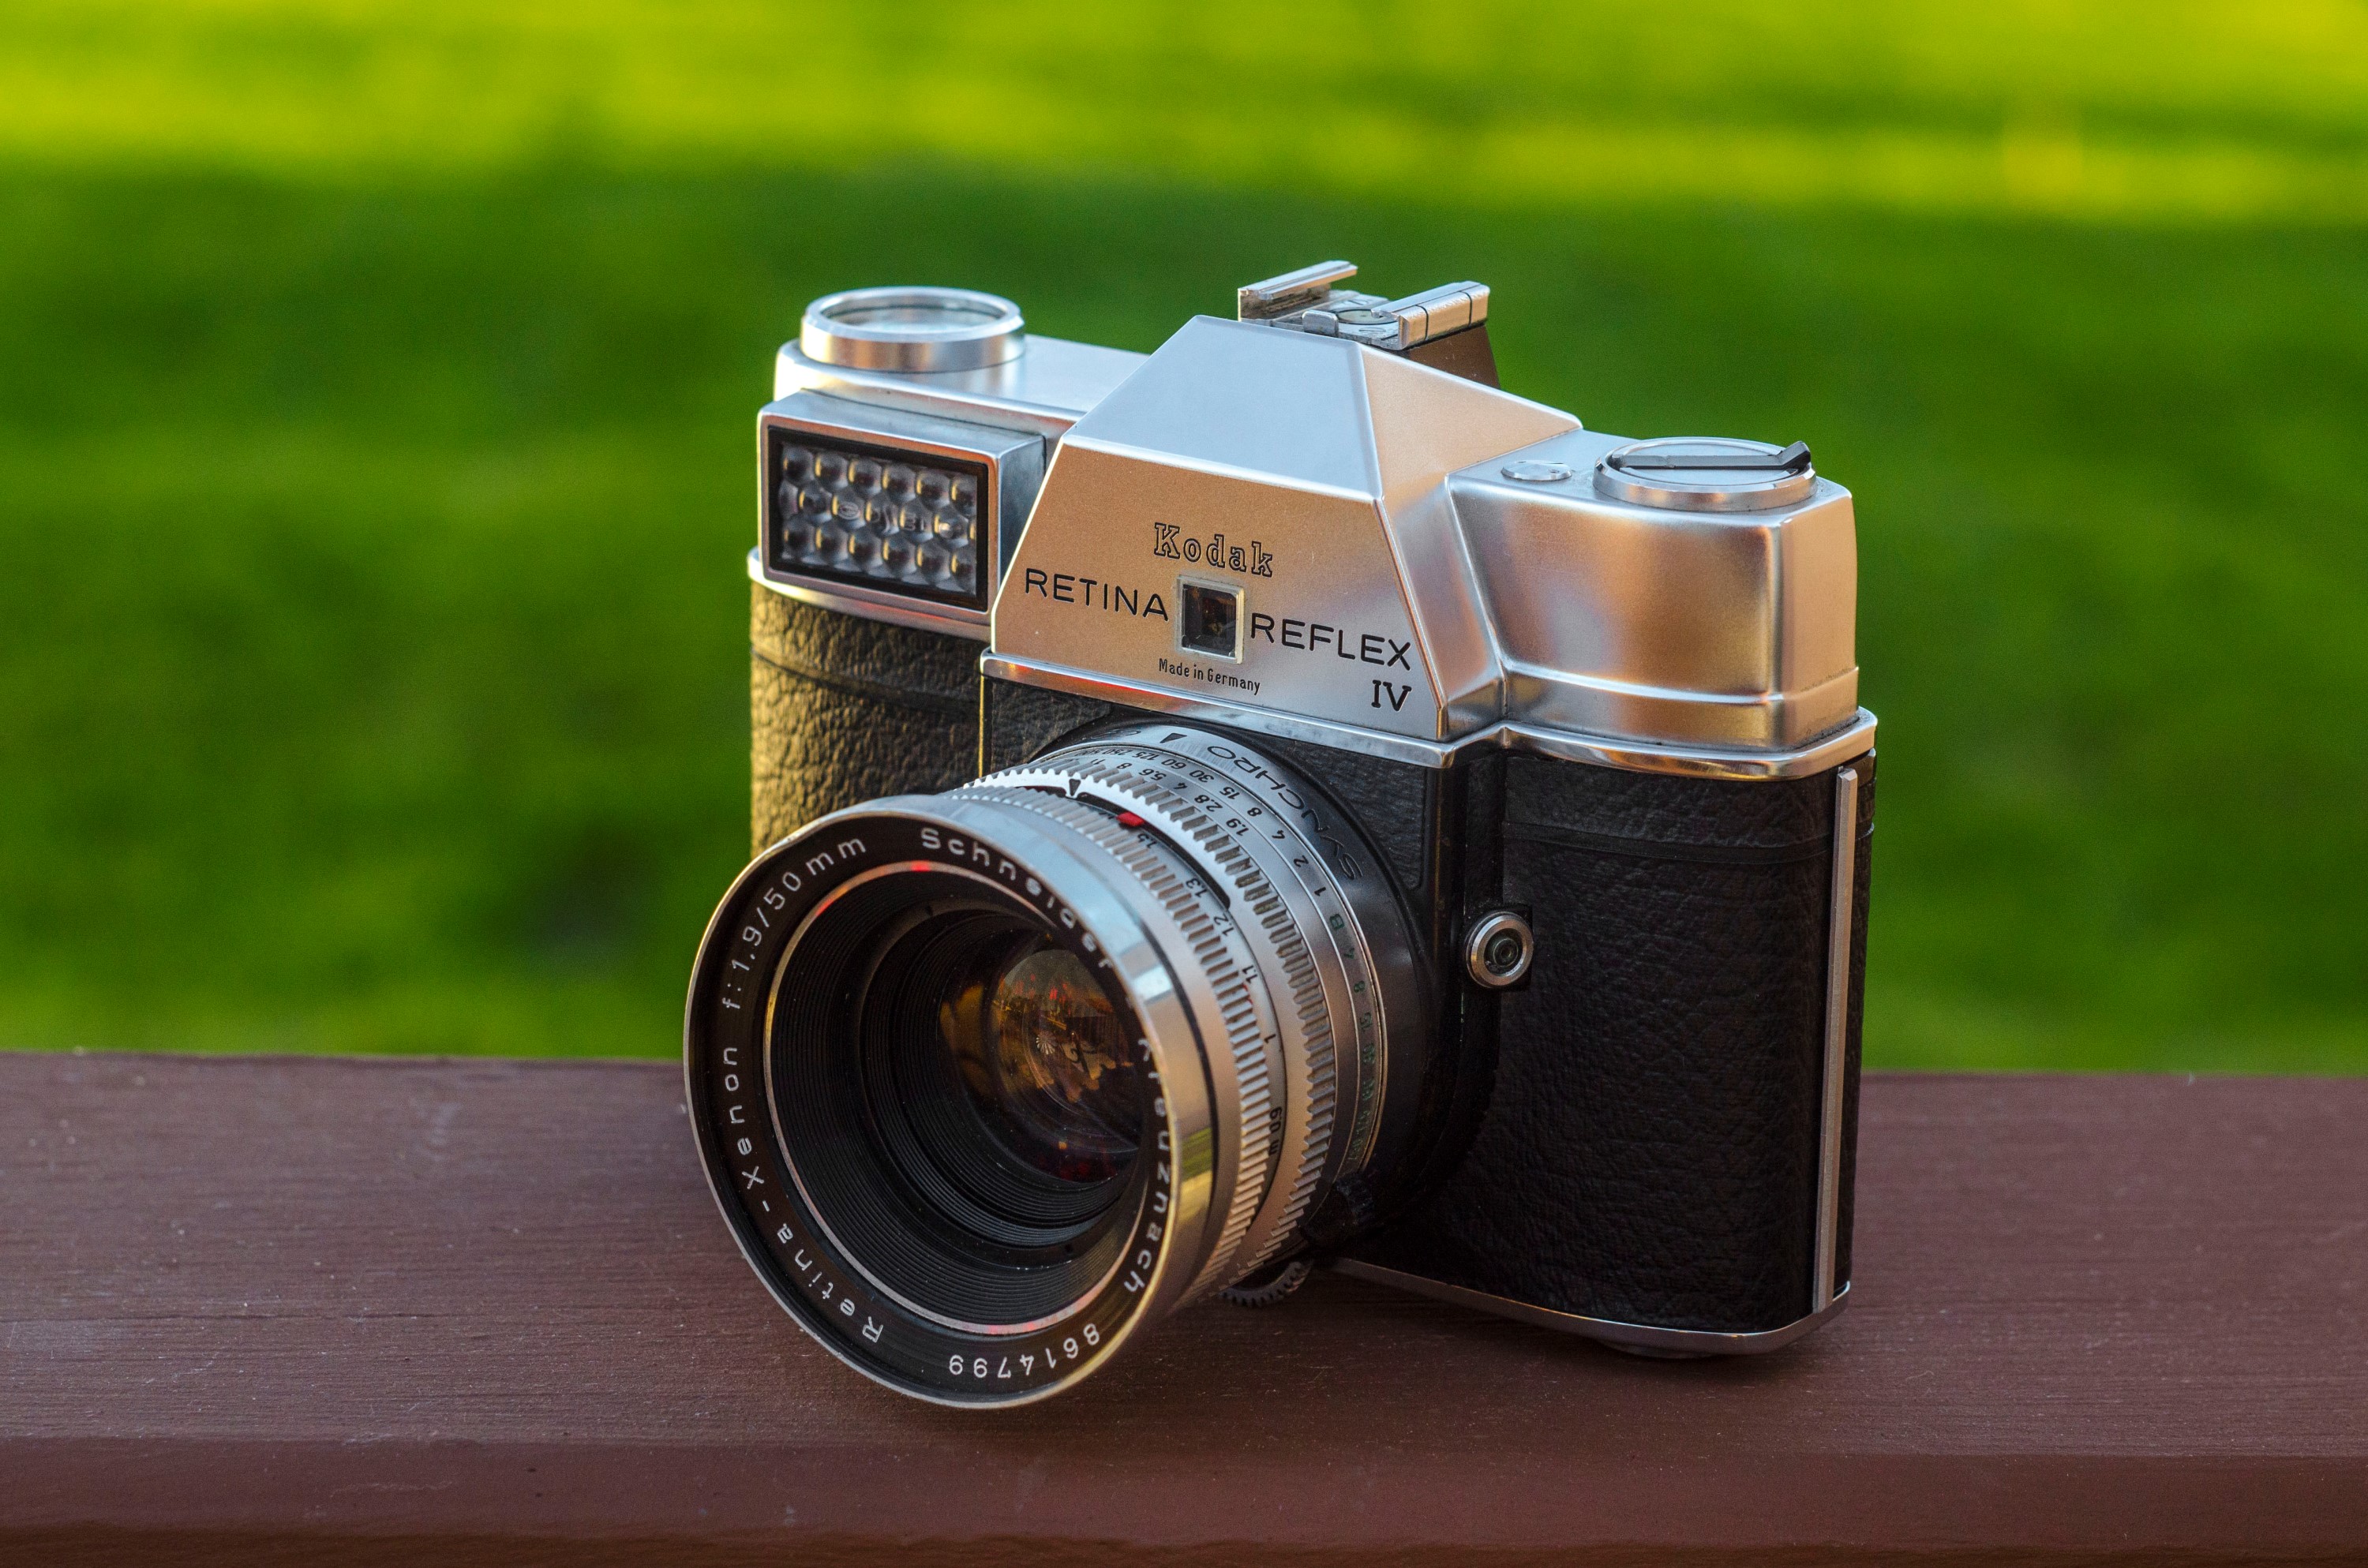
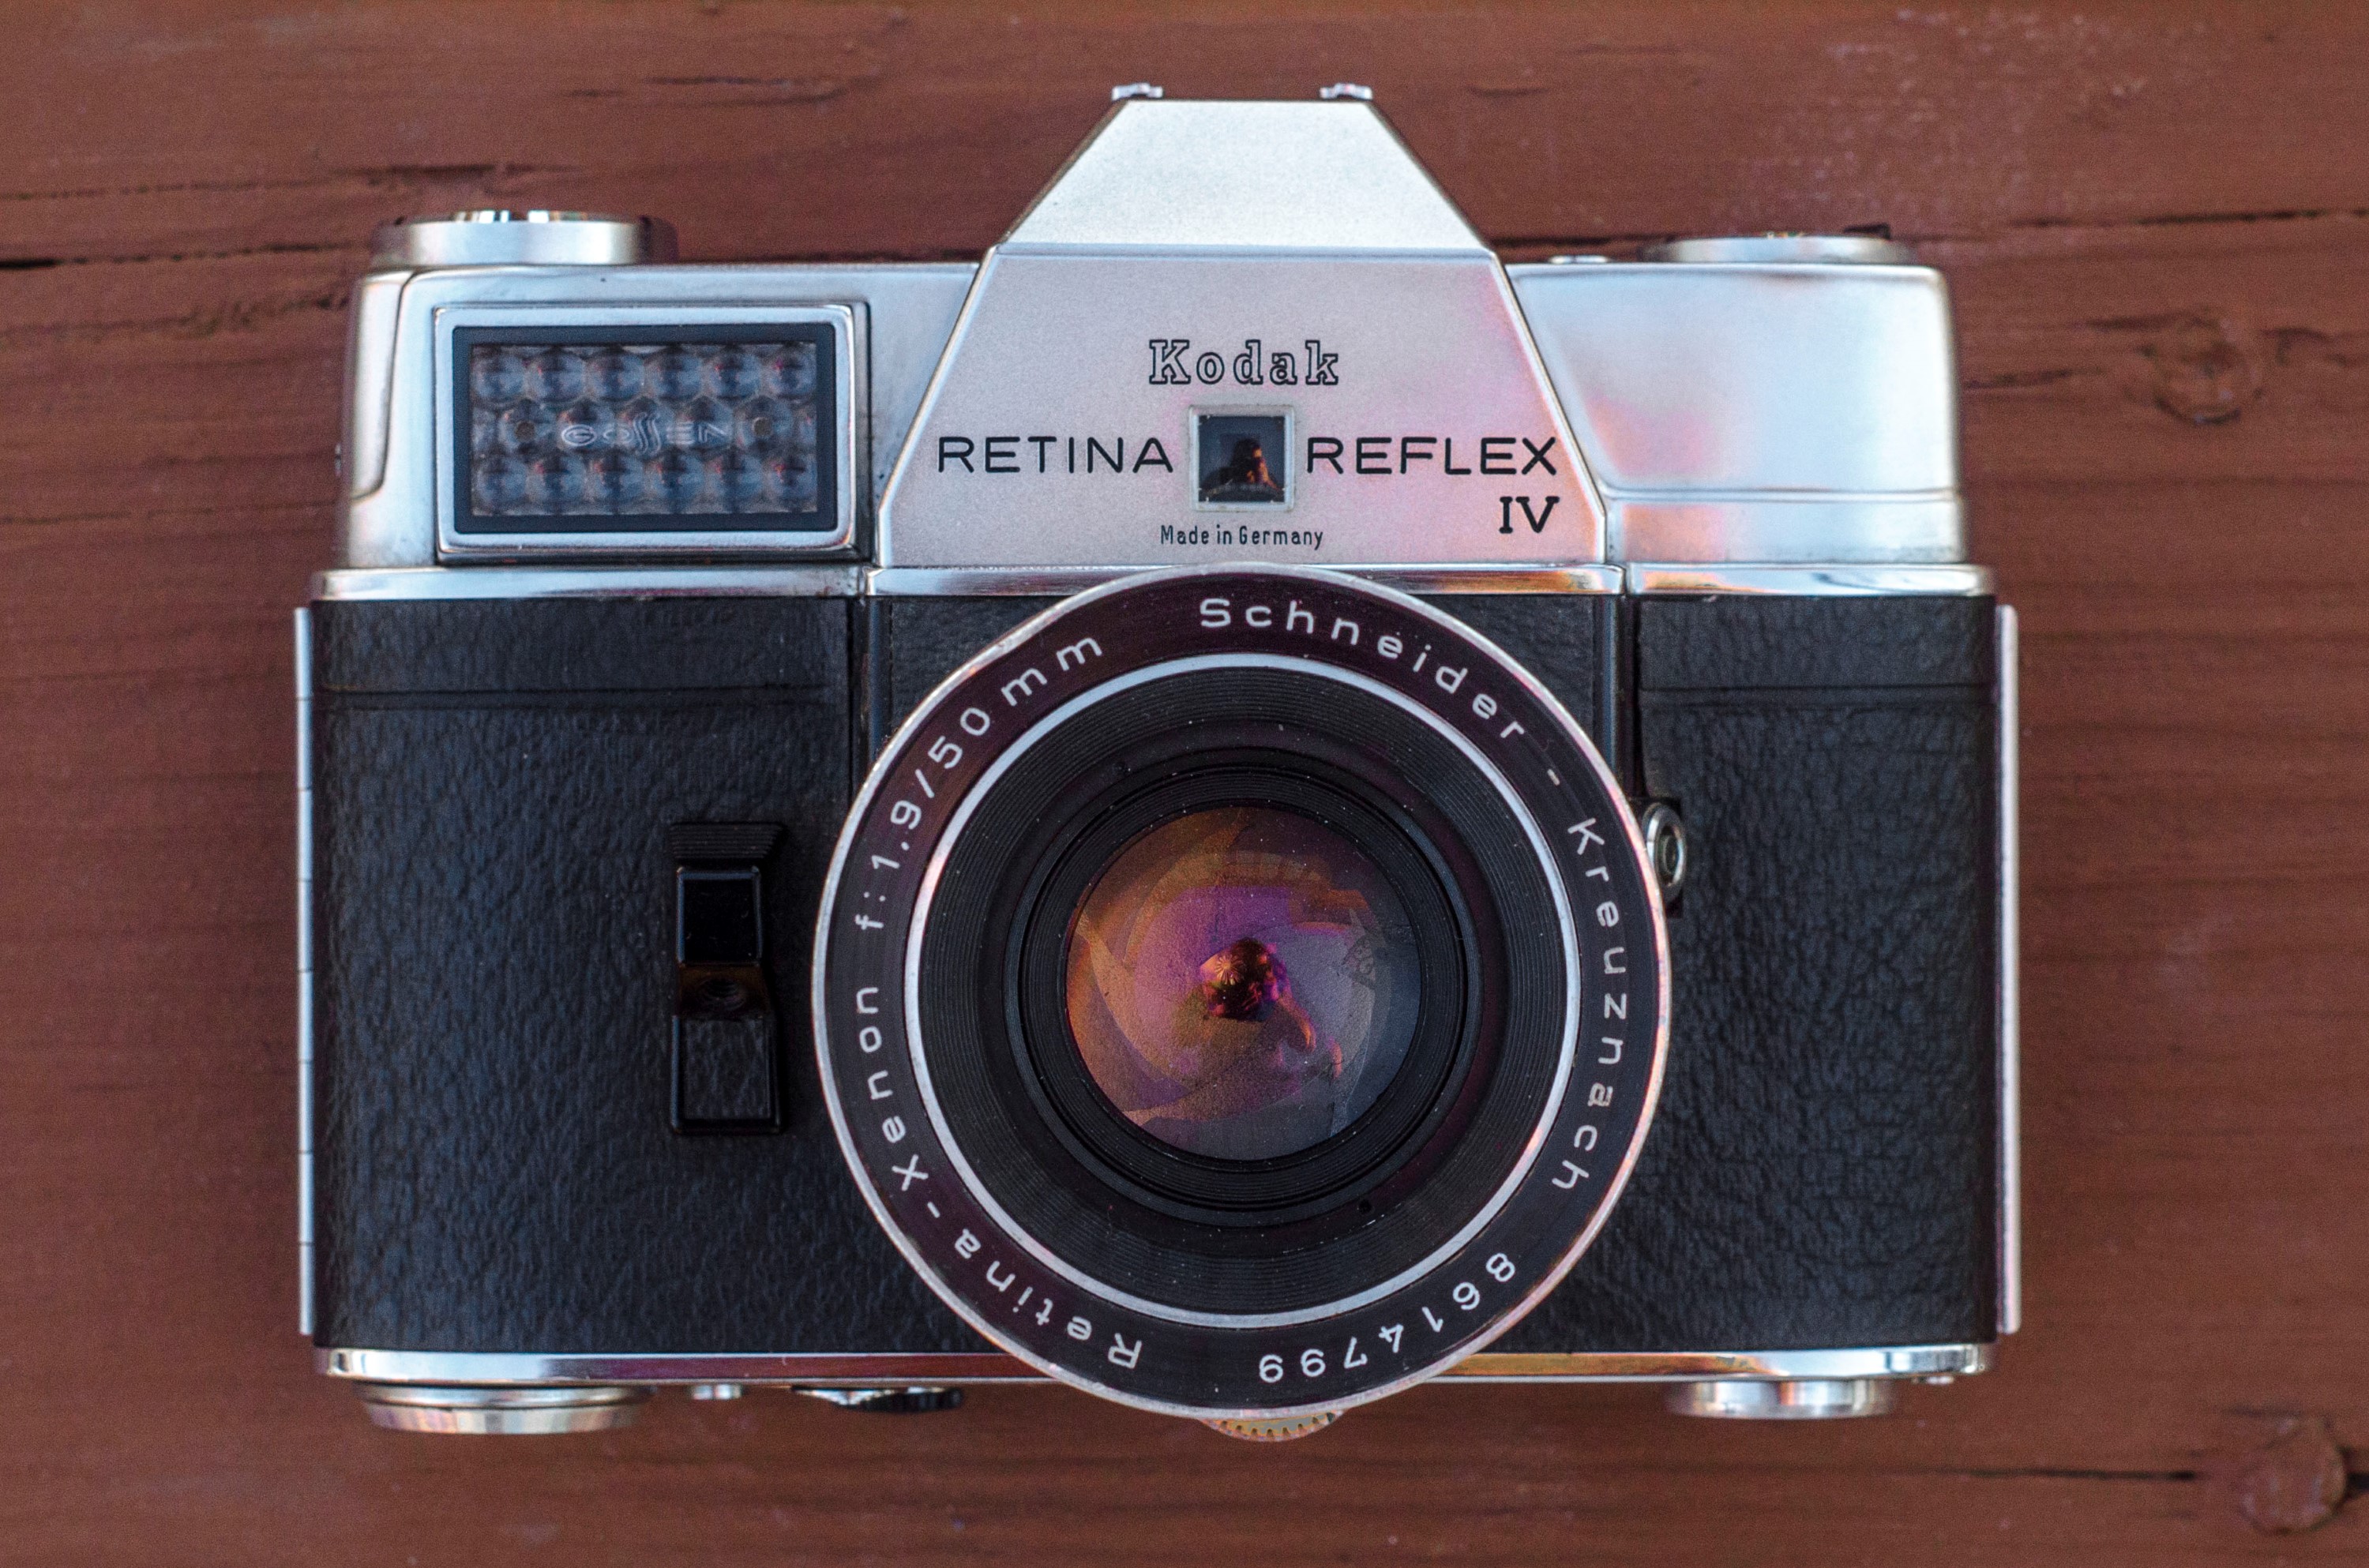
This is a Kodak Retina Reflex IV 35mm Single Lens Reflex camera made by Kodak AG in Stuttgart, West Germany between the years 1964 and 1967. The Retina Reflex series was a continuation of the earlier rangefinder Retina, and shared many of the same parts, including the body, lens mount, and leaf shutter. The leaf shutter in the Retina Reflex would prove to be problematic over the years which prevented them from being considered a serious SLR platform. Despite the unreliable shutter, the Retina Reflex series maintained the high quality standard of earlier Retinas, and included well built lenses that had excellent optics. The Retina Reflex IV was not only the last Retina Reflex, it was also the last “true” Retina camera, and the last time Kodak would ever build their own analog SLR.
 Film Type: 135 format 35mm film
Lens: 50mm Schneider-Kreuznach Retina-Xenon f/1.9 coated 6-elements
Lens Mount: Kodak Retina Reflex DKL Bayonet Mount
Focus: 3 feet / 0.9 meters to Infinity
Viewfinder: Fixed SLR Pentaprism w/ aperture, shutter speed, and exposure match needle readouts
Shutter: Synchro Compur-X Leaf
Speeds: B, 1 – 1/500
Exposure Meter: Gossen selenium cell with match needle visible in viewfinder
Battery: None
Flash Mount: Hot Shoe and PC socket X sync
Weight: 916 grams, 706 grams (body only)
Manual: http://www.cameramanuals.org/kodak_pdf/kodak_retina_reflex_iv.pdf
My Final WordHow these ratings work |
The Kodak Retina Reflex IV is the most advanced and feature rich of all Retina Reflex SLRs. Like all Retinas that came before it, the build quality is superb, and the lenses available for it are as good as anything out there. A combination of some strange design choices for essential controls and a dimmer viewfinder than I was used to made for a less than pleasurable experience, and after shooting my first roll, I felt this was a camera I’d never come back to again. The camera redeemed itself somewhat with an entire roll of nearly perfect photographs. It is clear that the Retina Reflex IV is a highly capable camera that is deserving of the Retina name, but is that enough to overlook the strange controls, high chance of failure, or dim viewfinder? I still don’t know. In any case, the Retina Reflex IV was the end of the line for the Retina series and in some ways, for Kodak as a camera maker. If you can find one in good working condition for the right price and have some patience, you will be rewarded with some really nice shots. | ||||||
| Images | Handling | Features | Viewfinder | Feel & Beauty | History | Age | |
| 2 | 0 | 1 | 0 | 2 | 1 | 20% | |
| Bonus | None | ||||||
| Final Score | 7.2 | ||||||
Camera of the Dead: The Epilogue
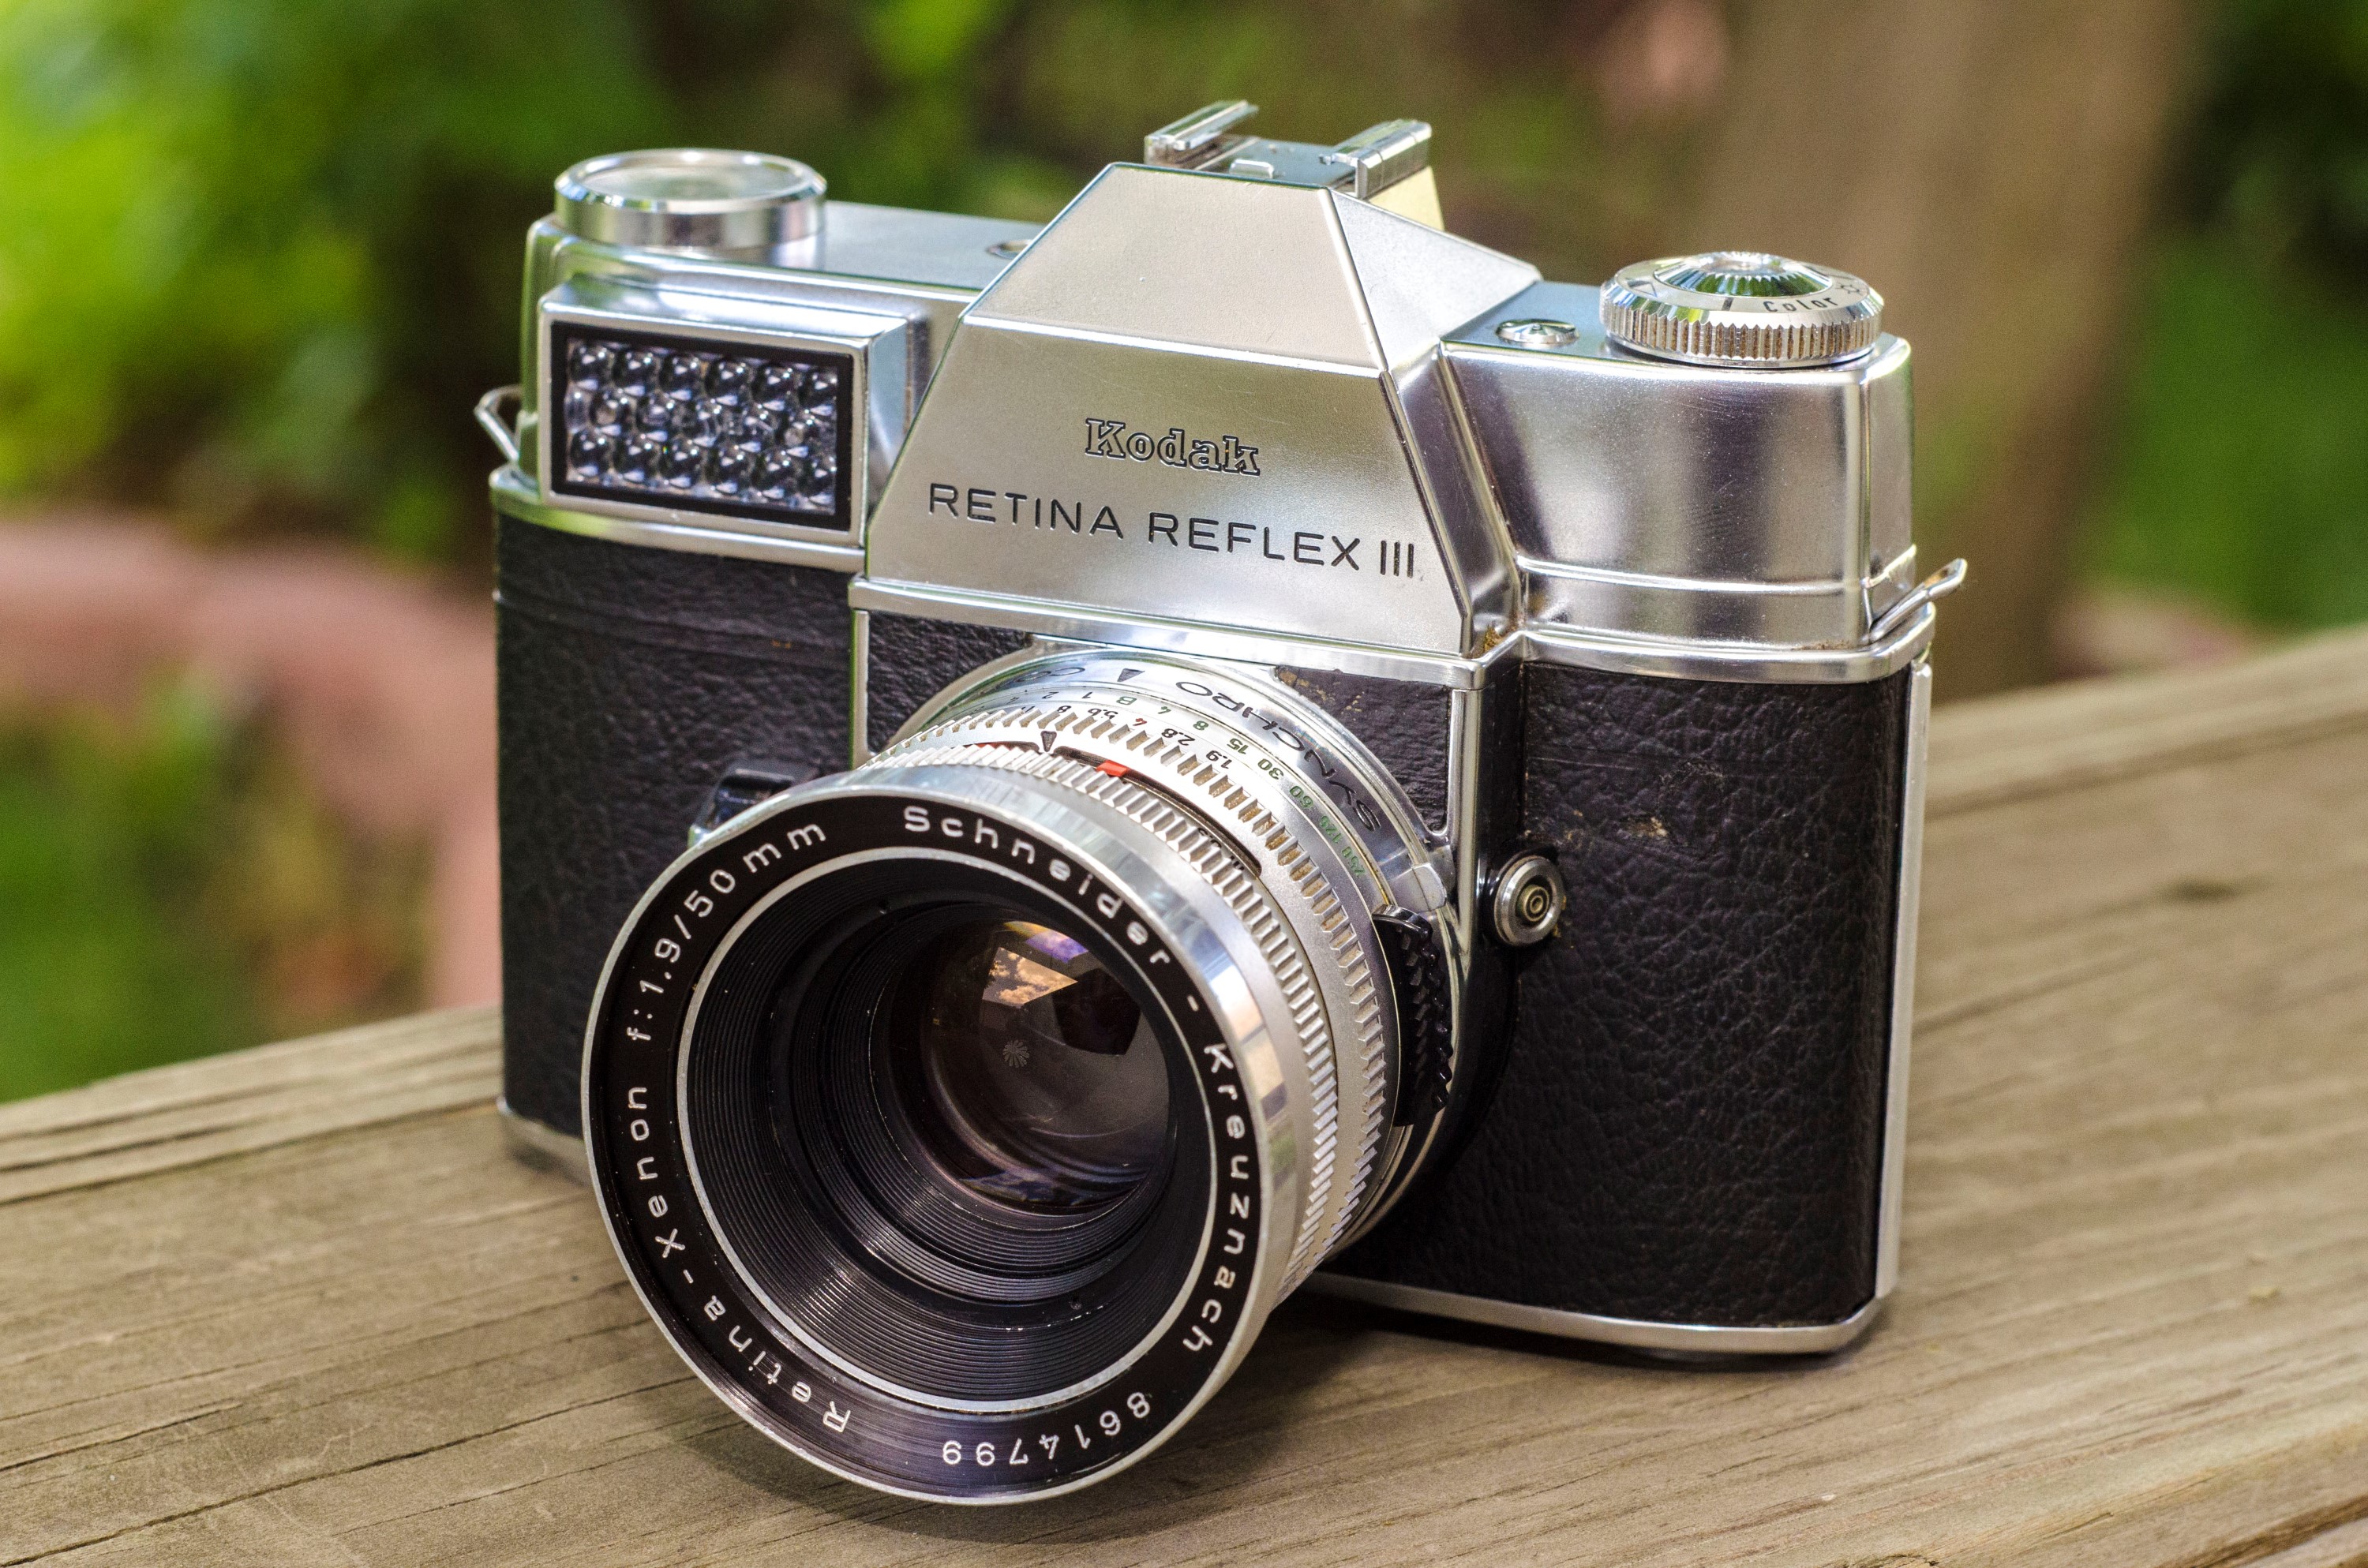
With this Kodak Retina Reflex IV, I have come the closest I’ve ever come from resurrecting a camera that I previously featured in one of my “Cameras of the Dead” articles. In October 2016, I posted a review of my dead Kodak Retina Reflex III in the second edition of the Cameras of the Dead series. I talked in that article about how the leaf shutter design of Kodak’s SLR was overly complicated and resulted in a shutter assembly that hasn’t fared well over the years. It seems that many leaf shutter SLRs from this era have also not fared well as many of them seem to be inoperable today. I tempted fate with another leaf shutter SLR, the Kowa SE-T and it died on me too.
What you wouldn’t know however, is that after my Retina Reflex III review, I made a valiant attempt to repair it. Armed with some knowledge from Chris Sherlock’s Retina Rescue site that the cocking rack was a part that commonly failed, I thought that perhaps if I were to replace this part, I could resurrect this dead camera. With nothing to lose, I took it apart.
There is a common rule that Retina cameras are overly complicated and shouldn’t be messed with by someone unfamiliar with this design. If you consider a Retina rangefinder to be a complex camera that’s tricky to repair, consider a Retina Reflex SLR to be like a Retina rangefinder on steroids. This is an infuriatingly complicated design that has some parts that are over engineered, but then also there’s some that are literally connected by a string (I’m not making this up). It is one thing to criticize the Retina Reflex series as having oddball exterior controls (I’ll get to that later), but in order to make all these needlessly complex things work, the insides of the camera is head scratchingly complicated.
At one point during my disassembly of the Retina Reflex III, I contacted Chris Sherlock for help, sending him photos and videos of my progress. To Mr. Sherlock’s credit, he responded back to me multiple times doing his best to help me. I’ll just skip to the part where I tell you I was unsuccessful, but not after getting a glimpse at how ridiculous of a camera this was. I won’t go into a full blown tutorial of what I did to the camera, but I thought it might be interesting to show you a few pictures and two videos that show partial operation of a Retina Reflex. These images and videos are all from a Retina Reflex III, but I believe all Retina Reflex cameras are similar in design.
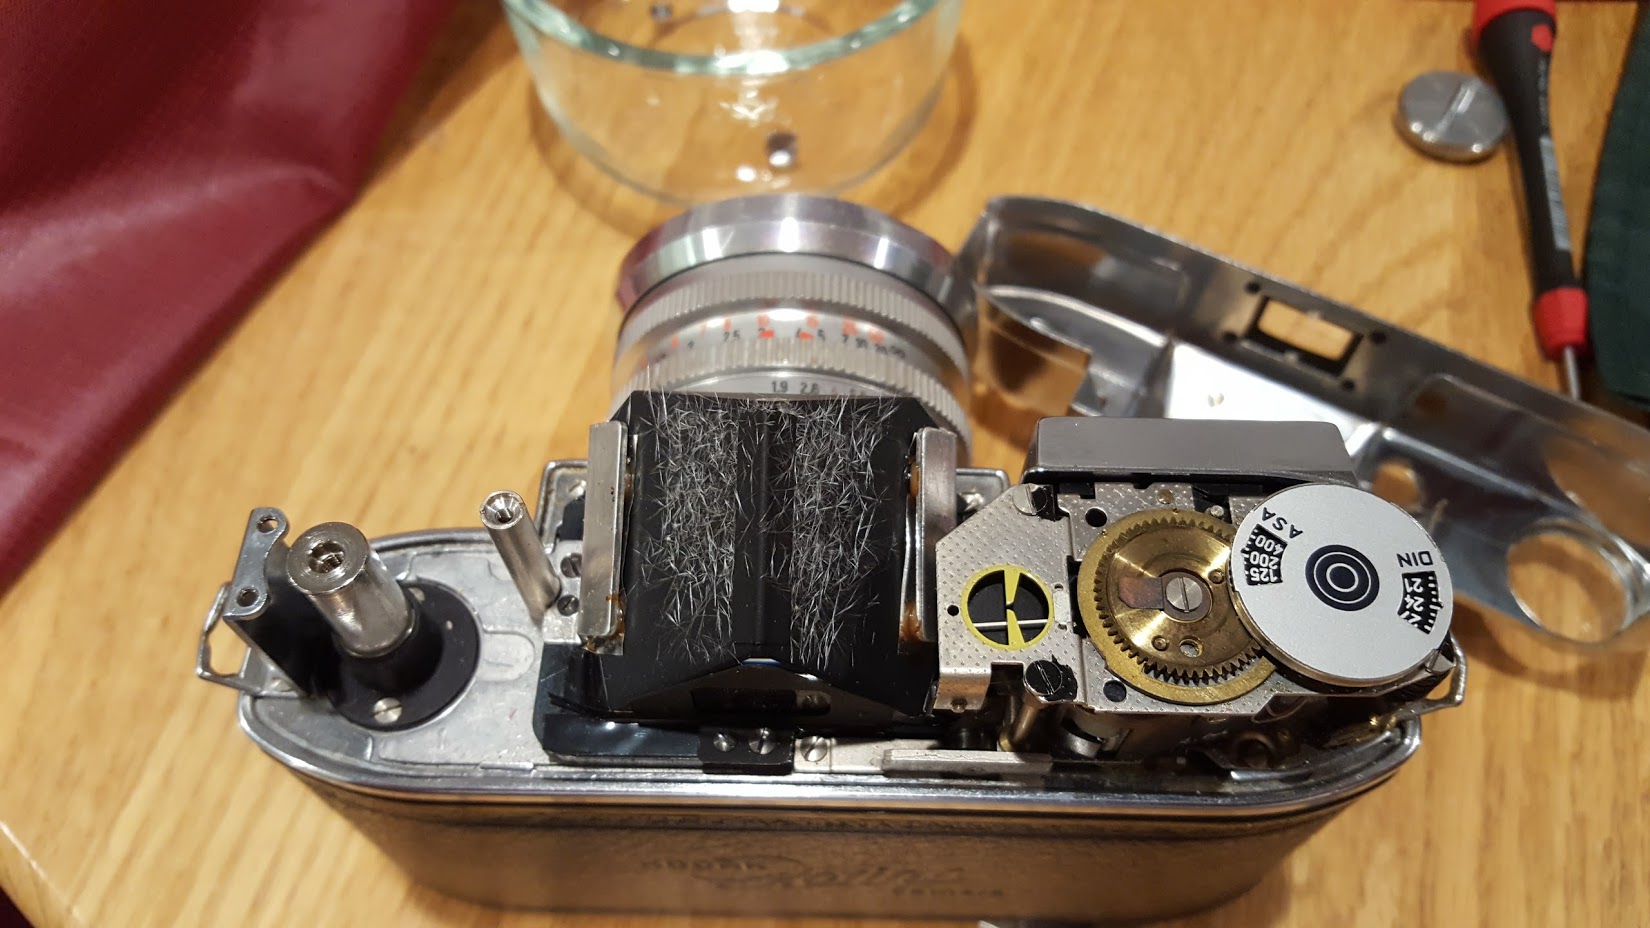
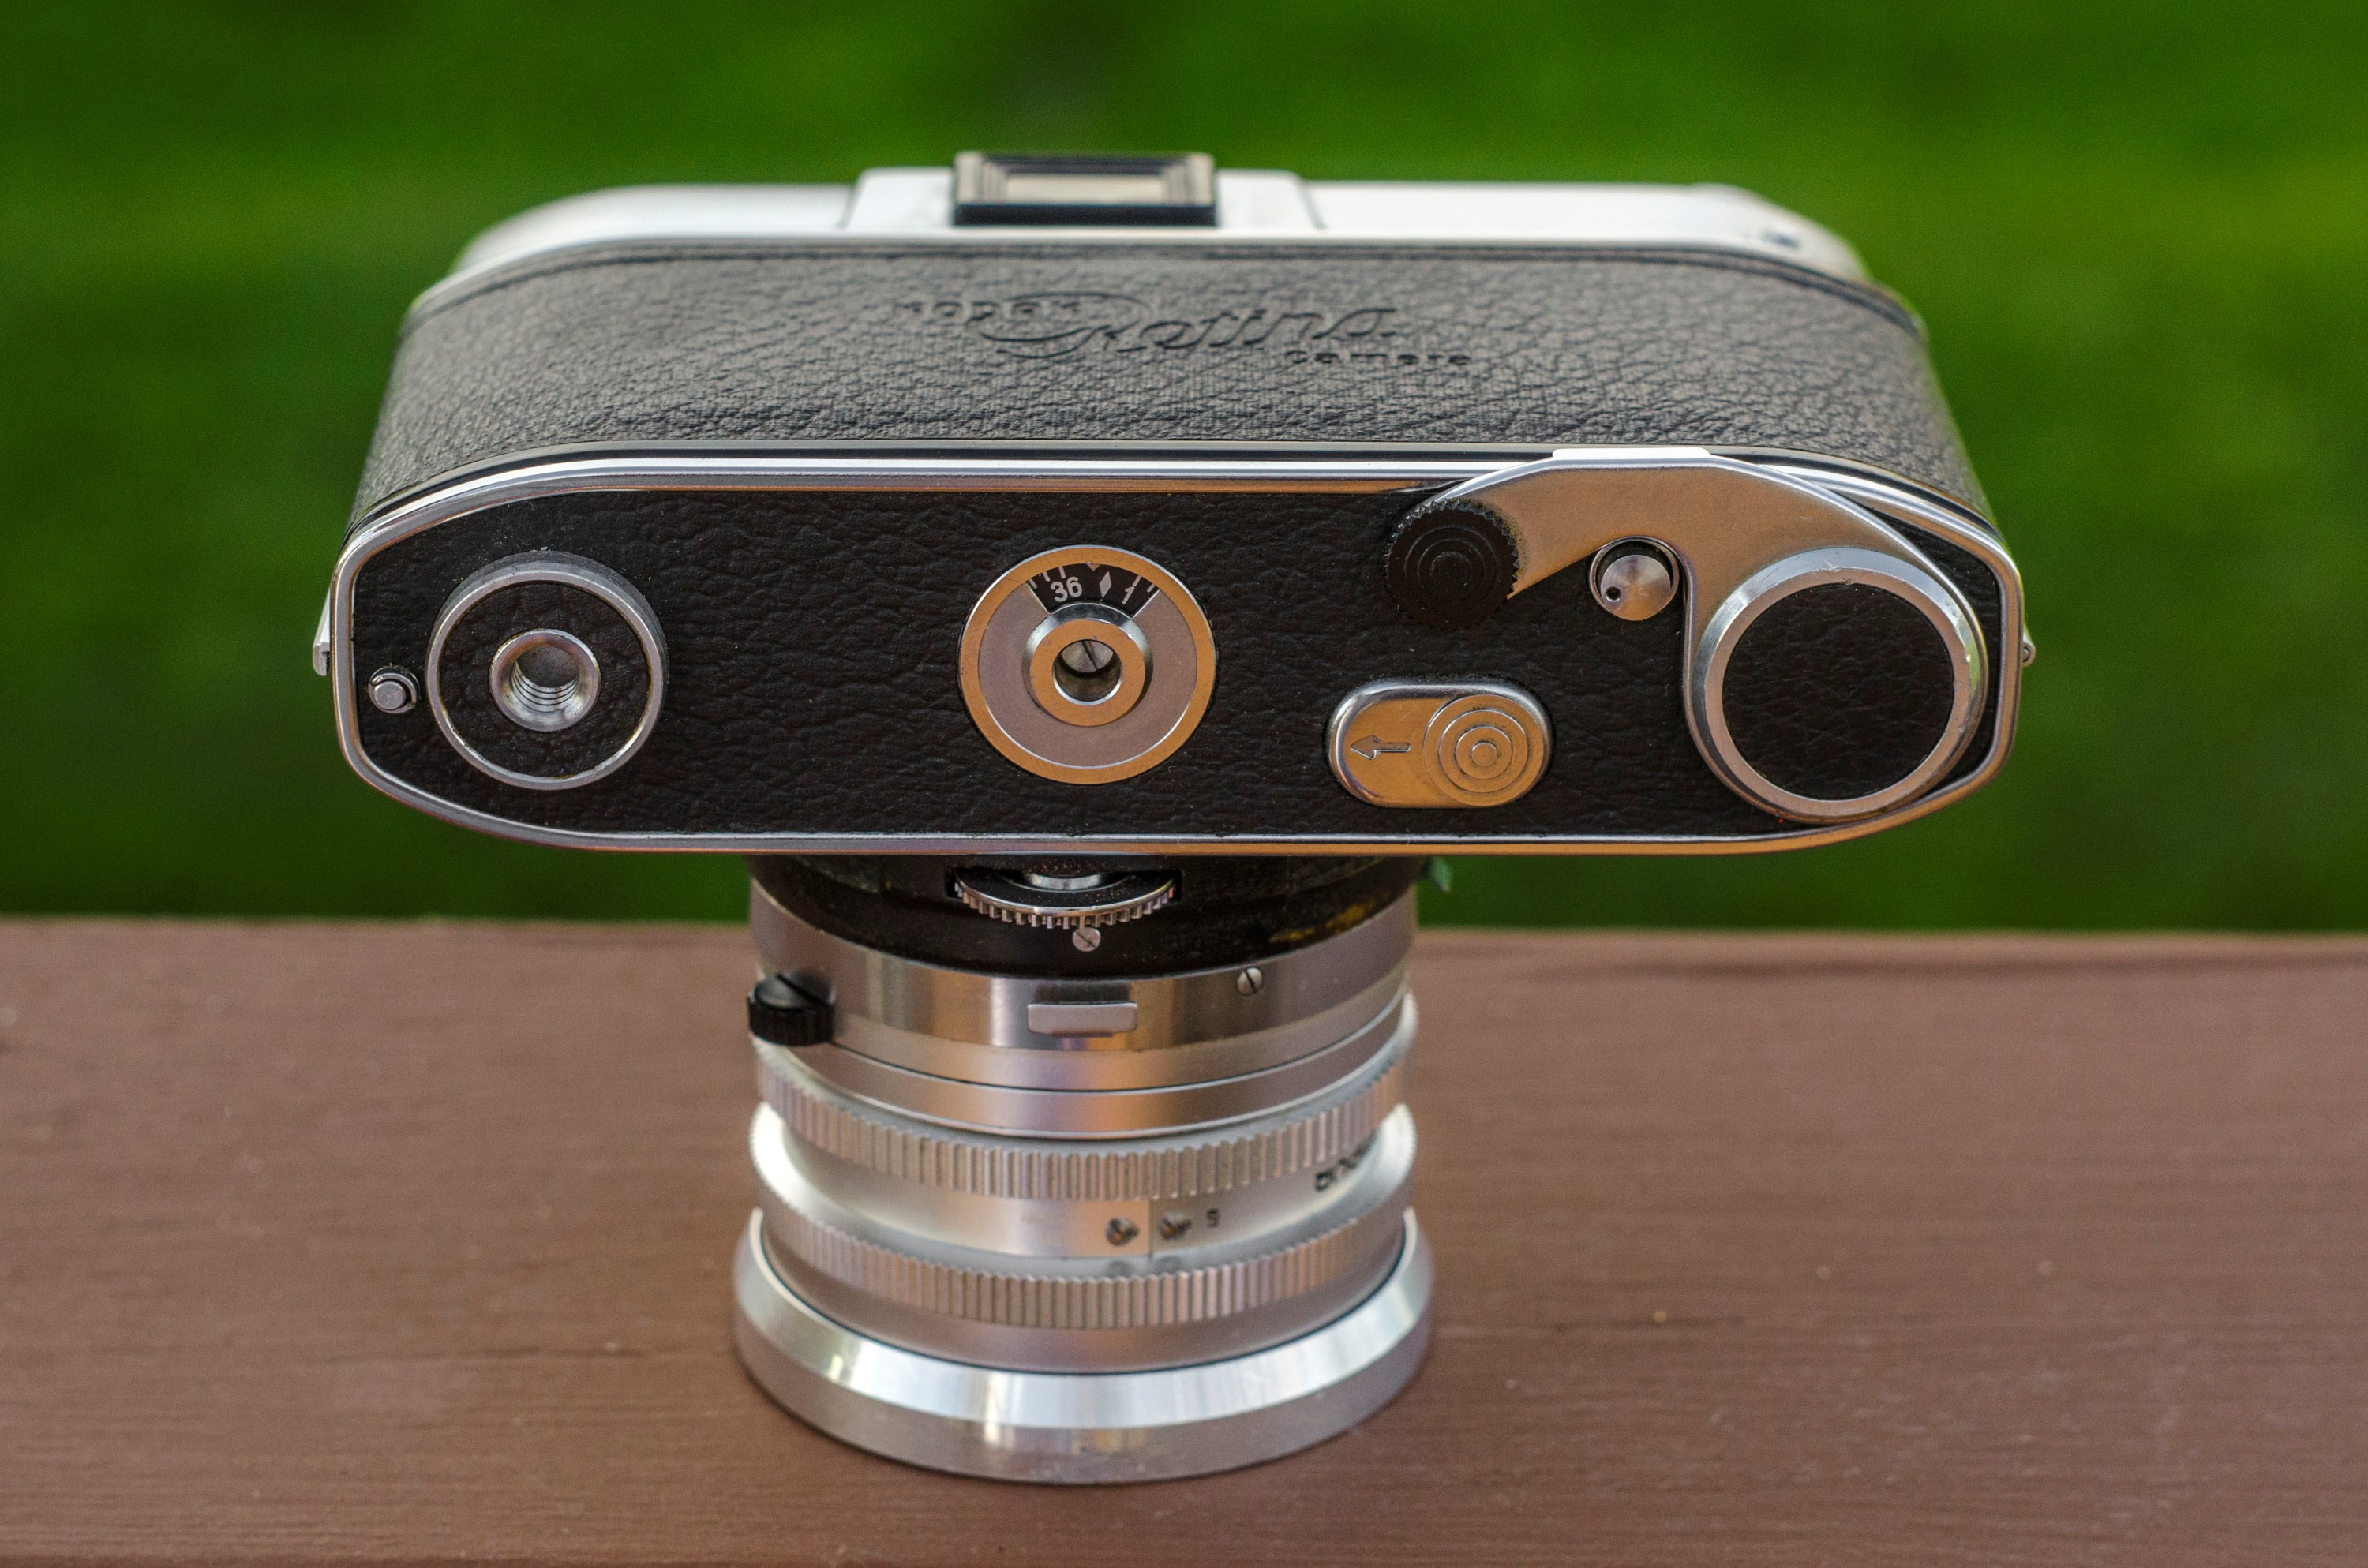
This first image shows whats underneath the top plate of a Retina Reflex. Notice the complex mechanism on the right, which is where the selenium exposure meter is connected. The ASA speed dial is also here, and is mechanically coupled to the aperture wheel using a string.
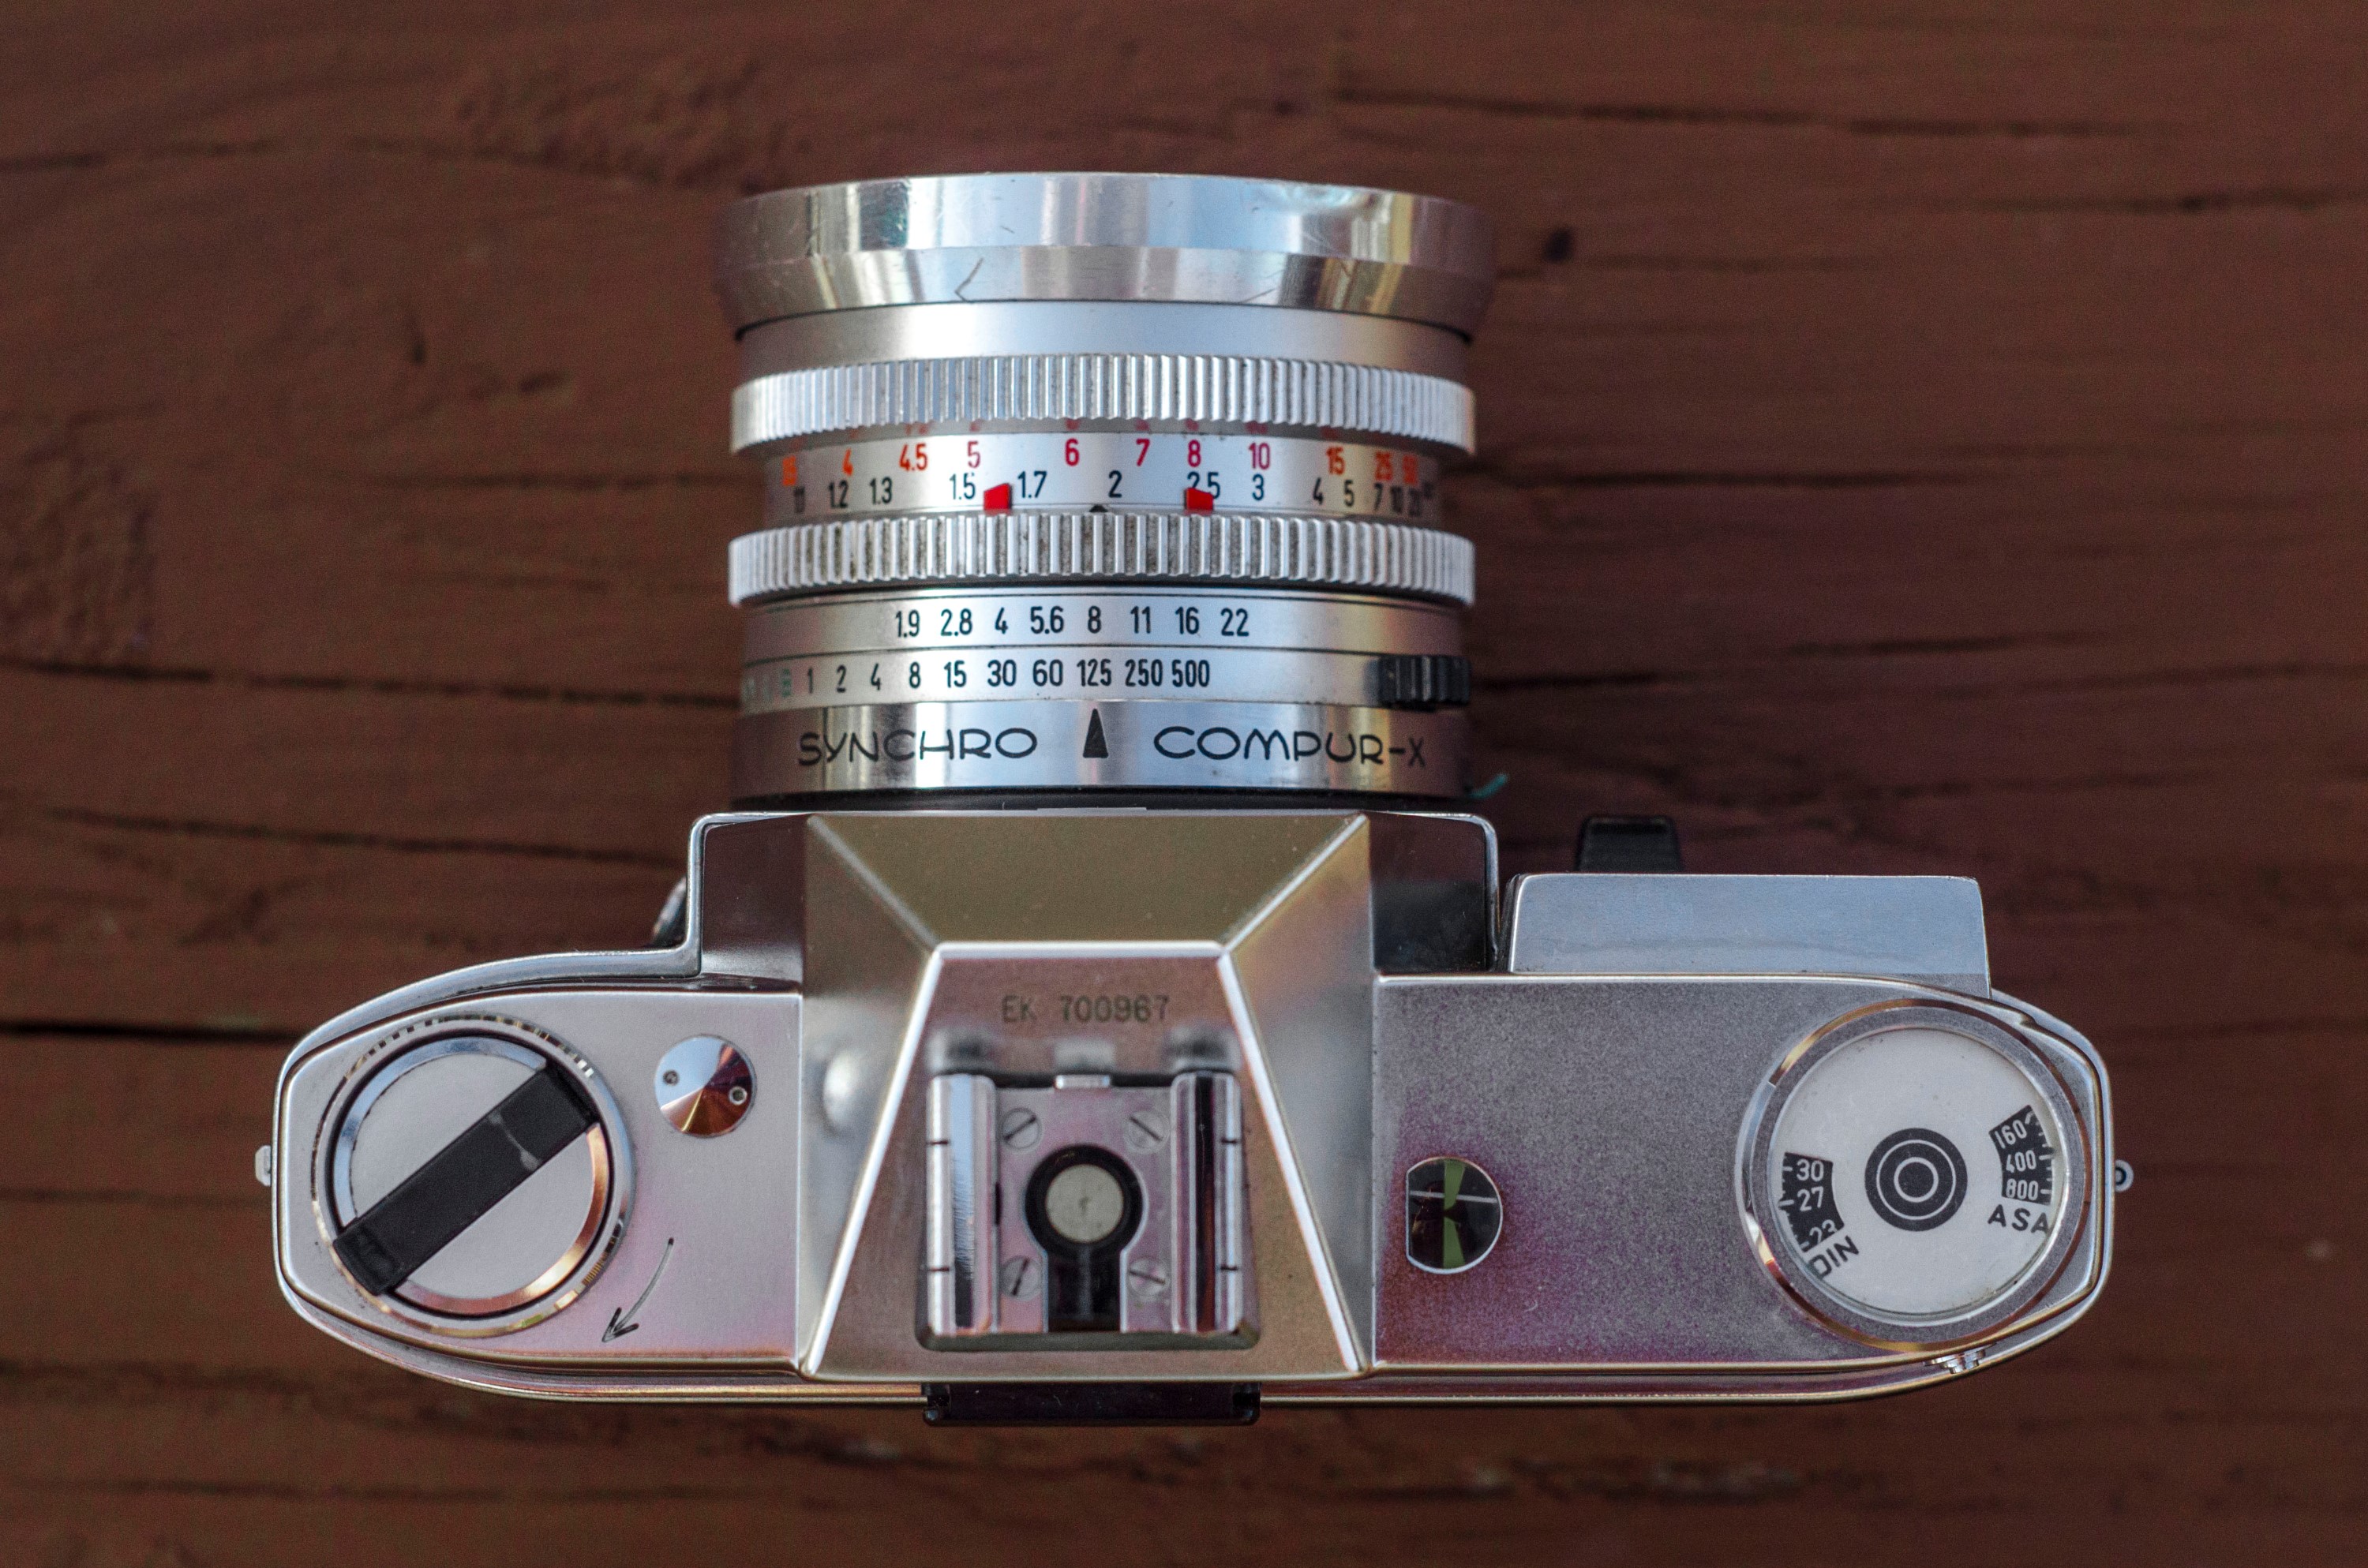
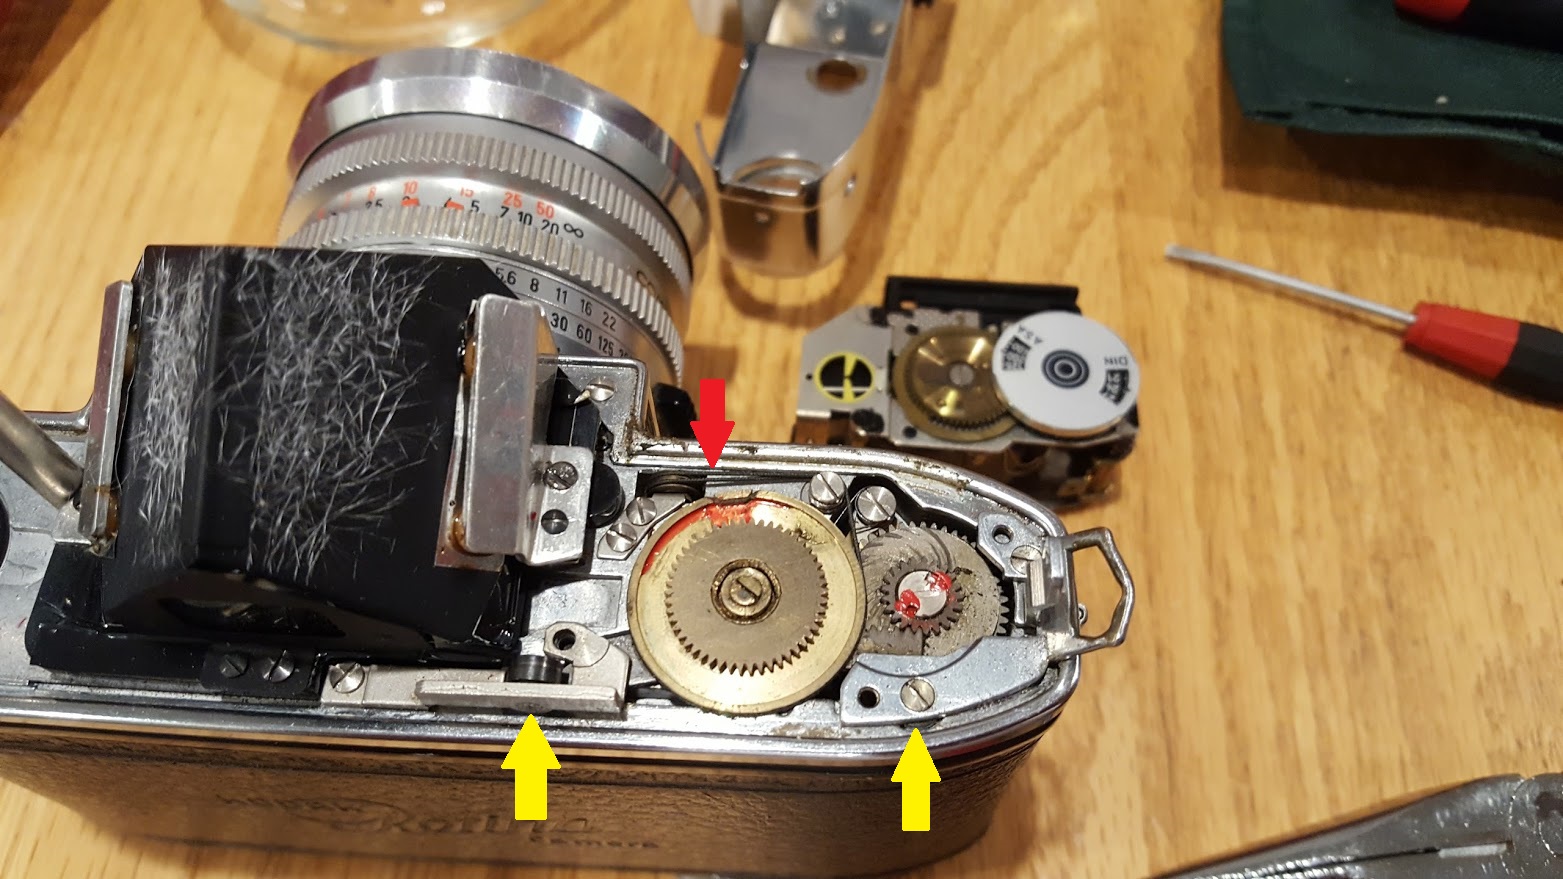 The red arrow in the image to the right points to the string which connects the aperture wheel on the bottom of the camera to that large brass wheel which controls both the iris and the exposure system. It probably comes as no surprise that if this string breaks, the Retina Reflex breaks too. The string is attached to the brass wheel using paint (yes, seriously). The two yellow arrows point to rollers that help move the cocking rack (which you can’t see) when it moves. According to Chris Sherlock, these wheels are also common points of failure as they can break or become stuck and must be properly lubricated.
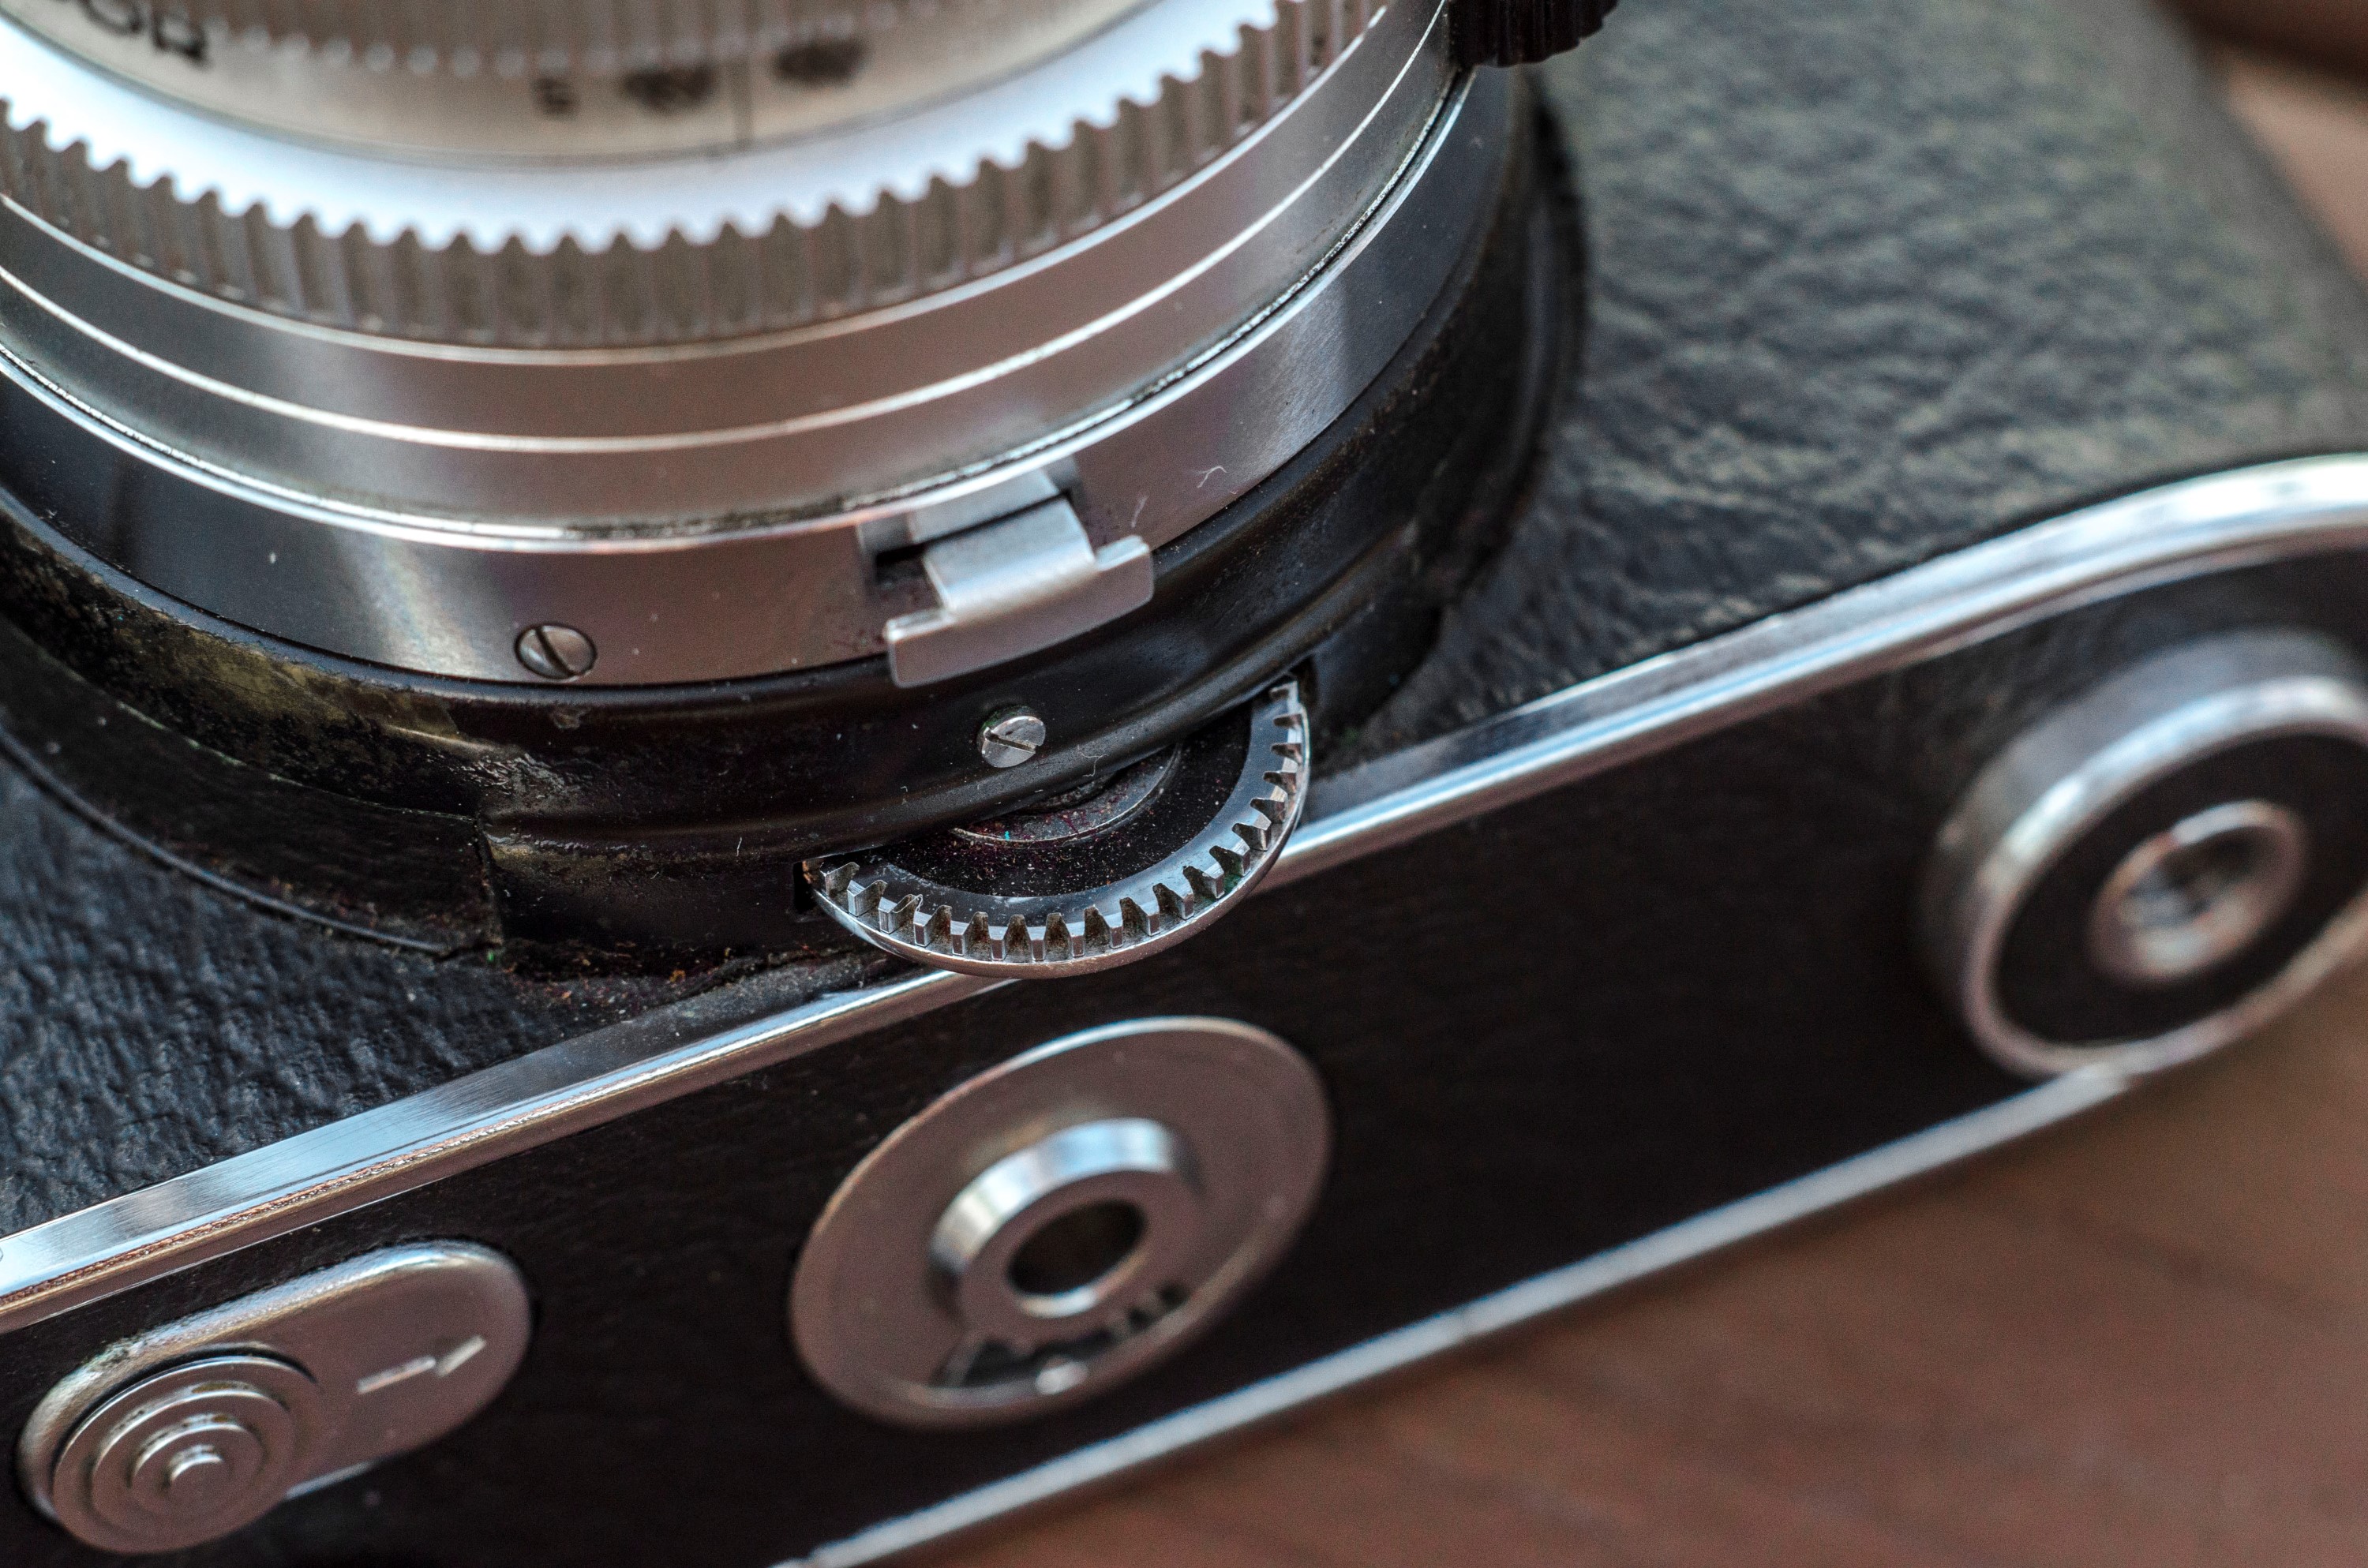
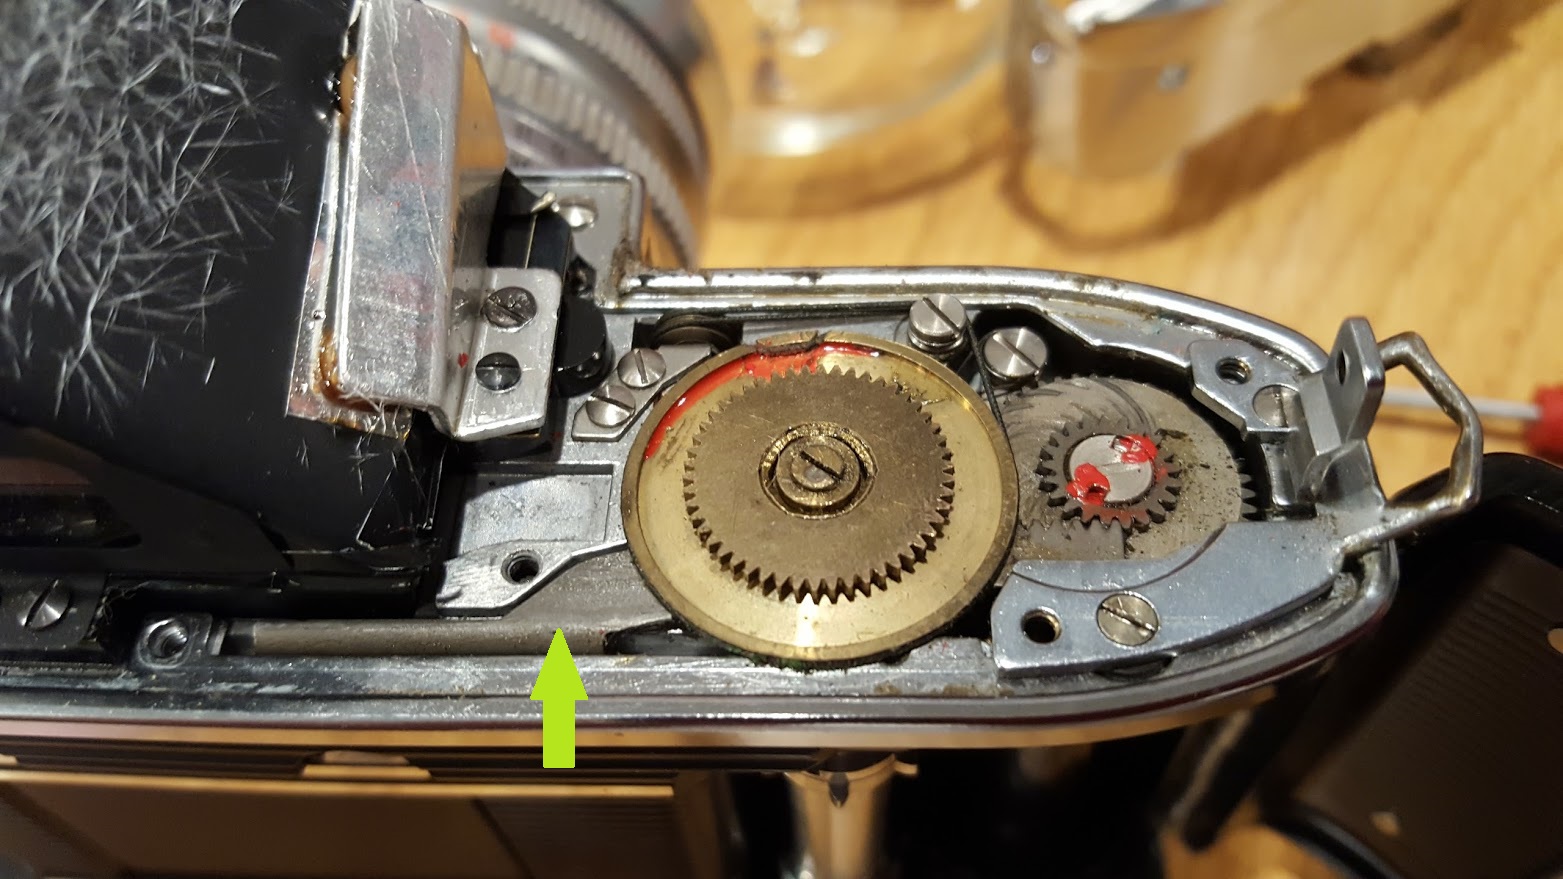 In the image to the left, the green arrow points to the cocking rack after removing one of the rollers from the previous image. On the underside of the rack, beneath the green arrow, are saw teeth that mesh with another brass gear which controls a camshaft inside of the mirror box of the camera. I will show how this cocking rack operates in a video below.
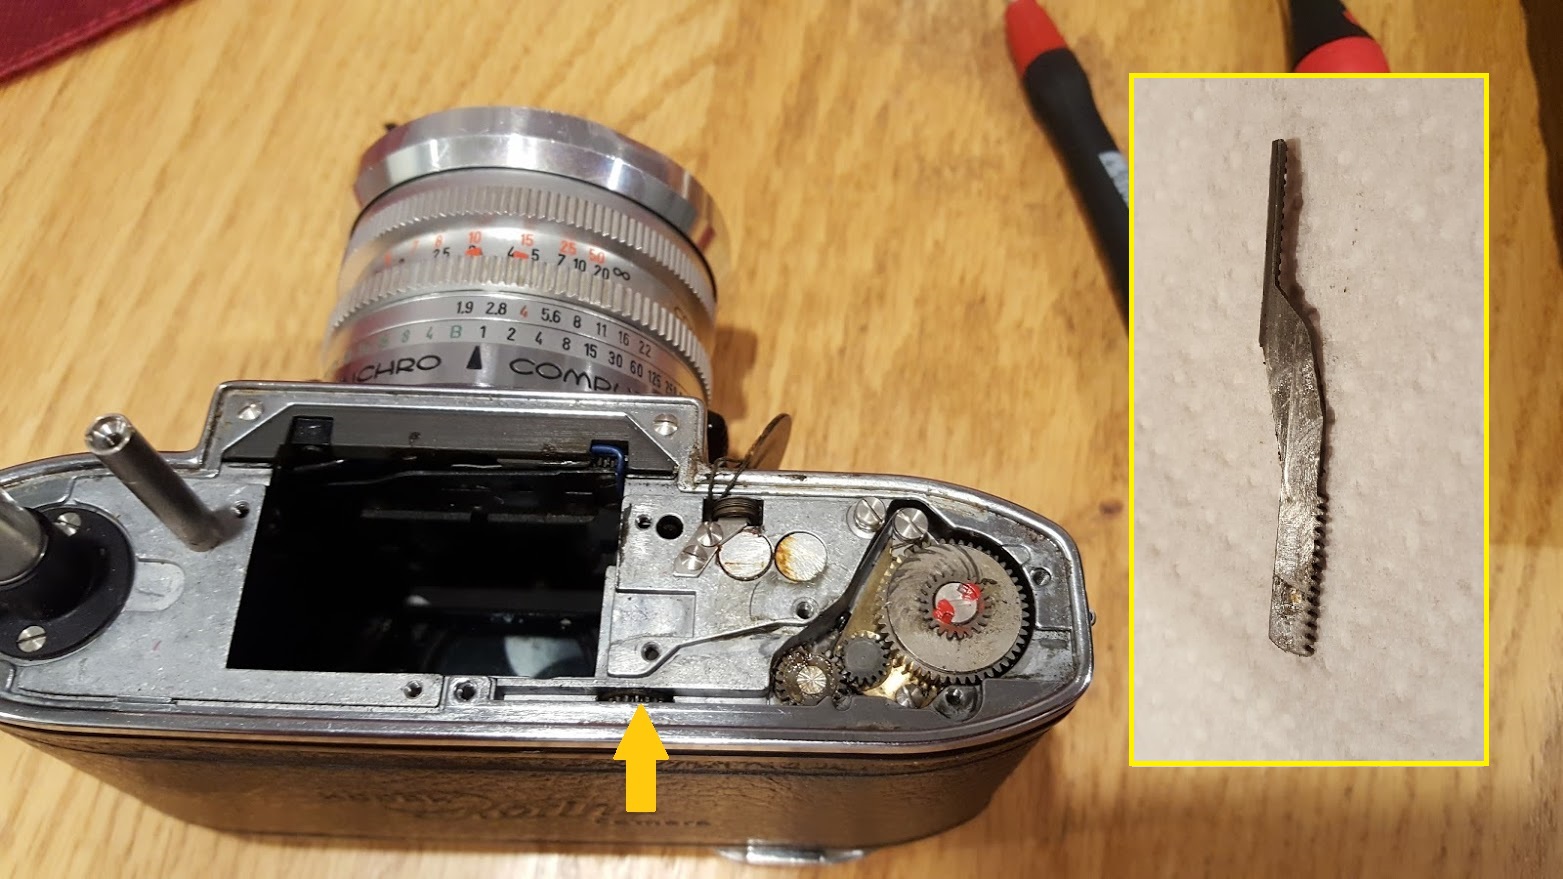 The orange arrow points to the small brass gear that is in contact with the saw teeth on the cocking rack. As the cocking rack (inset image) moves left and right, it spins this gear which acts like a “flywheel” on the cam shaft which you will see in the next image. Also notice that I removed the large brass wheel which is connected to that string, seen in the two previous images. Be careful not to break this string!
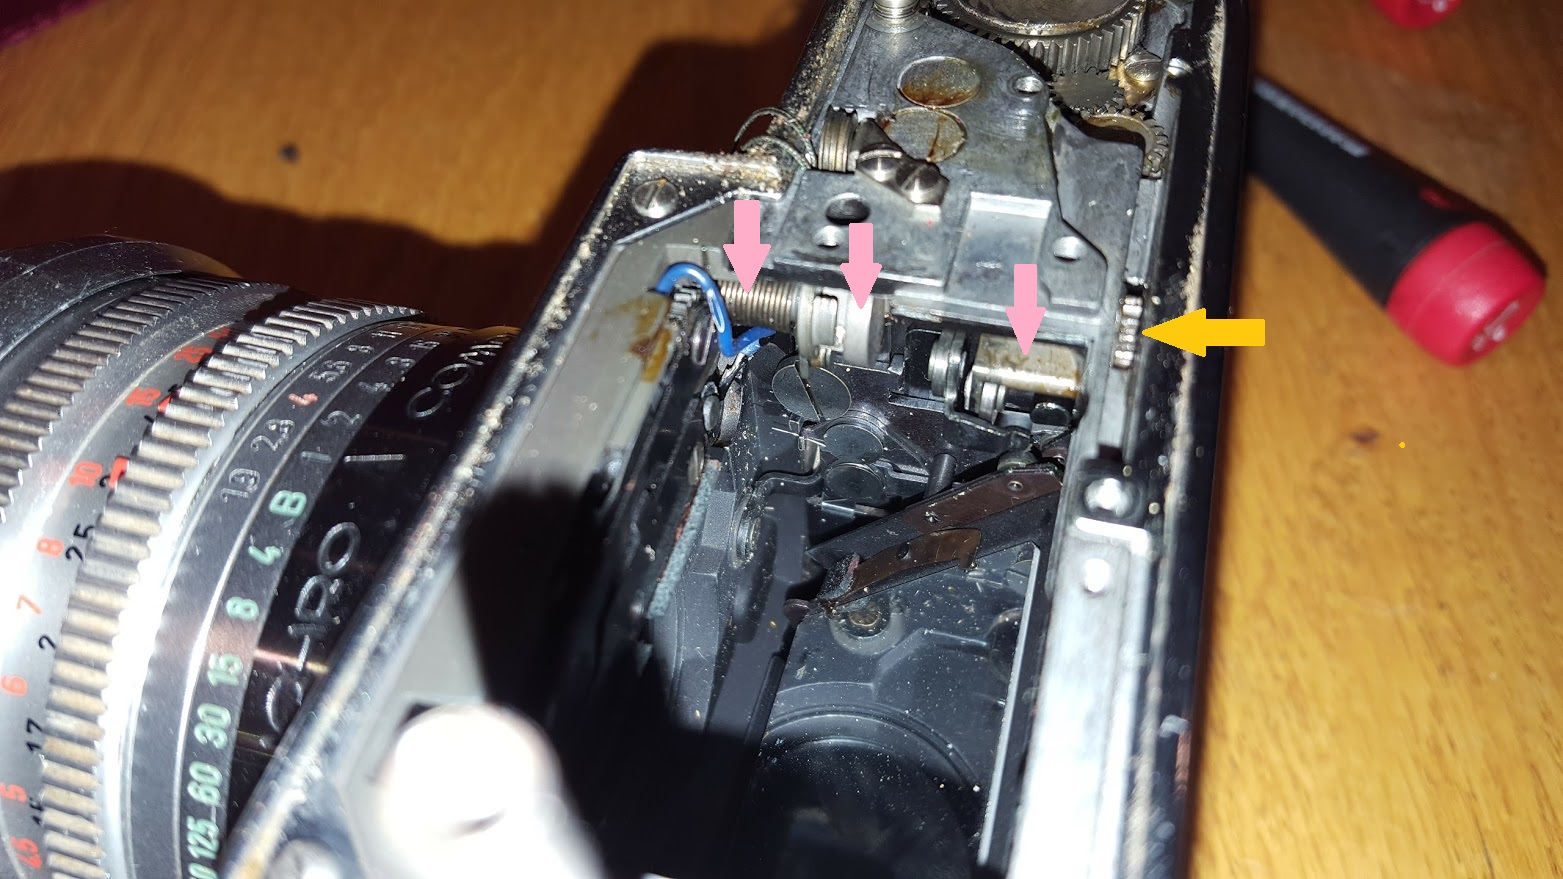 I needed to remove the prism for this next image, but now you can see the camshaft I was referring to earlier. The orange arrow is pointing to the same flywheel gear as the previous image. The three pink arrows point to a single camshaft which rotates when the cocking rack spins the flywheel. This camshaft does a variety of things like opening and closing the shutter, and raising and lowering both the reflex mirror and capping plate. I have a video of this camshaft in action below.
 This final image shows part of a geared mechanism that controls the shutter. The front end of the camshaft from the previous image is coupled to some type of geared drive which actuates the shutter to open and close as needed. I was never able to fully see how this part of the shutter worked, but it just continues to illustrate my point of how complex this camera is. It is no wonder how often they are found in disrepair.
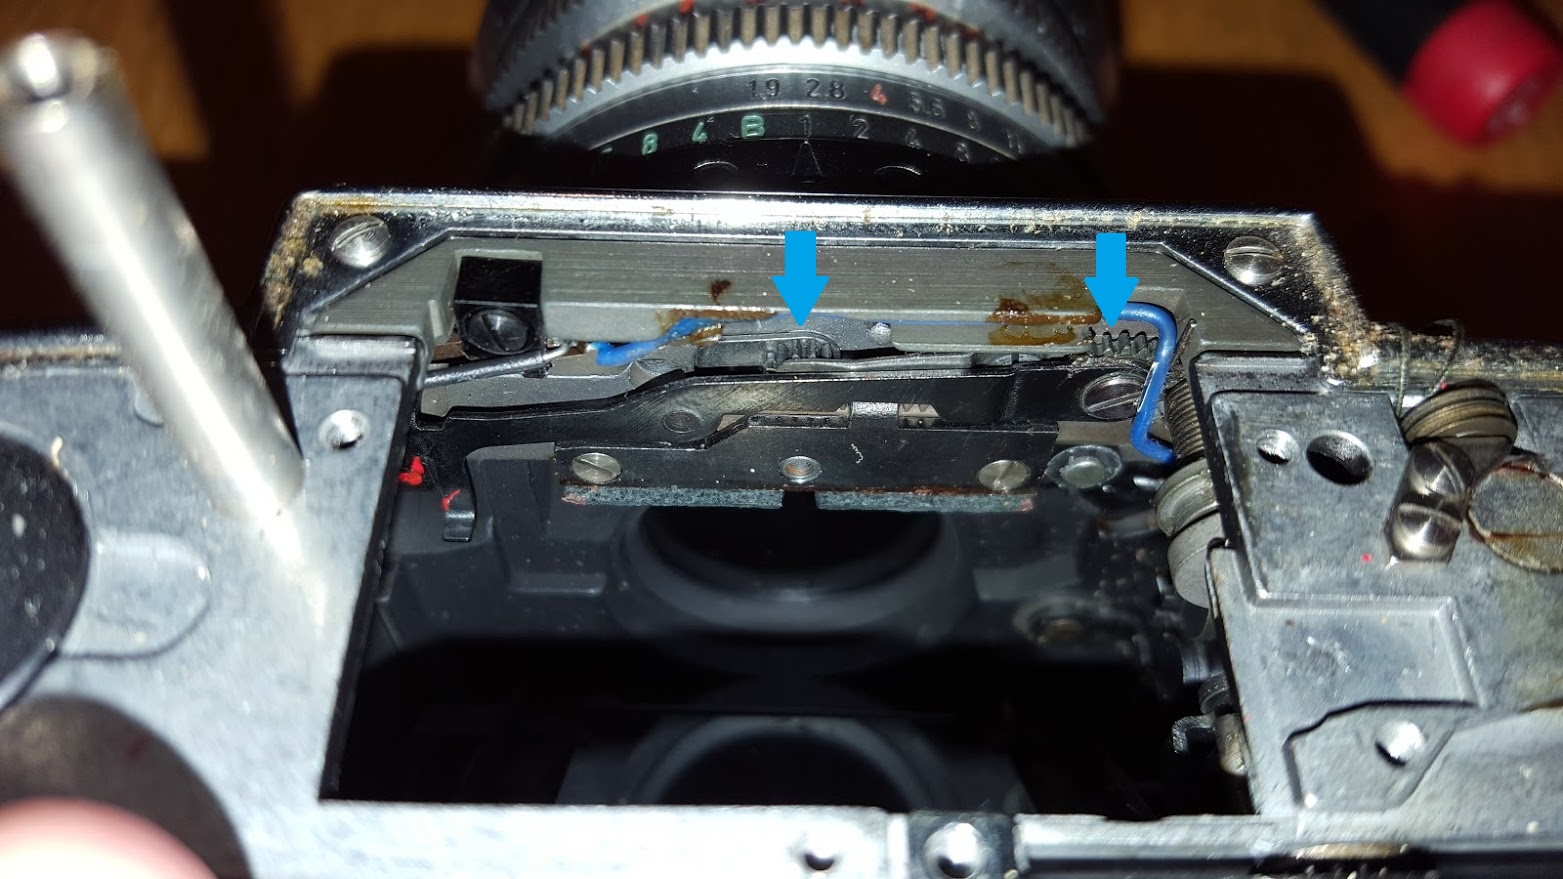
As promised, here are two YouTube videos I made of the camera while I had it apart. I sent both of these to Chris Sherlock to show what was working and what wasn’t. It is clear the cocking rack on mine was not at fault. Chris suggests that the rack on later Retina Reflexes like mine were made of a hardened steel which is less likely to wear out. The fault in my camera was somewhere inside of the mirror box and would have required a complete tear down of the camera to complete.
This first video shows the cocking rack in motion. I have removed one of the wheels indicated by a yellow arrow in the second image above, so that you can see the cocking rack. Notice that as I wind the lever, the rack moves back and forth, which spins the flywheel gear which I indicate with an orange arrow in the fourth and fifth images above.
This second video shows the camshaft that I indicate with the pink arrows in the fifth image above. Although the camshaft is rotating as I wind the lever, it is out of position which is part of my problem. You can see the reflex mirror move at the very end of wind motion, but it never catches a pin that should lift it. There is some kind of mechanical linkage which is either broken, missing, or out of alignment inside of the camera which is preventing normal operation of the shutter. You can also see the two gears indicated by blue arrows in the sixth image above moving, which begins to open the shutter.
At this point in my attempt to repair the Retina Reflex III, I thanked Chris Sherlock for his assistance, but gave up. The camera went into a Ziploc bag and was placed in the camera graveyard of doom (aka my basement).
As fate would have it, one day while browsing through a local pawn shop, I came across this Kodak Retina Reflex IV and it worked! The IV was very similar to the III and used the same interchangeable lens mount, but had the following upgrades:
- Small window in front of the pentaprism that allows you to see selected aperture and shutter speed settings from within the viewfinder
- Ground glass split image focus aide is rotated to a 45 degree angle from the standard horizontal aide on the III
- A flash hot shoe replaces the accessory shoe on top of the camera
- The exposure counter now automatically resets when opening the film back
In addition to these 4 upgrades, I also noticed that the camera had an increased use of plastic in its construction which was likely a cost cutting measure.
With my previous (bad) luck with leaf shutter SLRs and having them stay working, I wasted no time shooting a roll of film in the Retina Reflex IV. Thankfully the entire Retina Reflex series pre-dates the use of foam light seals in the film compartment, so I had no crumbling light seals to replace. I gave the camera a quick external wipe down, loaded in a roll of Fuji 200, and went shooting.
My Thoughts
The Retina Reflex IV, like any Retina that came before it, is a finely crafted piece of German engineering. Despite the increase in plastic from previous models, the Reflex IV is quite heavy. Weighing in at 912 grams with the Retina-Xenon 50/1.9 lens and 814 grams with the Retina-Xenon 50/2.8 lens, it is nearly as heavy as both a Nikon F w/ Nikkor 50/2 lens and pentaprism finder at 930 grams, and a Yashica D TLR at 949 grams. This is a large increase from that of a Retina IIa at 570 grams, and a Type 119 Retina I at 459 grams.
When holding the Reflex IV, the immediate heft inspires a similar confidence as when you hold pretty much any other Retina that came before it. If the thought of a Retina quality camera with Retina quality lenses, but with the advantage of a through the lens SLR viewfinder seems like this could be the perfect Retina, you will be sorely disappointed.
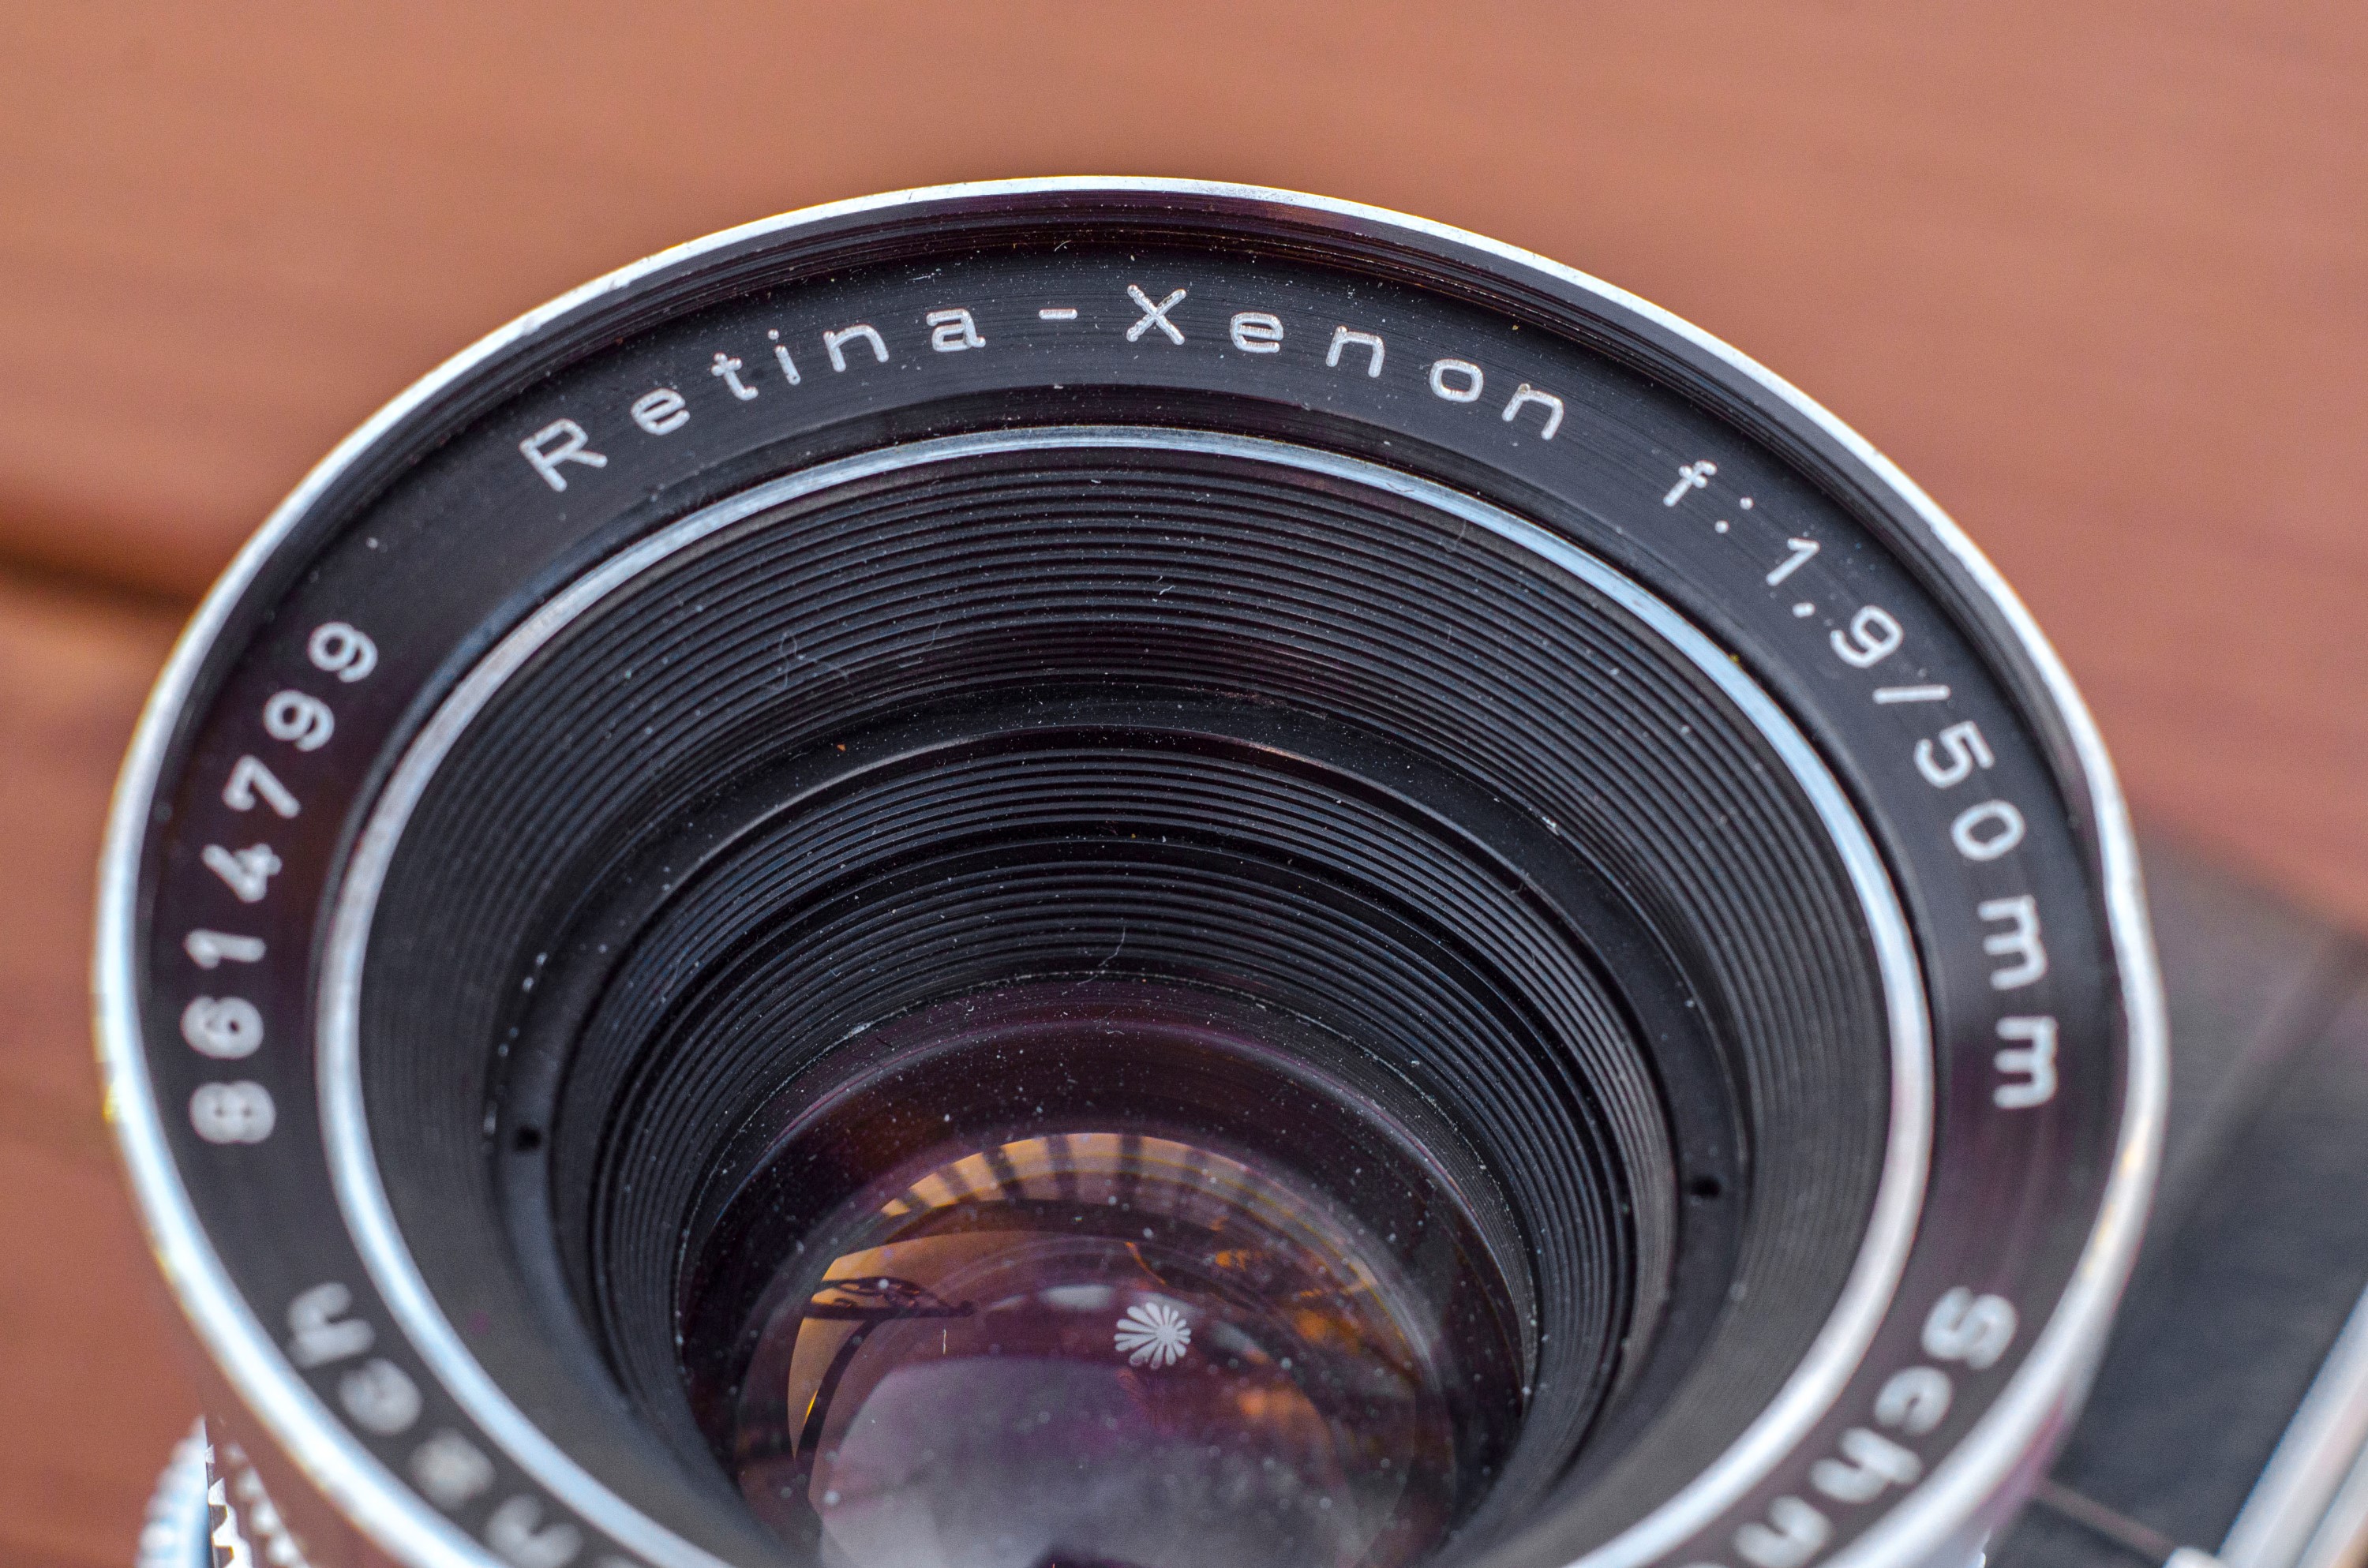
The example being reviewed here originally came with a Schneider-Kreuznach Retina-Xenar 50mm f/2.8 lens, but I swapped it for the f/1.9 Retina-Xenar from my original Retina Reflex III. The lenses between the models III, IV and S Retina-Reflexes are interchangeable, but not with previous Retina Reflexes as the mount changed. Although the f/1.9 Retina-Xenar was in mostly good condition, it had a tiny dent in the filter ring, and a strange “flower” anomaly inside of the lens which you can see in the image to the left. This type of anomaly is the result of “separation” where two glued together lens elements have begun to separate. The flower petal shape is caused by a very small imperfection that got into the lens when it was being made. For the first few decades of this lens’s life, this anomaly wouldn’t have been seen, but as time passes, the glue used to hold the two elements together begins to degrade causing this type of anomaly. These types of flower shaped anomalies are not unique to Retina lenses as it can happen to any number of lenses. Thankfully, they rarely cause any negative impact on image quality.
I’ll get straight the point and say that shooting with the Reflex IV was a miserable experience. Almost none of the charm of the rangefinder Retinas applies to this camera. I said in my review for the Retina IIc that the camera was growing in size and starting to lose the appeal of the compactness of the earlier models. Sadly, this trend continued as the Reflex IV is a bulbous and heavy camera that is in no stretch of the imagination a compact camera. Admittedly, the Schneider Retina-Xenar 50/1.9 lens adds to the size, as the camera can be shrunk a bit with the smaller Retina-Xenar 50/2.8 lens.
The problems don’t end with its size, however. The TTL SLR viewfinder is not very good. On paper, it has everything you’d think you would need in a vintage SLR. The viewing screen has a Fresnel pattern which is supposed to increase brightness, but that doesn’t seem to be happening here. For one, the Fresnel pattern has the thickest “ribs” I’ve ever seen in a viewing screen. You can see each individual circular pattern radiating from the center of the screen. The Fresnel pattern does not appear to be increasing the brightness at all, as I found the overall brightness to be quite dim, especially considering I had the benefit of a bright f/1.9 lens.
Surrounding the center of the viewing screen is a matte finish ground glass circle which would be useful for duplication or copy work, but that’s not something I really think a lot of people did with this camera. In the very center is a split image focus aide tilted at a 45 angle. On paper, a 45 degree split image might seem beneficial as it means it can be used with the camera in both portrait and landscape orientation, the angled line is less prominent, making fine focus work quite difficult. I found that by holding the camera initially at a 45 degree angle to make the split image horizontal again, selecting my focus and then rotating the camera back into a shooting position was the best way to use it, but if I have to turn the camera 45 degrees to make a 45 degree focus aide useful, then what’s the point?
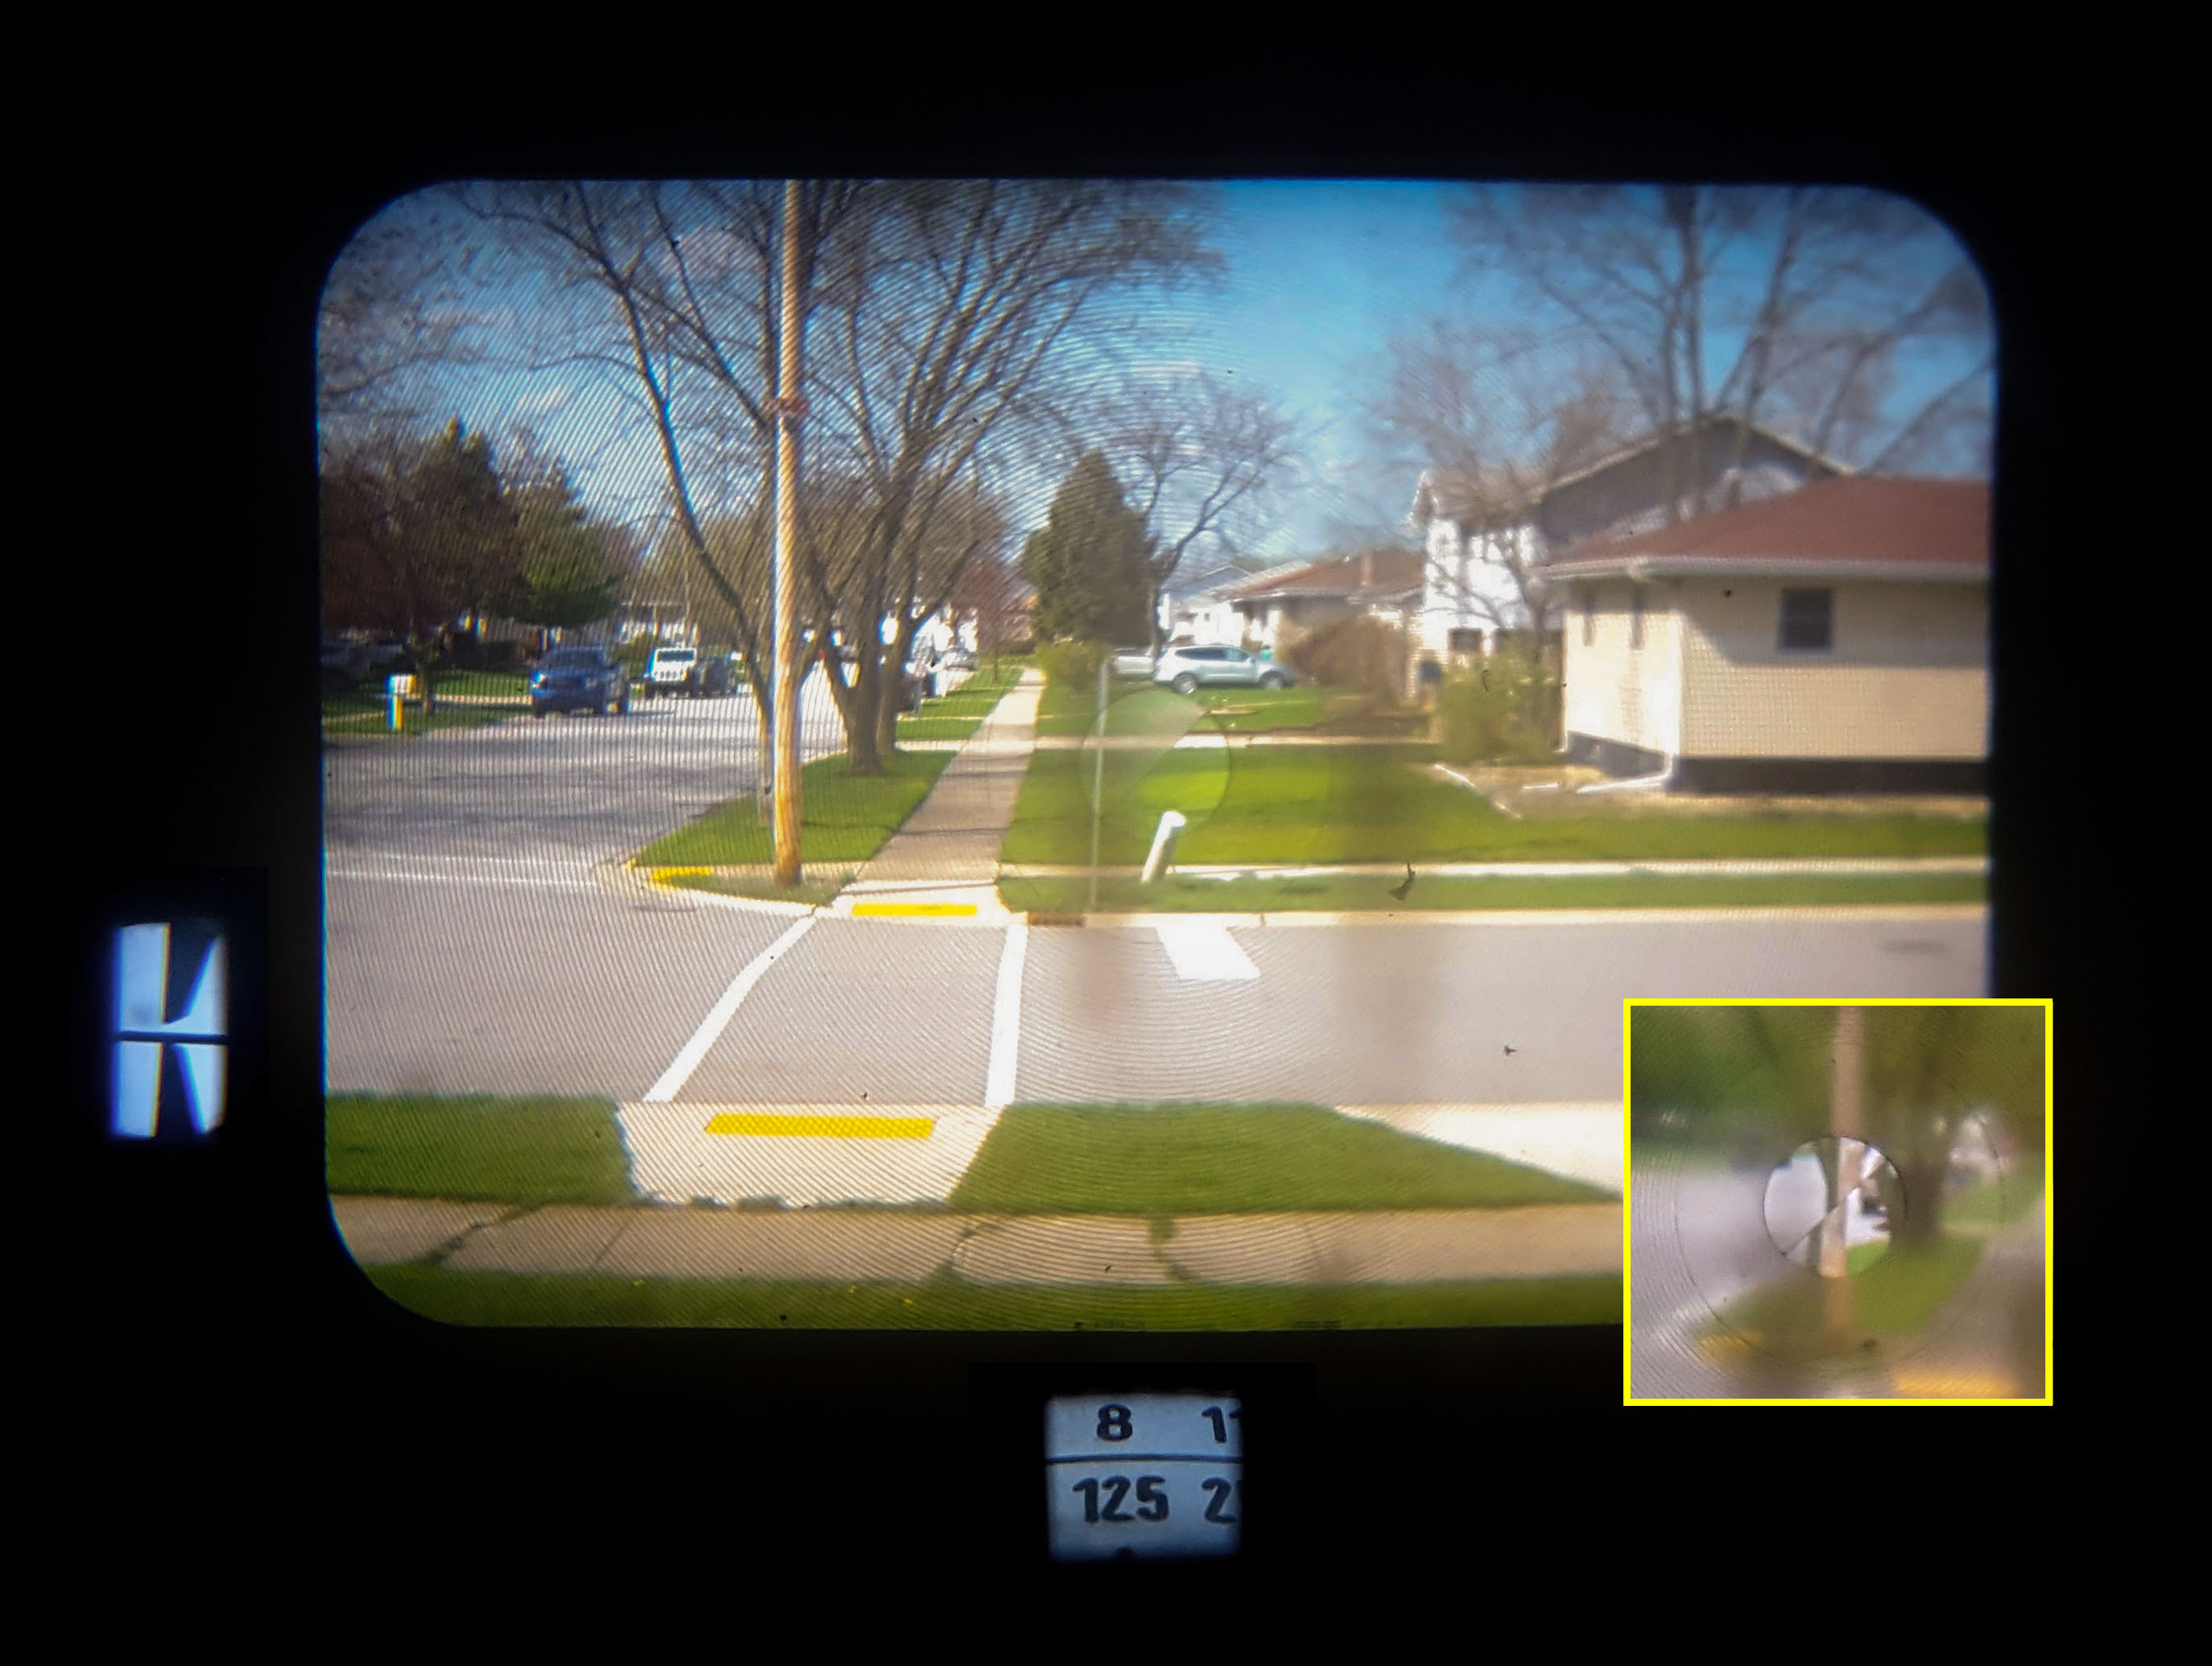
In addition to the poorly designed Fresnel pattern and less than useful focus aides, I found the implementation of the new shutter speed/aperture setting window (which is at the bottom) to be impossible to see at the same time as the match needle for the exposure meter (which is on the left). In the image to the left, I had to take 3 separate shots through the viewfinder with my cell phone and composite them all together to show you everything all at once. I could never find an orientation of the camera to my eye where I could see both the aperture and shutter speed windows and exposure meter at the same time. Also in the image to the left is an inset image showing the 45 degree focus aide where I intentionally had the camera out of focus, to make it easier to see.
Perhaps this wasn’t a big deal since once the exposure was correct, you really didn’t need to see the shutter and aperture numbers, but I figure if both were there, why not make them useful. Other companies were able to do that.
Moving beyond the viewfinder, I had several issues with the overall layout of the camera. Kodak Retinas have long gone against the grain of traditional control layouts. In my review for the Kodak IIc, I state that the bottom wind lever was neither an asset or a liability in use. I didn’t prefer it over a more traditional top wind lever, but I didn’t hate it. With the Reflex IV, I can’t say the same thing. Although mechanically, the bottom wind lever on the Reflex IV is nearly identical to the Retina rangefinders, but due to the larger and more top heavy layout of the Reflex IV, the position in where my hand is when holding the camera does not allow for a quick and easy flip of the thumb to wind the camera. With the rangefinder, it is possible to comfortably swing your right thumb to the bottom of the camera to wind it, but with the Reflex IV, I had to reposition my whole hand each time this needed to be done. The Reflex IV would have been much better suited to a top wind lever.
Focusing the camera wasn’t easy either. With the Retina-Xenon 50/1.9 lens attached, the focus ring looks and feels nearly identical to the grip ring that is used to detach the lens from the mount. The focus ring is forward of this grip ring, but behind the large chrome beauty ring of the lens. Although I didn’t use it much, the Retina-Xenon 50/2.8 improves on this as it lacks this large beauty ring, and instead has the focus ring at the very front of the camera. While not a deal breaker, I found myself regularly reaching for the lens’s grip ring rather than the focus ring each time I put it to my eye. This is likely something that I would have gotten used to had the Reflex IV been my every day camera, but through my test roll, I often fumbled with it.
If a pretty poor viewfinder, an awkward advance lever, and an unintuitive focus ring all seem pretty bad, it gets worse. Without a doubt, the worst thing about the Reflex IV is the convoluted system for changing aperture and shutter speed. Like most late 50s/early 60s cameras, the Reflex IV uses a coupled Light Value System (LVS) where making changes to the shutter speed makes a corresponding change to the aperture iris to maintain consistent exposure. Some companies like Yashica and Minolta created LVS systems that made sense and are easy to override, but then others like Aires and Meopta created LVS systems that require an additional movement like pulling upward on a ring to de-couple the settings, or manually releasing a tiny pin.
Then there’s the Retina Reflex. But here’s the really strange part. Kodak coupled the shutter and aperture controls to a single dial, and didn’t even include an LVS scale. So its like having all the annoyances of a badly designed LVS system without an actual LVS system.
On the lens barrel of the Reflex IV, you see aperture and shutter speed numbers, but you can’t change both independently. You rotate one ring and the shutter speed and aperture numbers will always go in opposite directions. So for example, lets say the camera is set at 1/30 and f/8. Rotate the ring clockwise and now you’re at 1/15 and f/11, rotate again, and you’re at 1/8 and f/16, one more time, and you’re at 1/4 and f/22.
But what if you wanted 1/125 and f/8? First, you must rotate the ring counter clockwise until you reach your desired shutter speed of 1/125, but the aperture will automatically move to f/4. You can force a different aperture size by rotating a small wheel on the very bottom of the lens mount. This wheel has no click stops, so you must rotate it while watching the scale on the top of the lens and stop when you see the aperture ring get to f/8. If you remember from earlier in this review where I show you images of my Retina Reflex III tear down, there was a large brass wheel with a string connected to it. Well that string is what’s moving all this stuff.
If this explanation sounds confusing, this isn’t one of those examples where it is hard to explain, but if you try it, it will make sense. Trust me, it will never make sense. This system that Kodak came up with is absolutely ludicrous. I guess I could understand if this was all cutting edge stuff, and no one had come up with an SLR with adjustable aperture and shutter speed settings. I could see a convoluted system like this being thought up in the 1920s or 30s, but not the 1960s when many other camera makers had already come up with a good design that was far less complicated and much easier to use. I can’t even say that this system was necessitated by the leaf shutter SLR design, as the Kowa SE-T that I reviewed in the Cameras of the Dead series has a very traditional control layout that works the same as literally every other SLR other than the Retina Reflex
Simply, the Retina Reflex IV (and the III that I couldn’t get working) have the worst control layout of any camera in my collection. Although I only shot one roll of film through the camera, I could never get used to it, and by the time I was 1/3rd of the way through the roll, all I could think about was finishing the roll so that I didn’t have to keep using it.
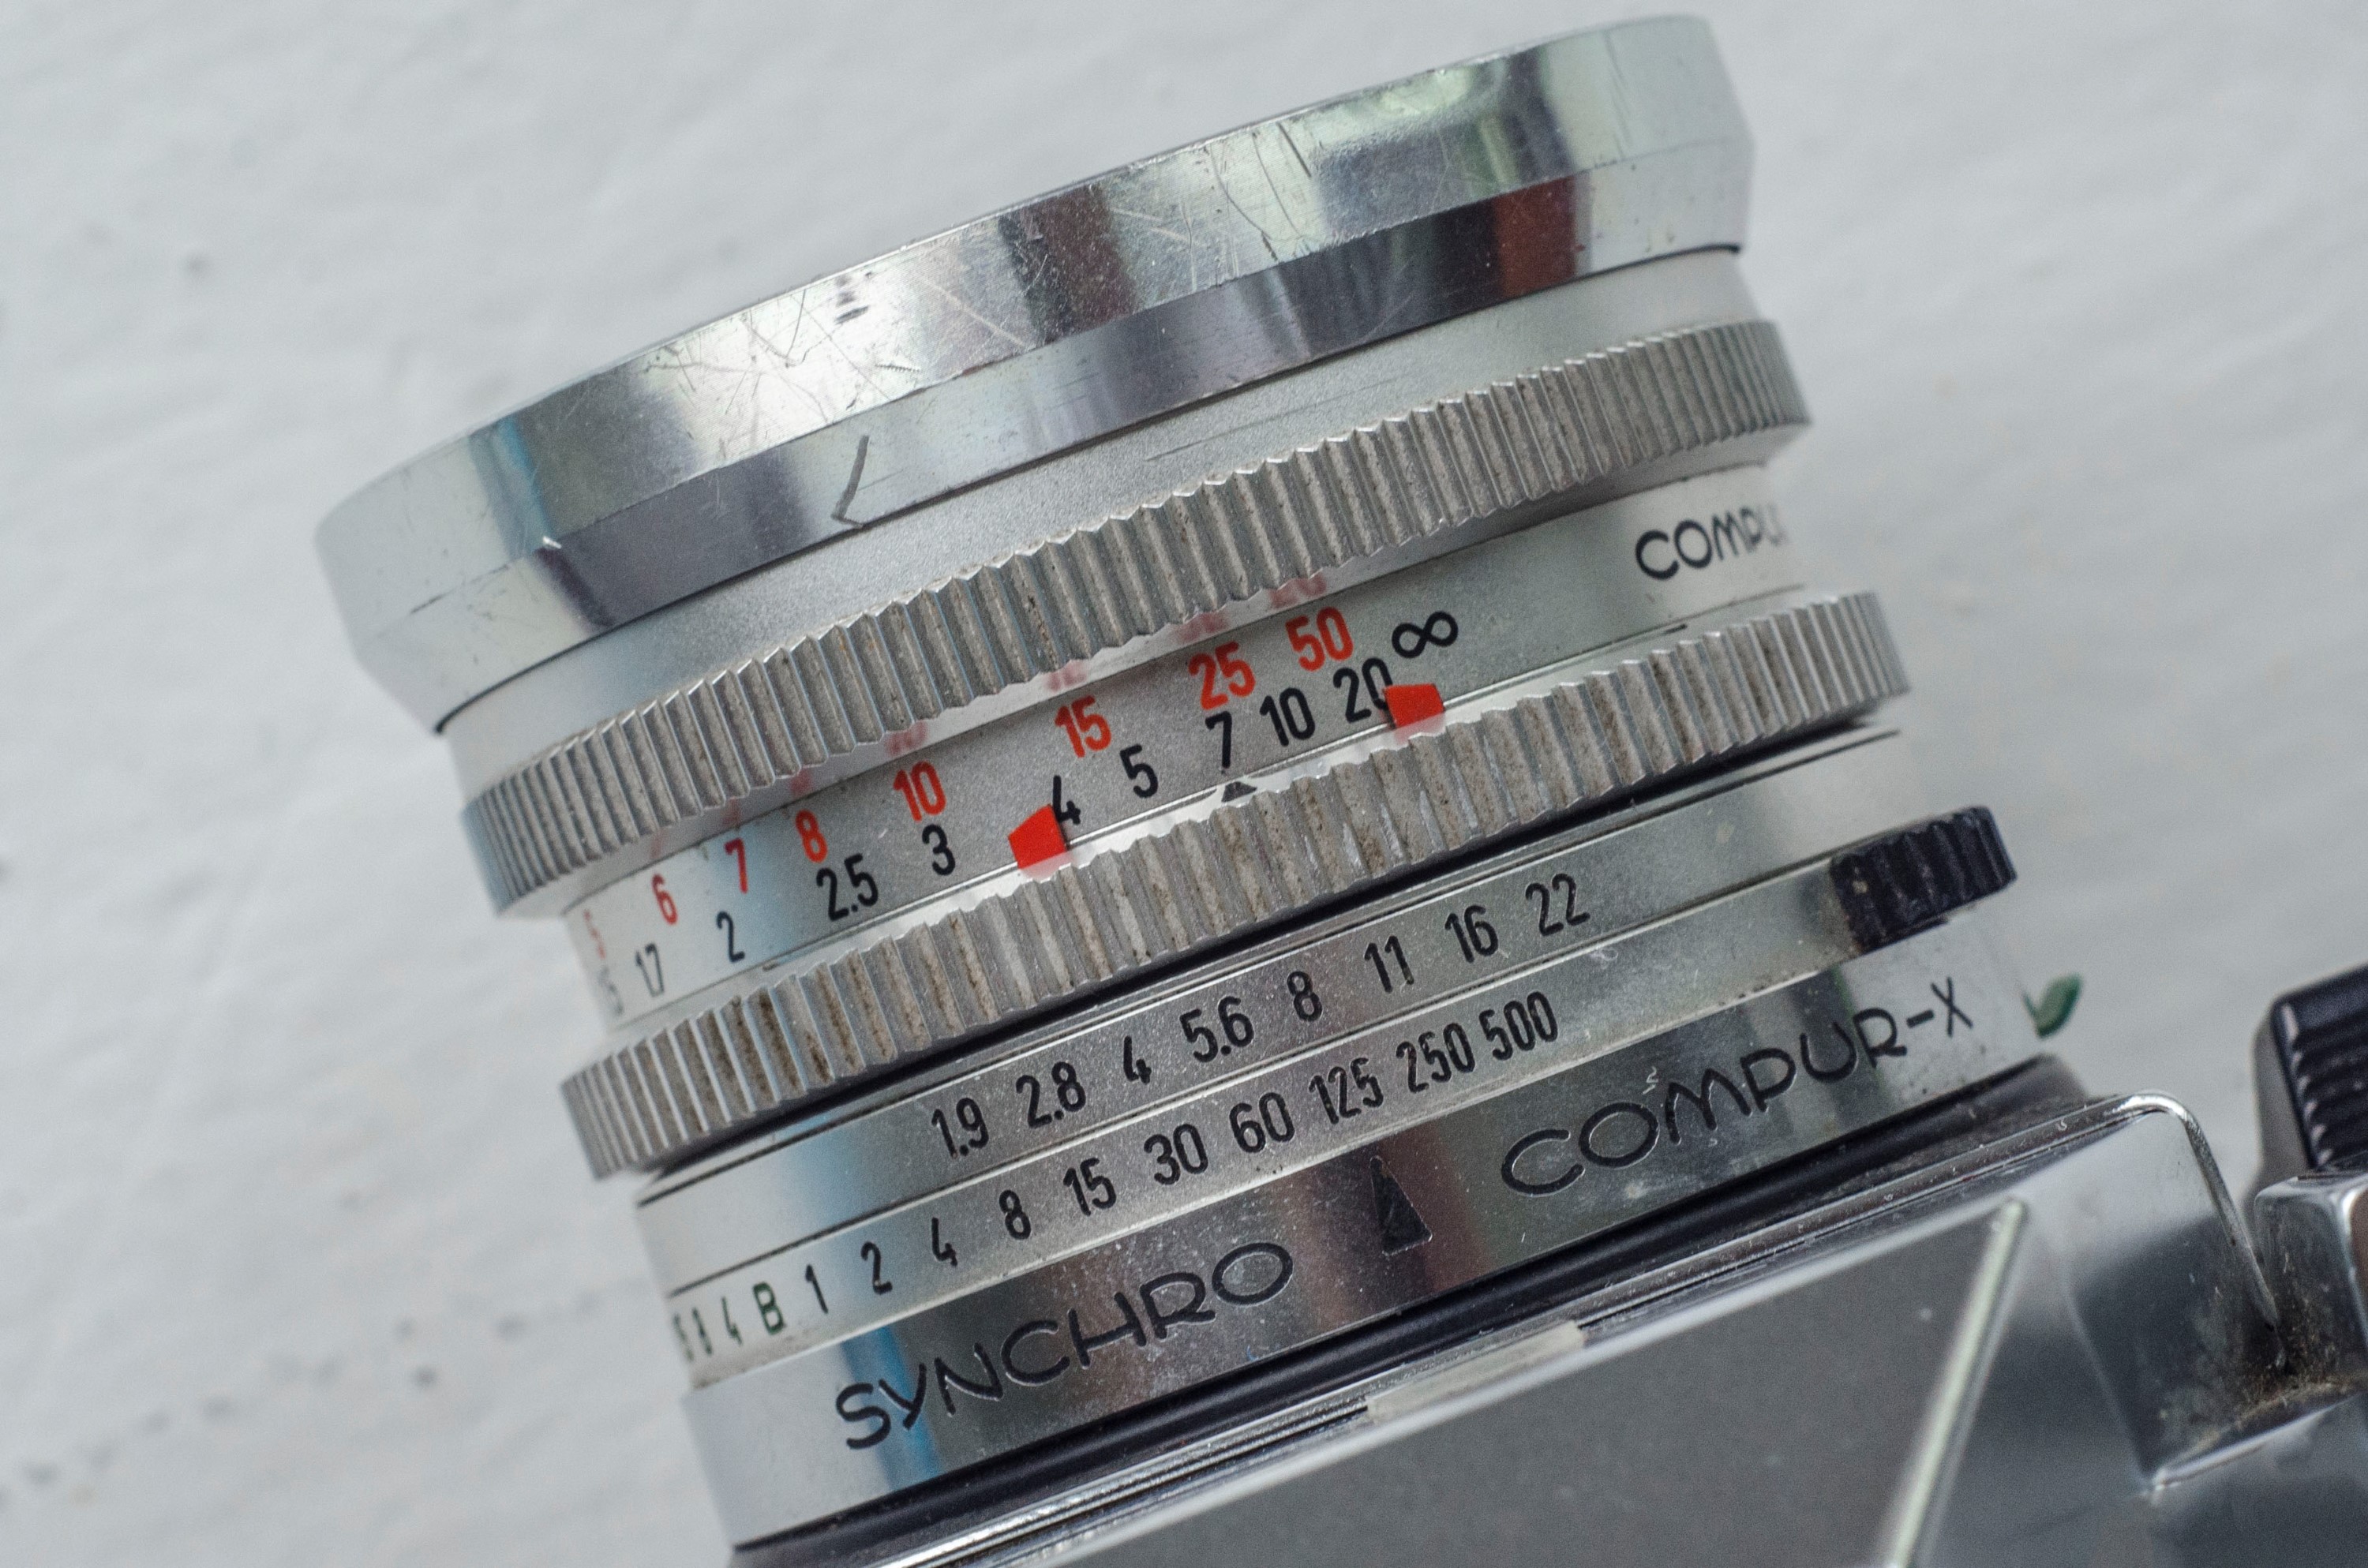
If you were to put a gun to my head and force me to come up with one nice thing to say about the layout of the Reflex IV, I’d say that the lens has a rather neat depth of field feature where these two red arrows move closer together or farther apart to indicate your depth of field depending on your chosen aperture size. Zeiss-Ikon had a similar system on the Carl Zeiss Pancolar 50/2 lens that was available in Exakta mount.
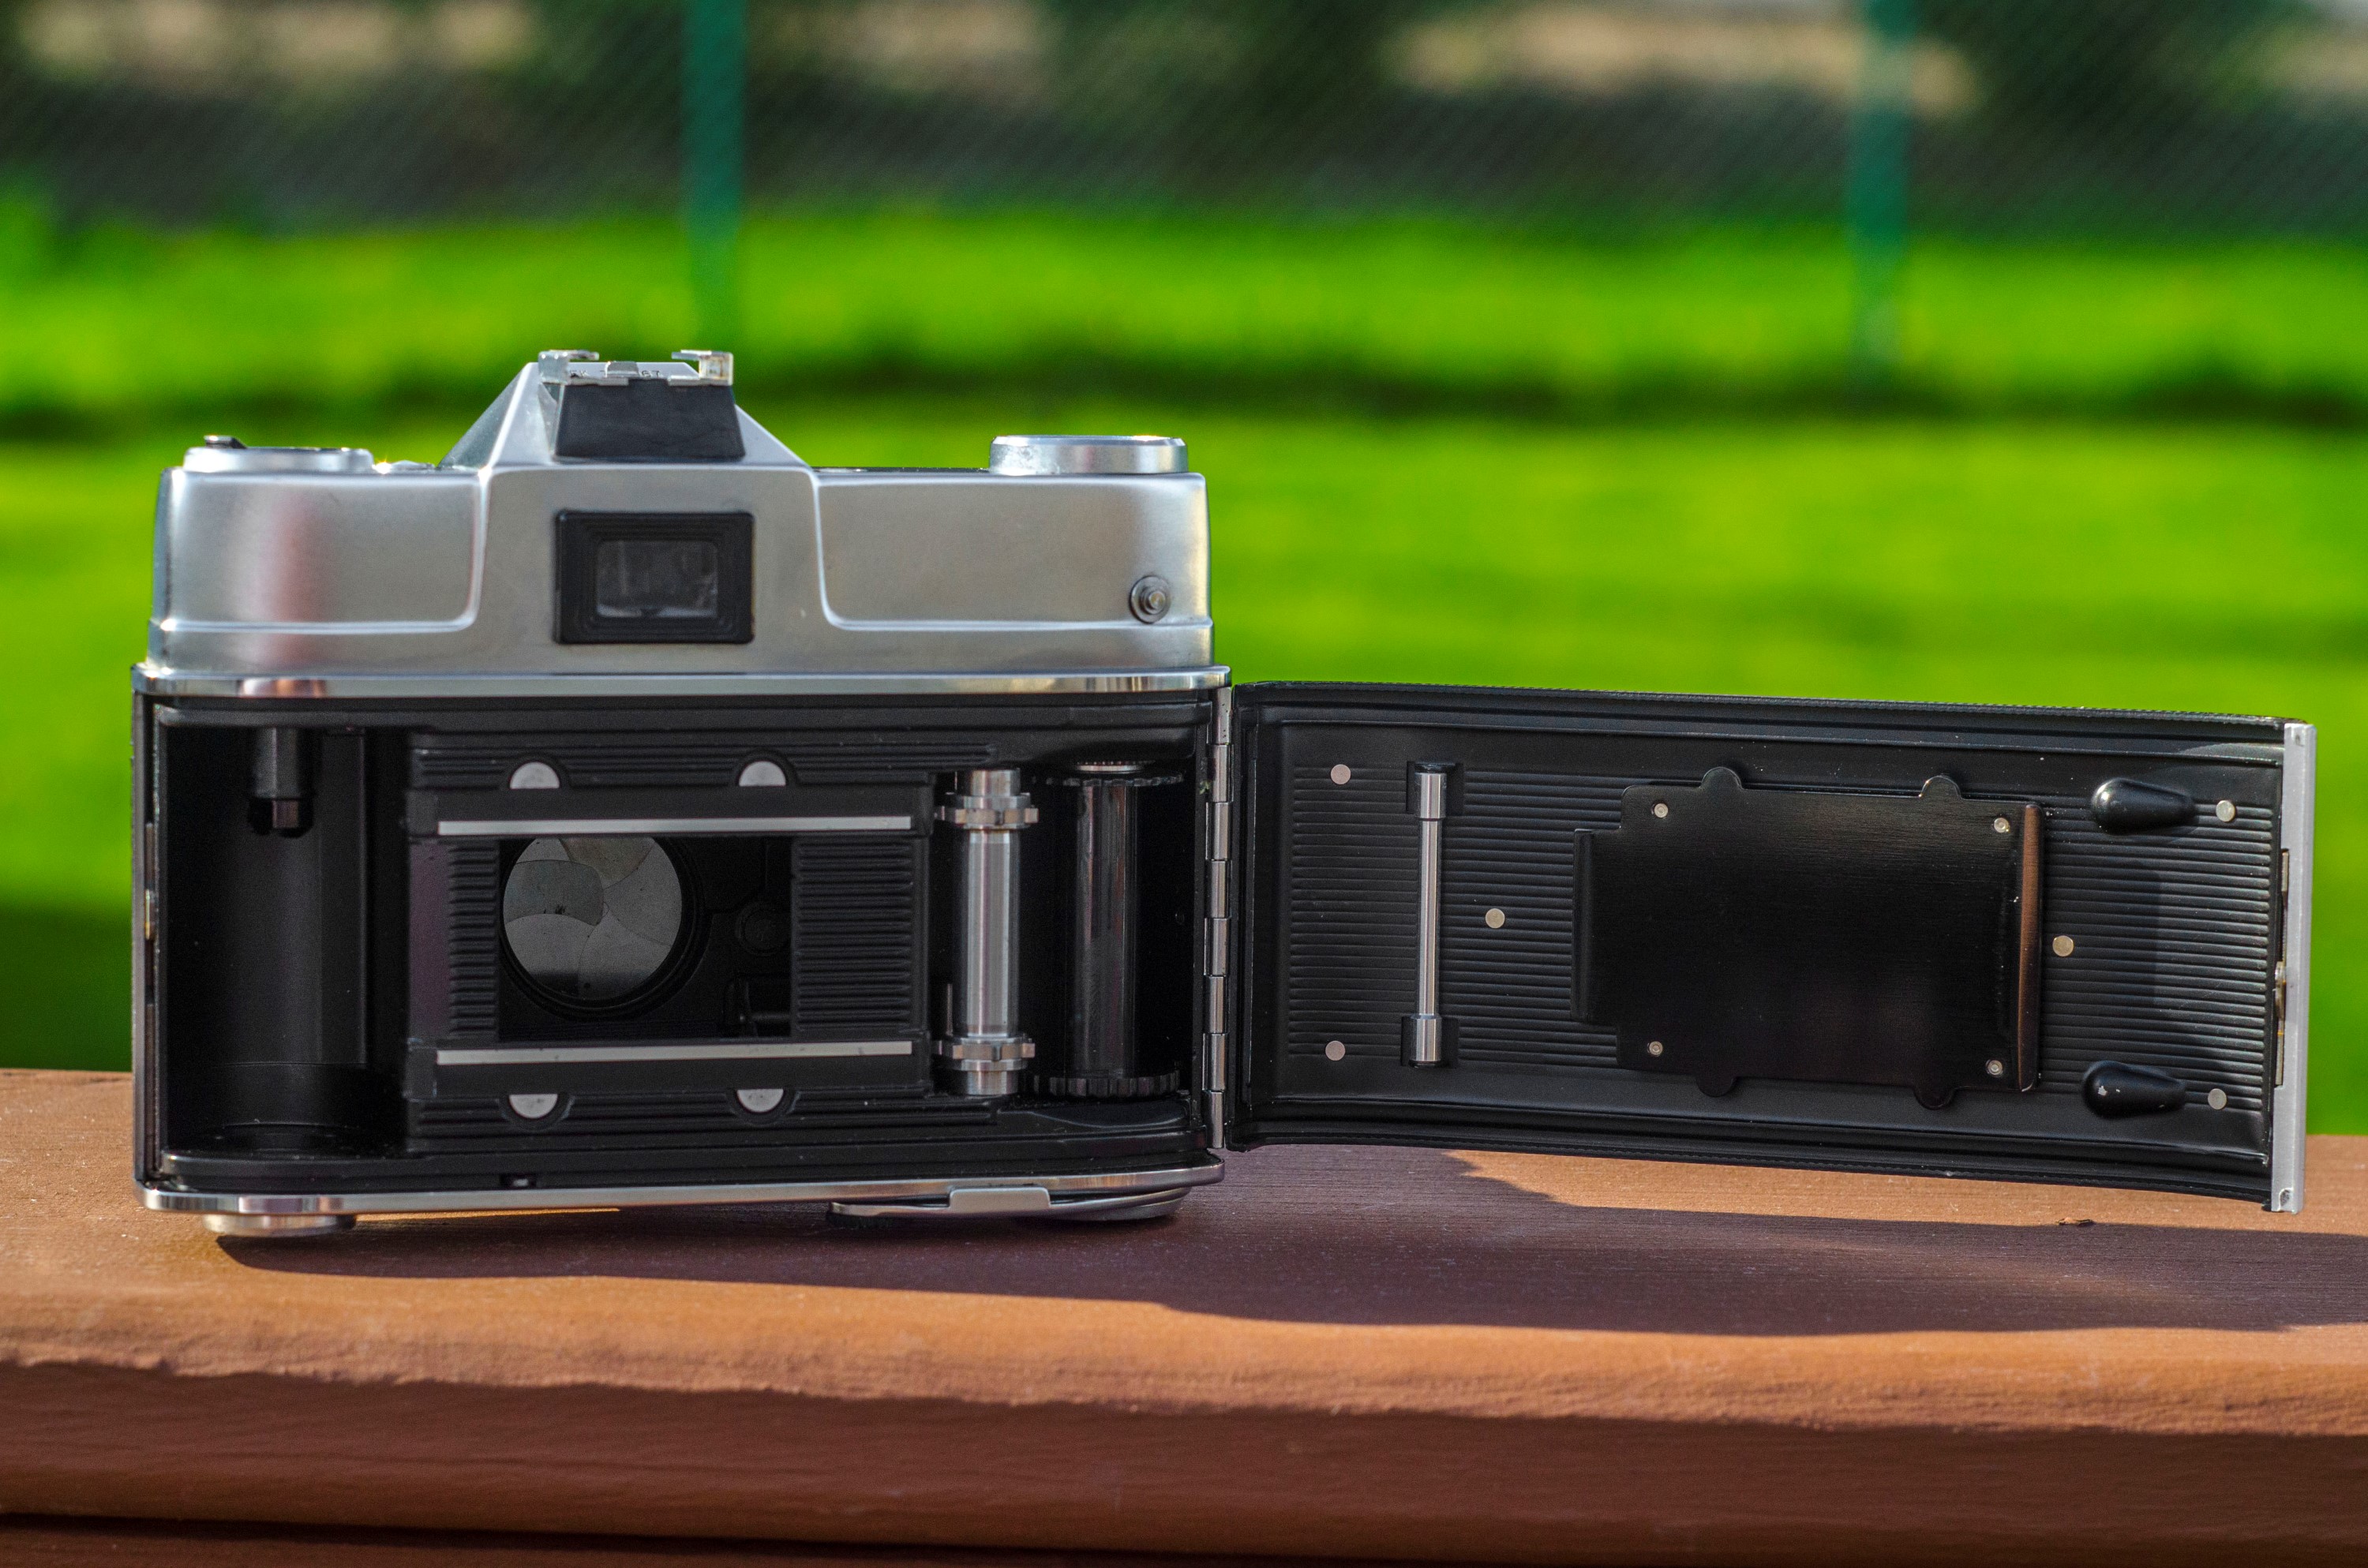
Thankfully, loading film is pretty straightforward. Like most Retinas, the Reflex Reflex has a release pin on the bottom of the camera that opens the right-hinged film door. A new film cassette is loaded on the left side and threaded into a takeup spool on the right. The image to the left shows the empty film compartment with the shutter in its un-cocked position which allows you to see the back of the Compur shutter’s blades.
With a list price of $277 in 1964, the Retina Reflex IV was not a cheap camera. When adjusted for inflation, $277 compares to $2176 today! That’s some serious change for a camera with this long list of complaints.
I’ve spent enough time giving you my thoughts on using the Reflex IV, let’s see some photos!
My Results
I haven’t exactly had the best of luck with leaf shutter SLRs, so when I got this Retina Reflex IV and saw that it appeared to be working, I didn’t want to press my luck with my film choice. I decided to shoot a roll of trusty ole Fuji 200. This is my “go-to” film for cameras where I don’t want to have to worry about expiration dates, excessive grain, color shifts, or any other film related issues. Fuji 200 is still available, cheap, and I know what to expect from it.
If the images came out bad from this camera, there could be no way I could blame the film. I took it out in late April as spring color was in bloom, so there would be no excuse to not get good images from it. Despite my obvious disdain for the design of the Retina Reflex IV, it is a Retina after all, and it seems that no matter which specific model you choose, whether its a pre-war Retina I, or a Retina SLR from the 1960s, the images should come out great! But did they?


Did they ever! Holy cow they came out great. In fact, I’d say the images came out so good, that it put me into a bit of a quandry. I really did not enjoy shooting this camera at all, but after seeing the images it could make, I just might be forced to take it out again. Maybe I was in a bad mood the day(s) I shot it. Maybe with a fresh set of expectations, I might enjoy it better.
Pretty much every complaint I had about the dim viewfinder and angled split image focus aide turned out to be a non issue. All but one shot from the 24 exposure roll was correctly in focus. The hateful design of the linked shutter speed/aperture exposure system gave me no problems with correct exposure as the entire roll, even interior shots came out properly exposed. The Gossen meter not only still works, but it is clearly very accurate as I nailed exposure in the most difficult of scenes. Simply, the Retina Reflex IV hit a home-run.
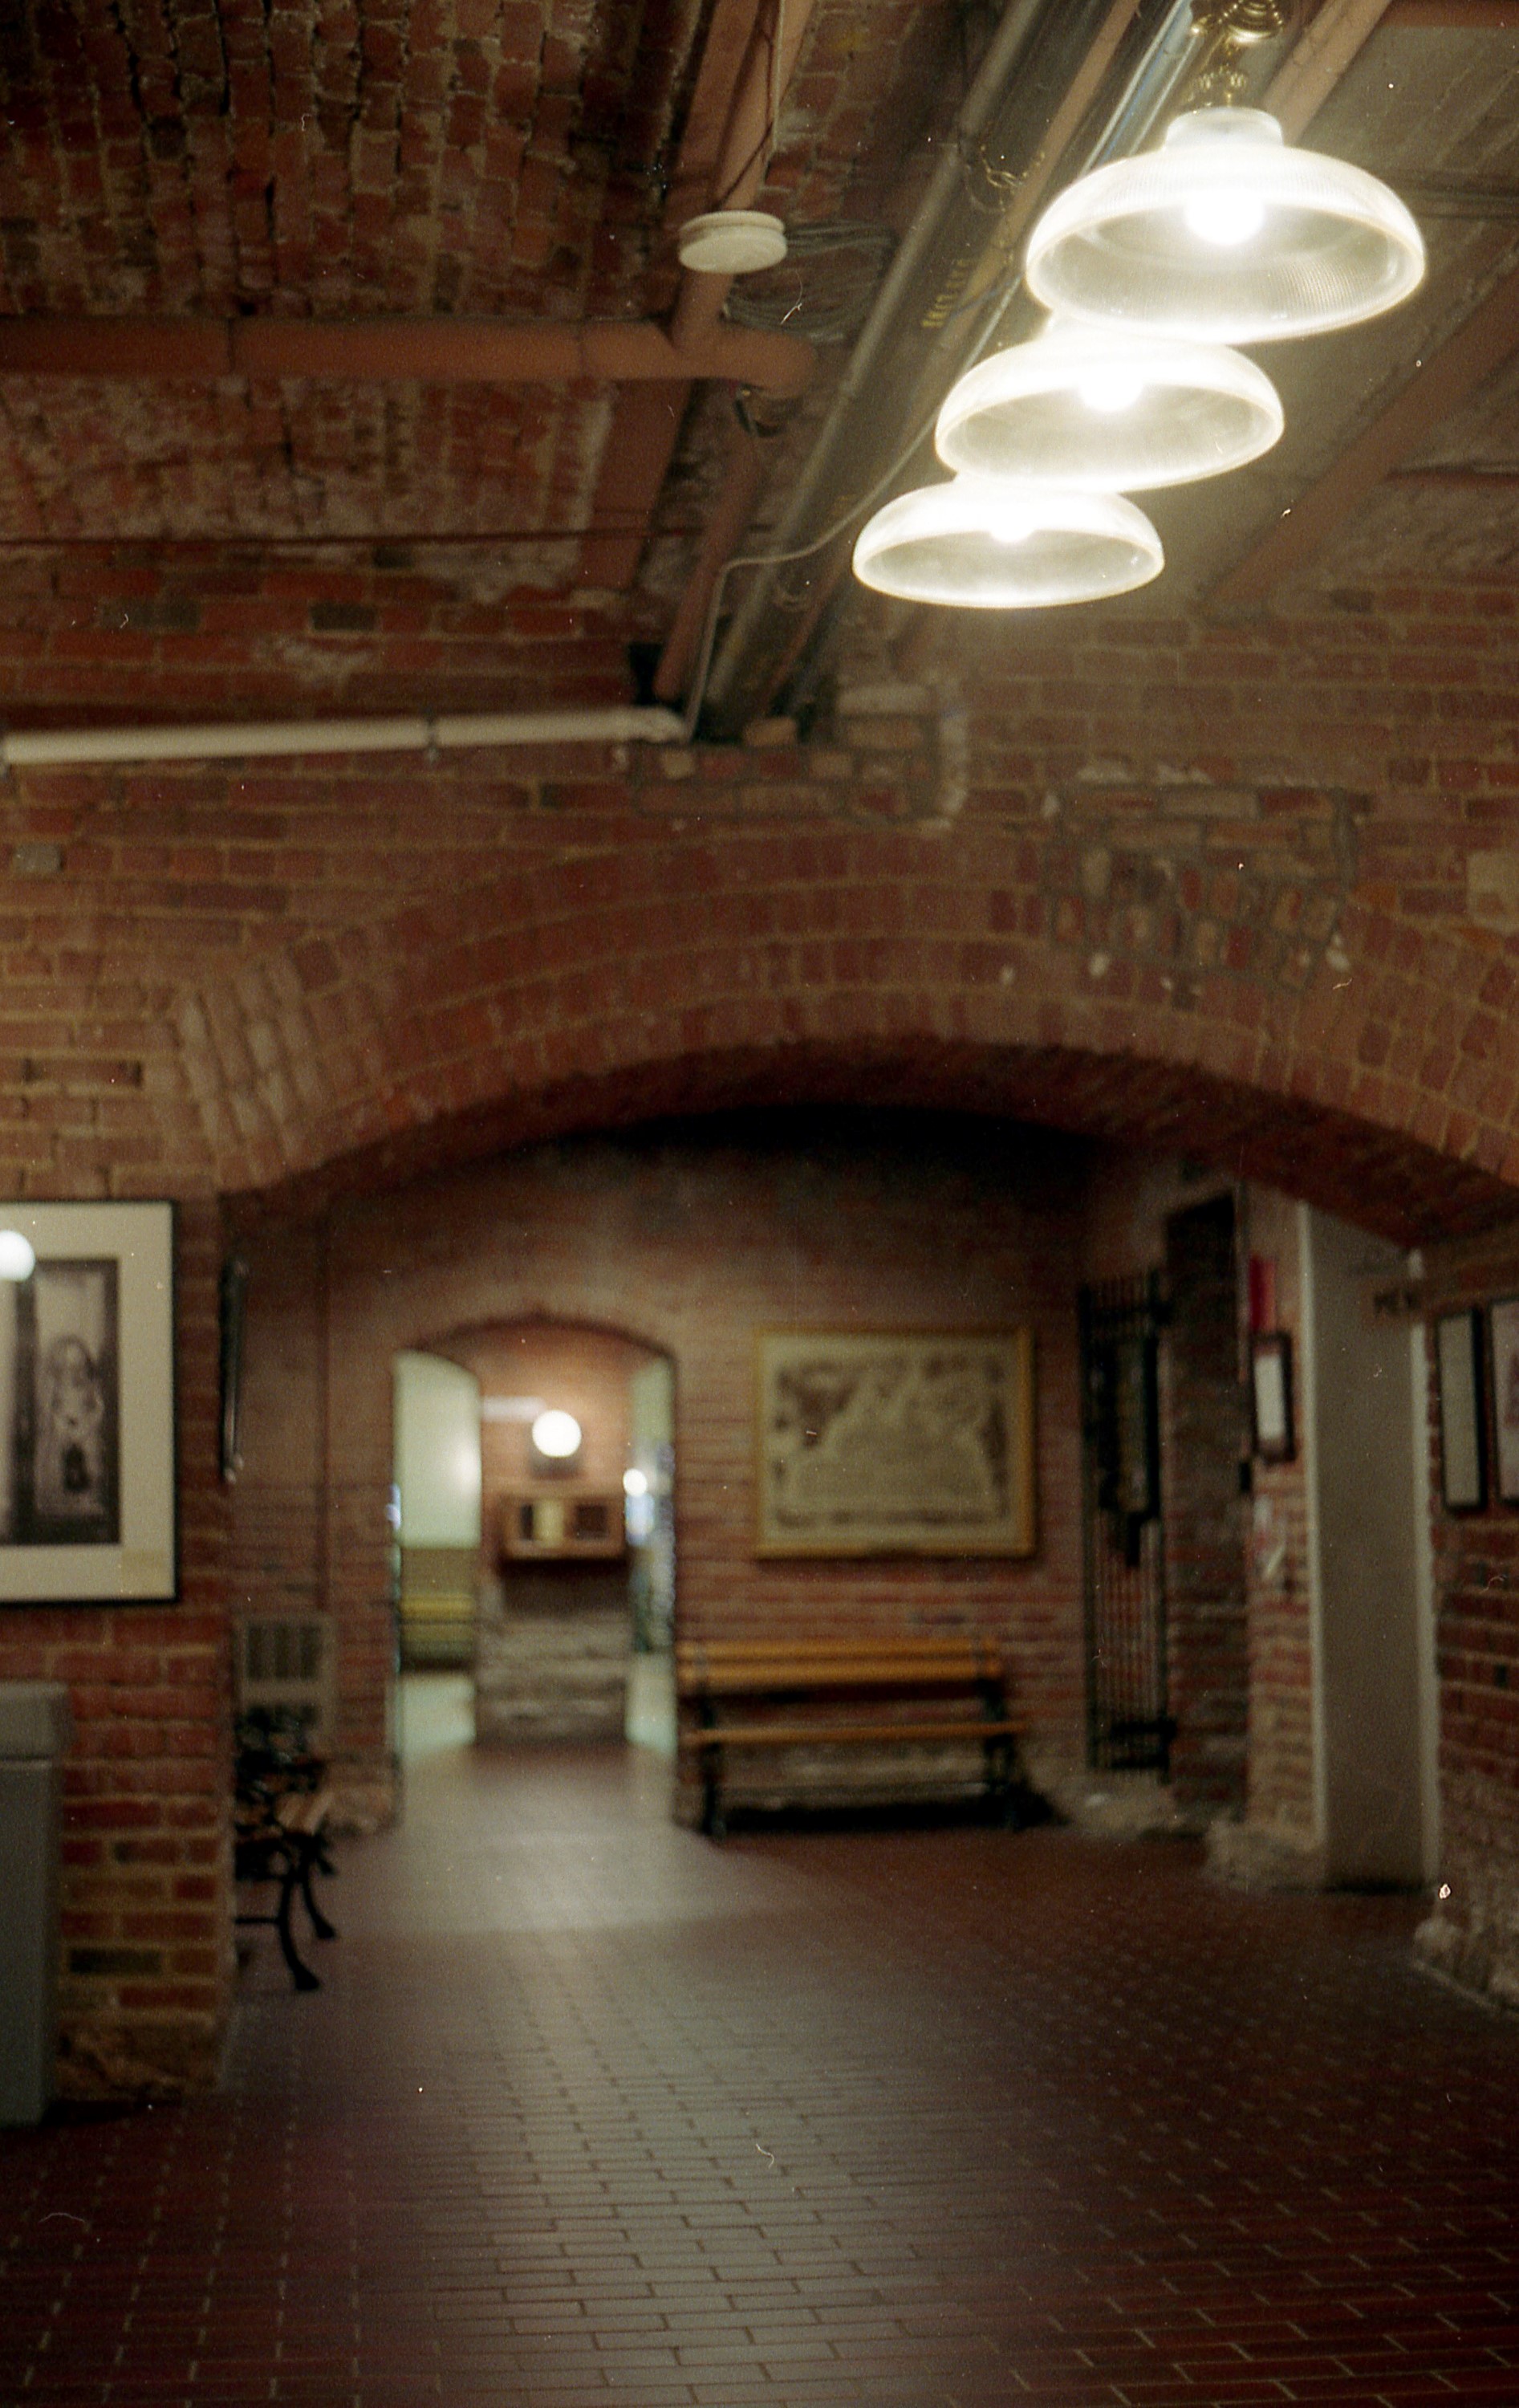
The one and only out of focus shot was this one of the basement of the Crown Point, IN court house. I honestly think that the error was on my part, rather than the camera, since it is so off. It is possible I spent so much time trying to get exposure correct in the difficult lighting, that I forgot to focus. It is a shame too as not only would this have been a cool shot, but back in March 1933, John Dillinger escaped from the Crown Point jail, only a couple blocks away from this courthouse. It is very likely that prior to his escape, he had been escorted down this very hallway. Today, the Crown Point Courthouse houses several retail shops and a John Dillinger Museum with artifacts of its most notorious criminals.
It is not often that you could complain that images from a camera are too good, but that appears to be the case here. It is clear to me that back when this camera was new, the high price of this camera was justified with the images it made. It is possible that many of my complaints would not have been shared by photographers in the early 1960s. The Retina Reflex was designed to be a “bridge” camera between a rangefinder and an SLR. For those who already had a set of lenses from the later Retina Rangefinders, it must have been nice to be able to swap them between cameras.
Even though these images caused me to have a partial change of heart, I have to point out that you can get razor sharp images just as good as these with any number of Japanese or German SLRs, many of which will have larger and brighter viewfinders, and won’t have such a convoluted exposure system. I won’t say that I wouldn’t recommend a Retina Reflex IV to someone, but with all of its challenges, plus the inconsistent reliability of leaf shutter SLRs, it is still not one I would recommend to someone looking to experience an old SLR. There are many more better options that have a better track of record of reliability.
Should you add a Retina Reflex IV to your collection? I am still on the fence about whether I like this camera. If you specifically collect Retina cameras or 1960s SLRs, then of course. If you just want to experience what a fully mechanical SLR is like, there are far better options out there. As you can see, it is capable of wonderful shots, and as long as you can get a guarantee from the seller that the camera works, it might be worth the gamble, but I will leave that up to you to decide.
Additional Resources
https://en.wikipedia.org/wiki/Kodak_Retina_Reflex
http://camerapedia.wikia.com/wiki/Kodak_Retina_Reflex
http://westfordcomp.com/classics/retinareflex4/rr4.html
https://blog.jimgrey.net/2013/10/18/kodak-retina-reflex-iv/
http://retinarescue.com/retinareflex4type051.html
http://www.cjs-classic-cameras.co.uk/retina/reflex.html
Wow you have been busy lately. I really enjoyed your several reviews. I agree the Schneider lenses are impressive. I have used them on my Leica screwmount cameras and have been pleased. I was wowed by your shots with the camera. That is really impressive. I am a sharpness freak and for a camera of that era you couldn’t ask for better performance. I also agree that the film scratches were probably lab related. I have seen similar damage during my film shooting days. I was using Leicas so it wasn’t the camera.Keep posting. I am looking forward to more.
Thorough review. The one I had was stiff and the meter was way off, but I shot it anyway and found the same thing you did: the photos were amazing. Mine’s long gone though. The photos weren’t amazing enough to shoot it again.
Nice pictures from the camera. As you saw, the Retina Reflex cameras and lends are superb! Although, I would say that I don’t agree at all with how you rated the rest of the camera. I have the Kodak Retina Reflex III and think all of the controls are very intuitive. They are laid out well and easy to maneuver. About your comment on the viewfinder. They are not dim at all. I wonder if perhaps yours needs to be cleaned. Mine did when I received it back in the early 2000s and I had Chris Sherlock perform a CLA and he cleaned the viewfinder and afterwards it was super bright! Just like new again!
I have always thought these cameras were something special. They were unlike anything else manufactured around that time, so different than the same boring foreign cameras other companies were cranking out. Its a real shame people gravitated towards the canon and other cameras that soon followed. I guess Kodak couldn’t compete with the mass produced cheaper cameras that were being made. To me, these cameras and lenses blew all the others out of the water when they were released. Even the leather and chrome camera cases were awesome! Armed with Kodachrome II they were simply magic.
I am glad and amazed that you attempted repair in the Reflex III. It was neat to see the internals of these cameras. I couldn’t image repairing one of these! Overall, very nice post 🙂
Jason, thanks for the comment! You will get no argument from me that the Retina Reflex III or IV is capable of some truly wonderful images! I will also certainly admit that my issues with the dim viewfinder could very well be due to it needing a good cleaning. You were smart to send yours to Chris Sherlock as he’s pretty much the world’s authority on these cameras and the only person I would trust with mine. I don’t know if you read the whole article, but I conversed with him through email while taking apart my RR III and he offered his advice. I was unable to repair it, but nevertheless, he made a valiant effort to help me! 🙂
So, with a perfectly CLA’d example, you’re right, the viewfinder probably would have been better, however the RR IV that I reviewed has the angled split image focus aide, as opposed to the horizontal one on yours which I would still not be a fan of. And no CLA would ever change the poor ergonomics of the camera.
I can respect that the controls didn’t bother you, but I simply hated Kodak’s decision to put the manual light value override on the bottom of the lens mount. In my time with either camera, I could never get used to it. Also, while I don’t inherently dislike bottom winders, for me, I should still be able to reach the wind lever with my right thumb while comfortably holding the camera. This isn’t a problem on other cameras like the Retina IIc or other bottom wind rangefinders in my collection, but the height of the Retina Reflex necessitates my hand being in a position where it is impossible to reach the wind lever with my thumb without having to constantly change the position of my hand each time I need to wind it and then to shoot it. I have what I would describe as average sized hands, so it’s possible with larger hands, this wouldn’t be an issue, but I predict that a majority of people with hands my size (or smaller) would have the same struggle I did.
You’re right though, the RR is unlike anything out there. It takes great pictures, and its a handsome looking camera, so it absolutely deserves a place in any collection. However, if I was reviewing this camera from the perspective of a potential customer back in 1964 when this camera was new, there were so many better alternatives that had easier and more ergonomic controls, with better viewfinders that were also considerably cheaper than this camera.
Late arriver to this very informative article!
Your experience and your expectations towards the RR 4 are interesting because they are so totally different compared to my experience as a 14 year old boy “inheriting” the same cam from his grandpa who had to dispense with the cam due to his failing eye sight.
I never berated the control layout that much. Everything looked familiar to other cameras (esp. the Nikon FT2 of my father’s which I wasn’t permitted to use/ touch!). I only wished I had one of these cool zoom lenses (silly me!). I used the camera as a landscape camera, so I chose an aperture as small as possible, and afterwards I used the small wheel at the lens base for fine adjustments. Completely different to your approach!
My camera didn’t let me down during the 5 years I heavily used it. I dropped it once, a direct hit to the mirror box. 🙁 And oddly enough the camera was repaired by Kodak Stuttgart – 25 years after purchase of the camera! A few months ago I retrieved the camera, the controls (especially the film transporter) were a little bit stiff, but it is still working properly. 🙂
Reading your article I am aware, though, that the count down is running…
Yeah, I was a bit harsh on the Retina Reflex, of course not for the quality of images it is capable of. As was the case of any Retina camera, these things have excellent optics and in the hands of the right people (with the right patience) can produce some wonderful images. As your 14 year old self, handling such a heavy piece of German engineering likely was awe-inspiring as I’m sure it would have been for me.
The bulk of my criticism with the RR’s controls is that it didn’t have to be this way. There were many other companies making SLRs at the time that didnt have aperture wheels at the bottom of the lens mount connected by a cord that you have to struggle with. Although the diagonal split image viewfinder in theory can help, comparing it to the one on the RR3, it just doesn’t work as well.
I didn’t hate the camera, in fact, I still like my RR4, and since writing that article, I’ve actually acquired a perfectly working RR3 too! I might even give the RR3 a re-review.
So, if you love the camera, don’t let anything I say take that away from you. I hope you keep reading my site and see that I generally am pretty favorable to most cameras, even quirky ones. I just feel as though Kodak AG got away from the simple perfection of the original Retinas that August Nagel designed. The Reflex cameras were like shoving a square peg through a round hole, and had Kodak had enough foresight to start with a logically designed 35mm SLR from the ground up, like many other companies did, perhaps they would have had better success!
I wish you were right. But then in fact the only remainder of the once big German camera industry is Leica (okay, you may count Zeiss, too, but it is not sure yet, whether their new digital cam is just a show piece or a long lasting attempt to re-enter the camera market).
German cameras as a whole grew more and more mechanically complicated and expensive. It was the Japanese camera industry which breathed fresh air into the camera business. German camera engineers seemed to be stuck with mechanical solutions and didn’t really think about including electric components. Actually the German car industry is currently facing similar problems… 🙂
Back to 14 year old me: I started with the camera and the 50 mm lens. After having proved that the camera would survive my handling I was also given the Kodak bag including the 28 mm and 135 mm lenses, filters, close distance front lenses and even a really old solid metal tripod from that time. I heavily used the kit for more than 5 years on a lot of hikes in the Alps until temptation in form of the (by then old) Nikon kit of my father’s grew too strong. 😉
I pondered about the DKL adapters, too, but I also read about the focussing problems. So for the time being I sometimes shot a roll of film with the Kodak. Another objection I heard about the camera is the lighting meter. Maybe due to being stored in the Kodak bag the metering still works fine, though.
Mike, thank you for the excellent review! We have been watching the original episodes of Mission Impossible. In episode 9 of the first season, Cinnamon is using the Retina Reflex IV and I wanted to know more about it. Thanks again!
I was nodding my head through most of the article. I also had a Reflex IV (before sending it to Chris for spares) and spent many hours trying to figure it out. Especially putting the front assembly back on the body, with the string in the right position and so that the cam and the mirror controls are well connected – and the three washers under every screw proved too much for my skill. But I had so much fun figuring it out, it was overall money well spent. I only squeezed a few test shots out of it.
I also have a Retina IIIS and I was missing a comment about how terrible the bottom “exposure setting” wheel is to operate. I feel it strips skin from my fingers everytime I rotate it, it could easily tear through finer leather gloves.
A shame the lenses are so good. Thankfully, there are DKL to Nikon adapters. Btw. have you ever seen a DKL to Olympus OM adapter?
As you already know, the Retina Reflexes are nice cameras that produce excellent results, but the ergonomics of them are still quite bad. I actually do have a Retina IIIS that I may one day review, but it’s so close in design to other Retinas, I don’t know that I have a ton to say about it that I havent already said about other Retina rangefinders or SLRs.
As for an adapter, I did a quick search and don’t see any DKL -> OM mount adapters. Fotodiox does not list one on their site. Be warned though that if you do find one, DKL adapters aren’t like other adapters that just need to physically change the mount. Since the mount itself controls the aperture, creating an aftermarket adapter needs to add this feature to the mount, increasing it’s complexity.
I actually have a DKL to Fuji X-mount adapter for my digital camera, and although it does work, it’s cheaply built, and changing f/stops is gritty, and it also screwed up the flange focal distance. I can focus the lens to infinity, but I can’t get to minimum focus of the lens. Using the standard 50mm Schneider, I cant get any closer than about 6 feet as the adapter doesn’t allow the lens to get far enough away from the camera.
Good luck in your search!
I sometimes use the DKL to Nikon F adapter and the aperture setting is quite gritty and uncertain there as well. My idea was that the 50 2.8 Xenar would add to the Olympus OM’s compactness and pocketability. As for the flange distance, a lot of these Retina lenses can be adjusted for infinity quite easily, just by unscrewing the nameplate and loosening three screws underneath, so I managed to make mine focus in the whole range (and e.g. the 85 tele-arton as well, same design).