

The Eastman Kodak Company’s daylight loading 35mm film cassette made it’s debut in 1934. With the release of the first Retina camera, Kodak’s type 135 film format took the world by storm and within a few short years was the dominant format of easy to load 35mm film for miniature (as they were called then) cameras.
In the early 1960s, Kodak’s film was approaching it’s 30th birthday, and Kodak thought it was time for something new and something easier to sell to consumer. But what could it be? How could Kodak make an already easy to load film even easier, or cheaper for consumers?
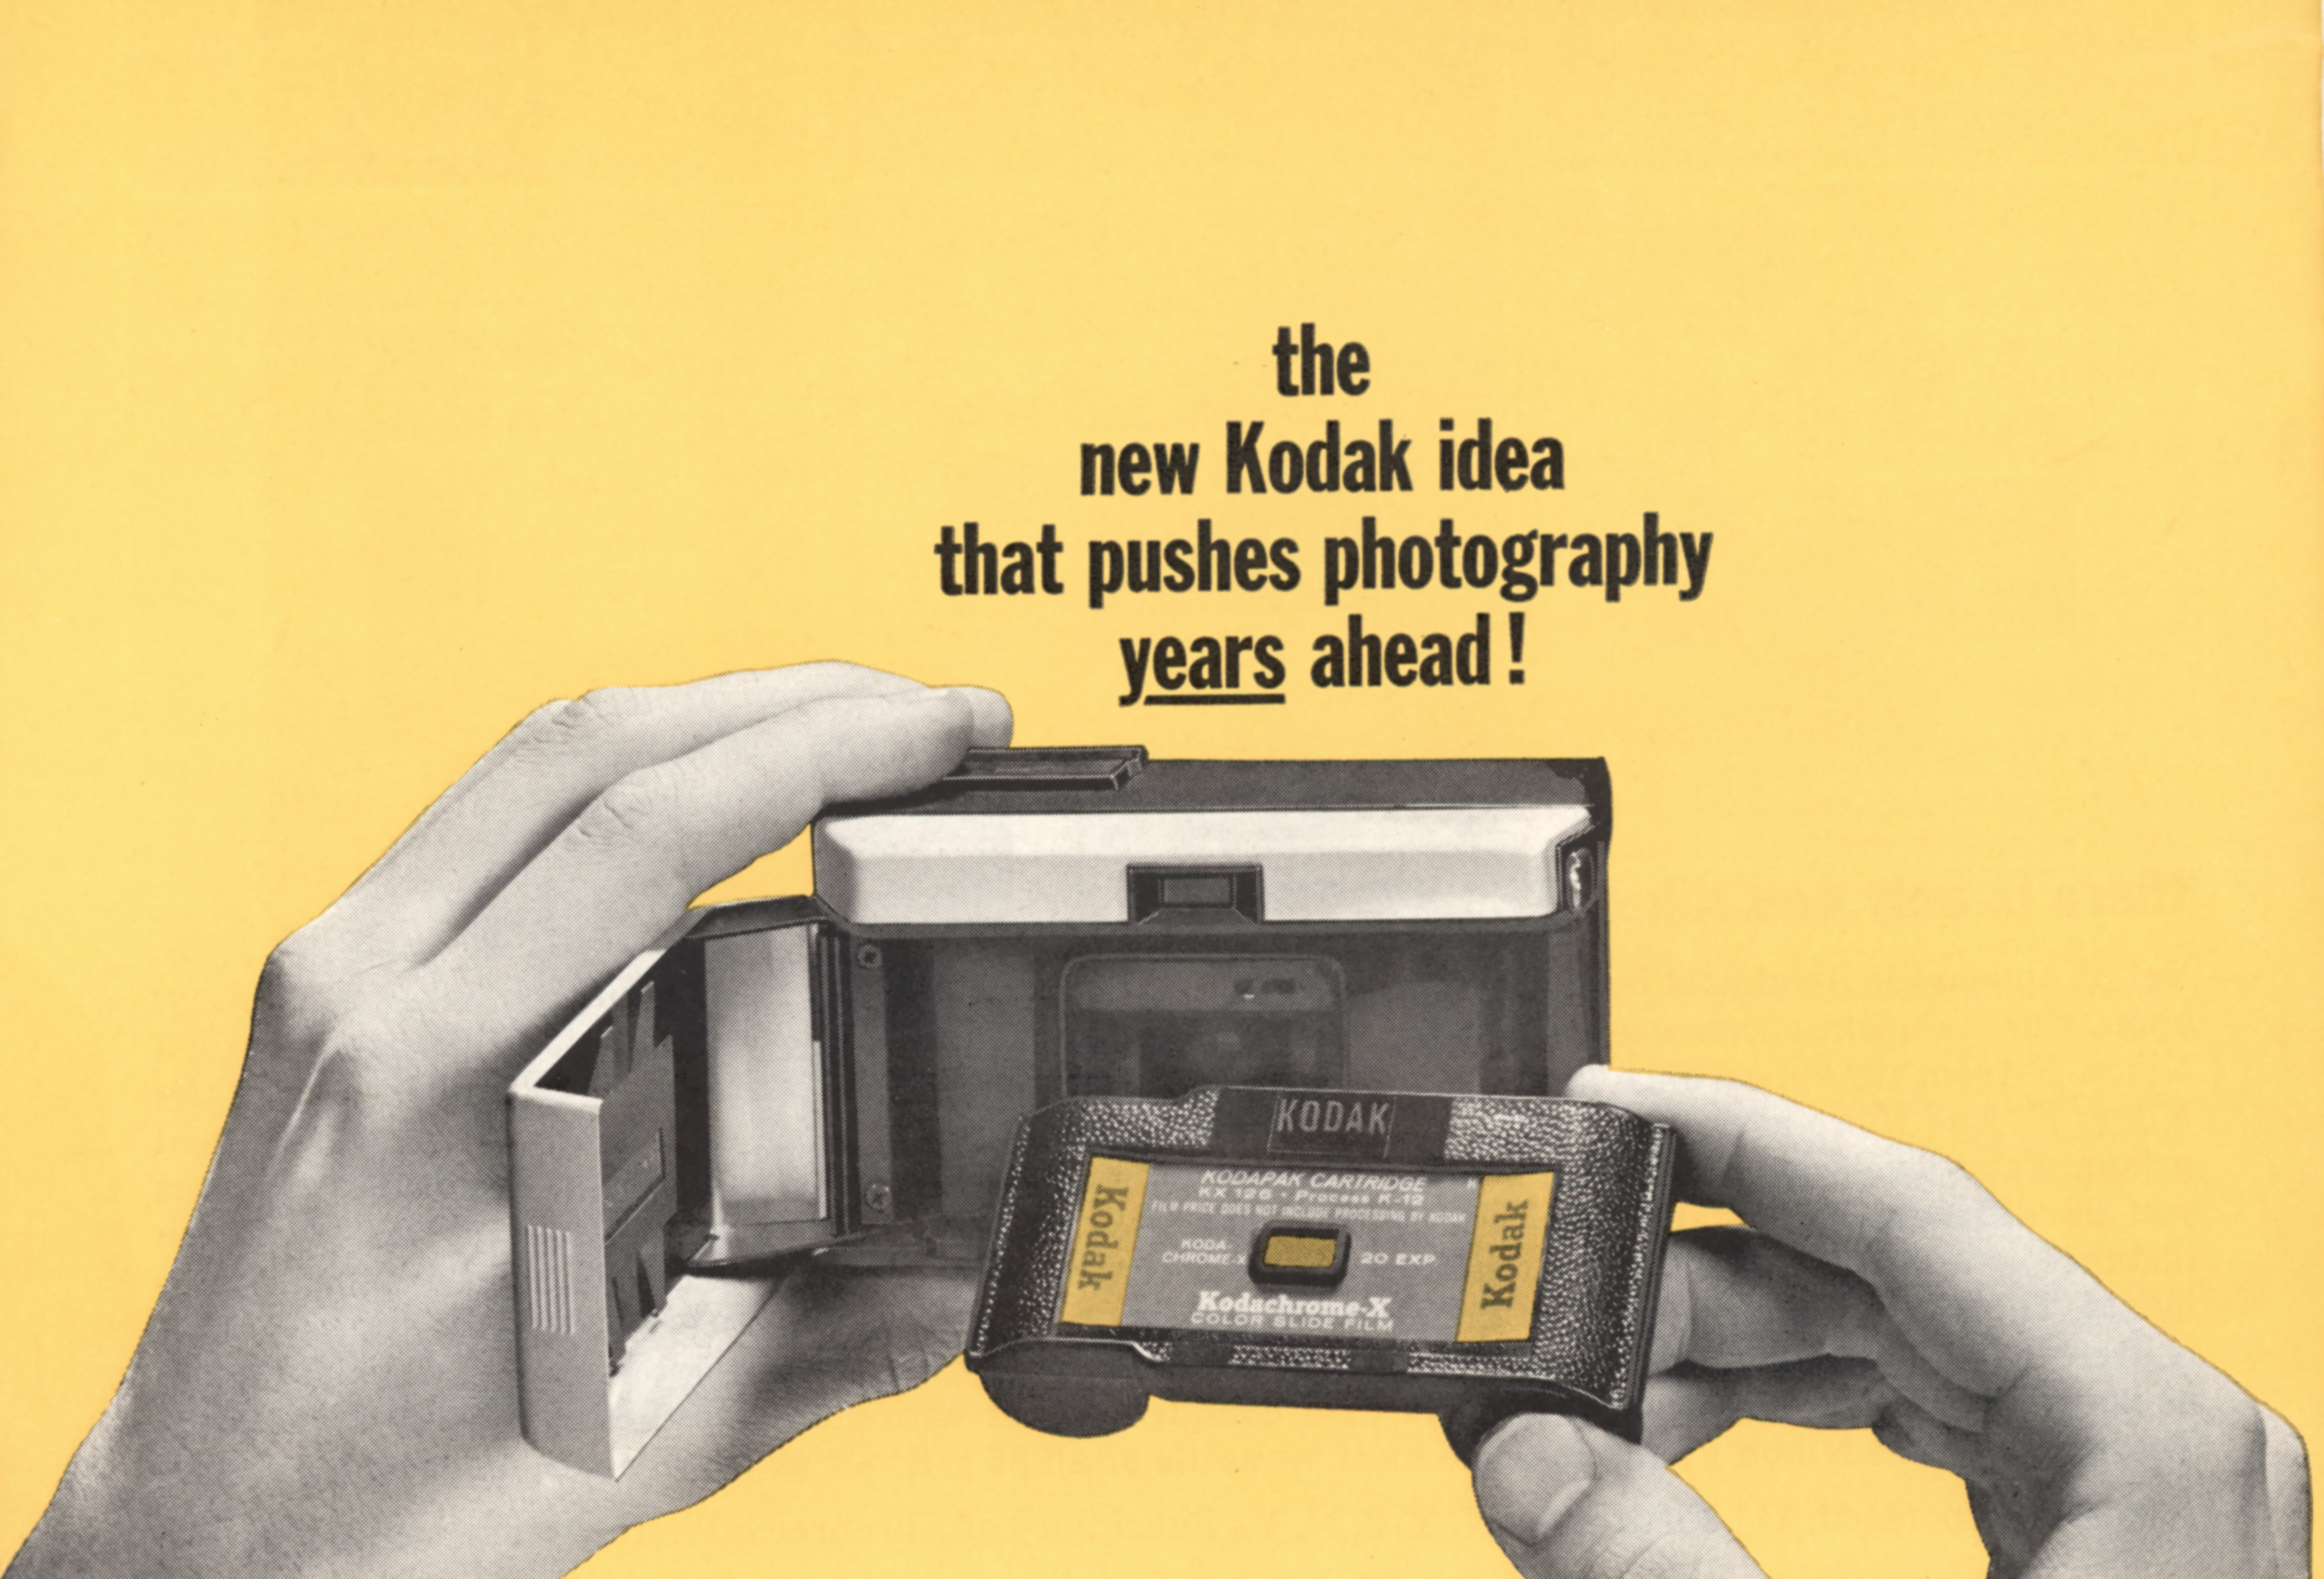
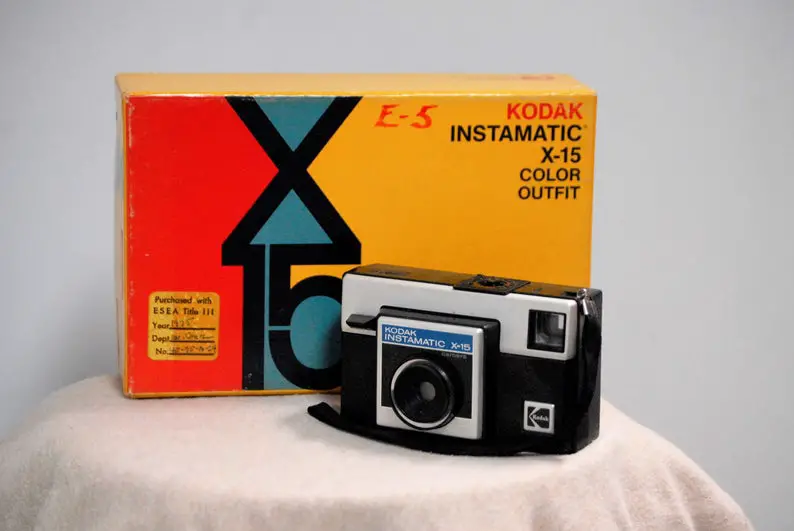
In early 1963, the world would get their answer with Kodak’s new Instamatic film system. The name Instamatic wasn’t only used on the new film, but was also the name of a lineup of cameras first designed for the new film. Designed by famed designer, Hubert Nerwin who first gained fame while working for Zeiss-Ikon in the 1930s, the new film would use a film stock that was the same width as 35mm, but would come entirely enclosed into an easy to load plastic cassette. Instamatic film would expose square images approximately 26.5mm x 26.5mm and would never have to be rewound at the end of each roll, making loading and unloading as easy as possible.
Although the first cameras were very basic models aimed at the low end of the market, more advanced cameras with rangefinders, motorized film transport, exposure meters, and even some interchangeable lens SLRs would support the format. Cameras were made by nearly every manufacturer out there from Zeiss Ikon, Voigtländer, Canon, Konica, and many others.
Check out the the article below which appeared in the June 1963 issue of Modern Photography, introducing the world to Kodak’s Instamatic system.

Kodak would often sell it’s cameras as loss leaders in the hope of introducing new people to photography who otherwise couldn’t afford it, or found it too difficult and Instamatic film would be tremendously successful, selling more than 50 million units by 1970.
In the years that would follow, a great deal of interesting cameras were produced that supported the format, many of which can be picked up for very little today, but like most film formats, it’s days were numbered.
Kodak would stop producing it’s last camera that used the film, the Instamatic X-15F in 1988 and would stop producing film for it in the early 2000s. The last company to produce Instamatic film was Ferrania who stopped in late 2007 and since then, the only way to get film was to buy old stock and hope that it works.

Beyond buying expired Instamatic film, in recent years some ambitious photographers have begun finding ways to reload regular 35mm into old Instamatic cassettes with varying levels of success. Since Instamatic film was just another type of 35mm film and has the same physical width, fitting 35mm into the cassette is the easy part.
Where it gets difficult is that no Instamatic cassette was meant to be reloadable so cracking them open can sometimes be difficult and even if you are successful, you’ll need to tape them back together to keep light out.
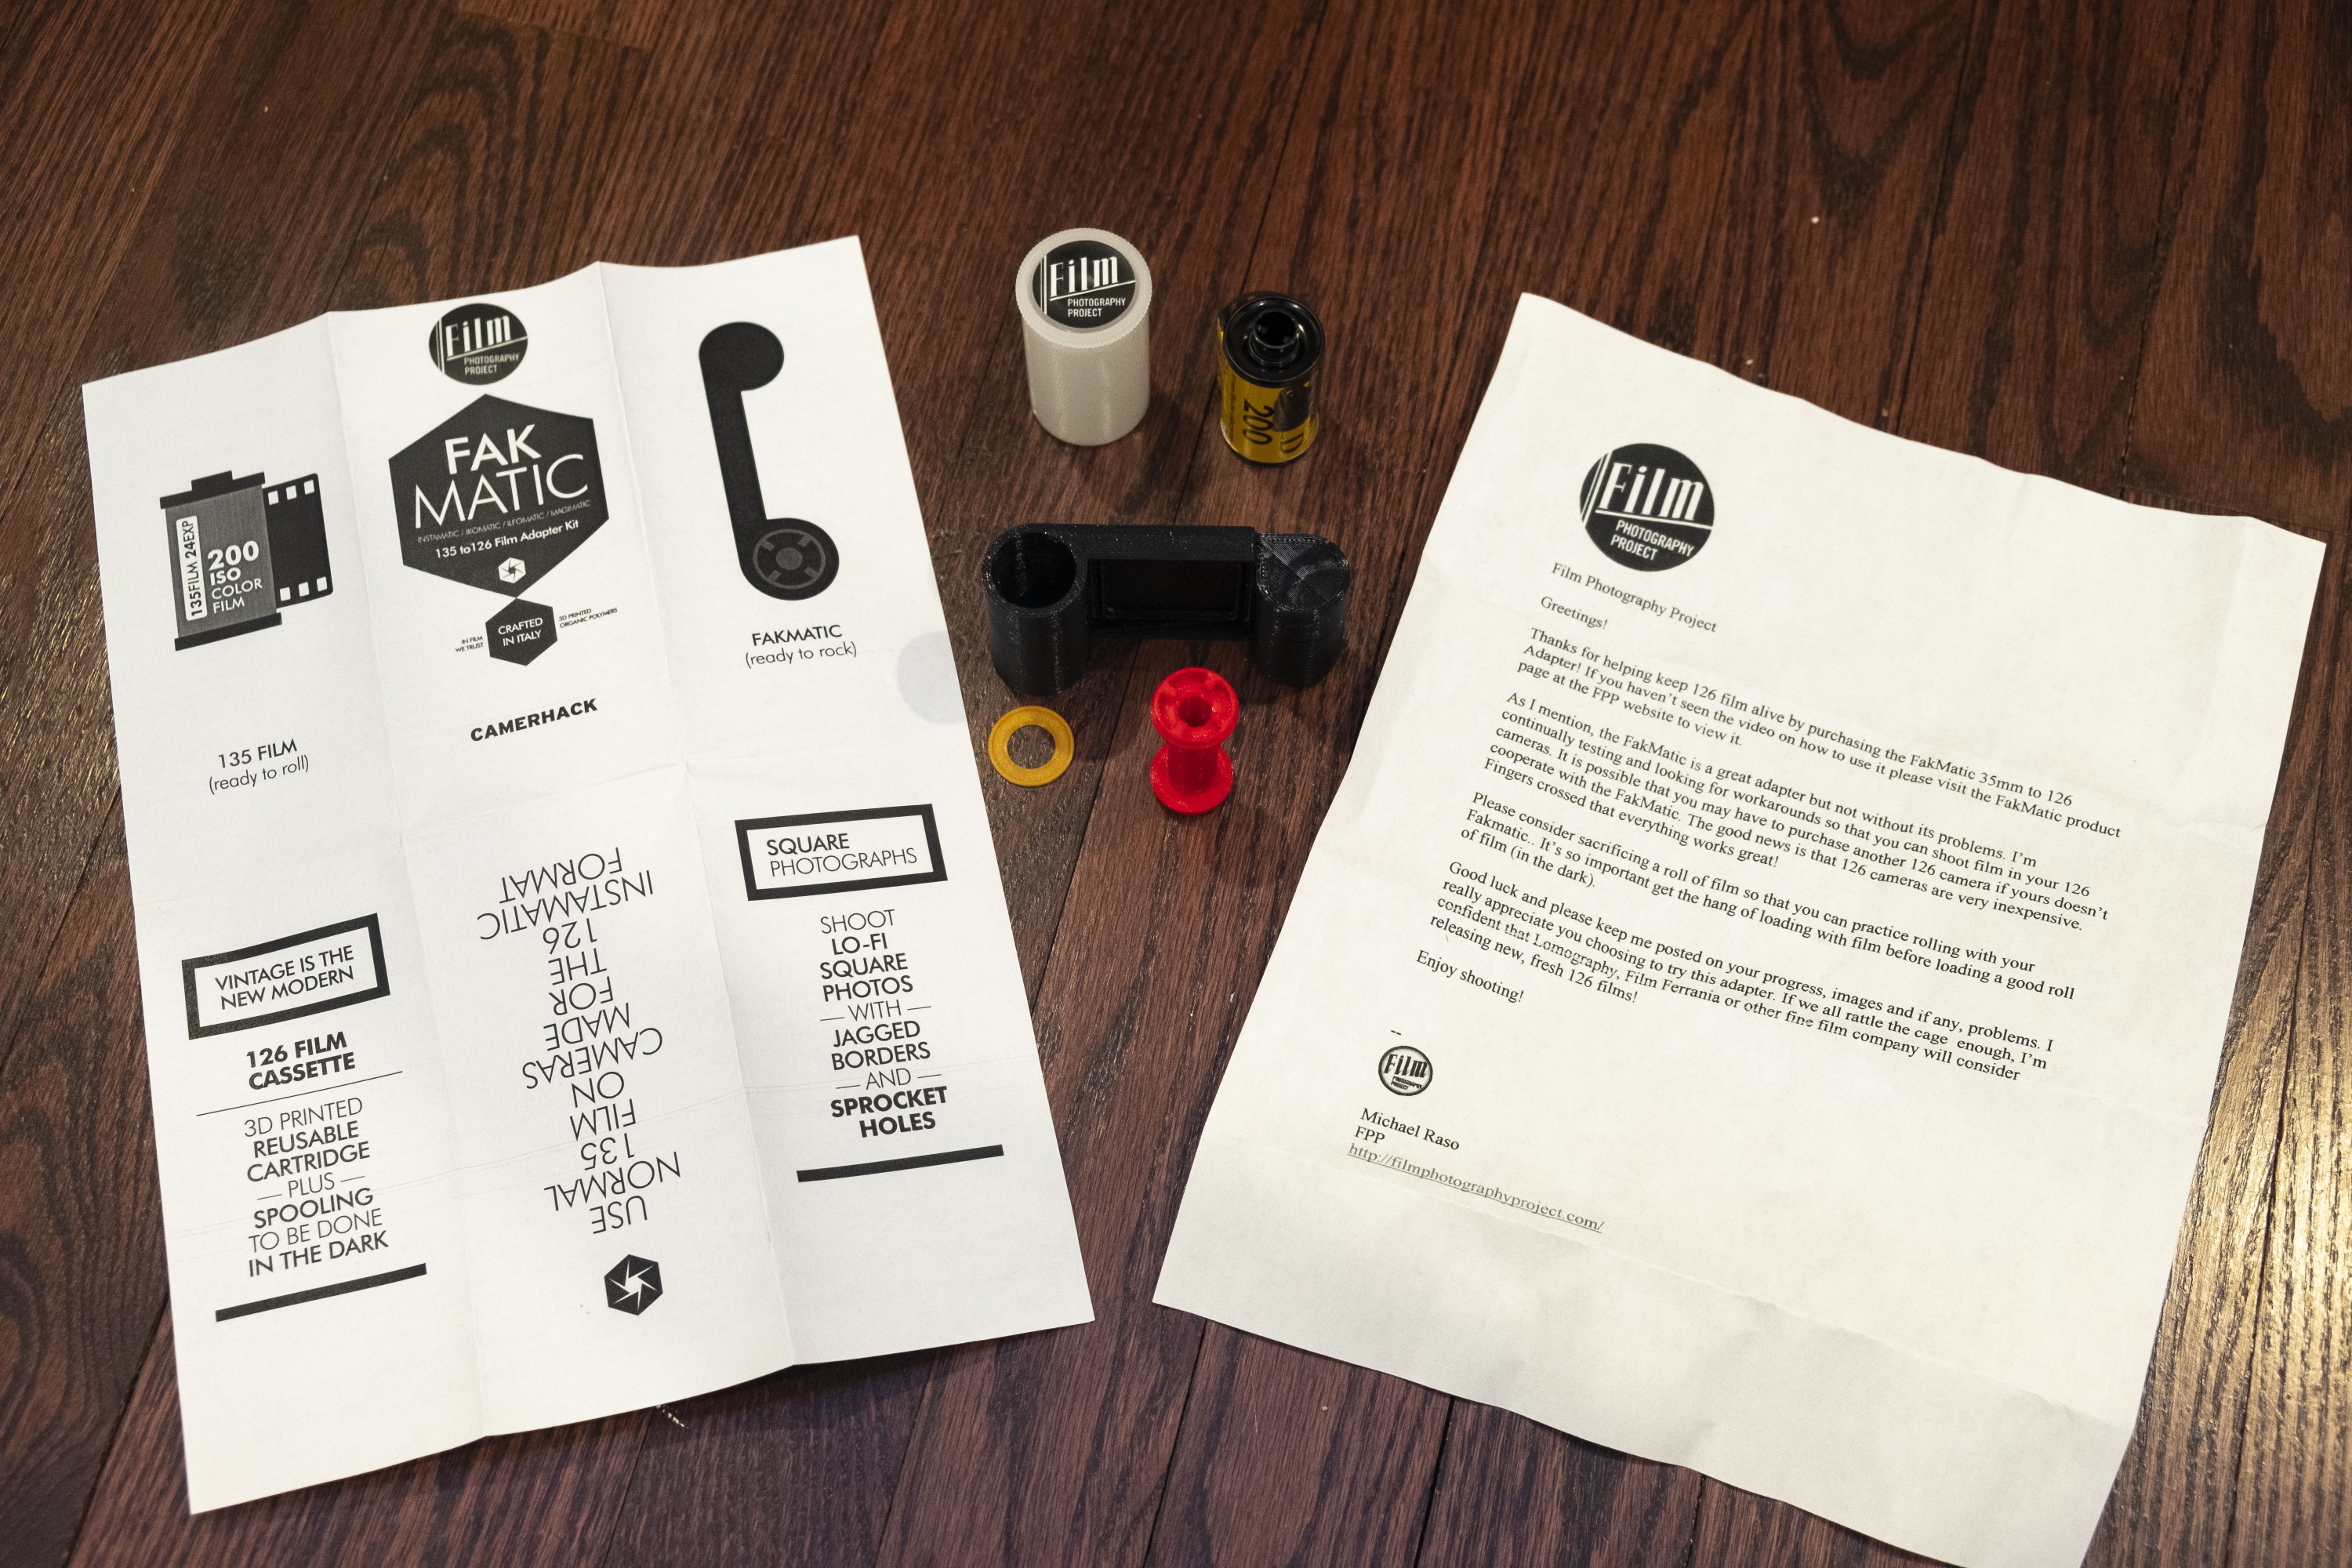
Thankfully, in 2017, a website called Camerhack created a reloadable Instamatic cassette called the Fakmatic that is designed to use regular 35mm film. It eliminates the rear window for reading the exposure numbers on the backing paper, making the cassette more light tight.
The problem with the Fakmatic and most people’s attempts at reloading an old cassette is that real Instamatic film doesn’t have the same sprocket holes as 35mm film does. Instamatic film has no holes at all on one side, and only a single hole for each exposure on the other side. The purpose of this hole is to be used as an indicator to the camera when it has reached the next exposure. Inside the film compartment is a spring loaded “finger” that feels for this hole when advancing the film, and when it is reached, the film transport locks until you make the next exposure.
When 35mm film is loaded into an Instamatic cassette, the continuous line of sprocket holes constantly trigger that finger, confusing or jamming it altogether. With the less expensive cameras like the Kodak Instamatic 133, this isn’t an issue as you can just keep winding until you know you’ve reached the next blank spot of film by counting the number of times you advance the camera.
The problem gets worse with more advanced Instamatic cameras with a motorized film transport or SLRs like the Kodak Instamatic Reflex, the row of perforations can often make the camera completely inoperable with reloaded 35mm film.
Most reloading solutions on the Internet do not address the challenges of using these more advanced cameras, and as a result, most people don’t even try, but there is a solution that should allow you to load 35mm film into any Instamatic camera and get it to work.
As it turns out, the backing paper that is in every genuine Instamatic cassette has holes only in the correct locations of where that single perforation in the film should be. Everywhere there isn’t a hole, the backing paper is flat. If you salvage the backing paper from a real Instamatic cassette and lay it behind your 35mm film before loading it into the cassette, you effectively solve the problem with 35mm’s repeating holes from causing problems.
For this article, I purchased a Fakmatic adapter from the Film Photography Project’s store and compared the process of shooting a couple different Instamatic cameras with a reloaded original cassette and the Fakmatic adapter both with and without backing paper. Since most articles online that talk about using 35mm film in an Instamatic cassette only cover doing this without backing paper, I put together this table showing the pros and cons of using backing paper so you can make the decision of whether this is something you want to try.

If this is something you’d like to try, here is what you’ll need to get started.
- A razor blade, hobby knife, or anything sharp to cut through the plastic seams on the edges of an Instamatic cassette to open it up.
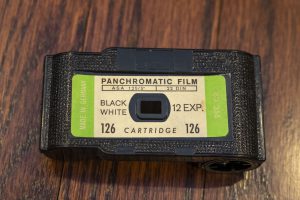
This is a generic “house brand” Instamatic film cassette that likely had AGFA film in it when it was new. This style of cassette is easier to open than a Kodak film cassette would be. - At least one original Instamatic cassette. It can be an unused one with unexposed film or it can be an empty one from one that was previously used. In my experience, and that of my friend Adam who has done this more times than I have, the backing paper from any old film cassette should work. You can use 12, 20, or 24 exposure cassettes, although with the 24 exposure cassettes, reloading 35mm can get to be a bit tight in the cassette, so for your first time doing this, I recommend finding a 12 or 20 exposure cassette.
- (Optional) Sometimes opening an original Instamatic cassette causes it to break into pieces making it unusable. You should still be able to get the paper out of it, but you’ll either need to find another that can be opened, or just order the Fakmatic. If you are in the US, I recommend the Film Photography Project Store.
- Unexposed 35mm film. It is important to choose a film speed that is appropriate for the camera you intend on using it in. Only the higher end models like the Instamatic 500 and some SLRs have the ability to expose multiple speeds of film. Many of the more basic cameras only support a single speed of film. I tend to favor 100 speed film in my reloads and find that any exposure errors are usually covered by the film’s latitude. Depending on whether you are using a 12, 20, or 24 exposure Instamatic cassette, the film needs to be cut to a specific length. You could technically use a longer strip of film, but it will be wasted, and if you try to put too long of a strip into the cassette with the backing paper, it won’t fit, so it’s a good idea to stick to these specific lengths.
- 12 Exp = 20 inches
- 20 Exp = 30 inches
- 24 Exp = 35 inches
- Black electrical or gaffer’s tape.
Great Tip: Since reloading an Instamatic cassette requires you to handle light sensitive film in complete darkness, I recommend the first time you attempt this, you try it on a scrap piece of film with the lights on.
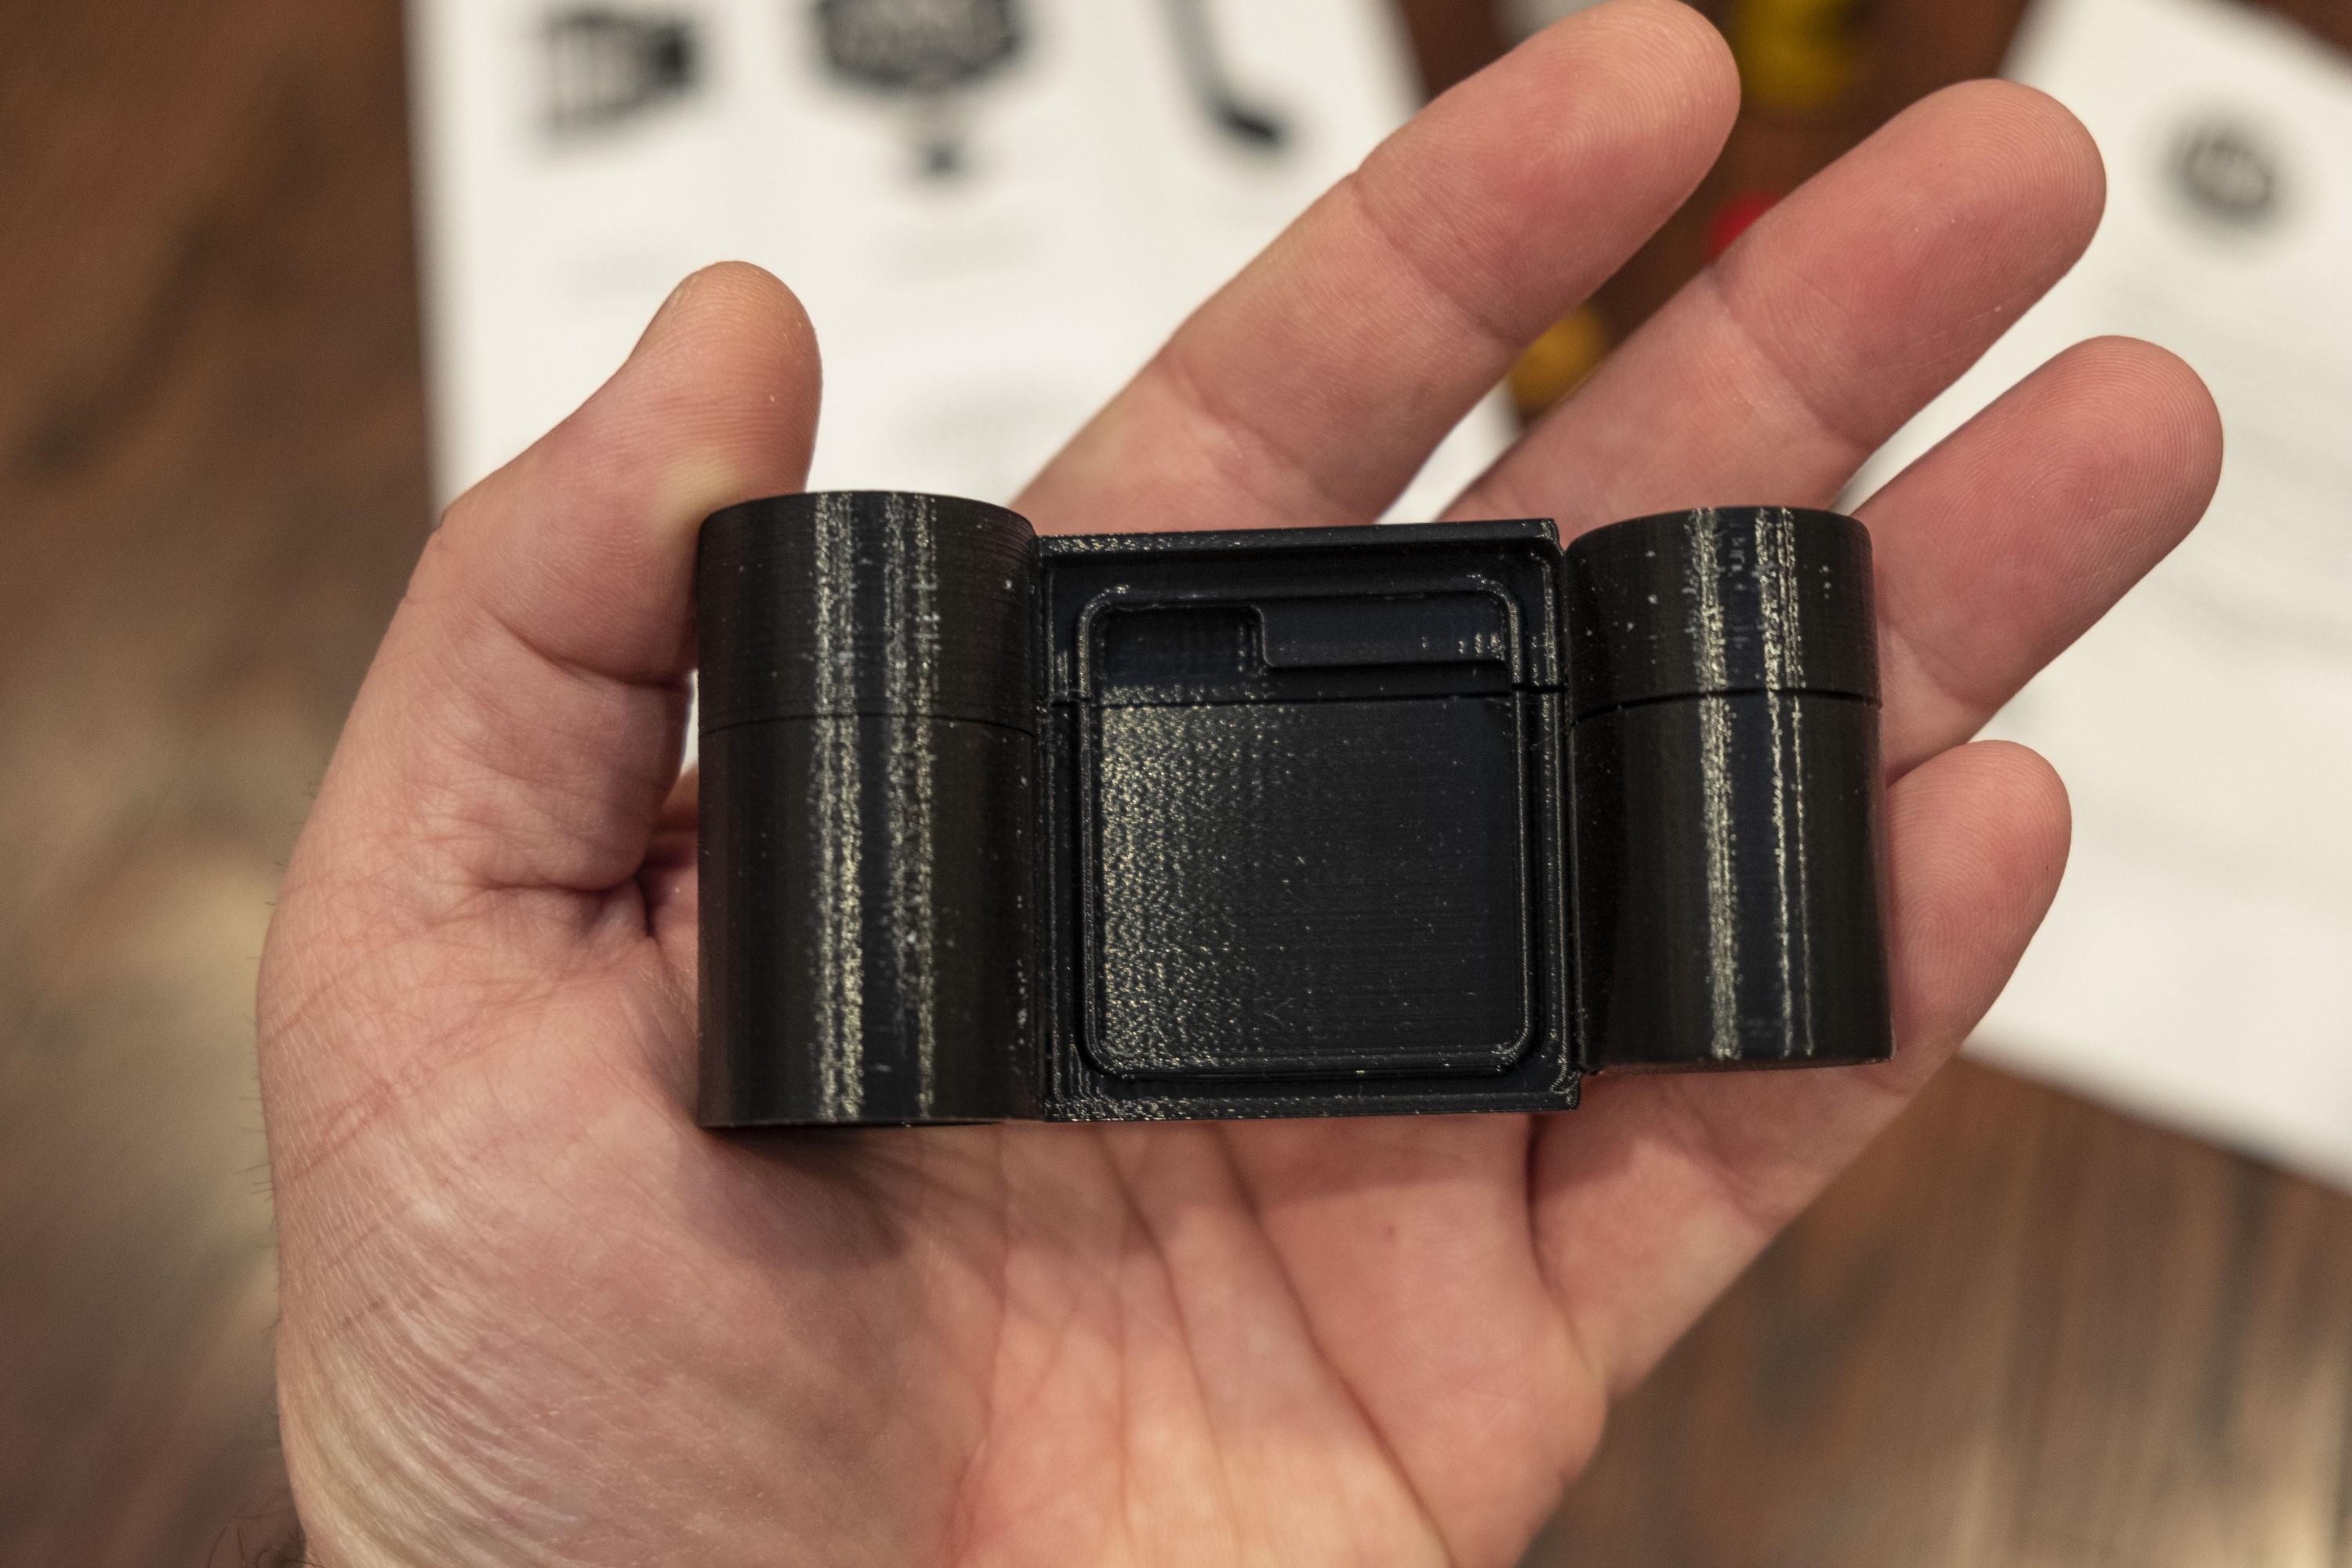
Step 1: Whether or not you want to reload an old Instamatic cassette or use the Fakmatic, you’re going to need the backing paper from a real cassette as the Fakmatic does not include any when you order it. Instamatic film originally came in 12, 20, and 24 exposure lengths. For this example, I am using the backing paper from a 20-exposure cassette.
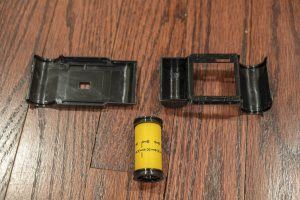
You’ll need to use a sharp razor blade or knife and “work the seams” over and over until you break through the plastic allowing you to separate the two halves of the cassette. I’ve found that Kodak cassettes are the hardest to open.
The take up spool rests in the curved side of the cassette. Pay attention to how it goes back in as you’ll need to be able to insert this spool back into the cassette in complete darkness when you are loading film. It might be a good idea at this point to practice putting the take up spool back into the cassette and joining the two halves together with the lights on, so you can remember how it’s done in the dark later.

Step 2: If you are opening a cassette with film in it, you’ll need to remove the old film from the backing paper and discard it. In the example to the left, the film has already been removed, so the backing paper is by itself.
Original film should have been taped to the backing paper starting about 2 inches before the first exposure. In the image to the left, you can see a piece of the old tape on the backing paper that originally held the film this cassette was loaded with when it was new. You’ll also notice a piece of tape holding the backing paper to the take up spool. Inspect this tape and make sure it is still securely holding the paper to the spool. Tape can use it’s adhesion over decades, so if the tape appears brittle or is not holding the paper properly, remove it and replace it with new tape.
Fakmatic Only: Get a new piece of tape and secure it to the red spool that came with it. Make sure you tape the paper to the spool in a way where when you roll it up onto the spool, the black side of the backing paper faces the spool. Another thing to pay attention to is the take up spool that comes with the Fakmatic is only geared on one side and flat on the other. Normal Instamatic spools are geared on both sides of the spool since some Instamatic cameras grab the spool from the top or bottom. With the Fakmatic, you need to know which side your camera needs to have the spool face. I have contacted the manufacturer of the Fakmatic asking if this can be changed in a future version.
Step 3: Determine the correct length of film that you’ll need for the backing paper you are using. When rolled up, the combination of film and backing paper takes up more space than just the film by itself, which is how most people load the Fakmatic or original cassettes.
Since this method relies on the elongated openings in the backing paper for the camera to properly locate the correct position on the film, you will only get the same number of exposures as the backing paper was designed for. This is in contrast to loading unbacked film into a cassette where you can get more exposures, but at the expense of decreased camera compatibility.
For this example, I am using a backing paper with 20 exposures, so I need a 30 inch length of film starting at where it is taped to the backing paper (near the piece of electrical tape) all the way past the 20th exposure. Since you’ll be attaching unexposed film to the backing paper in darkness, you’ll need to cut an appropriate length of string or some other measuring device to know how much film to cut when the lights are off.
Step 4: For your new film, I prefer using bulk film, but you could also use film from inside a fresh 24 or 36 exposure 35mm film cassette. Regardless of where you source your film from, it shouldn’t exceed the length you determined in the previous step.

First, take a piece of tape and secure the unexposed film to the underside of the backing paper. Make sure you have the emulsion side facing away from the paper.
You can do this step with the lights on because the 35mm film will be attached before the exposures on the backing paper begin. Just be careful not to pull too much film out of the bulk loader or 35mm cassette with the lights on.
Step 5: TURN OFF THE LIGHTS. The next step requires you to slowly pull a length of unexposed film out of whatever it is in so that a sufficient length can extend across all of the elongated holes on the backing paper. In this example, the backing paper has 20 exposures, so I need about 30 inches of film.
Once you have the correct length of film, cut it with your scissors so that you can begin rolling it back up with the backing paper.
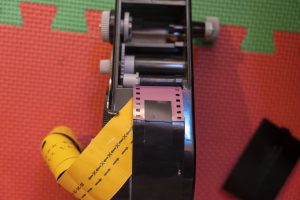
The end of the film where you just cut does not need to be taped to the backing paper. The only place where the film is taped to the paper is at the beginning of the roll, not the end. Instamatic cassettes do not have a supply spool. The film is just tightly wound “Commando Style” and shoved into the smaller side of the cassette opposite of where the take up spool goes.
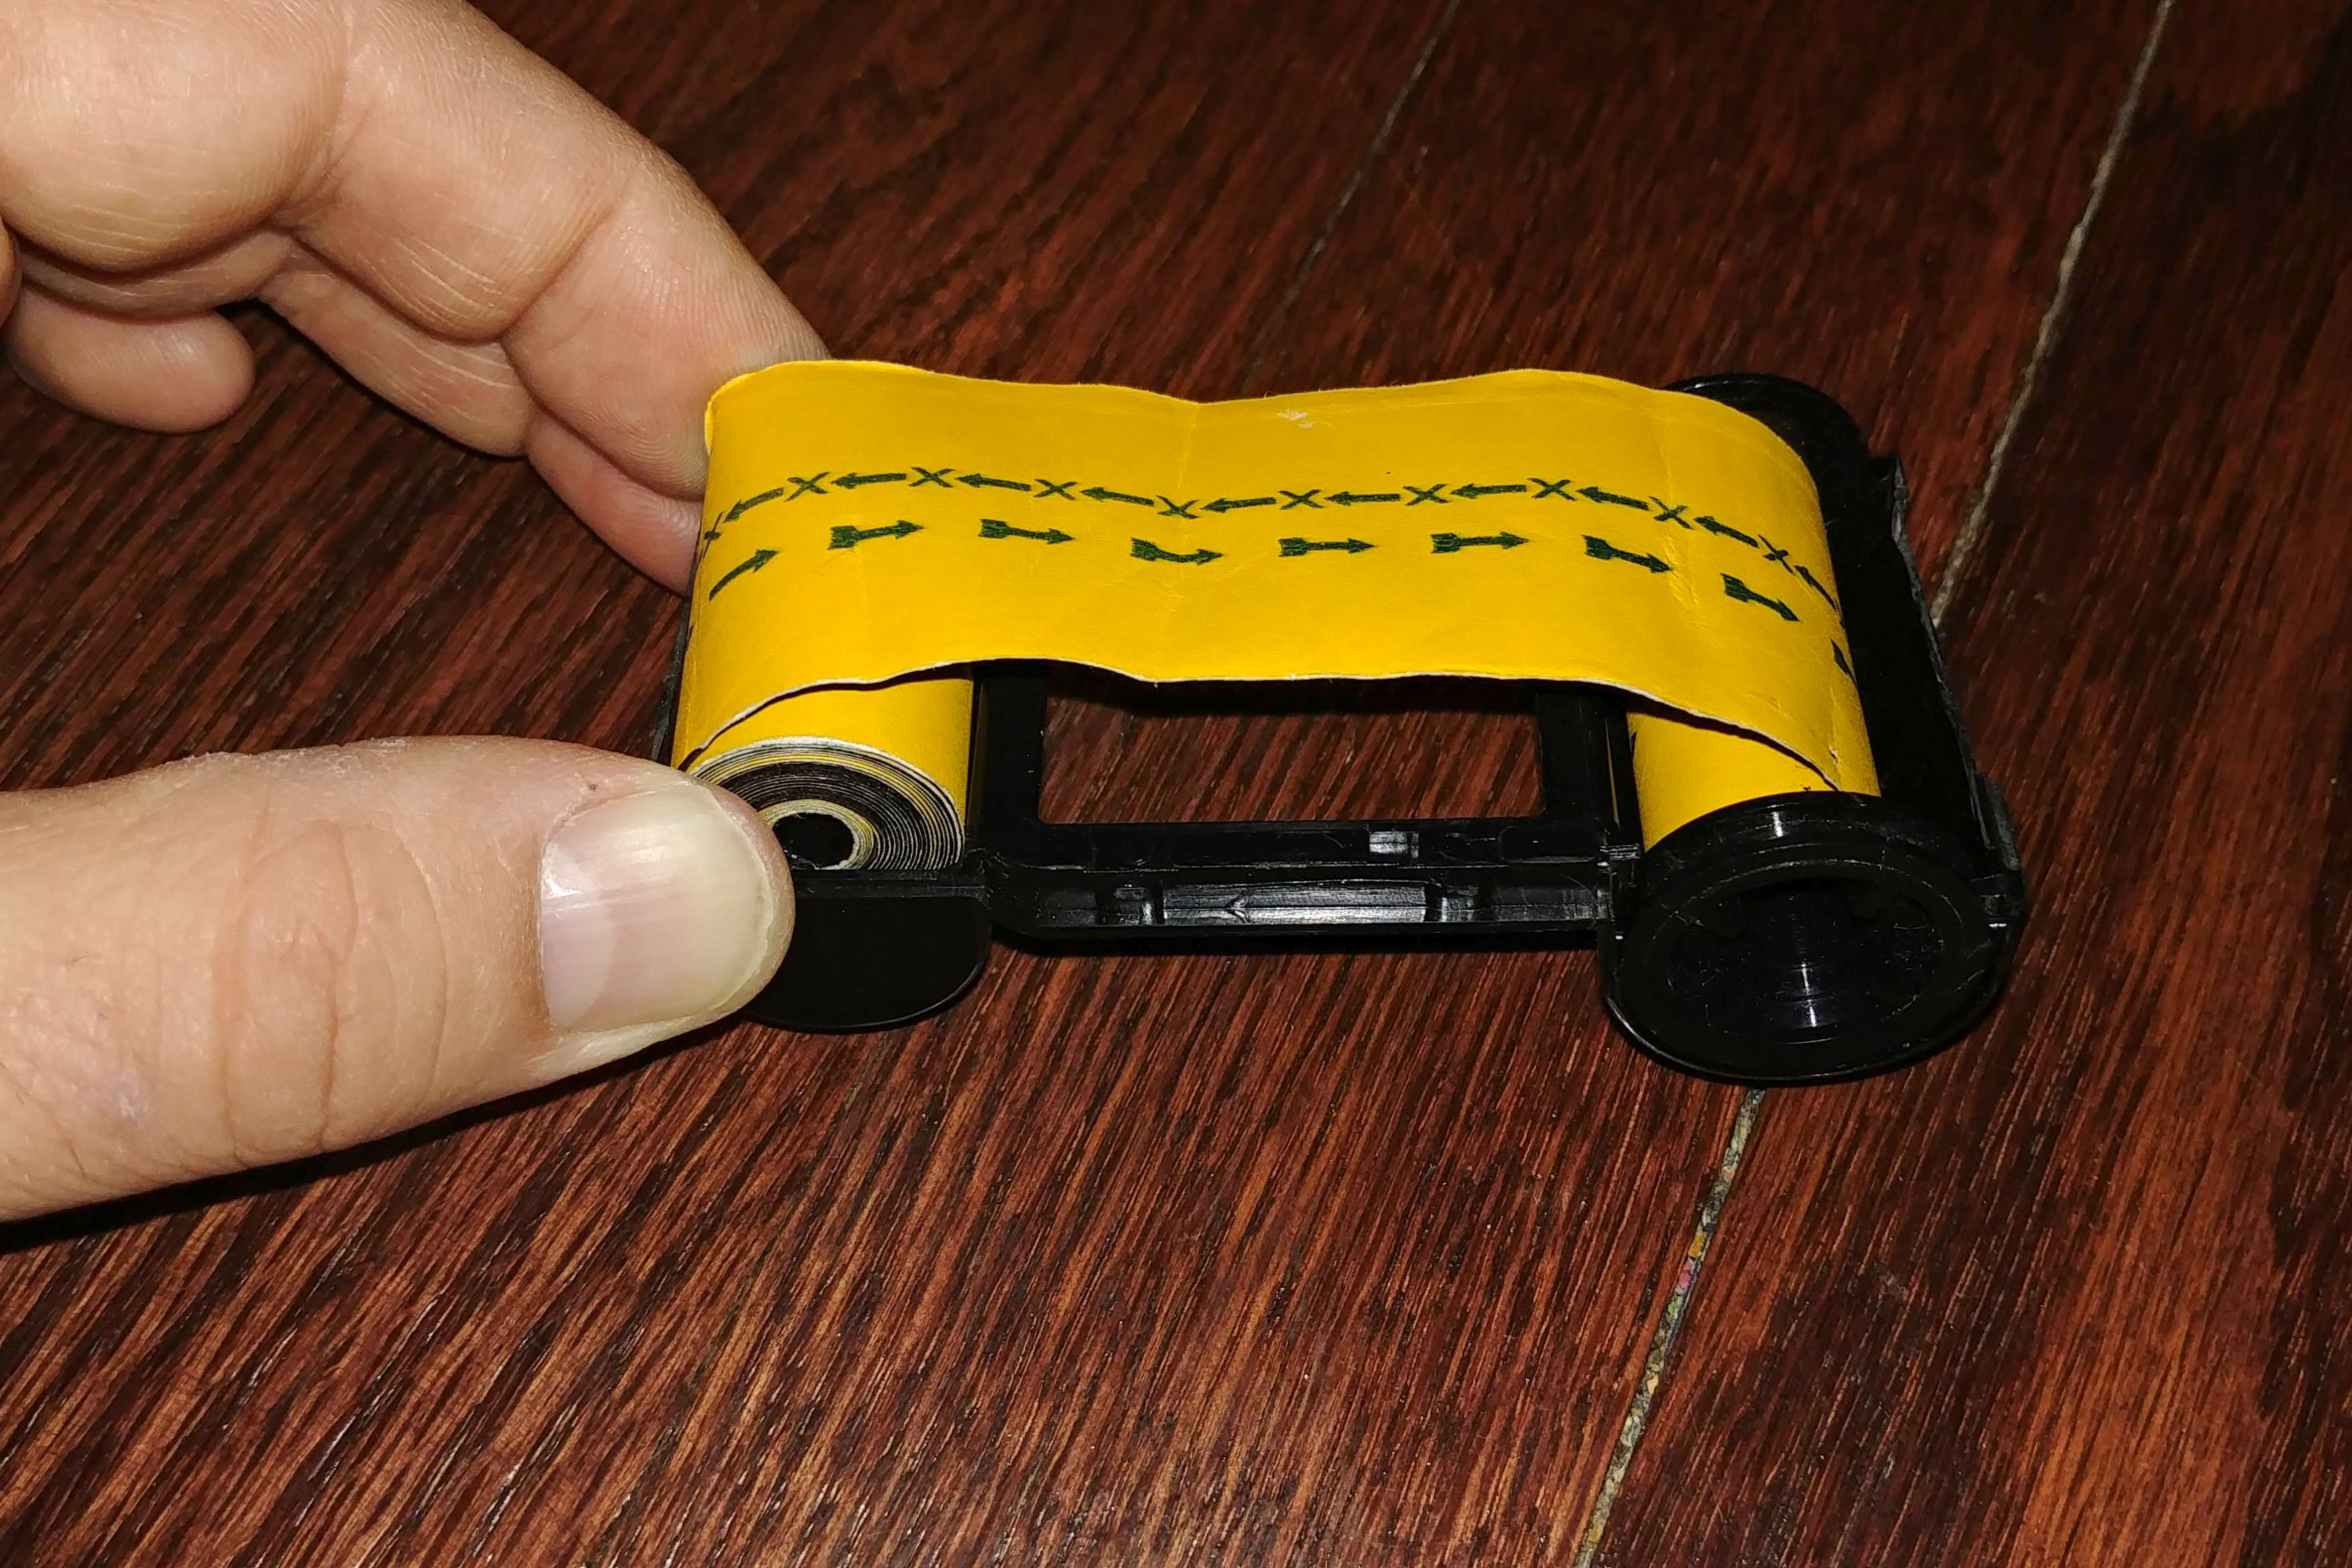
Step 6: LIGHTS STILL OFF. Roll the backing paper and film into as tight of a roll as you can. I used a 20 exposure backing paper and it is a very tight fit. 12 exposure backing papers are easier as there’s less film and paper to roll. I’ve never actually done this with a 24 exposure backing paper as I think it would be an extremely tight fit. As a side note, this is why no one ever made a 36 exposure Instamatic cassette as there’s no way it would fit.
Make sure that while you are rolling the backing paper and film together, that the paper and film stay even with each other. As you get closer to the beginning of the roll where your tape is, you might start to feel the film bulge a little. If this happens, don’t worry. When you get to the tape, simply peel the tape off and move it over a bit so that the film lays flat again. If you’ve ever respooled 120 roll film onto 620 spools, this happens with that too as the film and paper tend to slide a tiny amount while rolling. You just need to make sure not to have any bumps in the film when you are done.
Step 7: Once you have the entire roll of backing paper and film rolled into a tight roll, shove it into the supply (smaller) side of the cassette. If it does not fit, you will have to start over at step 5. Stretch the take up spool over to the larger side of the cassette and rest it into position and join to the two halves of the cassette back together.
Fakmatic Only: You will be shoving the supply side sideways down into the smaller side of the cassette and the take up spool into the larger side of the cassette, making sure the backing paper slides into the narrow cavity across the film plane. Once both the film and take up spool are in the Fakmatic, attach the top.
Step 8: At this point, your cassette is loaded, but is likely not very light tight. This is especially true with reloaded Instamatic cassettes since they weren’t designed to be reloaded in the first place, but even the Fakmatic is not perfectly light tight.
You can turn the lights back on, but I recommend using as little light as possible. Do not stand in direct sunlight or under a bright flood light. Just get to a place where there’s enough light to see and take some black electrical or gaffers tape and tape the seams of the cassette to ensure the cassette stays light tight.
When loading unbacked film into old Instamatic cassettes, you need to make sure you tape over the exposure counter hole in the cassette. This is not necessary here since the backing paper will do a good enough job of keeping light from leaking onto the film.
Step 9: The last thing to do is develop your film. Since you used regular 35mm film, you would develop it like any other 35mm film. If you plan on sending your film to a lab you’ll want to include a note with the film asking that they return your empty Instamatic cassette. Alternatively, you could try unloading the cassette in darkness and pushing the exposed film back into an empty 35mm cassette to protect it.
My Results
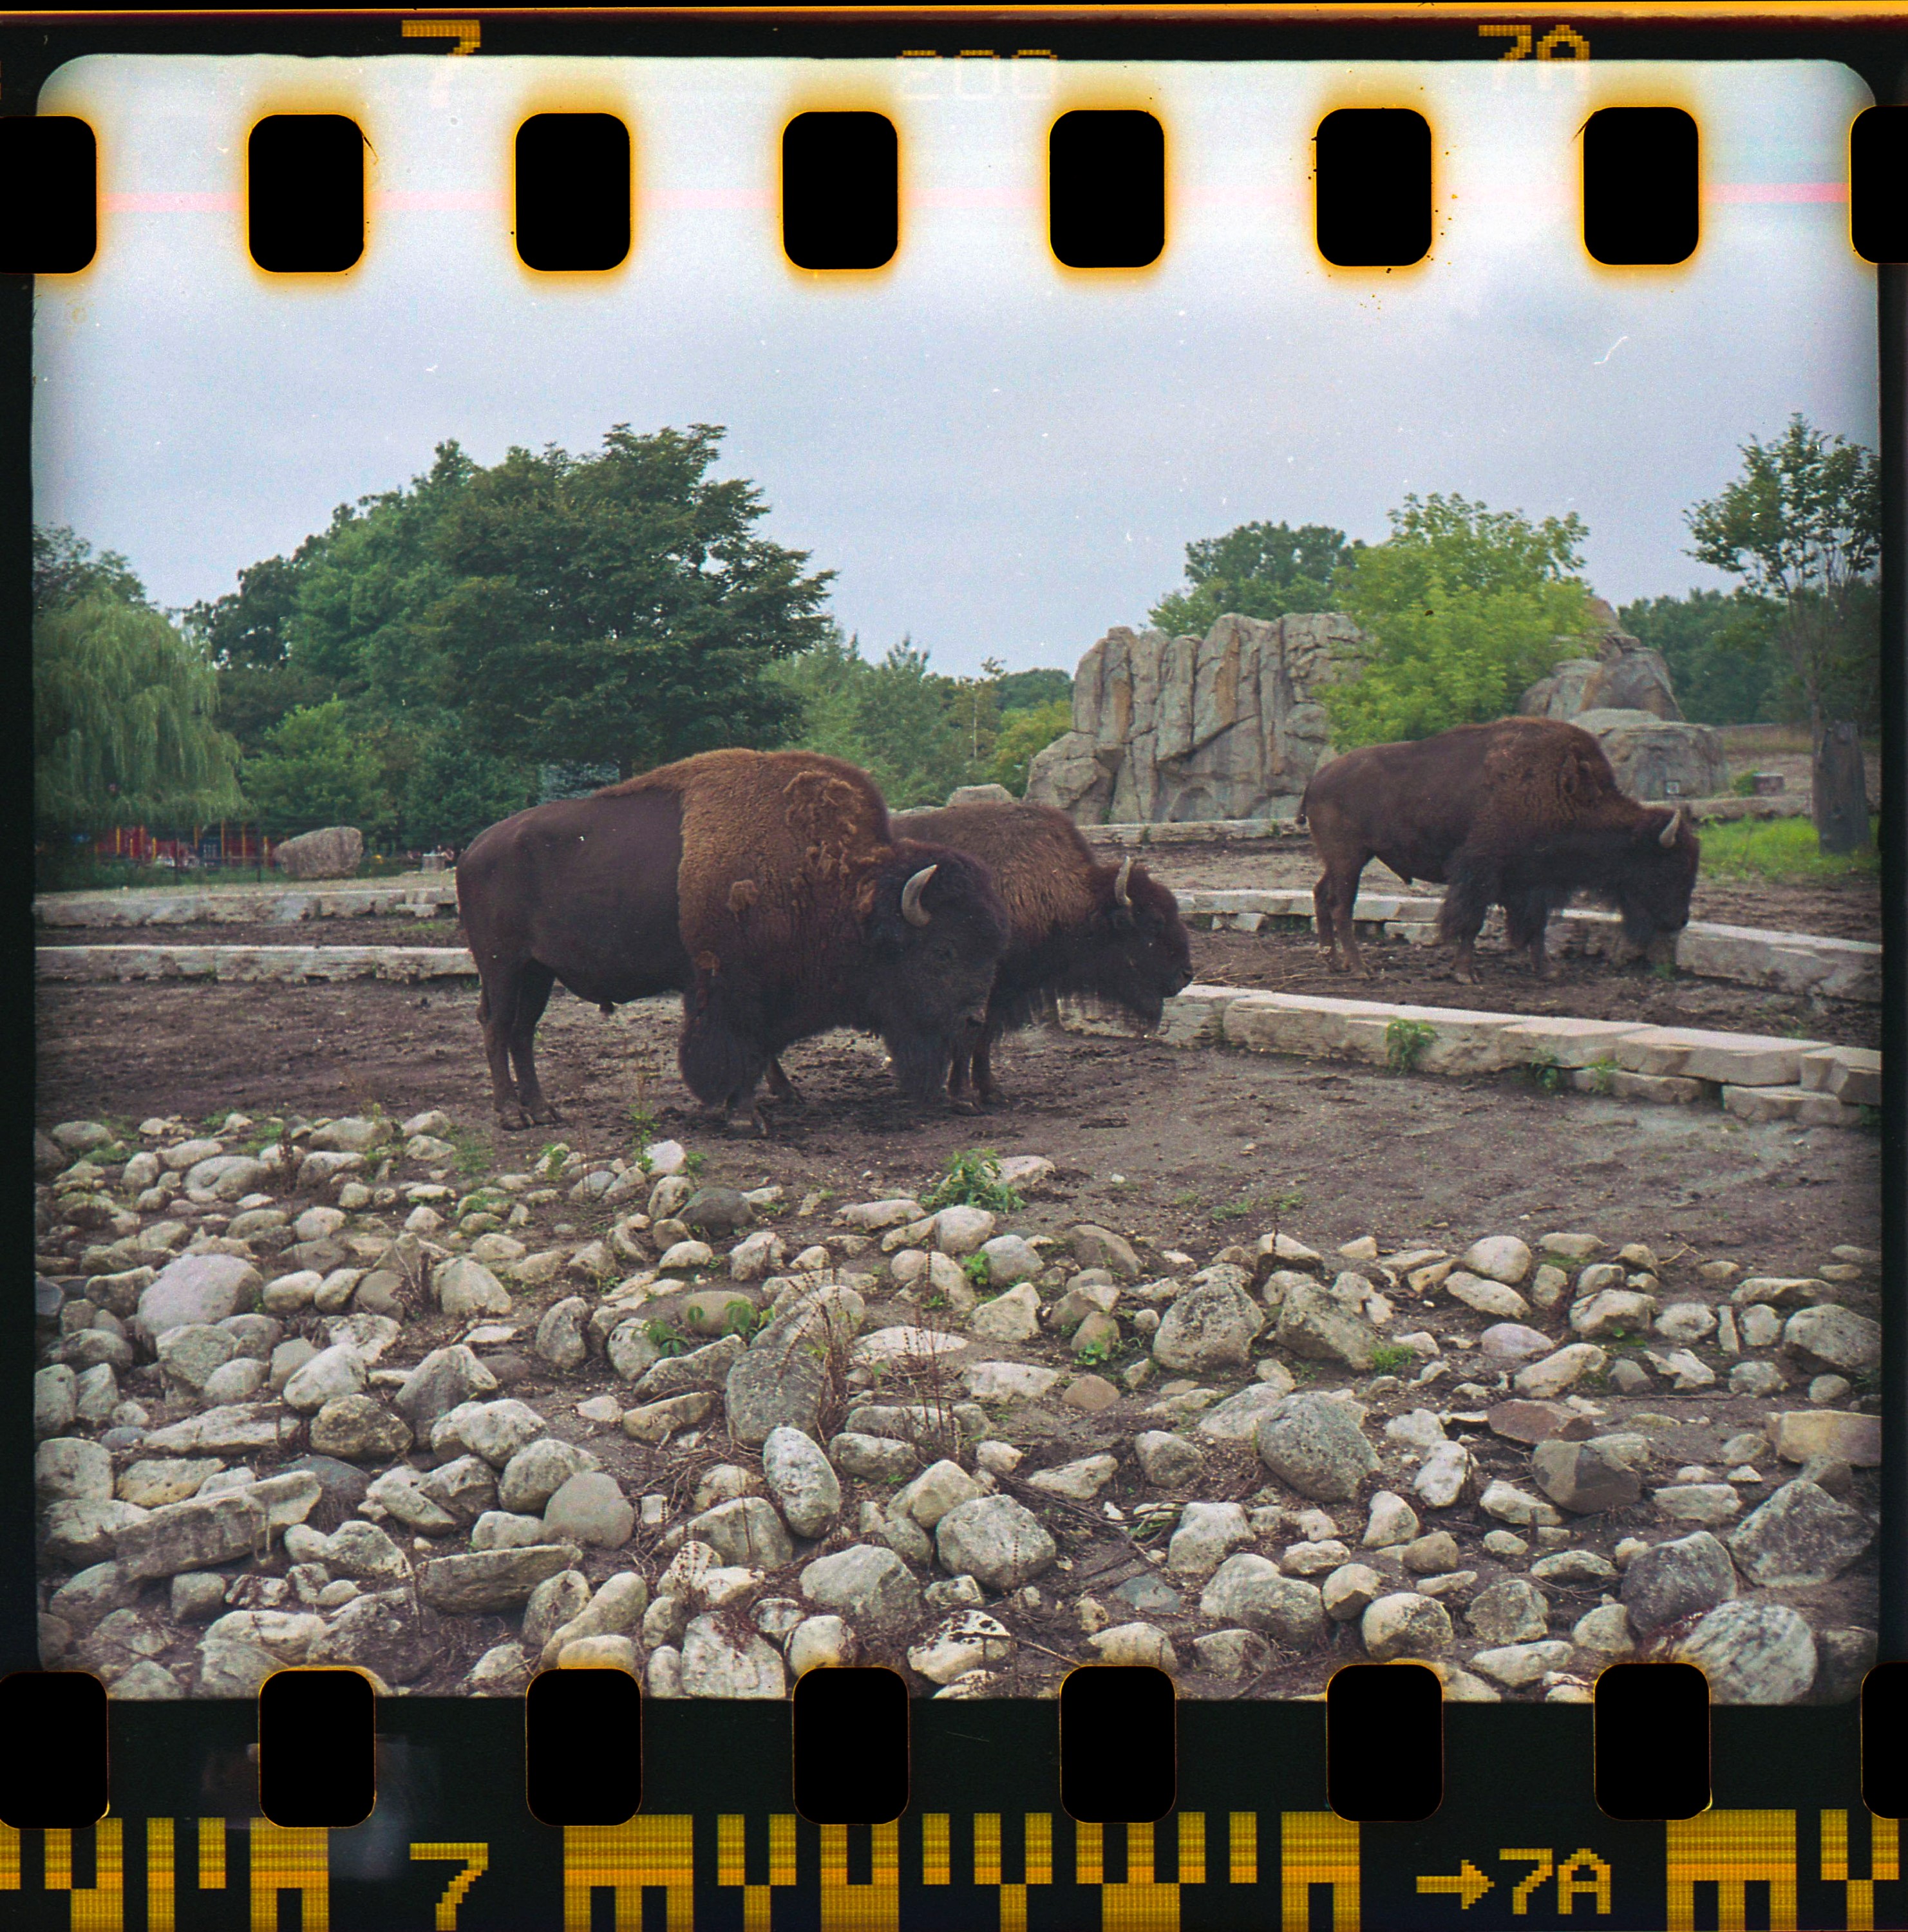
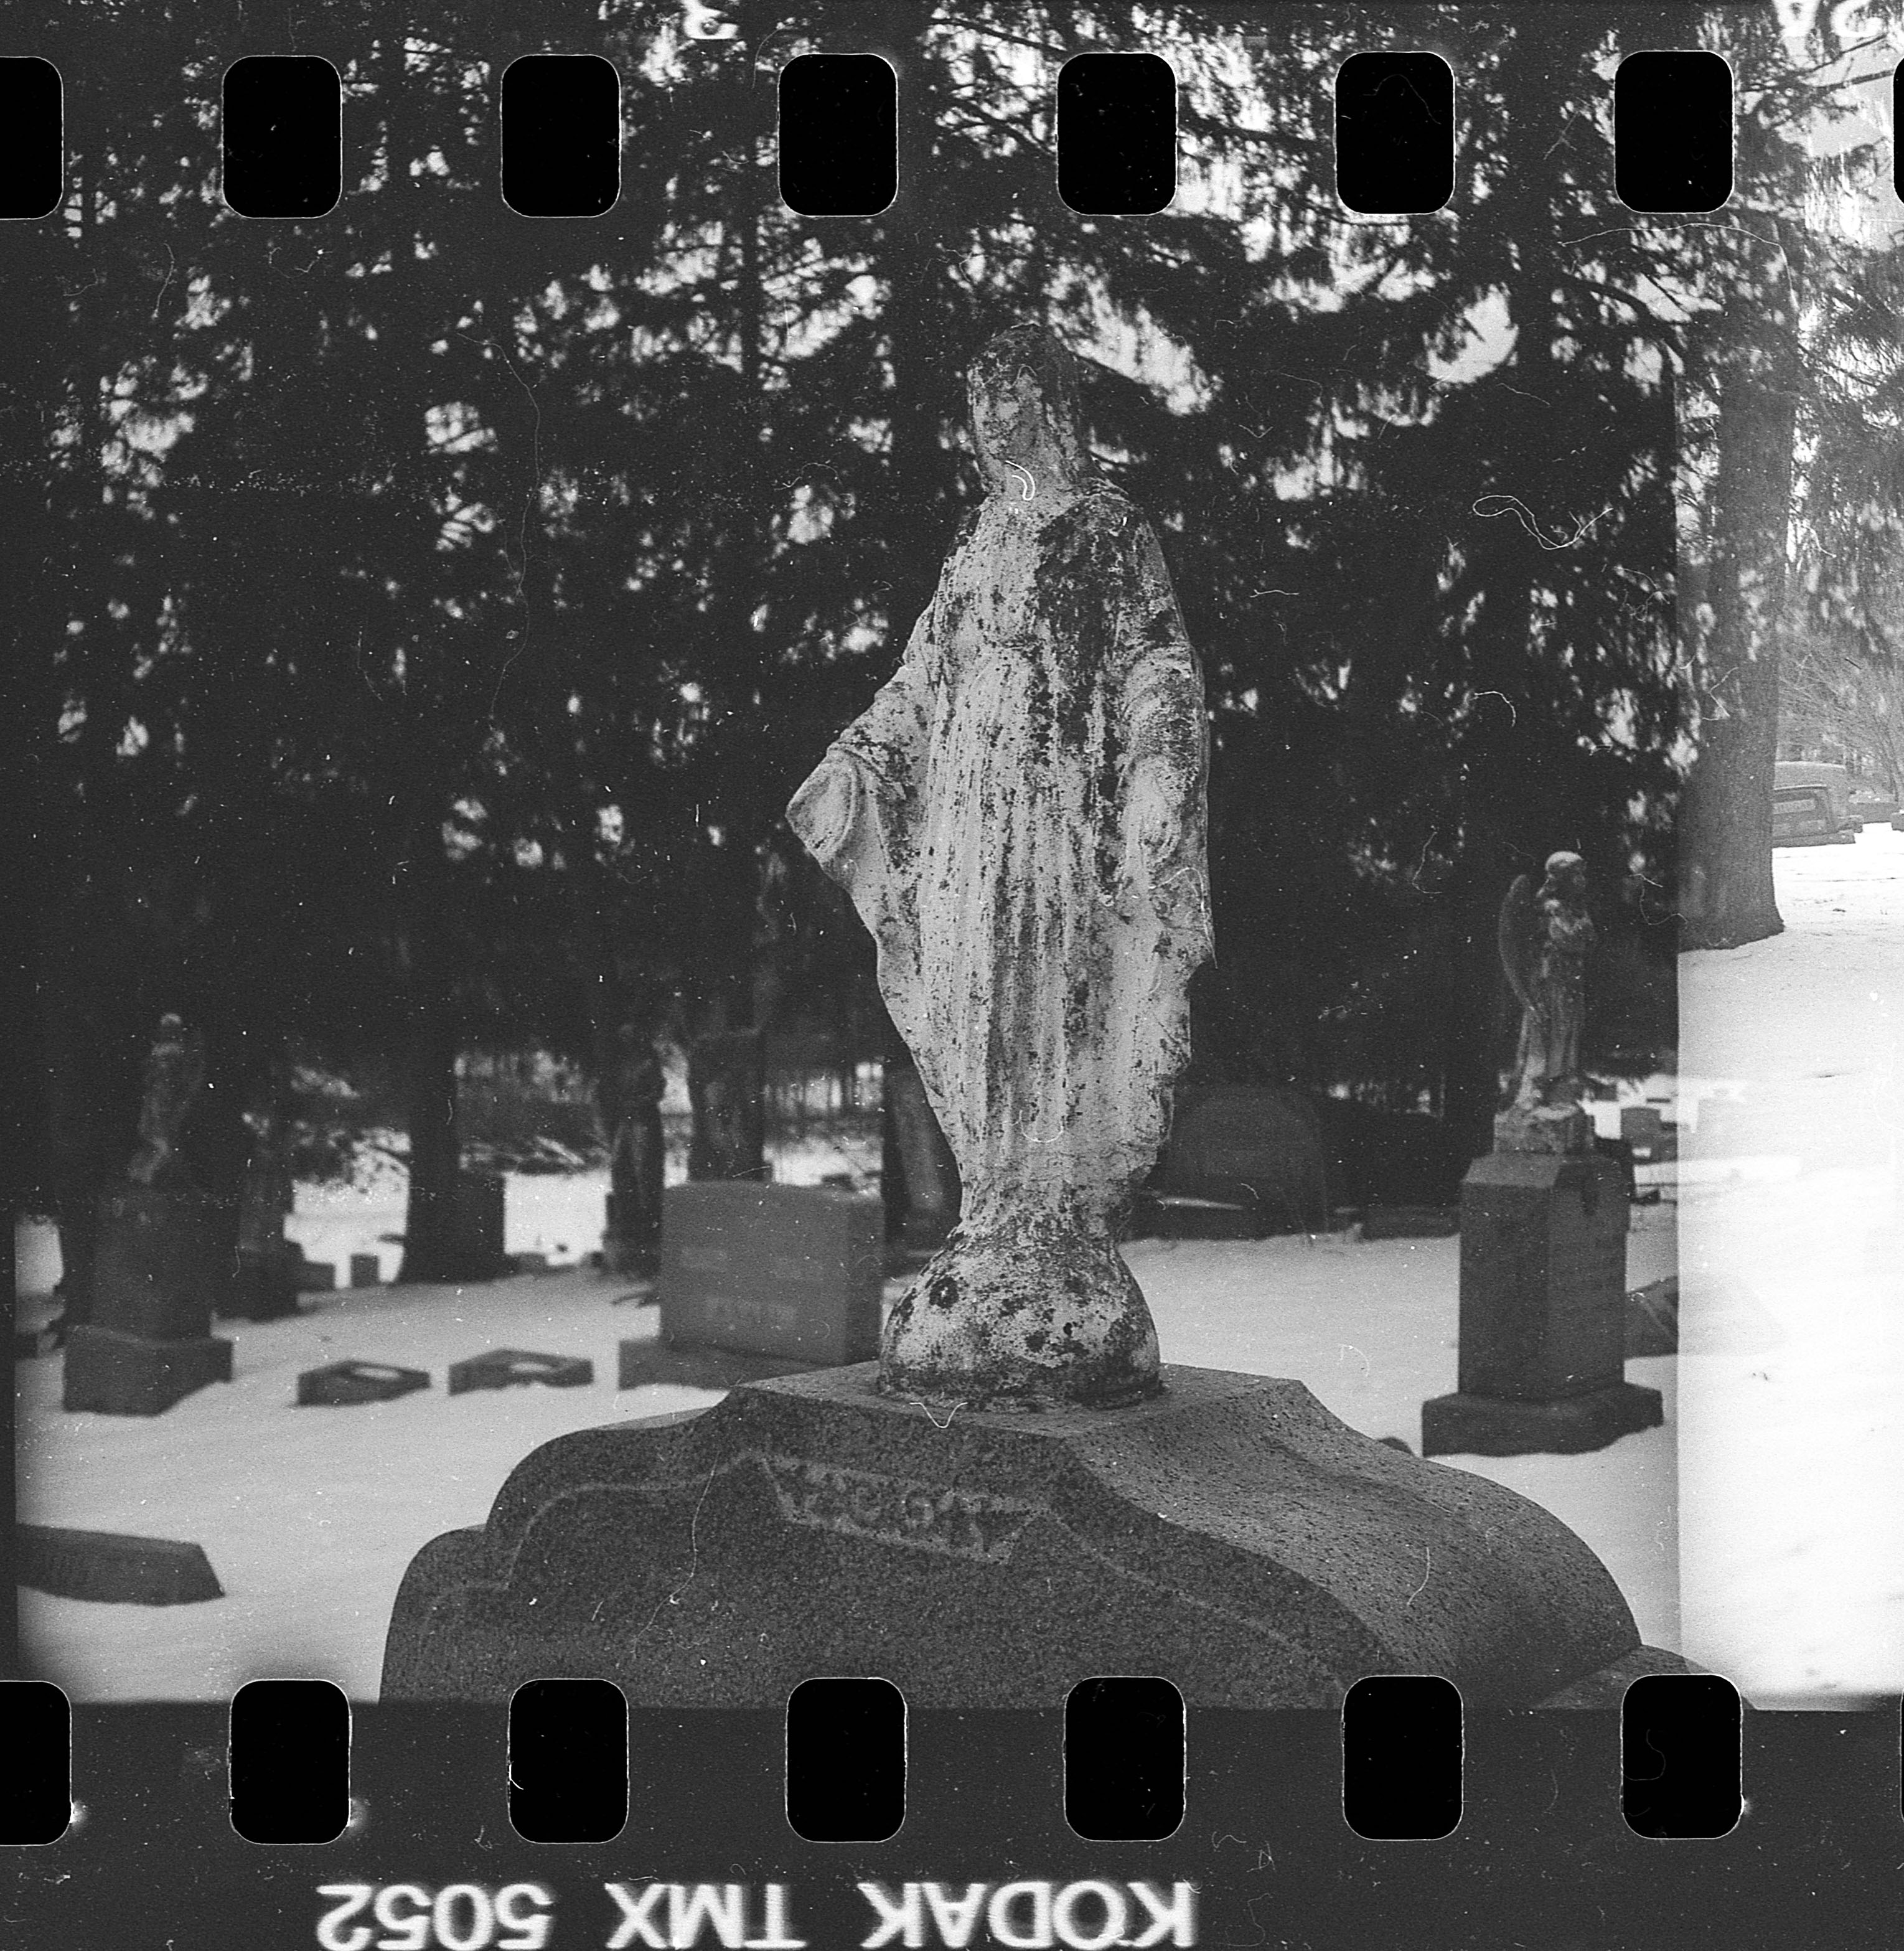
For this article, I shot backed and unbacked film in both the Fakmatic and original Instamatic cassettes, using three different Instamatic cameras, a Bell & Howell Autoload 342, a Revere 3M 1074 (Minolta Autopak 800 variant), and a Kodak Instamatic 704. Each of these cameras were pretty advanced models that had features such as motorized film transport, rangefinders, and better lenses than cheap models like the X-15.
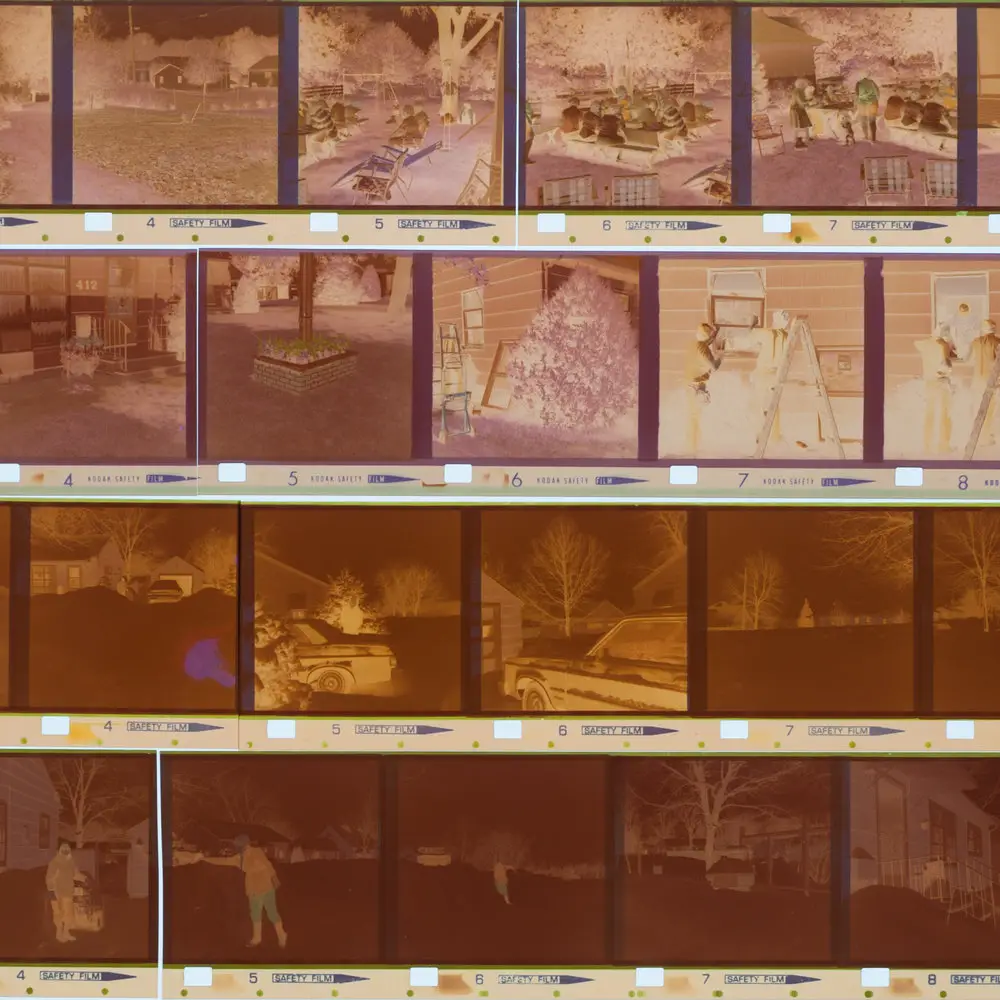
None of these three models are listed as recommended cameras to use with the Fakmatic adapter because of the way they handle film, yet I was able to shoot them all. The first two galleries were shot in the Autoload 342 and Instamatic 704 using reused Instamatic cassettes. The color photos were shot on Fuji 200 taken from a regular 35mm cassette, and the black and white photos are the bulk loaded Kodak TMax that I showed pictures of me loading earlier in this article.


These next three examples are from the Revere on expired Kodak Gold 200. This roll of film was shot using the Fakmatic adapter and I am pleased to say that the adapter did everything it was supposed to do. Despite not being on the recommended list of cameras, the Revere worked correctly with backing paper inside the cassette. In this gallery, I cropped the sprocket holes off the exposures only showing an approximation what would have been printed if this was real Instamatic film

Finally, these last three examples were shot on the Kodak Instamatic 704 by my friend Adam using the same method described in this article with backing paper on Ultrafine 100 film.
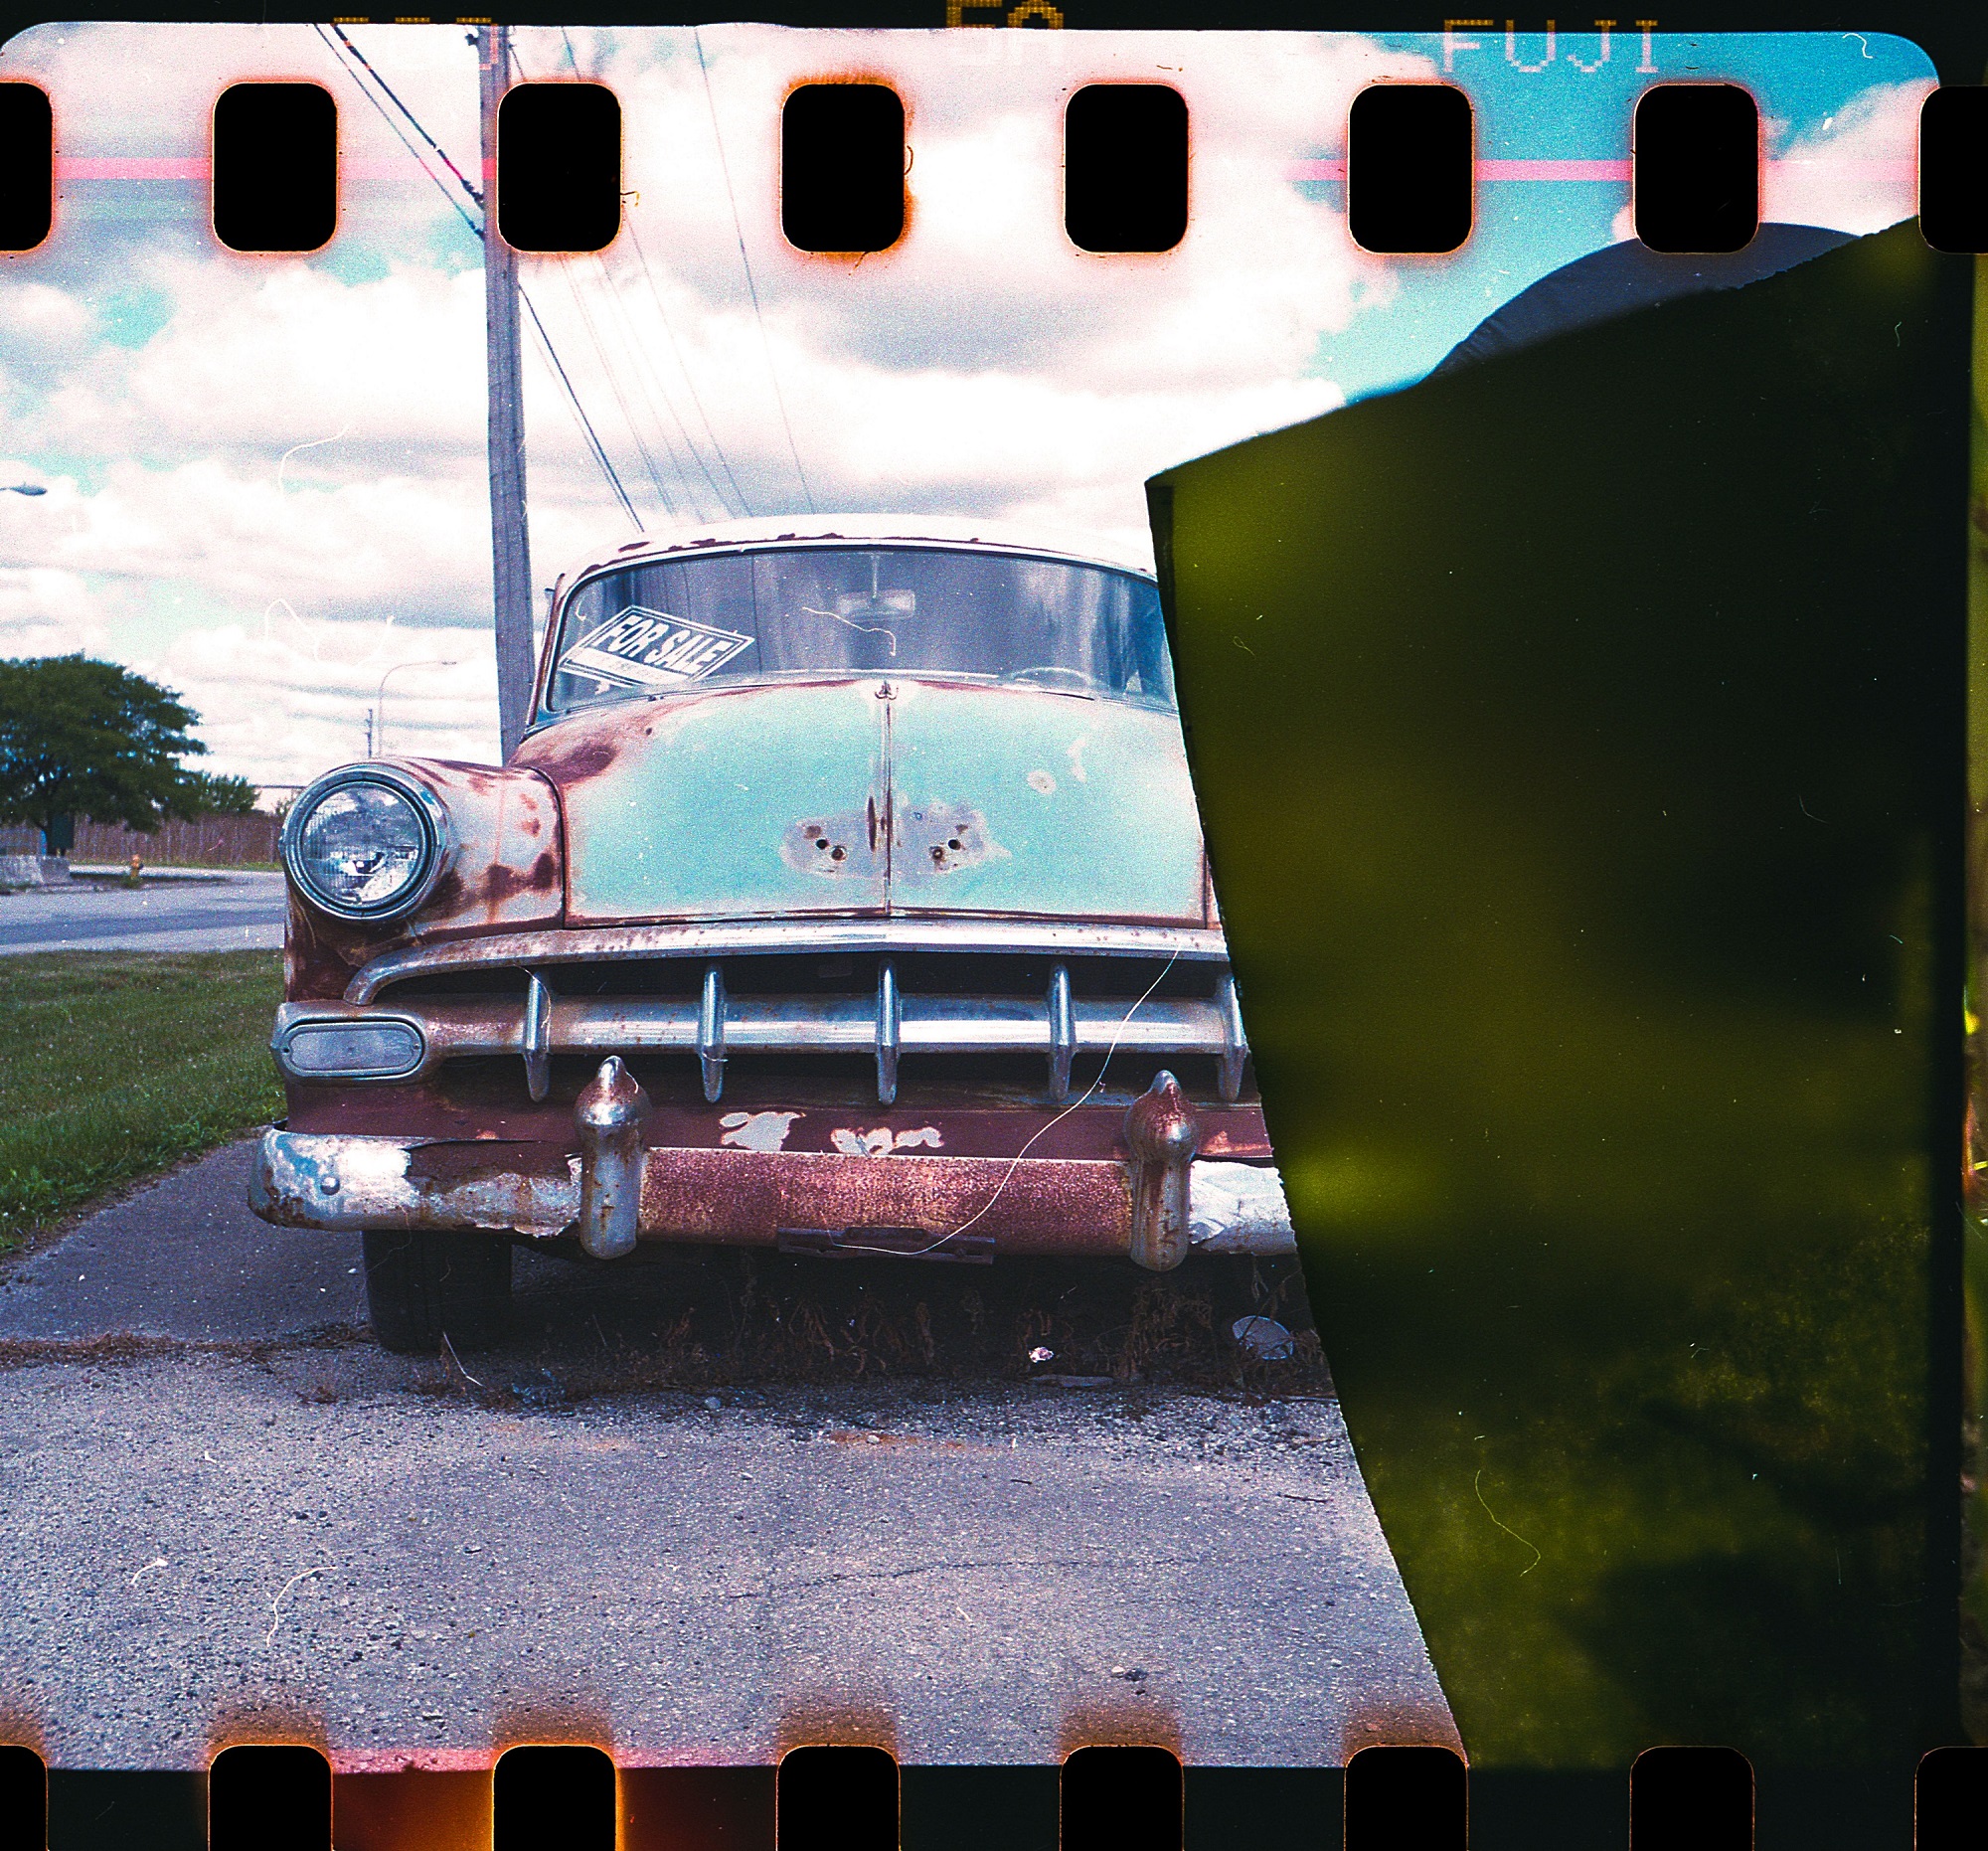
The results from all 3 cameras above are quite good and show the potential of what Instamatic was capable of. In all but the Revere gallery, I included full width scans of the exposed image including the sprockets from 35mm film, but remember that with real Instamatic film, the exposure would have had a prefogged frame around it that the printer would have used to crop the image for printing.
When composing your images, it’s important to remember that you’ll have the sprocket holes running across the top, so if you want to use these images for anything, try not to have any important parts of what you’ve about to capture near the top of the viewfinder. Sprocket holes can look cool in some compositions, but not if they’re running across someone’s face.
If you scan your own images on a flatbed scanner and want to keep the sprocket holes, you won’t be able to use the scanner’s 35mm film holders as they’ll cover up the holes. There are a few different options for scanning full width 35mm film on a flatbed scanner, but what I do is get two pieces of 8×10 glass and sandwich the film between them and then lay the glass directly on the surface of my scanner and scan it. You can’t just simply lay the film directly onto the scanning surface of most scanners as your images will likely be out of focus so you need a way to elevate the film about 2-3 mm off the surface of the scanner glass.
Looking at the results above, it’s easy to think that using paper backed 35mm film in Instamatic cameras is a perfect solution and that couldn’t be father from the truth. In reality, although I did have success with every camera I tried this on, I lost several frames each time. Sometimes images overlapped, in the case of the Autoload 342 the camera skipped past several frames for no apparent reason, and like pretty much any old camera, sometimes I encountered metering or shutter problems resulting in unusable exposures.
In my tests, I did not find any significant difference between shooting with the Fakmatic versus an original Instamatic cassette when using the paper backing other than the missing window for reading the exposure numbers on the backing paper. The absence of this window is beneficial when using unbacked film as it eliminates a source for light to leak in, but otherwise the two options were the same.
I won’t go as far as to say that using the Fakmatic with paper backed film guarantees compatibility with every camera out there, but it’s certainly better than limiting yourself to basic cameras like the Kodak Instamatic X-15.
Conclusion
With so many millions of 35mm and roll film cameras that have been made over the past 100+ years that use film that you can still easily buy today, why would anyone want to shoot film in a camera that it wasn’t designed for?
Maybe it’s the challenge of doing something just to see if you can, maybe you really like doing things the hard way, or maybe it’s that you want to experience all kids of photography that existed over the years and don’t want to be stopped by obsolescence.
Whatever your justification for doing this is, know that you’re not alone. The fact that a product like the Fakmatic exists, suggests that there’s quite a few people out there like you who want to do this. The vast number of high quality or unique cameras out there like the Kodak Instamatic Reflex, or the Bell & Howell Autoload 342 make for a fun shooting experience. Plus, shooting square frame images on 35mm film with exposed sprocket hole gives you a look you can’t get any other way.
The sad thing is that no matter how hard you try, whether you reload an old Instamatic cassette or use the Fakmatic, use backing paper or not, some cameras just won’t work. The compatibility of 35mm film in an Instamatic camera will never be 100%. Even if you are successful, sometimes you’ll get overlapping frames, if you’re using a camera with a motorized film transport, sometimes it will skip frames, and sometimes your exposures will be off.
This is very much a “proceed at your own risk” project, but if you are successful, I think the reward is worth the risk!
Have you ever loaded 35mm film into an Instamatic camera? What methods did you use and how did it turn out? Share your experience in the comments below.
So intact 126 backing paper is the key to better than the “keep winding not matter how grotty it sounds” approach to the original Fakmatic cartridge? I had visions of slitting and perforating 120 roll film down to size as another complicated alternative, as some do for 127 cameras. I wonder if Ye Ancient Minolta Autopak 700 is packed away somewhere among my college stuff?;)
Having backing paper greatly improves film advance, but doesn’t make it perfect. Depending on how you rolled it, there will be two or three sprocket holes within the oval opening on the backing paper that the camera’s “finger” can catch on. It’s not a perfect solution, but much better than loading film naked.
Thanks for a great article. I found that cheap cassettes can be easily opened by flexing them a good bit and they snap apart in seconds ready to reuse. I have used reloaded cassettes and the Fakmatic without backing paper and that is my current method.
If you use a Lomo Digitalizer for 35mm film on you flatbed scanner, the sprocket holes show.
I really enjoyed this post! I’ve used a couple of different methods to reload a 126 cartridge, without backing paper. The first couple of times I just used 35mm film in an Instamatic X-15, and spaced the shots by taking a blank frame in between each shot. I also experimented with deliberately allowing the shots to overlap, just to see how it would look.
For my Instamatic 500, I used old bulk 35mm Konica 160 with no sprocket holes (from The Frugal Photographer). I punched my own holes using a manual document binding machine with all but one of the punches removed. (I used an old piece of 126 film to help me figure out the spacing so I could then do it in the dark.) That worked really well, though I still had a few missed/misplaced frames. Still, I think I got about 16 good shots out of 20. Since then I’ve acquired a few more cartridges and some more backing paper, so I’ll keep experimenting with different methods to see how it goes.
For scanning, I bought a film holder from Negative Solutions on ebay. It is sized for 35mm film with the sprockets showing.
It has been a really fun project, and I just love using these cameras. Now that I know it works, I plan to get a few more 126 cameras; I’ve got my eye on a few Minolta Autopaks in particular, and the 700/800 Instamatics.
I’ve picked up a few rolls of that non-perforated film from the Frugal Photographer and it’s wonderful stuff. I use a 4mm square “craft punch” that I enhanced with an edge guide to align the hole in the dark, and a “feeler” whisker on the side that helps me align the holes between shots so they don’t overlap. It has worked really well so far!
The Kodak 700/800s are some really overlooked cameras with excellent lenses and image quality. They also seem to hold up well over the decades and are aren’t too demanding that the film stock be perfect. The Autopaks I’ve had less luck with – they have been in wonderful condition cosmetically, but curiously, all of the battery powered ones have had bad meters that default to the “flash mode” of automatically stopping down as you focus closer. The one standout of the half-dozen Autopaks I’ve picked up is actually the selenium powered Autopak 500.
Now if only I can find a fully working Autopak 324!
Adam, I think it was your review of the 700/800s that made me look into them in the first place! 🙂 I’m glad to hear that you had good results with the Autopak 500. I found a photo of my grandfather holding one at a family event 50 years ago, and I decided I wanted to find one for myself. Thanks for the info!
Thanks for the compliment! Sadly after making this, I haven’t once yet played with another Instamatic camera, but I have a Instamatic 500 and a couple others I want to load. I’ve seen that bulk unperforated film at Frugal and definitely need to look into getting some! Stay tuned!
The Fakmatic worked fine for me in the Instamatic 500, but I had other problems with every frame being out of focus, so I have to figure out why that happens. I also have acquired several other Instamatic models, including the Instamatic Reflex, that I am anxious to try.
I’m wondering, since the spring loaded “finger” seems to be a problem with 35mm sprocket holes, would it work to just grind that off and wind twice between frames?
I just finished a roll in the Instamatic 500 and they came out great. I emailed Mike Raso at FPP with my scans telling him how well it worked in the Fakmatic as I think they undersell the compatibility of this adapter. I have an Instamatic Reflex here too that is getting a roll next!
It would be cool if someone could supply bulk 35mm with the correct perforations. Then the fakmatic would work in all cameras. The FPP has been doing double perf 16mm and double 8, why not 35 with 126 perforations? Or even just supplying unperforated film that isn’t microfilm. I’d like to roll my own 828.
I definitely wish there were better options. Although the Fakmatic does work well (even better than the company claims), using double perforated 35mm is not ideal. If someone were to make a bulk 35mm with just the single indexing hole for 126 that could be hand loaded into the cassettes, that would be infinitely better!
I re-manufactured used cartridges / backing paper with slit 120 roll film and a perforator I designed that also measures the film length. Works correctly in any 126 camera. I never used 126 cameras in the day, but took a challenge from a friend last year to see if 126 film could be easily produced. Used his Kodak Hawkeye Instamatic-F and Minolta Autopak 700 to test. Takes about 10 minutes to produce a complete 126 cartridge, once it has been opened.
@peter, could you please explain further as to how you used the 120 roll film? You “slit” it? How did you remanufacture used cartridge? So many questions, sorry. Hope you or someone who understands this actually answers. Appreciation in advance to anyone who does. Thanks
FPP just put out a new product that changes everything in terms of Instamatic film. Essentially you buy a roll of properly punched 126 film, and then use that to reload either your vintage cartridge or a Fakmatic cartridge. Pretty cool stuff. No more crunchy film, or having to hold down the shutter button while you wind on.