

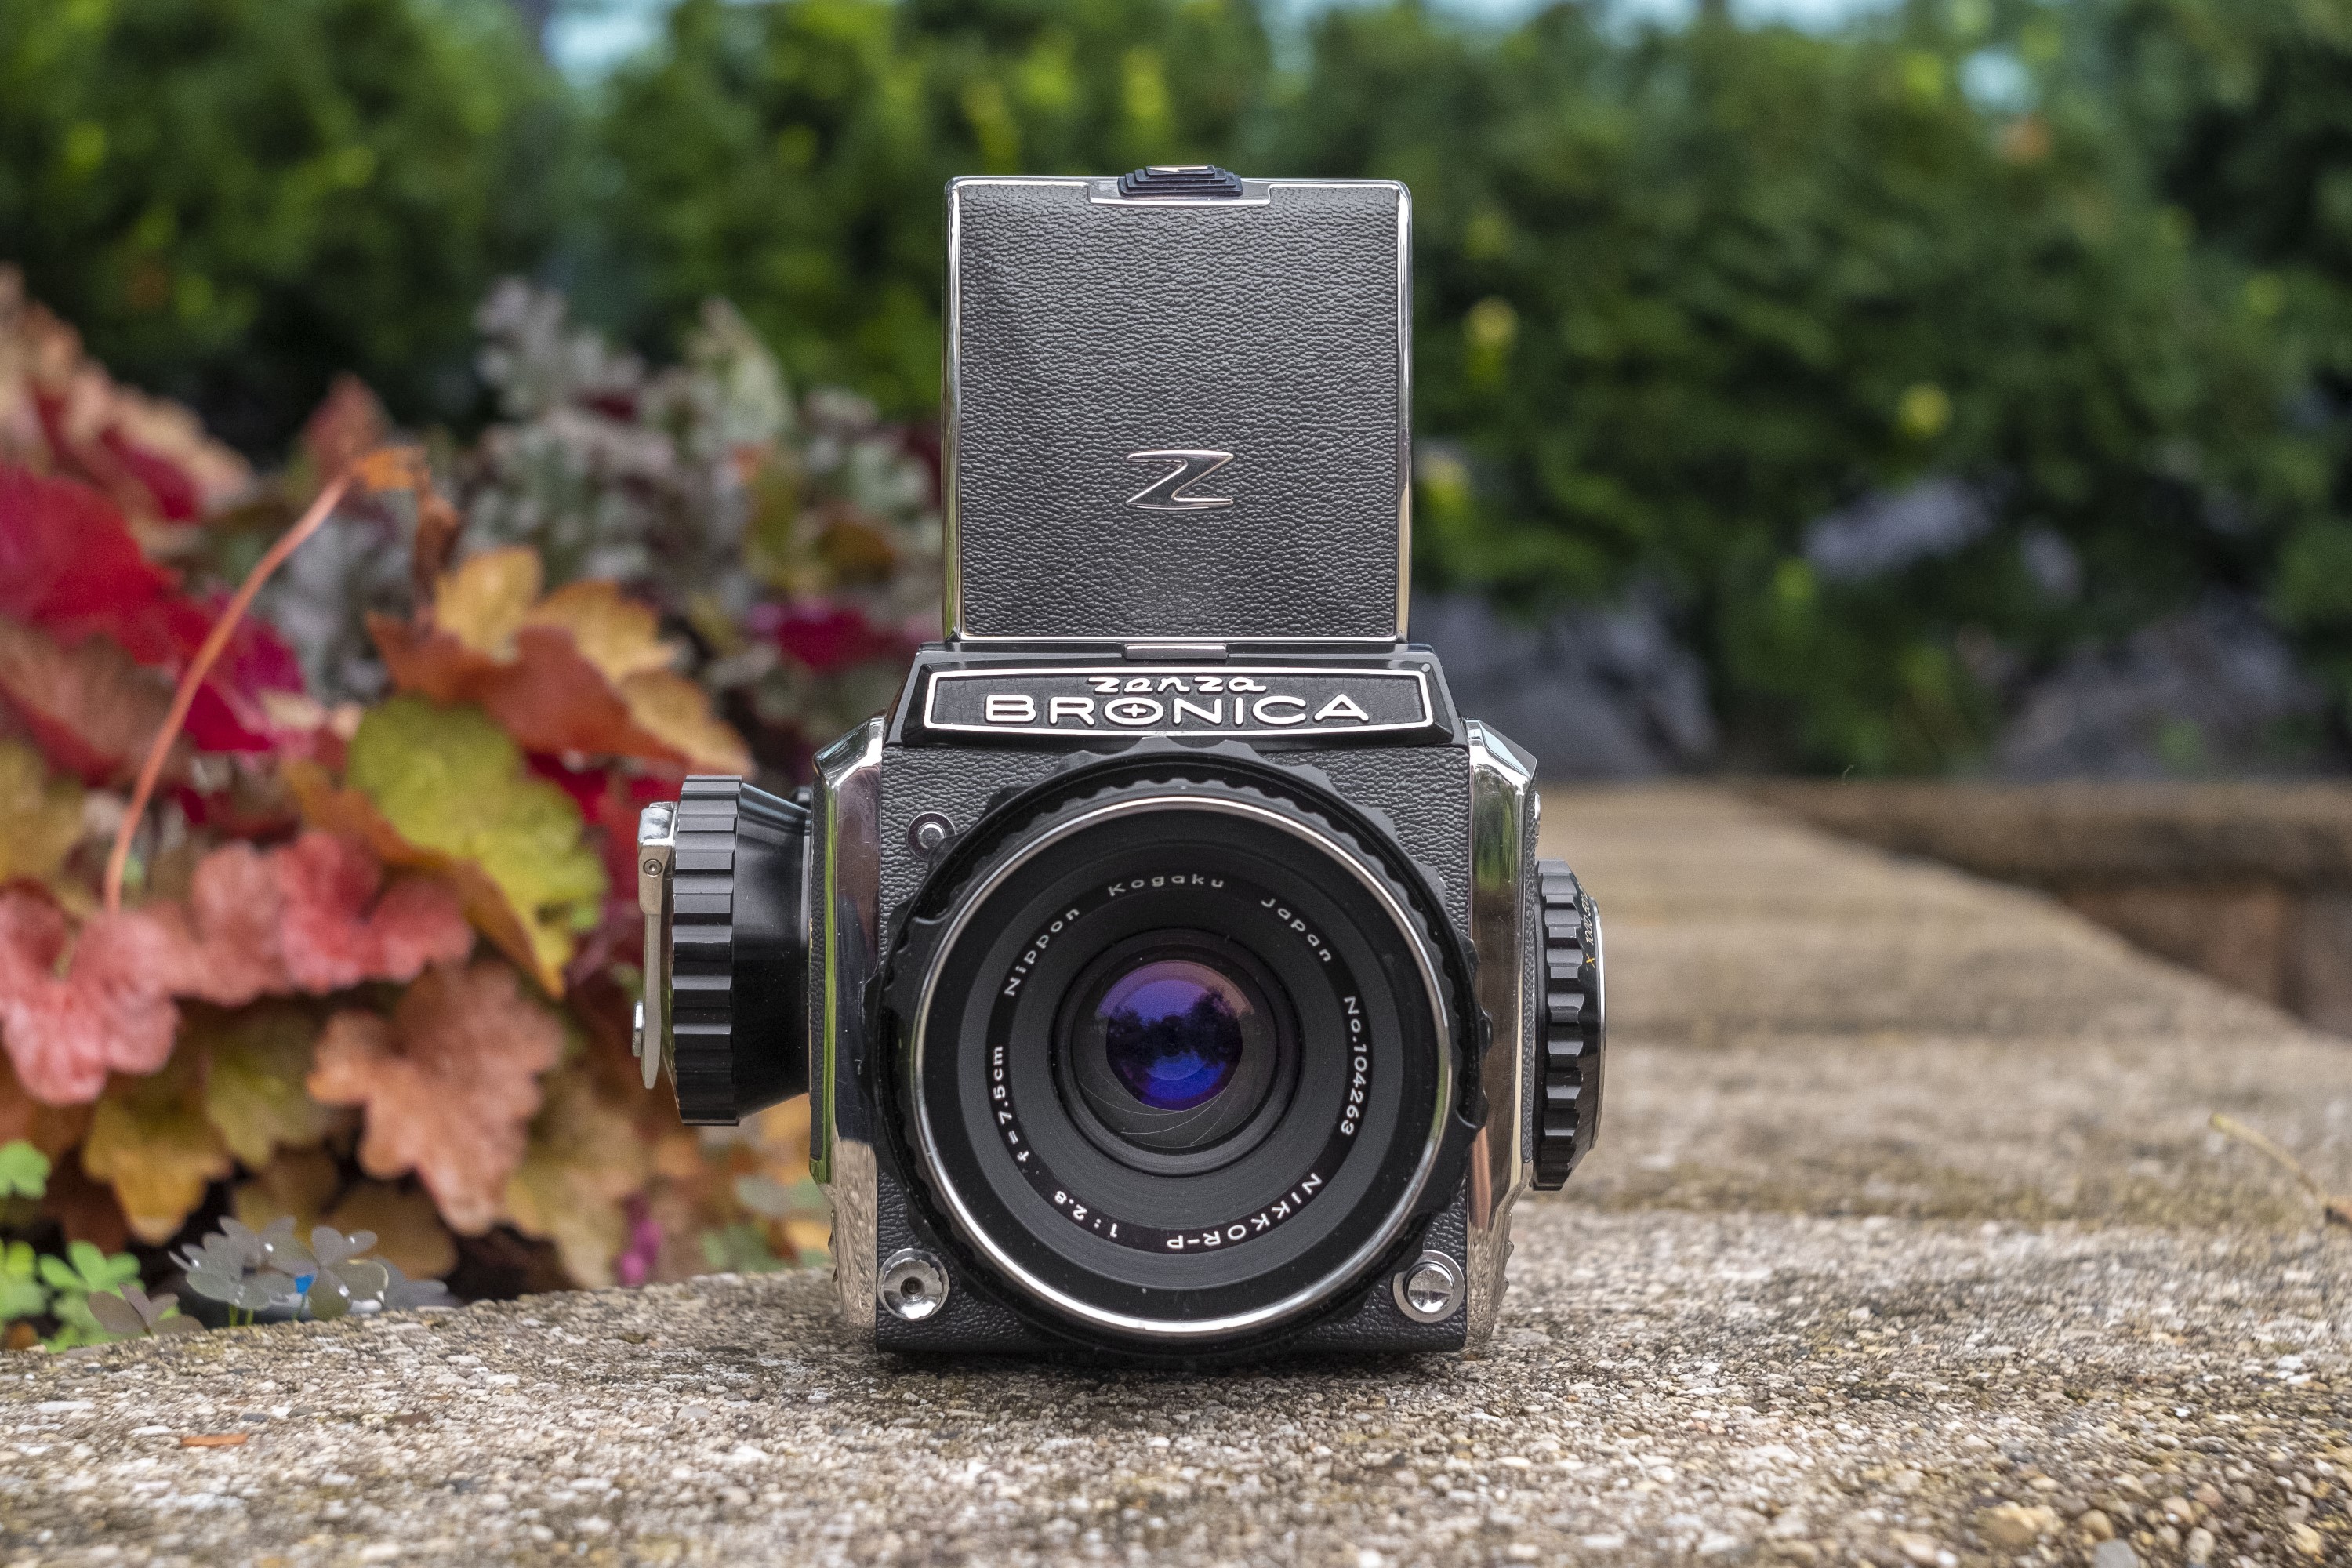
This is a Bronica S2, a medium format single lens reflex camera produced by Zenza Bronica Kogyo from 1965 to 1969. Originally built as a discount option to the Hasselblad medium format SLR, the Bronica S2 was an upgrade to the earlier Bronica S with the most significant change being an upgraded interchangeable front helical focusing mount. All Bronica S-series cameras shoot 6cm x 6cm images on 120 or 220 format roll film using a top down focusing screen. Most commonly found with a waist level finder, eye level prism viewfinders were available as well. The Bronica was a complete system camera with a huge range of lenses and accessories available.
Film Type: 120 / 220 Roll Film (twelve / twenty-four 6cm x 6cm exposures per roll)
Lens: 7.5cm f/2.8 Nikkor-P coated 5-elements in 4-groups
Lens Mount: Bronica Bayonet
Focus: 1.9 feet to Infinity
Viewfinder: Interchangeable Waist Level Viewfinder
Shutter: Cloth Focal Plane
Speeds: B, 1 – 1/1000 seconds
Exposure Meter: None
Battery: None
Flash Mount: M and X Flash, X-Sync at 1/40
Weight: 1857 grams, 1645 (body only)
Manual: https://www.cameramanuals.org/bronica/bronica_s2.pdf
How these ratings work |
The Bronica S2 was created for those who wanted an affordable alternative entry into medium format SLRs. It’s overall design was inspired by the Hasselblad 1000 with an interchangeable lens mount and waist level viewfinder, removable film magazine, and focal plane shutter. The ergonomics of the camera are familiar to anyone whose used a Hasselblad, and with Nikkor lenses made by Nippon Kogaku, the images they make are excellent. The Bronica was created as an economical option and it shows in it’s less than stellar reputation for reliability and extremely loud operation. | ||||||
| Images | Handling | Features | Viewfinder | Feel & Beauty | History | Age | |
| 2 | 2 | 1 | 1 | 2 | 1 | 20% | |
| Bonus | none | ||||||
| Final Score | 10.8 | ||||||
History
The first Bronica camera was produced in 1956 by a small Japanese company run by a former rice farmer named Zenzaburō Yoshino. Born in 1884 as the third and youngest son to a rice farmer in Kanda, Tokyo, he worked at his family farm for most of his life. Yoshino’s family’s business grew substantially throughout the years prior to World War II in Japan.
After the war, with Japan’s economy and agriculture in disarray, the rice industry was critical for Japanese farmers and citizens. Zenzaburō Yoshino’s company employed as many as 120 people and was a leader both in producing and distributing rice throughout the country. Throughout his time working in the rice industry, Yoshino had a strong fascination with the mechanics of how things operated. He also became interested in photography, amassing a collection of 30 cameras that he would use to photograph his daily life.
Unsatisfied that despite owning multiple cameras, there was not one single model that accomplished everything he wanted to do. With his passion shifting from rice distribution to photography, he knew that in order to start over in a new industry, he’d have to start small, and build up his knowledge, reputation, and most importantly, funding.
In 1947, Zenzaburō Yoshino founded a small shop in Toshin-cho, Itabashi-ku called Shinkodo Seisakusho that manufactured small devices like lighters, cigarette cases, clocks, and other compact devices. His strategy worked, and Shinkodo Seisakusho’s products sold well and became popular with US servicemen and women stationed in Tokyo.
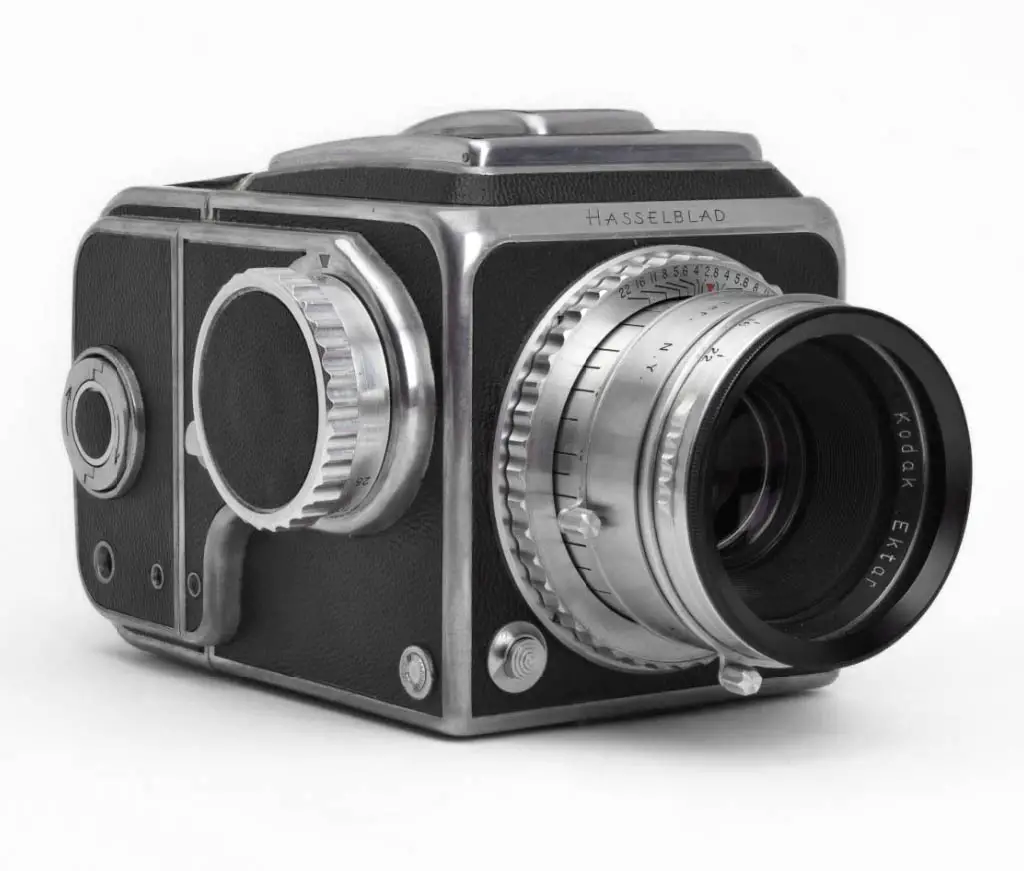
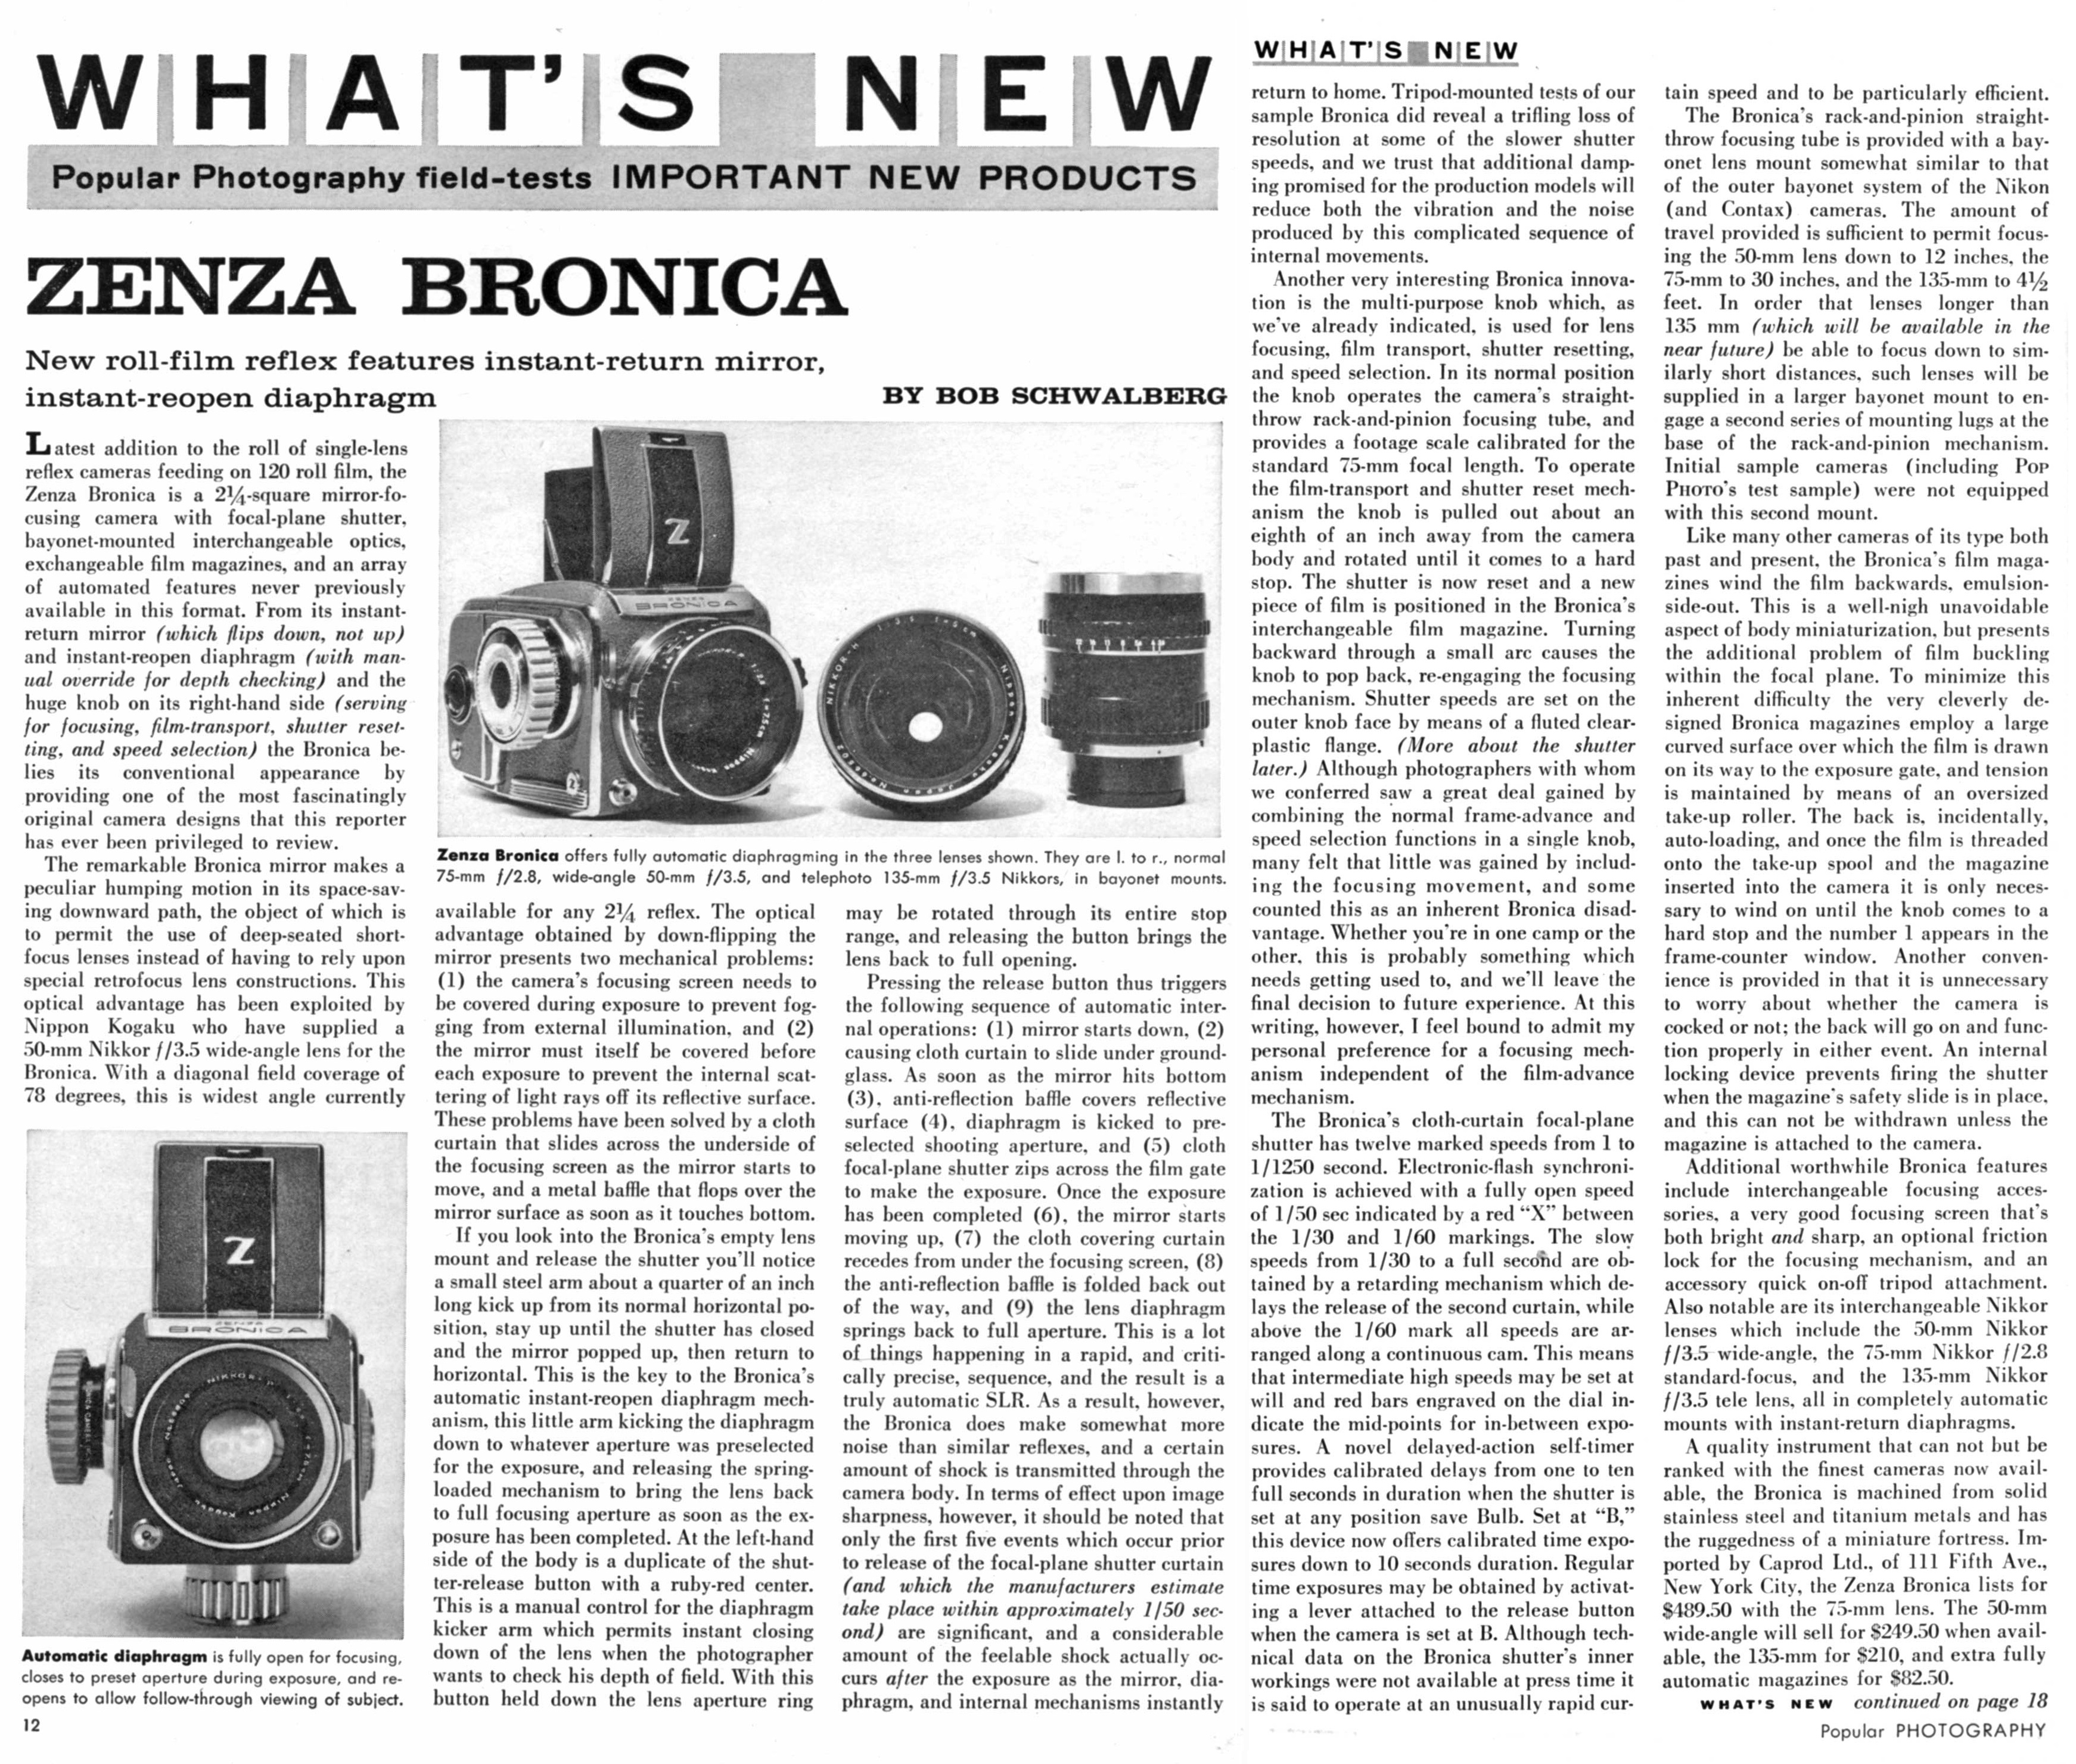
In January 1952, with a much better understanding of manufacturing and the financial means to bring his dream camera to life, Zenzaburō Yoshino started to work on his first camera. At this time, the Japanese camera industry had already become saturated with 35mm rangefinder cameras and the earliest SLR cameras first started to hit the market. Yoshino liked the design of a reflex camera, but in his dream, he wanted something capable of higher quality images than 35mm could offer. Twin Lens Reflex cameras were popular at the time, but they were large and didn’t offer a true through the lens viewfinder. Although he might not have known it at the time, Yoshimo’s dream camera would turn out to be a medium format SLR, similar in design to Victor Hasselblad’s first Hasselblad camera.
Zenzaburō Yoshino would spend the next four years evolving his idea with an emphasis on quality first, usability second, and luxury third. Finally, in June 1956, the first hand made prototype was finished. Referred to then as the Yoshimo Flex, the camera’s focal plane shutter was all new, and not based off any previous design. Early examples had a top speed of 1/1250, a speed that no other medium format shutter could achieve. The body of the camera needed to be strong, light weight, and portray an image of luxury, so unpainted 18-8 Stainless Steel was chosen. Zenzaburō Yoshino had a strong understanding of the mechanics of building a camera, but knew little about optics, so his priority was in making the camera itself, while partnering with other Japanese optics companies for lenses.
As the camera evolved, with Yoshino’s priorities, the complexity of his camera grew. An early prototype had as many as 1800 parts in it’s design.
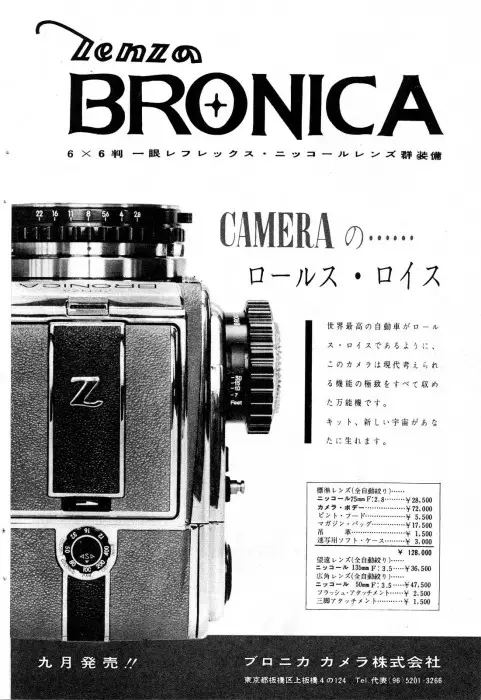
Over the next two years, the 1956 prototype would go through eight revisions before a final design was realized in October 1958. Now called the Zenza Bronica, and featuring lenses produced by Nippon Kogaku, the new camera had been in development for over six years, at a cost of over 200 million yen, an enormous amount of money at the time.
Yoshimo would wait a couple more months before publicly revealing his new camera in March 1959 at the Philadelphia Camera Show. The camera was a hit, appearing in nearly every photographic magazine’s summary of the Philadelphia show, in which it’s long list of features, and “ingenious” instant return mirror were highly regarded.
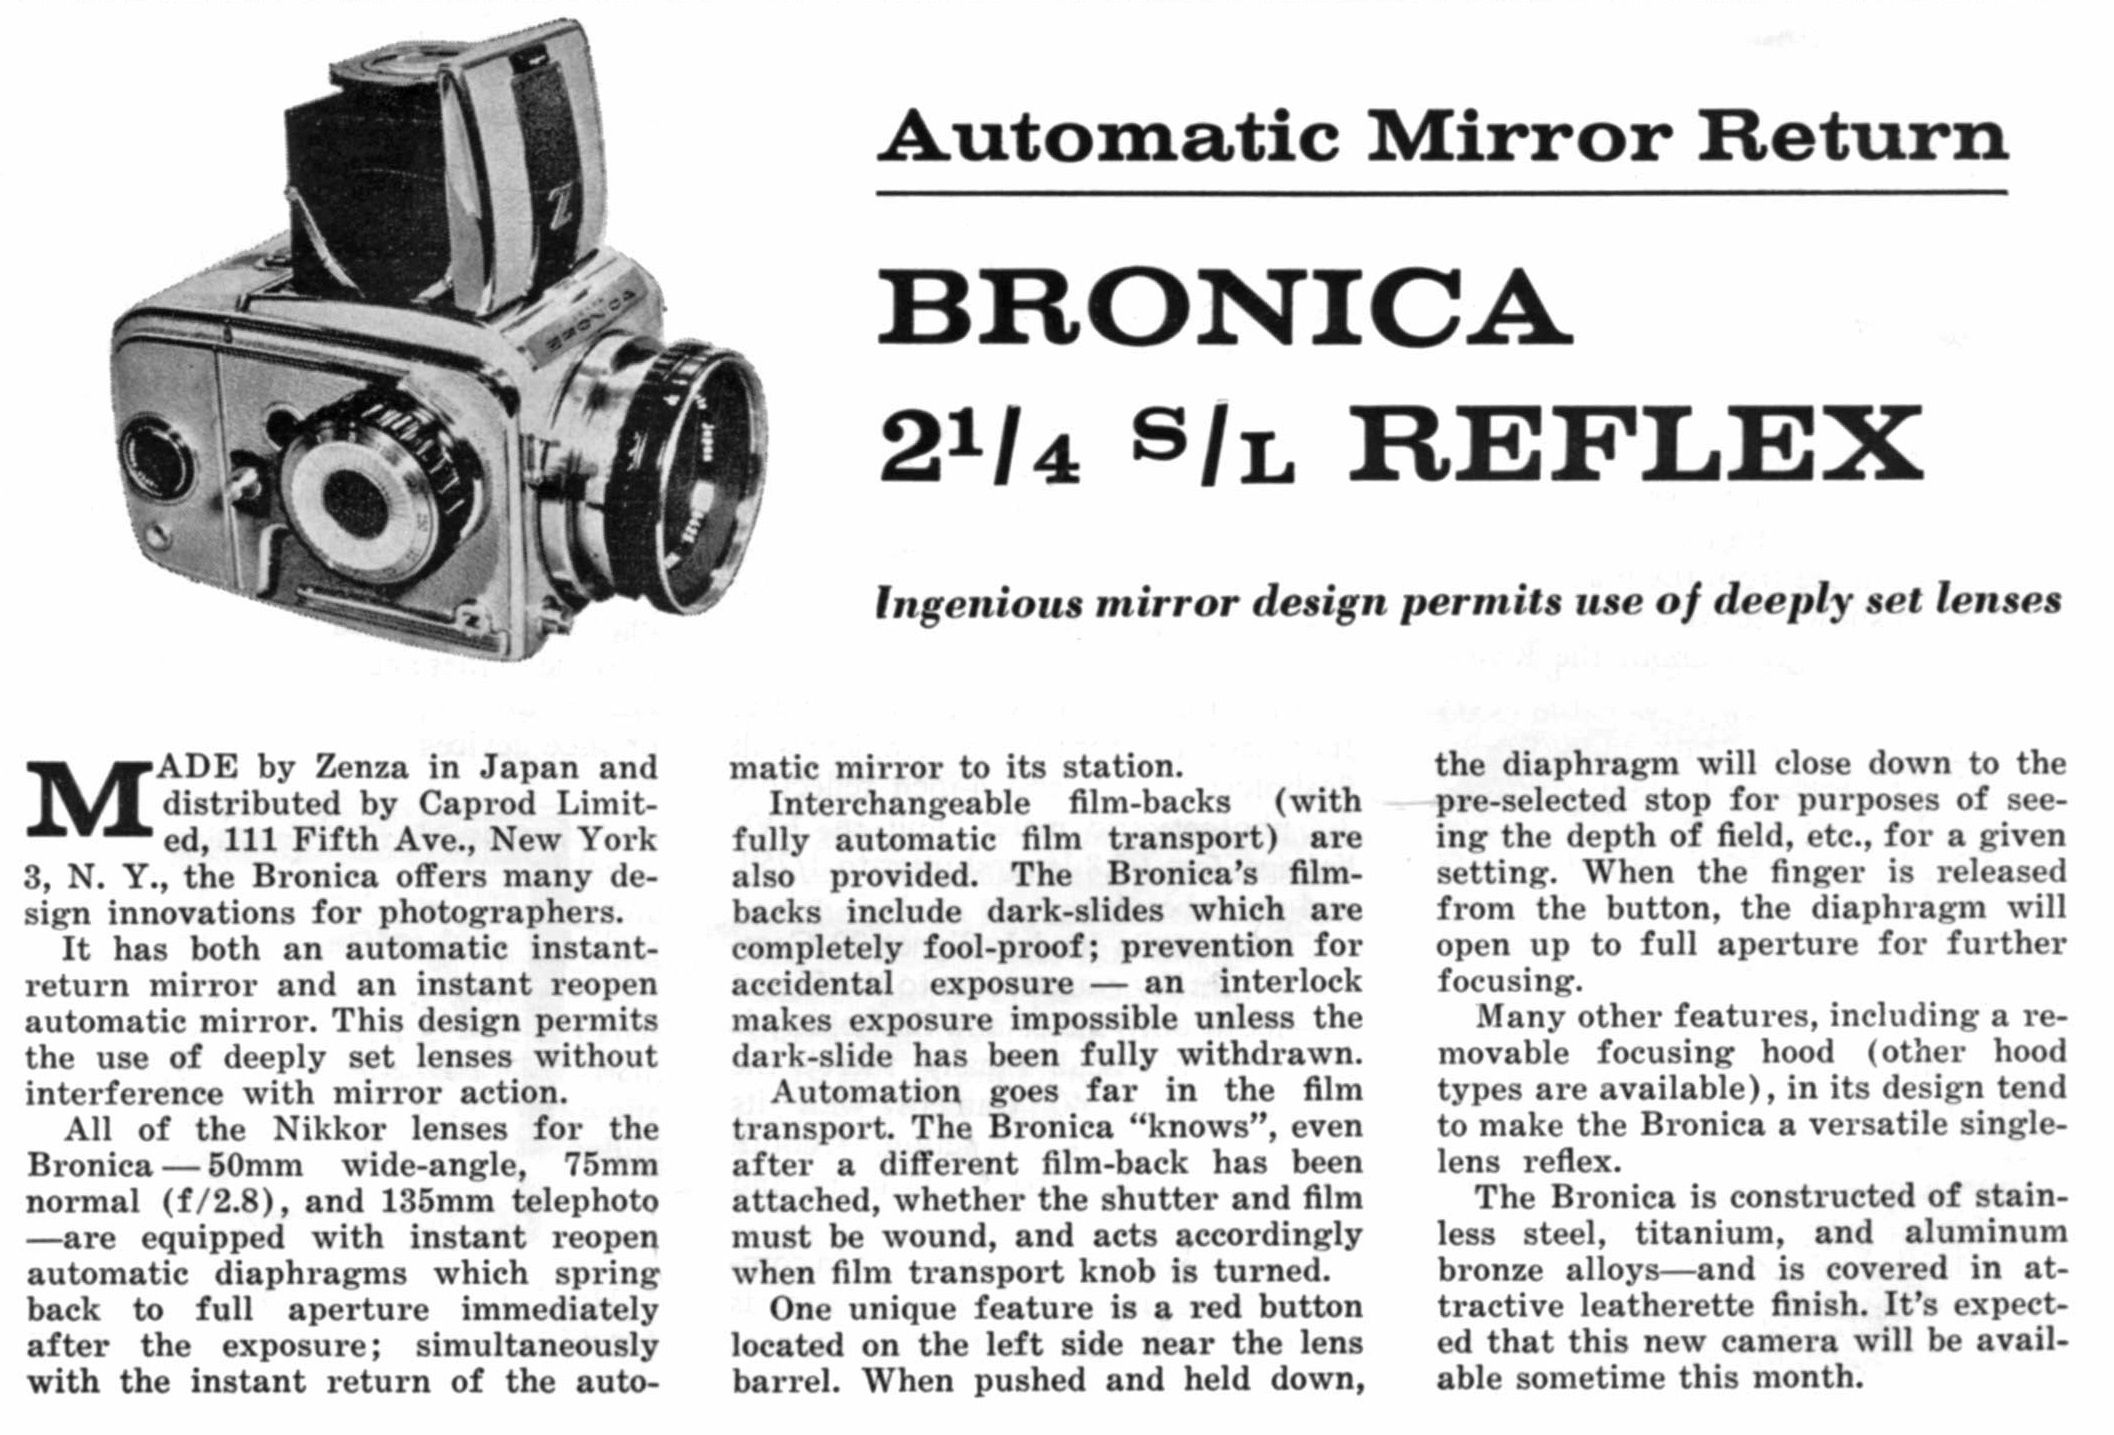
When it was released, the Bronica was the first medium format camera with a 1/1250 top shutter speed, first with an instant return mirror, and first with a downward hinged mirror. It’s innovative features, excellent build quality, and state of the art Nikkor lenses turned a lot of heads, but so did it’s $489.50 price. When adjusted for inflation, this compares to nearly $4400 today, certainly a high price to pay for a new camera by an unknown maker.
Over the course of the next few years, the Bronica continued to evolve with new models with new features being released on an almost annual basis. First was the Bronica Deluxe in 1960 which improved the focusing mechanism, added double exposure capability, a self-timer and a variety of other tweaks.
Next, in 1961 came the Bronica S which was a simplified version of the Deluxe that lowered the top shutter speed to 1/1000, removed the self-timer and double exposure features, and had a fixed non-removable focusing mount. Despite losing a few features from the Deluxe model (which continued to be sold), the reliability of the shutter improved due to the slower speed, and the price came down first to $419.50 and then $399.50 shortly after.
In 1964, an economy version of the Bronica S was released called the Bronica C, which removed the interchangeable magazine film back and lowered the top shutter speed to 1/500, but added back the double exposure mode from the Deluxe, and also introduced a new removable focusing helicoid allowing an expanded use of standard focusing and non focusing lenses, extension tubes, and bellows units.
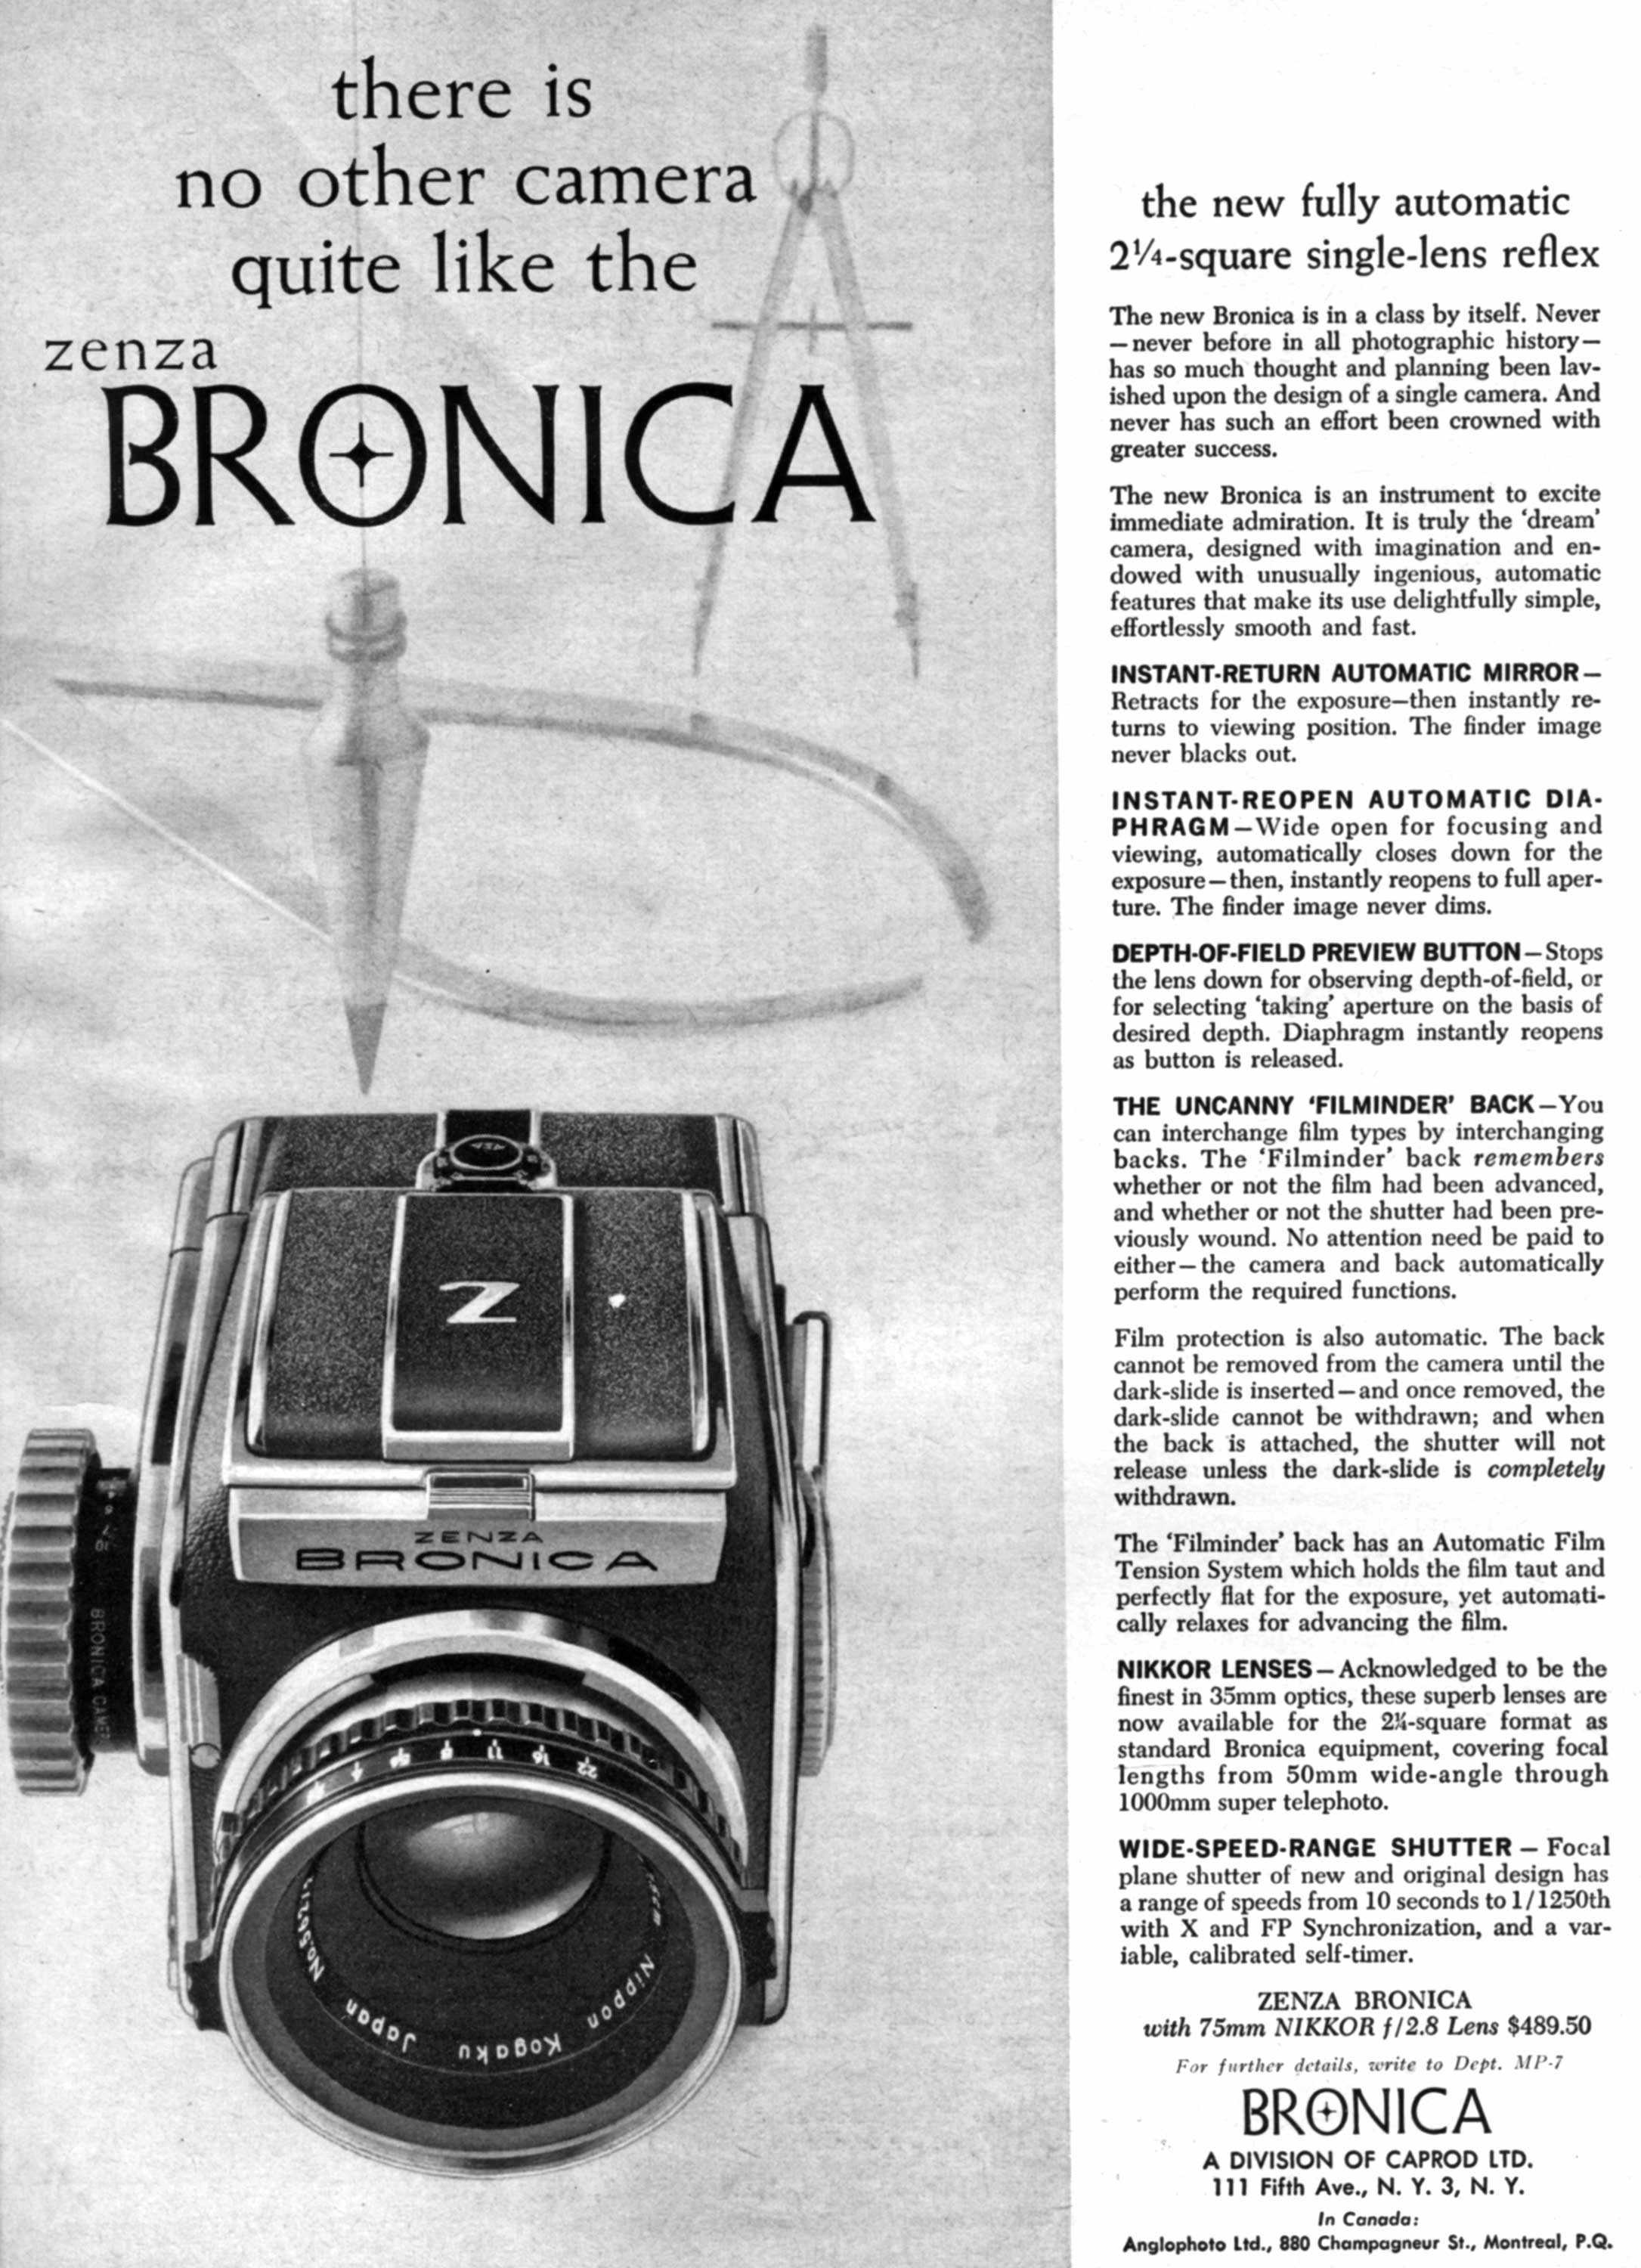
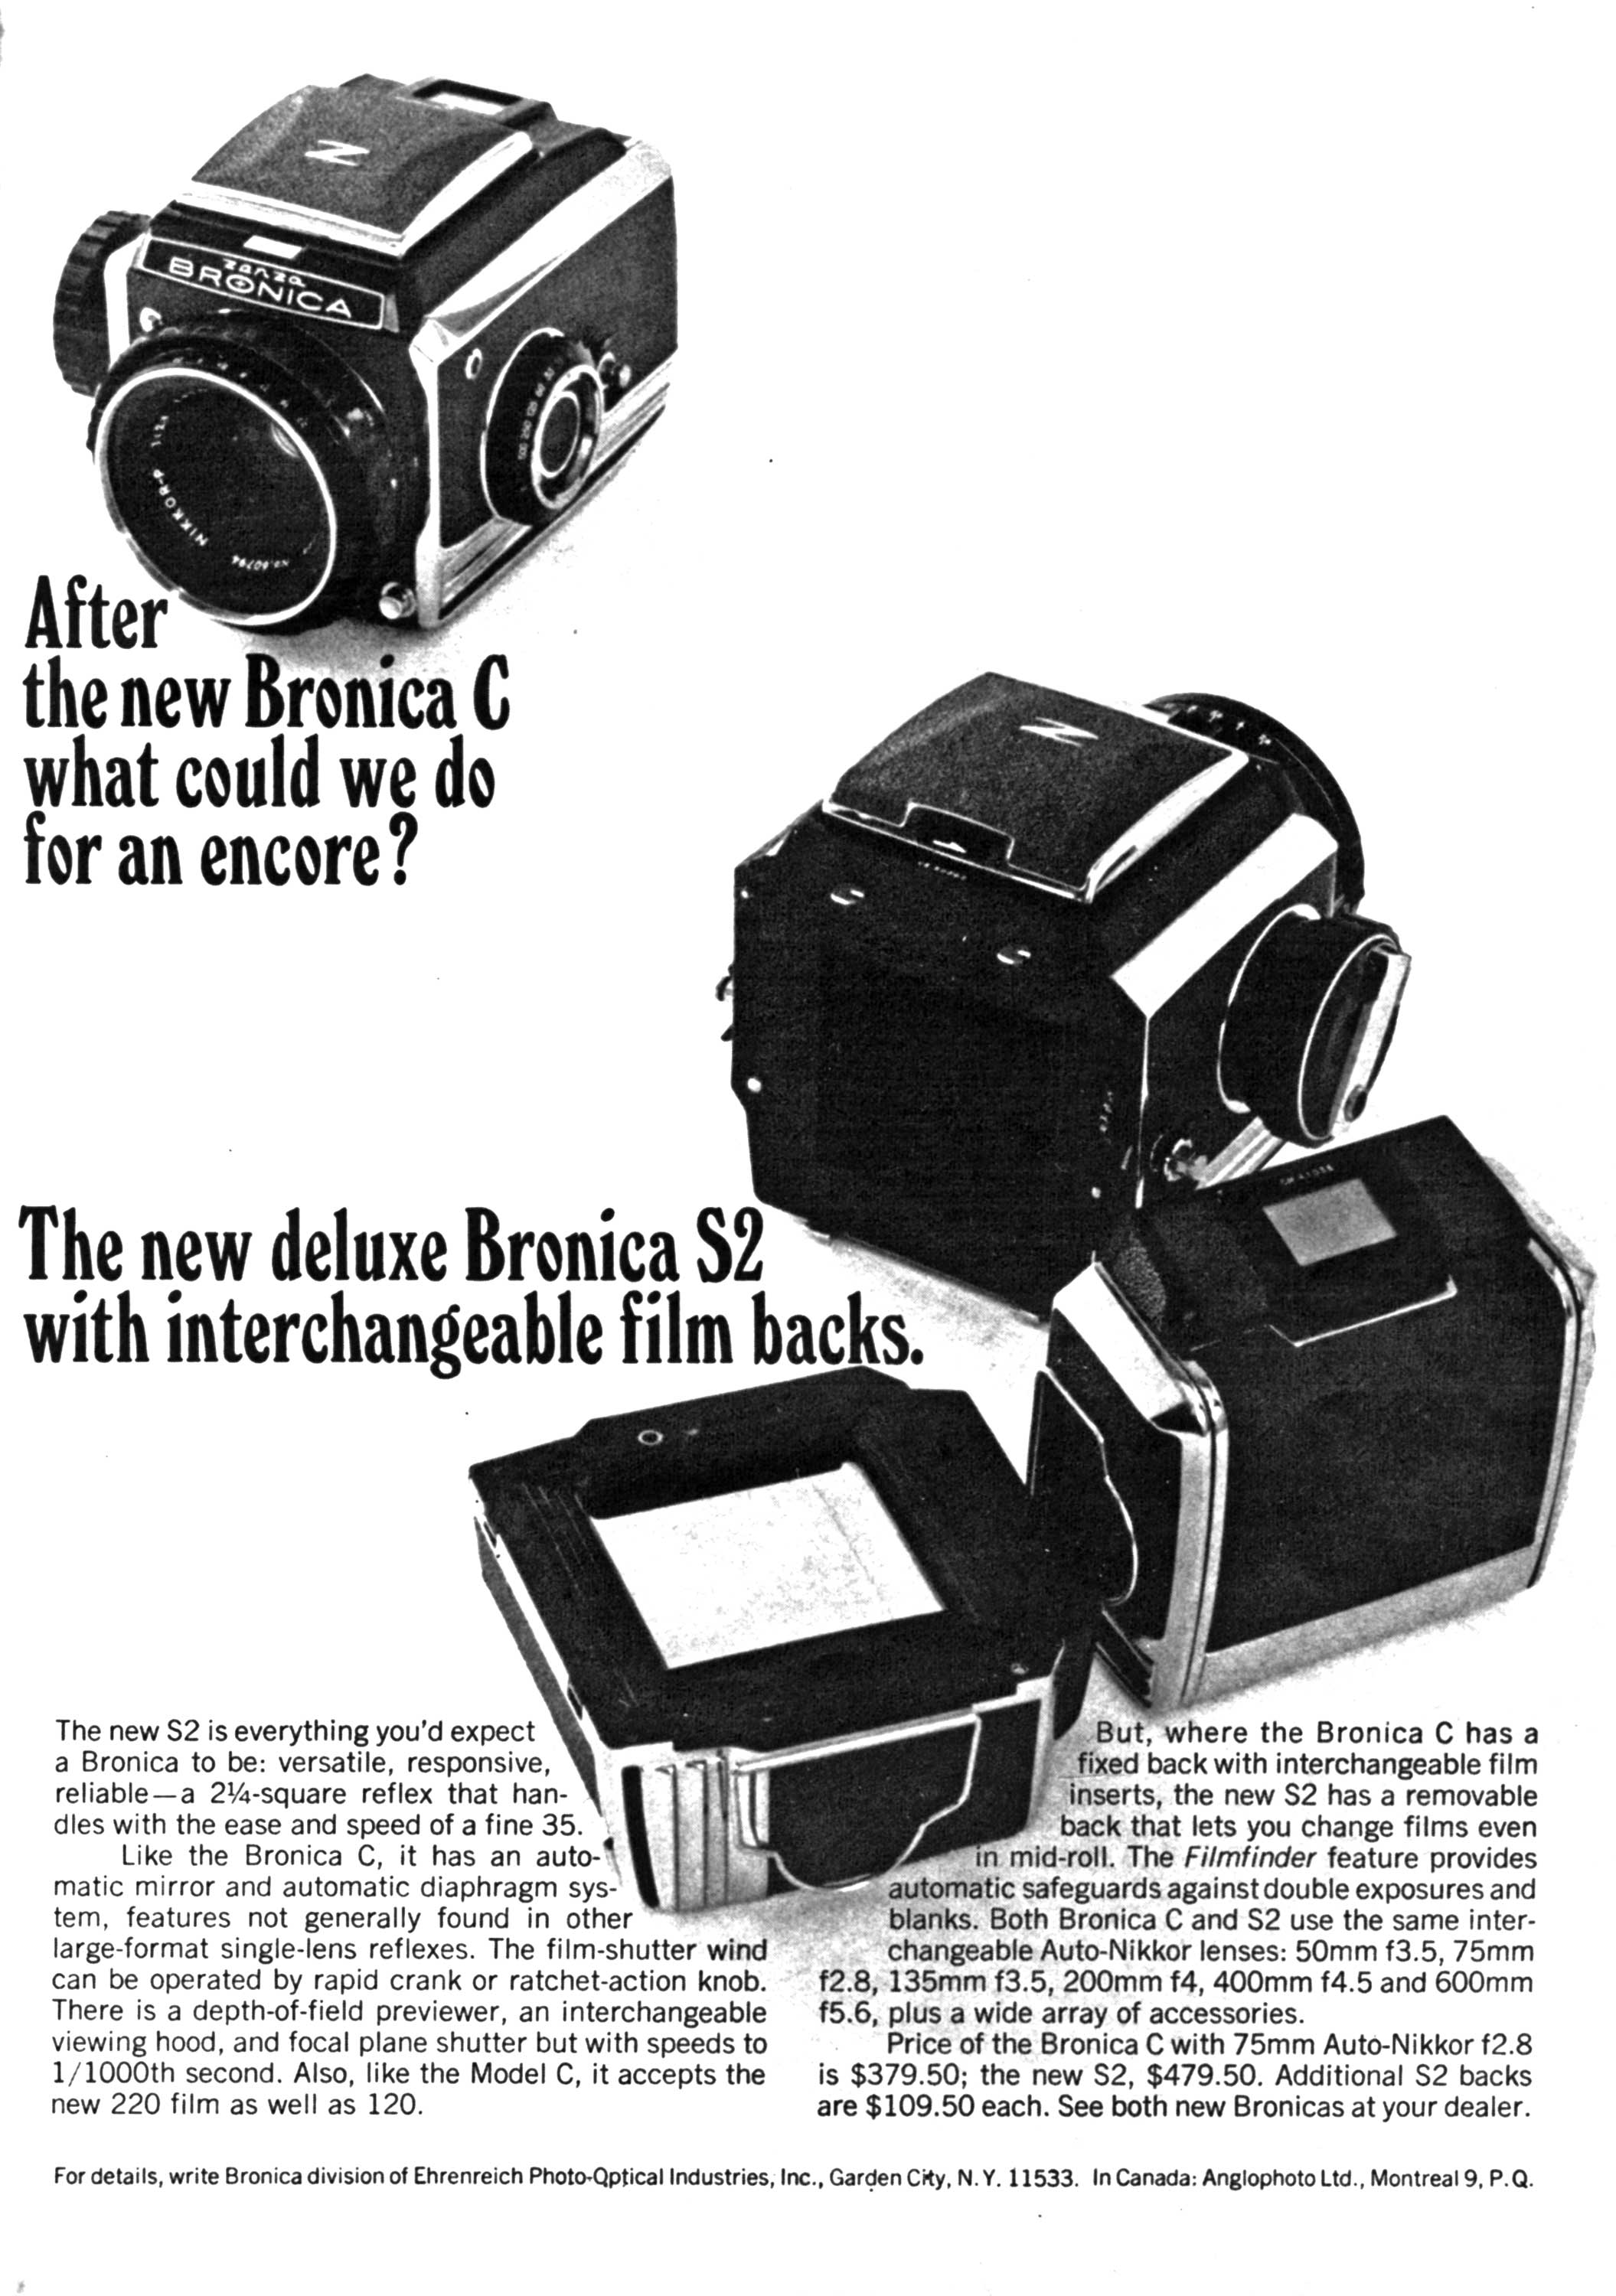
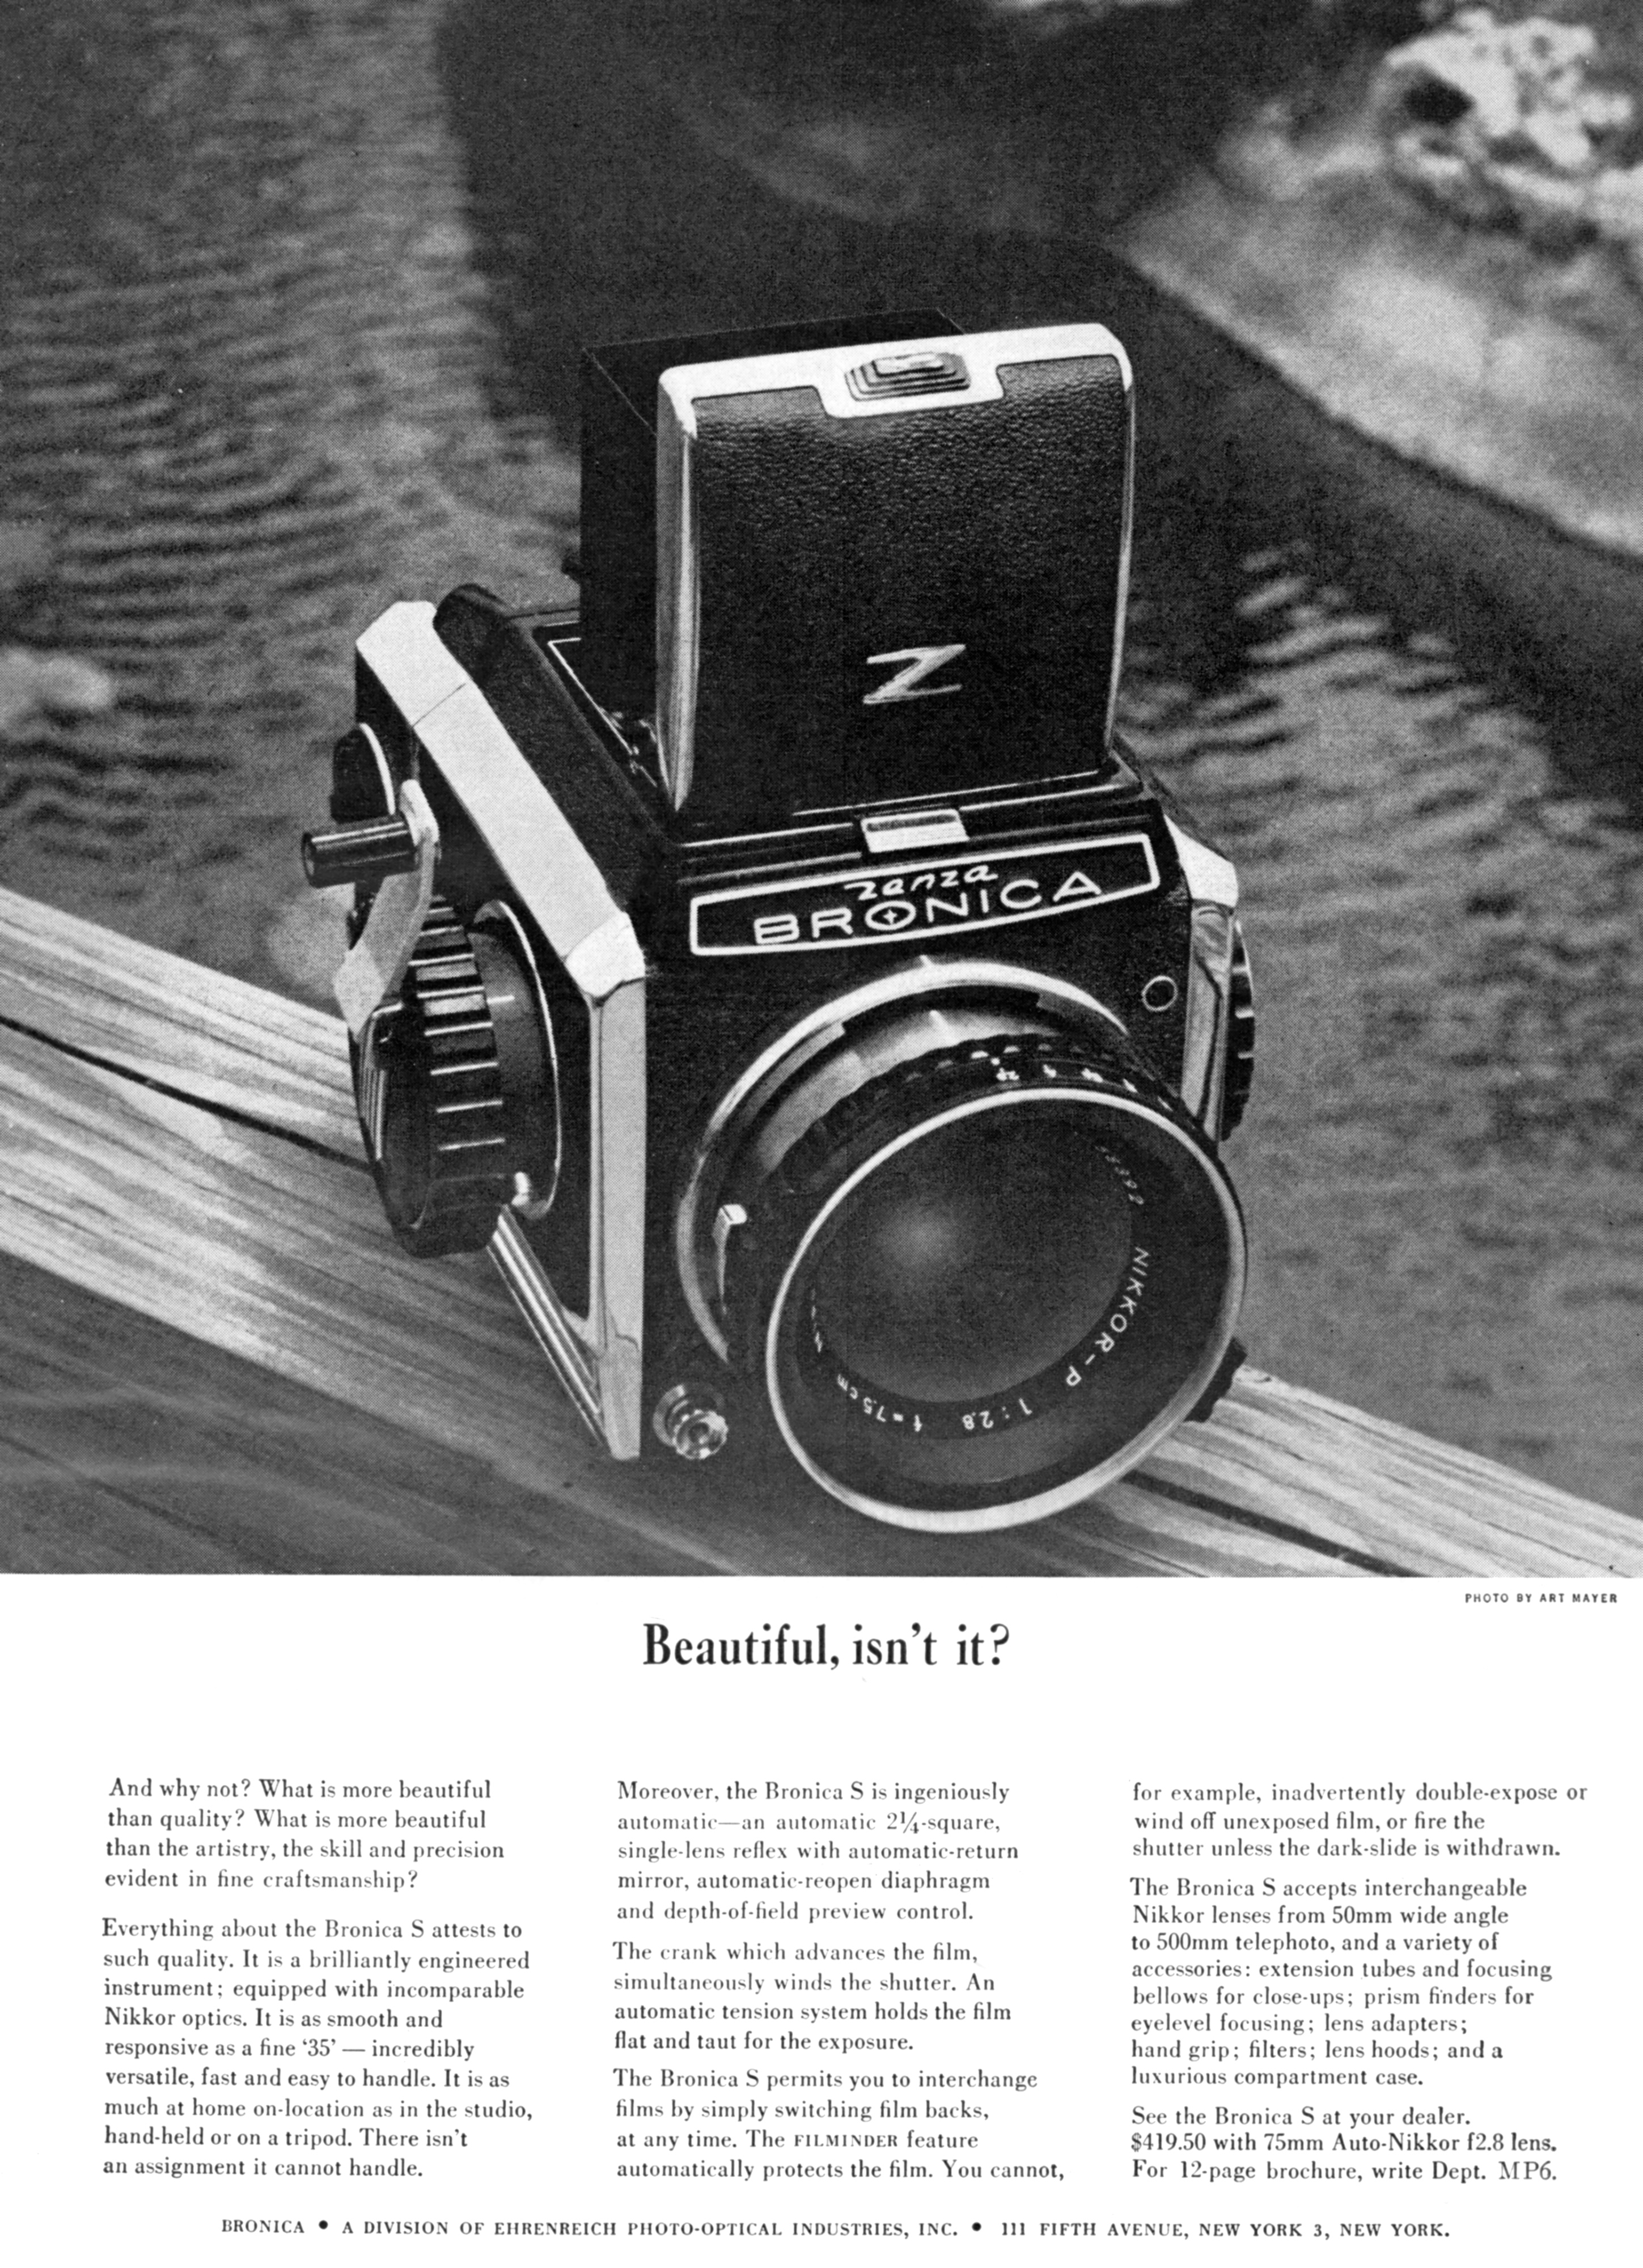

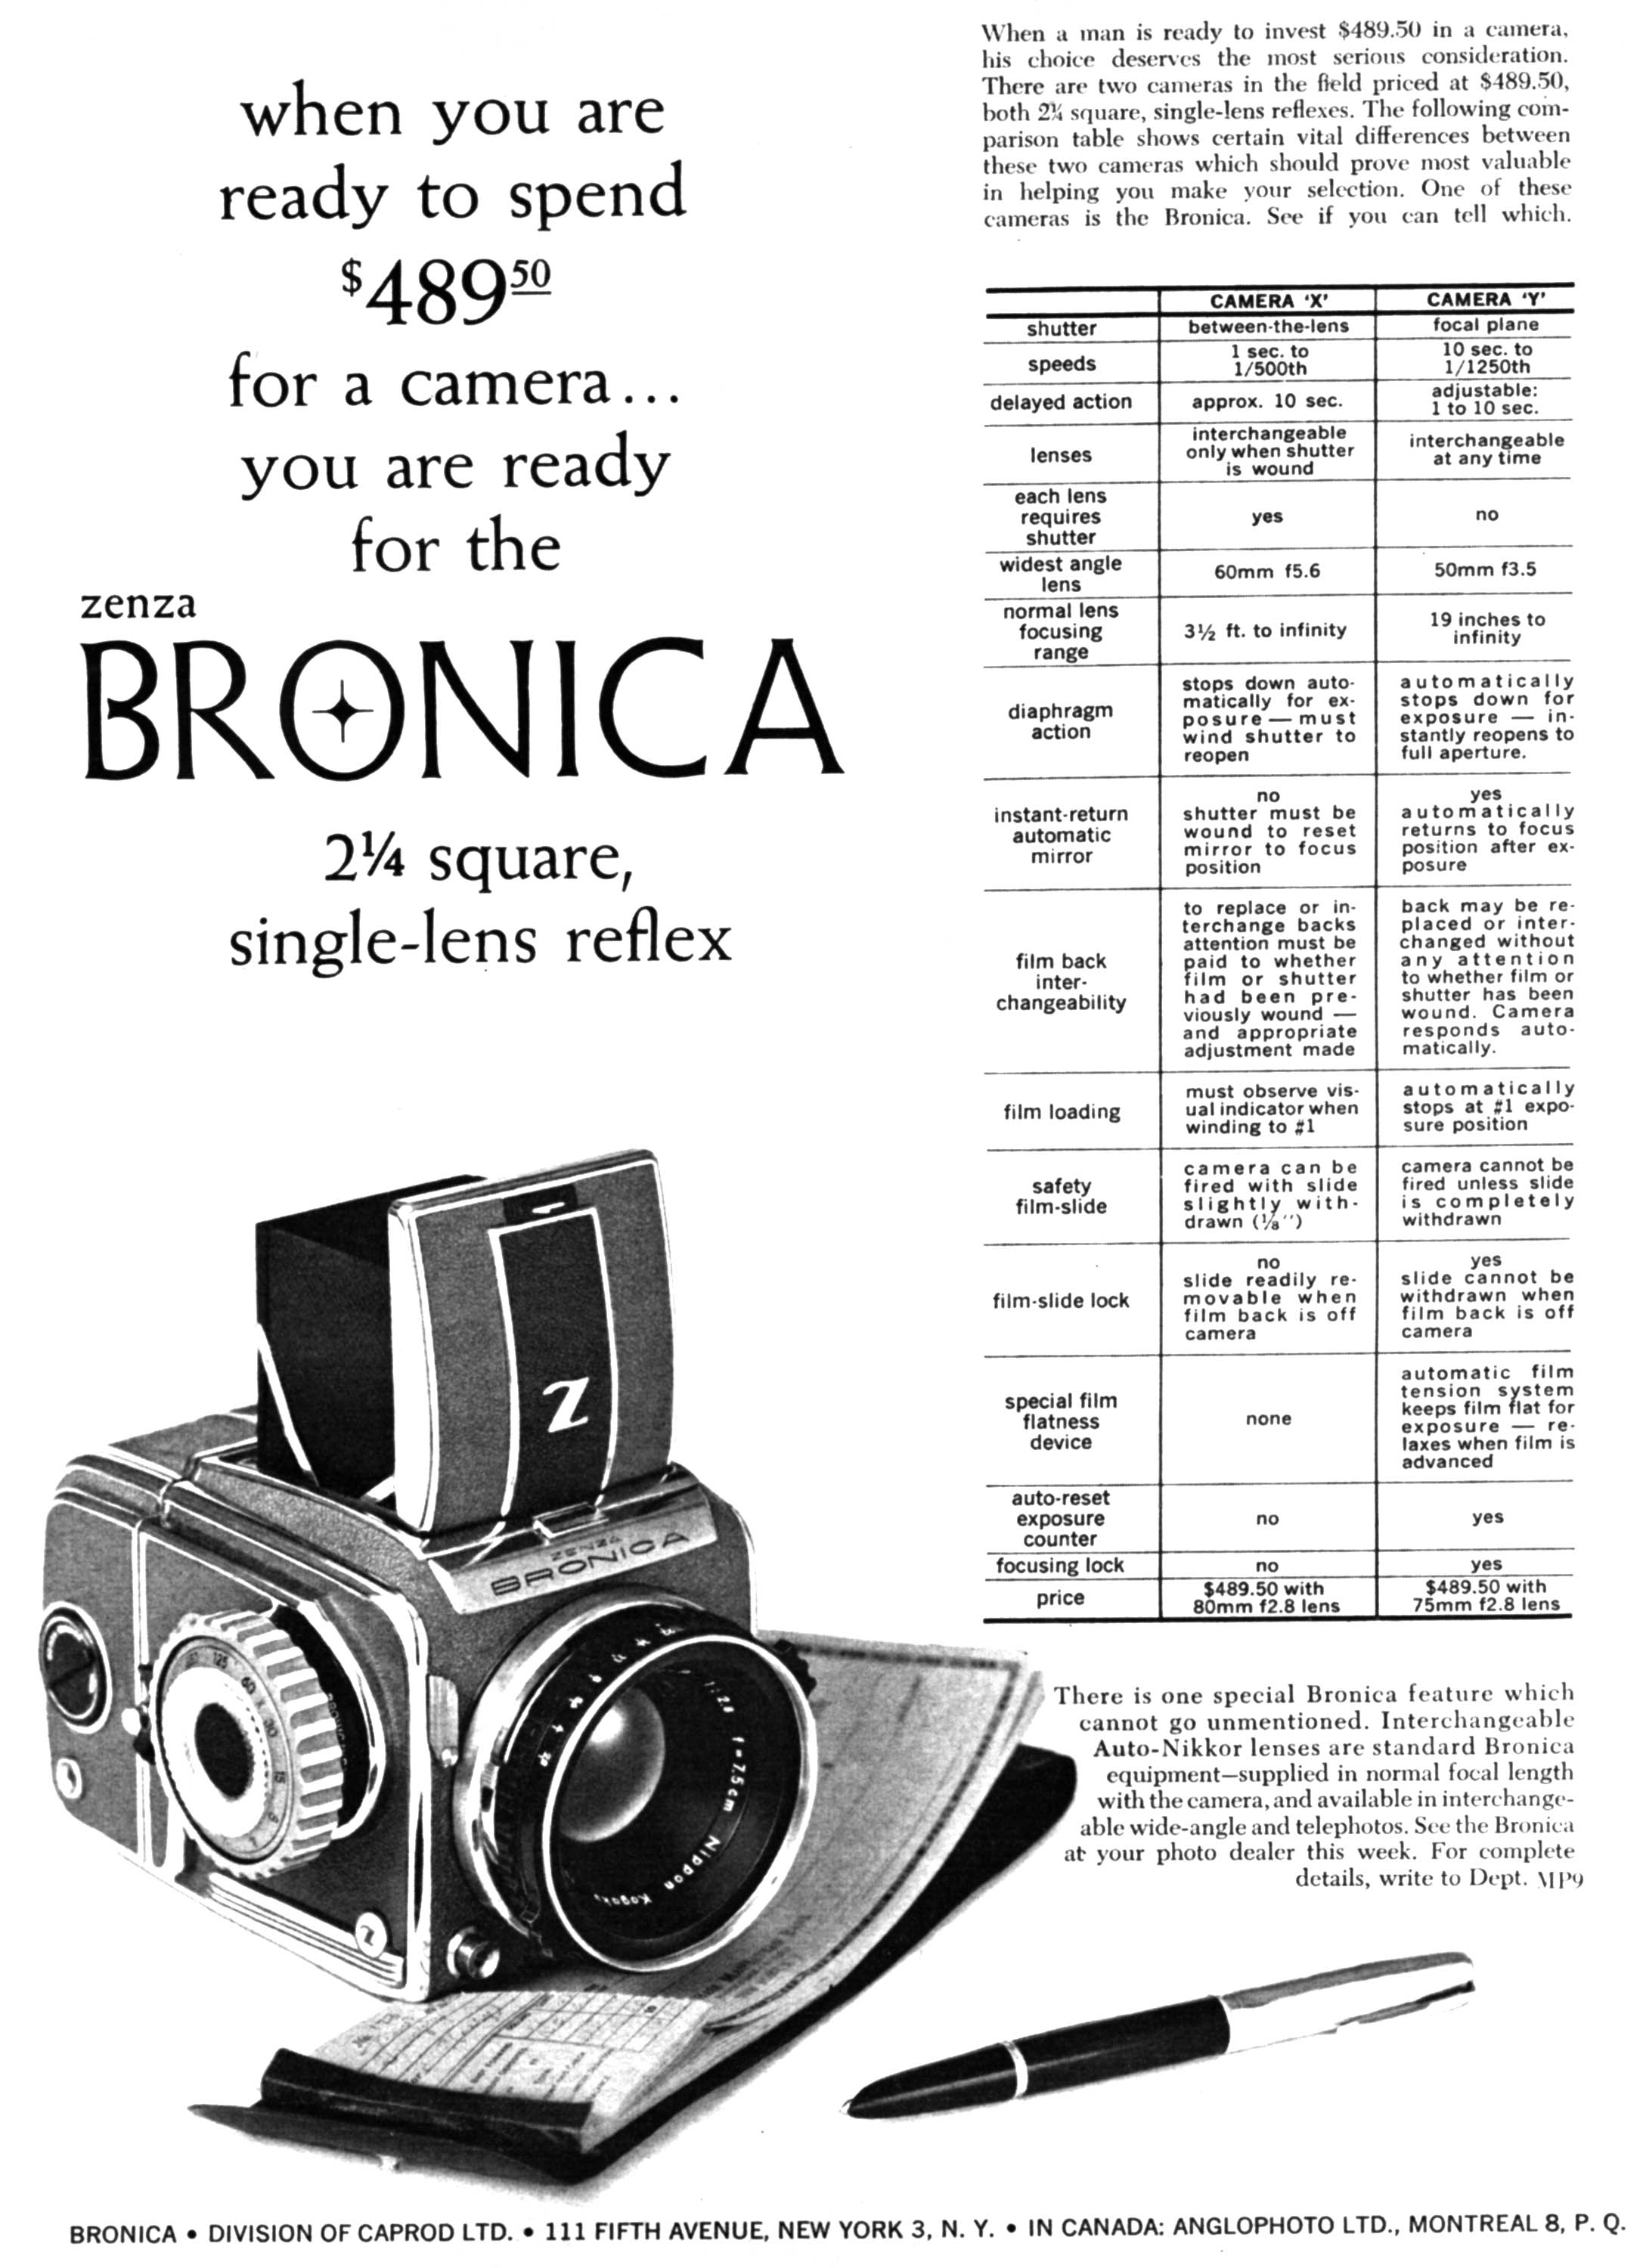
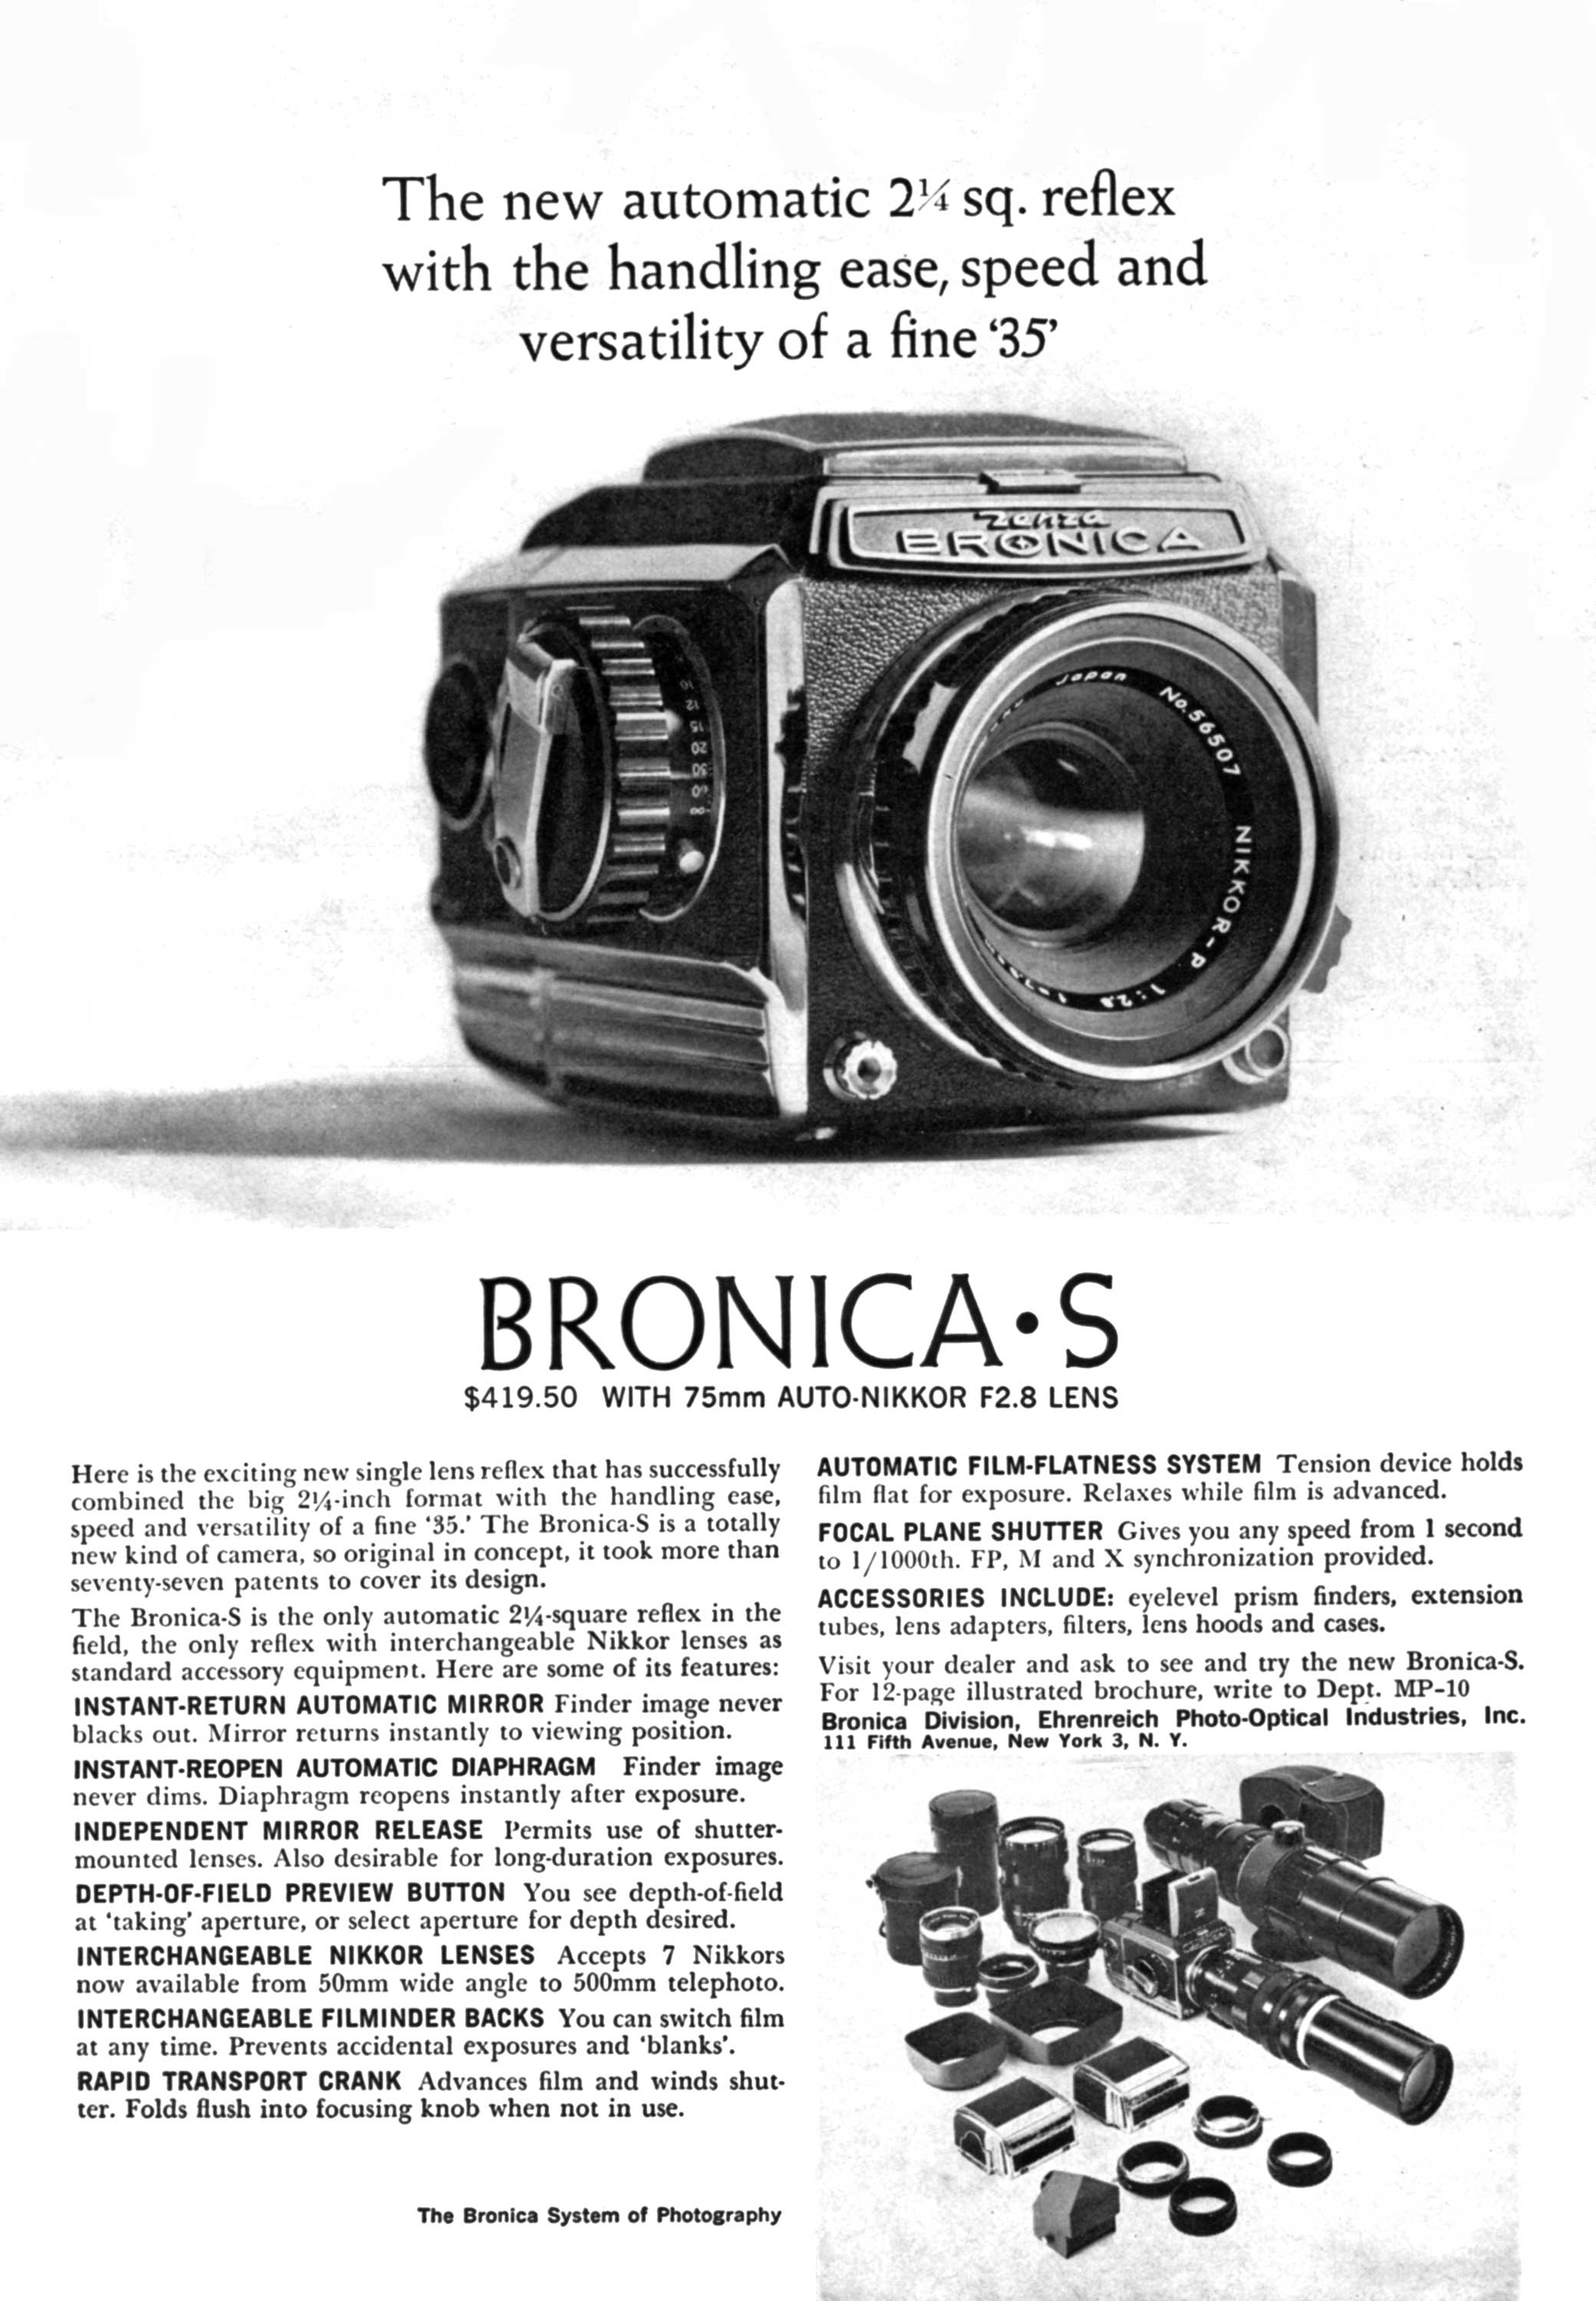
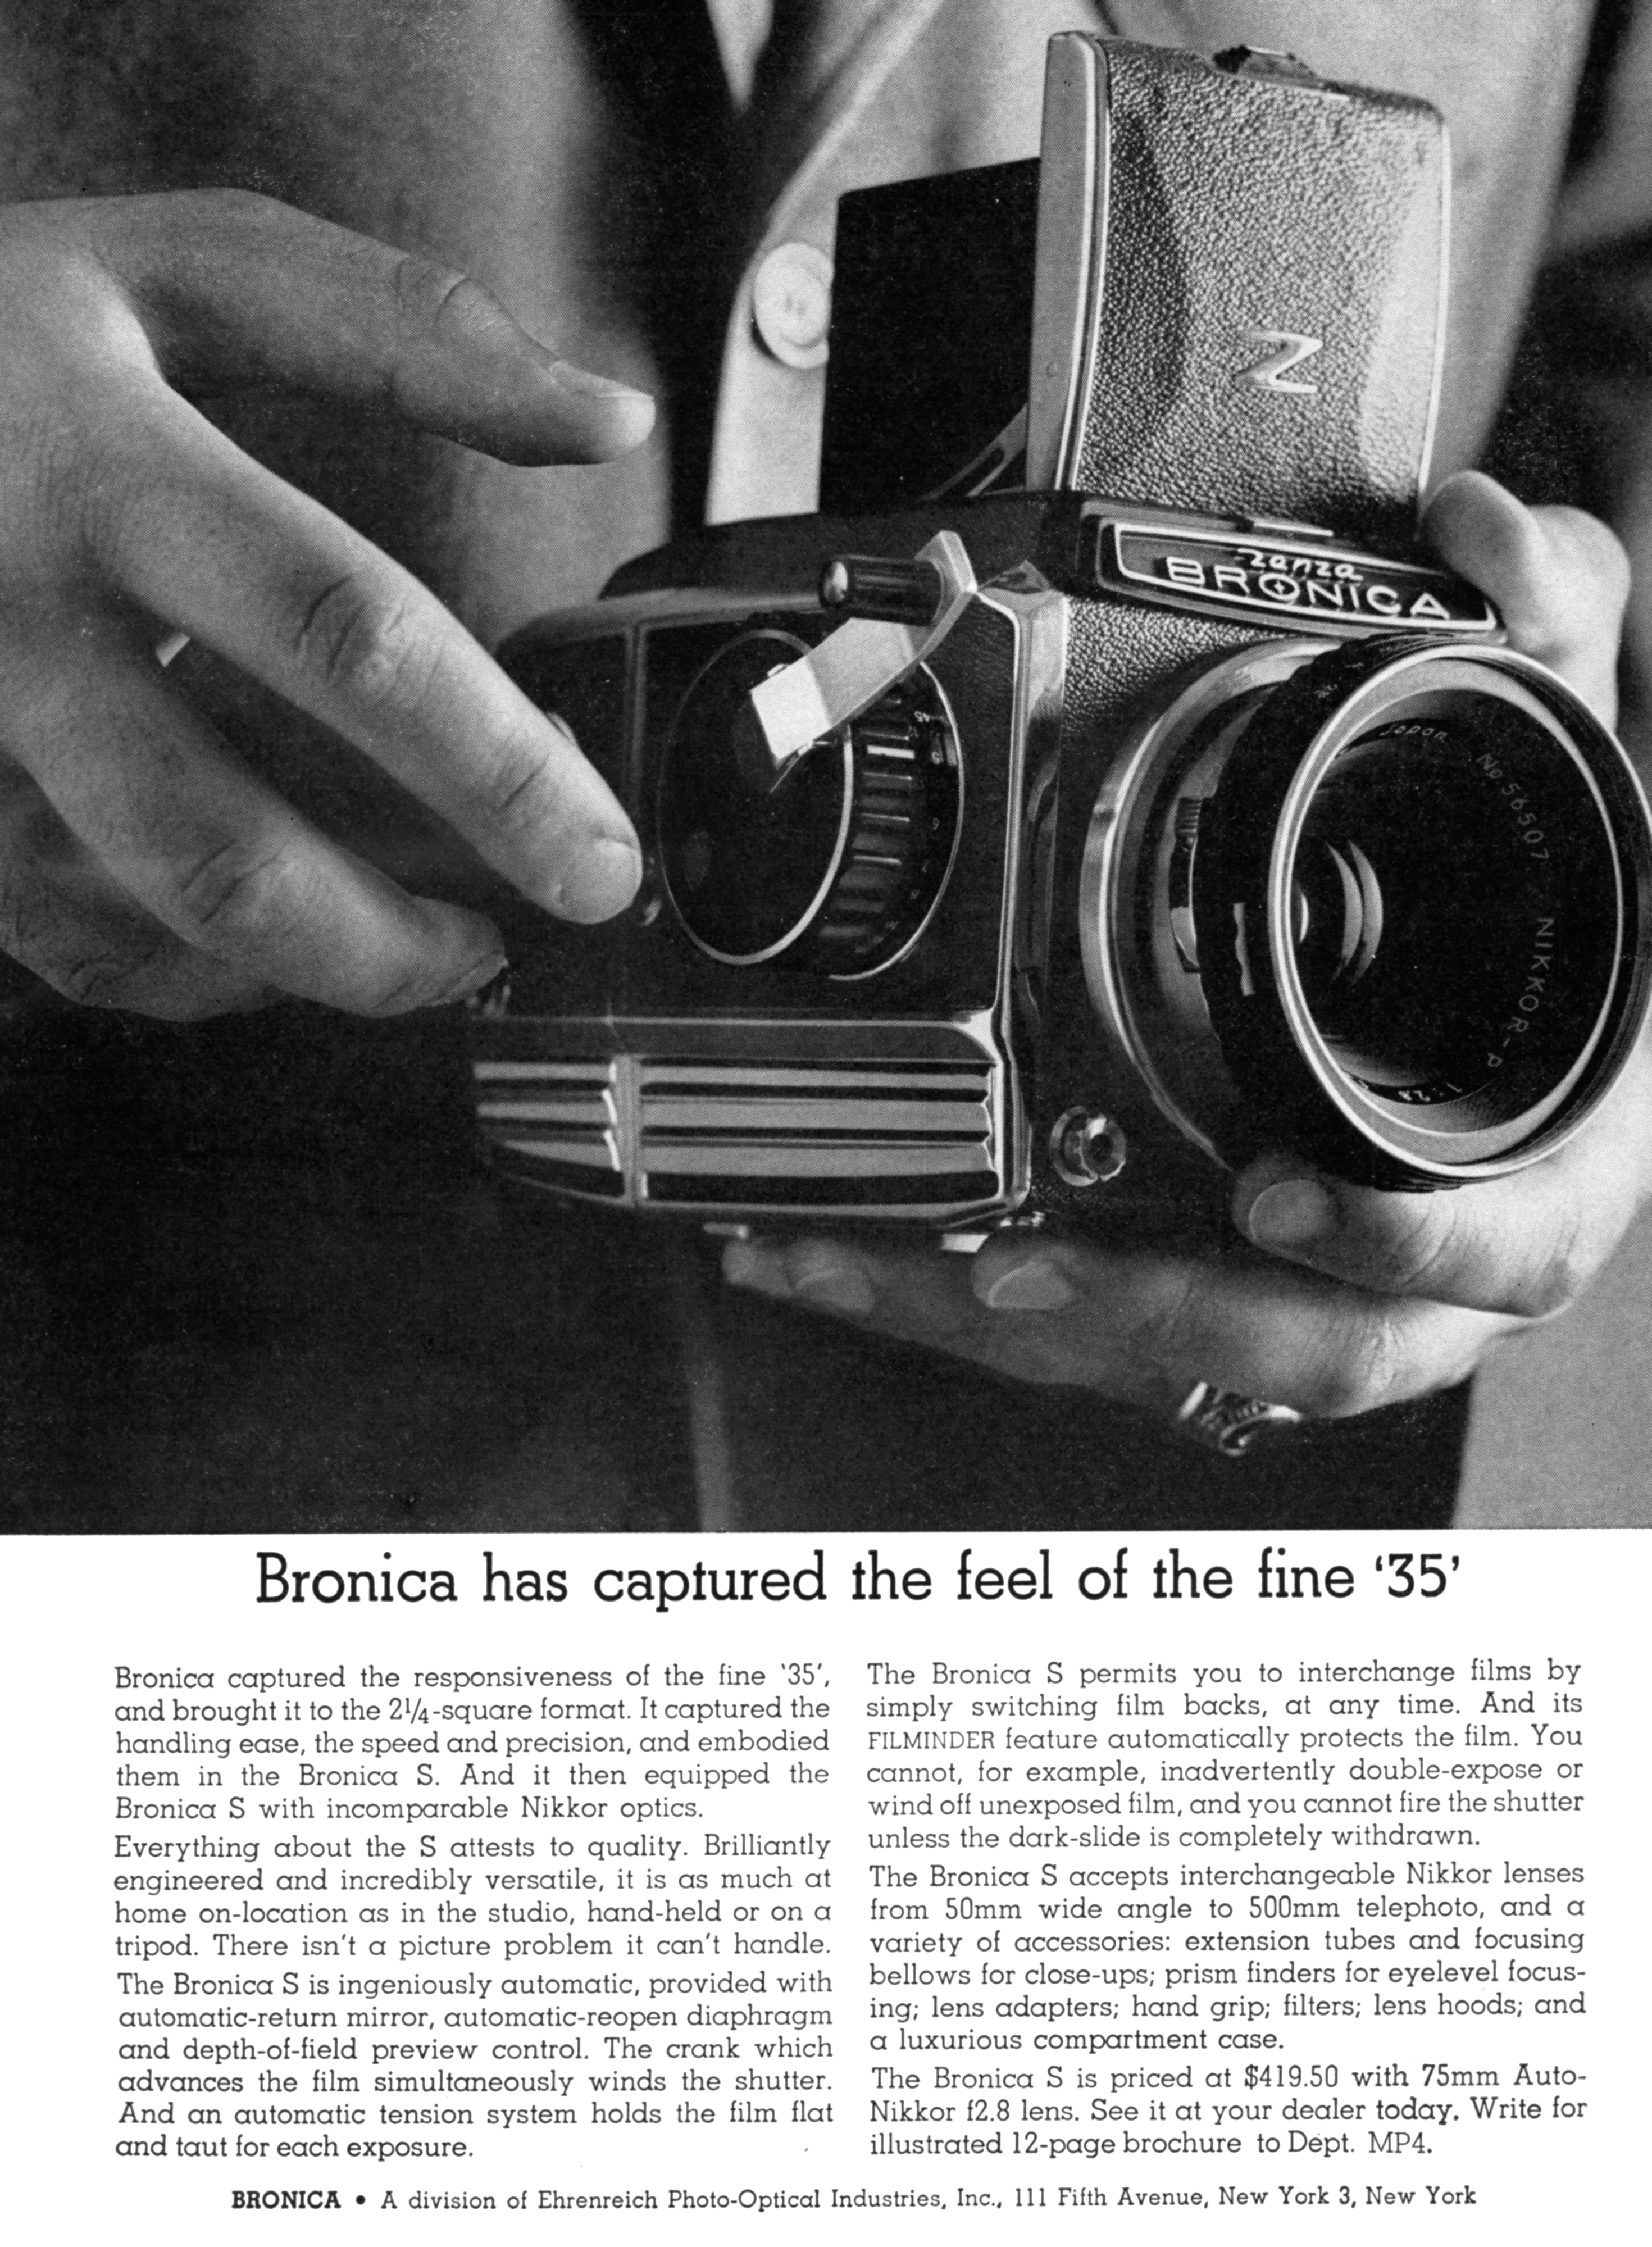

Finally, in 1965, the Bronica S2 would be released as a replacement to the Bronica S, retaining all of that model’s features, but adding the removable focusing helicoid previously released on the Bronica C. When it went on sale, the Bronica S2 cost $479.50 including the 7.5cm f/2.8 Nikkor-P lens. Additional backs cost $109.50. When adjusted for inflation, these prices compare to just under $4000 and $925 respectively. Although expensive, this was a cost savings of a Hasselblad 500 C at $549.50 which had a top shutter speed of 1/500 and lacked an instant return mirror.
The below test report for the Bronica S2 from September 1969 gives a technical look at both the camera itself and it’s Nikkor lens. The operation of the camera is explained by Ralph Hattersley who at the end of the article says this was the first 6×6 SLR he’s ever used, but that he found it’s operation to be intuitive and quick to learn. He makes a similar connection as I that the polished chrome reminds him of a vintage automobile (this is interesting as in 1969, what did they consider ‘vintage’?)
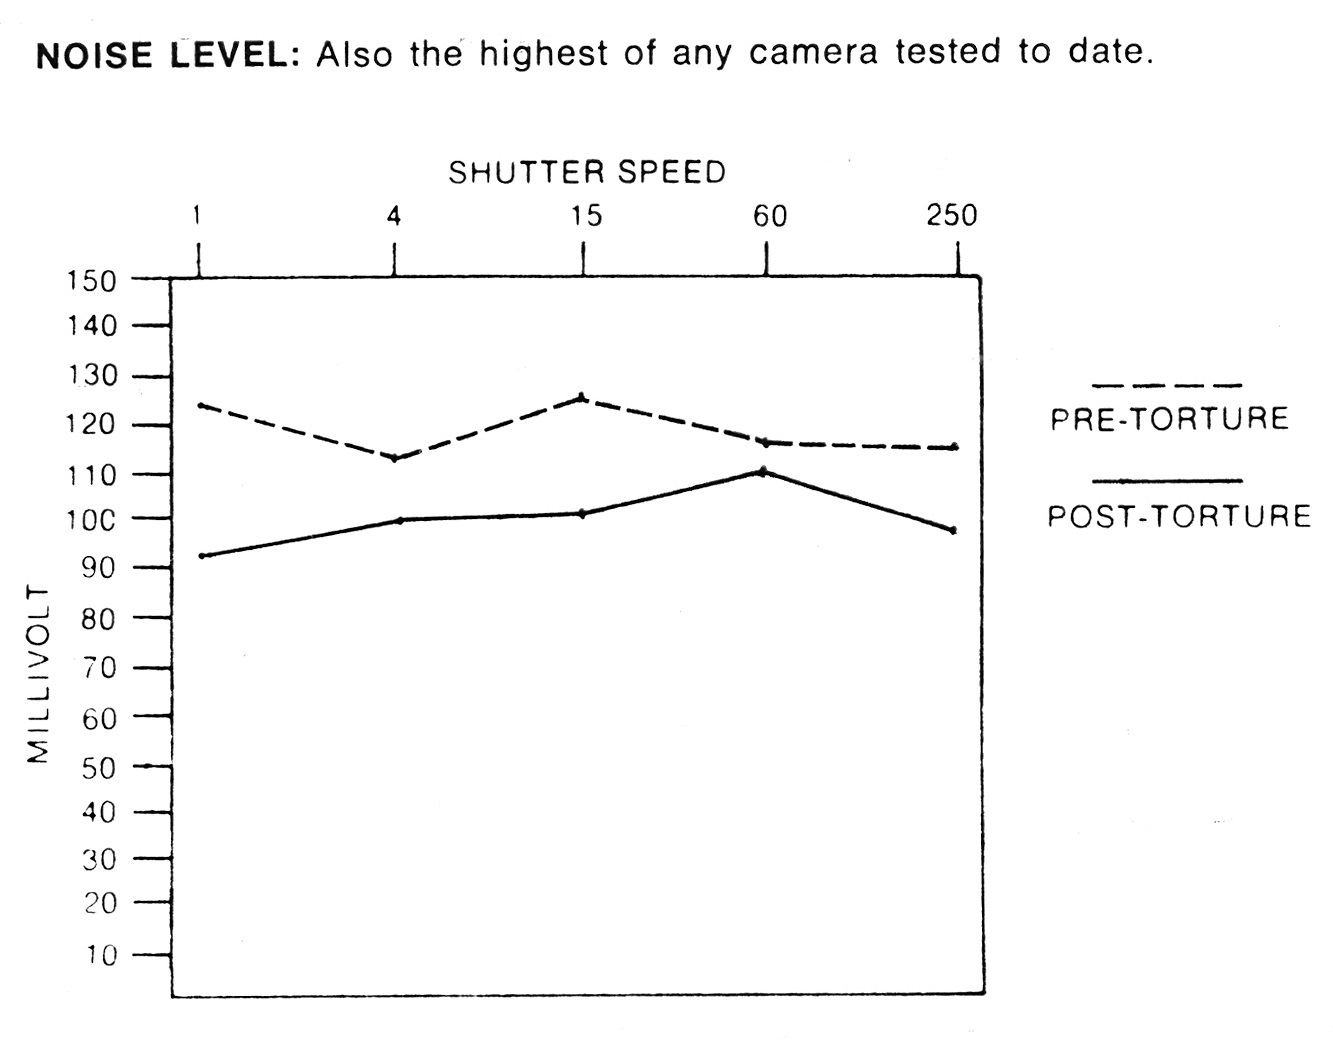
The lens test and a camera teardown is performed by Norman Rothschild who gives impressive remarks to the Nikkor lens, noting that a small amount of coma and softness can be seen wide open, but quickly disappears by f/5.6. Both Rothschild and Hattersley inconsistently describe the camera as having a quiet operation, but then in an included noise and vibration chart, claim it to be the noisiest camera they’ve ever tested, an observation which I note later in this review. Perhaps expectations of ‘quiet’ were different back then.
Complaints were mentioned about the kick from the mirror action, causing slow shutter speeds to result in blurred images, the strap lugs, and a slight amount of side to side play in the helical focusing mount. Overall, both reviewers seemed to come away impressed with the camera.
The Bronica S2 wasn’t a perfect camera, but it sold well enough to continue evolving the lineup. The first revision came in 1969 as the Bronica S2A which strengthened the design of the shutter rack and made a few cosmetic changes to the camera.
Later versions of the Bronica would employ an electronic shutter, along with other modern features like automatic exposure and motor drives. Later Bronicas would be available in 4.5×6 and 6×7 aspect ratios, and even a series of cameras with a Seiko leaf shutter.
In 1995, the Japanese company Tamron would begin acquiring parts of Bronica, eventually owning the whole company by 1998. New models would be released up until the start of the 21st century with the last model, the Bronica RF645 released in 2005 after which time Bronica stopped making cameras.
Today, the Bronica S2 is desirable for many of the same reasons people bought it when it was first released, a combination of good looks and an economical entry into medium format SLRs. Prices for used Bronica bodies usually start at $100 body only and go up there based on condition and availability of lenses. Although not pocket change, it’s a far cry from the inflation adjusted prices these cameras sold for new, or the used market prices for comparable Hasselblads.
The reliability of models like the S2 over the years is of concern as many of these cameras can jam and become inoperable. Although some camera technicians will still attempt to repair the S2, many will not, citing their complexity and overall unreliability as reasons. If you can find a Bronica S2 in good working condition for anywhere near a reasonable price, it may be a compelling option to pick up, but finding one in confirmed working order for cheap, is not going to be easy.
My Thoughts
My desire to own a Bronica S2 was likely the same desire people who bought this camera new back in 1965. I wanted a camera with a Hasselblad-like experience and form factor, but without the Hasselblad-like price. With that being the only criteria, the Bronica more than meets it, but of course, there is a lot more to this camera other than it being a discount Hassy.
For those of you who have never handled either camera, a medium format 6×6 SLR is like a 35mm SLR in that it has a moving reflex mirror that allows you to compose a through the lens image in the viewfinder…and that’s about it.
Everything else about using a camera like this is different from any 35mm SLRs. Starting with the most obvious is the weight. This camera is HEAVY. With the standard 7.5cm Nikkor lens, the camera and lens combo tip the scales at 1857 grams, or just over 4 lbs. Although this is the only lens I have, I looked up the other Bronica S lenses that were available at the time and the wide angle 5cm doubles the weight of the lens, the 200mm f/4 telephoto adds an extra 520 grams, and if you’re crazy enough to use the monster 3.3 kilogram 400mm f/4.5 lens, with the camera attached, you have a lethal weapon weighing just under 5 kilograms, or just under 11 lbs!
With heft, comes a level of reassurance that an all metal 1960s medium format SLR would bring. Zenza Bronica designed this camera to be rugged and to be used professionally. The chrome body is built to take some bumps and nicks in regular use. Hopefully that never happens though as the camera is truly stunning to look at. The chrome accents remind me of a classic American automobile, glistening in the showroom lights, begging for cruise nights past the local diner. Finally, there’s the pebbled off-black body covering that’s not quite gray, not quite black, and just different enough to cause you to admire it. The material on this example was not peeling anywhere on the camera suggesting it is made of a durable material.
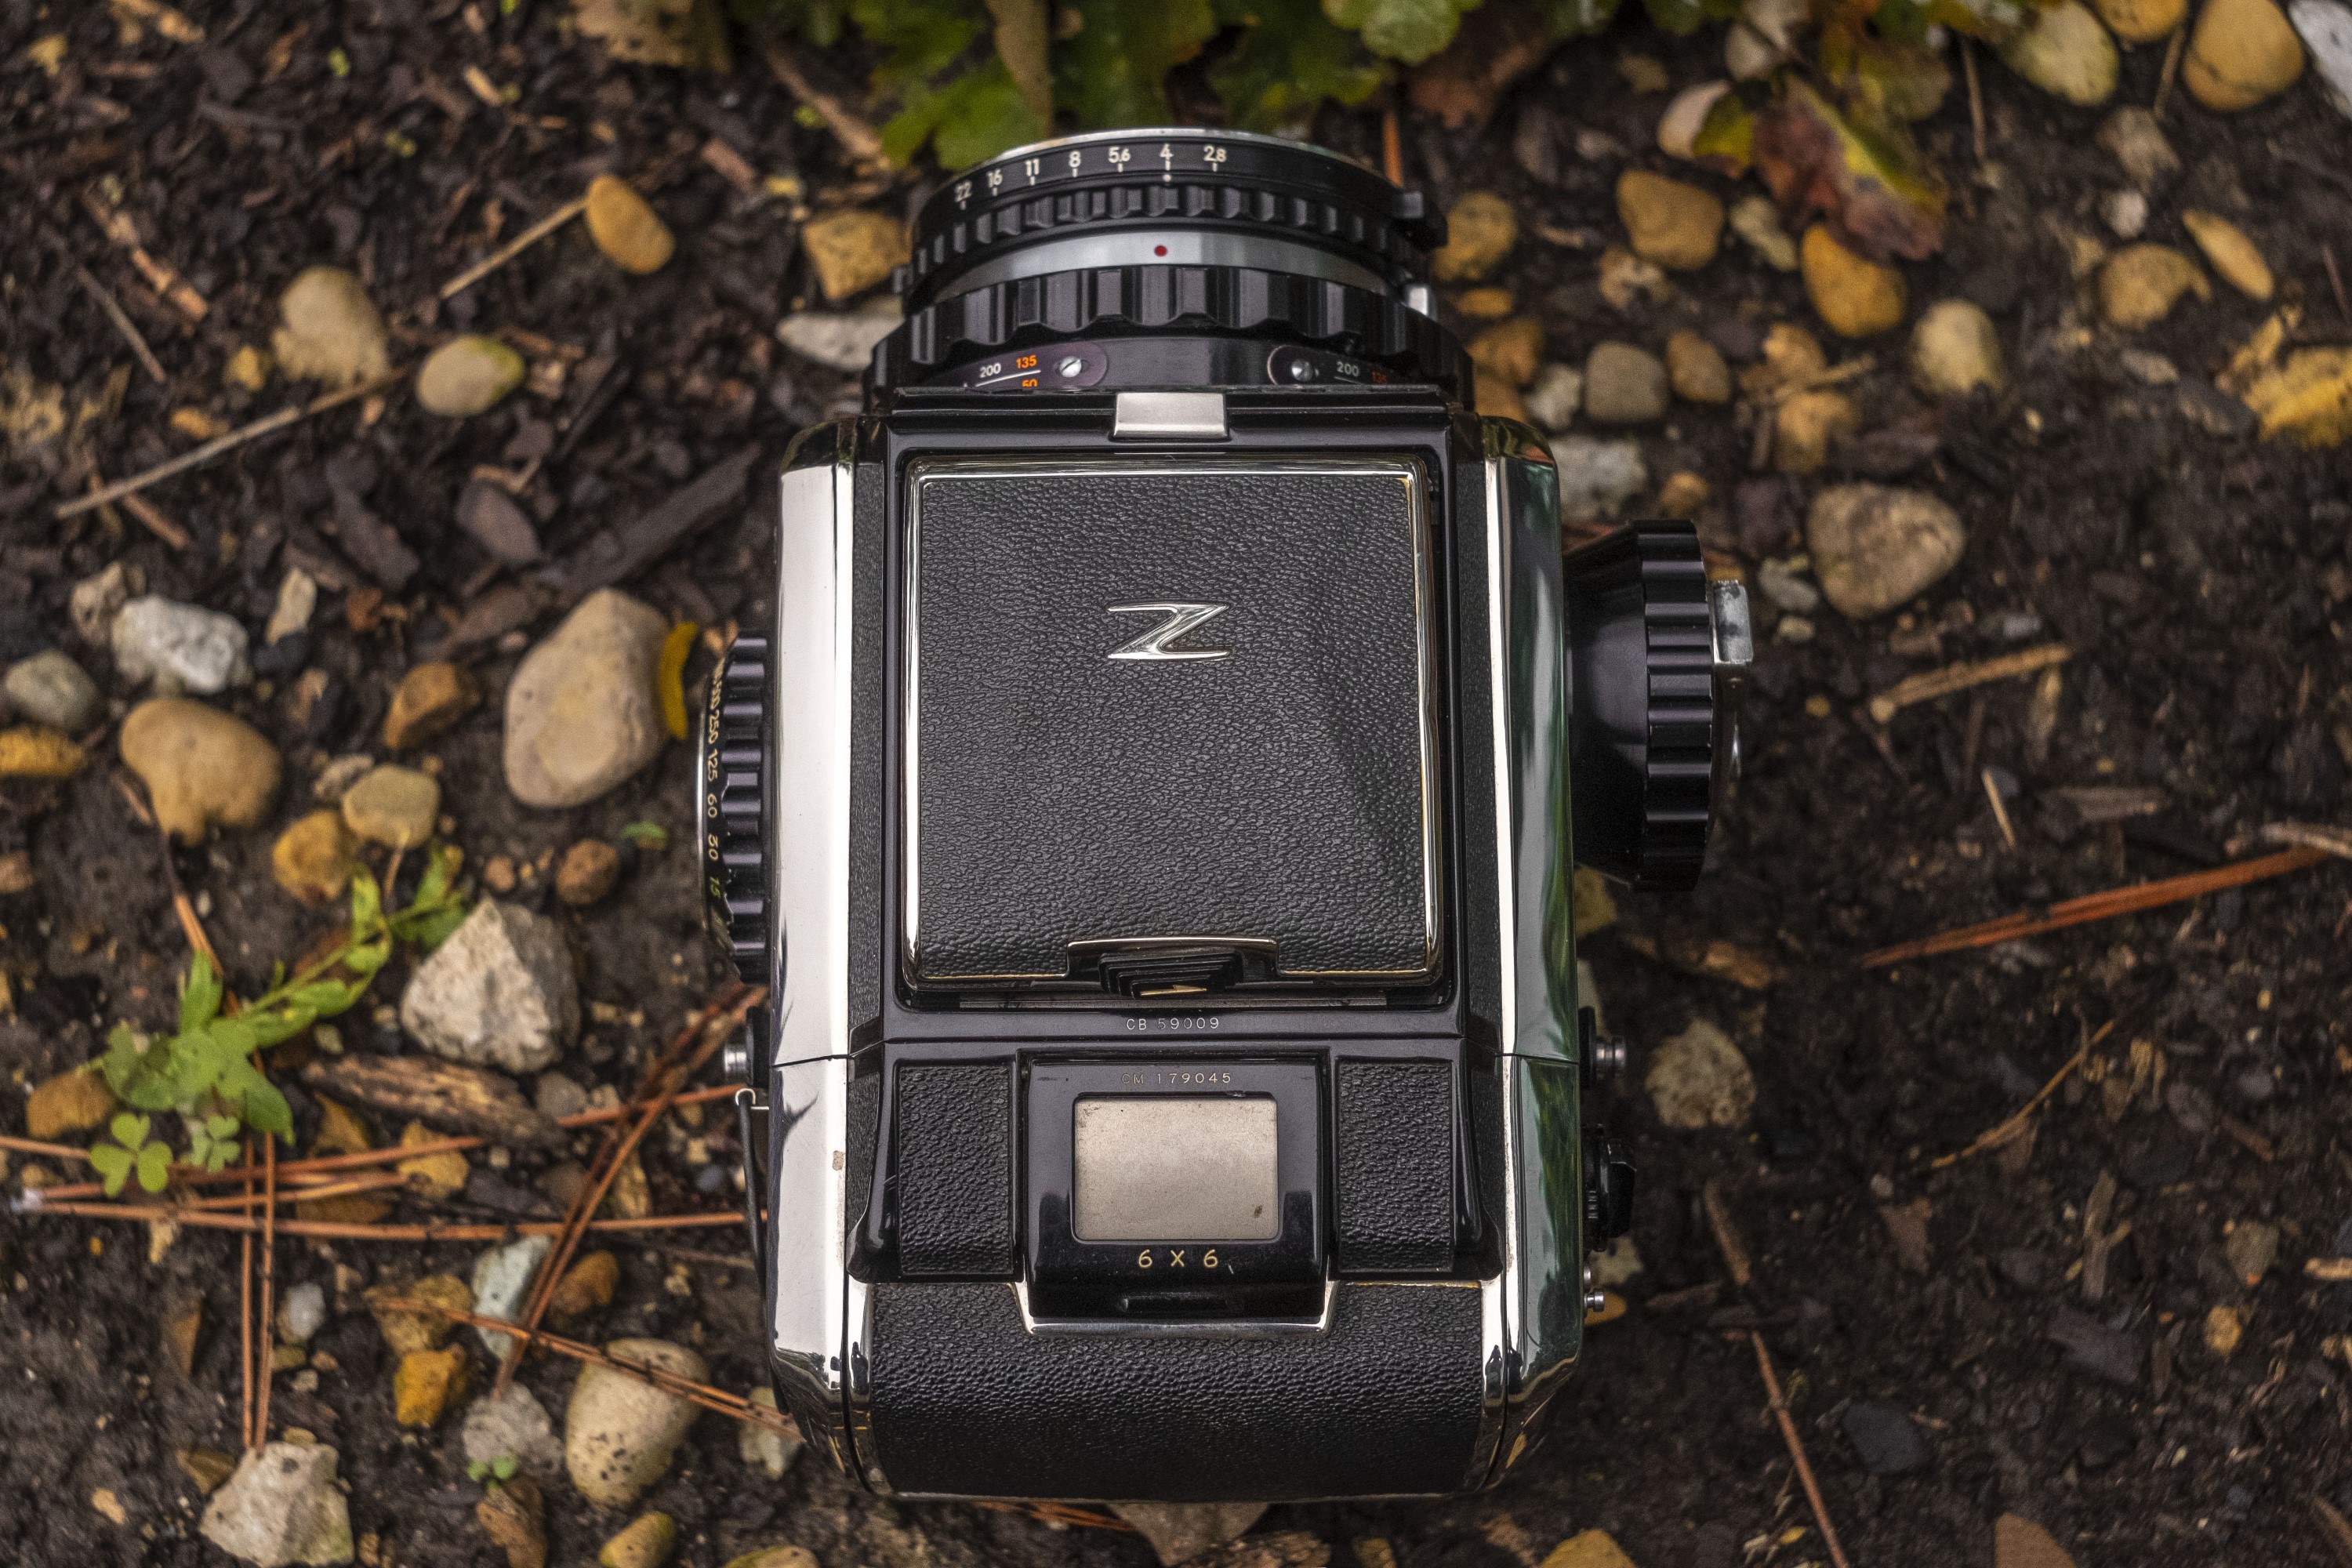
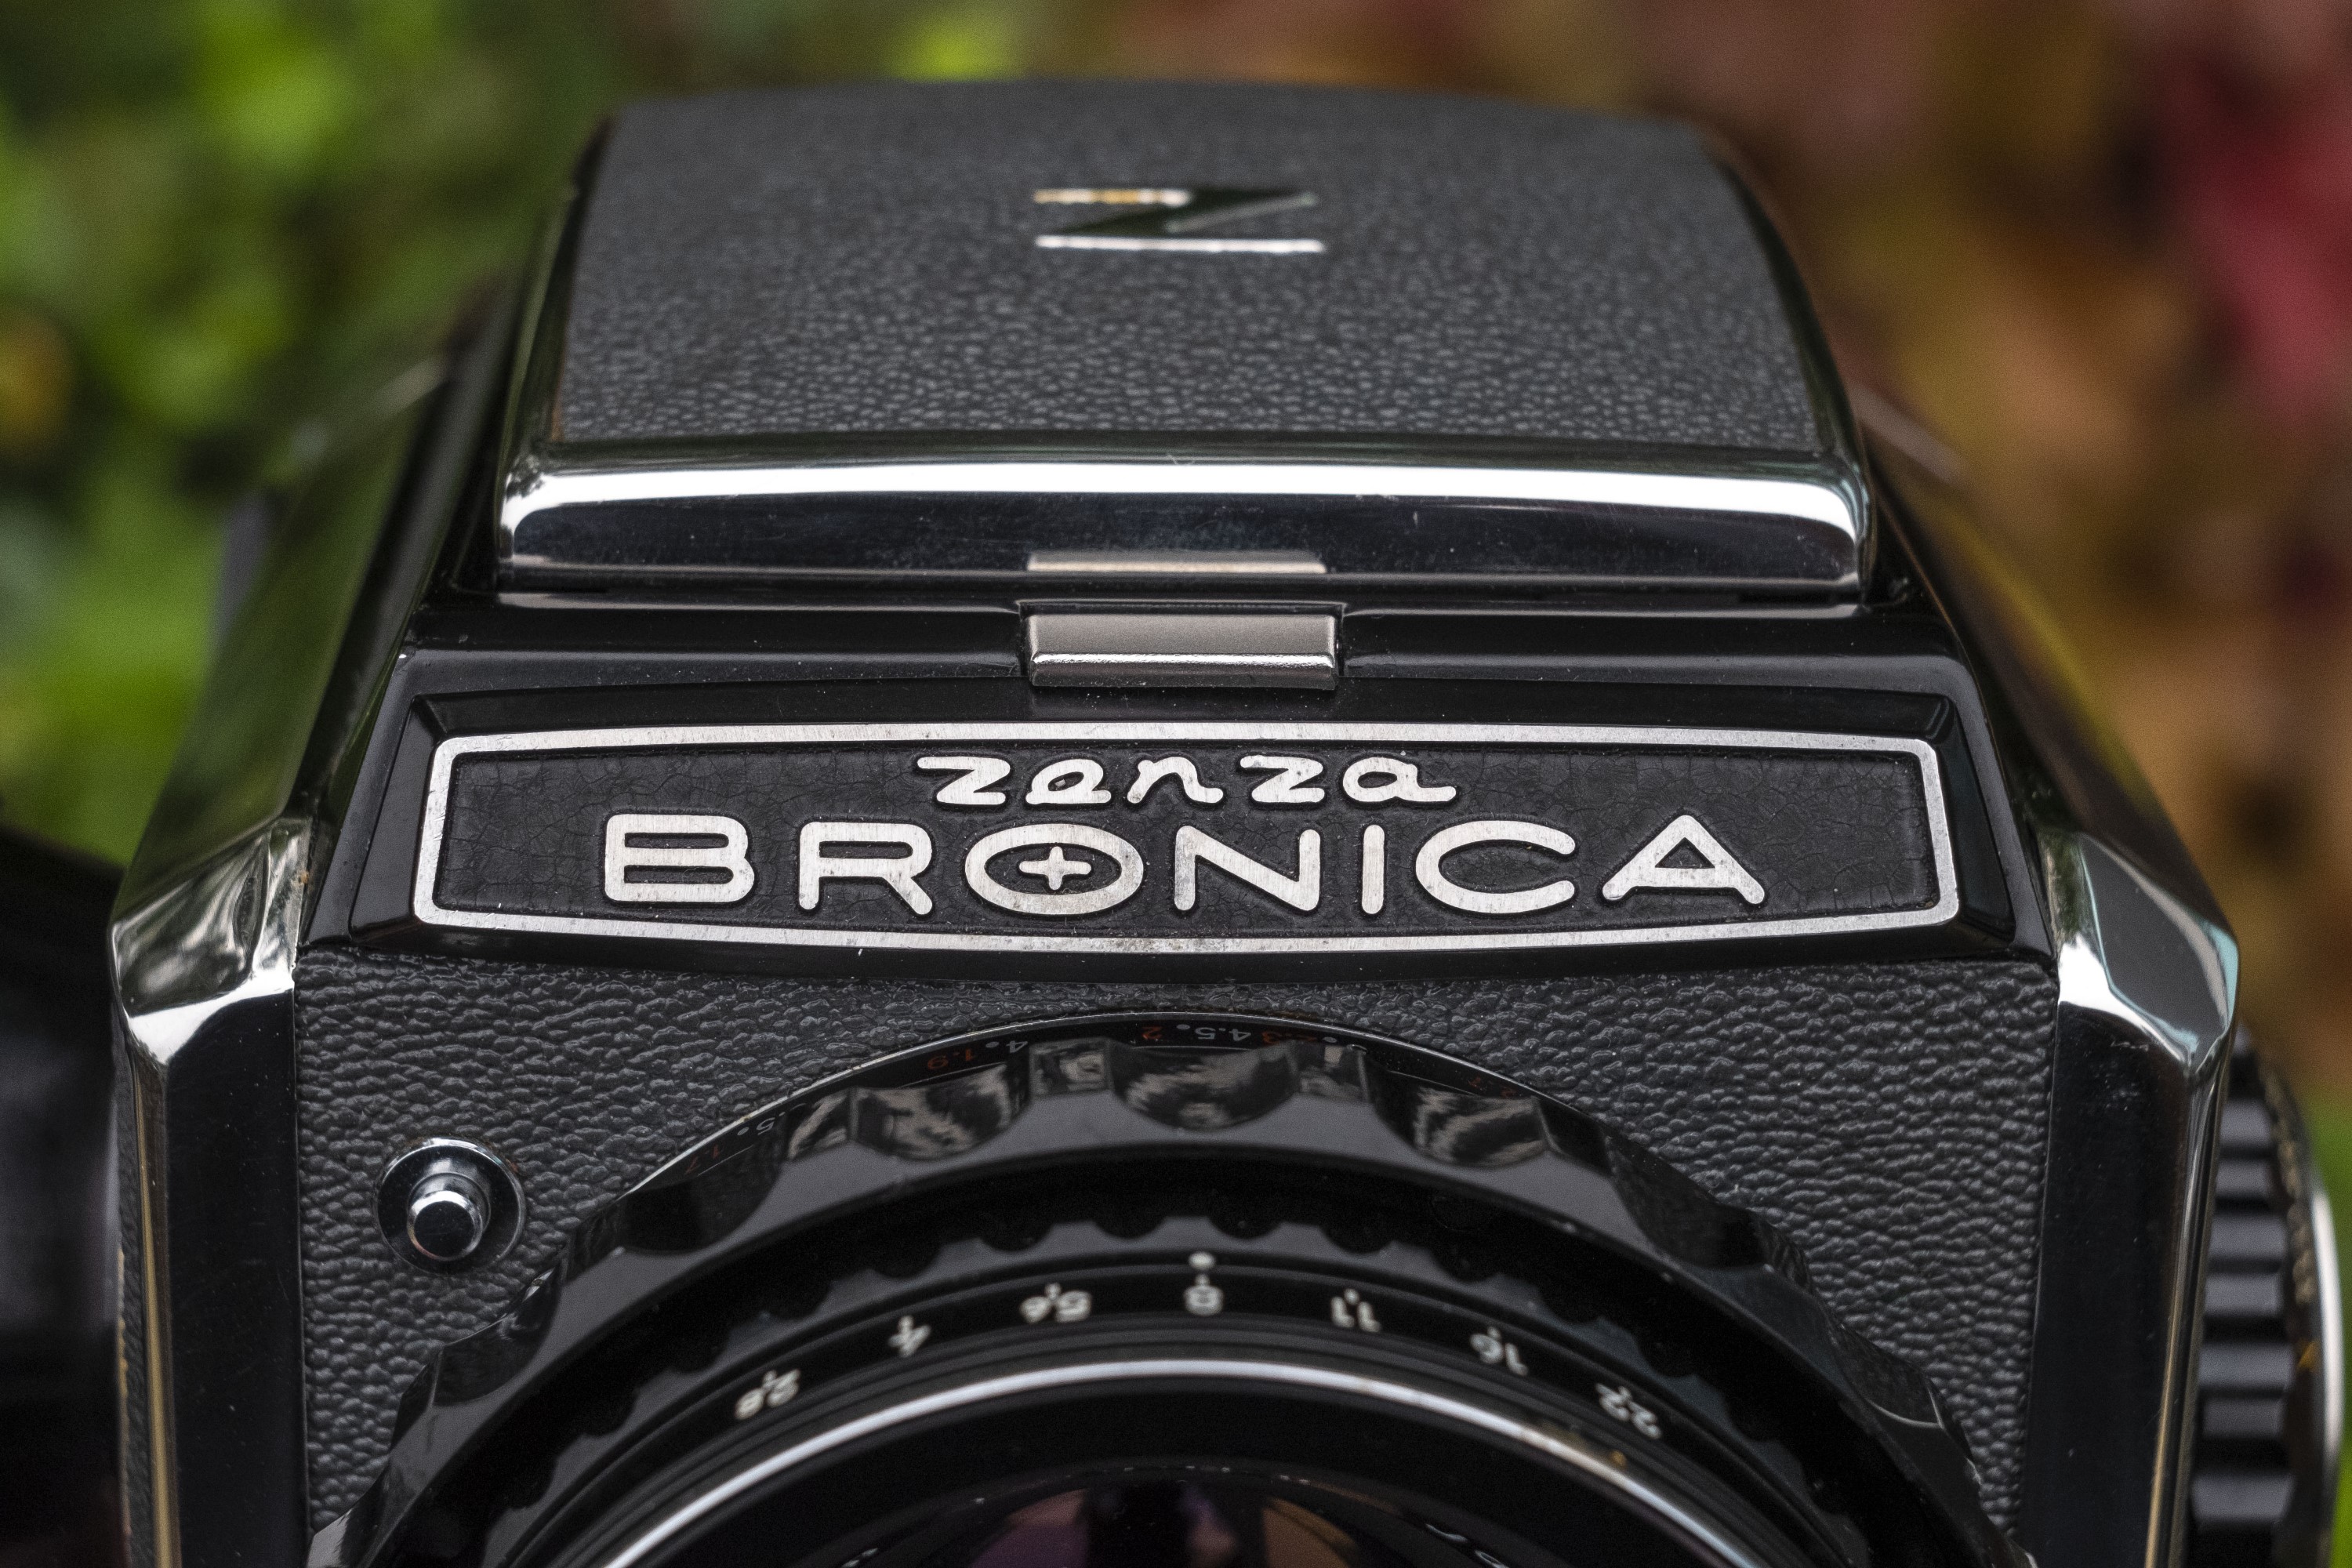
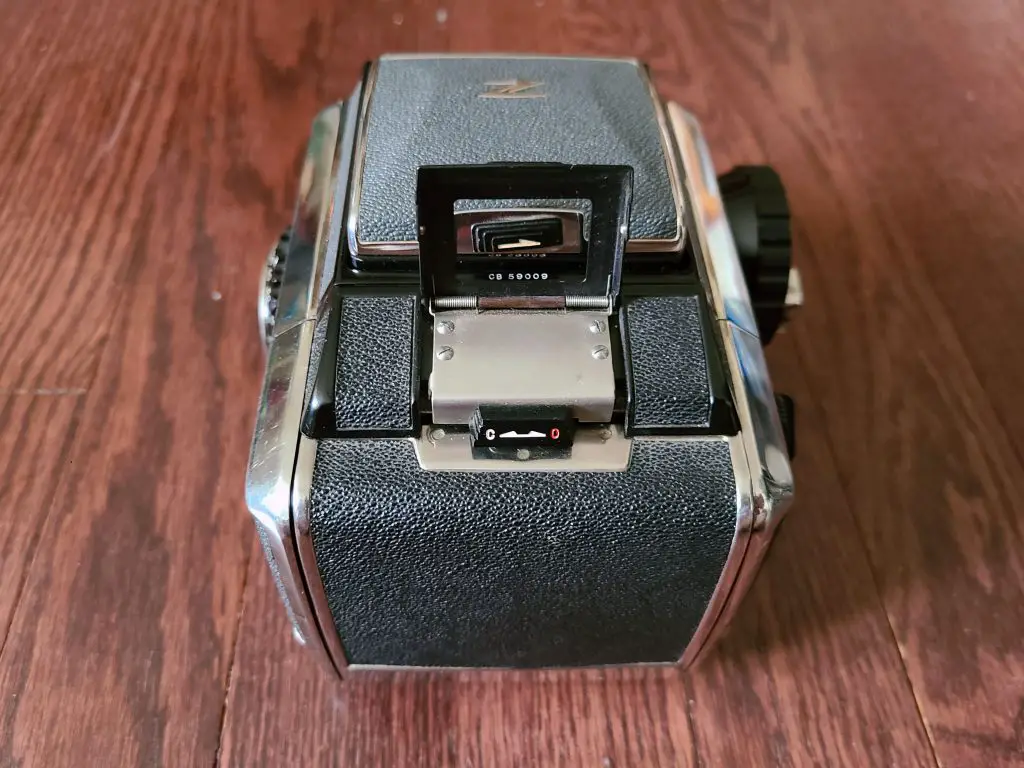
Starting with the top, the hood has an elegant chromed Z logo here, almost like a hood ornament placed there by Zorro. A black tab with a white arrow is the release for the hood that when pushed to the right causes all four sides of the viewfinder hood to immediately spring up into shooting position. Behind the hood is a multi function flip up frame that doubles as a holder for the edge of a film box to remind you what kind of film is in the camera, and beneath it the release for the film compartment. Keeping the edge of a film box here is enough to hopefully remind you not to try and open the camera with film in it.
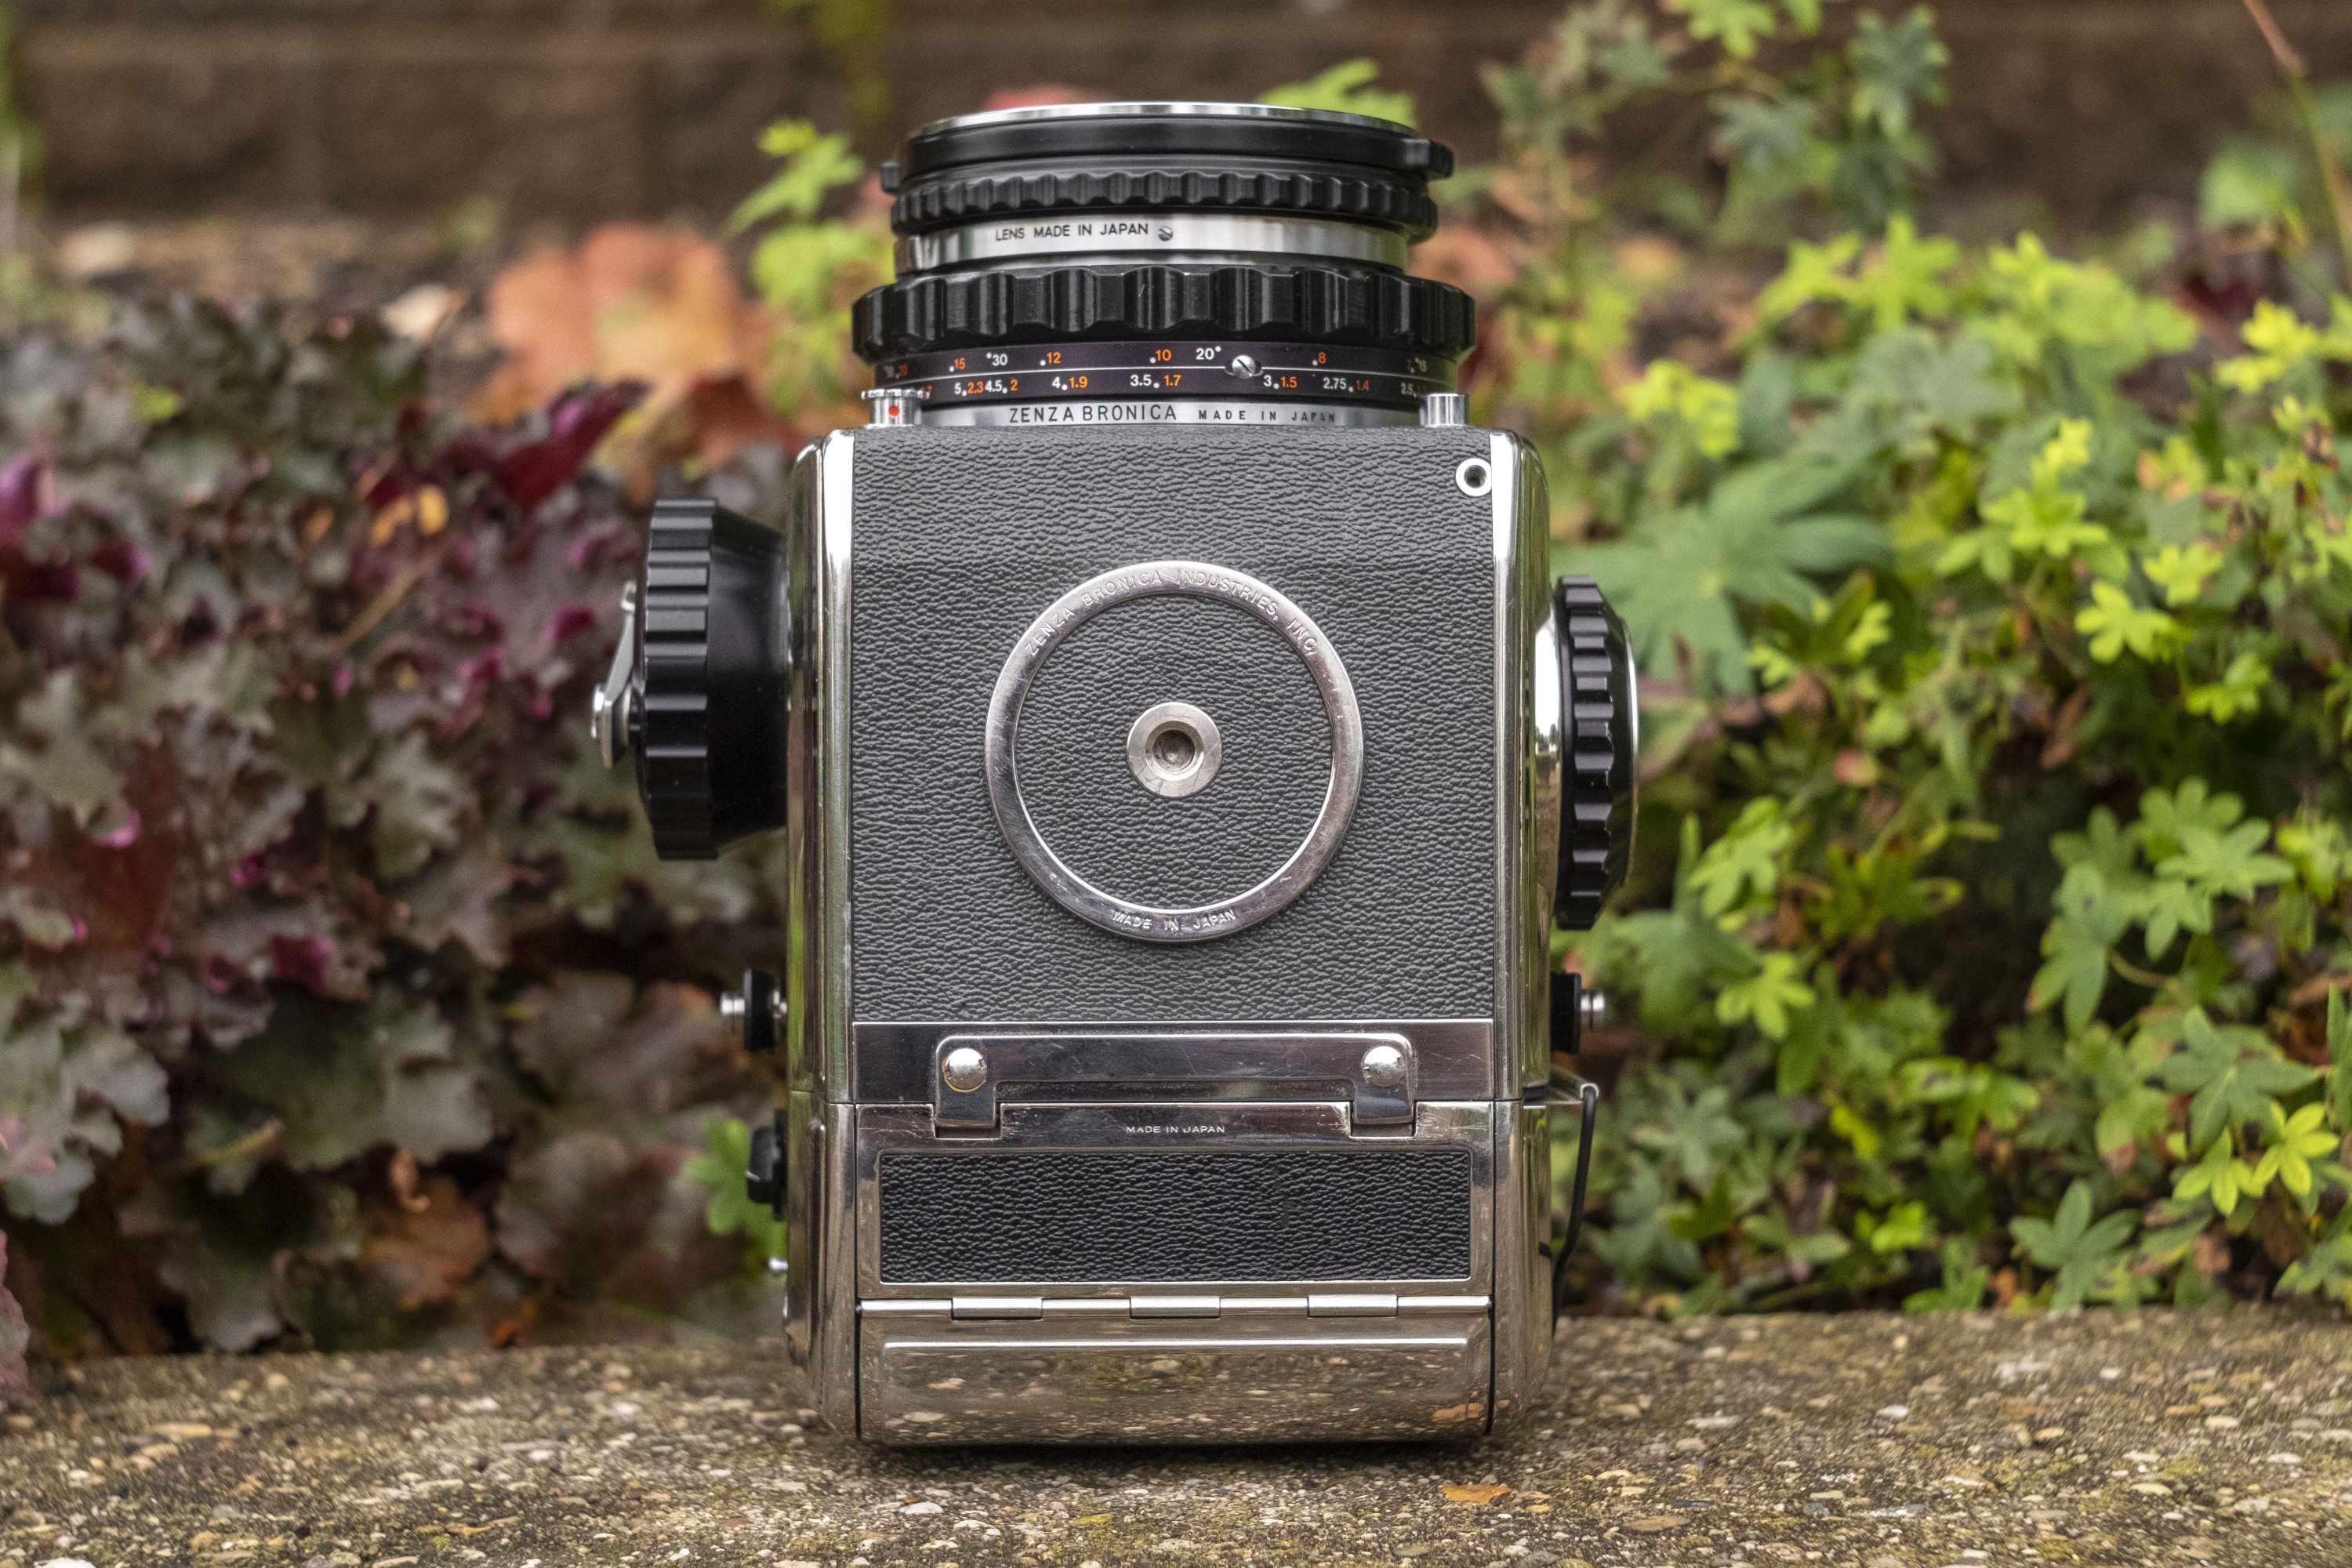
The bottom of the camera has only the centrally located 1/4″ tripod socket in a raised circular platform which means it should fit onto most tripods without any kind of adapters like those required of some TLRs. From this angle, you can see the words “Made in Japan” in three different locations, one on the film magazine, one around the circular trim, and once again beneath the lens mount!
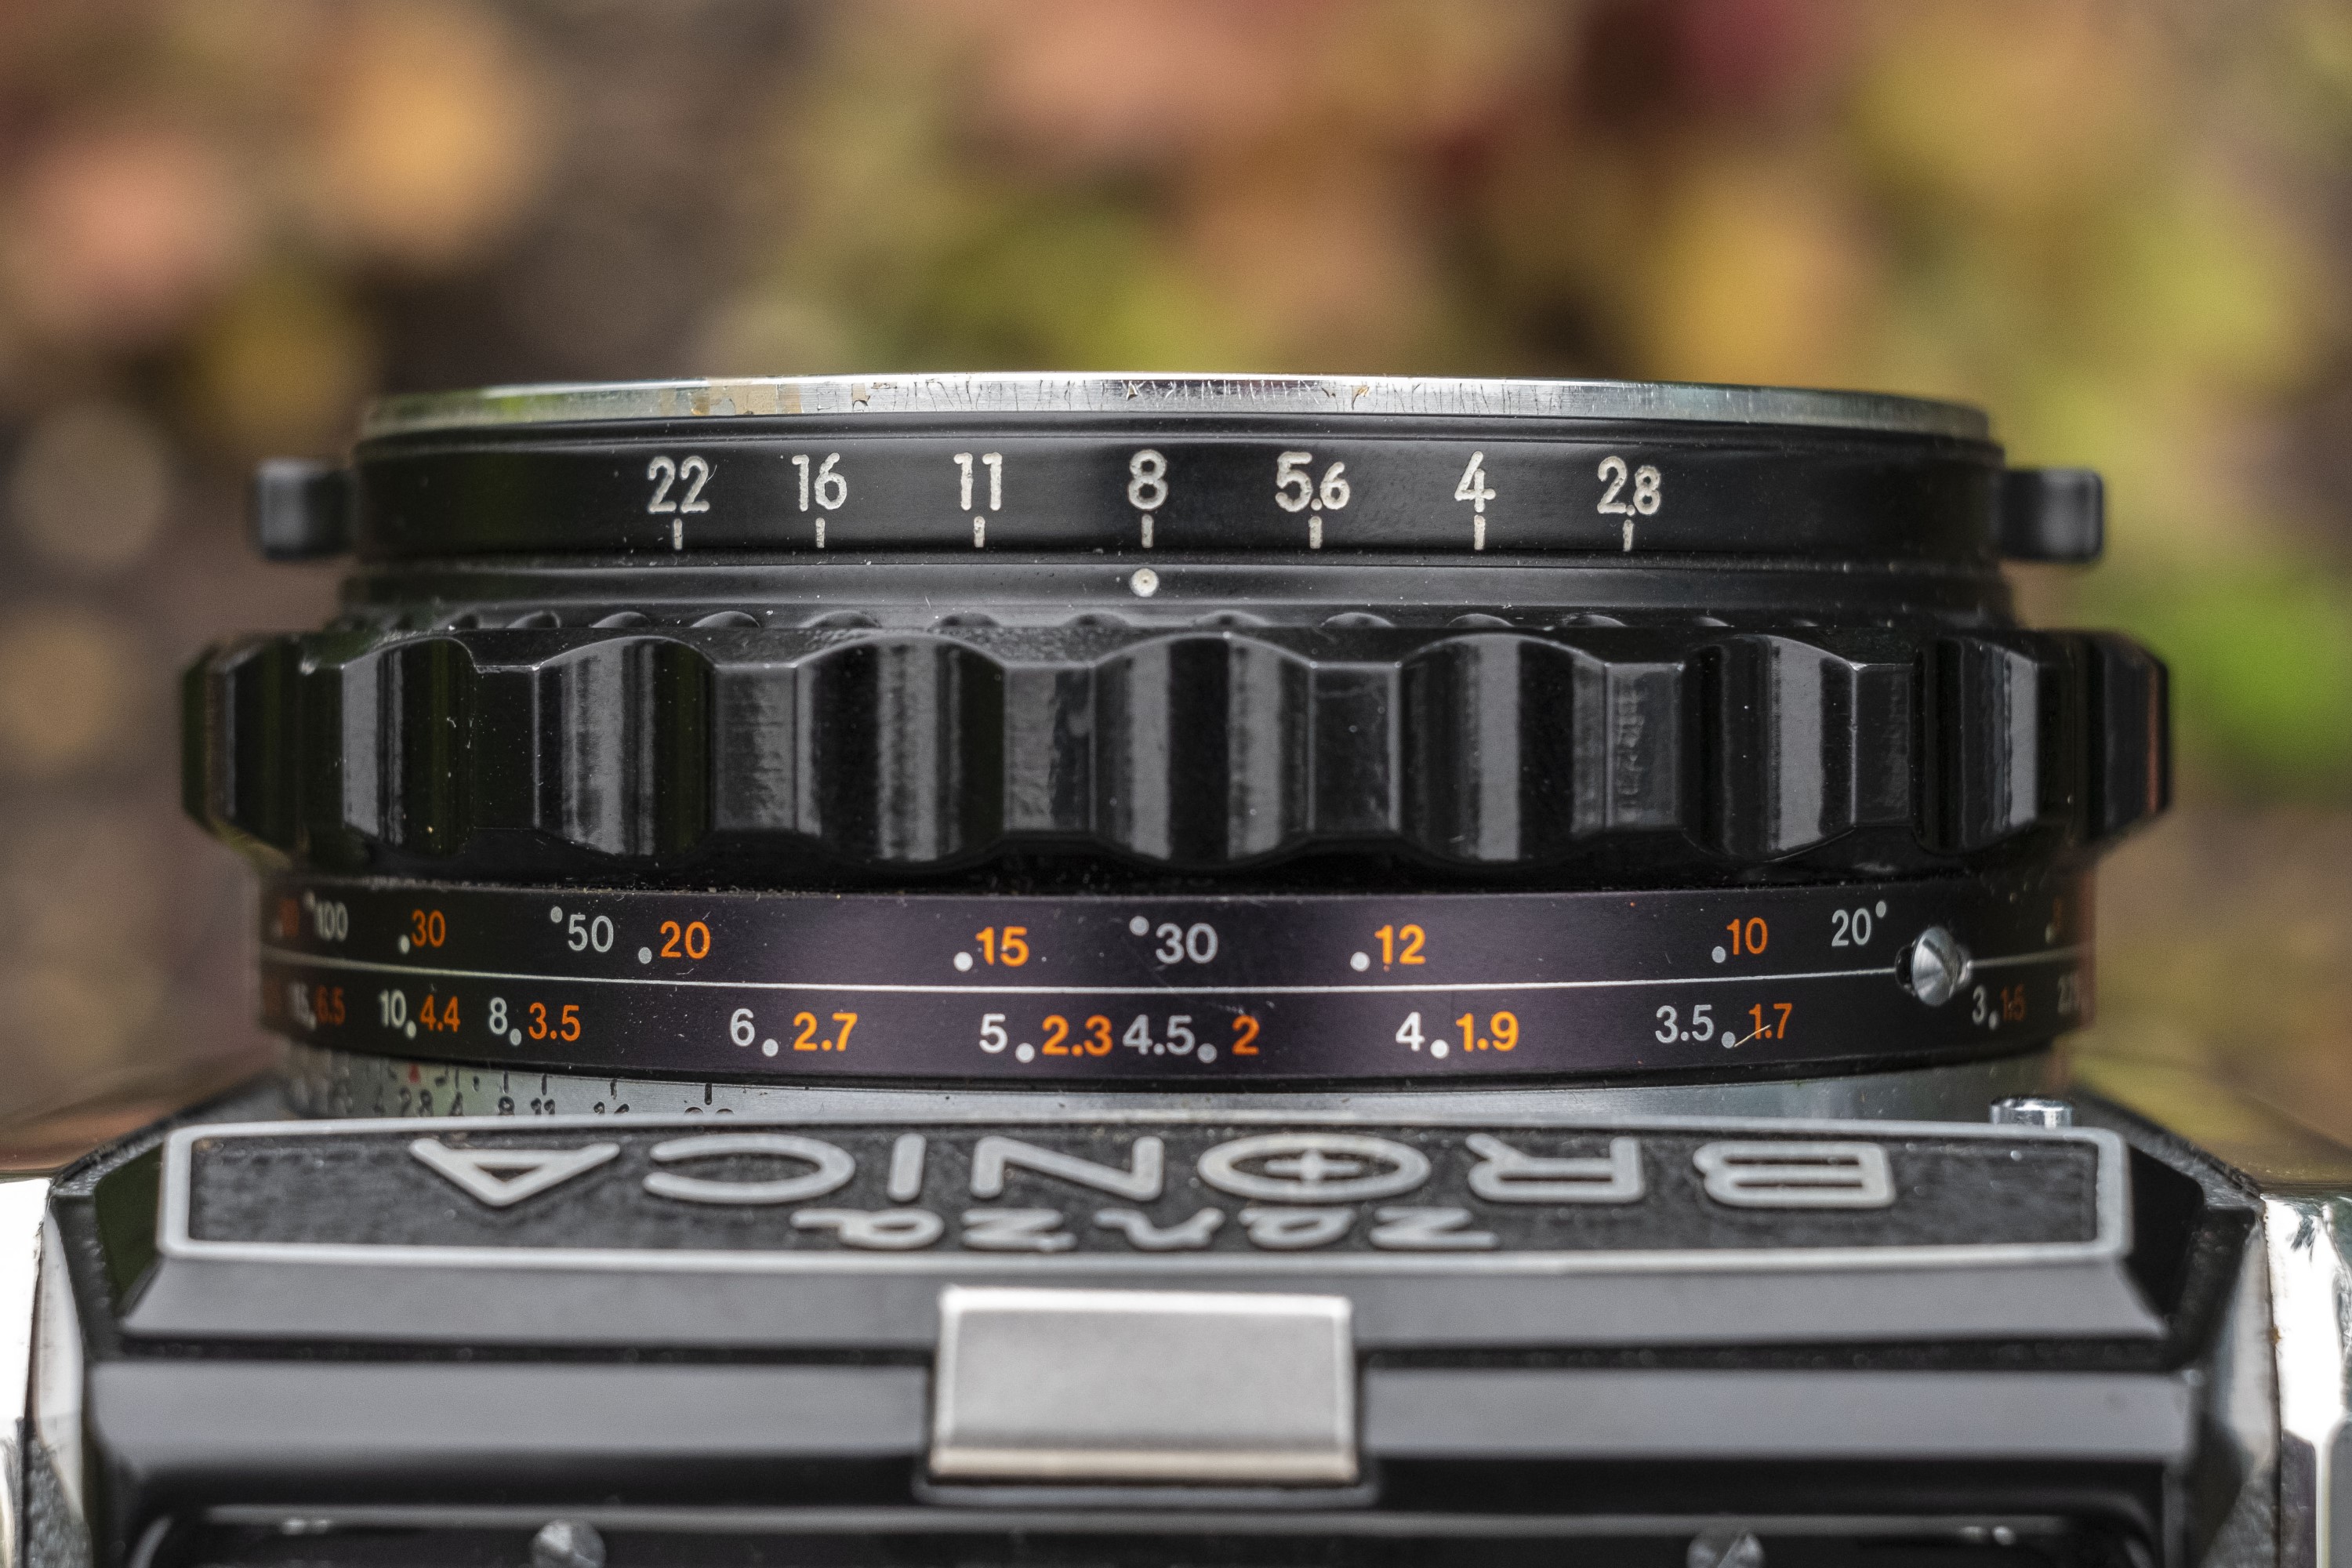
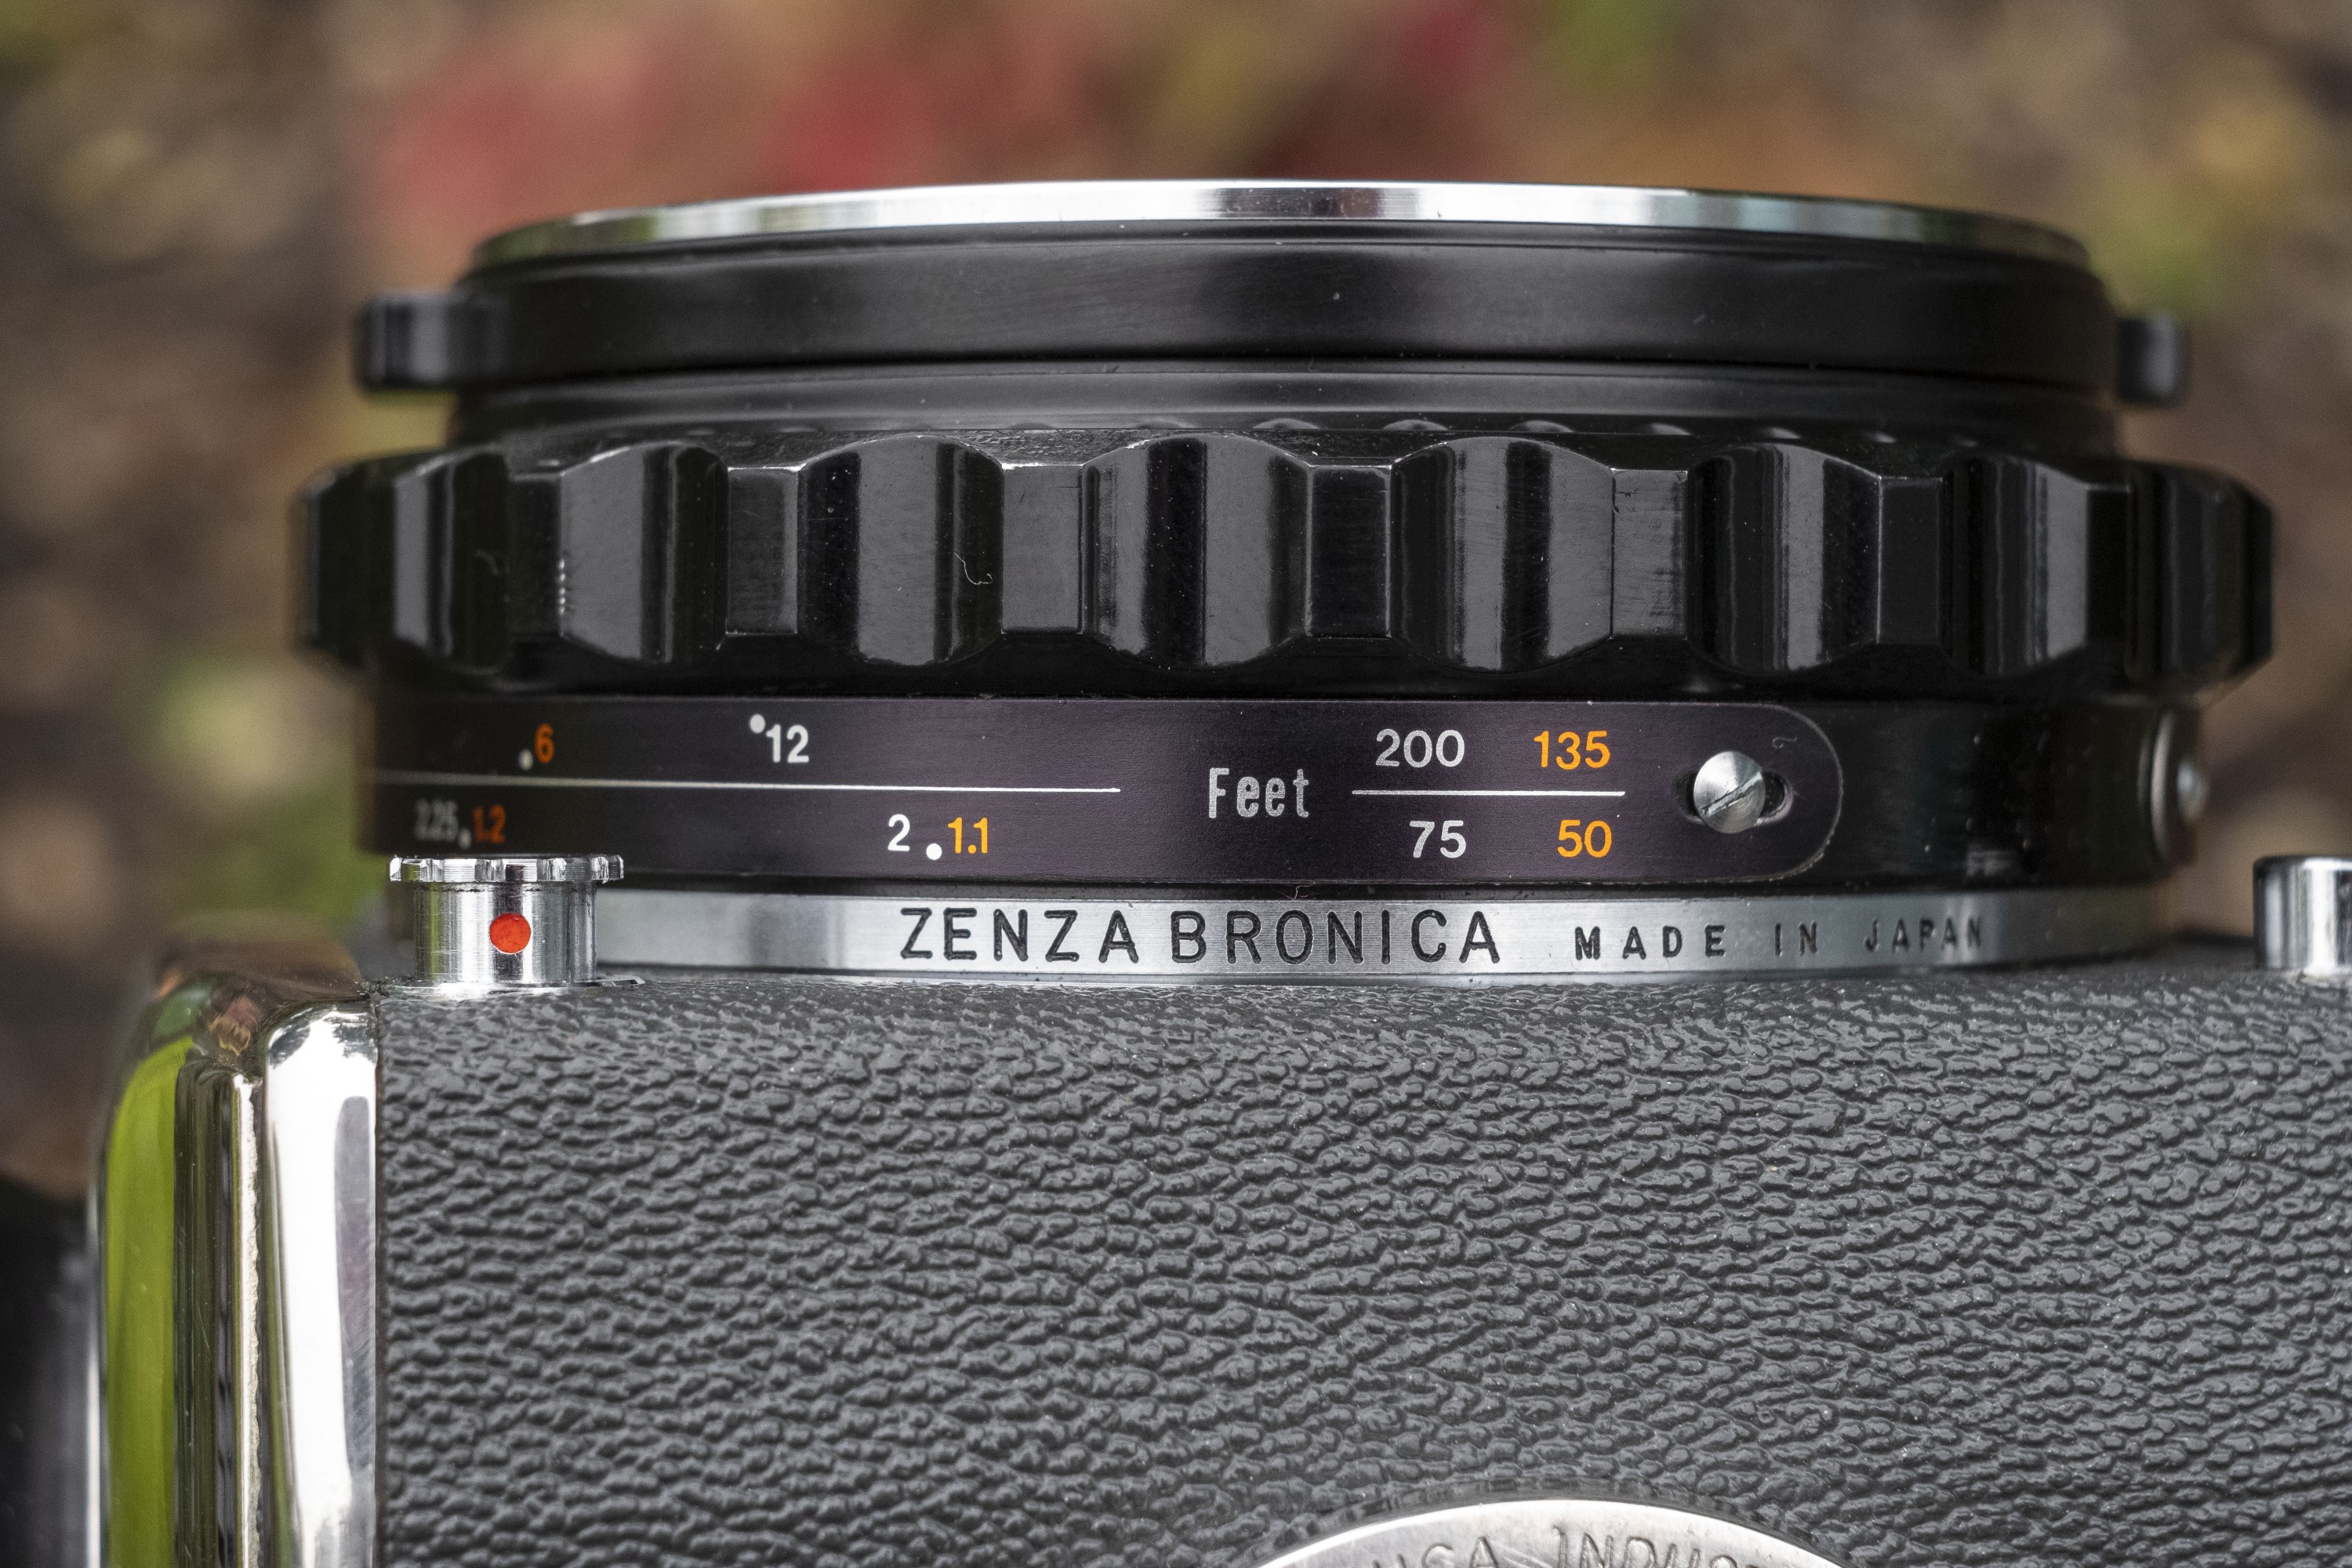
The left side of the camera has the ASA flash sync port, the shutter speed dial, and one of two strap lugs. The shutter speed dial has evenly spaced speeds from 1 second to 1/1000, plus B and X. X-sync is 1/40th of a second. Although there are click stops at every position, according to the Bronica’s manual, intermediate speeds are possible between 1 and 1/4, then again between 1/8 and 1/30, and then again between 1/60 and 1/1000 allowing for more precise shutter speed control. The outside of the shutter speed knob has a bayonet which is where you’d attach an optional TTL exposure meter that could be purchased for the S2.
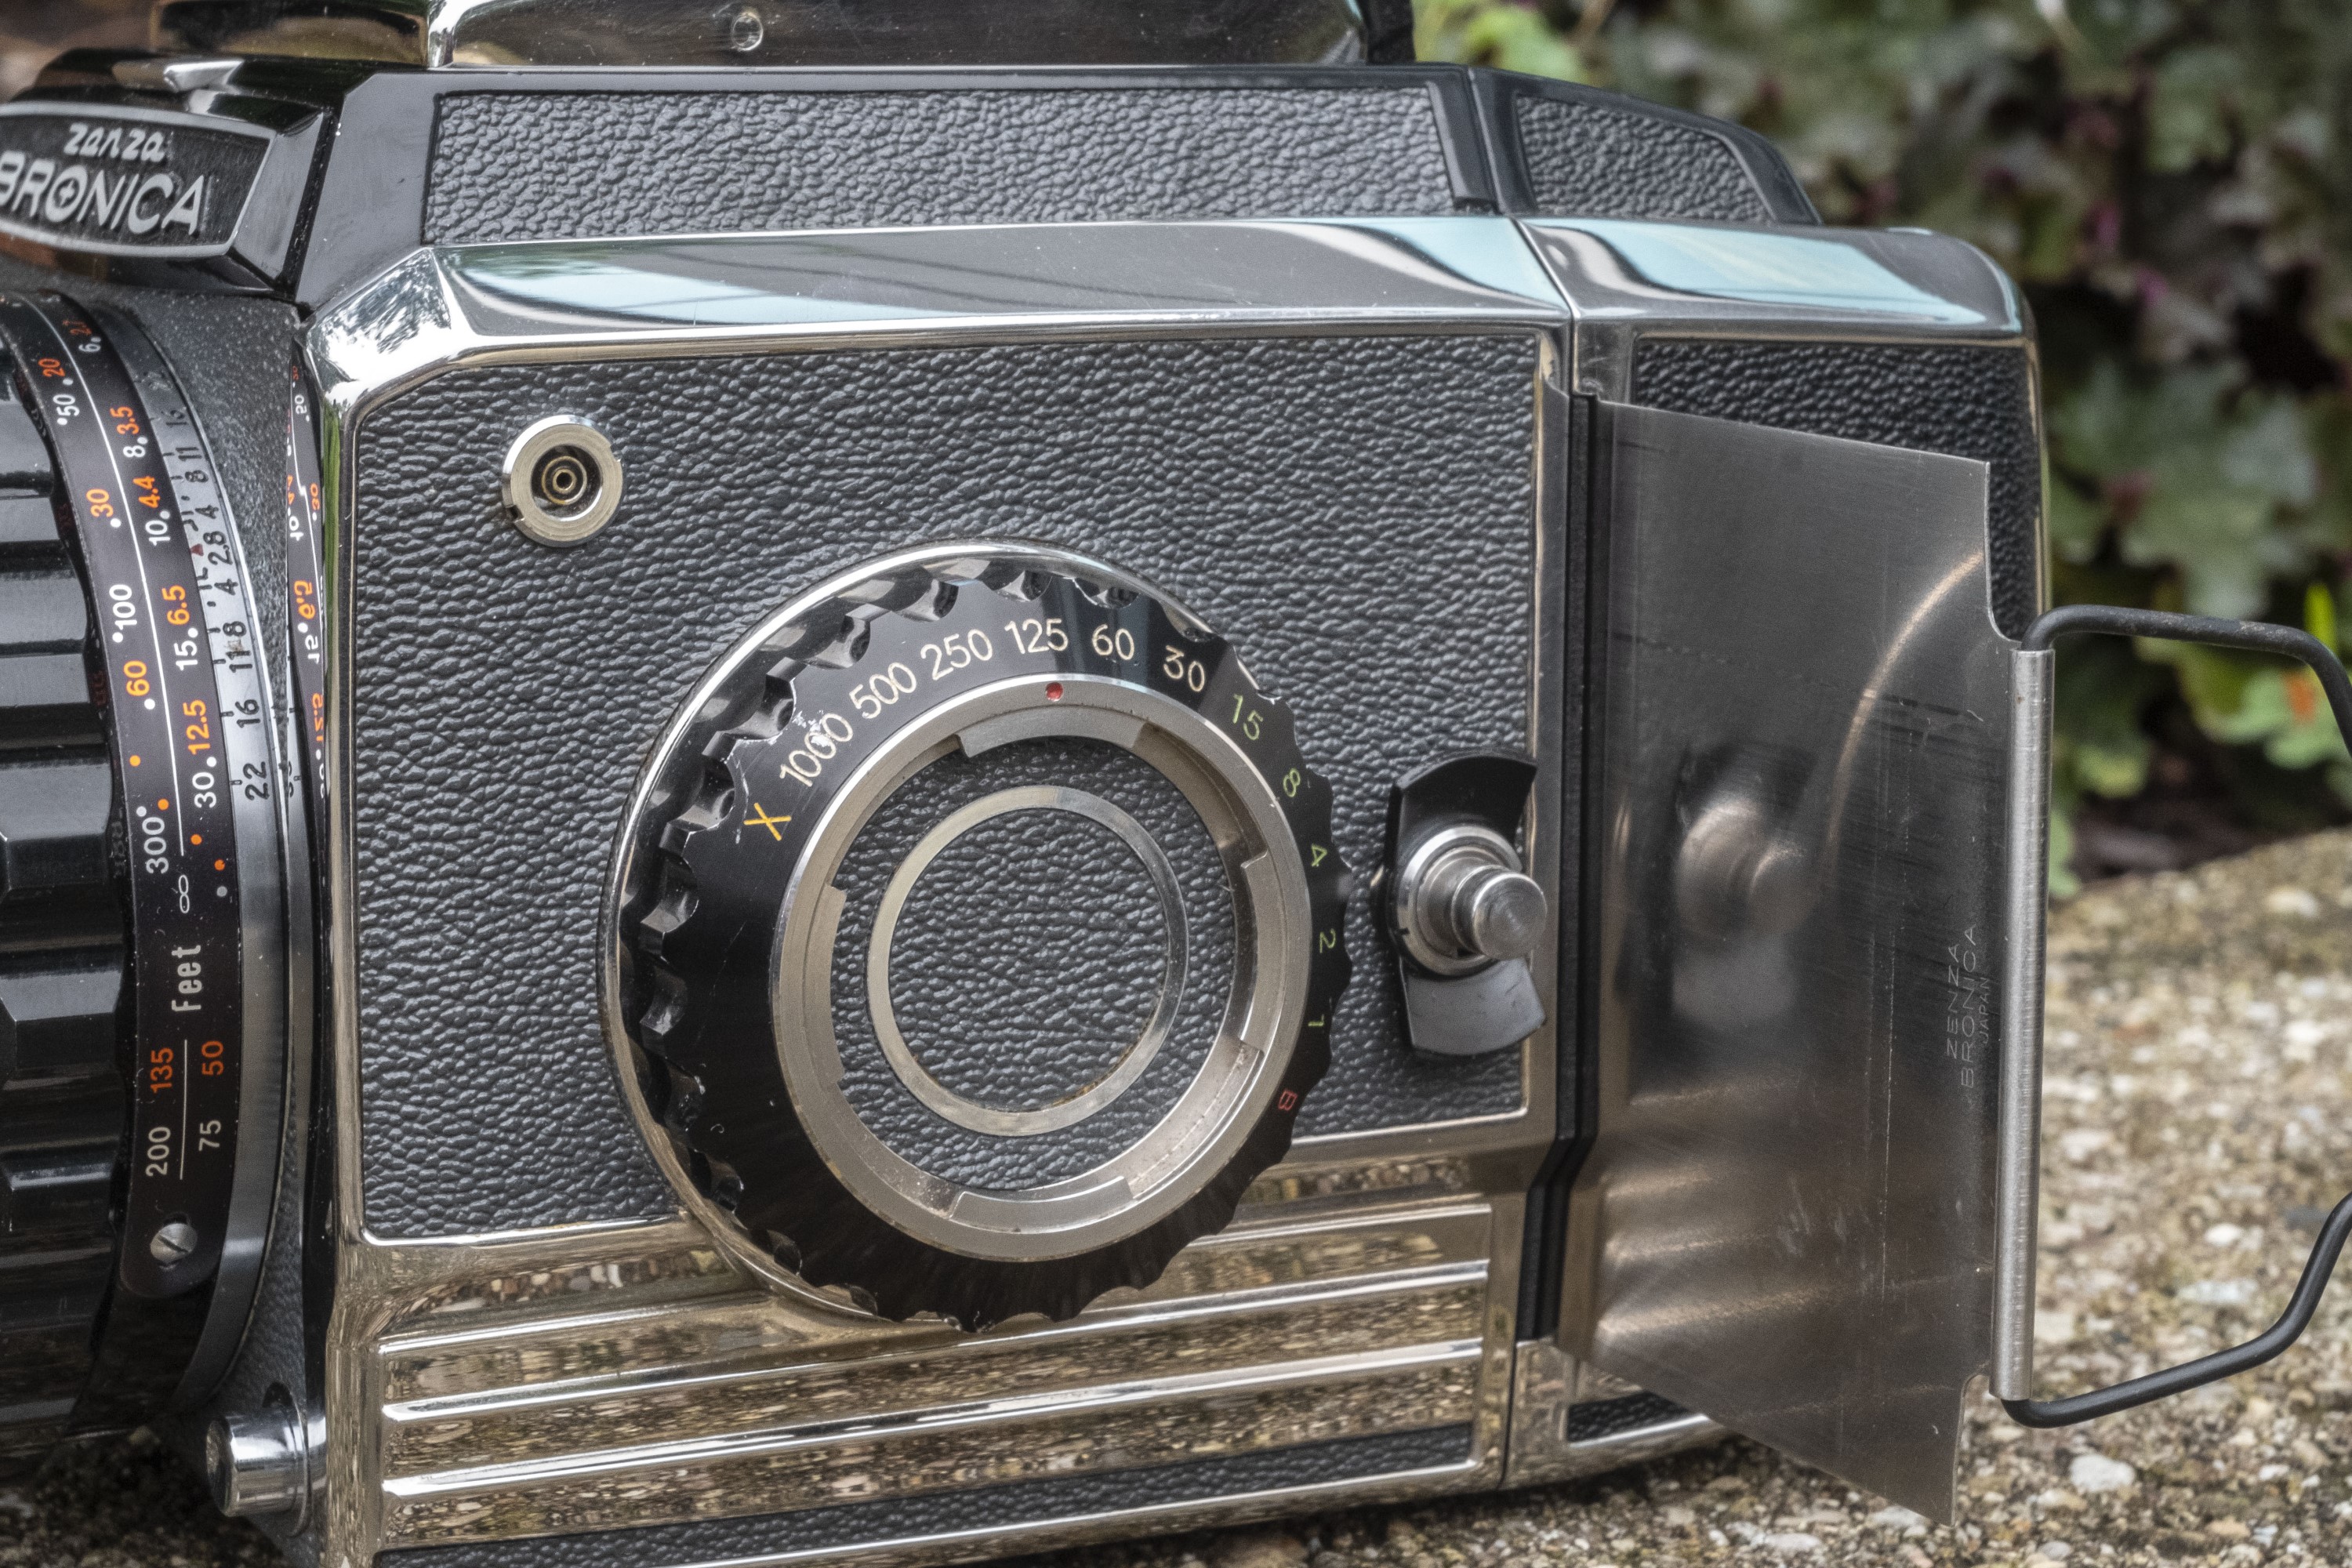
One last thing that is really important on this side is the location of the metal dark slide, which in these images is installed into the camera. The purpose of the dark slide is to cover the film gate on the magazine when detaching it from the camera. With the Bronica S2, a photographer could have multiple magazines loaded with different film stocks, for example, a high and slow speed film, or perhaps black and white and color. He or she could quickly swap films without having to finish the previous roll by removing the entire magazine and replacing it with another. The dark slide stays with the magazine, so that light does not expose the film inside. The dark slide must be fully inserted into the camera before you can remove the back so if you lose it, you will not be able to swap magazines, even if film isn’t loaded. Also, with the dark slide in, the shutter release becomes locked, and you cannot use the camera as this would expose a blank frame.
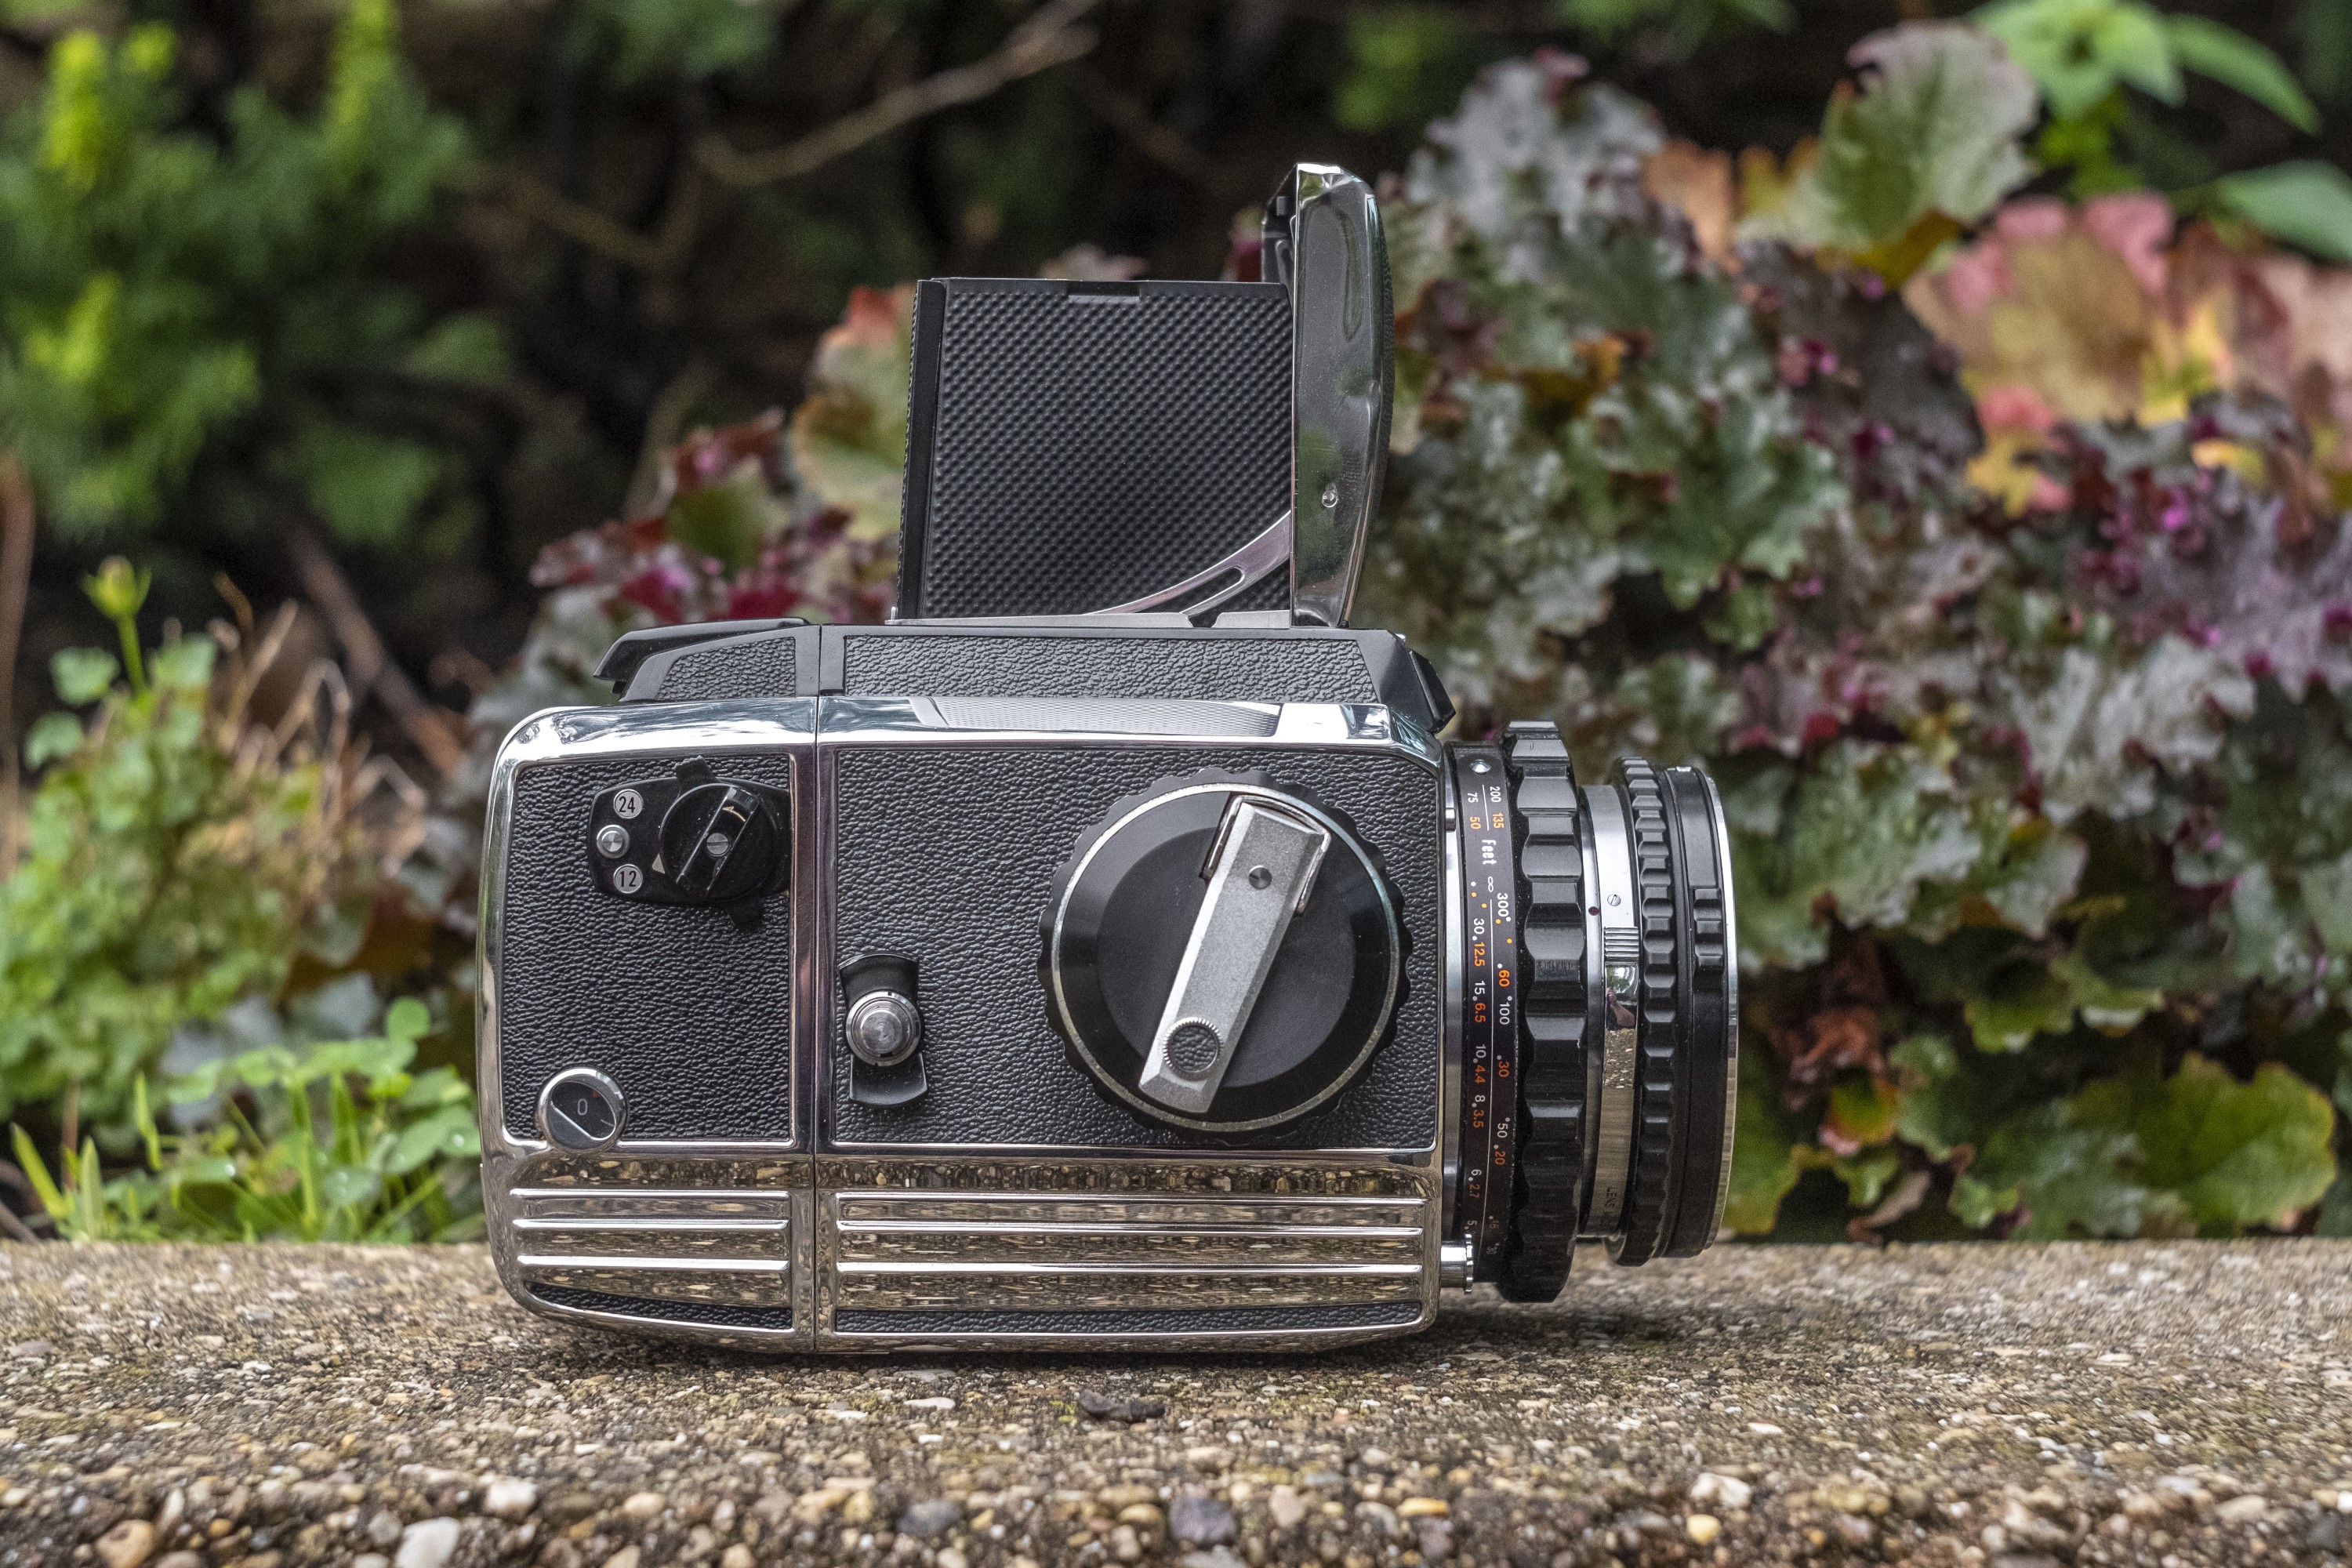
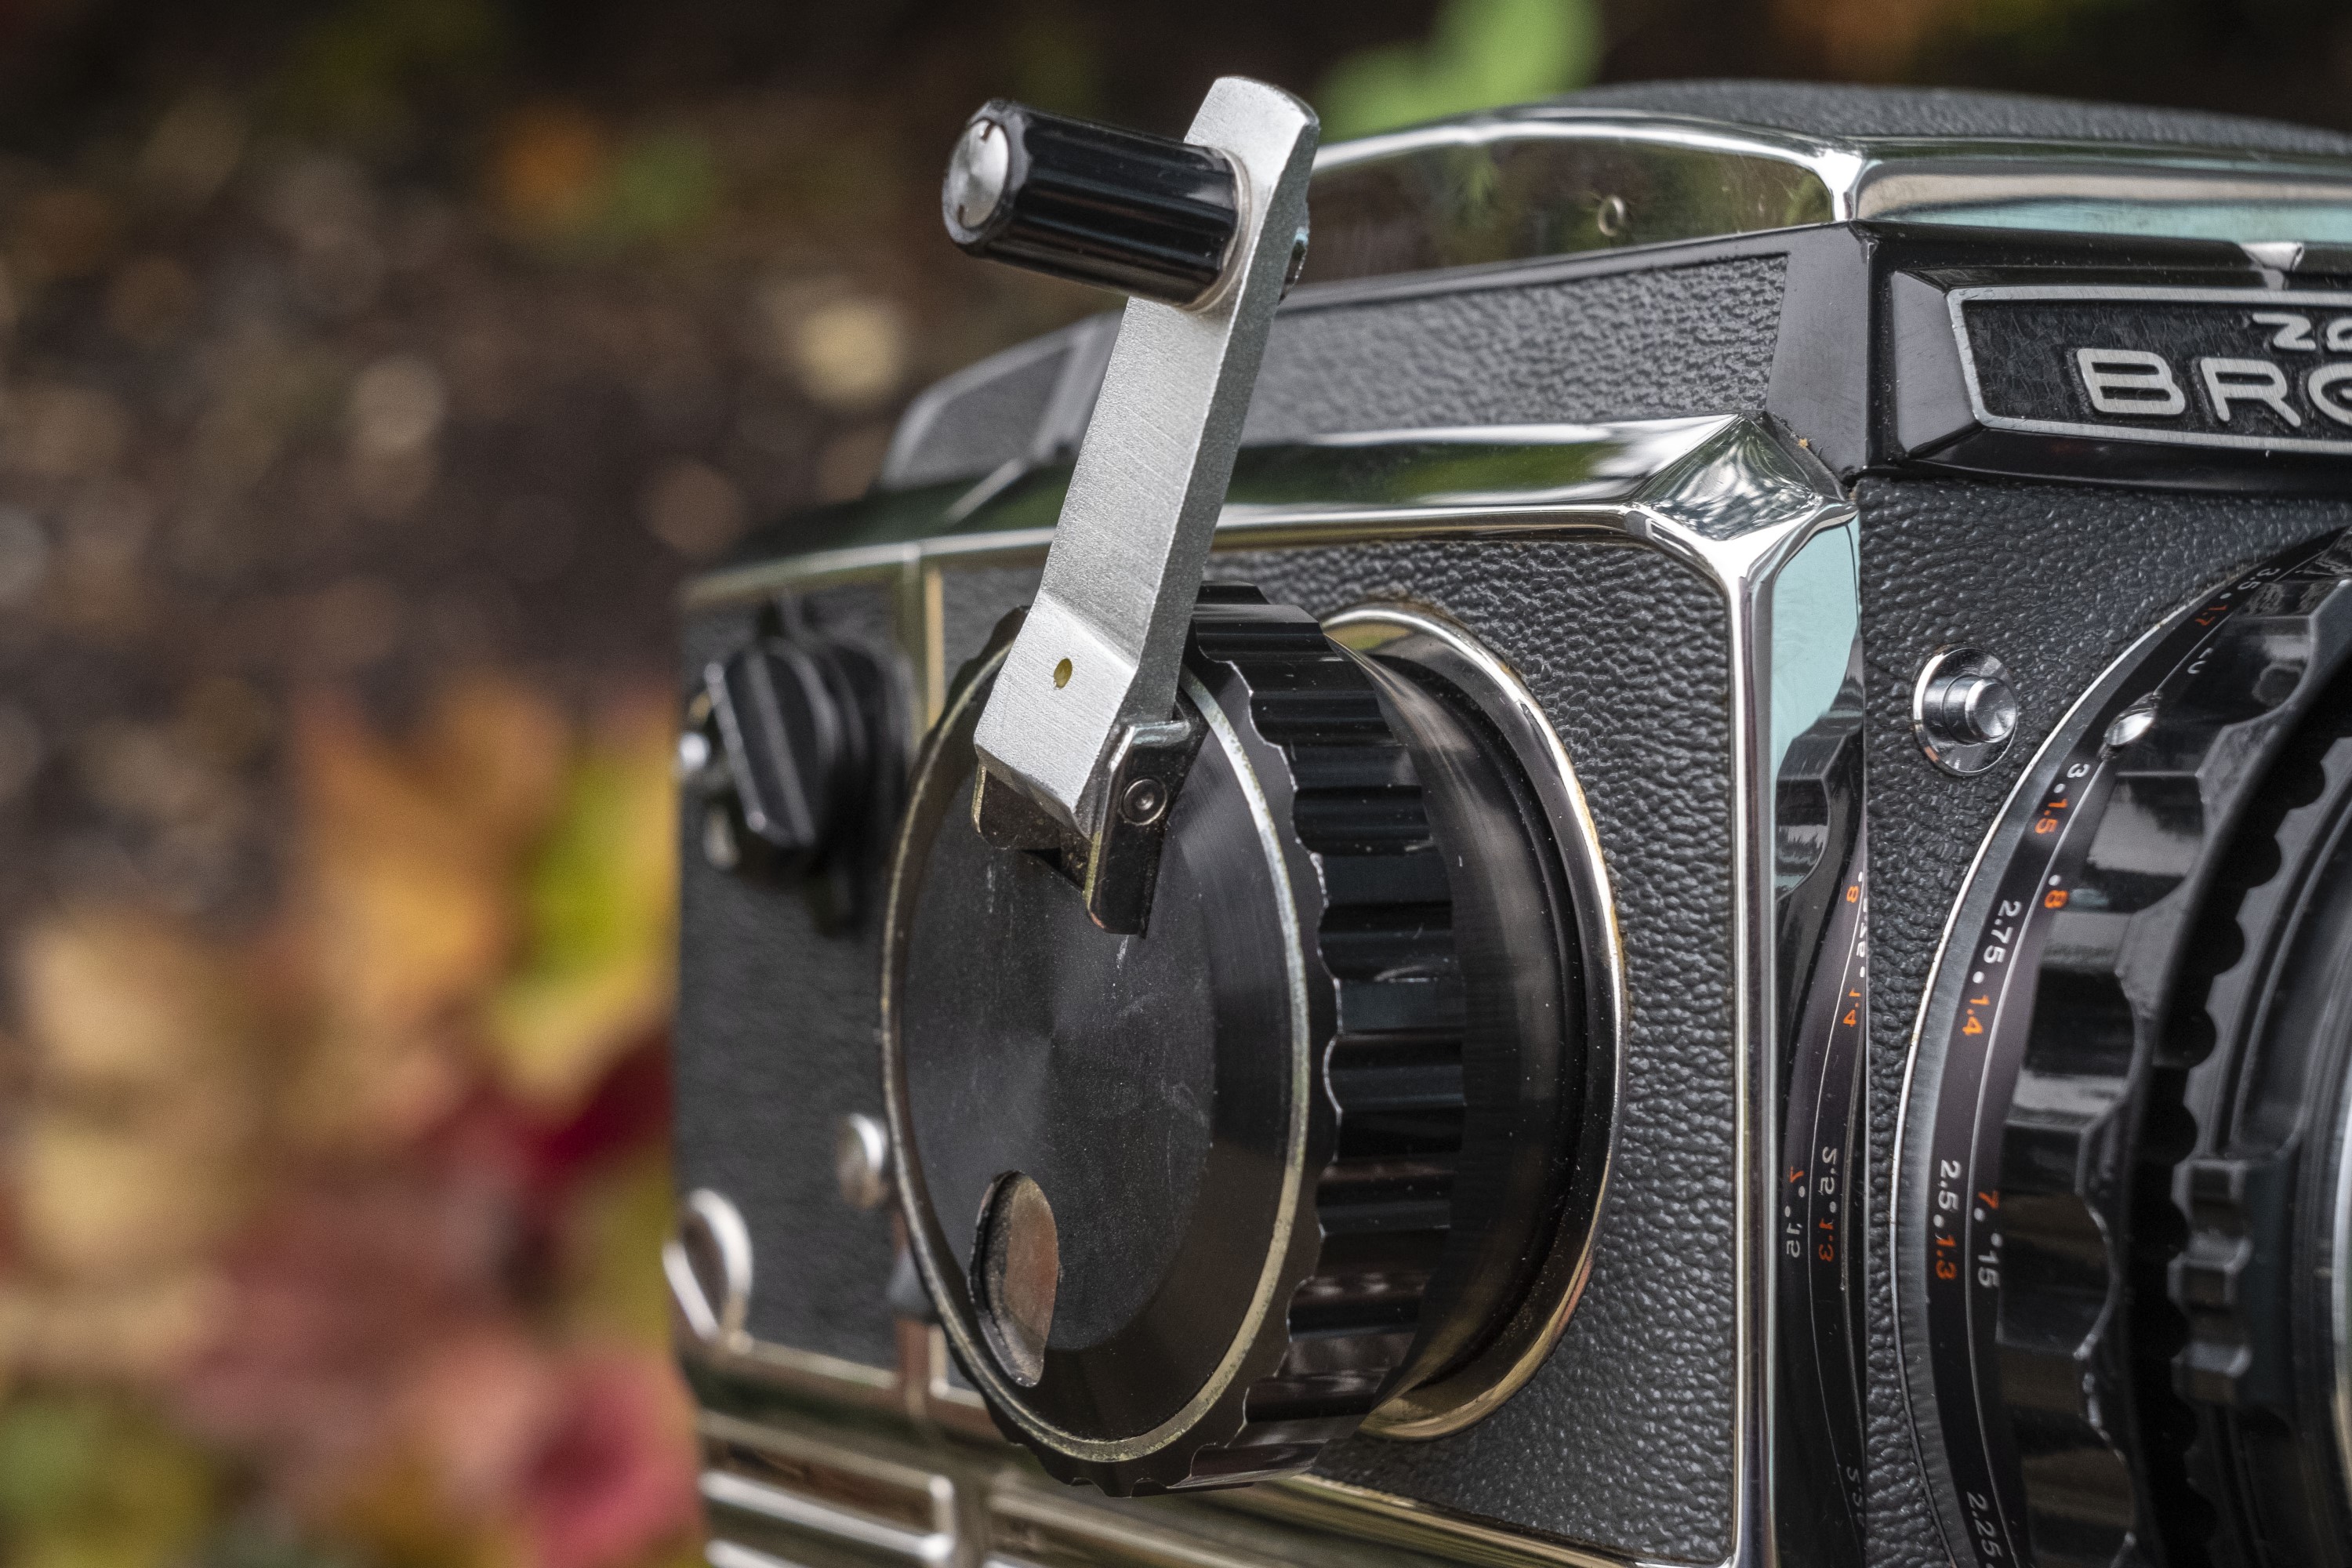
The camera’s right side is dominated by the large film advance knob with fold out crank. You can use the knob with or without the crank. I find it easier while shooting the camera to just turn the knob, and only use the crank when loading in a new roll of film. The film advance knob has a very low gearing which means that it takes several rotations to advance the film one exposure. This is probably good for not tearing the film, but increases the amount of time before you can get ready for your next shot.
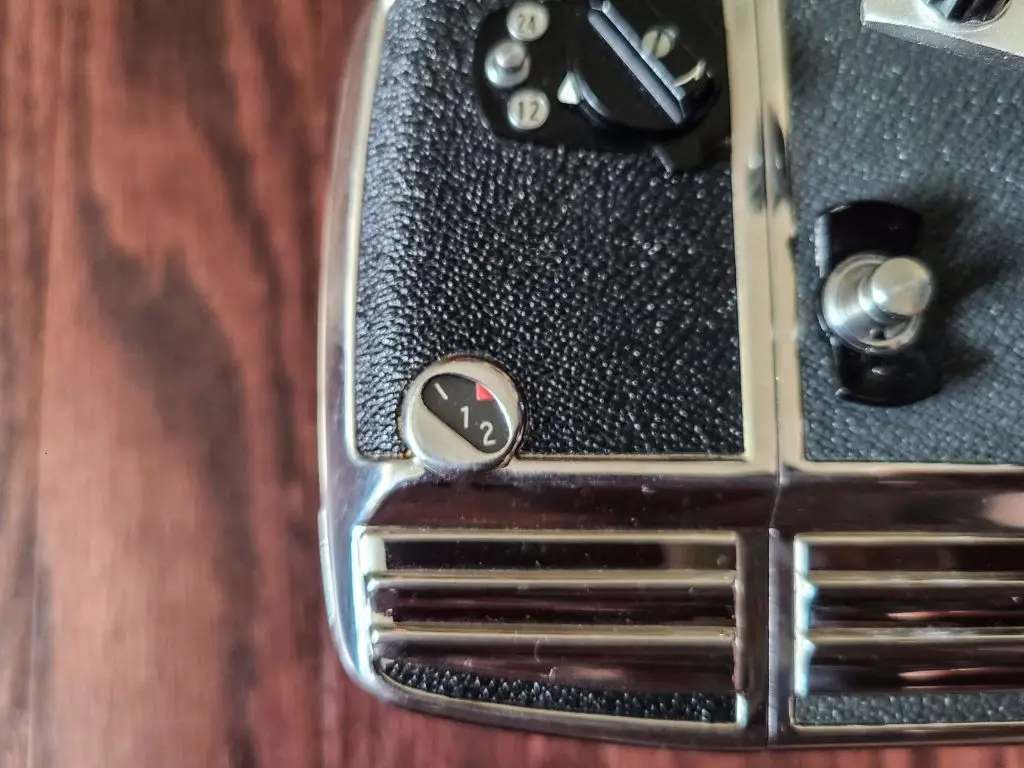
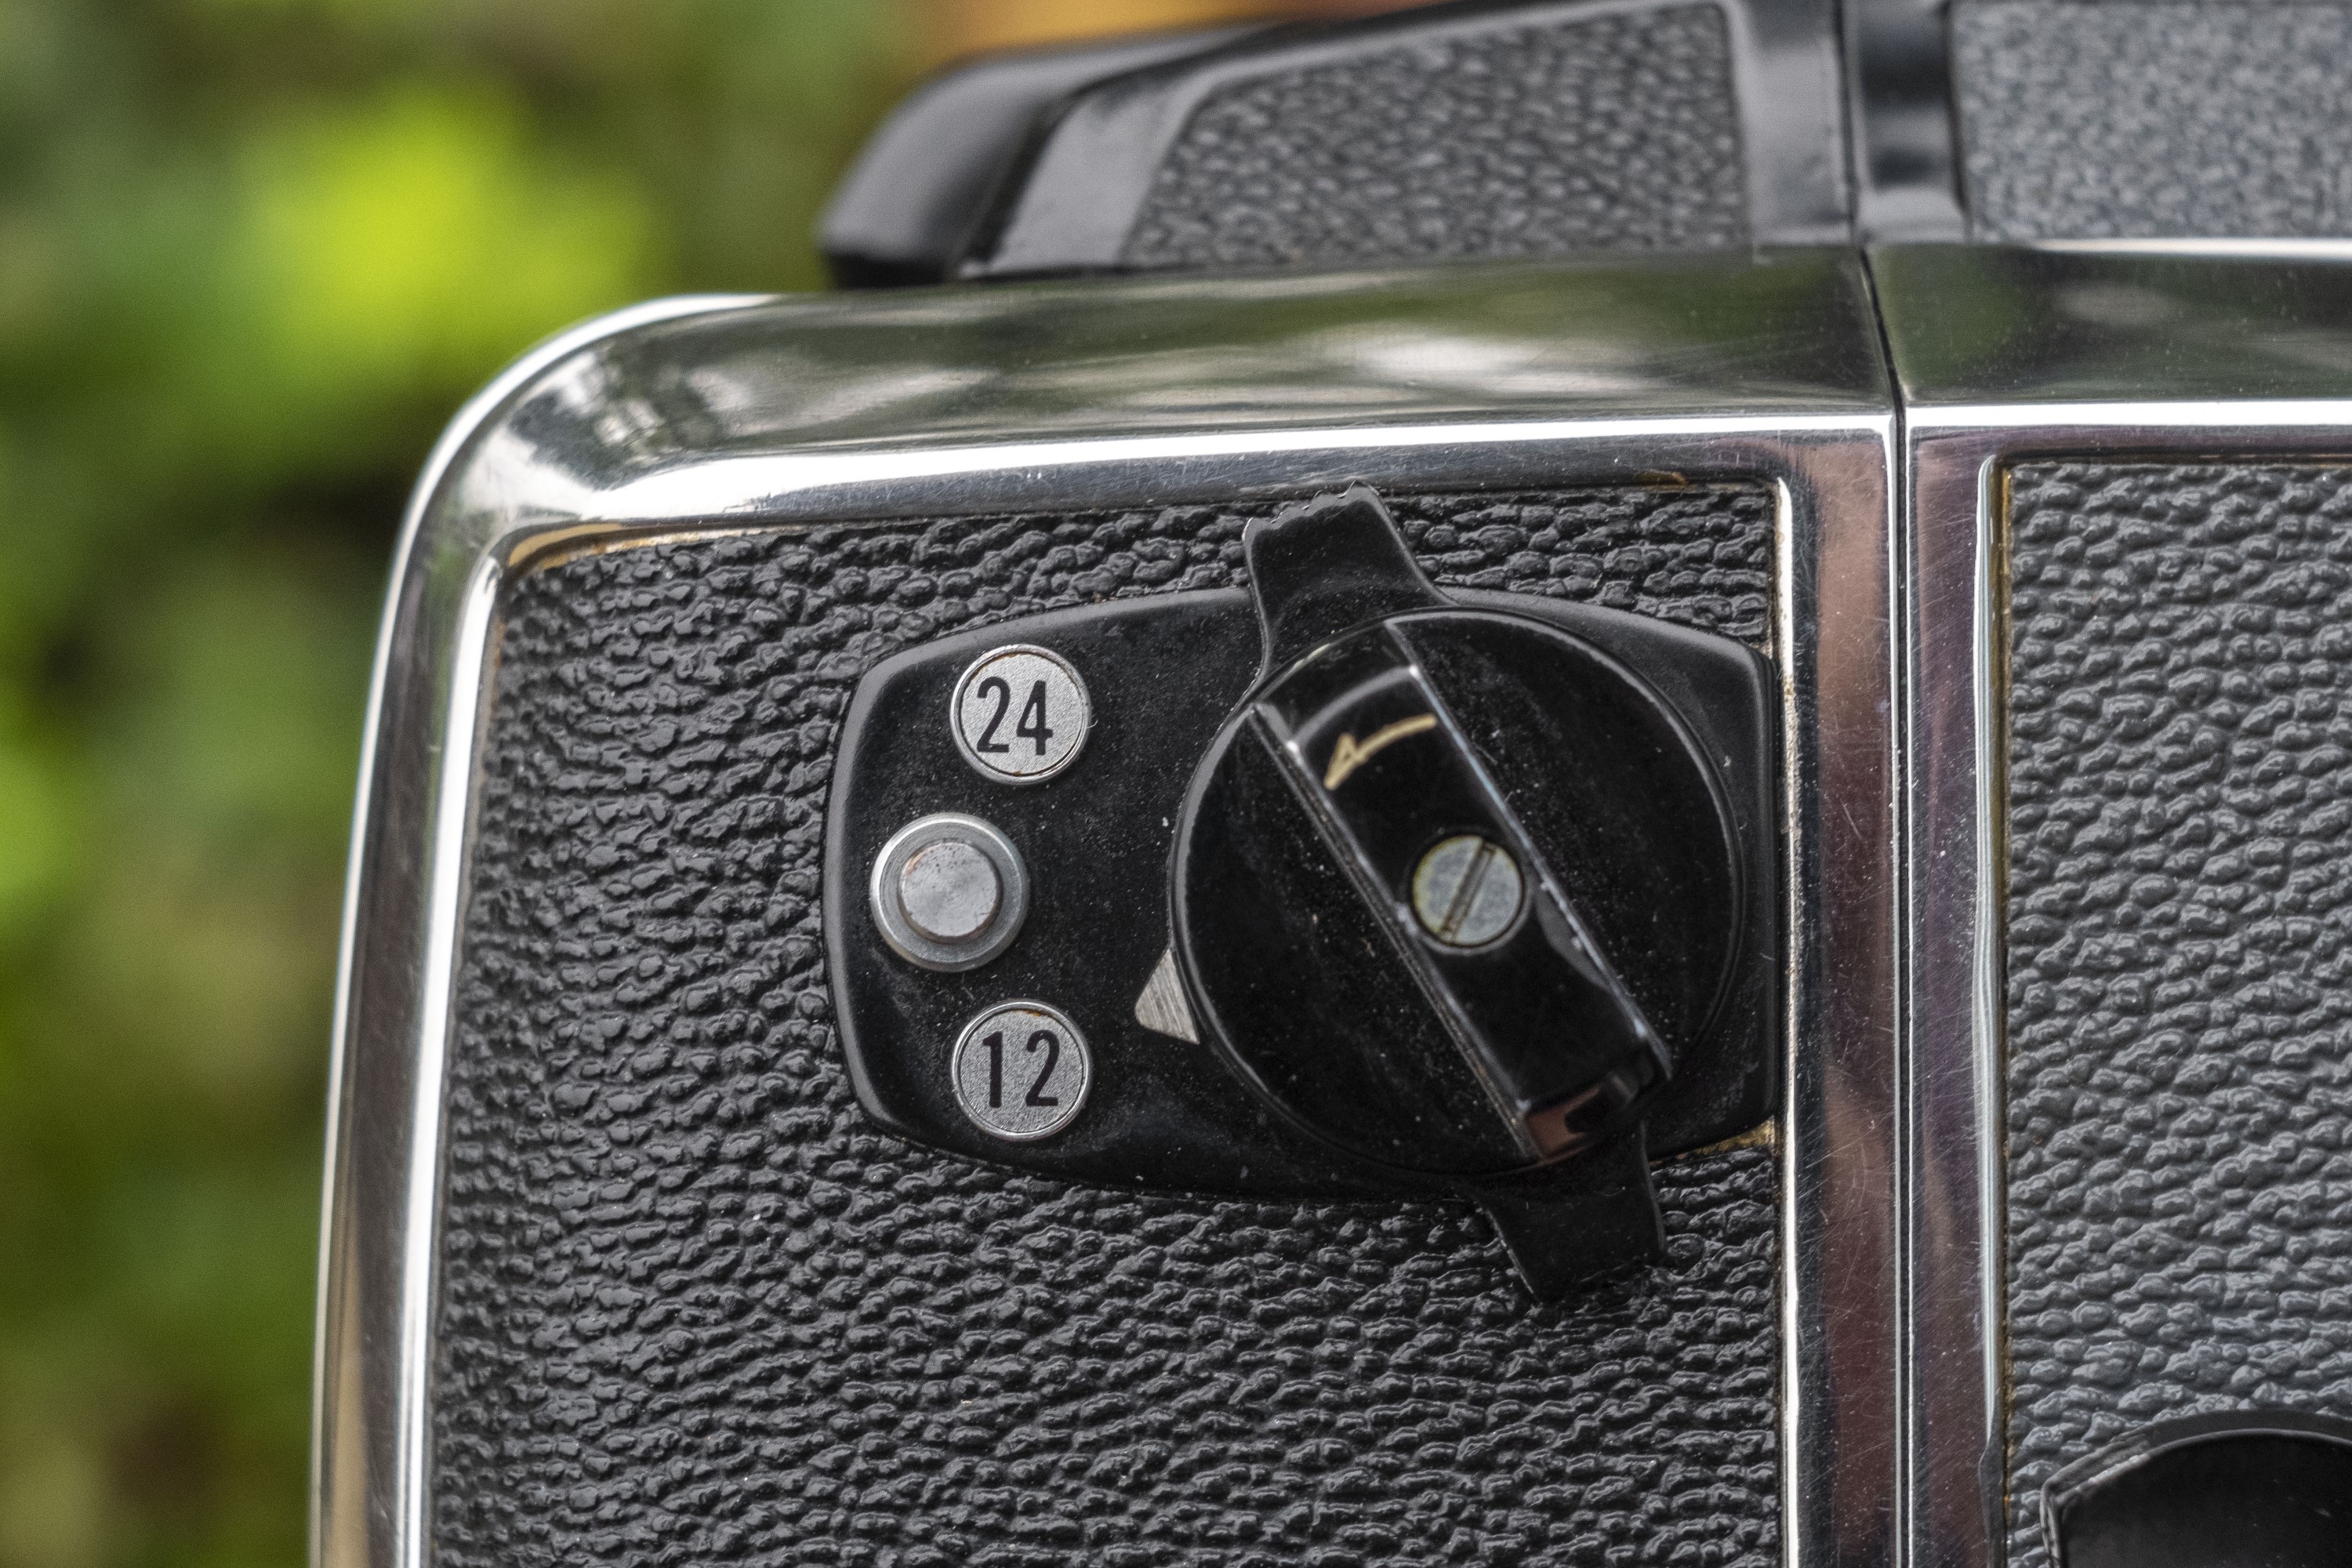
On the side of the magazine is the automatic resetting exposure counter and a switch for selecting between 12 or 24 exposures. Each magazine supports both 120 and 220 films. The reason for the switch is that with 220, the normal backing paper found on 120 film is eliminated behind the actual photographic film, reducing the thickness of the film plane. With the camera properly set to use 220 film, the pressure plate moves forward ever so slightly to take up the space normally occupied by the backing paper. This is more convenient than other roll film SLRs such as the Mamiya M645 which require a dedicated film holder for 220.
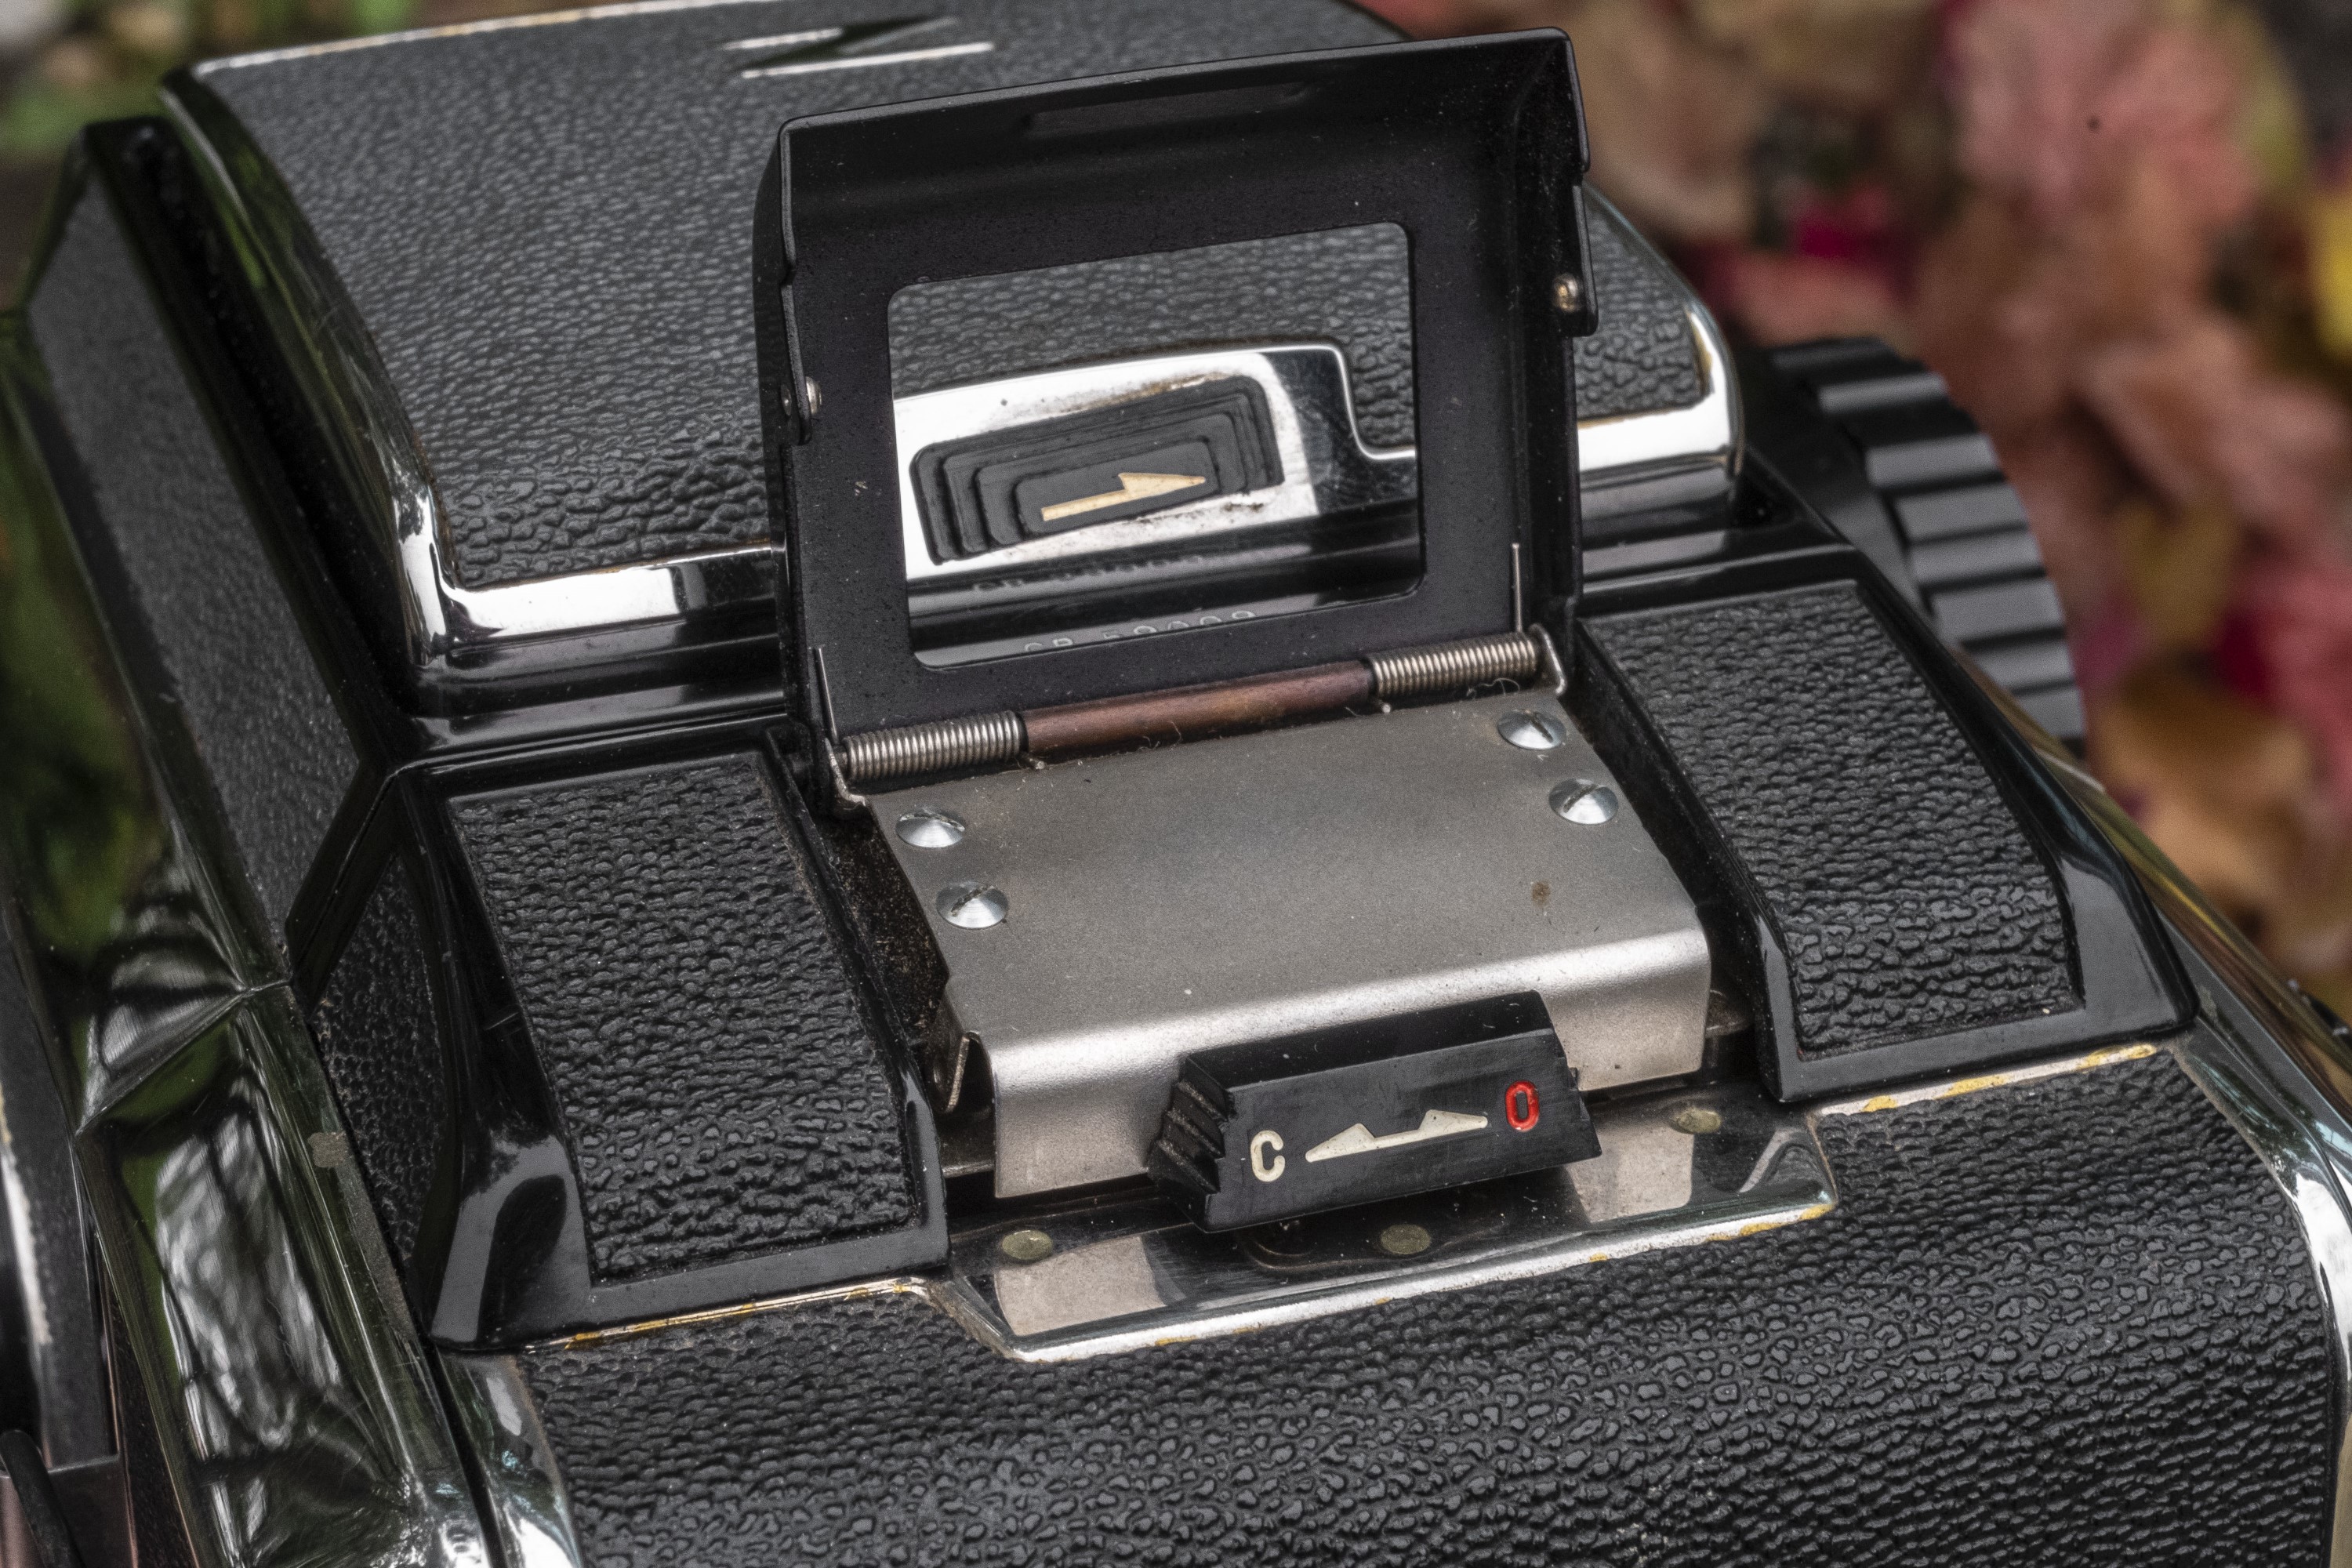
Loading film first requires lifting the film reminder frame on top of the camera to expose the film door release. Sliding it towards the red letter “O” opens the door. This can be done independent of whether the dark slide is in the camera or not.
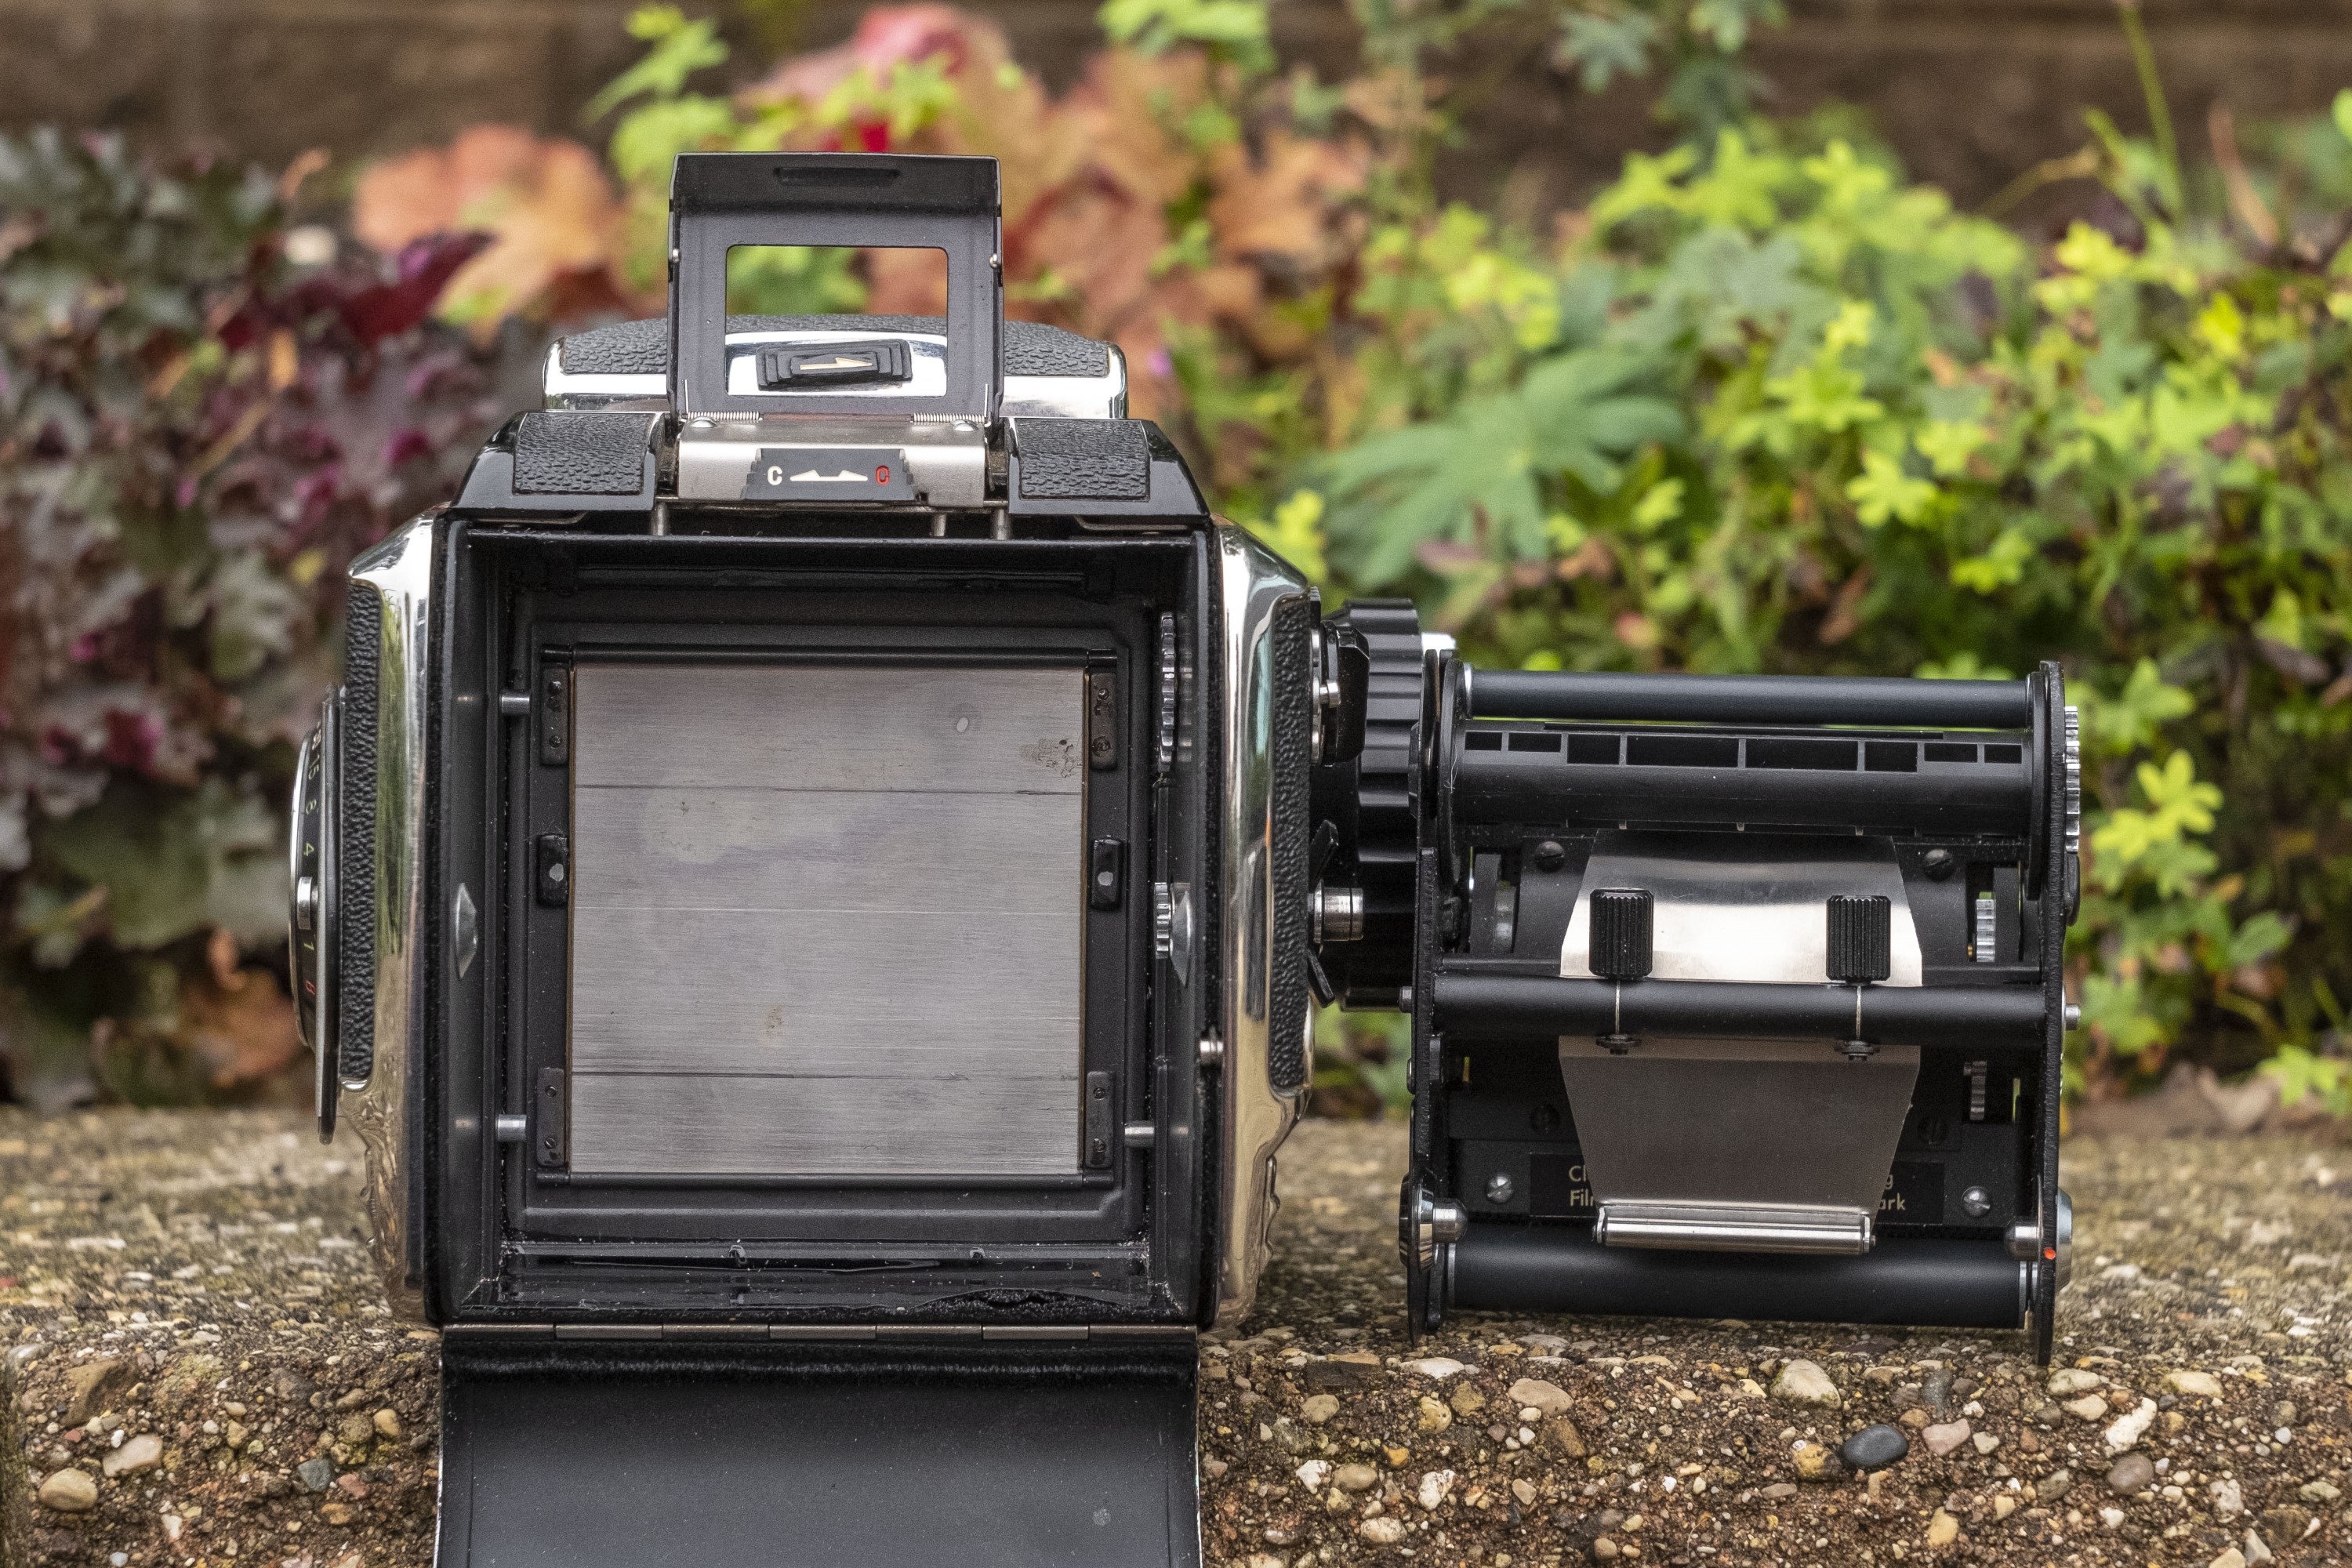
Once the bottom hinged door swings down, the film holder is exposed. You can remove it by squeezing together the two black prongs in the middle and pulling out. With the film holder out of the camera, you will either see the black cloth shutter curtain, or dark slide if it is installed.
Loading film isn’t difficult, but for the first time user of the Bronica S2, might require some instruction. I will cover loading a new roll of film later in this review, so for now, I’ll just move on.
One of the unique attributes to the Bronica S2 is in it’s lens mount. The lens mount contains the focusing helix which stays with the camera when removing lenses, allowing the lenses to be more compact than some other interchangeable lens cameras. In an effort to further minimize the overall size of the camera with a lens attached, the focusing lens mount attaches to each lens much farther forward than you would expect to see on other interchangeable lens cameras. This means that more of the lens is inside of the camera body than on other systems.
The focusing grip is large and very easy to turn with just your fingertips while supporting the camera from the bottom, or by gripping it with either of your hands, whichever is most comfortable for you.
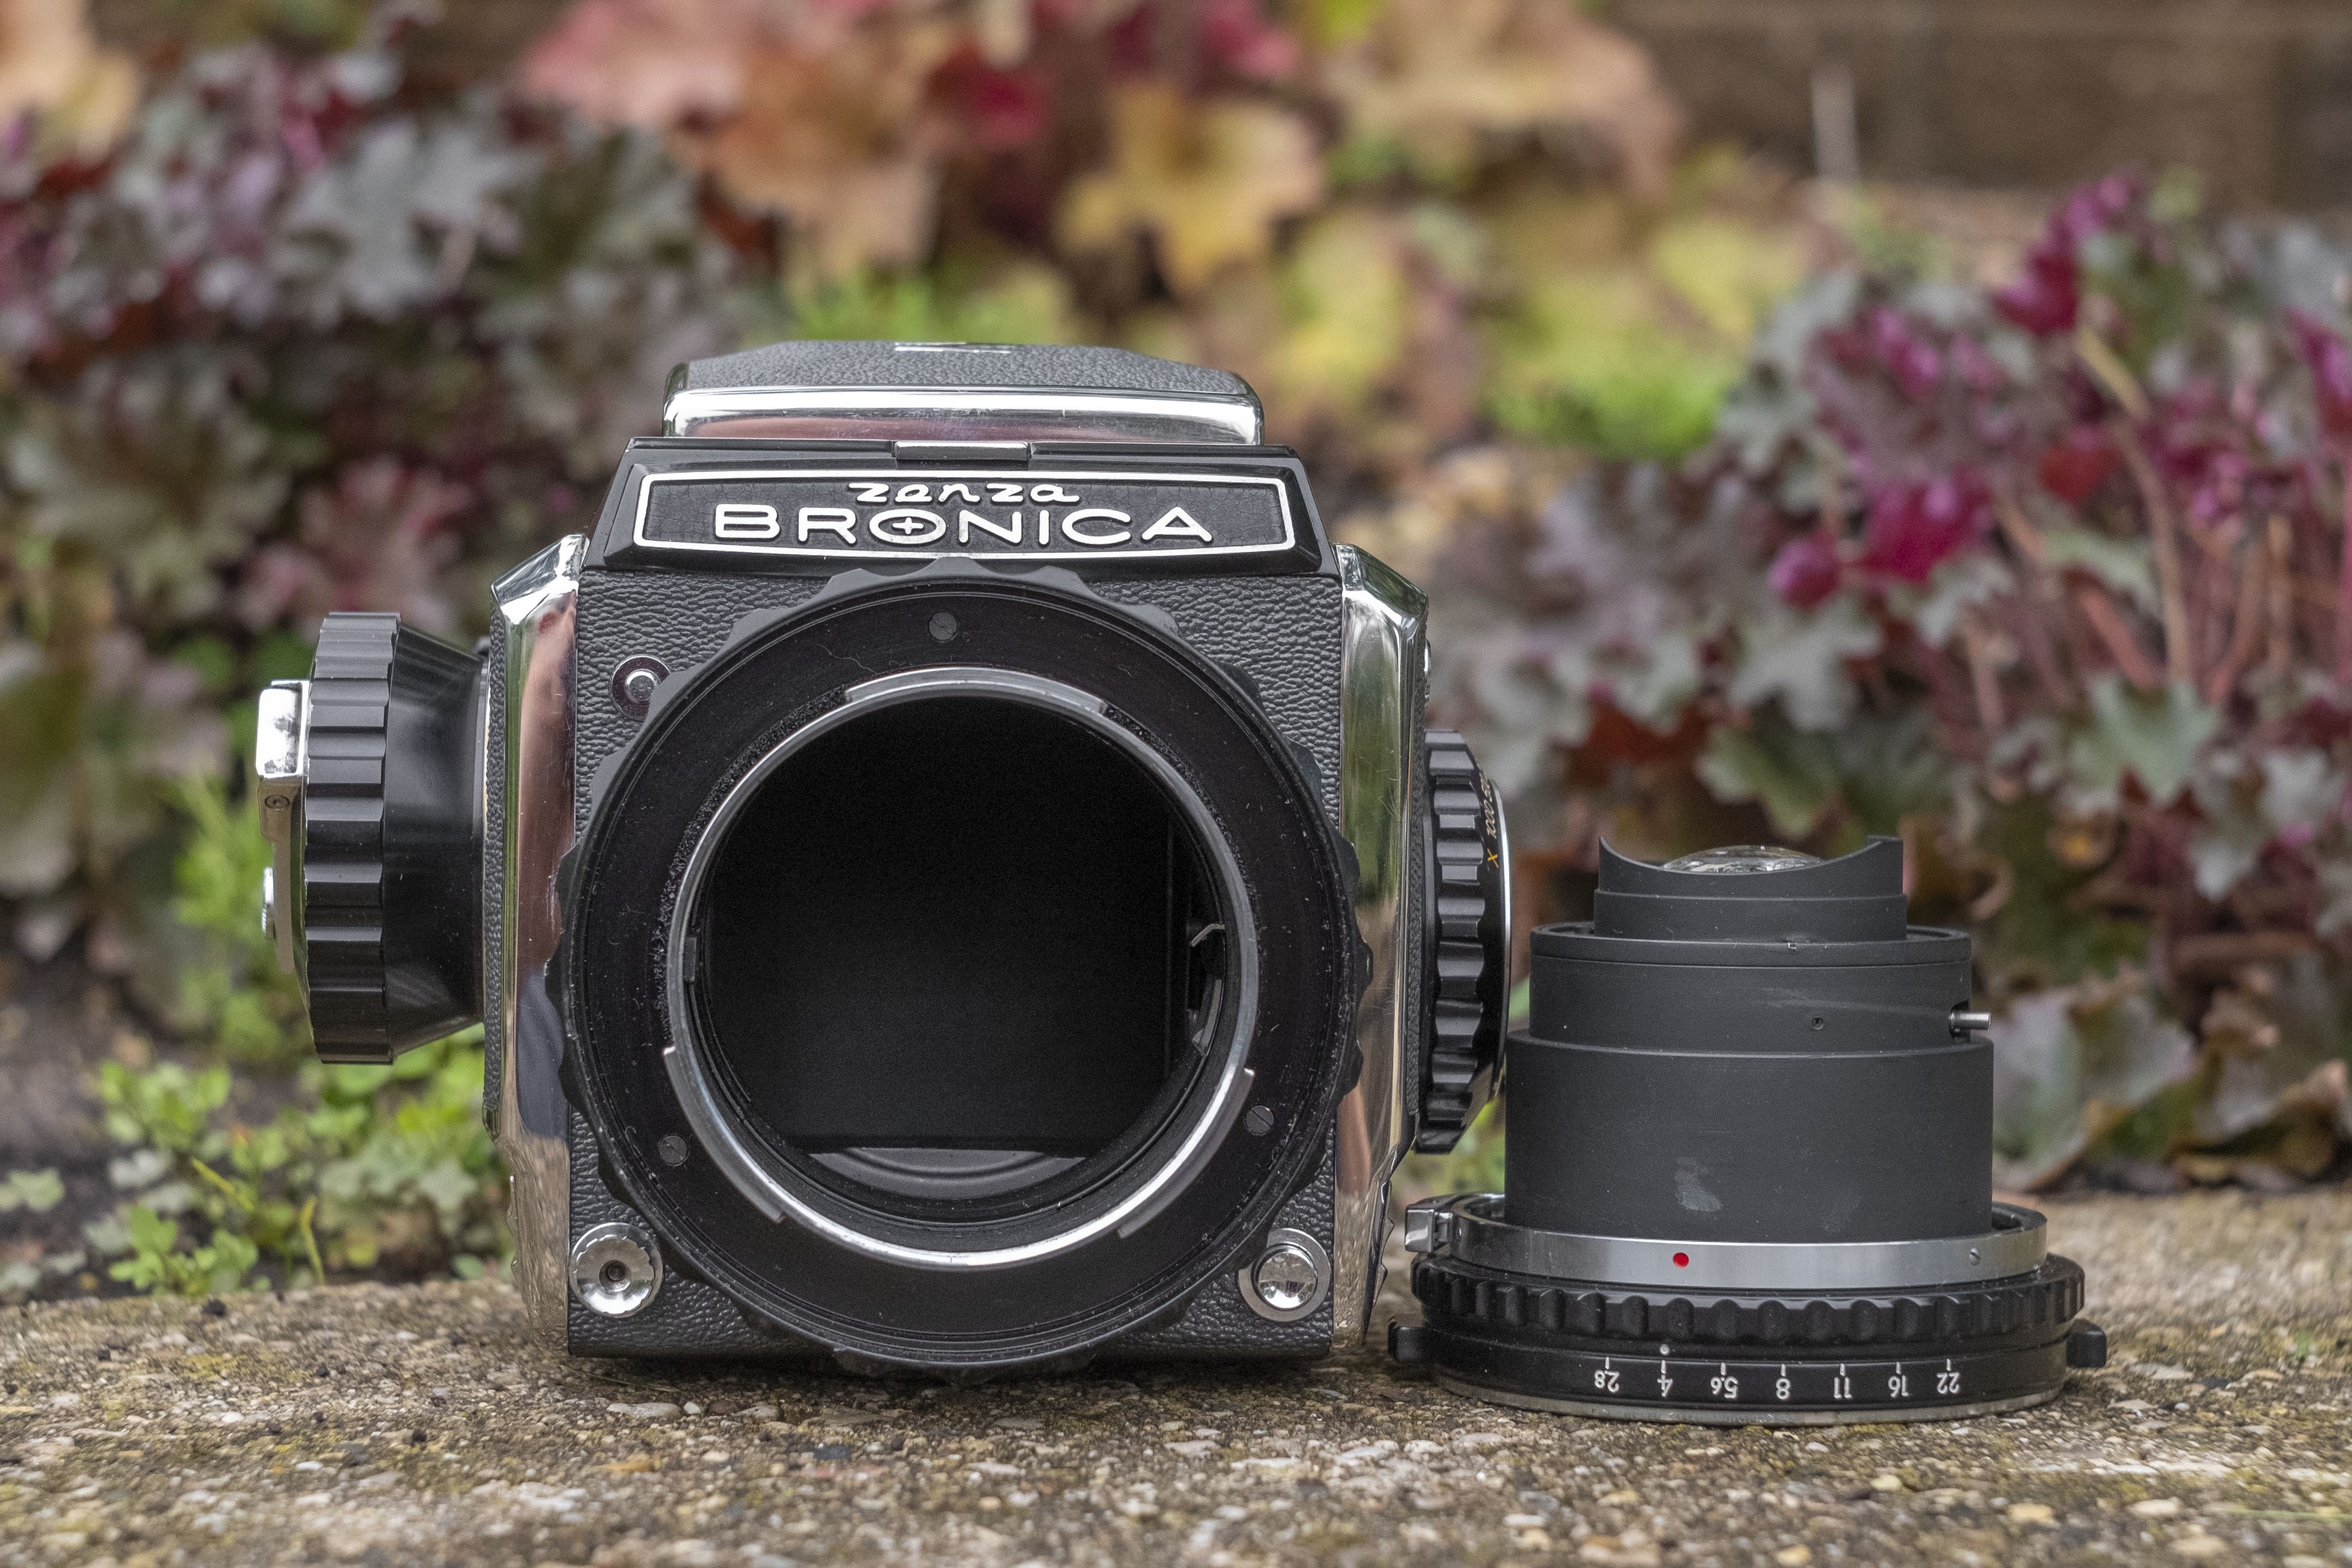
In addition to how the lens attaches to the focusing mount, the entire mount itself can be removed from the camera, revealing a helix-less bayonet. This is needed when attaching close-up bellows or lenses such as the 400mm telephoto which have their own focusing helix. In the previous image, only the black ring with f/stops on it is the lens. The larger ring with the depth of field scale is the focusing helix.

To remove just the lens, you must first focus the helix to it’s minimum distance, which pushes the lens out from the camera body. With the lens extended, you will see one red dot on the inner chrome lip of the lens. Below the red dot is a chrome clamp that acts as a lens release. Simply press in on the clamp while turning the lens counterclockwise and it will come off. In the image to the right, the lens has already been released from the mount to reveal a second red dot, which is used to align the lens when reattaching it. With the lens securely attached, you will not be able to see both red dots at the same time. Re attaching the lens is a matter of lining up the two red dots like in the previous image and then twisting the lens clockwise until it clicks.
To remove the focusing helix, press in on the small chrome button near the 10 o’clock position of the body and rotate the entire focusing helix counterclockwise. You can independently separate the lens from the focusing helix attached and not attached to the camera body, although it’s probably a good idea to keep them together.
Pro Tip from Perry Ge: In a previous discussion on the Classic Lenses Podcast, host Perry Ge discussed a “hack” with the Bronica S2’s helicoid mount, which after removing the lens, exposes a 58mm threaded mount that is not normally used for most lenses. With a couple of different adapters, Perry has found that you can adapt other 35mm camera lenses to the Bronica and still achieve infinity focus. Check out Perry’s instructions, with a list of parts needed to do this and some sample pics.
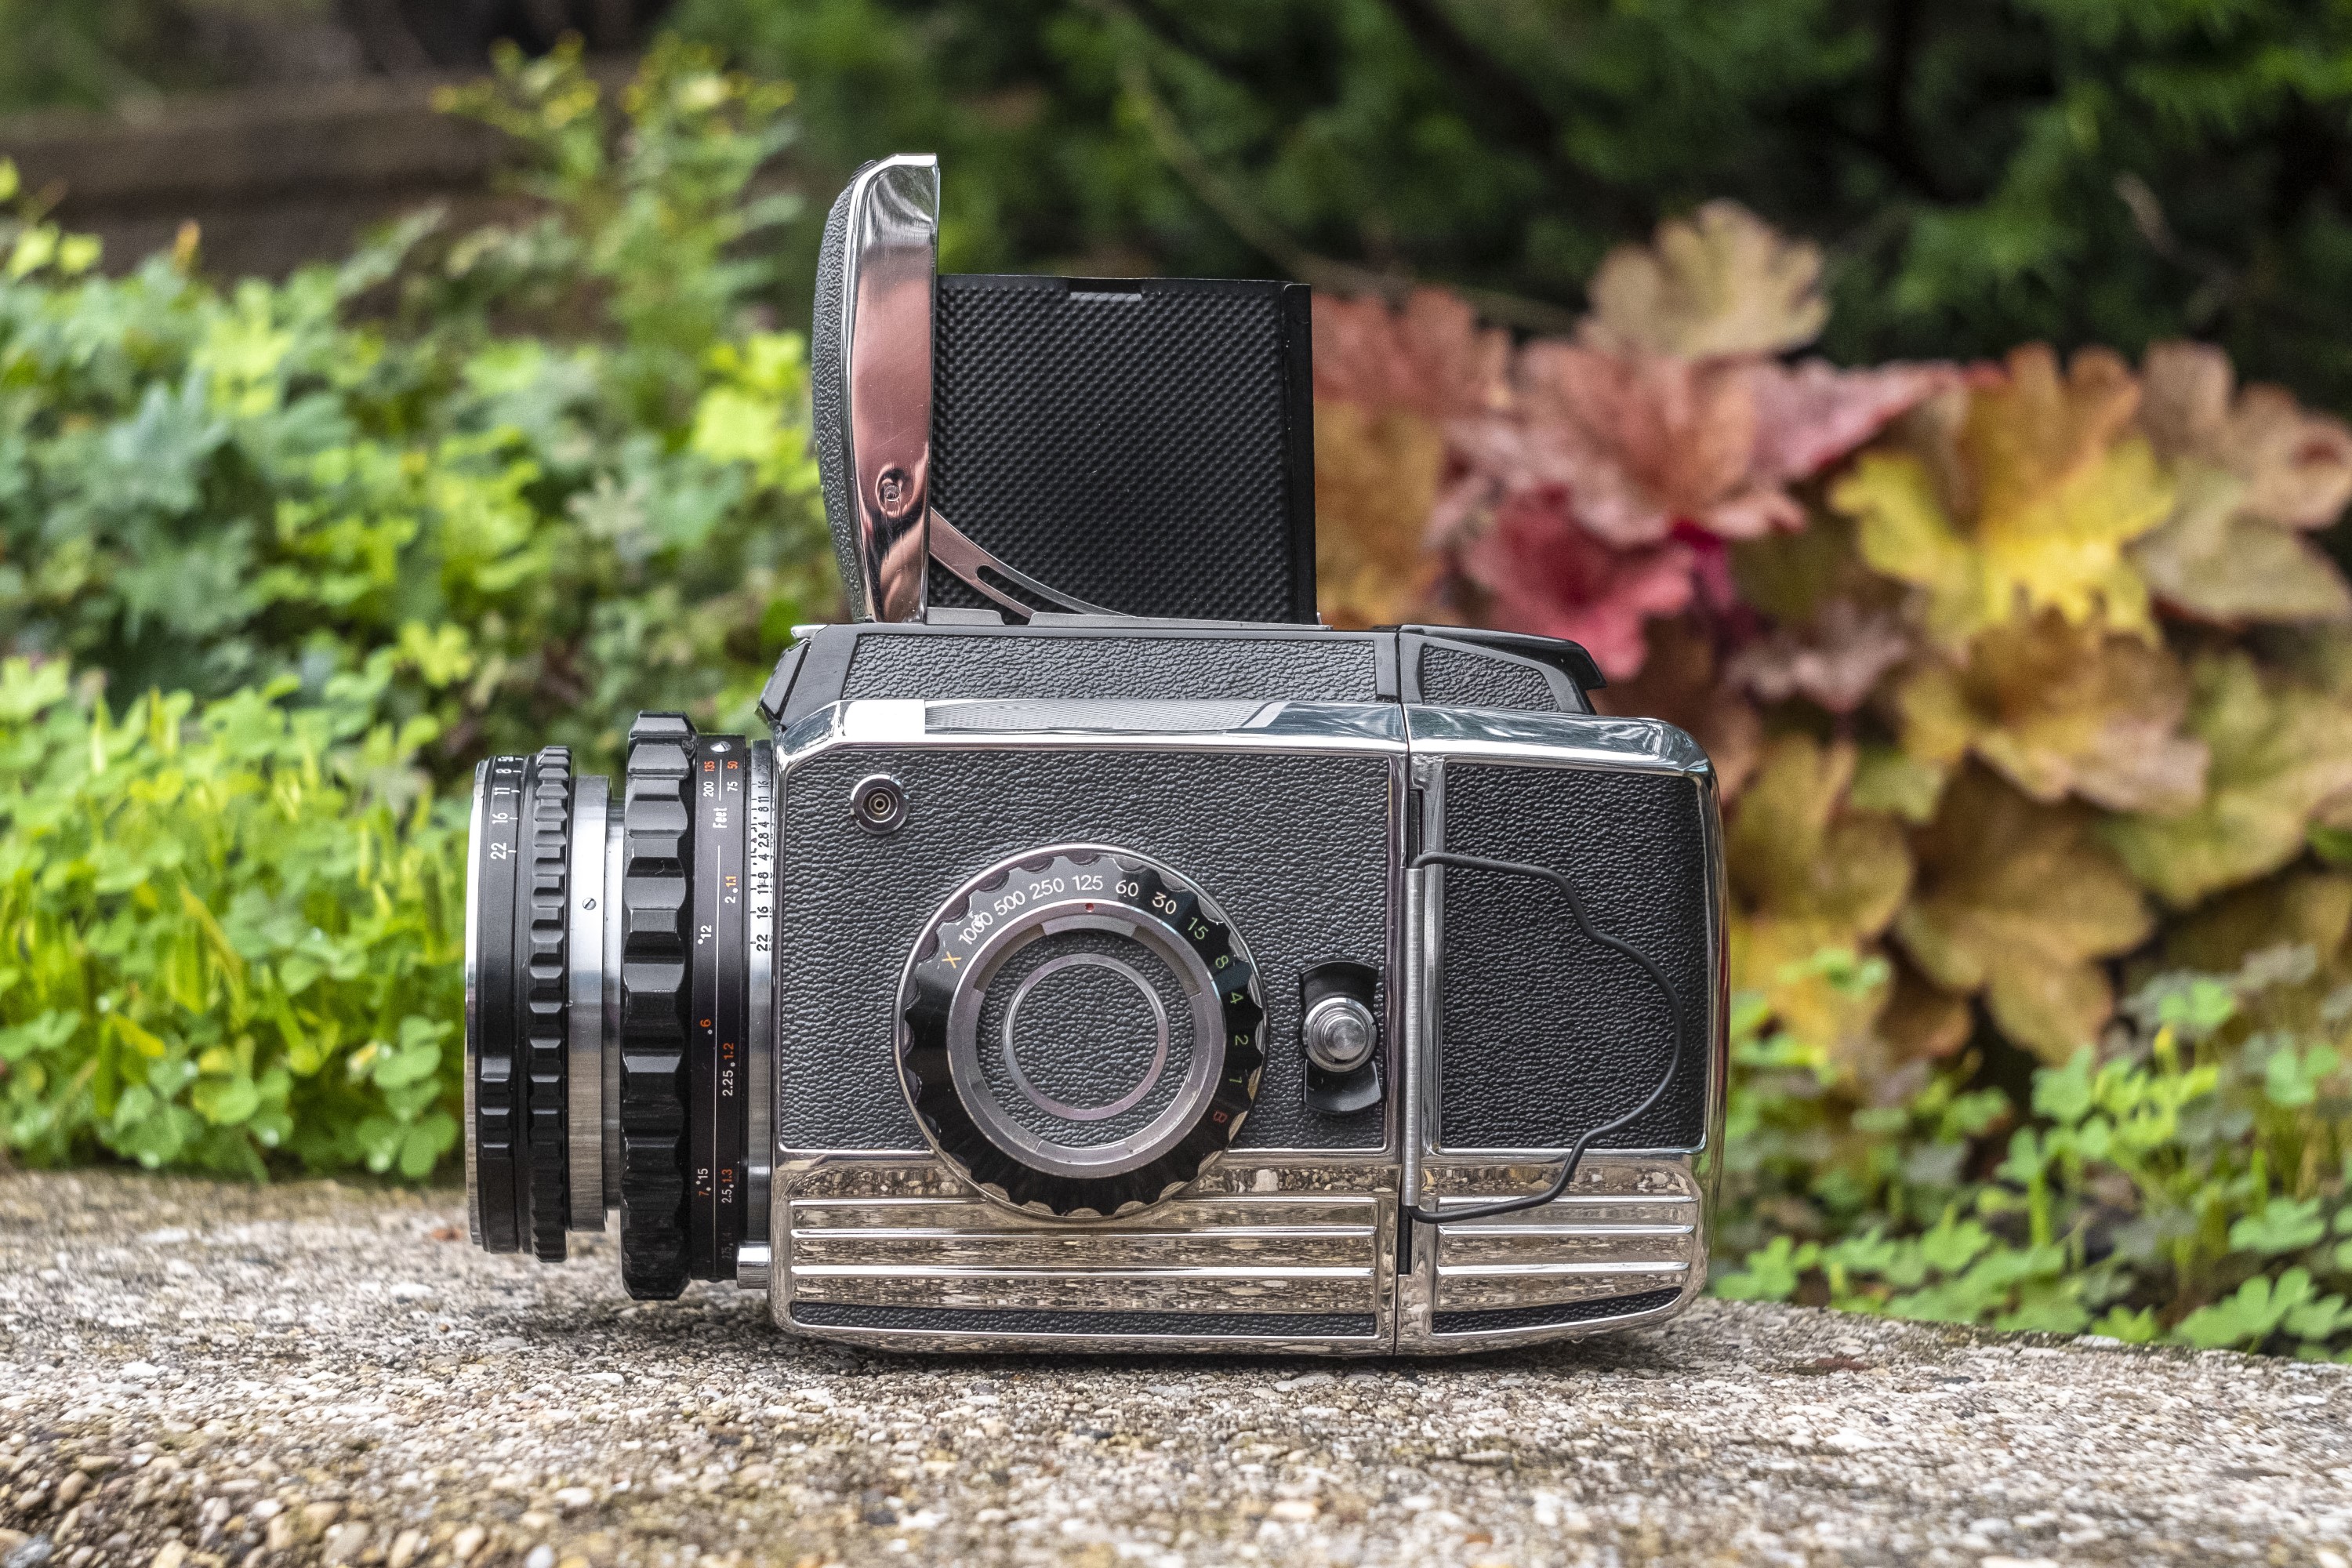
In addition to interchangeable lenses, the Bronica S2 can also swap viewfinders too. To remove the hood for the waist level viewfinder, lift up on the chrome tab above the Zenza Bronica nameplate while simultaneously lifting on the hood and it will come off. Installing a new viewfinder requires you to align two metal tabs on the rear edge of the viewfinder while firmly pressing down on the front to latch it into place.
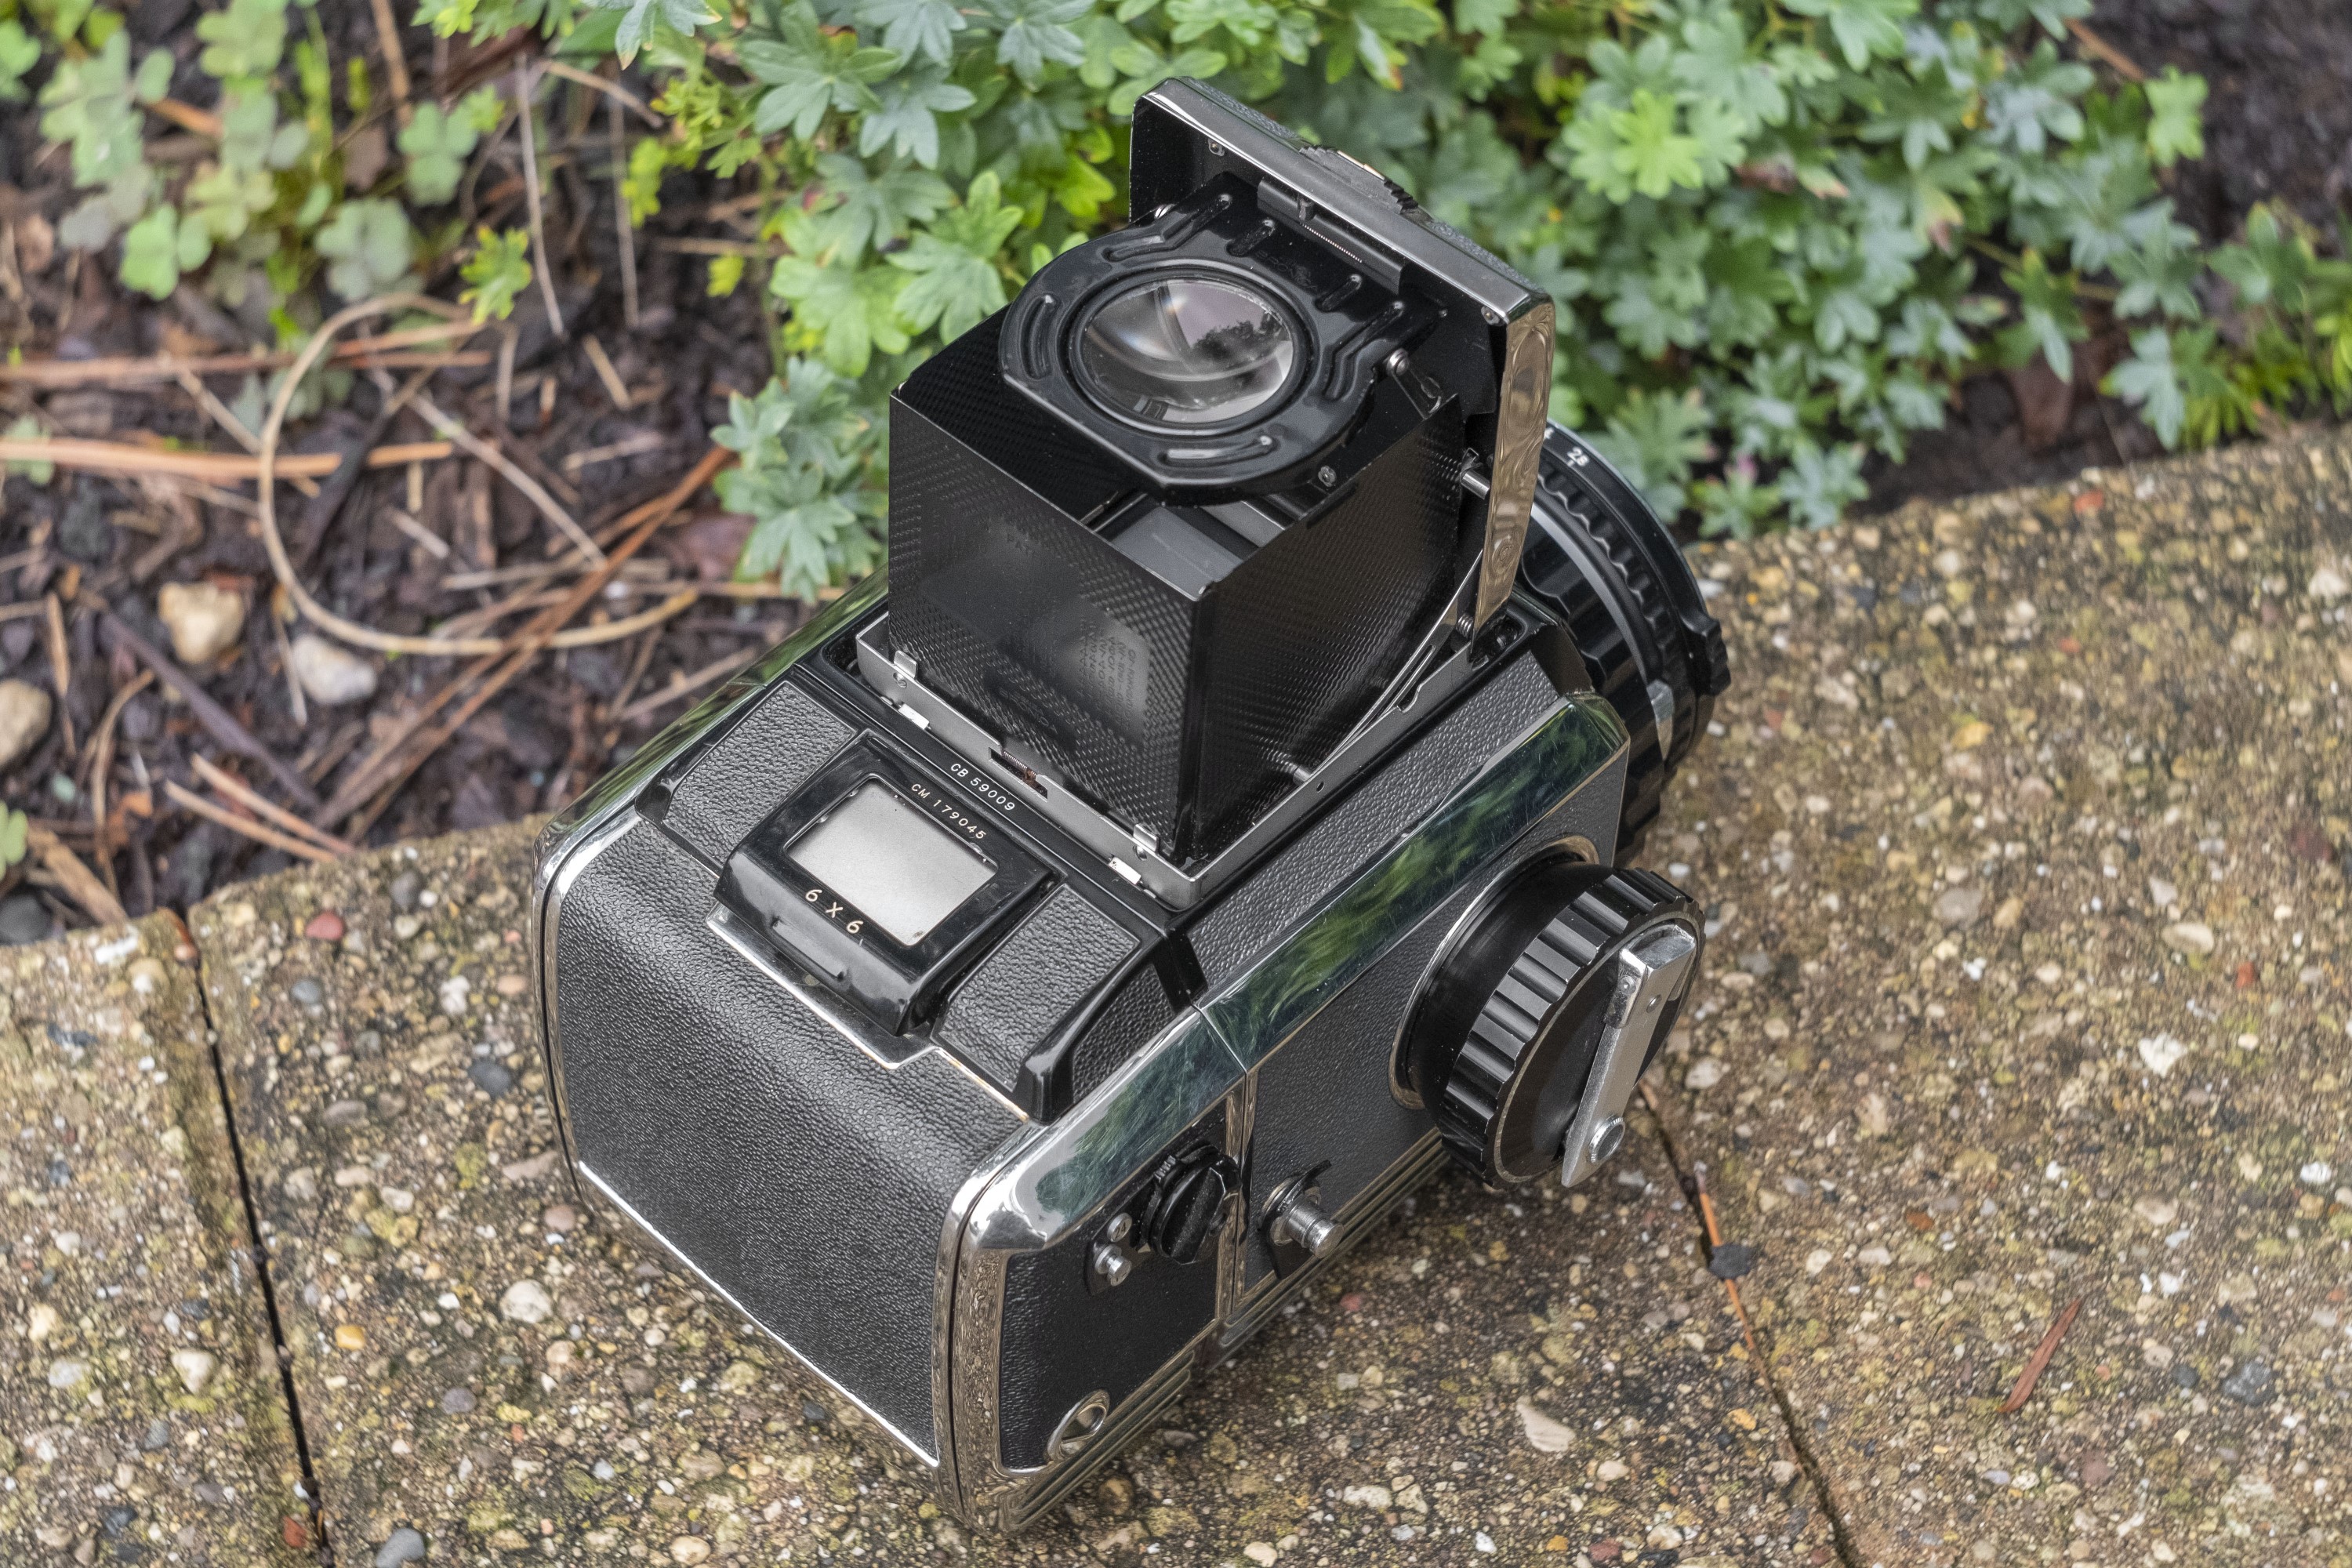
I did not have access to any other viewfinder other than the waist level hood, but from experience, I find that these 6×6 SLRs work best at waist level. The ergonomics and comfort of holding a three-plus pound metal cube to your face in order to see through an eye level viewfinder is not pleasant.
As is the case with most cameras with waist level finders, there is a folding magnifying glass that can be swung into position for precision focus work. The magnifying glass is tightly hidden under the front lid, but getting it out is just a matter of gently squeezing on the front and back of the hood, which causes it to pop into position. To fold it back down, you just press it back into place and it stays there.
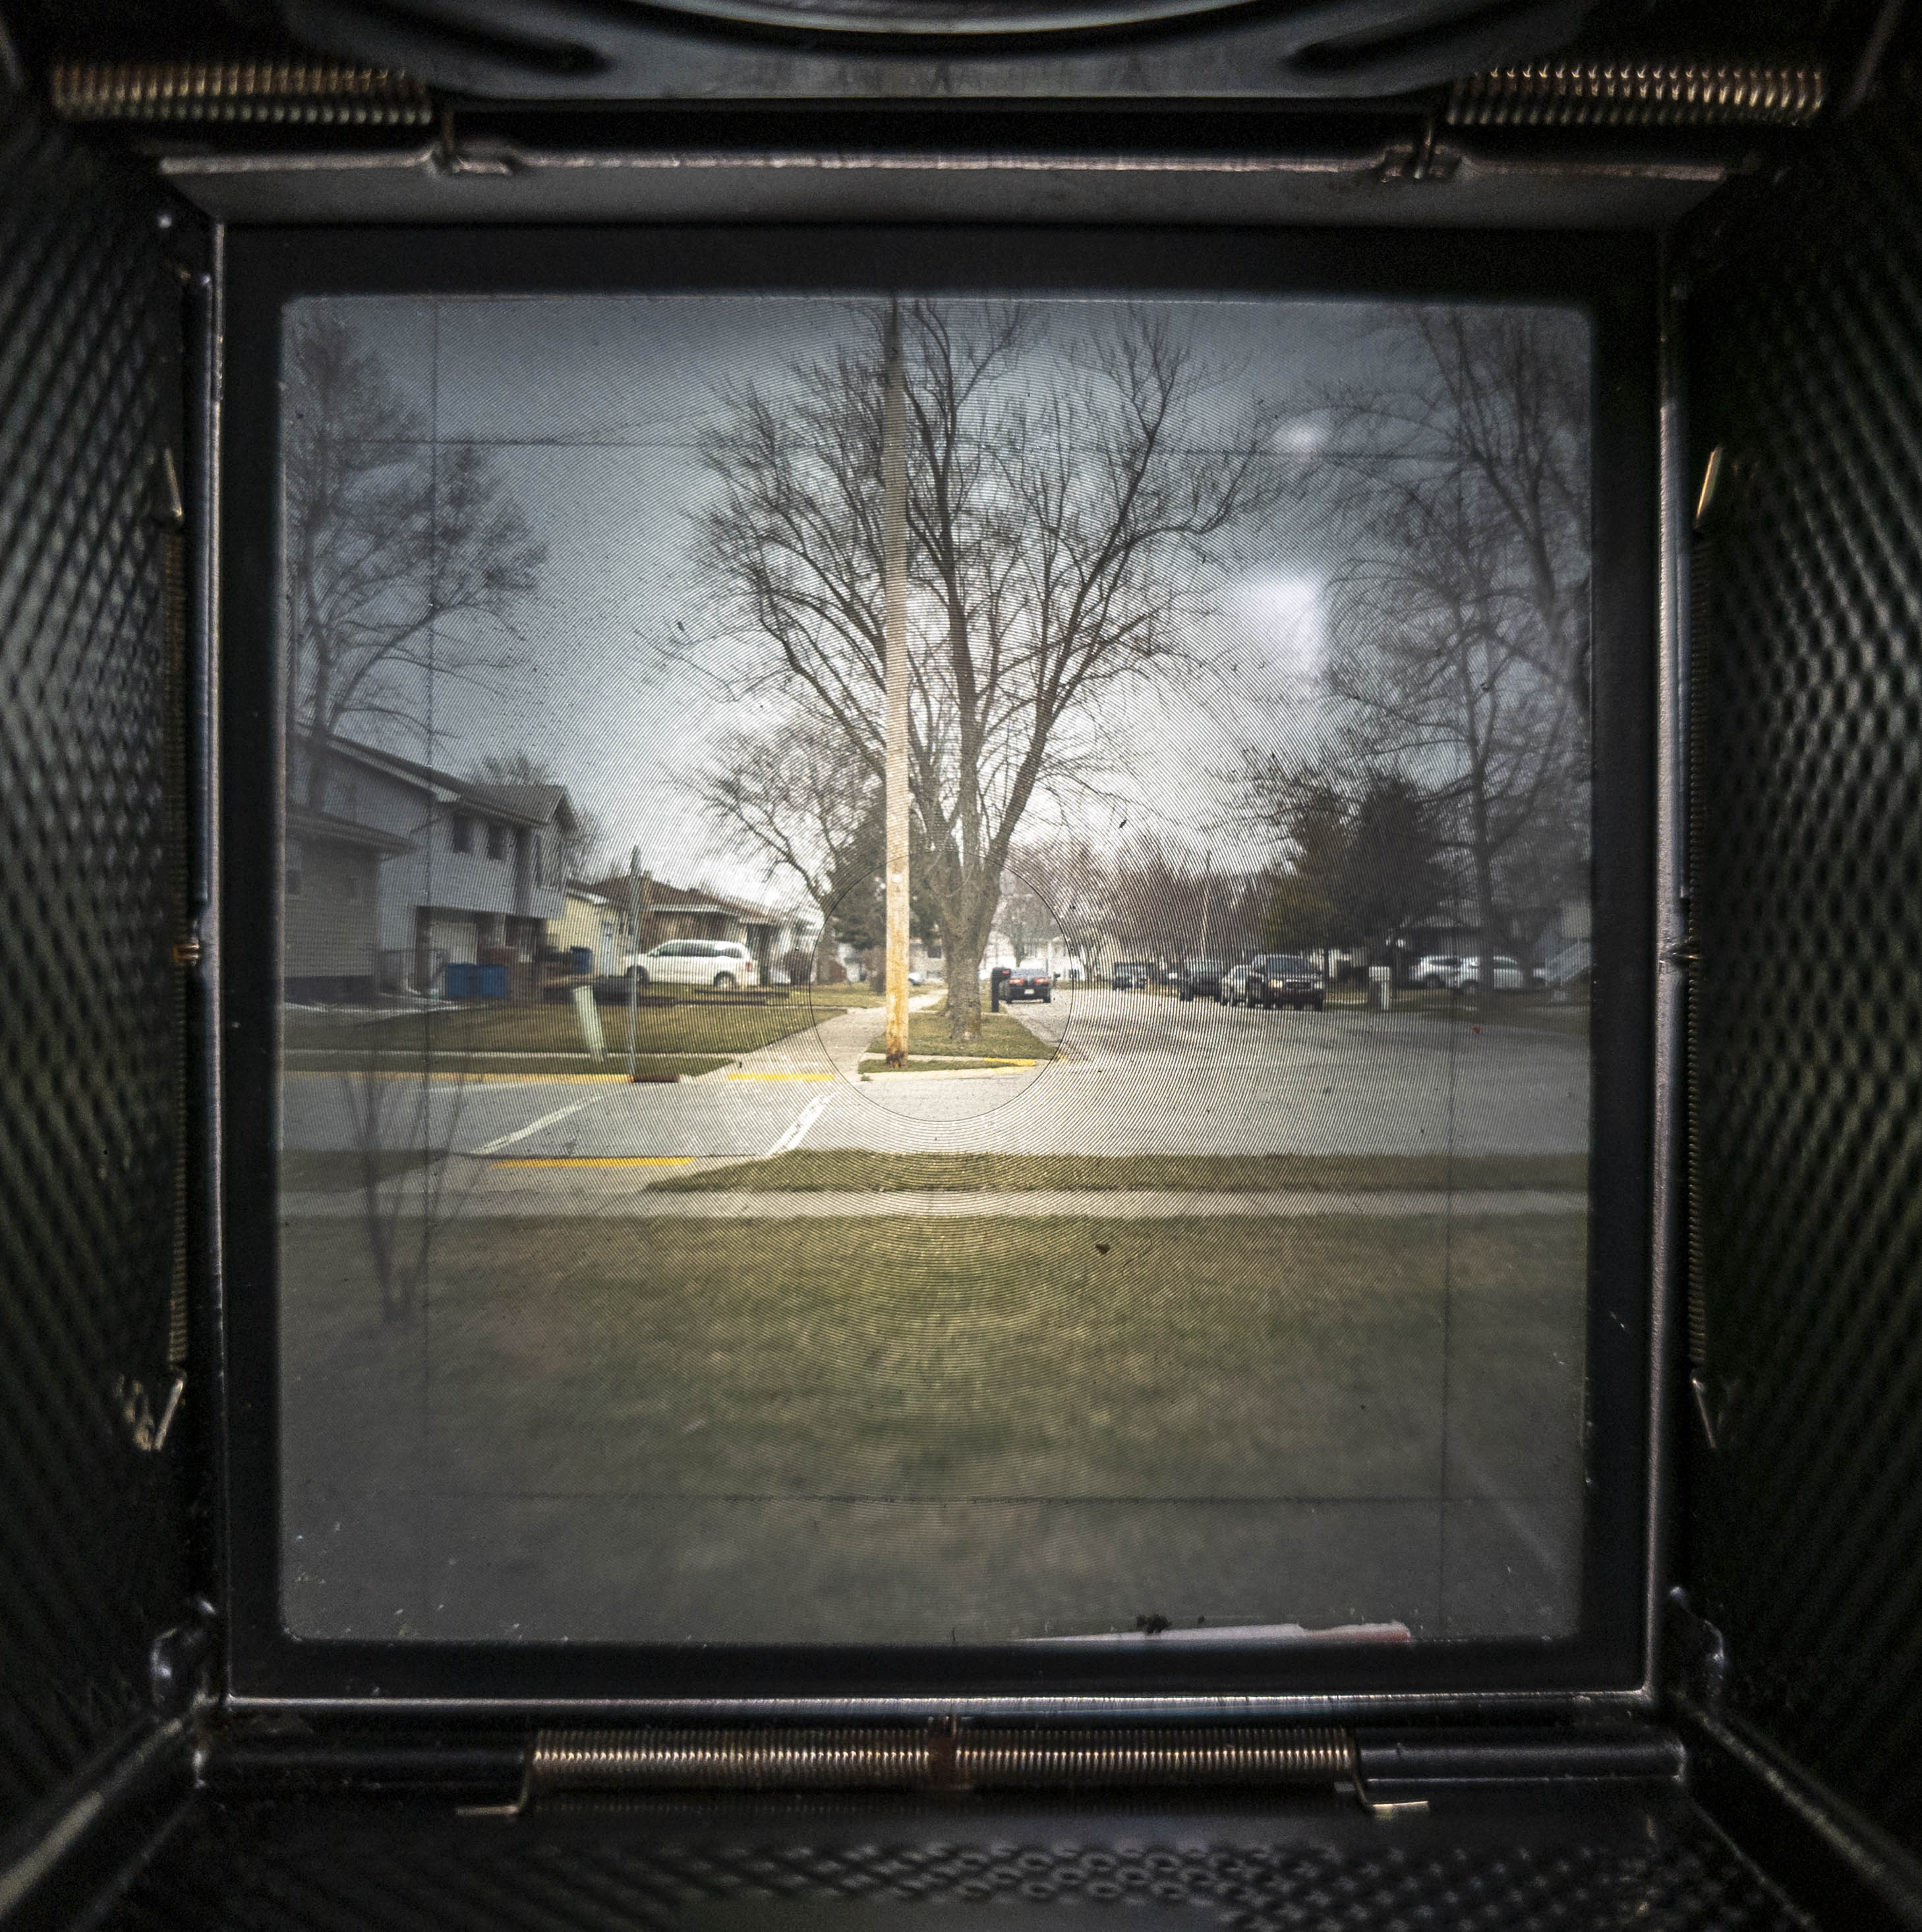
The focusing screen is a frosted ground glass with a Fresnel pattern radiating out of a central ground glass circle. Being an SLR, there is no need for parallax correction like on a TLR in which the image captured on film will not always match what you see in the viewfinder. As with any SLR, what you see is what you’ll get. Brightness on the viewing screen is very good, but not as good as later SLR or TLRs with laser etched focusing screens. In bright light, you can clearly see the image across the entire frame, but in low light, some vignetting does appear. Other than the image, there is no other information to be seen through the viewfinder.
Handling the Bronica is much like other medium format SLRs by Hasselblad, Mamiya, and Rollei. Although many of these models had optional pentaprism viewfinders, I much prefer these cameras with waist level finders as I feel that holding a medium format SLR to your eye is like awkwardly holding a square bowling ball up to your face.
Composing your image is exactly the same as with a TLR, except that there never any parallax error and you can preview depth of field, although in some cases, this comes at the expense of brightness.
For those wanting the benefit in image quality offered by medium format film, but with the convenience of a medium format SLR system with interchangeable lenses, backs, and viewfinders, the Bronica S2 is a heck of a great option. With prices then and now cheaper than similar Hasselblads, they are often a good introduction to the format.
But with anything, sometimes you get what you pay for, and with the Bronica’s reputation as an inexpensive alternative to more expensive models, how does it hold up in use? Keep reading!
Loading Film
The Bronica S2 loads film using a removable magazine back, like many other medium format SLRs. The film compartment is made up of two parts, the magazine itself and a roll film holder within. The loading process can be done both with the magazine attached to the camera or removed. The process is exactly the same with the only difference being you must first insert the dark slide into the camera before you can remove the back.
If you’ve ever changed film in a medium format SLR by Hasselblad, Mamiya, or any other similar designs, there shouldn’t be any surprises with the Bronica, but for the first timer, here are step by step instructions.
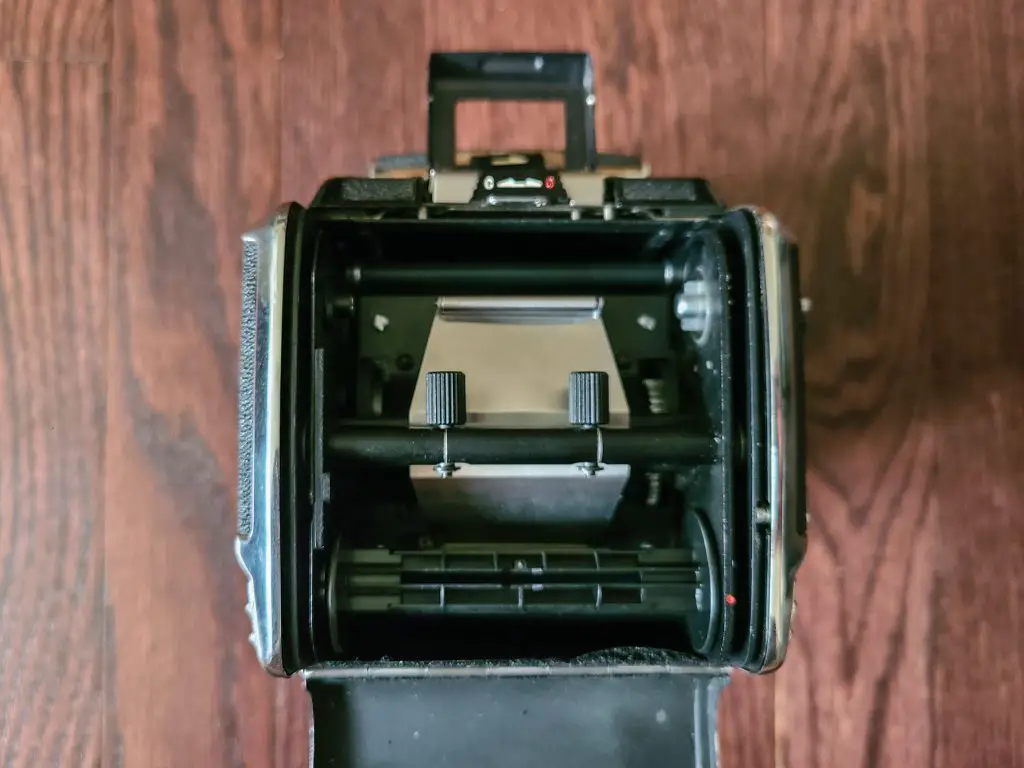
The first step requires you to open the back and remove the film holder from the magazine. You cannot load film into the camera without first removing the film holder. This is done by flipping up the film box frame holder to reveal the Open/Close lock. Slide the lock to Open and the door will pop open, revealing the film holder.
Across the middle of the film holder is a bar with two plastic posts sticking up, which when squeezed together, allows you to pull the film holder out of the magazine.
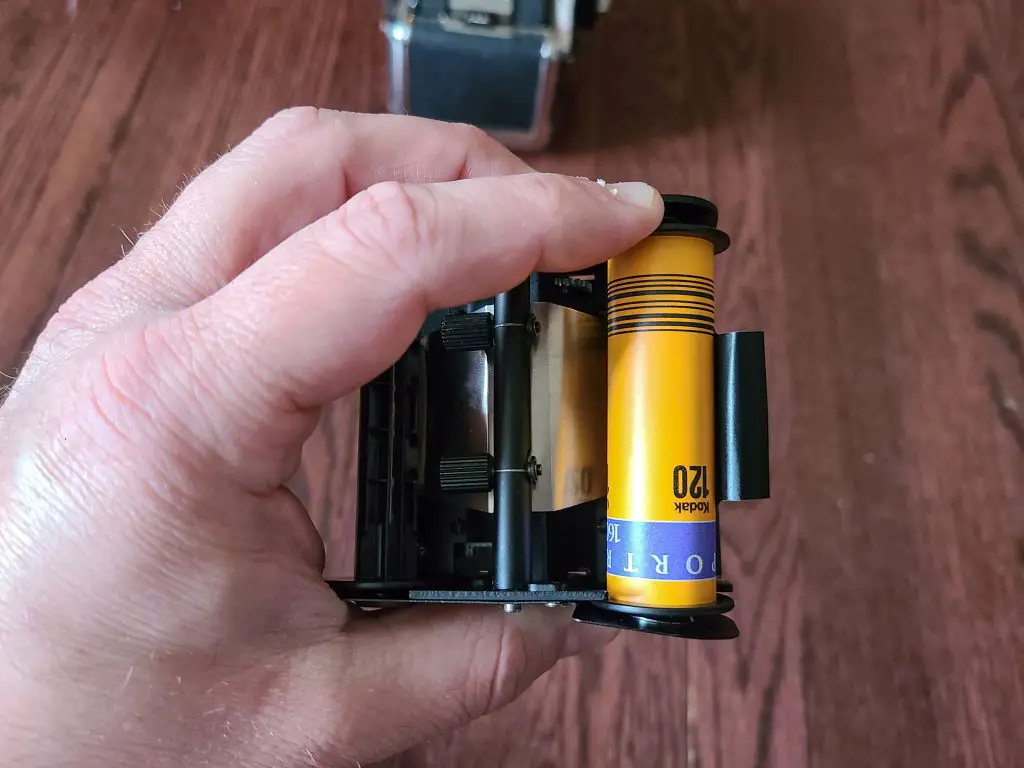
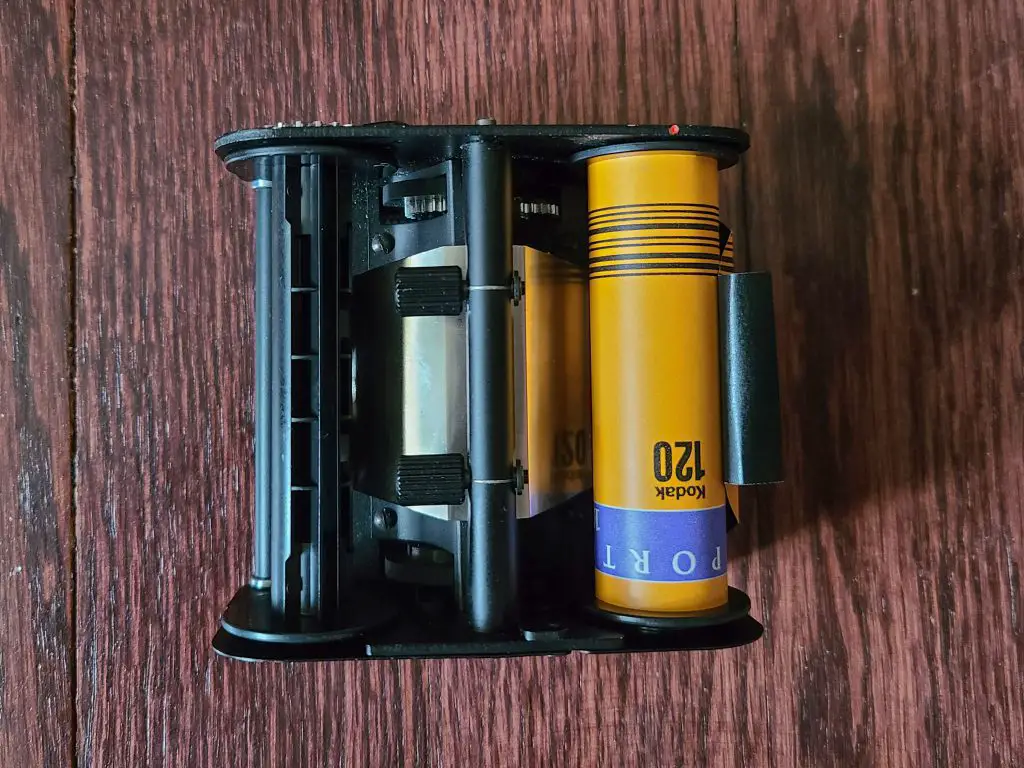
In most cases, when you pull the film holder out of the magazine, there will be an empty spool on side away from the two prongs. Move it over to the other side of the magazine nearest the prongs by pressing down on the spool to release it and do the same thing on the other side to stick it in. Insert a fresh roll of film into the now empty side once again by pressing down on the clip and sliding it in. In the middle image of the gallery above, a fresh roll of film is on the supply side and the empty spool on the take up side.
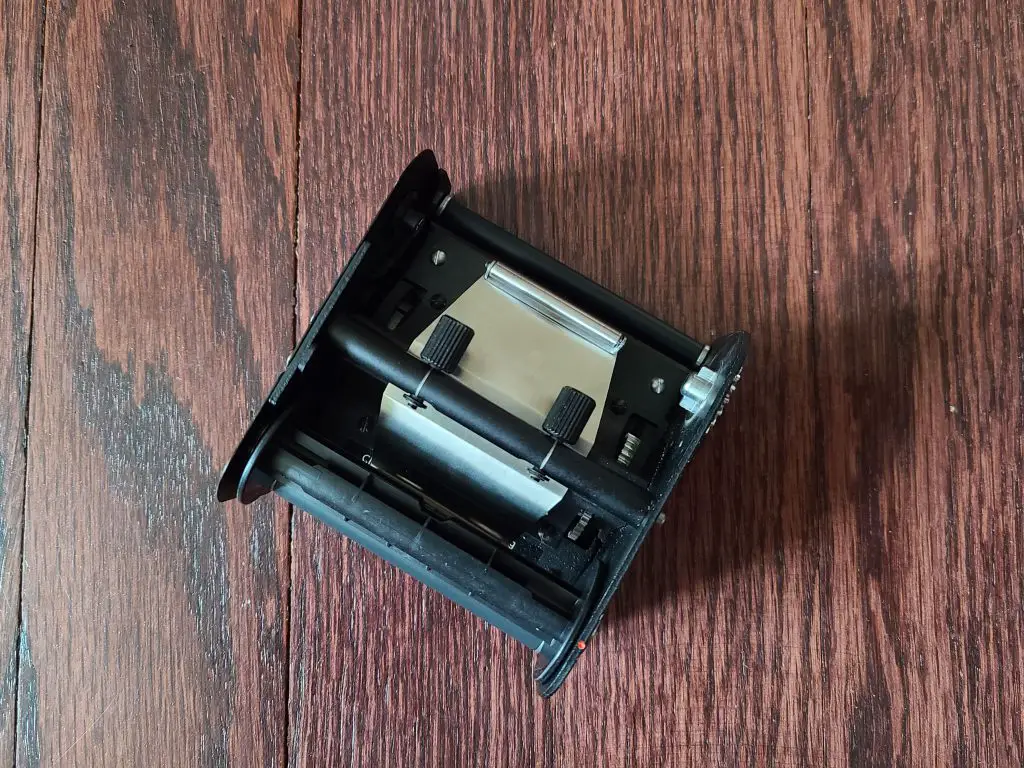
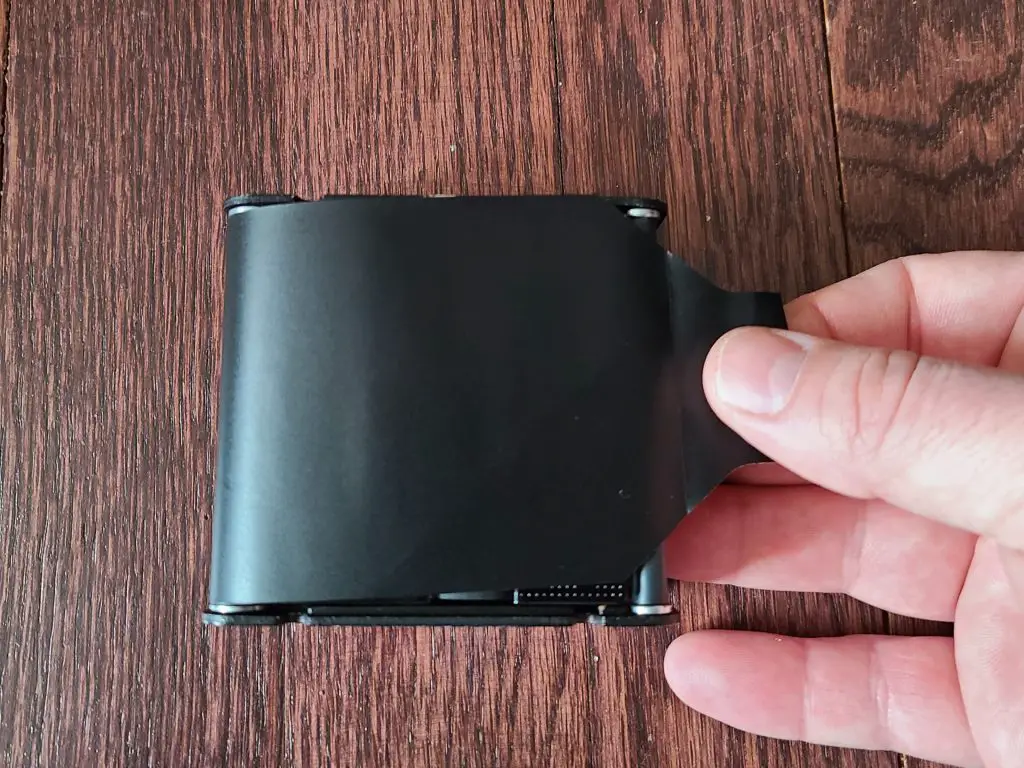
Pay attention to the orientation of the new roll of film as the backing paper must roll out with the black side facing away from the film pressure plate like in the third image. If when rolling the paper across the pressure plate, you can see the ink side, you have it backwards and you must stop and reverse the new roll of film.
Assuming you have the black side facing out, pull out enough paper to make two 180 degree turns across the pressure plate so that you can attach the paper leader to the empty take up spool. Thread enough of the paper and manually turn the take up spool enough times so that the backing paper is securely attached.
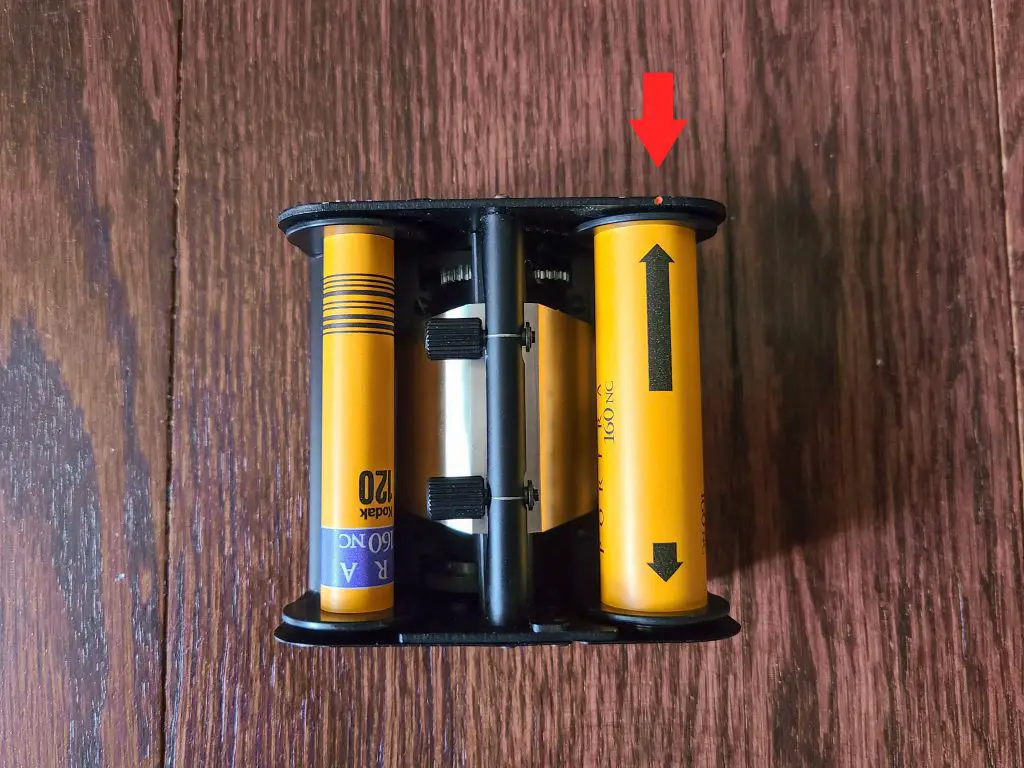
Once the backing paper is secured to the take up spool, manually spin the take up spool far enough to where the black arrow (some films will say the word “START”) lines up with the red dot in the upper right corner of the film holder. Aligning the arrow with this dot is essentially for getting the film ready for the first exposure. If you do this incorrectly, you can lose either the very first, or very last exposure on your roll.
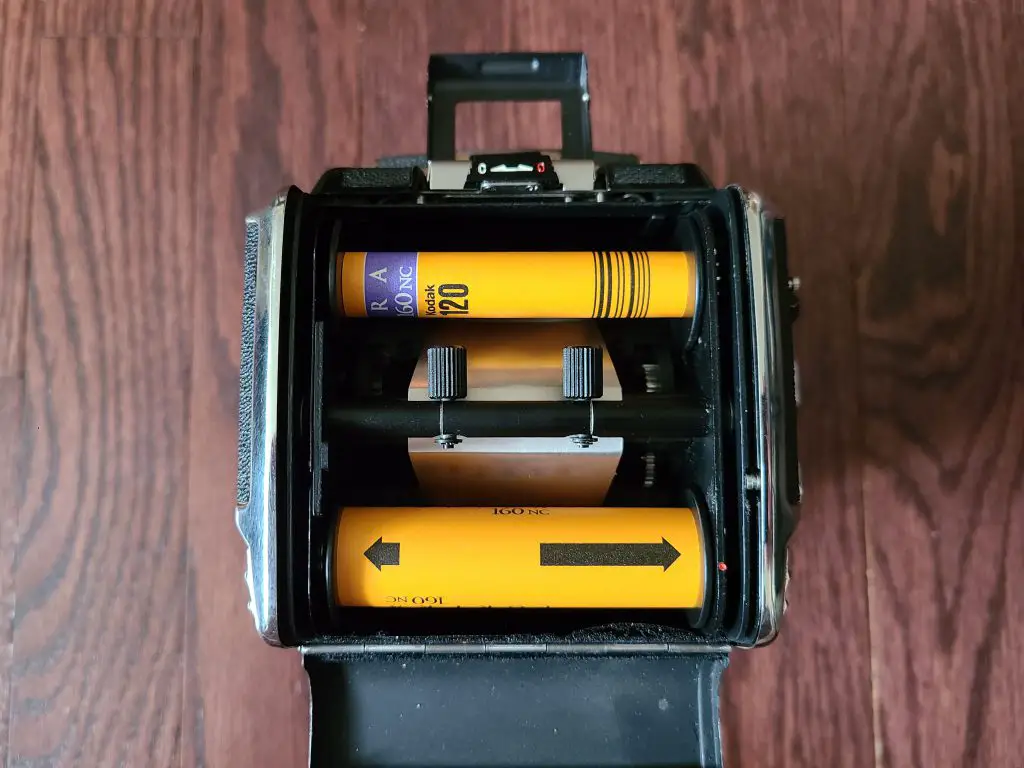
Once the dot is lined up with the arrow, do one more check to make sure both spools are securely attached and the backing paper is not crinkled or otherwise obstructed and insert the film holder and film back into the camera. Once secured, it should click into place, and you can close the door and lower the frame.
The process for loading 120 and 220 film is the same with the only exception being if you just loaded 220 film, you must change the film type selector to 24 instead of 12, and vice versa. Assuming you did everything correctly, rotate the film advance knob until it stops at the first exposure. The number ‘1’ should be displayed in the exposure counter.
Repairs
When I received the Bronica S2, it came with two problems. The first was that the reflex mirror was stuck causing the shutter not to fire, but the second I did not discover until after shooting my first roll of film, which was that all of my images were out of focus.
As it would turn out, both issues are pretty common with the camera and if you’re lucky, can both be remedied easily…or not. For the first issue, I reached out a respected Bronica repair person who upon telling him of the camera’s symptoms, he suggested I firmly, whack the camera on the floor. Immediate flashbacks from my Canon T90 “repair” which involved whacking it on the floor to release the mirror, I figured what the hell and tried it. I was sure to do it on a carpeted floor, so as to not dent the bottom, and after the first whack, nothing had improved, so I tried it two more times and after the third whack, I heard the sound of the mirror releasing and the shutter firing!
Score! The camera worked! After talking to the repairman, he suggested that the linkage for the reflex mirror can become stuck due to dried lubricants and a firm whack will allow it to move, resetting the whole cycle. He said that assuming there were no other problems with the camera, as long as I kept using the camera, it should be fine, but if not, then it would need a CLA. As I write this, that was over 4 months ago, and the camera has never once locked up, so, so far so good!
The second issue I didn’t realize until after inspecting my first roll of film. While none of the images were badly out of focus, they were much softer than I had expected the Nikkor-P lens to produce. In a couple images, I could clearly see a razor sharp depth of field before or beyond whatever it was I was photographing. Had this been on an image or two, I could have chalked it up to me rushing, or not being familiar enough with a new camera, but this problem affected all 12 exposures, and there’s no way I could be that bad so as to mess up every shot on the roll.
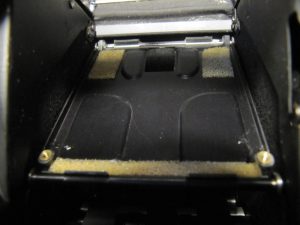
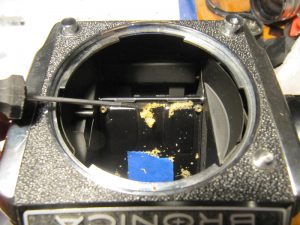
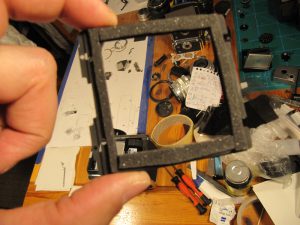
After doing more research, it turns out the Bronica S2 (and other Bronicas of the era) have a common problem in which foam light seals beneath both the ground glass and mirror deteriorate causing them to fall out of the exact focal plane of the film. When this happens, you can look through the viewfinder and focus a sharp image, except what you are seeing as a sharp image on the ground glass, is not what will be sharply focused on the film when you press the shutter release.
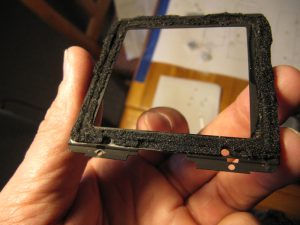
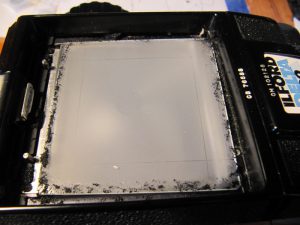
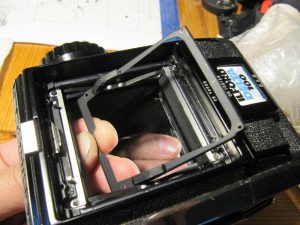
Fixing this issue is a matter of removing a black frame around the ground glass and mirror, scraping off the old gunk and replacing it with something comparable. There are light seal kits for the Bronica which you can buy online, or you can try to make some yourself.
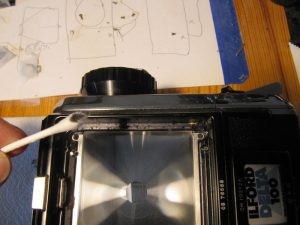
Rather than explain the entire process here, I’ll direct you to an excellent tutorial with many photos written by user antoniobravo on photo.net. As is the case with any camera light seal replacement, the job isn’t difficult, it’s just tedious and messy. You will need some good screwdrivers and something to scrape/absorb the old foam away, and then you have to be able to make a replacement that’s approximately the same thickness as the original stuff.

If this is a job you’re willing to try yourself, consider this an excellent time to perhaps order one of Rick Oleson’s BrightScreens to improve brightness in the viewfinder or add things like a split image focus aide. If your mirror is showing signs of being desilvered, check out one of Martin Seelig’s replacement front reflective mirrors. I can personally vouch for both Rick and Marty’s products as I have experience with both.
All images above courtesy of user antoniobravo, photo.net.
My Results
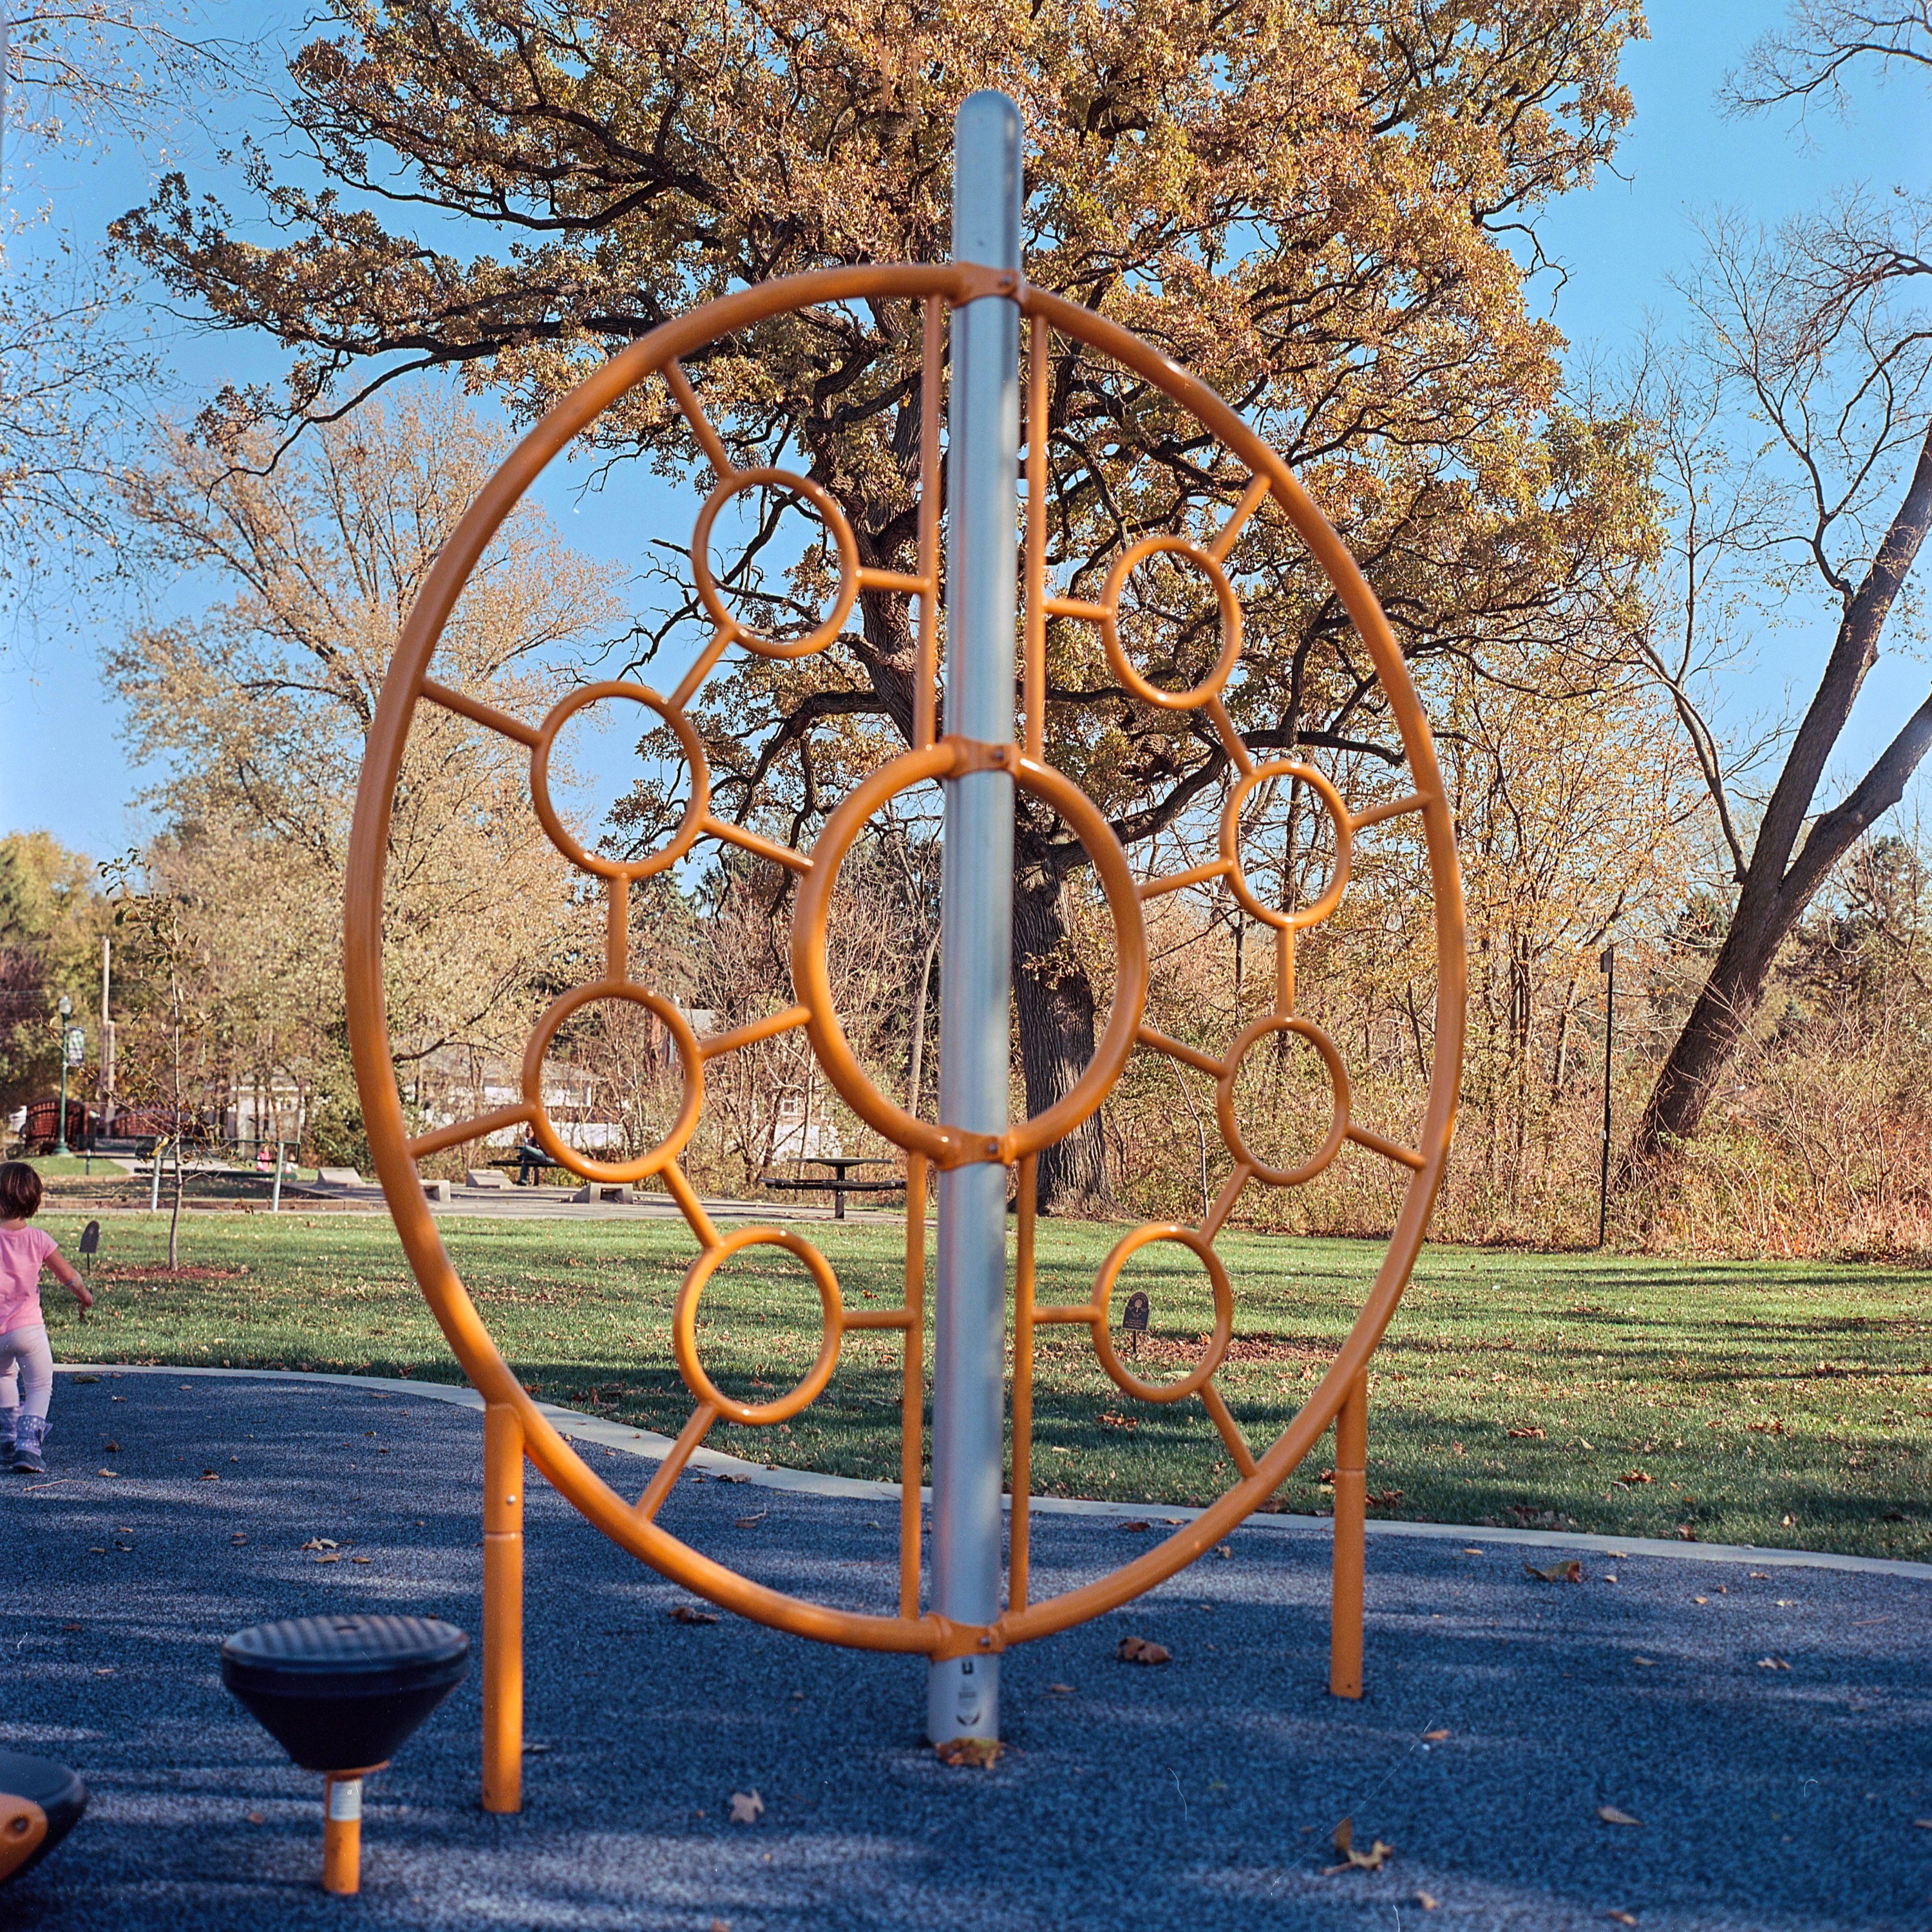
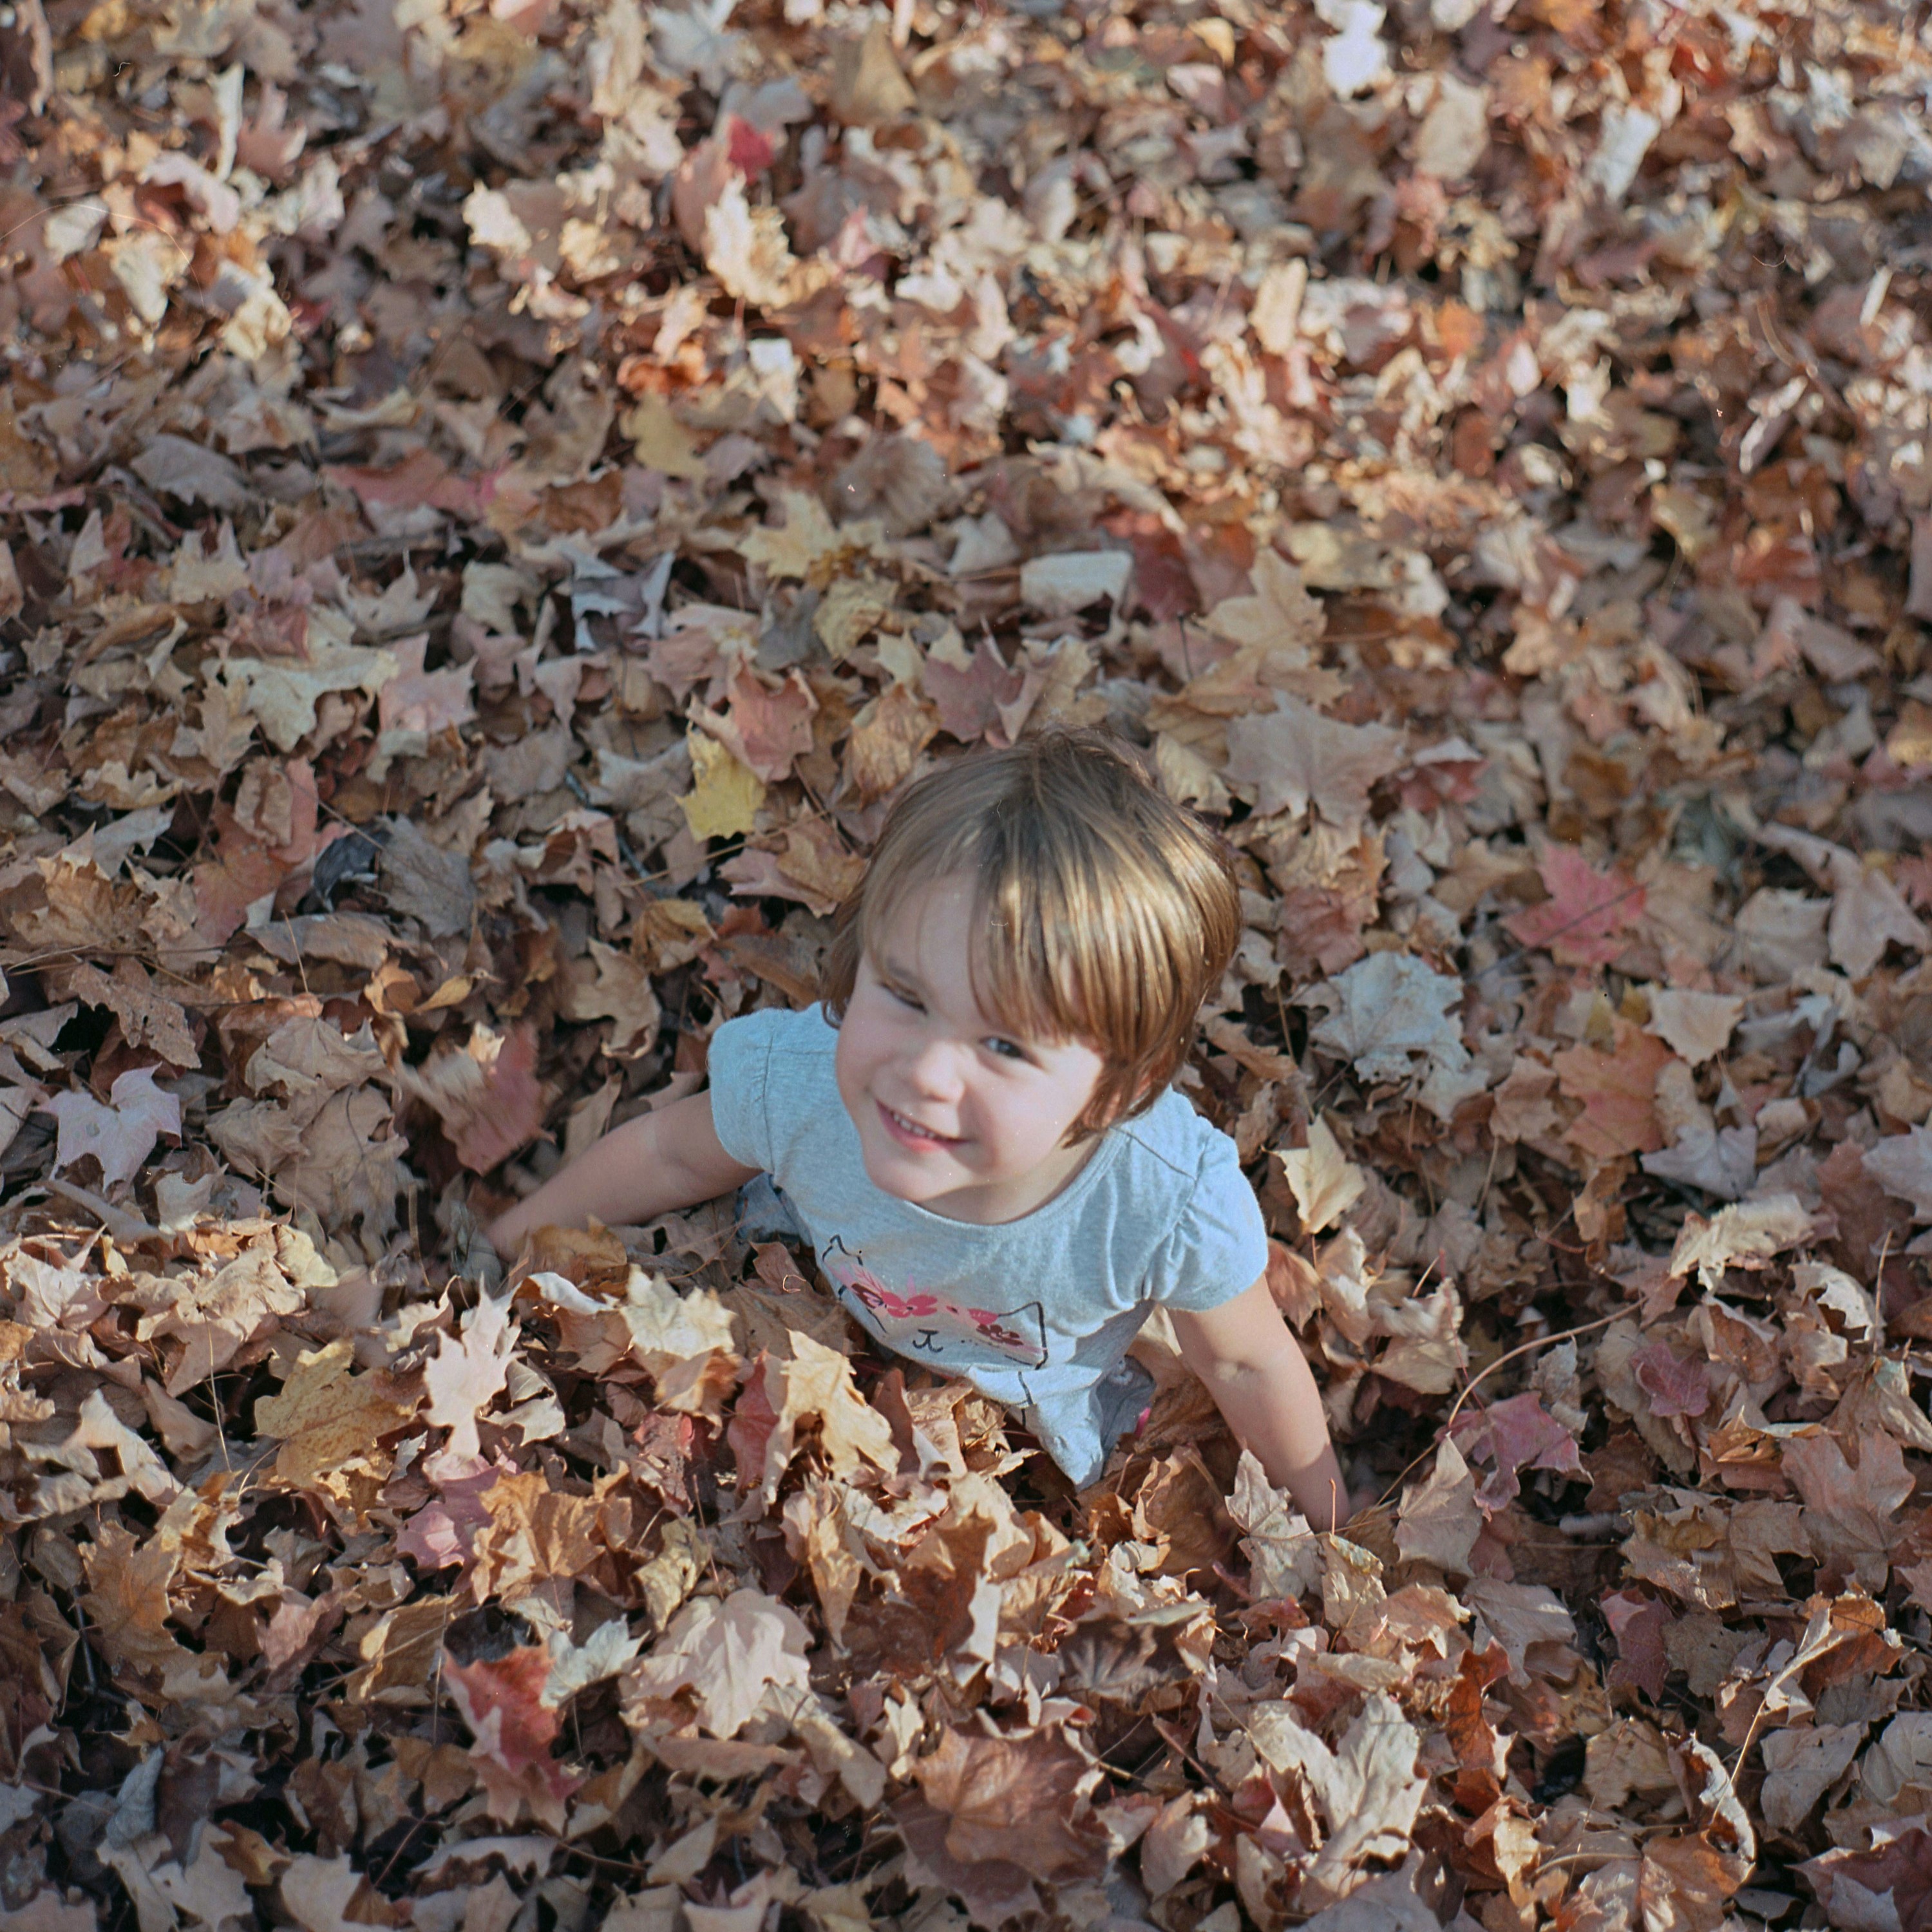
Shortly after getting the shutter firing on the Bronica, I felt good enough to put my first roll of film through the camera, so I loaded in a fresh roll of Kodak Ektar 100 and took it on a fall trip to the beach. Not fully releasing the many ways in which these cameras can fail, I had not yet known that the foam had degraded under the focusing screen and that although I could see a properly focused image on the ground glass, my images would all turn out slightly out of focus. It’s not extremely noticeable, especially on images where I focused to infinity as depth of field was able to take care of it, but notice on the pictures of the playground equipment and the little girl, the foreground is not razor sharp as you would expect it to be.


After replacing the foam, I wanted to check the camera, and not willing to risk ruining another roll of fresh Ektar, I used a short roll of Kodak 2475 Recording Film that I use for testing 120 film cameras and shot some random things around my community.


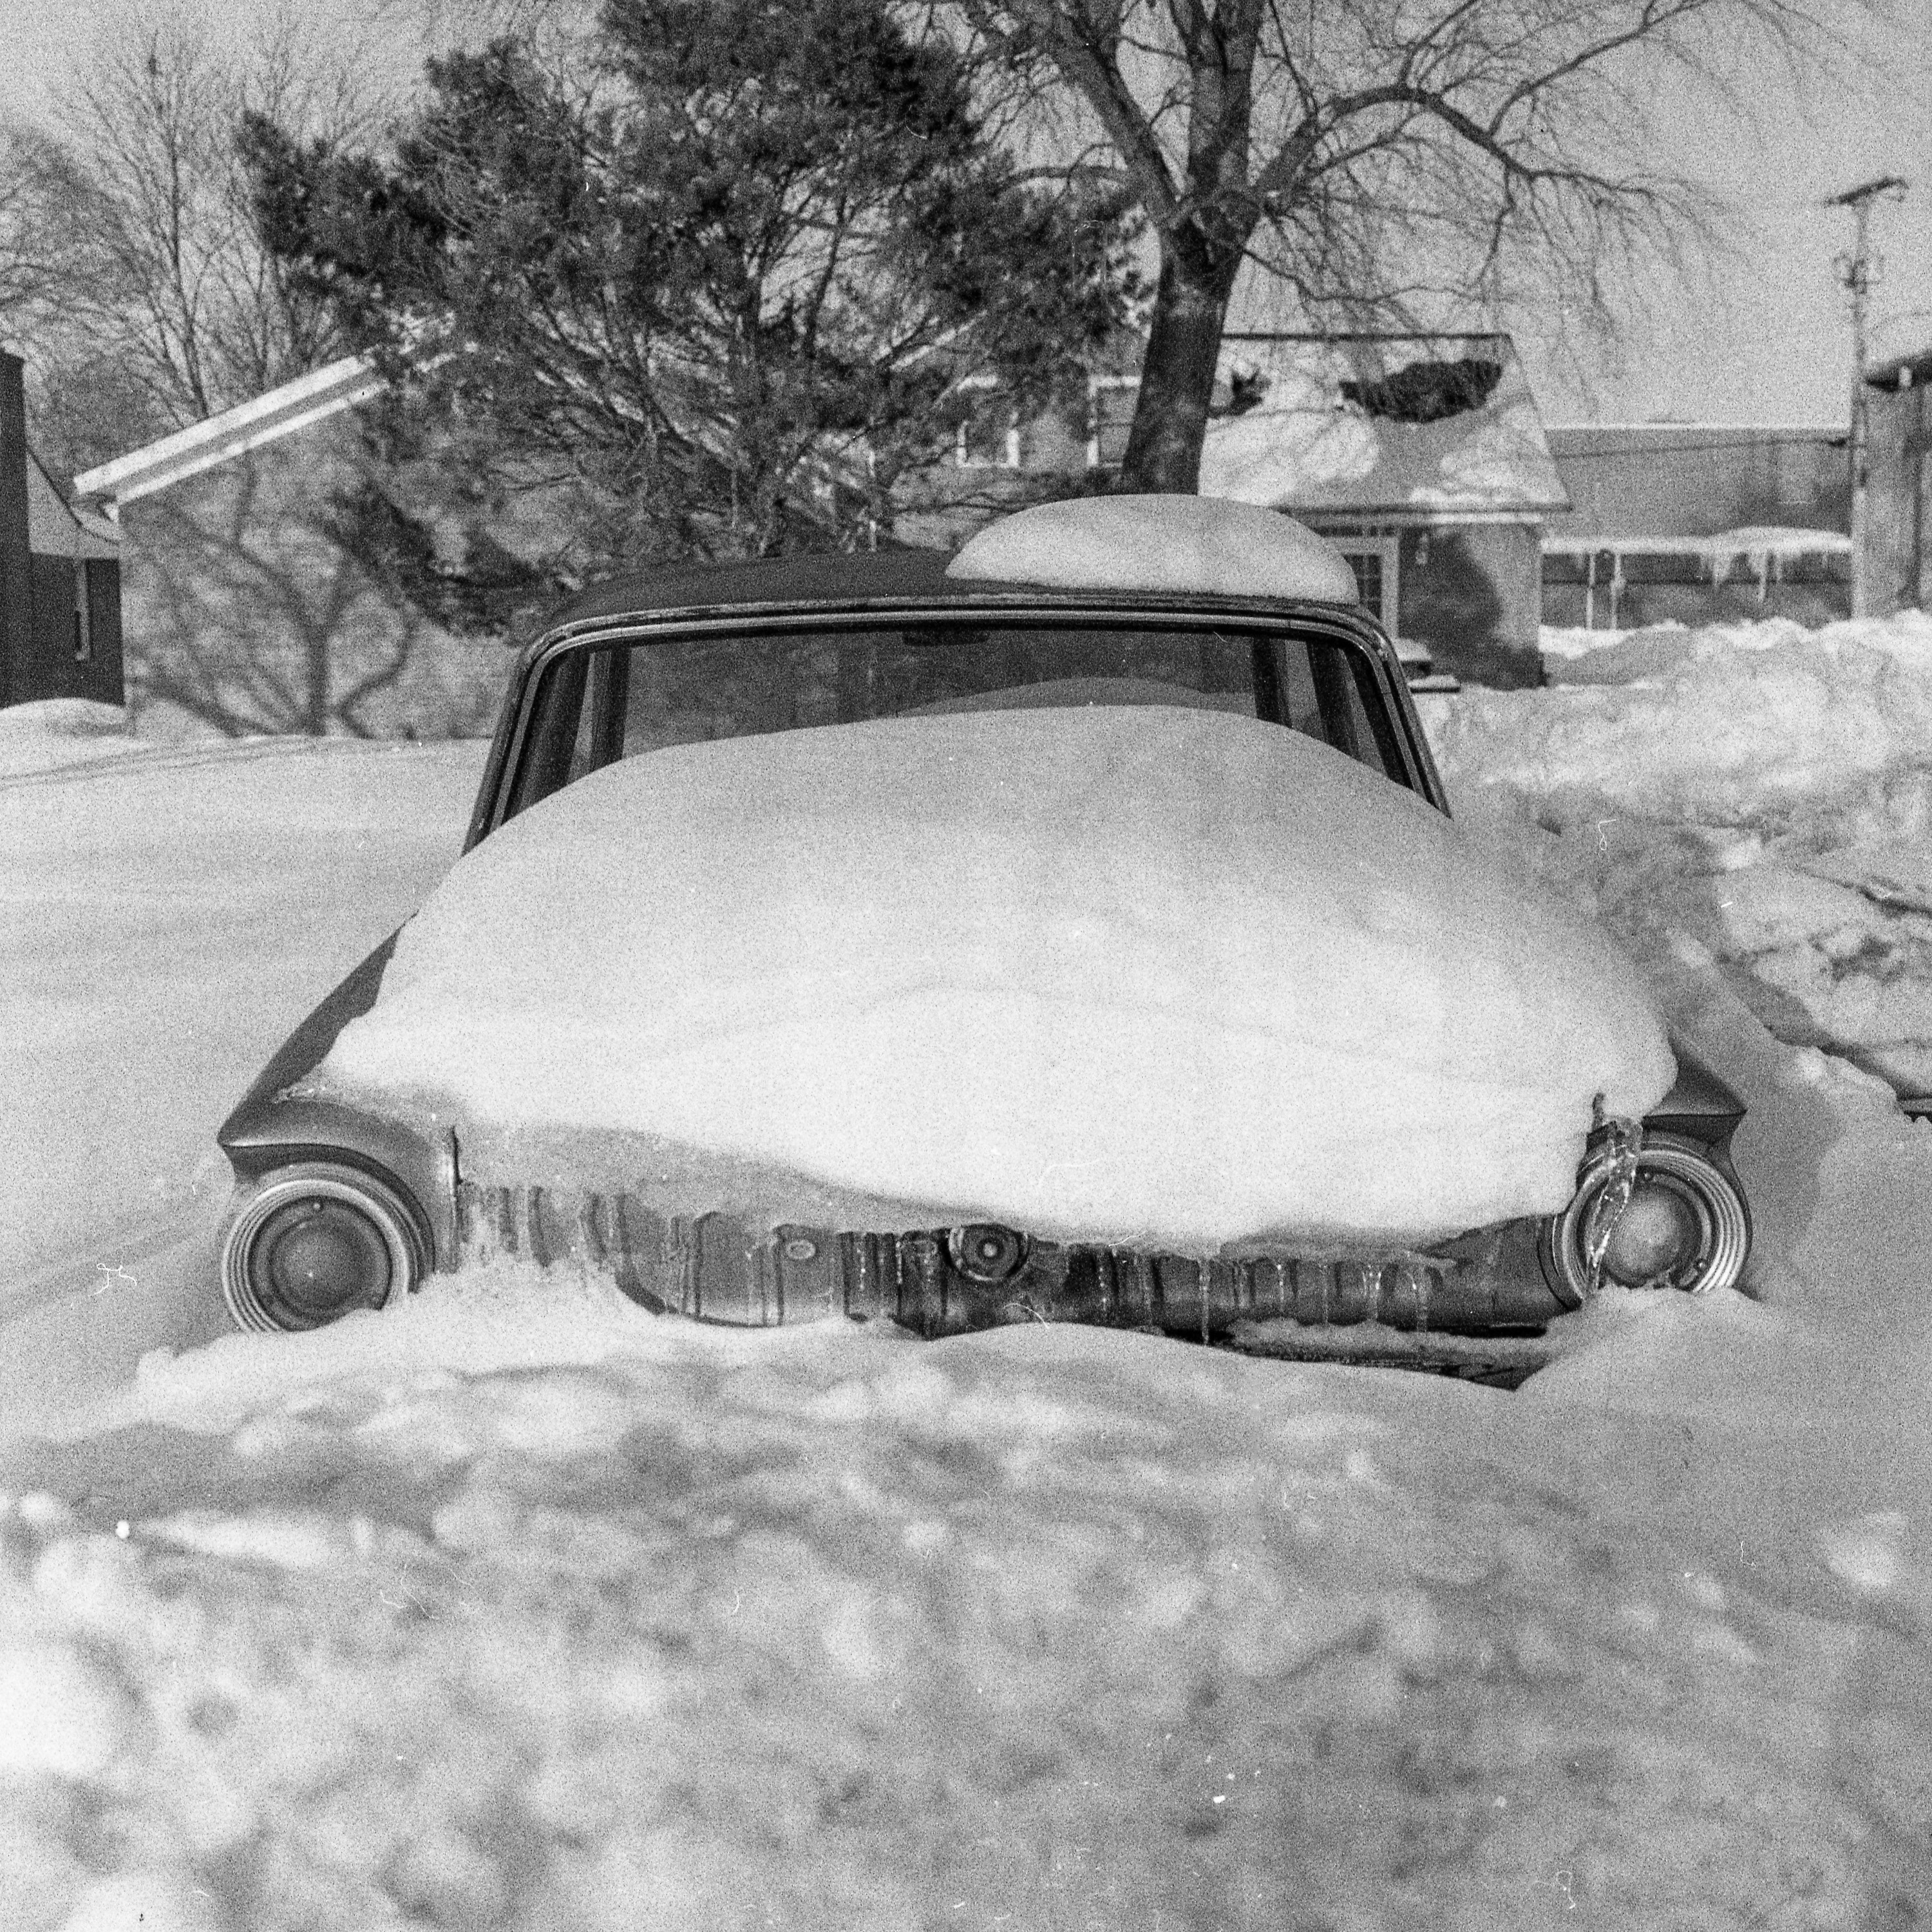

The film I used was heavily degraded and showed quite a bit of grain, but it accomplished my goal of being able to see if the viewfinder focal plane matched that of the film’s focal plane.
Finally satisfied that everything was working correctly, I loaded in two more rolls of film, this time some slightly expired Kodak Portra 160 NC and shot more pictures.


Nippon Kogaku may have never made a medium format camera, so the Bronica SLR is the closest you’ll likely come as the quality of the Nikkor lenses were easily on par with both the company’s 35mm lenses, but also competing lenses for other medium format SLRs. I am not sure there are any meaningful differences in quality between the f/2.8 Nikkor-P on the Bronica and a f/2.8 Carl Zeiss Planar found on a Hasselblad. Images shot with both cameras are going to be razor sharp corner to corner without any optical anomalies associated with lesser lenses.
The differences in shooting a Bronica compared to a Hasselblad is something I’d like to explore further in a future article, but for now, I can tell you they are world’s apart.
While I enjoyed shooting the Bronica, and once I got the shutter working (by slamming it on the floor), I had no major complaints, the first word that comes to my mind when thinking about this camera is “loud”. The Bronica S2 has got to be the loudest camera in any format I have ever used. Everything from the sound of the four sides of the hood popping up when opening the viewfinder, to the various creaks and groans of the film transport, to the horrendous metal clank of cocking the shutter, and last but certainly not least, the cacophony of noise pollution emitted by the camera when firing the shutter. I could keep giving you adjectives to describe shooting the camera, but instead I’ll show you a video I made of me cycling through the shutter three times.
The video above does not do the camera’s noises justice as it somehow seems louder in person. To be fair, no medium format SLR is exactly quiet, but when comparing the noises from the Bronica to that of a Hasselblad 500C, the difference is night and day. If you could somehow combine the sounds of this camera with the look of a Zenit Photosniper, you’d have the attention of any local S.W.A.T. team in seconds.
Beyond it’s auditory unpleasantness, another thing I didn’t exactly love was the extremely low gearing of the film advance lever. The higher the gearing of a film advance lever, the faster the film moves in the camera, which is great for speed, but can also cause damage to the film if it’s pulled too hard. This was one of my complaints about the Anscomark M which has one of the highest gearing film advance levers of any camera I’ve used. The Bronica S2 takes it a bit too far in the other direction though. Watching the video above, it takes almost four and a half full rotations to advance the film between frames. A Hasselblad 500C takes one single rotation. When loading a new roll of film into the camera, it takes what feels like forever to get to the first exposure. I’m not suggesting that the Bronica is wrong, and Hasselblad is right, but 4.5 turns is far too many.
Another thing about the film transport is a very significant amount of resistance right at the moment the shutter is fully cocked. Watching the video above again, pay attention to right before I finish winding the knob, you’ll see the camera jerk as I have to overcome this resistance, which when I do, causes another loud metal noise as the shutter is cocked.
It would be reasonable for anyone reading my review and watching the video to assume something must be wrong with my particular example. After all, I am reviewing a camera that’s more than half a century old and has likely gone decades since being serviced. But in talking to many other Bronica owners and reading other reviews online, it would seem that my experience is normal. All of these cameras are noisy and require quite a bit of effort to properly cock the shutter.
Again, this isn’t necessarily bad, as many people used these cameras for quite a long time without issue. Clearly, this is how the camera was designed, it’s just not very confidence inspiring for the first time user as the camera feels like it’s about to explode each time you advance the film.
Now that I’ve finished bellyaching, I feel as though I should explain that all is not bad with the Bronica S2. There are quite a number of things to like about it as well.
For starters, the location of all the controls are very well thought out. The shutter release, focusing ring and aperture selector can all be used with your left and right finger tips while still supporting the camera’s bottom. The focusing ring is thick and easy to turn, and in my example was very smooth and without grit. The aperture ring has very pronounced click stops which give reassurance as they reach their intended positions without being too tough to move.
The viewfinder is nice and bright and has an instant return mirror which means you always have a bright and easy to compose image. This was a feature not common on medium format SLRs of the era.
Finally, the adjustable film plane of the film holders which allows use of both 120 and 220 film is a nice addition too, compared to other medium format SLRs which require dedicated film holders for each film type. Although 220 has not been in production for quite some time, I have to imagine people shooting these cameras professionally appreciated the ability to quickly switch back and forth between formats without having to remember to grab the right holder.
Overall, I enjoyed my time with the Bronica, and to be honest, without ever having used a medium format SLR by any other company, I might think that the noises and operation of the Bronica are “just the way it is”. None of these issues are deal breakers, as the camera performs it’s intended function just fine. I got excellent images from all of the rolls after I corrected the viewfinder foam problem, and the camera has yet to fail on me which suggests it’s probably built a little better than I, and other people give it credit for.
If you can find a Bronica S2 in good condition with a good lens at a price you can live with, you should absolutely consider picking it up. It is a fun to use and gorgeous camera that delivers the goods in terms of optical quality. You just might want to get a pair of earplugs to go with it!
Related Posts You Might Enjoy
External Links
http://camera-wiki.org/wiki/Bronica_S2
http://web.archive.org/web/20001023050705/http://www.smu.edu/~rmonagha/brons2.html (Archived)
Great test. Early reliability issues put off many pro users in the day, even after they were fixed. I was amused at the time when my accountant told me that I would have no problem depreciating my Hasselblad, but that an auditor might question a Bronica as a professional tool!
I’ve always wanted a Bronica in part just because of how different it looks but because the name is so cool. Excellent, well-researched article. You’ve got me thinking about the S2 – darn you! I thought I had poured some water on my GAS but I see it’s making a comeback. Chris
Great, detailed review, as usual. I didn’t see it mentioned in the review, but I think the Bronica S added a mirror lock up feature, that then was dropped on subsequent models.
Your review (and the video!) is dead-on, Mike. I used a Bronica S2A for many years, even on mountain backpacking trips in the Rockies and extensive camping in Europe. The picture quality was truly amazing. The weight finally got to be a nuisance, though, but that camera is still being used today by a professional photographer in New Mexico. I still occasionally miss it.
I was aware of the Bronica S and C series 120/220 SLRs from magazine ads and tests. At the time, I was using Ye Olde Rolleicord V for occasional “larger than 35mm” photos, but Ye Olde Nikkormat FTN was my most used camera. These were my college days, so money was tight and reserved for black-and-white film and paper. (These were also the days of Freestyle Sales Company film trials with ORWO and not-officially-available-in-North-America Ilford films.) 120 SLR? My accessory 35mm SLR lenses were Soligor or Vivitar.
After college, I looked at 120 SLRs and (very) briefly considered the Kowa Six. I went back to Ye Old Rolleicord and Minolta Autocord. In short, Bronica wasn’t even a blip on my radar until the ETR series arrived, That led to the purchase of an ETR-C and “the usual suspects” of lenses, but that’s another story
In the late 1990’s, I was working for a photo studio that did everything from studio portraits to weddings to school pictures. There were Bronica S2As in the “set aside” locker, along with Welt/Safelock tripods, but this was a Mamiya or Hasselblad shop by then. I did look at Bronica S2As in Shutterbug Ads, but the slow X-Synch (electronic flash) speed put me off; I had a Rolleicord and Autocord with leaf shutters that would “chase ghosts” away. (I’d seen slow X-synch ghosts with my flash-converted Leica IIIa at 1/20 sec,)
Would I buy a Bronica S2A today? One can never tell…
Super, detailed review – thank you! I second Kurt Ingham’s comments about early-stage reliability; back when Bronicas were new to the pro market the working guys I knew said they were “crappy cameras with great lenses”. Oh, and the comment about the classic look of the chrome trim? Remember, youngster: To a guy in the late 1960s, a ’57 Chevy was a “classic”!
The Bronica System was an “also ran” for professionals solely based on the focal plane shutter. The need to sync with electronic flash, especially outside, and at all shutter speeds, was just something that was considered absolutely necessary to professional usage, especially for advertising/commercial and wedding photographers. It was a tough decision because of the reverence for Nikkor lenses, but those I knew that stuck their toe into the Bronica market reluctantly left after a while just for a leaf-shutter lenses, even tho they raved about the Nikkors! Ditto for the Rollei SL/66.
The camera did have a high level of vibration, something partially addressed with the Bronica EC/TL, that had a split mirror that went in two different directions, and had more dampening mechanisms. Unfortunately, even Hasselblad is not vibration free! I’ve been using ‘blads all my life, and my CM bodies have a large amount of vibration at 1/60th of a second and slower, so much so that I usually use the easy to actuate pre-exposure mirror release on the side (not really useable with portraiture). Not that long ago I shot my Hasselblad on 1/60th and on a tripod, for some portraits outdoors, and a lot of the results had vibration softness, due to internal vibration. By 1/125th, it’s gone! Actually my Mamiya RB system does not exhibit the same problem!
Bronica waited far too long to create the SQ system, which a lot of professionals considered a “winner” as long as you used the “pro” series lenses, which had a good reputation (in fact, it took them some time to perfect the pro lenses, which pushed off adoption even farther, before that, the SQ lenses were “meh”). That’s a camera that used to be considered a “best buy” used a few years ago, it was dirt cheap! I believe the prices have been sky-rocketing with the millennial interest in film cameras.
Also a warning on the ETR system. In my city, wedding photographers adopted the Bronica ETR system almost universally! Not long afterwards, the guy responsible for sending out professional repairs at my pro-shop, his desk was littered with ETR equipment that wasn’t electronically ‘syncing’ with backs, lenses and meters, and with some mechanical problems as well. It continued like this until the wedding people migrated to the Mamiya 645 system after they got interchangeable backs and leaf shutters! One guy told me he had to have one or two more ETR bodies than he would normally own just to cover on-the-job breakage and turn-around time for repairs!
Lots of great info, Andy. Thanks for sharing!
Thanks for a detailed review. I own both Bronica S and S2. I must disagree that it was merely “economical option” for a Hasselblad. It was an expensive camera by any means. Hasselblad 500C won the professional market because its central shutter was more suited to studio photography, and it offered interchangeable backs and lenses example compared to Rolleiflex. Bronica was late into competition and stuck with focal plane shutter. First Bronicas were also too complicated to be reliable in hard use. All focal plane shuttered medium format SLRs are noisy. Also Hasselblad 1000F & 1600F were not exactly models of reliability. Advance and shutter tensioning mechanism mechanism of S and S2 is vulnerable if treated roughly, there were modications made to prevent this in S2a model.
I have owned two bronicas, one back in the 1980s. I still miss them. This excellent article has made me want another, damn you. I am not sure I would be brave enough to whack one through.
To whack, or not to whack, that is the question! 🙂
Please correct your use of “it’s”, which is the contraction of the words “it is.”
Naaaaah! 🙂
Hello thank you for this awesome informations.
I bought the Rick Oleson screen and I have just received back from my technician, I realised that looking at the magnifier from the waist distance, the image is distrorted…
here a video
https://youtube.com/shorts/mQinSbmfGvQ?feature=share
is it normal?