
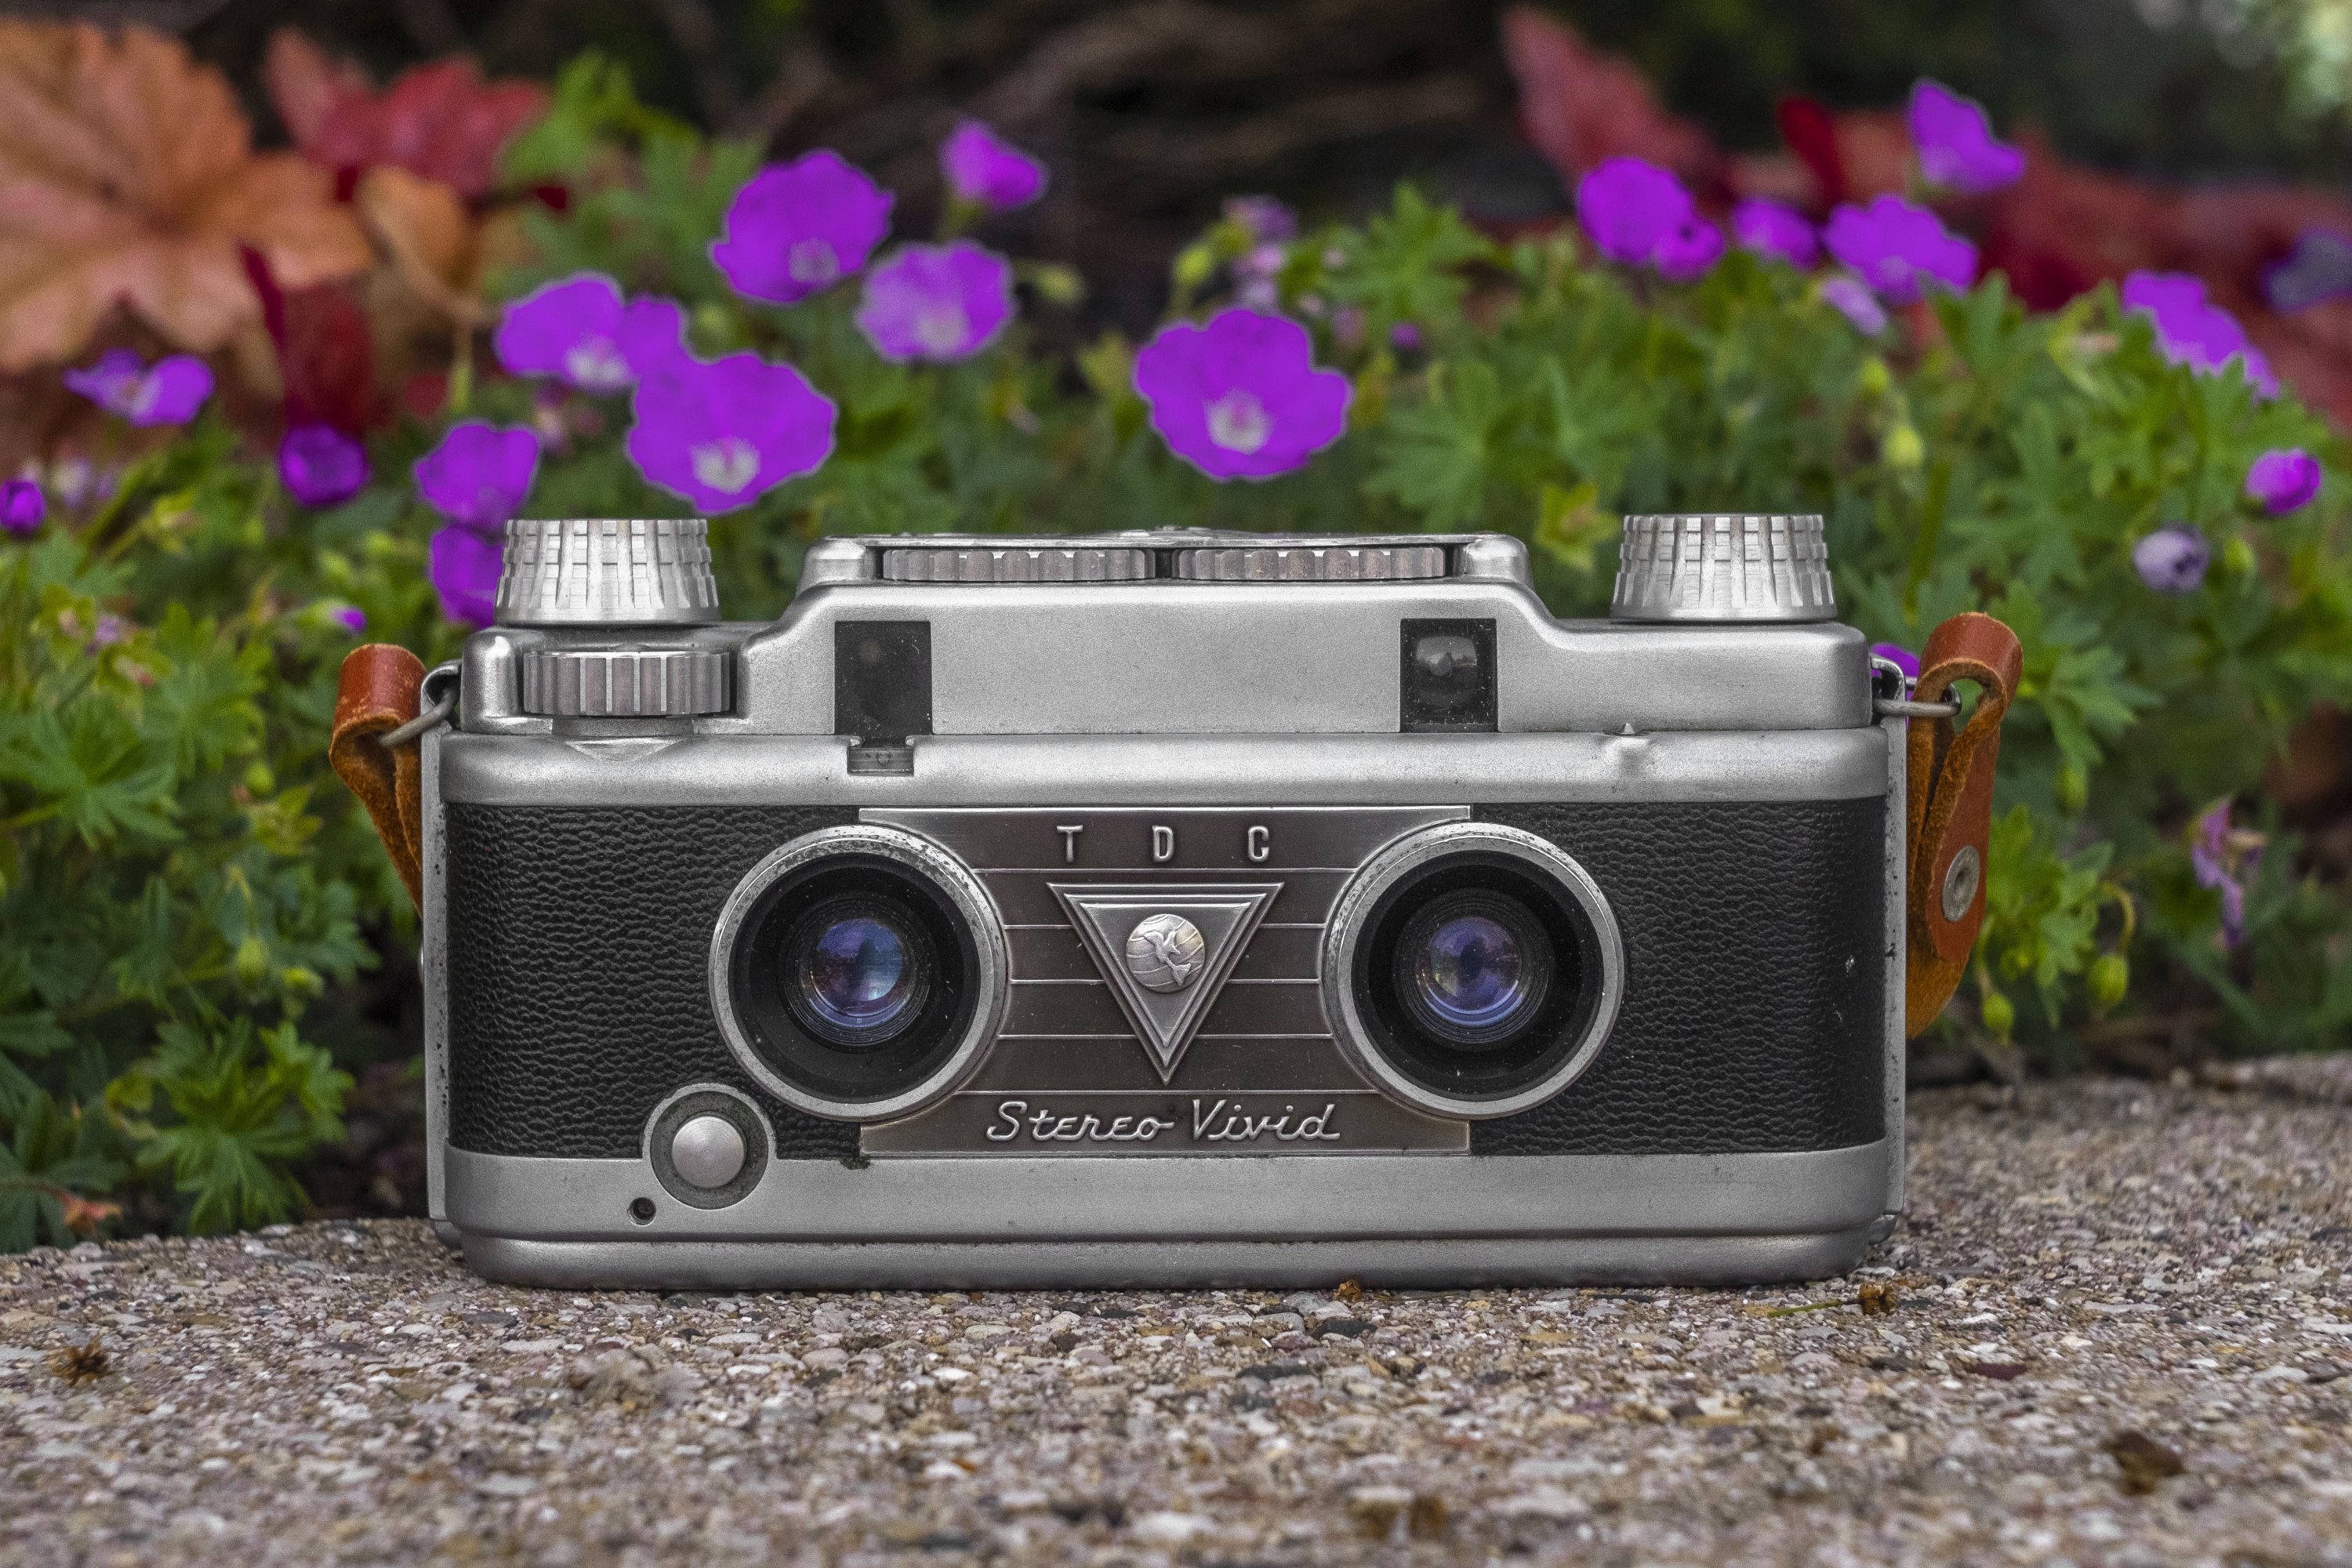
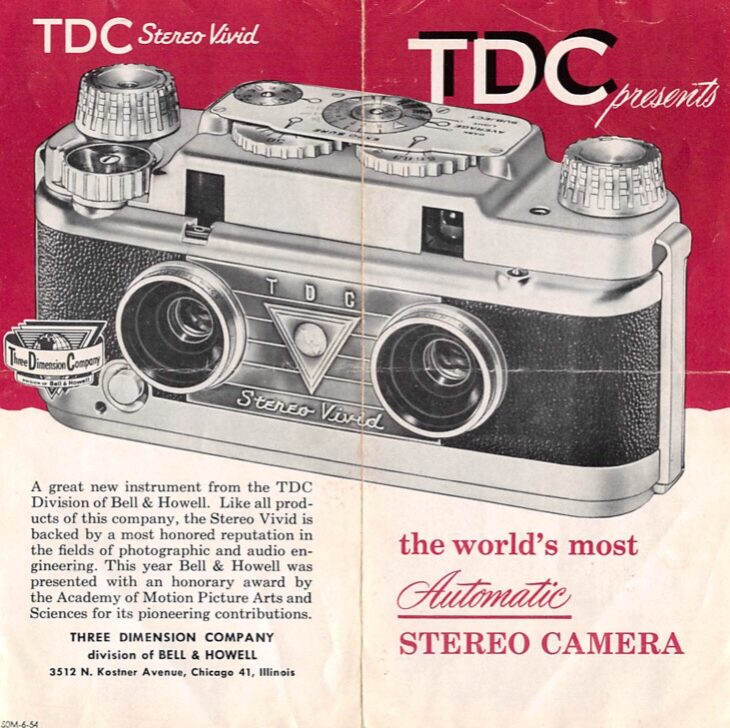
This is a TDC Stereo Vivid, a 35mm stereo camera produced by the Three Dimension Company, a subsidiary of Bell & Howell in Chicago, IL, USA between the years 1954 and 1960. The Stereo Vivid exposes 24mm x 23mm stereo images on regular 35mm film, for use with stereo slide viewers, a type of photography that was extremely popular in the mid 20th century. The Stereo Vivid was seen as a higher end camera, equipped with advanced features like a coupled rangefinder, above average quality lenses, and a complex mechanical exposure calculator on the top plate. Combined with an attractive all metal body with leather covering and fine details, the Stereo Vivid was an attractive option for anyone who wanted their camera to look as good as the photos it made.
Film Type: 135 (35mm), 24mm x 23mm Stereo Pairs
Lens: (2x) 35mm f/3.5 Tridar Anastigmat coated 3-elements in 2-groups
Focus: Variable if SLR, 4 feet to Infinity (2.75 feet to Infinity @ f/16)
Viewfinder: Coincident Image Coupled Rangefinder
Shutter: Metal Blade
Speeds: B, 1/10 – 1/100 seconds
Exposure Meter: None
Battery: None
Flash Mount: None
Other Features: Mechanical Exposure Calculator, Viewfinder Bubble Level
Weight: 614 grams
Manual: https://www.cameramanuals.org/stereo/tdc_stereo_vivid_camera.pdf
How these ratings work |
The Bell & Howell TDC Stereo Vivid was a premium 35mm stereo camera from the mid 1950s with an unusual combination of features not often found on other stereo cameras. With a coupled rangefinder, bubble level, mechanical exposure calculator, and above average three element lenses, the TDC Stereo Vivid made some of the best looking stereo images out there. This camera is solidly built and assuming it hasn’t been abused, should still be capable of great stereo slides, but if you plan on scanning these into a computer, be warned that the process of scanning film shot in this camera has some extra steps. | ||||||
| Images | Handling | Features | Viewfinder | Feel & Beauty | History | Age | |
| 2 | 1 | 2 | 1 | 2 | 1 | 30% | |
| Bonus | None | ||||||
| Final Score | 11.7 | ||||||
History
The history of stereoscopic photography is almost as old as photography itself, dating back to the early 19th century as early photographers strove to recreate images that when viewed through a special stereoscope, would recreate depth perception in still images, similar to how our own eyes work.

The man most commonly cited as the inventor of stereoscopy is Sir Charles Wheatstone, who in 1832 invented a variety of “Wheatstone Stereoscopes”, some using reflecting mirrors, and others using prisms. Wheatstone’s original scopes used hand drawings rather than photographic images, and had the pair of images opposed from each other facing towards twin 45 degree mirrors or prisms.
Stereoscopy would remain a popular field of study throughout the 19th century as a variety of other inventors such as David Brewster and Oliver Wendell Holmes improved upon the concept first by placing the two images side by side instead of 180 degrees apart, and later making the technology more portable and easy to use.
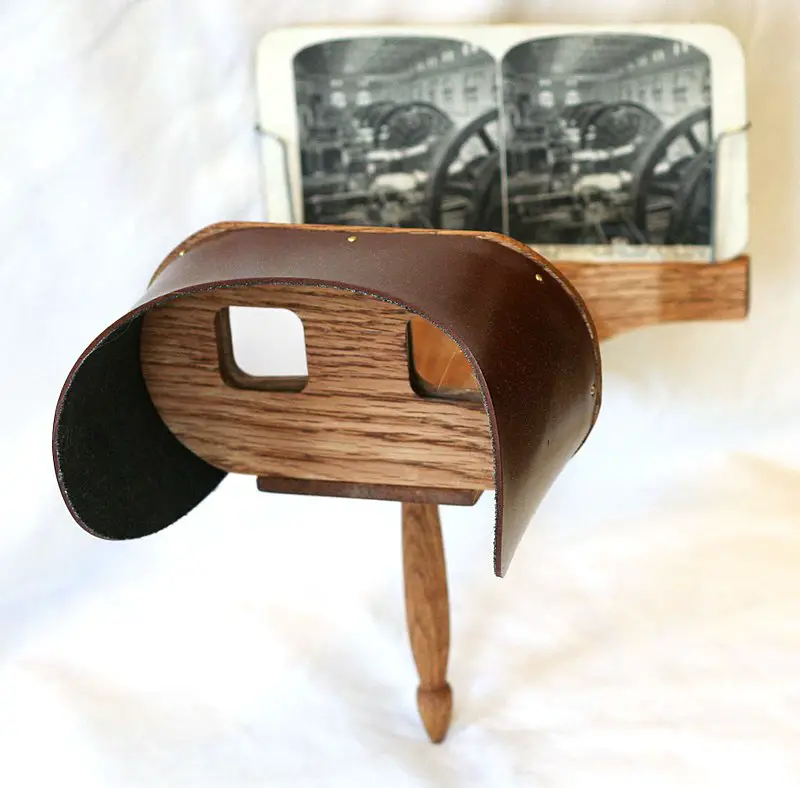
Variations on the Holmes stereoscope became extremely popular in the late 19th and early 20th centuries as building them was very easy. Consisting of nothing more than a wooden frame and two prismatic lenses, building a stereoscope was easy, but creating the images to go in them was a bit more difficult.
Early cameras of this time were very large and heavy, and had slow shutters and even slower film emulsions. In order to create a realistic stereoscopic image, two separate lenses with two separate shutters needed to be spaced apart approximately the same distance as two human eyes, and needed to be triggered simultaneously and with the same shutter timings so as not to have two images with differing exposures.
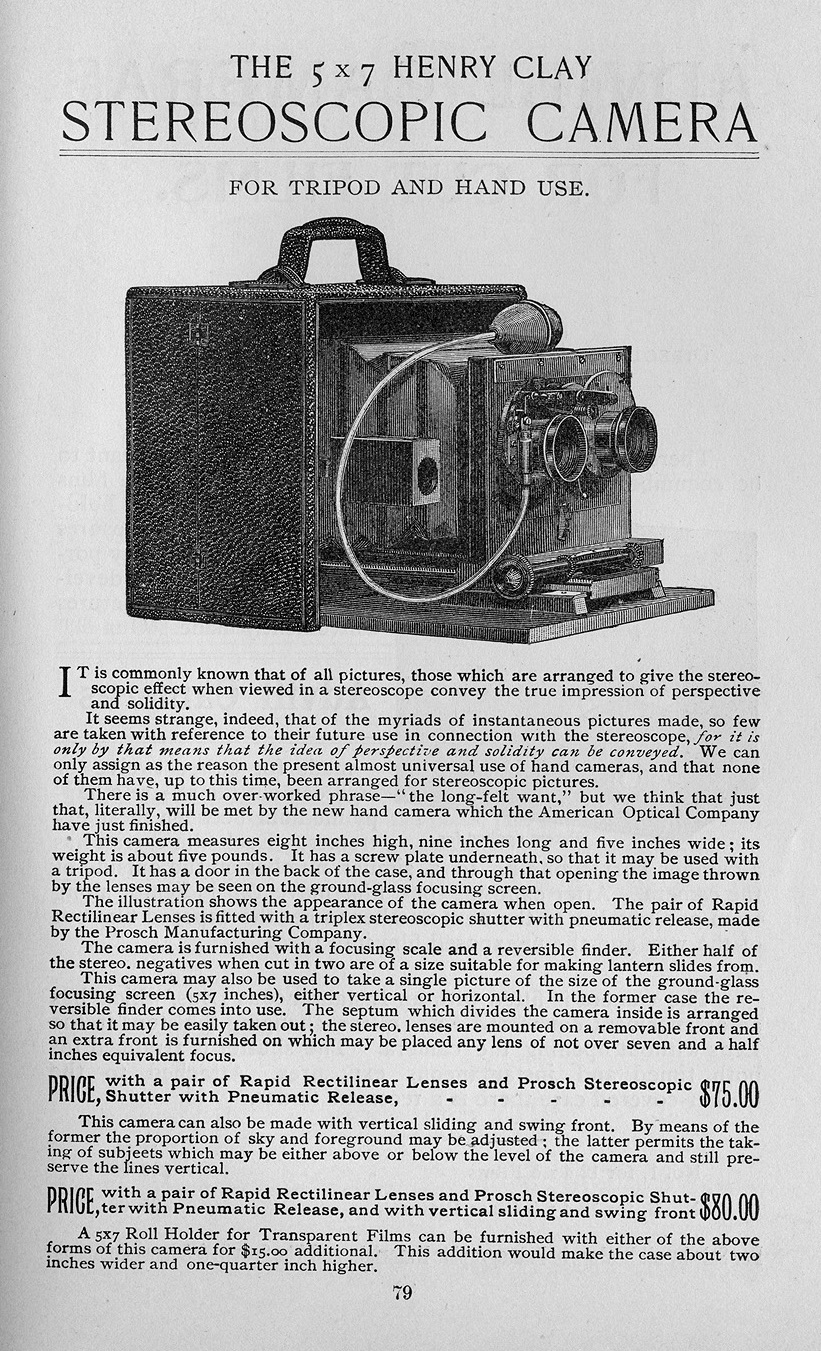
The earliest stereoscopic cameras were essentially just two regular cameras built close together and triggered with a single shutter release linkage. Cameras like the Henry Clay 5×7 Stereoscopic Camera to the left were featured in photo galleries all over the world. Manufacturers from the United States dominated early stereo cameras, but German companies like Voigtländer, ICA, and Franke & Heidecke churned out cameras like the Stereflektoskop, Polyscop, and Heidoscop continued to refine the art of the stereo camera into higher quality and smaller packages.
By the end of the 1930s, stereo photography took backseat to other forms of still photography. The war changed the focus from medium format roll film cameras to 35mm cameras like the Leitz Leica, Zeiss-Ikon Contax, and Kodak Retina.
In the early 1950s, cinema movies in 3D rose in popularity, as with 3D stereo cameras with models like the David White Stereo Realist from 1951 and the Sawyer’s View-Master Personal Stereo Camera from 1952. Each of these models paired the early twin lens design of stereo roll film cameras into a much more compact body that used regular 35mm film. Instead of making full size 24mm x 36mm images, the View-Master shot proprietary 14mm x 12mm stereo images and the Stereo Realist shot 25mm x 23mm images.
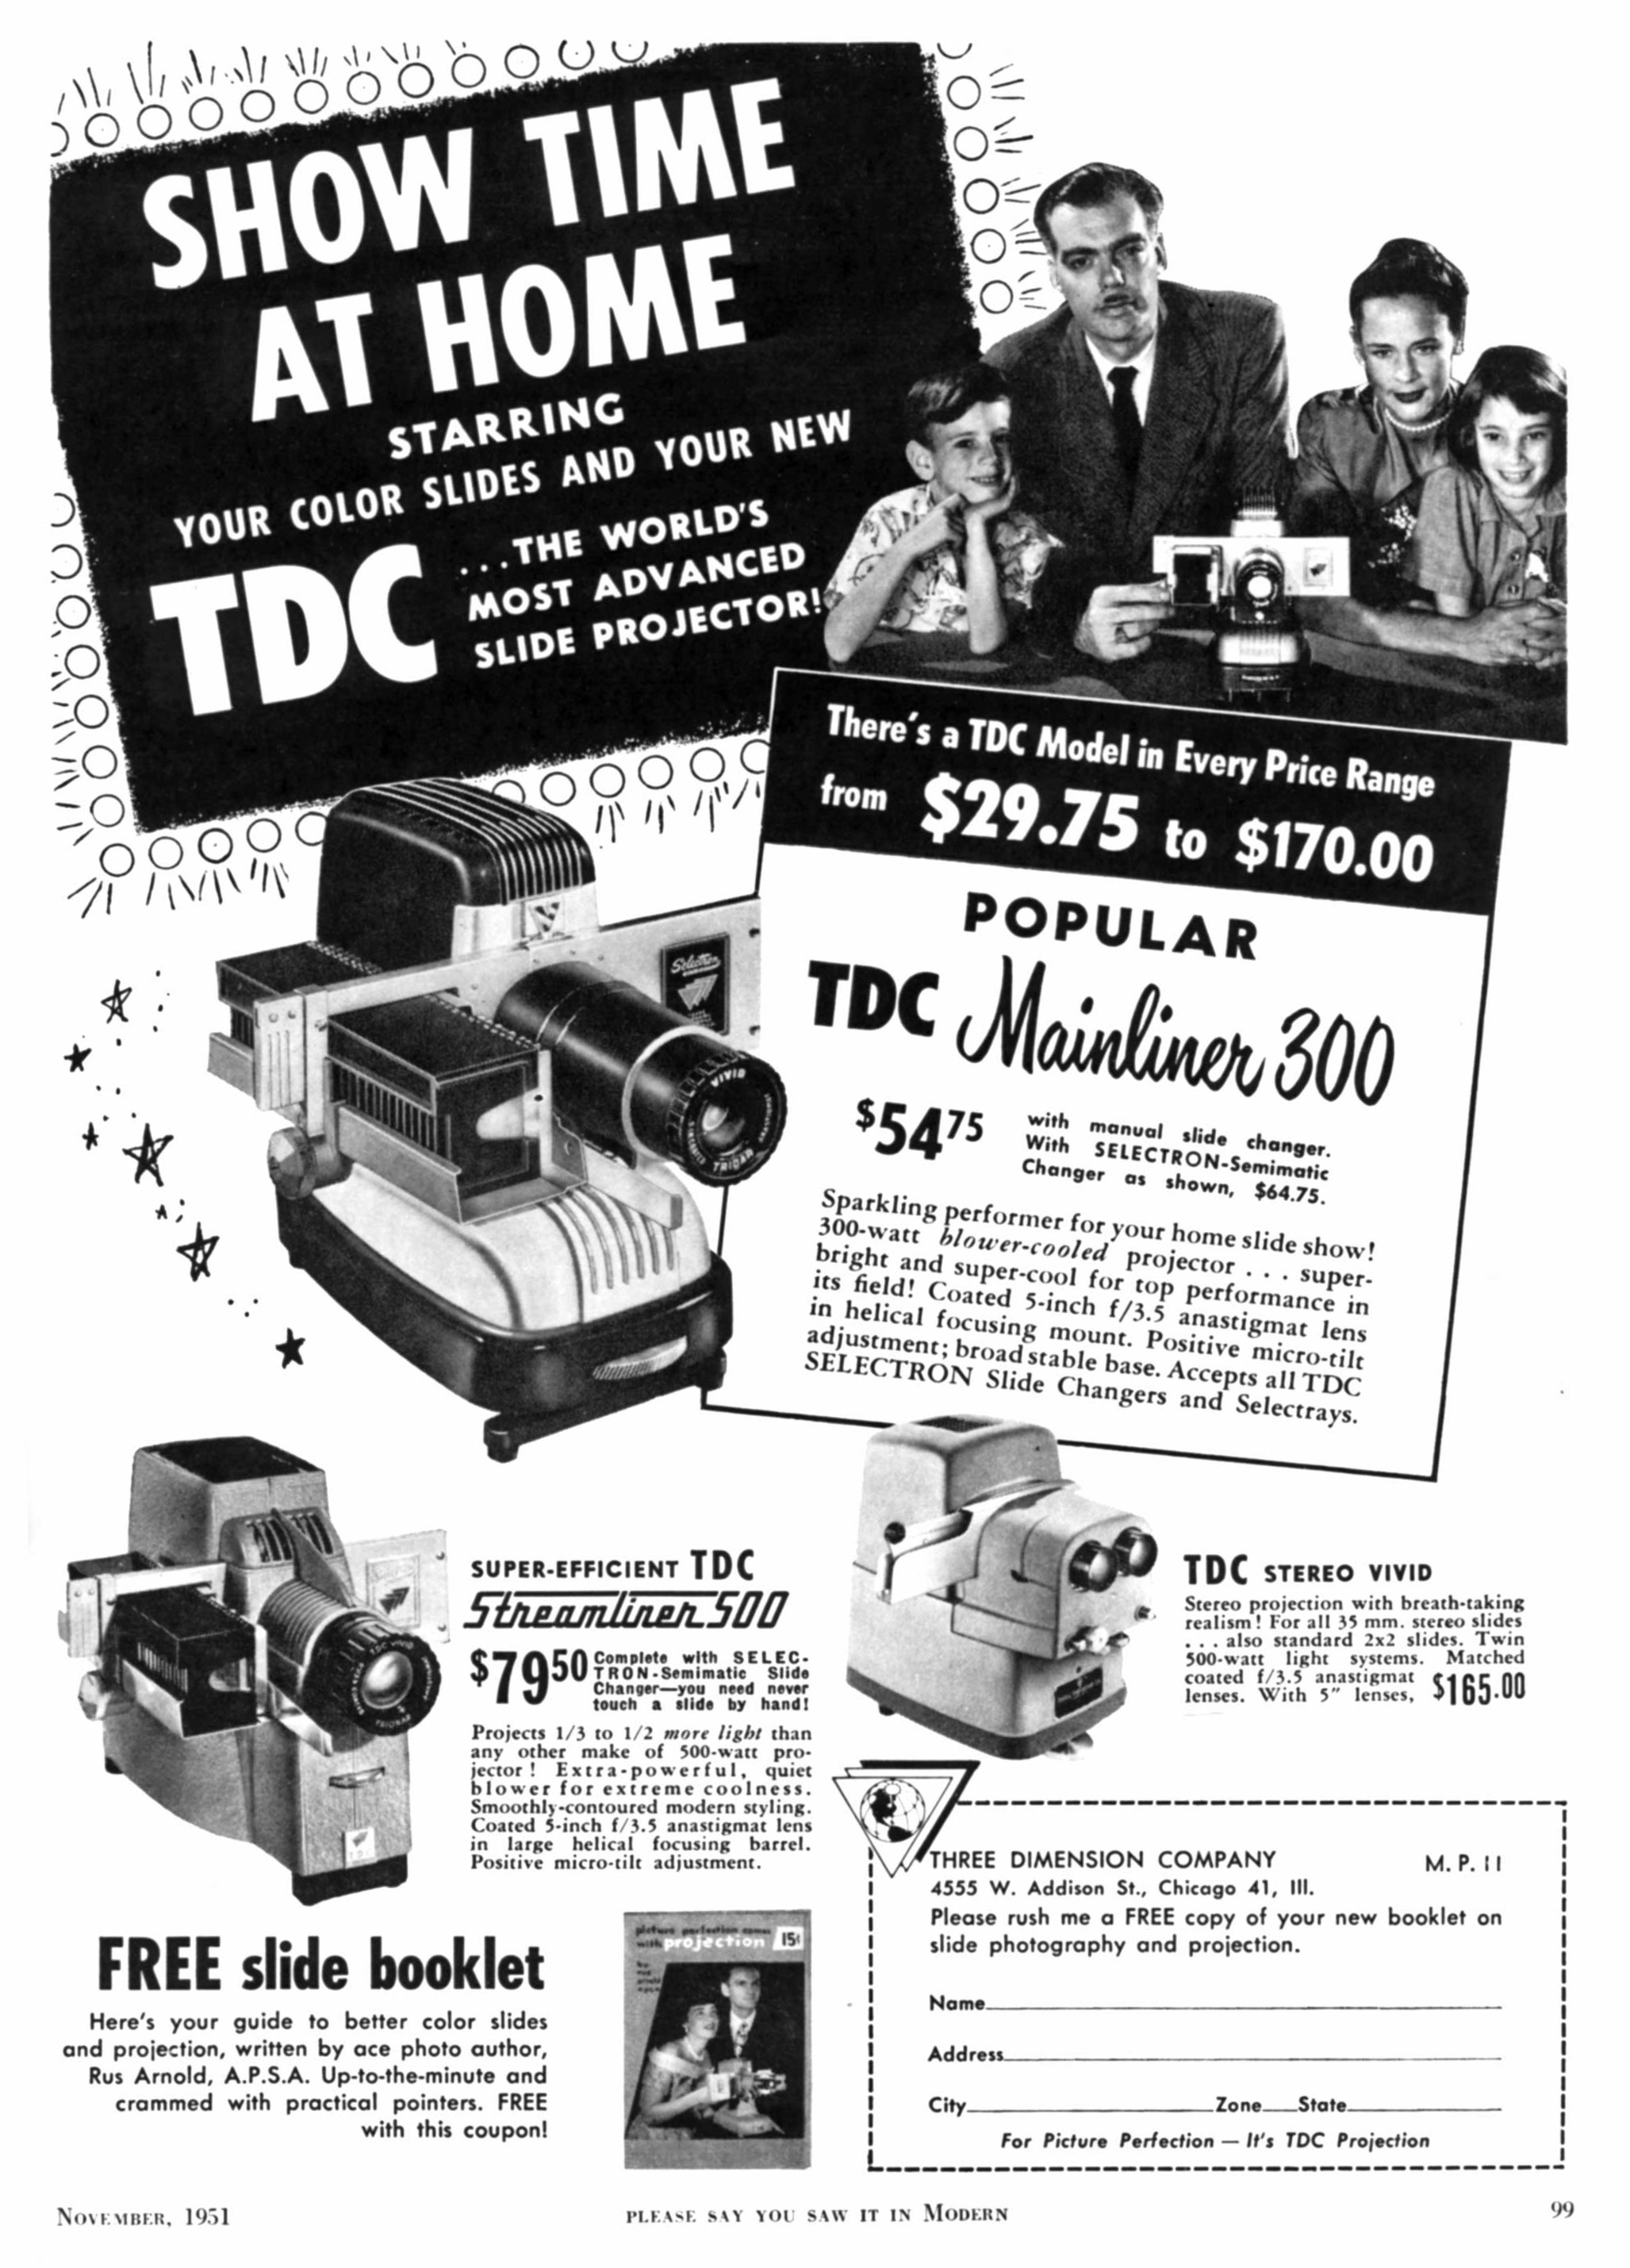
With these cameras, a huge industry of similar stereo cameras appeared with new models from Kodak, Revere, Iloca, Wirgin, Meopta, and many others. One company that was famous for stereo projectors was the Three Dimension Company from Chicago, IL, USA.
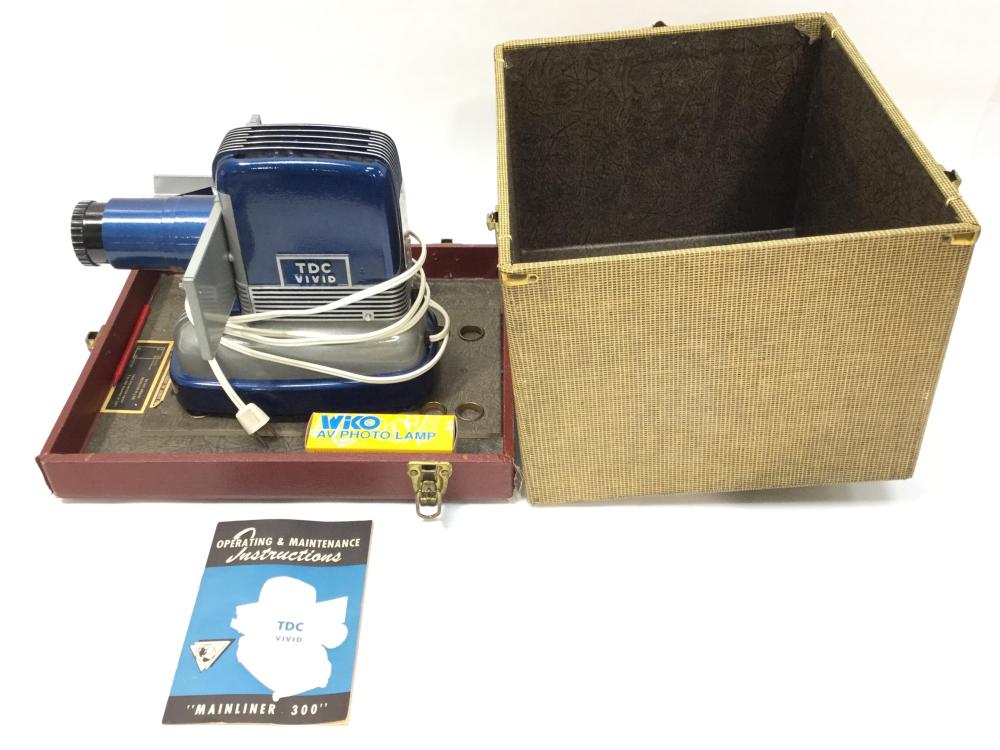
Sources online state that TDC was formed in 1940 and was located at 4555 W. Addison St., Chicago, IL. Their primary market was stereo film projectors, but also made other stereo equipment and tape recorders. Beyond this limited information, the only other fact I learned was that in the early 1950s, TDC was acquired by Bell & Howell, who themselves were also based in Chicago and produced slide projectors and other cinema equipment. Little other information is easily found online, but it would make sense that if Bell & Howell wanted to start producing stereo photographic products and a nearby company in the same city was already doing it, perhaps acquiring TDC made more sense than coming up with their own way of doing it.
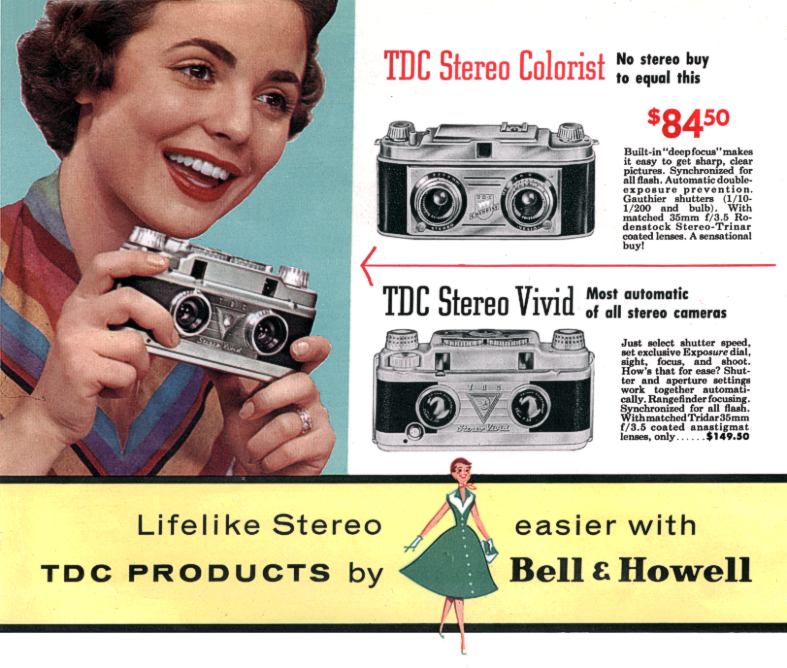
In my research for this article, three stereo cameras are credited to TDC, the TDC Stereo Colorist and Stereo Colorist II and a model called the TDC Stereo Vivid. All three of these cameras appear to have come out around the same time, with the two Stereo Colorists being made in Germany by a company called Bodenseewerk in Überlingen, Germany and the Stereo Vivid by Bell & Howell.
It is not clear to me why TDC would have cameras made nearly simultaneously around the same time, by two different companies. That the TDC Stereo Colorists were sold in the United States ends any debate that perhaps some models were Europe and some were North America only. Regardless of the reason, after 1954 the name TDC was permanently linked to Bell & Howell and did not appear on any other products after the 1950s.
The TDC Stereo Colorist and TDC Stereo Vivid were both produced concurrently until at least 1958, possibly longer, with the Stereo Vivid being the premium model. In a 1958 Bell & Howell price guide, the Stereo Colorist had a retail price of $69.50 and the Stereo Vivid a price of $129.50. These prices, when adjusted for inflation compare to about $750 and $1400 today.
I was unable to find any contemporary reviews of the TDC Stereo Vivid, likely due to its higher cost putting it out of reach of most photographers. That it was produced for at least 4 years suggests that some made their ways into the hands of consumers, so it is strange I found so little about it.
As it seemed to do, the popularity of 3D and stereo photography comes and goes and by the end of the 1950s, people seemed to be over it. While a fun way to experience photographs, to effectively see a 3D image, you need to wear special glasses, or use 3D specific viewers. Simply opening up a photo book and showing off your vacation photos was not as easy with stereo photographs, so I would suspect people lost interest.
Around the same time stereo photography’s popularity died down, the name TDC seems to have disappeared as well. Bell & Howell would continue as a maker of cinema cameras and projectors, and would enter in a distribution deal with Canon to sell Bell & Howell branded versions of Canon cameras like the Canon EX35, Canon 7, and some Canonet rangefinders.
Today, stereo cameras occupy a narrow interest in camera collecting. My own observations of other collectors is that people who love these cameras likely never use them for their original intended purposes. I don’t think there is a huge market for 3D slide mounts or hand held stereo viewers. That these cameras only work with slide film, of which few stocks are still made and that to properly experience the images as they were intended requires custom development, mounting, and viewing, totally kills the desire of most people to seek out these cameras.
Still, their unique twin lens look and their prominent history in mid century America is undeniable. These are cool looking cameras, and even if you have no intention of shooting one as they were originally intended, they can still be used to shoot on color or black and white negative film, and scanned into a PC to emulate a 3D experience. The TDC Stereo Vivid was one of the more advanced models, and has an unusual appearance, so I would suspect it fetches a slightly higher price than some of the other, more simpler models, but it is still not high. To add one of these cameras to your collection shouldn’t make too big of a dent in your pocket book, and hey, they look cool!
My Thoughts
I have always been drawn to stereo cameras for the same reason I think most people are attracted to TLRs. If one lens is good, then two must be better! But unlike a TLR in which only one lens makes a image, with a stereo camera, you get two images for the specific purpose of making a 3D stereo image, something that just isn’t really done that much these days.

It seems that the 3D crazes come and go in 50 year cycles. Around the turn of the 20th century, stereo photography was very popular, with wooden stereoscopes used to view stereo images printed on cards. In the middle of the century, stereo photography made a huge comeback with cameras like the Sawyer’s View-Master and other stereo cameras by Kodak, Bell & Howell, Revere, and a bunch of other companies. The 1950s and 60s also saw a huge uptick in 3D movies in which large radioactive ants terrorized unsuspecting suburban moms in the desert. Once again in the early 21th century, movies like James Cameron’s Avatar delighted 3D fans, after which a large rush of 3D movies and 3D televisions were the latest consumer electronics craze.
The TDC Stereo Vivid by Bell & Howell falls well within the middle of the 20th century’s infatuation with stereo photography, but unlike many other examples of 3D cameras has a body design that is unusually designed. The camera is dominated by the large and complex looking mechanical exposure calculator on top, but every single dial and control point of the camera seems to have been designed by someone who really liked textures. It is almost as if when prototypes of the camera were first presented, someone said, “No, this needs more bumps and ridges!” I am not sure what kind of design aesthetic this camera has, whether its Art Deco, Streamliner, or Steampunk, but it is definitely unique.
Like most stereo cameras of its day, the TDC Stereo Vivid has a large and heavy, mostly metal body. Additional width is required to accomodate two lenses, shutters, and film gates, but the camera is also a bit deeper front to back than I’d expect, for reasons I’m not quite sure of. Overall, the camera is a bit bulbous and certainly not something you’d want hanging from your neck all day.

Up top, the Stereo Vivid has a lot going on, so I’ll start with the simple controls first. On the left is the deeply knurled film rewind knob. The knob is quite tall with sharp ridges that if you apply too much pressure can cut into your bare skin, but at the very least, shouldn’t ever slip accidentally. The knob lifts up while loading film to get the cassette fork out of the way. Above and to the right is a threaded hole which at first looks like a cable release socket, but is actually for mounting a flash built specifically for this camera. This hole is where the flash mounts to the camera so that it makes an electrical contact with a cone shaped contact point in front of it.

On the opposite side of the top plate is the film advance knob, which is a mirror copy of the rewind knob, complete with the same deep knurls. Two arrows are engraved into the top edge to remind you which direction it must be turned to advance the film. Immediately in front of and below the film advance knob is the focus wheel which has a knurled metal outer edge, but is clear plastic in the center. Printed on the clear plastic are distance markings from 2¾ feet to infinity. At the forwardmost position under the numbers is a red dot that acts as the focus index. It is worth noting that the focus wheel cannot actually be turned to the 2¾ foot mark, as it physically stops at 4 feet. The reason for this, is that also below the clear plastic is an interactive depth of field indicator which is coupled to the aperture dial. As you select different f/stops from f/3.5 to f/16, two opposing red arrows move indicating the minimum and maximum limits of depth of field. With the diaphragm set at f/16 and the focus wheel set to 4 feet, depth of field is from 2¾ to a little under 15 feet. This might sound complicated in text, it actually works quite well, and reminds me of similar interactive depth of field indicators on many German Schneider and Zeiss lenses from the same period. The location of the focus wheel in front of the film advance knob is quite convenient as it allows easy changes to distance with the camera to your eye.
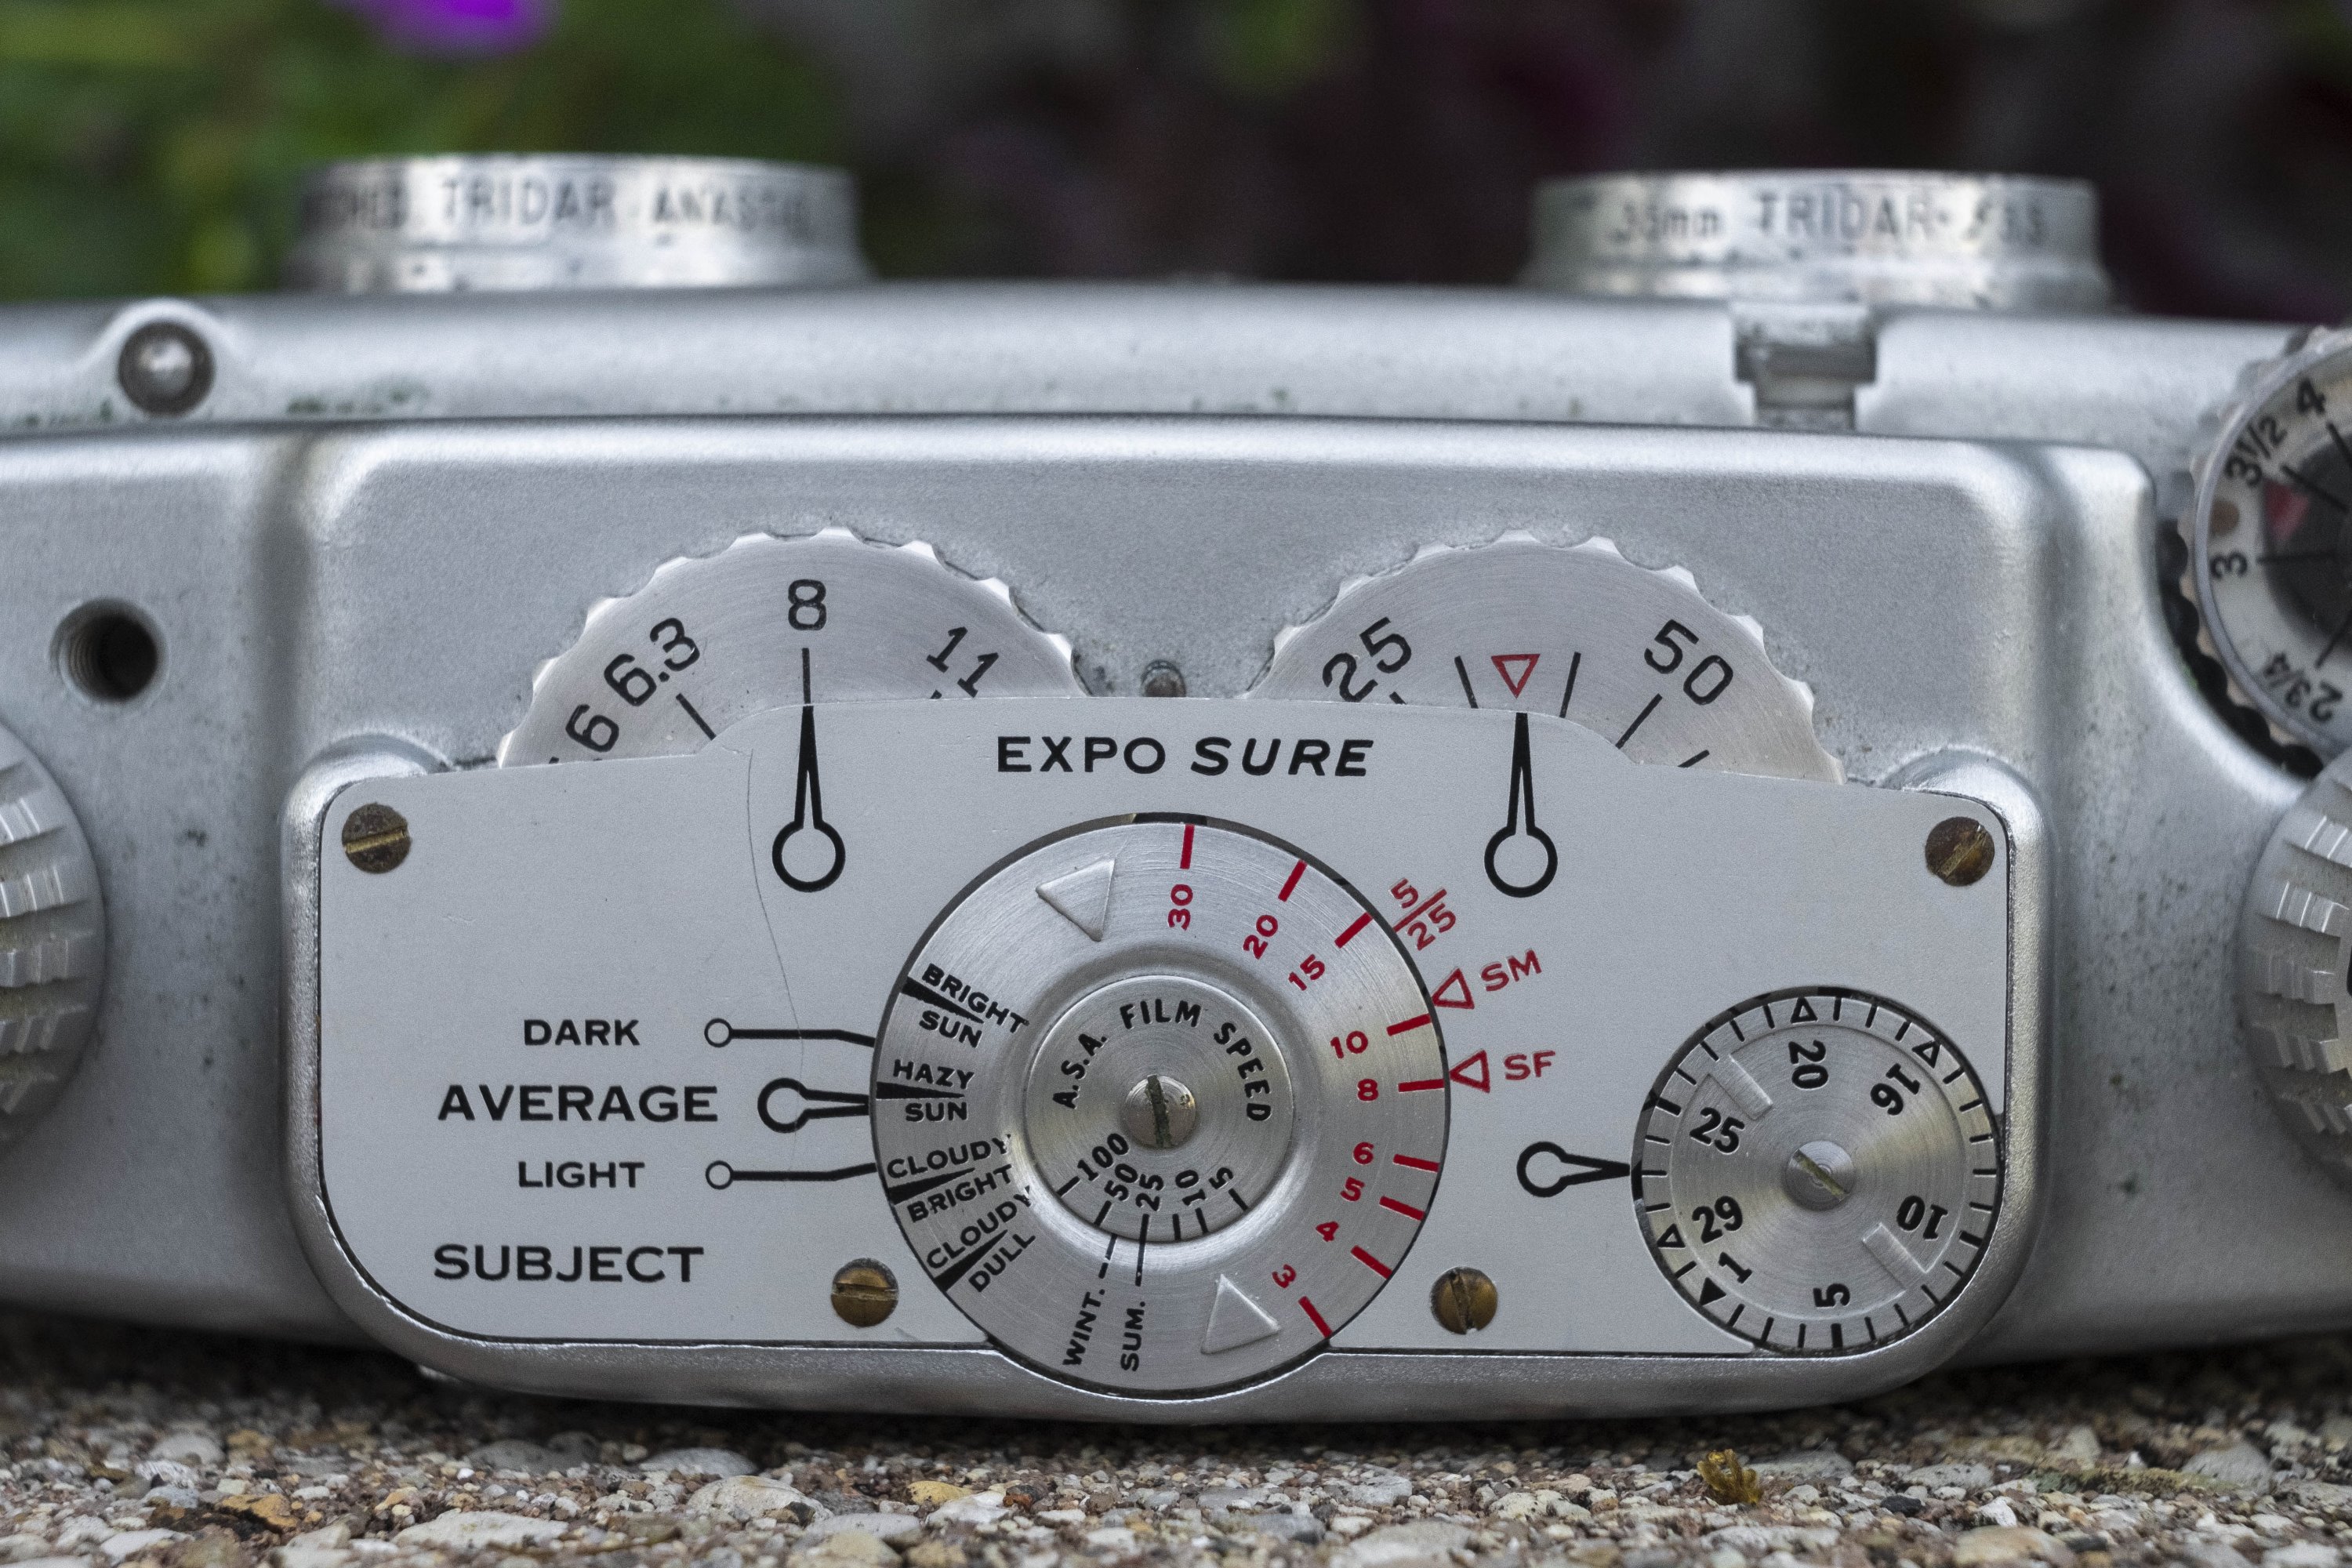
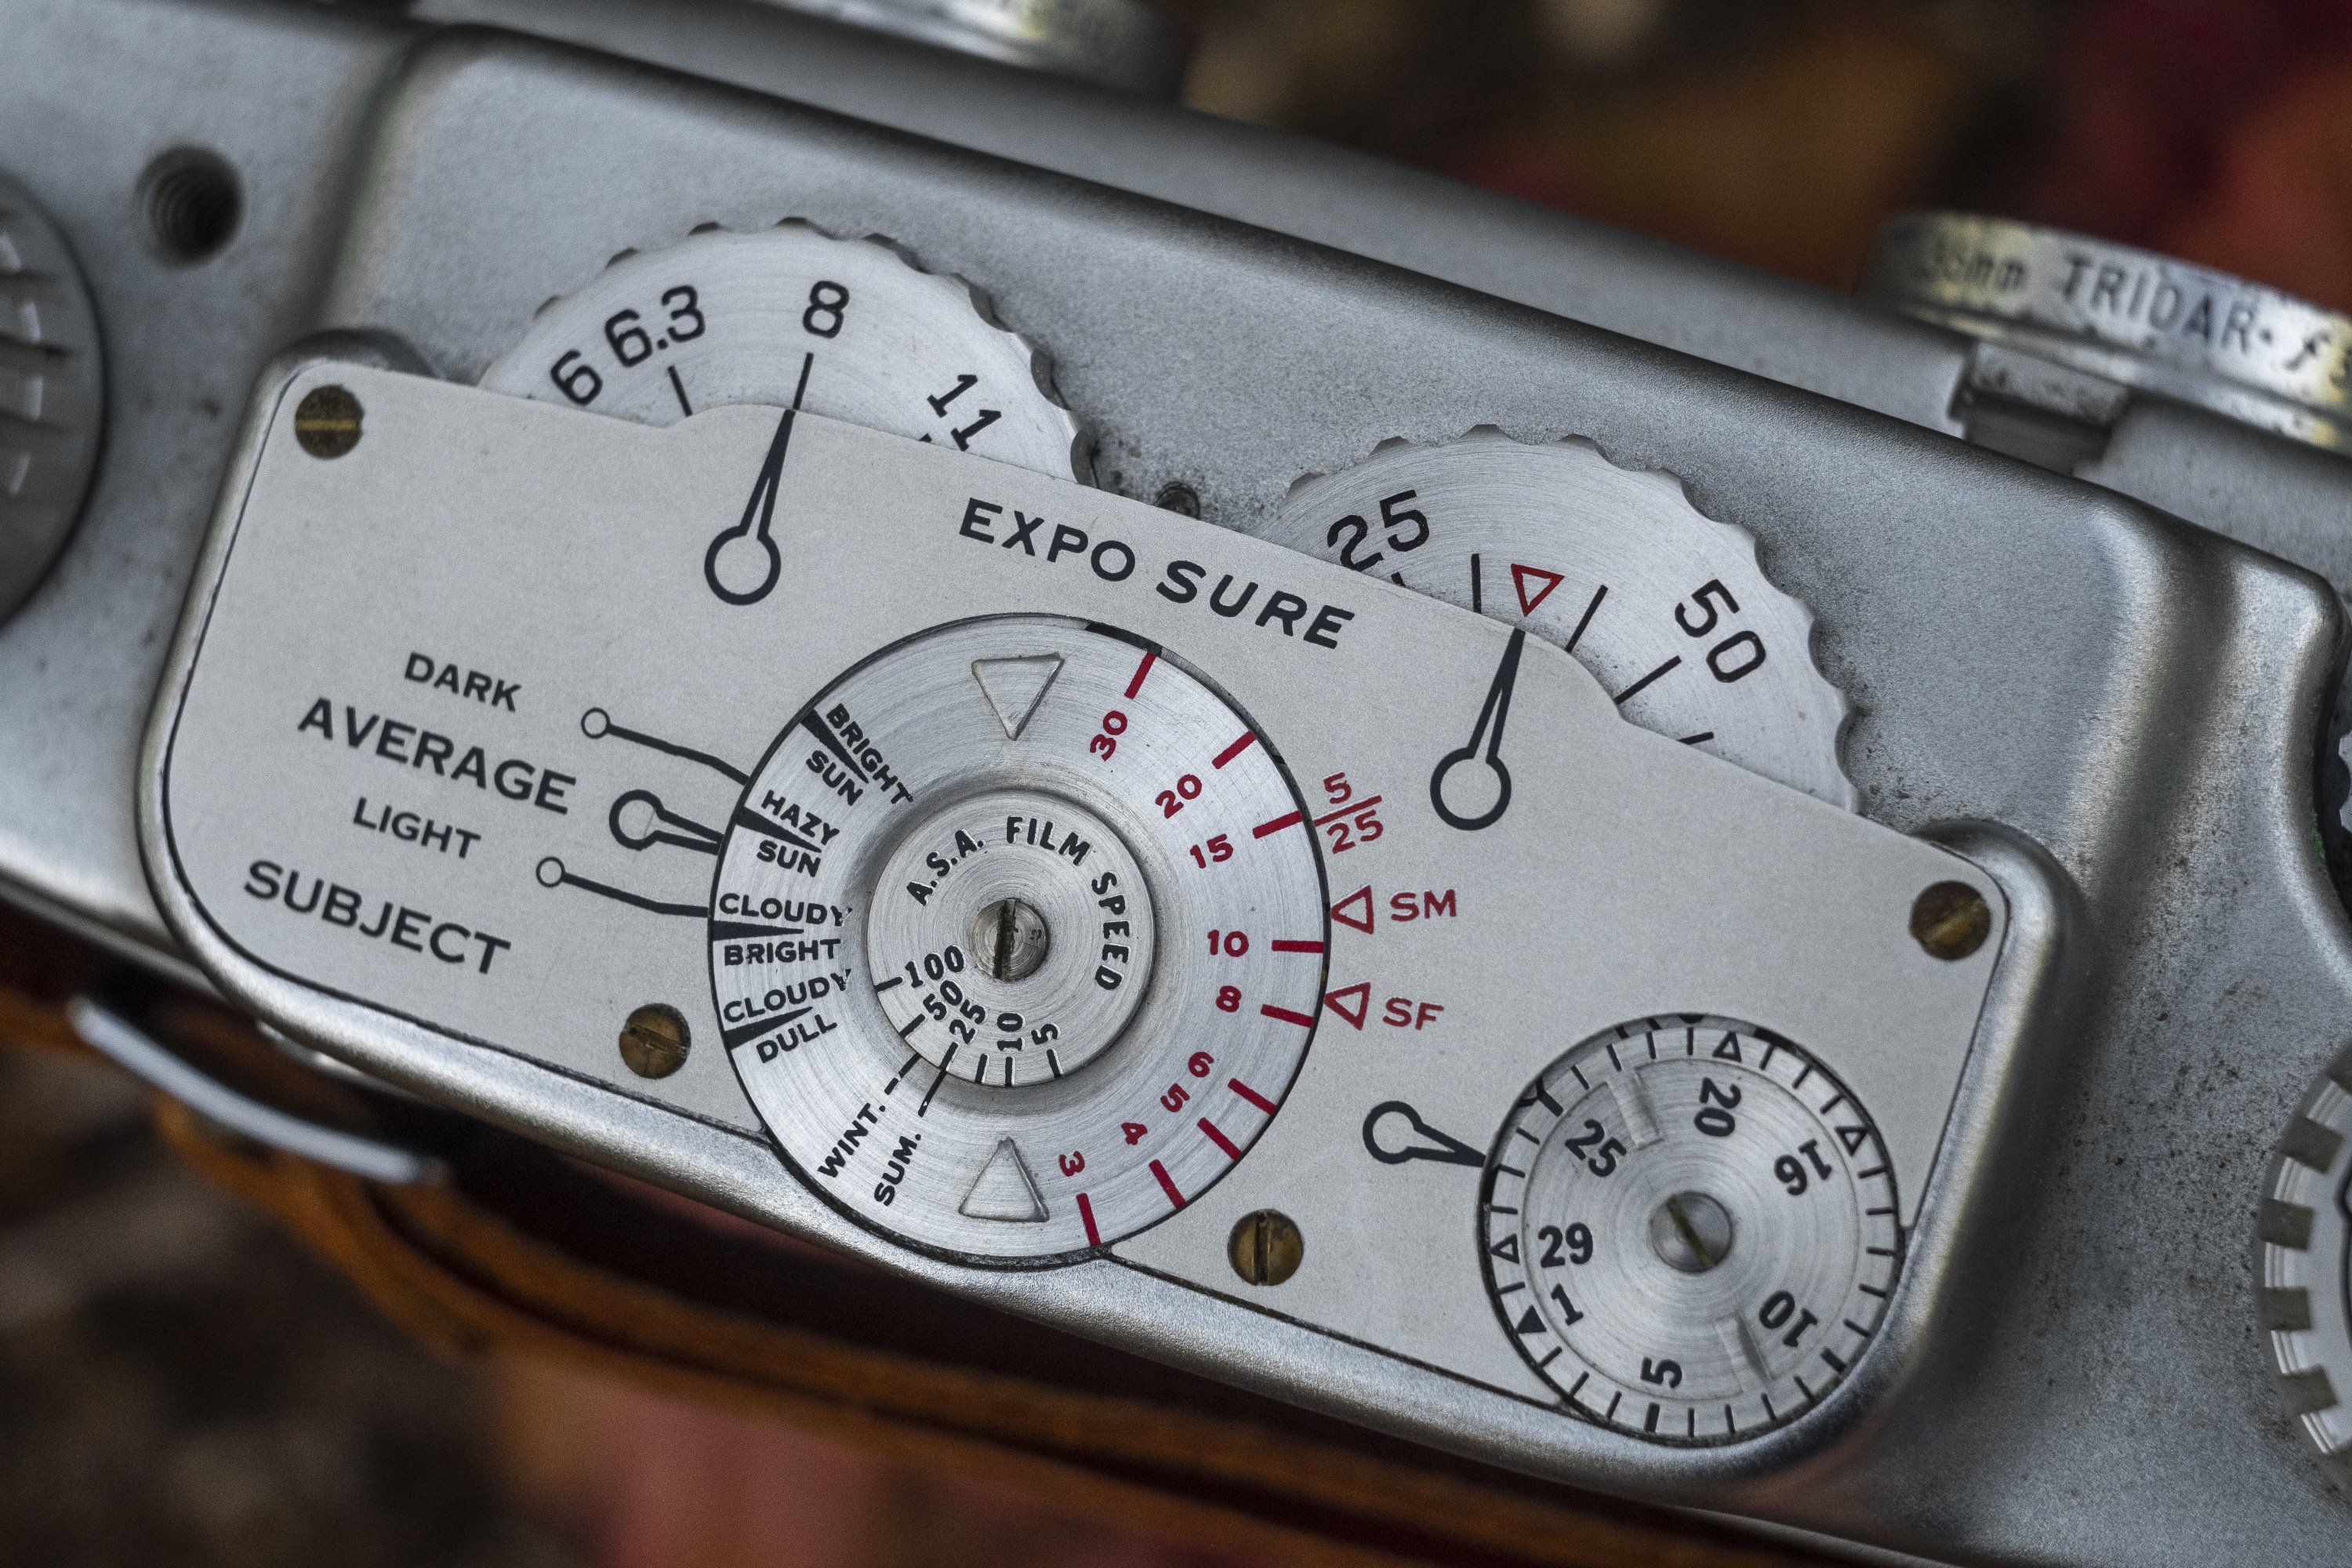
In the middle of the top plate is the combined exposure calculator, exposure counter, and knobs for diaphragm and shutter speed control. Starting in the top center is a the exposure counter itself which has a smaller dial in the middle for film speed. Although the TDC Stereo Vivid does not have a meter, you still need to set the film speed to use the calculator. The available range of speeds is quite limited at ASA 5 to 100, but that stereo cameras were meant for slide film which at the time was slower than most color or black and white negative films, explains the lack of speeds over ASA 100. Separate marks for Winter and Summer line are to be lined up with whatever speed film is in the camera. A separate scale in red for flash photography is the right side of the large dial and is something I didn’t bother to read about as it looks confusing as hell.
In an early draft of this review, I attempted to explain the exposure calculator, and frankly, I confused myself. No matter how I tried to reword what I thought would get the point across, in reading back what I wrote, I don’t think anyone would be able to follow it, so I just deleted the whole section, and suggest you read the manual if you want to try to use it. While I think Bell & Howell was very clever in its design, I suspect original owners of this camera probably just used a hand held meter or guessed exposure like I usually do.

The base of the camera has a 1/4″ tripod socket in the center which is important as this is a pretty heavy camera and having it under the center of mass will help balance it on a tripod. Surrounding the tripod socket are probably the most comprehensive instructions ever printed on a camera for loading film and getting it ready for the first exposure. A total of 10 steps include every step from loading in the cassette to how to reset the exposure counter before making your first exposure. While I do think the instructions are a little overkill, I would guess that they’ve come in handy at least a few times for novice photographers who’ve used one of these cameras. In addition to the instructions, the camera’s serial number is also stamped into the bottom plate.

The sides are pretty symmetrical with metal strap loops, which on this camera have a permanently attached leather strap running through it. The use of a strap is nice as this is a rather heavy camera and I wouldn’t want to keep gripping it in my hand while walking around taking stereo photos, although I don’t like this style of leather strap which is riveted in place. Of the two sides of the camera, the right side has a push button for releasing the film door lock. While there isn’t much to see on the sides of the camera, you do get an idea of how thick this camera is front to back. The tiny lens doesn’t stick out very far, but the entirety of the body front to back is quite large.
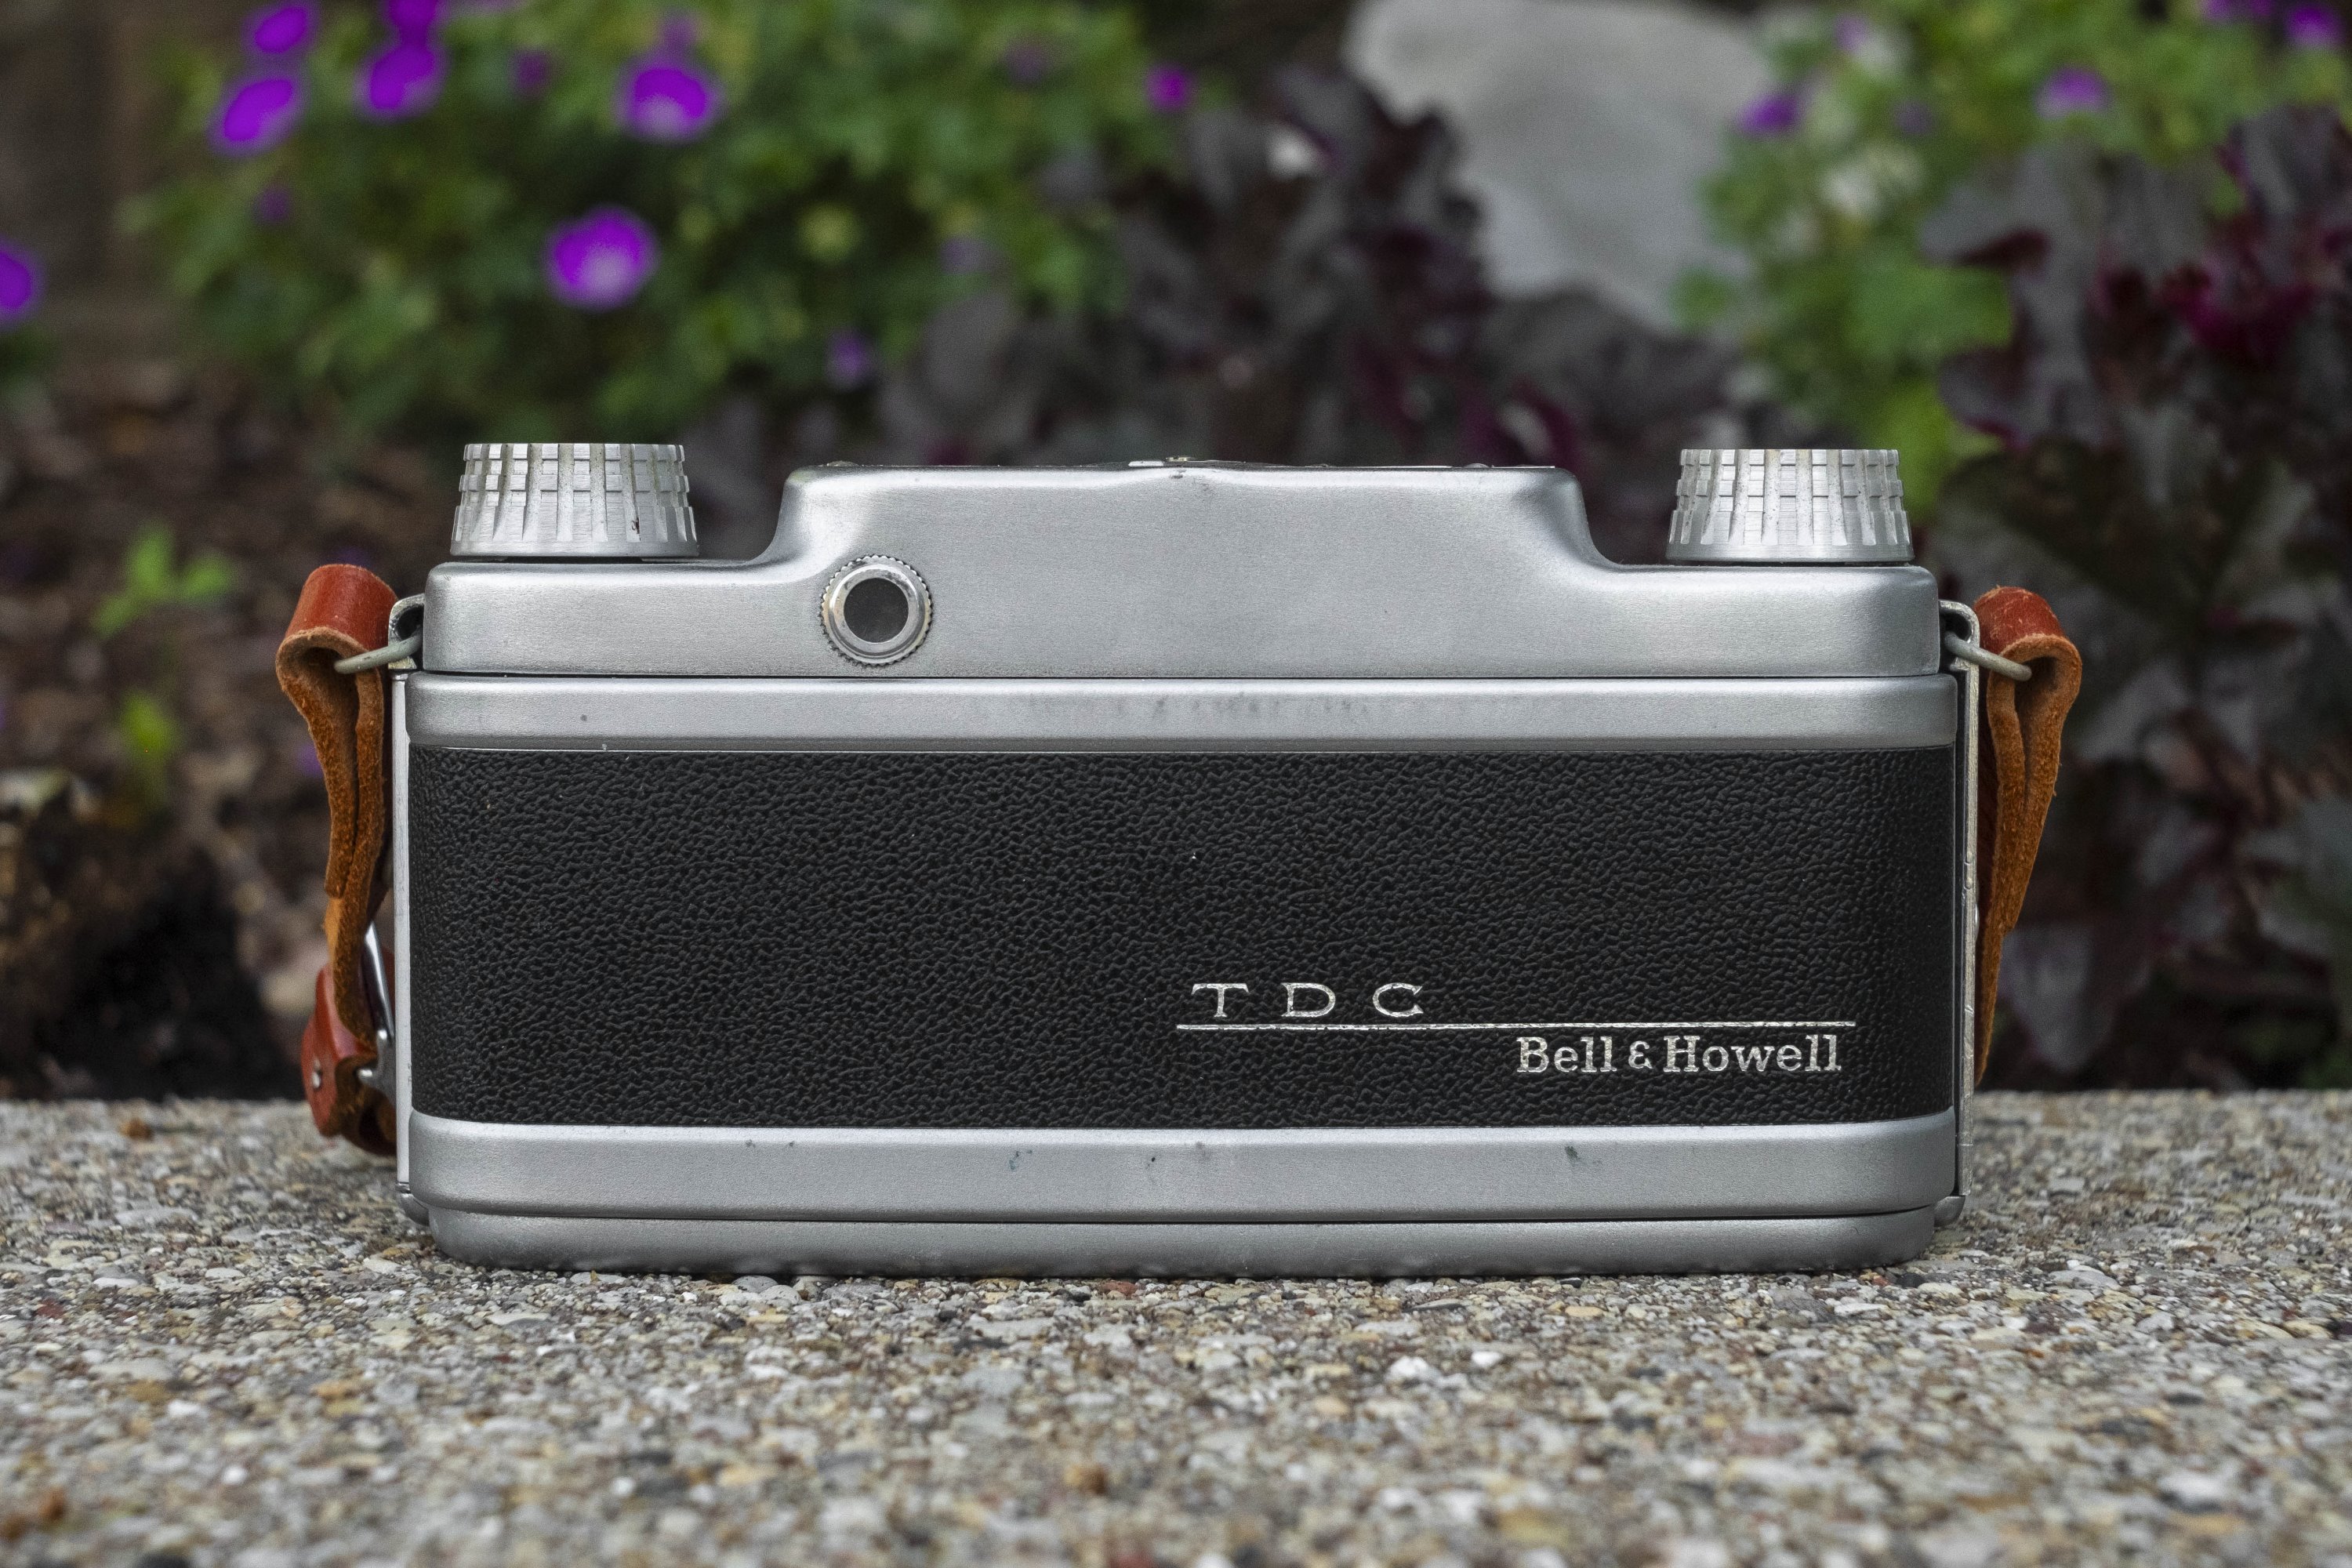
The back of the camera is the only area of the camera with little to see. Only the round opening for the viewfinder and a silkscreen TDC/Bell & Howell logo in the body covering are visible here.

If the outside of the TDC Stereo Vivid didn’t impress you, one area of the camera that’s sure to turn some heads is the film compartment. Like any stereo camera, there are two film gates for the dual squarish exposures that the camera is made, but beyond that there is something you don’t expect to see, which is the sprocket shaft for the exposure counter. This location serves a dual purpose along with a roller to it’s right which by bending the film towards the center of the camera, adds tension to the film as it crosses both film gates. Had this not been here and the left to right film transport been free to traverse across film gates, there is a chance that some slack could appear in the film causing out of focus images. By forcing the film under the sprocket and around a third roller, maintains a perfectly flat film plane across both gates. Of course this means when loading film, you need to thread the leader under the shaft and this third roll and allow it to continue to the single slotted metal take up spool.
For those of you who like to attach your leader to the take up spool before inserting the cassette will be disappointed to see that is not possible here. With the TDC Stereo Vivid, you must thread the film first, and attach to the spool last. Now all those detailed instructions on the base of the camera describing how to load film don’t seem so out of place. In practice, it is really not that bad, although a multi-slotted take up spool would have been better as it would have given you multiple attachment points, instead of just one.
The inside of the film door has a very long, unpainted metal film pressure plate. I find it curious that this plate isn’t painted as was common by the time this camera was made, but I suppose it did a good enough job. Lastly, there are no foam or fabric light seals of any kind in the door channels or near the hinge, meaning you don’t have to worry about replacing them.
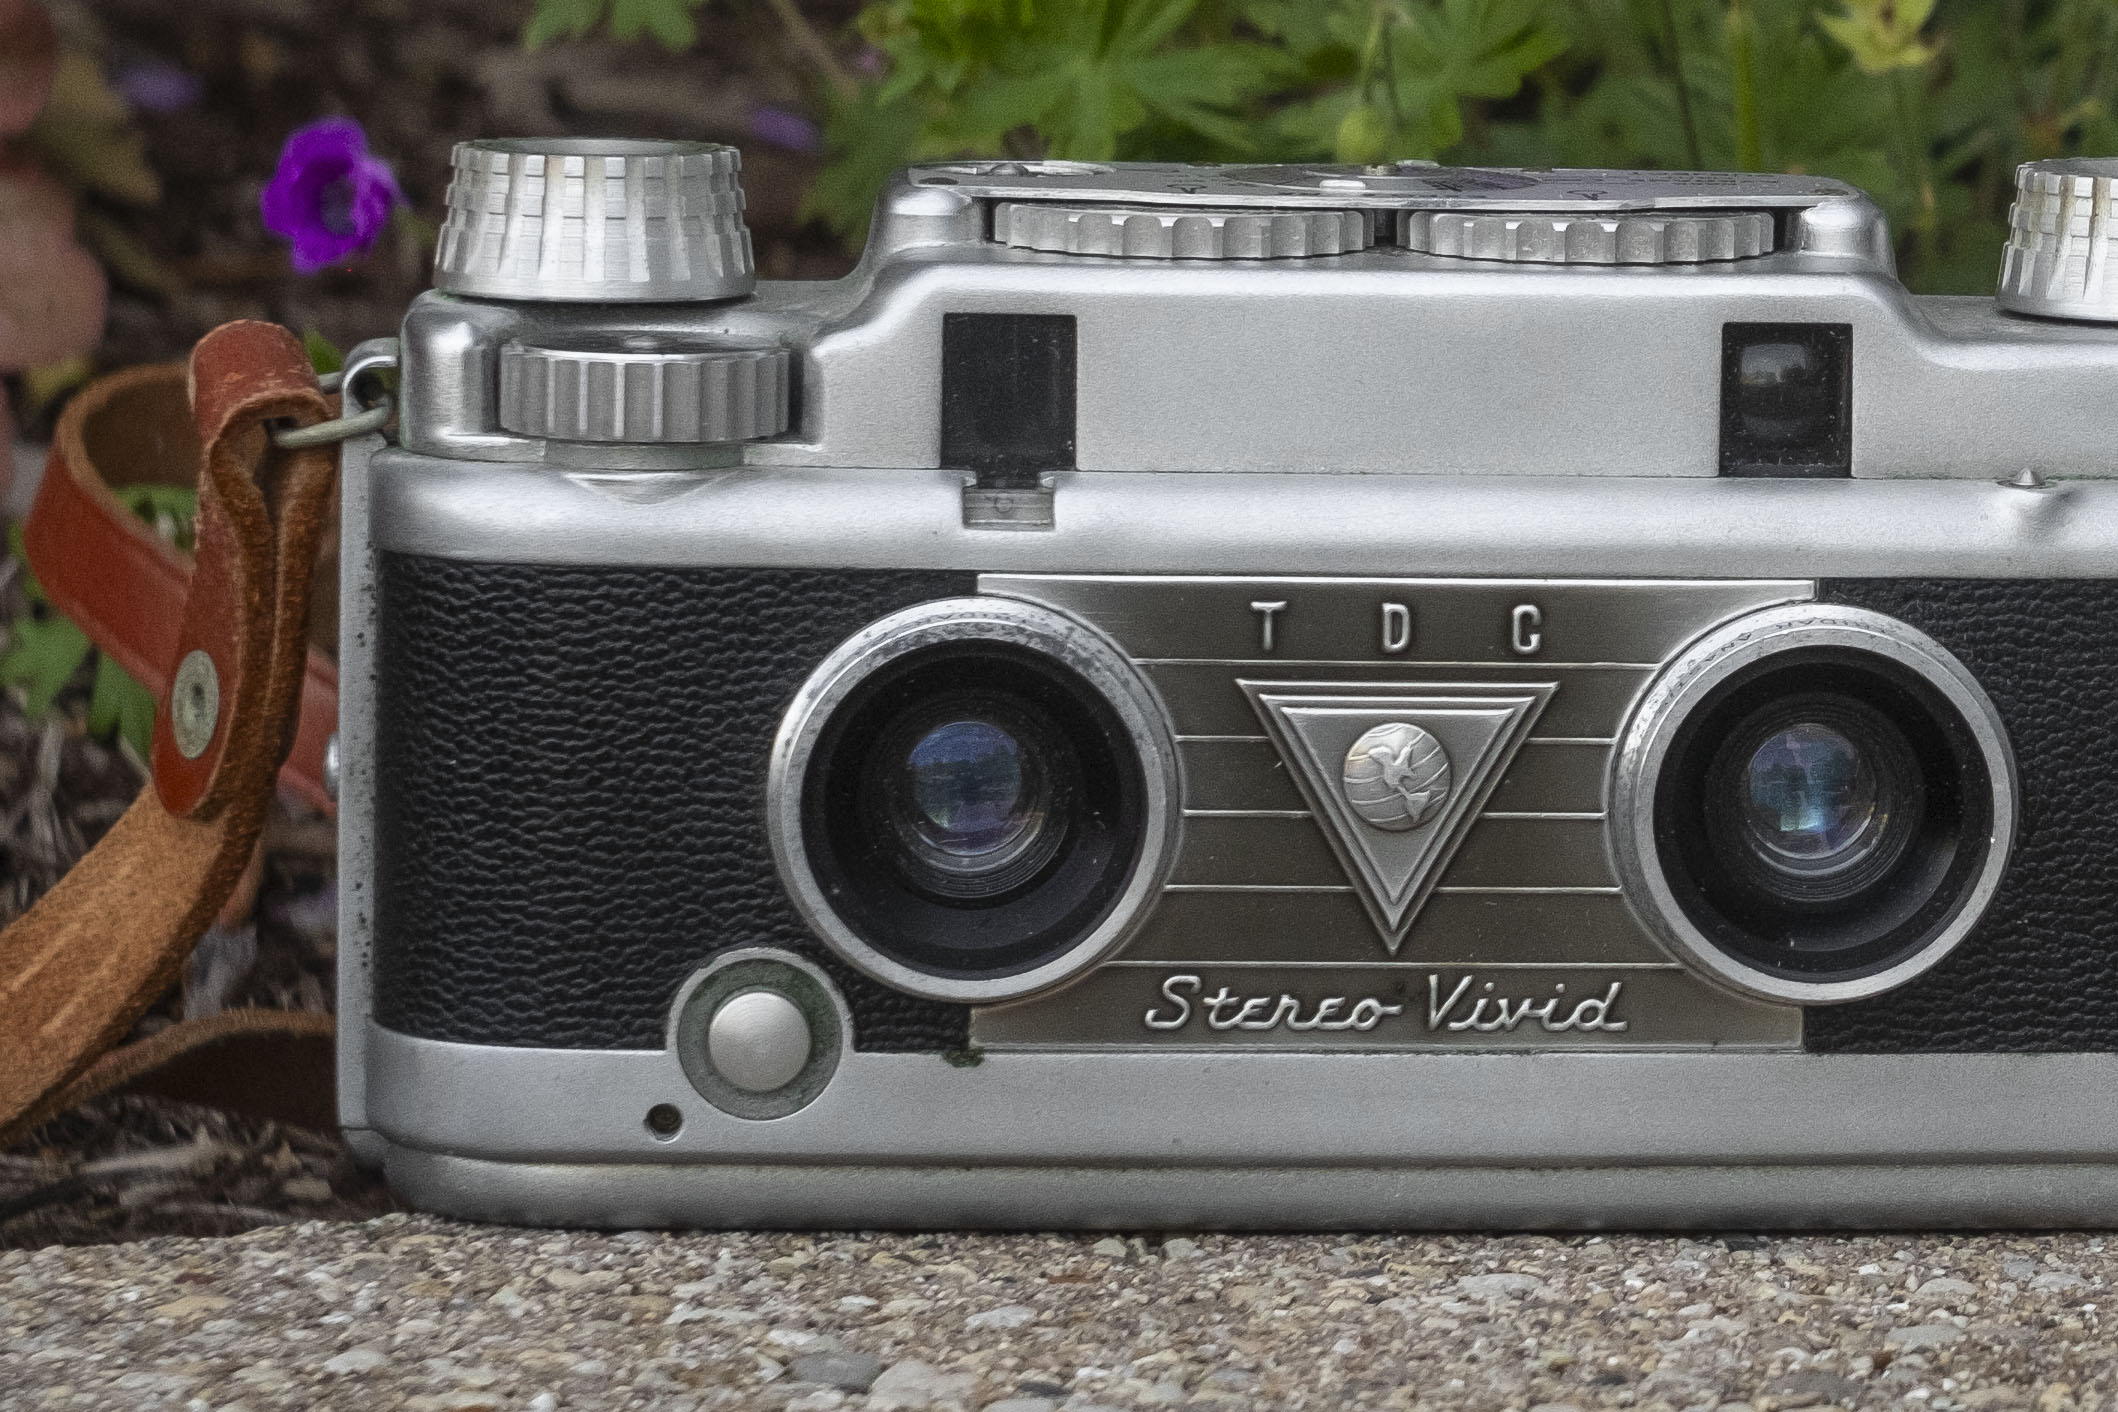
Up front, the camera is dominated by the two Tridar lenses and an elegant TDC Stereo Vivid front plate. Not quite as noticeable, but still worthwhile is the round button below and to the left of the right (from the shooter’s perspective) lens, which is the shutter release. I am a big fan of front shutter releases as I often find them to be comfortably located, plus they provide an additional benefit of allowing you to stabilize the camera against your face as you press inward on the shutter release, as opposed to top plate shutter releases where the pressure is downward. Unfortunately, the location of the shutter release on the TDC Stereo Vivid is a bit awkward and I often struggled to locate it with the camera to my eye. Another unfortunate design of the shutter release is that it requires very little pressure to activate the shutter, so if your finger is ‘hunting’ across the front of the camera while trying to find it, there is a high chance of accidentally firing the shutter before you are ready. A small threaded hole next to the shutter release is for a cable release, if you so desire to use one.
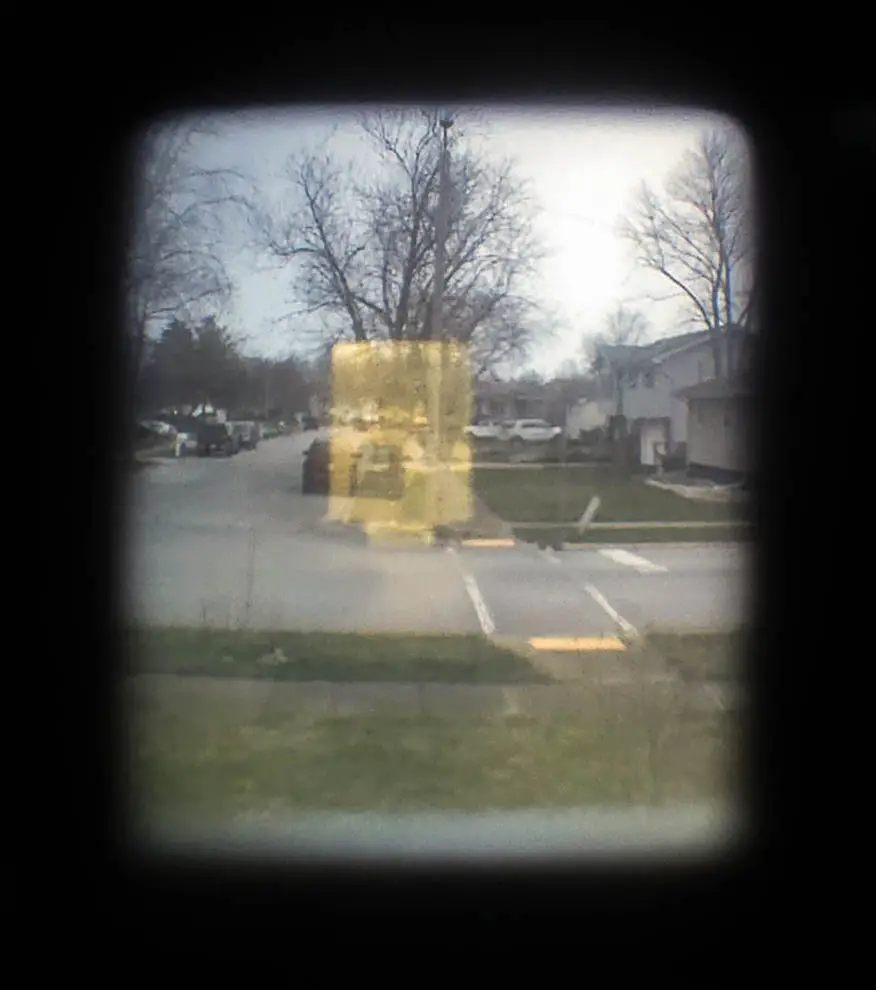
For anyone who has never used a stereo film camera before, you might be disappointed in that the viewfinder does not present you with a stereo image. Looking through the viewfinder is like those on a single lens camera. The Bell & Howell TDC Stereo Vivid’s viewfinder approximates the slightly tall square aspect ratio of a single frame with a rectangular combined image rangefinder patch in the center. My example suffers from a bit of haze, but I found the contrast of the rangefinder patch to still be good enough to be useful in all but the worst lighting conditions. From what I can see, I believe that when new, or after a good CLA, the viewfinder would be very nice with excellent contrast.
There are no framelines or any other type of parallax correction marks, however near the bottom of the rangefinder patch is a notch with a very tiny little bubble level. With stereo images, it helps to keep the camera parallel to the ground so the images line up. This bubble level is linear, just like on a construction level, with the bubble traveling to whatever side of the camera is highest. When the camera is level, the bubble stays in the middle. While this concept works quite well, I must say that it is incredibly small and difficult to see in most conditions, limiting its effectiveness. Had TDC put the bubble level at the bottom of the main viewfinder image, rather than the bottom of the rangefinder patch would have been far more userful, still, I commend the designers for putting it there as in a pinch, it does work!
Without a doubt, the Bell & Howell TDC Stereo Vivid is an attractive, yet strange looking, high quality, and innovative camera all wrapped in one. It is no wonder the list price on these were nearly double that of TDC’s other offerings at the time and also why these cameras are harder to find today, as they likely were a tough sell to customers looking for an inexpensive, yet easy to use stereo camera. If you were a fan of this style of camera, but didn’t want to skimp on bells and whistles the TDC Stereo Vivid would be the camera for you. As a collector’s piece today, it is a wonderful camera that even if you have no interest in stereo photography, is worth considering, even if just to shoot single images out of. Sure, I can rave all I want about how cool and neat looking a camera is, but what is it like to shoot? Keep reading…
My Results
I have no ability, nor a desire to shoot true stereo images in the way this camera was intended. In order to do that, I’d need to start with slide film, which is a type of film I cannot develop myself, but also I’d need some kind of stereo slide holder and viewer to see the stereophonic images, which is also something I don’t have. Instead, I decided to load in some color negative film and just shoot it like a regular camera. I’d still get twin, nearly square images, but I figured I could scan them in and see how they could compare to other squarish exposure 35mm cameras. For my initial test, I chose some fresh Fuji 200.


Putting aside that these images aren’t how images from this camera weren’t designed to be viewed, looking at the full size scans on a 32″ desktop PC monitor, I was quite impressed at the quality of the 24mm x 23mm images the camera made. Using my imagination, I suspect that viewing these as slide film without magnification in a cheap stereo viewer, I am seeing more detail on my PC than anyone would have back in the 1950s.

It is clear that the 35mm f/3.5 Tridar Anastigmat triplets were more than up to the task. Like so many mid century triplet lenses, the image quality was quite good, with good sharpness in the center, extending to the edges of the frame. That these images were less rectangular than normal 24mm x 36mm images, I believe that even if there was some sharpness or vignetting near the corners, you won’t ever see it with this camera.
I found color reproduction quite good on the Fuji 200 film, which suggests that the bright and vivid colors offered by period film stocks like Kodachrome or Ektachrome would have been even better. Part of me wishes I had taken the time to do this the right away, but I also know that the obstacles needed to do that, would have likely resulted in this camera sitting on the shelf forever, and never getting a review, so what we have here is my consolation to be able to talk about it.
The exposure calculator on the top plate of the camera is undeniably cool, as are the coupled dials for aperture and shutter speed. The moving depth of field scale under the focus wheel is super cool too. The TDC Stereo Vivid is not only the coolest 35mm stereo cameras I’ve ever seen, it is also one of the coolest looking 35mm cameras period. I really wish that someone would have used this type of design on a regular single lens 35mm camera as that could have made for a really interesting camera.
Since I had the latitude of color negative film, I found that Sunny 16 worked good enough in the scenes I was shooting this camera, so I didn’t need to rely on the calculator, but found most of the camera’s controls to be easy and comfortable to use. Notice I said “most”.
Without a doubt, the biggest ergonomic snafu with this camera is the location of the shutter release, which I already touched upon in the section above in this review. While I normally am a fan of front body mounted shutter release, the lower location of the one on this camera is too close to the bottom of the camera to be comfortably located with the camera to your eye. Furthermore, the relative little pressure required to fire the shutter resulted in a number of accidental exposures while out with the camera. It was quite surprising at how little force needed to accidentally fire the shutter. I definitely did not like the design and locaiton of the shutter release, and while I wouldn’t go as far as to say it was a dealbreaker, it definitely was my least favorite part of using the TDC Stereo Vivid.
For the 21st century collector who has no interest in using a stereo camera like the TDC Stereo Vivid how it was intended, is that if you want to shoot film and scan it into your computer, be prepared for some harrowing frame spacing. I noticed that every single exposure on my test roll overlapped the frame next to it by 1-2mm for each exposure. This suggests that the frame size is a bit larger than what you’d see on period correct stereo mounts. The camera is fitting in more of the image than you’d normally see, but this will be an issue if your scanning software attempts to detect images.
Using both Silverfast and the Epson software that came with my V750 scanner, the auto detection didn’t work at all, and I was forced to scan entire strips at once, like in the image below. After scanning, I would take the long and skinny JPGs and individually crop out each image in post. This isn’t necessarily a difficult thing to do, but it is time consuming and isn’t something I’d want to do with any regularity if I wanted to shoot this camera often.

Whether you are a dedicated collector of mid century stereo cameras, or just like to pick up cameras that are unique and look cool, the Bell & Howell TDC Stereo Vivid is an easy recommendation. The camera’s looks alone should put it on most collector’s radar, but the convenience of the coupled rangefinder and excellent performance of the twin Tridar lenses make for a capable shooter. Regardless of the reason, this is a camera that should be on your shelf.
Related Posts You Might Enjoy
External Links
http://camera-wiki.org/wiki/TDC_Stereo_Vivid
https://www.brennanprobst.com/2021/11/spotlight-tdc-stereo-vivid.html
https://utahfilmphotography.com/2015/11/25/tdc-stereo-vivid/
https://stereoscopy.blog/2021/01/26/getting-started-in-stereo-film-photography/
Nice article as usual Mike. At the risk of being accused of self-promotion, here’s a podcast where I talked all about how to shoot stereo film cameras today and make stereo cards. http://www.alexluyckx.com/blog/2020/06/11/classic-camera-revival-episode-81-living-in-stereo/?fbclid=IwAR1ZtQG6TIXspcoYPEkmBlkamay7u81cIEeiGqSTTRfMUlLi9nbpYxkle0A
Of course Howard! Share away! 🙂
Both the TDC Vivid and the View Master Personal Stereo cameras were made by Stereocraft Engineering Company in Portland, Oregon. Sawyer’s bought Stereocraft in 1956. I don’t know whether or when Bell & Howell acquired the tooling for the Vivid. The kinship between the Vivid and the View Master cameras shows most clearly in the “Expo Sure” calculators. The reason for the convoluted film path is that the lenses on the Vivid are slightly closer together, which should give a more natural stereo effect. The lenses on a Realist and most other stereo cameras are slightly wider apart than the average interpupillary distance and exaggerate the stereo effect a little. There’s a little information on Stereocraft at stereocraft.com.
Great info William. While doing this review I found a small reference to Stereocraft but this info was inconclusive. It’s hard sometimes to get accurate info.
It is possible (altho tedious) to shoot b&w with these cameras, make appropriately- sized prints, and mount them in pairs on cardboard for viewing with an old school handheld reflected light viewer.
I have one of the Bodenseewerk Stereo Vivid models, but have yet to shoot with it. I do have the ability to view these images by crossing or paralleling my eyes to infinity while focusing, much like was required to view those computer generated hidden 3D images from the 90s.
It seems to me the main impetus for the resurgence of stereo photography in the 50s wasn’t just the timing with 3D motion pictures, but the wider availability and affordability of Kodachrome. Prior stereo viewing was done with prints, and lacked the luminosity and depth of viewing through backlit transparencies. Kodachrome made shooting fine-grained transparencies accessible to the masses, and would have provided a more lifelike viewing experience than the viewers of the Victorian and Edwardian eras.
This was a wonderful review with great timing. I had my TDC Vivid for over 10 years, just sitting on a shelf and last month, I decided to give it a try. I was thrilled with the results. I have a few old stereo photographs that I had viewed with a replica wooden viewer and also a modern cheap cardboard viewer. Both viewers worked well so I printed the pairs and found my images were really nice in stereo. Alternately, you can also learn to relax your eyes, look “through” the image pair, and have them snap in to stereo if they are printed side by side, or even on a computer monitor. It doesn’t work every time for me but does work over 90% of the times I try.
I shot my first roll in B&W but plan to take the camera to a vintage air show in June and shoot some hopefully cool stereo photos in color with color negative film.
Since you have the stereo negatives anyway, maybe you could update the review with “wigglegrams” (GIFs that switch between the two images on a loop). They’re not as nice as a true 3D viewing but still can give you an idea of the depth of objects and can be seen without further accessories on any digital screen.